FBV3 - Guitar effects pedals LINE 6 - Free user manual and instructions
Find the device manual for free FBV3 LINE 6 in PDF.

| Product Type | Control pedalboard for Line 6 amps and processors |
| Power Supply | Via FBV cable (included) or optional power adapter (9V DC) |
| Main Functions | 13 footswitches, integrated volume/wah pedal, expression pedal input, LED display, chromatic tuner, MIDI control via USB, Live editing mode for Firehawk 1500 |
| Maintenance and Cleaning | Clean with a dry cloth. Avoid moisture and liquids. |
| Safety | Do not open the device. No user-serviceable parts. Do not expose to rain or moisture. Disconnect during storms or prolonged non-use. |
| Spare Parts and Repairability | No spare parts available. For any repair, consult a qualified technician. |
| General Information | Brand: Line 6, Model: FBV3, Category: Musical effects pedal |
Frequently Asked Questions - FBV3 LINE 6
User questions about FBV3 LINE 6
0 question about this device. Answer the ones you know or ask your own.
Ask a new question about this device
Download the instructions for your Guitar effects pedals in PDF format for free! Find your manual FBV3 - LINE 6 and take your electronic device back in hand. On this page are published all the documents necessary for the use of your device. FBV3 by LINE 6.
USER MANUAL FBV3 LINE 6
Important Safety Instructions
CAUTION
RISK OF ELECTRIC SHOCK DO NOT OPEN

WARNING : TO REDUCE THE RISK OF FIRE OR ELECTRIC SHOCK, DO NOT REMOVE SCREWS. NO USER-SERVICEABLE PARTS INSIDE. REFER SERVICING TO QUALIFIED SERVICE PERSONNEL.
WARNING: TO REDUCE THE RISK OF FIRE OR ELECTRIC SHOCK, DO NOT EXPOSE THE APPLIANCE TO RAIN OR MOISTURE.
CAUTION: This equipment has been tested and found to comply with the limits for a Class B digital device pursuant to Part 15 of FCC Rules. Operation is subject to the following two conditions: (1) This device may not cause harmful interference, and (2) this device must accept any interference received, including interference that may cause undesired operation.

The lightning symbol within a triangle means “electrical caution!” It indicates the presence of information about operating voltage and potential risks of electrical shock.

The exclamation point within a triangle means “caution!” Please read the information next to all caution signs.
Changes or modifications not expressly approved by the party responsible for compliance could void the user's authority to operate the equipment. Note: This equipment has been tested and found to comply with the limits for a Class B digital device, pursuant to part 15 of the FCC Rules. These limits are designed to provide reasonable protection against harmful interference in a residential installation. This equipment generates, uses and can radiate radio frequency energy and, if not installed and used in accordance with the instructions, may cause harmful interference to radio communications. However, there is no guarantee that interference will not occur in a particular installation. If this equipment does cause harmful interference to radio or television reception, which can be determined by turning the equipment off and on, the user is encouraged to try to correct the interference by one or more of the following measures:
—Reorient or relocate the receiving antenna.
—Increase the separation between the equipment and receiver.
—Connect the equipment into an outlet on a circuit different from that to which the receiver is connected.
—Consult the dealer or an experienced radio/TV technician for help.
Please Note: Line 6 and POD are registered trademarks of Line 6, Inc. registered in the U.S. and other countries. FBV3 and FIREHAWK are trademarks of Line 6, Inc. All rights reserved.

You should read these Important Safety Instructions. Keep these instructions in a safe place

- Read these instructions.
- Keep these instructions.
- Heed all warnings.
- Follow all instructions.
- Do not use this apparatus near water.
- Clean only with dry cloth.
• Do not block any ventilation openings. Install in accordance with the manufacturer's instructions.
• Do not install near any heat sources such as radiators, heat registers, stoves, or other apparatus (including amplifiers) that produce heat.
- Protect the power cord from being walked on or pinched particularly at plugs, convenience receptacles, and the point where they exit from the apparatus.
- Only use attachments/accessories specified by the manufacturer.
• Use only with the cart, stand, tripod, bracket, or table specified by the manufacturer, or sold with the apparatus. When a cart is used, use caution when moving the cart/apparatus combination to avoid injury from tip-over.
- Unplug this apparatus during lightning storms or when unused for long periods of time.
• The apparatus shall not be exposed to dripping or splashing and that no objects filled with liquids, such as vases, shall be placed on the apparatus.
• WARNING: To reduce the risk of fire or electric shock do not expose this apparatus to rain or moisture.
• The appliance coupler is used as the disconnect device, the disconnect device shall remain readily operable.
• Use only with recommended external power supply. Always follow power supply directions for safe use.
• Prolonged listening at high volume levels may cause irreparable hearing loss and/or damage. Always be sure to practice “safe listening.”
• Service is required when the apparatus has been damaged in any way, such as:
- Power-supply cord or plug is damaged.
- Liquid has been spilled or objects have fallen into the apparatus.
- The unit has been exposed to rain or moisture.
- The unit is dropped or the enclosure is damaged.
- The unit does not operate normally or changes in performance in a significant way.
- This apparatus should only be used at temperatures between 0^ and 50^ .

SERIAL NO:
WELCOME TO FBV 3 FOOTCONTROLLER FOR LINE 6 AMPS AND POD PRODUCTS
FBV 3 gives you hands free control of FBV Shortboard compatible amps and POD products.
FBV 3 Features
- Hands free control of compatible Line 6 Amps and POD (See www.line6.com for compatibility info)
- 13 rugged switches, burly wah/volume pedal, expression pedal input when used with the Line 6 Firehawk 1500 Stage Amp
- Multi-Color LEDs sync with the assigned Effect type
• Large, bright display indicates preset name and onboard tuner
• Control MAC/PC MIDI apps over USB.
Top and Rear Panel Controls
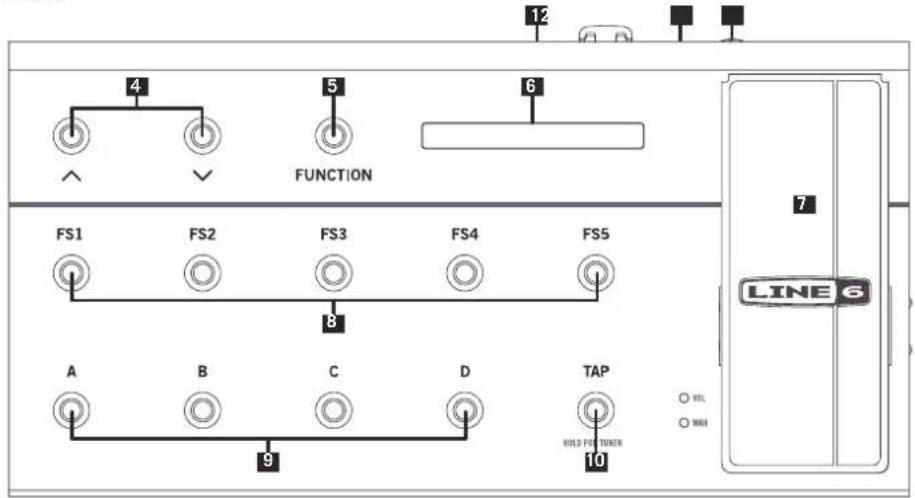
- USB - Connect to Mac/ PC for USB Midi.
- FBV Connector - Connect your Line 6 Amp or POD
- 1/4" Expression Pedal - Optionally add a 2nd pedal for even greater control! The Line 6 EX-1 Expression Pedal is designed to work with the FBV 3.
- Bank Up / Down - Press the "Bank" buttons (labeled with the up and down arrows) to scroll through the User Banks.
- Function Assign Footswitch - Function Switch (with POD HD series and USB connected PC) / Enter Live Edit mode (Firehawk 1500).
- LED Display - This display shows your current Bank, Preset and Preset Name or Tuner interface when activated.
- Volume / Wah Pedal - Typically controls either the Wah or Volume of the current preset - press the pedal forward to activate the toe sw to toggle between Wah or Volume. The LEDs on bottom left shows the active function of your on board expression pedal.
- FS1-FS5 Footswitches - User defined footswitches. Press to toggle the assigned effect on/off in the current preset.
- Channel A,B,C,D Footswitches - Select to call up one of the four "Channels" in the current Bank.
- Tap Tempo - Tap in a tempo for your active Delay or Modulation effects of the current preset to follow. Press and hold TAP to activate the chromatic tuner. The Tap button is also used to exit menus in Live Edit mode.
Line 6 FBV Control Application Installation
If you plan on using your FBV 3 to control software on your Macr Windows® computer, then you'll also want to install the latest Line 6 FBV Control application. This free software provides you with the ability to create, load, edit and store FBV presets - full sets of customized MIDI controller configurations - all in an easy-to-use application!
The FBV Control App can be downloaded from line6.com/software/
Live Edit Mode with Firehawk 1500
Note: Both Firehawk 1500 and FBV 3 reflect Live Edit mode, regardless of how the user engages it; that is, pressing FUNCTION on FBV 3 will also change the UI state of Firehawk 1500's top panel.
Pressing FS1-FS5 will display the model assignment for \~1 second, and then time out:

After \~1 second...

- Press FUNC to enter Live Edit mode.
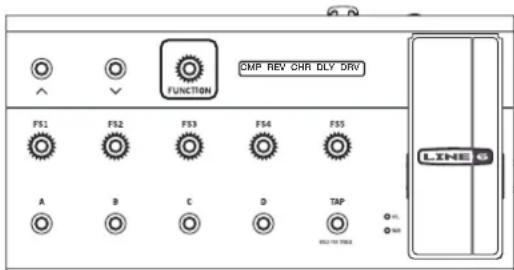
FUNC lights FS1-FS5 flash. Please select one for editing. The 5. Press TAP to exit Live Edit mode.
display flashes 3-character abbreviations for models assigned to FS1-FS5:
Press & hold currently lit "Channel" switch A–D to enter save mode.
Select new Bank if necessary. Press & hold a channel switch to save in that location.
- Press the desired stomp you wish to edit (FS1-FS5).
The selected FS switch is bright (indicating it is selected) and the other four go dim; the VOL and WAH LEDs go dark.
The full model name appears in the display for 1 second, after which the most recently accessed of its parameters appears and the big encoder's LED ring represents its value.
< Analog Chorus >
After \~1 second...
CHO:Speed 1.09 Hz
- Repeatedly press the same switch to cycle through all parameters.
Pressing a different switch displays the full model name for \~1 second before displaying its most recently accessed parameter.
- Move the expression pedal to adjust the selected parameter's value.
Press bank up or down to adjust the value in fine increments.

FBV 3
MANUEL DE PILOTAGE

16B Pastor of Muppet
16B Pastor of Muppet
16B Pastor of Muppet