Bolero Dresscode Washdry 106610 - Refrigerator CECOTEC - Free user manual and instructions
Find the device manual for free Bolero Dresscode Washdry 106610 CECOTEC in PDF.


| Product type | Washer-dryer |
| Brand | Cecotec |
| Model | Bolero Dresscode Washdry 106610 |
| Washing capacity | 10 kg |
| Drying capacity | 6 kg |
| Rated voltage | 220-240 V |
| Rated frequency | 50 Hz |
| Washing power | 2000 W |
| Drying power | 1600 W |
| Energy efficiency class (washing) | A |
| Energy efficiency class (drying) | D |
| Water pressure | 0.03-1.0 MPa |
| Degree of protection | IPX4 |
| Washing programmes | Mixed, Cotton, Eco 40-60, Anti-allergy, Wool, Baby clothes, Shirts, Bed linen, Quick wash, Duvets, Rinse+Spin, Spin only, Drum cleaning, OnSmart |
| Functions | Automatic/timed drying, Steam, Delayed finish, Child lock, Load balancing system, Drum lighting |
| Safety | Child lock, water leak protection, automatic stop in case of malfunction |
| Maintenance | Pump filter cleaning, detergent drawer cleaning, descaling, drum cleaning |
| Installation | Requires removal of transport bolts, levelling, water and drain connection |
| Use | Household use only, do not install built-in, ambient temperature between 5 and 35 °C |
| Repairability | Cecotec After-Sales Service, spare parts available via after-sales service |
Frequently Asked Questions - Bolero Dresscode Washdry 106610 CECOTEC
User questions about Bolero Dresscode Washdry 106610 CECOTEC
0 question about this device. Answer the ones you know or ask your own.
Ask a new question about this device
Download the instructions for your Refrigerator in PDF format for free! Find your manual Bolero Dresscode Washdry 106610 - CECOTEC and take your electronic device back in hand. On this page are published all the documents necessary for the use of your device. Bolero Dresscode Washdry 106610 by CECOTEC.
USER MANUAL Bolero Dresscode Washdry 106610 CECOTEC
Safety instructions 12
-
Parts and components 87
-
Before use 87
-
Installation 88
-
Operation 92
-
Cleaning and maintenance 104
-
Troubleshooting 107
-
Technical specifications 112
-
Recycling of electrical and
electronic equipment 118
-
Copyright 119
-
Simplified EU Declaration of Conformity 119
SOMMAIRE
Read the following instructions carefully before using the product. Keep this instruction manual for future reference or new users.
- Make sure that the mains voltage matches the voltage specified on the product's rating label and that the plug is earthed.
- This appliance is intended for domestic use only and is not suitable for use in commercial establishments such as bars, restaurants, farms, hotels, motels, and offices.
- If the power cord is damaged, it must be replaced by Cecotec's Official Technical Support Service, or similarly qualified persons, to avoid any hazard.
- This appliance is for indoor use only.
- Make sure the device is installed in places where the temperature is above 0 °C.
- The appliance is not designed for built-in installation.
- Use the hose set supplied with the appliance. Do not reuse old hoses.
- Check hose connections regularly to ensure that no water leaks out.
- Do not use the appliance if parts are missing or defective or if the power cord or plug is damaged.
- Do not use the appliance until you are sure that it is installed in accordance with the instructions provided in this manual and all water, drain, electrical and grounding connections comply with all applicable local regulations and/or other requirements.
- Before carrying out any maintenance or cleaning in the device, unplug the appliance from the mains.
- As a safety measure, we advise you to unplug the appliance and cut the water supply after every use. Maximum water
inlet pressure: 1 MPa. Minimum water-inlet pressure: 0.03 MPa.
- Never unplug the appliance with wet hands.
- For safety, be sure to connect the plug to a 3-pin socket. Check carefully and make sure that your socket is properly and reliably earthed.
- It must be possible to disconnect the appliance from the power supply by unplugging it if the plug is accessible, or by means of an all-pole switch upstream of the plug, in accordance with national electrical safety regulations.
- The maximum current of the device is 10 A, make sure that the power supply system (voltage, current and cable) is applicable to the load of the device.
- Make sure that the socket outlet is capable of supporting the Maximum Power rating of the appliance as indicated on the rating plate.
- Water and electrical devices must be connected by a qualified technician in accordance with the manufacturer's instructions and local safety regulations.
- The door may reach high temperatures during operation. Keep children and pets away from the glass door. Never open the door during the washing stage.
- Do not operate the appliance in very wet rooms or in rooms with explosive or caustic gas.
- Adequate ventilation must be provided to avoid the back flow of gases into the room from appliances burning other fuels, including open fires.
- Do not dry unwashed items in the appliance.
- Do not wash articles that have been cleaned in, washed in, soaked in, or stained with flammable or explosive substances, like wax, oil, paint, petrol, degreasers, dry-cleaning solvents, kerosene, etc., which may result in
fire or explosion.
- Fabric softeners or similar products should be used as specified by manufacturer.
- Do not wash or dry articles that have been cleaned in, washed in, soaked in, or dabbed with combustible or explosive substances (such as wax, oil, paint, petrol, degreasers, dry-cleaning solvents, kerosene, etc.). This may result in fire or explosion.
- When washing fabrics that contain vegetable or cooking oil or have been contaminated by hair care products, they should first be washed in hot water with extra detergent. This will reduce, but not eliminate, the hazard.
- The exhaust air must not be discharged into a flue which is for exhausting fumes from appliances burning gas or other fuels.
- The air openings must not be obstructed by a carpet.
- Appliances with a single inlet valve can only be connected to a cold water supply. Appliances with a double inlet valve must be correctly connected to a hot water and cold water supply (depending on the washing machine model).
- The plug must be accessible after installation.
- The appliance must not be installed behind a lockable door, a sliding door, or a door with a hinge on the opposite side to that of the device.
- The appliance shall not be installed in a humid place.
- Do not place other items or appliances (such as microwaves) or objects under pressure on the device.
- This product is intended for domestic use only and designed exclusively for machine-washable garments and tumble-drying suitable items.
- The product cannot be used for commercial or industrial purposes. Do not use the appliance outdoors, even if the
area is protected, as it may be exposed to moisture, rain or thunderstorms.
- Do not insert more laundry load than the allowed load (maximum allowed load indicated in the product data tables).
- This appliance is not designed to operate via external switching devices such as timers or remote control systems.
- Do not use an extension lead or multiple sockets.
- Do not wash or dry items containing fibreglass (such as certain curtains or blinds) as particles may remain in the washing machine and adhere to other garments, causing skin irritation.
- Do not stand, sit on, or lean against the appliance or its door.
- Flammable and explosive or toxic solvents are forbidden. Do not use detergents containing petrol, alcohol, etc. Use only detergents suitable for machine washing, especially for the drum.
- Garments containing oil may catch fire spontaneously, especially when exposed to heat sources such as a washing machine. The garments are heated, causing an oxidation reaction in the oil. Oxidation generates heat. If heat cannot escape, garments may become hot enough to catch fire. Piling, stacking or storing garments containing oil retains heat and therefore creates a fire hazard.
- Make sure that no objects such as lighters, matches, etc. are introduced.
- Close the door properly, if it is difficult to close, check that clothing does not prevent proper closing.
-
Make sure that there is no water in the drum before opening the door.
-
This appliance can be used by children aged 8 and above and people with reduced physical, sensory, or mental capabilities or lack of experience and knowledge, as long as they have been given supervision or instruction concerning the use of the appliance in a safe way and understand the hazards involved. Do not allow children to play with the appliance. Cleaning and maintenance should not be carried out by children without supervision.
- Children of less than 3 years should be supervised to ensure that they do not play with the appliance.
- Supervise children to ensure they do not play with the appliance.
- Cleaning and maintenance should not be carried out by children without supervision.
- Keep the cleaning products out of the reach of children.
- When relocating the washing machine, ensure transit bolts are refitted to prevent drum damage during transport.
- Water accumulated inside the appliance must be drained out.
- Handle the machine carefully. Never hold each protruded part on the machine while lifting. Do not use the appliance door as a handle during transport.
- The appliance is very heavy. Transport it with care.
- Secure the drain and water-supply hose correctly.
- Do not insert hands into the running water extracting tub.
- Do not close the door with excessive force. If it is found difficult to close the door, please check if the clothes are put in or distributed well.
- It is forbidden to wash carpets.
- Never refill the water by hand during washing.
- The appliance must be handled and installed by 2 or more people to avoid risk of injury. Wear protective gloves when
unpacking and installing the product to avoid cutting hazards.
- Keep children away during installation process.
- During installation, make sure that the power cable is not damaged to avoid possible risk of fire or electric shock.
- Transit bolts must be removed before use.
- Keep the room dry and ventilated.
- Never place the appliance over the opening of an uncovered drain.
- Do not expose the device to temperatures below 5° C or above 35° C.
- Do not install in bathrooms or very damp rooms.
- Check that it is correctly levelled on the floor by means of the feet.
- WARNING! Cecotec accepts no liability for incidents caused by improper use outside the rules set out in this instruction manual.
INSTRUCTIONS DE SÉCURITÉ
| Ciclo de lavado | Temp °C (Máx) | Carga máx Lavado (kg) | Carga máx secado (kg) | Detergente universal | Detergente especial | Suavizante |
| Mix | 60 | 8 | 5 | L / P | --- | 0 |
| Cotton (algodón) | 60 | 8 | 5 | L / P | --- | 0 |
| Anti-allergy (anti-alergias) | 85 | 3 | 3 | L / P | --- | 0 |
| Wool (lana) | 40 | 1 | --- | --- | L | 0 |
| Baby Care (ropa de bebé) | 85 | 5 | 5 | L / P | --- | 0 |
| Shirts (camisetas) | 60 | 3 | --- | L/P | L | 0 |
| Bedding (ropa de cama) | 60 | 6 | 3 | L/P | --- | 0 |
| ECO 4060 | 40 | 8 | 5 | L/P | --- | 0 |
| 20°C | 30 | 2 | --- | L/P | --- | 0 |
| Quick wash (lavado rápido) | 40 | 1 | 1 | L/P | --- | 0 |
| Drying (secado) | --- | --- | 5 | --- | --- | --- |
| Down Jacket (plumas) | 40 | 2 | 2 | --- | L | 0 |
| Rinse + Spin (enjuague + centrifugado) | --- | 8 | 5 | --- | --- | 0 |
| Spin only (solo centrifugado) | --- | 8 | 5 | --- | --- | --- |
| Drum clean (limpieza del tambor) | 85 | --- | --- | --- | --- | --- |
| OnSmart (lavado inteligente) | 40 | 5 | --- | L/P | --- | 0 |
Esta tabla es para los modos EU01_129674 - Bolero DressCode Wash&Dry 106610, EU01_129675 - Bolero DressCode Wash&Dry 106610 Steel y EU01_129676 - Bolero DressCode Wash&Dry 106610 Titanium
| Ciclo de lavado | Temp °C (Máx) | Carga máx Lavado (kg) | Carga máx secado (kg) | Detergente universal | Detergente especial | Suavizante |
| Mix | 60 | 10 | 6 | L/P | --- | 0 |
| Cotton (algodón) | 60 | 10 | 6 | L/P | --- | 0 |
| Anti-allergy (anti-alergias) | 85 | 3 | 3 | L/P | --- | 0 |
| Wool (lana) | 40 | 1 | --- | --- | L | 0 |
| Baby Care (ropa de bebé) | 85 | 5 | 6 | L/P | --- | 0 |
| Shirts (camisetas) | 60 | 3 | --- | L/P | L | 0 |
| Bedding (ropa de cama) | 60 | 6 | 3 | L/P | --- | 0 |
| ECO 4060 | 40 | 10 | 6 | L/P | --- | 0 |
| 20°C | 30 | 2 | --- | L/P | --- | 0 |
| Quick wash (lavado rápido) | 40 | 1 | 1 | L/P | --- | 0 |
| Drying (secado) | --- | --- | 6 | --- | --- | --- |
| Down Jacket (plumas) | 40 | 2 | 2 | --- | L | 0 |
| Rinse + Spin (enjuague + centrifugado) | --- | 10 | 6 | --- | --- | 0 |
| Spin only (solo centrifugado) | --- | 10 | 6 | --- | --- | --- |
| Drum clean (limpieza del tambor) | 85 | --- | --- | --- | --- | --- |
| OnSmart (lavado inteligente) | 40 | 5 | --- | L/P | --- | 0 |
ESPAÑOL
- Water inlet valve
- Door
- Drain hose
- Furniture/housing
- Power cord and plug
- Detergent dispenser tank
- Control panel
- Drum
- Drain filter cover
- Adjustable feet
Note:
The graphics in this manual are schematic representations and may not exactly match the product.
2. BEFORE USE
- This appliance comes in a packaging designed to protect it during transport. Remove the appliance from its box. You can keep the original box and other packaging materials in a safe place to prevent damage to the appliance if you need to transport it in the future. If you wish to dispose of the original packaging, make sure all items are recycled properly.
- Check that all parts and components are included and in good condition. If any of them are missing or damaged, please contact Cecotec's Official Technical Support Service immediately.
Box contents:
- Product
- Water supply hose
- Fixed spanner
- 4 trim covers
- Instruction manual
- Do not remove the product's serial number in order to keep proper traceability if technical assistance is required.
3. INSTALLATION
Removing the transport bolts
- To prevent damage to the unit during transport, the drum is secured with transport bolts. If they are not removed before the first use, they can damage the Drum, cause excessive vibrations and significantly increase the noise during spinning. Completely remove the 4 transport bolts before starting up the unit for the first time. Keep the bolts. Fig. 2
If the unit is to be moved or transported at a later date, reinstall the transport bolts to prevent damage during transport.
Procedure
Fig. 3
- Loosen and remove the four carriage bolts using the wrench provided.
- Remove the four spacer tubes. During removal, some may fall inside the cabinet. Gently tilt the appliance forward to retrieve them from the floor or inside the base.
- Plug the holes left by the bolts with the four caps included in the accessory bag.
- Keep all parts in a safe place: they will be needed if the unit is moved in the future.
NOTE
The carriage bolts include washers to prevent breakage. When reinstalling them for relocation, also use them to secure the power cord and plug to the back of the unit to prevent it from becoming loose during transport.
Location requirements
Install the machine on firm, solid and level ground. Do not place it on soft carpeting or on wooden floors that may warp.
Do not install the machine on a home plinth/plinth. If it is not possible to change the location, the plinth must be reinforced (e.g. increase its surface and fix it with brackets). Do not place the appliance on separate racks or bases.
Please note that due to overloading, vibrations or humidity of the plinth, the device may shift over time and may fall down if improperly installed.
- Keep the environment dry and ventilated.
The machine must be installed and operated in a room with drainage.
Do not place small appliances (e.g. microwave or rice cooker) on top of the machine.
- Keep the machine away from open flames or heat sources (candles, stoves, liquefied gas cylinders, etc.).
Do not place pressurized containers on the machine.
Do not place the machine over uncovered drain openings.
Space requirements
- Locate the appliance with easy access to the power cord and plug and to the outlet.
Leave free space around it as shown in figure 4:
a) 3 cm or more at the top.
b) 5 cm or more at the back.
c) 5 cm or more on the left side.
d) 5 cm or more on the right side.
e) 70 cm or more of front clearance for handling and opening the door.
Caution: Avoid contact between metal parts of the appliance and metal sinks or other electrical appliances.
Levelling the appliance
Fig. 5
-
Place the appliance on a firm, level surface, preferably in a corner of the room.
-
If the floor is uneven, adjust the adjustable feet until the unit is level. Do not place foreign shims under the legs.
-
Do not extend the adjustable feet more than necessary. The more they are extended, the more vibration they can transmit.
-
Check the lateral and front leveling with a spirit level (not supplied).
-
Press down on each corner of the top. The device must not «dance». All adjustable legs must be firmly and evenly supported.
-
When it is level and stable, lock the lock nuts of the adjustable legs by tightening them against the base of the unit, without changing the height achieved.
Adjustable feet levelling procedure
-
Once the leg(s) to be extended have been identified, lift that corner slightly (with the help of another person) to unload weight.
-
Rotate the leg: clockwise to shorten or counterclockwise to lengthen, until the swing is eliminated.
-
At the correct height, raise and tighten the locknut until the leg is locked against the base.
ENGLISH
Water supply hose connection
Fig. 6
- Connect one end of the water inlet hose to a cold water tap and hand tighten. Before final connection, let the water run until it runs clear to clean the line.
- Connect the other end to the water inlet valve located at the rear of the appliance and tighten by hand.
- Open the tap slowly and check for leaks. Do not kink, crush, modify or cut the hose. Tighten the fittings firmly by hand (without tools). The supply pressure must be between 0.03 and 1.0 MPa. If this value is exceeded, install a pressure reducing valve. If the hose is not long enough, contact a specialist retailer or an authorised technician. Do not use second-hand water inlet hoses. Use the new hose supplied with the appliance.
Drain hose connection Drain outlet height
Fig. 7
- Height difference between the floor and drain: minimum 60 cm (24 in) and maximum 100 cm (39 in).
Connection types
Vertical tube
· Attach the Drain Hose to a U-bend bracket (not supplied). Fig. 8
- Position the elbow 100 mm (4 in) from the end of the hose as usual to insert that section into the drain pipe.
Do not insert the hose too deeply into the tube, to avoid self-siphoning (continuous emptying during filling).
- Secure the elbow and hose with a clamp to prevent them from slipping out of the drain pipe during use.
Connection to the sink trap
Fig. 9
- Attach the drain hose to the sink trap using a hose clamp with a diameter of 0.9–1.6 inches (20–44 mm), available at hardware stores. Secure the joint to prevent leakage.
Washbasin or sink
WARNING: Risk of scalding. During high temperature washing, when pumping hot soapy water into the sink/sink there is a risk of contact burns. Do not put your hands in the hot water or reach into the hot foam.
You can place the drain hose in a U-tube as shown in Figure 10 to drain directly into the sink.
Warning - Risk of damage to the device or tissues by backflow
Height difference between the floor and drain: minimum 60 cm (24 in) and maximum 100 cm (39 in). Fig. 11
If the end of the drain hose touches the water already discharged, it may return by suction (self-siphonage) into the appliance and damage the equipment or garments. Make sure of the following:
o There is no plug or seal on the sink/washbasin drain.
o The end of the drain hose does not touch the drained water.
o The sink drain drains freely and is not partially or completely clogged.
o The drain hose is securely attached to the sink/sink.
Drainage installation recommendations
Do not twist, pull or bend the drain hose excessively.
- Fasten the Drain Hose with a flange to the drain pipe, siphon or rim of the sink/sink to prevent it from coming loose under water pressure.
The use of hose extensions is not recommended. If, exceptionally, it is indispensable, the extension must:
o Maintain the same inside diameter as the original hose.
o Not to exceed 250 cm in total length.
o Secure with suitable sleeves and watertight clamps at all joints.
Electrical connection
Before plugging the device into the mains, check:
The socket is grounded and complies with applicable standards.
The socket withstands the maximum power indicated on the appliance's rating plate.
The supply voltage is within the values indicated on the nameplate.
During heating, the maximum current of the appliance is 10 A. Check that the installation (voltage, current and wiring cross-section) is suitable for this load.
The socket is compatible with the appliance's plug. If not, have the socket or plug replaced by a qualified electrician.
General electrical use and safety
The appliance is not intended to be operated using an external switching device, such as a timer, or by means of a separate remote control system.
After installation, the power socket must remain easily accessible.
Do not use extension leads, power strips or multiple adapters.
ENGLISH
To unplug, grasp the plug and pull straight out. Do not pull the cord.
After installation, electrical components must not be accessible to the user.
Do not connect or handle the plug with wet or damp hands. Do not use the device when wet or barefoot.
Do not use the appliance if the power cable and plug are damaged, if the equipment is not working properly, or if it has been knocked or dropped.
4. OPERATION
Control panel
Fig. 12
A. Programme knob: turn the knob mark to the OFF position to switch off the appliance. If it switches off during a cycle, the programme is cancelled.
B. Temperature button: changes the temperature of the current cycle. The display shows five temperature values. When you select one, the corresponding indicator lights up.
C. Spin button: changes the spin speed of the current cycle. The display shows five values. When selected, the corresponding indicator lights up.
Child lock function: with the cycle running, press and hold the spin button for 3 seconds to activate or cancel the child lock. When activated, the panel is locked.
- Cancel the buzzer: press and hold the spin button and the ONSMART button at the same time for at least 3 seconds to silence the buzzer that sounds during washing.
D. Drying button: adjusts the type of drying or drying time as required. The selected type or time is displayed on the digital display. Some programs cannot be used in conjunction with the drying function.
E. Steam button: Activates the steam wash.
F. Delay end button: Sets the end time (countdown) of the program.
G. ONSMART button: Select the ONSMART washing programme.
H. START/PAUSE button: Press and hold this button to start or pause a cycle.
- Add laundry while the cycle is running: to pause, press and hold the button again. When the DOOR LOCK indicator is off, the door can be opened to insert or remove garments. Close the door and press and hold again to resume from the pause point.
M. Display and indicators
- Temperature indicator light: When a programme is selected, the default temperature value lights up. You can change the temperature using the temperature button. There are five temperature indicators. If all indicators are off, the programme uses only cold water without activating the heating element.
- Spin speed indicator: When a programme is selected, the preset speed
illuminates. You can change it using the spin button. There are five settings (e.g. 1400/1200/900/700/500 rpm). If all are switched off, the programme does not spin after the final drain.
- Door lock indicator: if the indicator is lit, the door is locked. Wait until it switches off before opening the door. To open the door while a cycle is running, press the Start/Pause button; once the door locked indicator turns off, you may open the door.
- Child lock indicator: if the indicator is illuminated, the child lock is activated and the control panel is locked.
- Delay end indicator: if the indicator is lit, the delay end function is activated. The countdown to completion appears on the digital display.
- ONSMART indicator: if the indicator is lit, it means that the OnSmart programme is selected. There are two ways to establish it.
- Drying function indicator: if the indicator is lit, drying has been programmed or the drying cycle is in progress.
- Digital display: it can show the following information: Remaining wash cycle time, Time to deferred end, Drying time, Number of rinses and Error code.
| [1204] | Temperature button |
| - | |
 | Spin button |
| [4472] | Drying button |
| [trawd] | Steam button |
| [evcd] | Delay end button |
 Smart 3" Smart 3" | ONSMART button |
 | Start/Pause button |
| - | |
| [soval] | Child lock indicator light |
 | Door lock indicator |
| [BYC6] | Delay end indicator |
 | ONSMART indicator |
 | Drying function indicator |
Preparing the laundry (before washing)
- Remove loose or metallic objects from garments (coins, safety pins, paper clips, needles, nails).
• Brush and empty pockets and hems of sand, coins, etc. - Close zips and fasten cushion covers, duvet covers, etc.
- Remove the curtain rods/rail or place them in a mesh bag.
- Very delicate garments (e.g. stockings or lace garments) and small items (small socks, handkerchiefs) should be washed in a mesh bag.
Some garments are best washed inside out (e.g. knitwear, pants, T-shirts, sweatshirts).
Make sure underwired bras are machine washable. Insert underwired bras in a pillowcase or bag that closes with a zipper or button. If an underwire comes loose, it may pass through the drum holes and cause serious damage.
Preparing the laundry for drying (drying function only)
Dry only textiles that have already been washed, rinsed and spun-dried.
- Remove as much water as possible. To do this, do not reduce the speed with the spin button if you are going to use the dryer.
For even drying, sort by fabric type and required drying level.
Garments to be ironed do not need to be ironed immediately after drying: they should be folded or rolled for a while to distribute the residual moisture.
Use the correct amount of detergent and textile care products according to the manufacturer's instructions.
Textiles that must not be tumble-dried
Garments marked with the non-drying symbol in drum.
- Wool or wool-containing garments. There is a risk of shrinkage.
Delicate fabrics (silk, synthetic sheers). Risk of creasing.
- Items containing rubber foam or similar materials.
- Items treated with flammable solvents (stain removers, petrol, paint thinners). Risk of explosion.
Garments with hairspray or other volatile substances. Hazardous vapours.
Garments dripping water. Energy waste.
Sorting by colour and soil level
- Sort garments by color (white, light, dark) and by degree of soiling. Please note the recommended temperature range for each fabric.
Garments may fade. Do not wash multi-coloured garments together with other items for the first time.
• Always wash white garments separately from coloured items to prevent them from turning grey.
Soil level (to help select the programme and temperature)
Lightly soiled: no visible dirt or stains, although some odor may be present.
Examples: lightweight summer items (T-shirts, shirts or blouses) worn just once; bed linen or guest towels in need of a quick freshen-up.
Normal soiling: visible dirt and/or some light stains. Examples: T-shirts, shirts or blouses worn multiple times or with sweat stains; towels, hand towels or bed linen used for up to a week; unstained curtains that have not been washed for up to six months.
Heavily soiled: visible dirt and stains. Examples: tea towels, cloth napkins, bibs, children's outer garments, sportswear; items stained with grass or mud; workwear (overalls) and jeans or other clothes worn for outdoor activities.
Sorting by care label
The symbols on your garment's care label help you choose the right washing programme, the correct temperature, washing cycles, and ironing methods. Always check these indications before selecting the program.
Table of washing programmes
This table is for models EU01_129671 - Bolero DressCode Wash&Dry 85610, EU01_129672 - Bolero DressCode Wash&Dry 85610 Steel and EU01_129673 - Bolero DressCode Wash&Dry 85610 Titanium.
| Washing cycle | Temp °C (Max.) | Max. washing load (kg) | Max. drying load (kg) | Universal detergent | Special detergent | Fabric softener |
| Mix | 60 | 8 | 5 | L/P | --- | 0 |
| Cotton | 60 | 8 | 5 | L/P | --- | 0 |
| Anti-Allergy | 85 | 3 | 3 | L/P | --- | 0 |
| Wool | 40 | 1 | --- | --- | L | 0 |
| Baby Care | 85 | 5 | 5 | L/P | --- | 0 |
| Shirts | 60 | 3 | --- | L/P | L | 0 |
| Bedding | 60 | 6 | 3 | L/P | --- | 0 |
| ECO 40-60 | 40 | 8 | 5 | L/P | --- | 0 |
| 20°C | 30 | 2 | --- | L/P | --- | 0 |
| Quick Wash | 40 | 1 | 1 | L/P | --- | 0 |
| Drying | --- | --- | 5 | --- | --- | --- |
| Down Jacket | 40 | 2 | 2 | --- | L | 0 |
| Rinse + Spin | --- | 8 | 5 | --- | --- | 0 |
| Spin Only | --- | 8 | 5 | --- | --- | --- |
| Drum Clean | 85 | --- | --- | --- | --- | --- |
| OnSmart (smart washing) | 40 | 5 | --- | L/P | --- | 0 |
This table is for models EU01_129674 - Bolero DressCode Wash&Dry 106610, EU01_129675 - Bolero DressCode Wash&Dry 106610 Steel and EU01_129676 - Bolero DressCode Wash&Dry 106610 Titanium.
| Washing cycle | Temp °C (Max.) | Max. washing load (kg) | Max. drying load (kg) | Universal detergent | Special detergent | Fabric softener |
| Mix | 60 | 10 | 6 | L/P | --- | 0 |
| Cotton | 60 | 10 | 6 | L/P | --- | 0 |
| Anti-Allergy | 85 | 3 | 3 | L/P | --- | 0 |
| Wool | 40 | 1 | --- | --- | L | 0 |
| Baby Care | 85 | 5 | 6 | L/P | --- | 0 |
| Shirts | 60 | 3 | --- | L/P | L | 0 |
| Bedding | 60 | 6 | 3 | L/P | --- | 0 |
| ECO 40-60 | 40 | 10 | 6 | L/P | --- | 0 |
| 20°C | 30 | 2 | --- | L/P | --- | 0 |
| Quick Wash | 40 | 1 | 1 | L/P | --- | 0 |
| Drying | --- | --- | 6 | --- | --- | --- |
| Down Jacket | 40 | 2 | 2 | --- | L | 0 |
| Rinse + Spin | --- | 10 | 6 | --- | --- | 0 |
| Spin Only | --- | 10 | 6 | --- | --- | --- |
| Drum Clean | 85 | --- | --- | --- | --- | --- |
| OnSmart (smart washing) | 40 | 5 | --- | L/P | --- | 0 |
Types of detergents: L = gel/liquid detergent; P = powder detergent; O = optional; “—” = not applicable.
If using liquid detergent, it is not recommended to activate the Delay End function.
- Recommendation: use a laundry detergent rated for 20–80°C; for woollen items, use a dedicated wool detergent rated for 20–40°C.
• Always follow the dosage indicated by the detergent manufacturer (package).
Programmes
| Washing cycle | Specification |
| Mix | For washing mixed loads of cotton and synthetic fabrics with light to normal soiling; suitable for white and coloured garments. |
| Cotton | For everyday cotton, linen, and cotton-blend garments. Energy efficiency test programme. |
| Anti-Allergy | For items requiring the removal of dust mites and allergens. |
| Wool | For machine washable wool and wool blends. Before washing, confirm on the label that the garment is «machine washable». To avoid damage, the water temperature should not exceed 40 °C. For best results and to minimize the risk of damage, use specific detergent for wool. Maximum recommended load: 1.0 kg.Remove garments as soon as the cycle ends; reshape and leave to dry to prevent creasing and distortion from sitting in the drum. |
| Baby Care | For children's clothing.Cycle designed for the typical soiling of children's clothes. Optimizes rinsing to minimize detergent residues on fabrics. |
| Shirts | For shirts and women's blouses. |
| Bedding | For large items such as blankets, curtains, and bedspreads. |
| ECO 40-60 | Energy efficiency test programme. |
| 20°C | For small loads of items prone to colour bleeding; this programme uses cold water only, with no heating element, to protect colours. |
| Quick Wash | For small quantities or lightly soiled garments when you need a quick wash. |
| Drying | For drying damp cotton fabric. |
| Down Jacket | Specific cycle for washing feather items: single comforters (max. weight 2.0 kg), cushions or garments quilted with goose down (e.g. puffer jacket). Placement in the Drum: insert the pieces with the edges folded inwards (see figure in the manual). Not to exceed 3/4 of the total volume of the Drum. Recommended detergent: use liquid detergent and dose it in the detergent dispenser. |
| Rinse + Spin | Combines a rinse and spin cycle for loads that need an extra rinse, or for items that only require rinsing. |
| Spin Only | This cycle uses spinning to reduce the drying time for heavy fabrics or special care garments washed by hand. |
| Drum Clean | Cleans the drum by removing dirt and bacteria. Make sure the drum is empty. |
| OnSmart (smart washing) | A special cycle that can be started simply by pressing the ONSMART button. |
Special functions and cycles
ONSMART cycle
The ONSMART cycle intelligently detects the load weight and adjusts the time and temperature to achieve an efficient wash. There are two ways to activate the ONSMART cycle:
A. With the unit switched on, press and hold the ONSMART button for at least 3 seconds: the ONSMART indicator lights up and the ONSMART cycle starts directly.
B. With the appliance switched on, briefly press the ONSMART button: the ONSMART indicator will light up; then press the Start/Pause button to start the ONSMART cycle.
Drying
Washing + drying programme
• Only some wash programs allow the addition of the drying function.
- Load the laundry into the drum, close the door, turn the programme knob to the desired washing programme (except «Drying») and use the drying button to select the drying mode:
Automatic drying: press the drying button repeatedly until «Auto» appears on the display. The appliance automatically adjusts the drying time based on the quantity and moisture level of the garments.
Timed drying: press the drying button to set a drying time. The display shows incremental options (30–60–90–120–150–180–210–240 min). Select the desired time.
- Press the Start/Pause button to start. Drying will be activated automatically at the end of the wash.
Only drying programme
Suitable for cotton garments. Do not dry garments prone to warping or shrinkage.
- Load the laundry into the drum, close the door, turn the programme knob and select the Drying programme, press the drying button to activate «Auto Dry» or «Timed Dry» mode, and press the Start/Pause button to begin.
ENGLISH
• Pre-recommendation: spin dry to remove as much water as possible before drying.
Down Jacket programme with drying
To dry down-filled items that are suitable for machine washing and tumble drying, select the «Down Jacket» programme and «Auto Dry» mode.
Do not use the «dry only» mode (indicated above) for down jackets.
Precautions for the drying programme
If the garments contain too much moisture, the machine will automatically extend the drying time. It is normal for the time shown to increase. The dryer has a system of sensors that measure the humidity of the interior to manage a drying cycle. If the sensors detect that the laundry is still damp, it automatically adjusts the time for optimal and efficient drying.
During drying, keep the water tap open: the appliance needs water for condensation and dehumidification of the air.
To reduce wrinkling due to overdrying, set a shorter time first and, if necessary, add additional time.
Before performing the «drying only» mode, perform a spin cycle.
If knots or pilling form after spinning, untwist and distribute the garments before drying.
• On large or thick garments, drying may be uneven. Check and add time if necessary.
· Wool fabrics are not suitable for machine drying.
Do not dry garments that may warp or shrink.
• Some programs cannot be used in conjunction with the drying function.
Steam function
Cycle designed for cotton garments with low tendency to fade. The steam treatment helps reduce wrinkles, restores garments to an optimal moisture level and facilitates ironing. It also helps to eliminate odors characteristic of garments.
Delay End function
Procedure: with the desired programme selected (before pressing the Start/Pause button), press the Delay End button repeatedly until the desired end time is displayed (up to a maximum of 24 hours) and the Delay End indicator lights up.
- Important: the programme duration is included in the set Delay End time.
- Cancelling the Delay End: turn the programme knob to the reset/programme selection position. The deferred end indicator turns off when canceled.
Note: the delayed end function is not available in some programs. Actual time of completion may vary depending on water pressure, drain, type of load, water
temperature and other conditions.
Child lock function
This function prevents accidental operation or external interference during use.
Activation/deactivation: while the cycle is running, press and hold the spin button for 3 seconds to activate or cancel the child lock.
When this function is activated, the child lock indicator lights up, the buttons do not respond. The door remains locked (the door locked indicator is lit); it cannot be opened. The programme knob does not allow programme changes unless turned to OFF to switch off the machine. If it is turned to OFF, the device stops and the child lock is cancelled. If the appliance is switched off with the child lock active and then switched back on, the previous programme will not resume automatically.
Add garments during programme
- With the programme running, press and hold the Start/Pause button to pause. If the door locked indicator goes out, the door can be opened to add or remove garments.
- Close the door and press and hold the Start/Pause button again to resume; the cycle continues from where it left off.
- Warning: if the water level or temperature in the drum is too high, the door locked indicator will remain lit and the door will not open; in this case, it is not possible to add or remove garments.
Buzzer cancelation (acoustic)
To mute the beeps during operation: press and hold the spin button and the ONSMART button at the same time for ≥ 3 seconds.
- To reactivate the buzzer: repeat the same operation. The setting is confirmed with a beep.
Load balancing system
The appliance is equipped with an automatic system that detects the eccentricity of the load during spinning and redistributes it before reaching the target speed.
If the load cannot be evenly distributed within the time allowed, the machine reduces or cancels the spin to avoid excessive vibrations.
In this case:
Check for knotted or tangled garments. Separate them and select the «Spin Only» programme to complete the spin cycle.
o With very small loads (e.g., a pair of jeans, a sweater or a large towel),
ENGLISH
the appliance may not complete spinning due to balance protection. Mix large and small items to facilitate even distribution.
Note: depending on the type and material of the laundry, the system may make several redistribution attempts, extending the spin time. This is normal behavior, not a malfunction.
Inner drum light
The interior light is illuminated during program/function selection and during operation.
With the programme paused, the light turns on when the door is opened.
During the cycle, the light may come on automatically when changing wash phase.
In addition, touching any button on the panel (except the power button) can momentarily turn on the interior light.
Daily use. Preparing the laundry
Empty pockets: remove coins and any other objects; tissues will disintegrate and leave residue.
- Closing zippers buttons buttons/hooks and tying ribbons. Insert small garments or garments with hooks in mesh bag. The curtains should be without hoops or in a bag with the hoops.
Read label instructions: cotton, blends, synthetics/easy care, wool, «hand wash».
Classify:
Colours: wash whites separately and new coloured garments separately for their first wash.
o Size: mix large and small garments to improve distribution in the Drum.
o Delicate: separately and with gentle treatment.
This device was factory tested by running several cycles. A small amount of water may remain in the tank and in the drainage system. Before the first wash, run a Drum clean cycle without laundry and detergent to clean the system.
How to use the appliance
- Load the laundry: Open the Door and load the garments one at a time, loose, without overfilling the Drum. Observe the loads indicated in the «Programme table». Overloading reduces washing efficiency and causes wrinkling.
- Close the door: Make sure that no fabric is trapped between the door glass and the rubber gasket. Close until you hear the «click».
-
Open the tap: Verify that the appliance is connected to the water supply. Open the tap.
-
Select the desired programme: Turn the programme knob to the required cycle. The cycle time is shown on the Digital Display. The machine displays the preset temperature and spin speed for that program. Adjust if necessary:
- Change temperature: press the Temperature button to progressively reduce the temperature to «cold wash» (all temperature indicators go off). Pressing it again sets the maximum available value.
Change Spin Speed: Press the Spin Button to decrease the speed to «no spin» (all Spin Speed Indicators turn off). Pressing it again sets the maximum available value. - Selecting options: press the option button(s) to activate them; the corresponding indicator lights up. Press again to cancel; the indicator goes out. If the option is incompatible with the program, a buzzer will sound and the indicator for that option will flash. If it conflicts with another option already selected, only the most recent selection will remain active.
- Add detergent: Remove the detergent drawer and add the products in the correct compartments. Fig. 13
- Deferred termination: To set a delayed end time for the programme, use the Delay End button.
- Start the programme: Press the Start/Pause button. Its indicator lights up, the Door is locked and the Door Locked Indicator is illuminated. To avoid overflow, do not open the detergent drawer while the programme is running. The remaining duration may vary. Load imbalance or excess foam may affect the cycle time.
- Changing settings while the programme is running (if applicable): You can change settings as long as the corresponding phase has not been completed. Press the Start/Pause button to pause and change the settings using the corresponding buttons. Press again to continue. If you change the program, do not add more detergent.
• To avoid accidental changes, activate the child lock by holding down for 3 seconds.
Fig. 13 key:
- Compartment for washing powder detergent.
- Compartment for washing liquid detergent. Do not exceed the "MAX" mark.
- Softener compartment. Do not exceed the "MAX" mark.
Pause and open the door (if necessary)
- Press the Start/Pause button to pause.
If the water level and/or temperature is not high, the Door Locked Indicator turns off and you can open the Door to add or remove items. - Close the door and press the Start/Pause button to resume.
ENGLISH
Cancel a running programme (if necessary)
- Turn the programme knob to the OFF position to switch off the appliance.
- If the water level/temperature is already low, the Door is unlocked and can be opened.
-
If the door is still blocked due to high water level:
Select the «Spin Only» programme using the programme knob.
Press the spin button to «no spin» (spin speed indicator off).
Press the Start/Pause button to run the drain-only function.
Water will be expelled during the cycle and the door unlocks at the end of the cycle. -
Switching off after programme completion: When finished, the digital display (8) shows «End». The Door can only be opened when the Door Locked Indicator is turned off. Set the programme knob to the «OFF» position. Leave the door ajar to ventilate and dry the interior.
5. CLEANING AND MAINTENANCE
WARNING: Risk of electric shock
Always disconnect the unit from the power supply before cleaning or performing any maintenance.
Never clean the unit with a pressure washer or high-pressure water jet.
Cutting off water and electricity supplies
- Turn off the water tap after each wash cycle to reduce wear on the internal hydraulic circuit and prevent leaks.
Unplug the appliance during cleaning and all maintenance operations.
Cleaning the appliance exterior
WARNING: Risk of explosion. Do not use flammable solvents to clean the unit.
Procedure
Clean the exterior surface with a soft cloth dampened with warm soapy water or a mild non-abrasive cleaner.
- Remove any debris or stains immediately.
Do not use high-pressure sprayers.
Drum cleaning
- Clean the inside of the drum immediately, metal debris left in the drum can cause rust stains on the drum surface.
Do not use steel wool.
Use a non-chlorine cleaner and follow the product manufacturer's instructions.
Descaling (limescale removal)
If you dose the detergent correctly, descaling is not necessary on a regular basis.
If descaling of the Drum is required, follow the descaler manufacturer's instructions exactly.
- Small amounts of descaler can be used to remove white spots on the Drum caused by lime or mineral deposits, or small rust stains from forgotten metal objects.
WARNING: Descalers contain acids that can attack components of the appliance and discolor the laundry.
Door and Drum Care
Leave the door ajar after use to prevent the formation of unpleasant odors.
Checking the water inlet hose
- Check the inlet hose at least once a year. If it is cracked or damaged, replace it immediately: during washing the pressure is high and a cracked hose can open suddenly.
Do not use second hand inlet hoses.
Cleaning the detergent drawer
Fig. 14
If you notice detergent/additive build-up or the softener compartment does not rinse properly, clean the drawer:
- Open the drawer tray completely. Press the tab on the drawer and pull the tray out.
- Remove the liquid detergent cover by pulling it upwards from the tray.
- Wash the liquid detergent lid and the drawer tray under running water. Remove any remaining detergent residue with a cloth.
- Replace the liquid detergent cover and slide the drawer tray all the way down. Close properly.
Tip: Do not use the appliance without the drawer tray installed. Always keep the box completely closed during operation.
Inlet hose screen filter and water inlet valve cleaning
ENGLISH
Fig. 15
- Close the faucet and unscrew the inlet hose on the faucet.
- Carefully clean the mesh filter at the end of the hose with a fine brush.
- Now unscrew the inlet hose at the rear of the unit by hand. Using tweezers, remove the mesh filter from the Water Inlet Valve (rear) and clean it carefully.
- Reinstall the filter. Reconnect the inlet hose to the tap and to the appliance. Do not use tools to tighten the hose (hand tighten only). Open the tap and check the tightness of all connections.
Cleaning the drain pump
Fig. 16
WARNING: Risk of burns: The water may be very hot. Follow all safety precautions when draining water from the appliance and/or manually opening the Door.
If the appliance does not drain (you do not hear pumping when it should be draining) and other nearby drains, such as the sink, are working properly, the pump may be blocked by loose debris or lint and you should perform this cleaning.
- If the device has not been emptied, try emptying it:
o Turn the programme knob to "Spin Only".
o Press the Spin Button until the spin is cancelled (all Spin Speed Indicators off).
o Press the Start/Pause button. Wait for the pump to evacuate the water. If the pump is totally clogged, it will not drain and the cycle will end.
-
Turn off the faucet to prevent further water entry. Turn the appliance off and unplug it.
-
Open the drain filter cover.
-
Use the emergency drain hose (if equipped) behind the lid to drain the remaining water into a suitable container (up to approx. 20 liters / 5.3 US gal). Remove the cap from the hose, direct the end into the container and let the water drain out. When finished, replace the cap and store the hose in its housing.
-
Turn the pump filter cap anticlockwise to remove it. A small amount of residual water may come out.
o Clean the inside of the pump casing, removing any debris or foreign objects.
o Verify that the impeller at the bottom of the pump rotates freely.
o Remove lint, residue or detergent residue from the threads of the lid and its housing.
o Reassemble the filter cover by screwing it on tightly without forcing.
-
Close the Drain Filter Cover and wipe up any spilled water.
-
TROUBLESHOOTING
| Problem | Possible cause / solutions |
| There are colour and oil stains on the drum. | The device requires a maintenance wash. Run “Drum clean” without detergent and without clothes. |
| The machine emits an odour | Due to the use of rubber components, a slight rubber smell may be noticeable at first; this will gradually disappear with use. |
| The door cannot be opened | Safety protection is active: the temperature and/or water level is too high. |
| Check whether the programme has finished normally or whether there has been a power cut. | |
| Check if the child lock is activated, deactivate it if it is activated. | |
| Cancel the delayed end with the Delayed End Button. | |
| The machine is leaking from the casing. | The box is clogged with detergent and needs to be cleaned. |
| The water pressure is too high, slightly reduce the opening of the water tap and try again. | |
| The unit is tilted forward: it must be perfectly level. | |
| The machine is leaking (not in the casing) | The inlet hose is loose, tighten it at the tap and at the water inlet valve. |
| If even though tightened, it still leaks: replace the rubber washers or install them if missing. | |
| The drain hose is not properly secured. | |
| If there is a water leak inside the appliance, switch it off, turn off the tap and contact Cecotec's Official Technical Support Service. | |
| The machine does not turn on | The plug is not fully inserted into the socket or does not make good contact. |
| There is no voltage at the socket or the fuse has blown. | |
| The washing cycle does not start | The door is not properly closed. |
| The Start/Pause button has not been pressed. | |
| The water faucet has not been turned on. | |
| A deferred end has been set. | |
| Machine does not fill with water, detergent does not enter the drum or “E02” appears on the display. | The inlet hose is kinked, twisted, or crushed. |
| The inlet hose is not connected to the supply. | |
| The water pressure is too low. | |
| The tap has not been opened. | |
| There is no water supply in the dwelling. | |
| The mesh filter on the inlet hose and/or the water inlet valve is/are clogged. | |
| A delayed end has been set, so that the machine does not start the water intake until the programmed time. | |
| The Start/Pause button has not been pressed. | |
| There is already enough water in the drum. | |
| The machine discharges the water at the start of the program | It is not a fault. Do not pour water directly into the drum before starting the programme; otherwise, the machine may drain that water when the cycle begins. |
| The water level is too low during washing. | It is not a fault. This appliance uses relatively little water, the visible water level may be lower than in other models. |
| Replenishes water during the washing cycle | If the level drops, the machine automatically refills with water. |
| If the load is very large, you can replenish water several times during the wash. | |
| There is too much foam in the drum or foam overflowing from the drum | The detergent is not suitable for washing machines or is “for hand washing”. |
| Too much detergent has been used: for example, soft water requires a smaller amount. | |
| High-speed spinning is repeated multiple times | Due to the type/material of the laundry, the balancing system can distribute the load several times to extend the spin time. This is normal, it is not a malfunction. |
| Machine does not spin | Spin has been deactivated by pressing the Spin Button until all Spin Speed Indicators are off. Select a speed again. |
| The machine vibrates excessively during the spin cycle | The levelling feet have not been adjusted; the machine is unstable. |
| The transport screws, plastic separator or polystyrene packaging have not been removed. | |
| The appliance is trapped between furniture and/or walls. | |
| The load is slightly unbalanced: the appliance spins, but at a lower speed. | |
| Centrifugation effect is not as expected | With very small loads (e.g., a pair of jeans, a sweater, a bath towel), the balance protection may prevent the spinning process from being completed. |
| If the load is somewhat unbalanced, the unit will spin at a slower speed (not at the cycle default or selected speed). | |
| The machine does not drain / drains slowly or “E03” appears on the display | The end of the drain hose is positioned too high. It must be between 65 and 100 cm from the floor. |
| The pump filter is blocked. | |
| The drain hose is kinked, twisted, or crushed. | |
| The drain hose is blocked or frozen. | |
| The programme timer stops before entering the high-speed spin cycle | It is not a fault. The balancing system redistributes the load to achieve balance before the high-speed spin. During this process, the timer pauses until the machine reaches high speed. |
| The programme takes too long | The time may vary due to water pressure, inlet temperature or if the load becomes unbalanced (which automatically lengthens the process). |
| The machine is making noise | It is normal to hear the motor, pump and drum turning. |
| The washing machine touches other objects. | |
| Foreign objects (coins, hairpins, etc.) are present in the drum or tub, remove them. | |
| The machine fills and empties continuously | The top of the drain pipe is positioned too low. It must be between 65 and 100 cm from the floor. |
| The hose has been inserted too far into the standpipe. The elbow must be 100 mm from the end of the hose. | |
| The end of the hose is submerged in the drained water. | |
| Discharged water returns to the unit | If the end of the hose touches water that has already been drained (e.g. in a sink), the water may be sucked back in and damage the unit or textiles. Elevate/secure hose to prevent backflow. |
| One area of the control panel heats up | Slight warming due to the electronic components on the circuit board behind the panel; this is normal. |
| After drying, water droplets remain on the door and drum | During drying, water droplets may remain on the door. Wipe them away with a cloth. |
| The load is excessive or too thick. | |
| Poor or uneven drying | Mixing of difficult to dry fabrics (coarse fabrics/dense cotton) with easy to dry fabrics (synthetics) in the same load. |
| Too many clothes to dry. Dry clothes in batches. | |
| In “Drying only” mode, you must first separate very wet or tangled garments. | |
| Due to different types and quantities of garments, uneven drying may occur. If drying is uneven, add time or run an additional drying cycle. | |
| The faucet was turned off during drying (the condensation system needs water). | |
| Pump filter clogged during drying | |
| The drain hose is kinked, twisted, or blocked during drying | |
| General | The unit is equipped with sensors that monitor the cycle (e.g., water level, temperature, imbalances, time/progress). If the cycle ends correctly, there is normally no failure. |
Error codes
In the following cases, the microprocessor detects the fault, emits a buzzer and the panel displays the corresponding code.
| Fault codes | Type of fault | Possible cause / solutions |
| E02 | No water in | 1) Turn on the faucet and confirm that there is water supply in the house.2) Check the inlet hose: no kinks, kinks or freezing.3) Clean the mesh filters: at the end of the hose and on the appliance's water inlet valve.4) Check the mains pressure: 0.03-1.0 MPa (0.3-10 bar).5) Check that the deferred end is not active.6) Reset: turn the programme knob to OFF for 1 minute, reselect the programme and press the Start/Pause button. If E02 persists, turn off the tap, unplug the appliance and contact Cecotec's Official Technical Support Service. |
| E03 | Abnormal water drainage | 1) Try draining: select the "Spin Only" programme, press the spin button until all spin indicators turn off and press the Start/Pause button.2) Clean the pump filter as indicated in the "Cleaning and maintenance" section.3) Check the drain hose: no kinks/obstructions, end not submerged and correct height 60-100 cm from the ground.4) If the error code persists after these actions, contact Cecotec's Official Technical Support Service. |
| U4H | Door lock faultHigh drum temperature | 1) Close the door tightly (check that there is no garment in the seal).2) Soft reset: turn the programme knob to the OFF position. Next, select a programme and press the Start/Pause button.3) If you cannot open the door: wait a few minutes. If there is water in the drum, run the pump as described in step 1 of E03.4) If U4 reappears, contact Cecotec's Official Technical Support Service.1) Press the Start/Pause button to pause and wait several minutes.2) Once the temperature drops, the code disappears and the door locked indicator turns off, press the Start/Pause button to continue.3) If the code reappears, contact Cecotec's Official Technical Support Service. |
| EXX | Other errors | 1) Set the programme knob to the OFF position and unplug the appliance for 1 minute.2) Plug it back in, select the programme and press the Start/Pause button.If the error code reappears, set the programme knob to the OFF position, leave the appliance unplugged and contact Cecotec's Official Technical Support Service as soon as possible. |
Notes
- Ensure that you resolve the cause of the fault before pressing the Start/Pause button again.
If the code disappears, the device will continue the cycle. If the code persists, set the programme knob to the OFF position, unplug the appliance and contact Cecotec's Official Technical Support Service. - Remember: service charges may apply if the problem is due to improper installation.
- Failure to empty pockets may cause blockages in the pump or drain hose, or damage the machine.
- Do not wash items without a care label or that are not indicated as machine washable.
7. TECHNICAL SPECIFICATIONS
You can find more information on this model and access its database by scanning the QR code (also found on the energy label).
| Reference | EU01_129671 | EU01_129672 | EU01_129673 | EU01_129674 | EU01_129675 | EU01_129676 |
| Model | Bolero DressCode Wash&Dry 85610 | Bolero DressCode Wash&Dry 85610 Steel | Bolero DressCode Wash&Dry 85610 Titanium | Bolero DressCode Wash&Dry 106610 | Bolero DressCode Wash&Dry 106610 Steel | Bolero DressCode Wash&Dry 106610 Titanium |
| QR code |  |  |  |  |  |  |
| Rated voltage | 220 - 240 V | 220 - 240 V | 220 - 240 V | 220 - 240 V | 220 - 240 V | 220 - 240 V |
| Rated frequency | 50 Hz | 50 Hz | 50 Hz | 50 Hz | 50 Hz | 50 Hz |
| Washing capacity | 8.0 kg | 8.0 kg | 8.0 kg | 10.0 kg | 10.0 kg | 10.0 kg |
| Drying capacity | 5.0 kg | 5.0 kg | 5.0 kg | 6.0 kg | 6.0 kg | 6.0 kg |
| Rated washing power | 2000 W | 2000 W | 2000 W | 2000 W | 2000 W | 2000 W |
| Rated drying power | 1600 W | 1600 W | 1600 W | 1600 W | 1600 W | 1600 W |
| Energy efficiency class | A/D | A/D | A/D | A/D | A/D | A/D |
| Standard water pressure | 0.03-1.0 MPa | 0.03-1.0 MPa | 0.03-1.0 MPa | 0.03-1.0 MPa | 0.03-1.0 MPa | 0.03-1.0 MPa |
| Protection rating | IPX4 | IPX4 | IPX4 | IPX4 | IPX4 | IPX4 |
ENGLISH
Technical specifications may change without prior notice to improve product quality. Made in China | Designed in Spain
Technical sheets
Input method for the new energy efficiency standard (EN60456:2016 + FprAA:2020) Eco 40-60, (parameters are not set by default)
This table is for models EU01_129671 - Bolero DressCode Wash&Dry 85610, EU01_129672 - Bolero DressCode Wash&Dry 85610 Steel and EU01_129673 - Bolero DressCode Wash&Dry 85610 Titanium.
| 20°C | Cotton | Wool | Quick | |
| Rated capacity (kg) | 2 | 8 | 1 | 1 |
| Programme duration (h:min) | 0:39 | 0:57 | 0:50 | 0:15 |
| Energy consumption (kWh/cycle) | 0.24 | 1.25 | 0.20 | 0.10 |
| Water consumption (l/cycle) | 65 | 80 | 70 | 40 |
| MAX temperature (°C) | 30 | 55 | 35 | 35 |
| Remaining moisture content | 75% | 70% | 85% | 75% |
| Spin speed (rpm) | 700 | 900 | 500 | 700 |
This table is for models EU01_129674 - Bolero DressCode Wash&Dry 106610, EU01_129675 - Bolero DressCode Wash&Dry 106610 Steel and EU01_129676 - Bolero DressCode Wash&Dry 106610 Titanium.
| 20°C | Cotton | Wool | Quick | |
| Rated capacity (kg) | 2 | 10 | 1 | 1 |
| Programme duration (h:min) | 0:39 | 0:57 | 0:50 | 0:15 |
| Energy consumption (kWh/cycle) | 0.26 | 1.27 | 0.22 | 0.11 |
| Water consumption (l/cycle) | 60 | 75 | 65 | 45 |
| MAX temperature (°C) | 30 | 55 | 35 | 35 |
| Remaining moisture content | 75% | 70% | 85% | 75% |
| Spin speed (rpm) | 700 | 900 | 500 | 700 |
The Eco 40-60 programme can wash cotton laundry with normal soiling declared washable at 40 °C or 60 °C, together in the same cycle, and this programme is used to assess compliance with EU eco-design legislation;
The most energy-efficient programmes are generally those that operate at lower temperatures and for longer durations;
- Noise and remaining moisture content are influenced by the spin speed: the higher the spin speed in the spin phase, the higher the noise and the lower the remaining moisture content;
The values given for programmes other than the Eco40-60 programme and the washing and drying cycle are only indicative.
| SETTING | UNIT | VALUE | VALUE |
| Rated capacity for washing cycle, in 0.5 kg(c) intervals | kg | 8.0 | 10,0 |
| Rated capacity for the wash and dry cycle, at 0,5 kg(c) intervals | kg | 5.0 | 6.0 |
| Power consumption for ECO 40-60 programme at rated capacity ( EW,full ) | kWh/cycle | 0.801 | 0.920 |
| Power consumption for ECO 40-60 programme at half capacity ( EW,1/2 ) | kWh/cycle | 0.400 | 0.580 |
| Power consumption for ECO programme 40-60 at one-quarter of rated capacity ( EW,1/4 ) | kWh/cycle | 0.171 | 0.203 |
| Weighted energy consumption of ECO 40-60 programme ( EW ) | kWh/cycle | 0.472 | 0.513 |
| Standard energy consumption of the ECO 40-60 programme ( SCEW ) | kWh/cycle | 0.909 | 0.988 |
| Energy efficiency index of the washing cycle ( EEIW ) | — | 51.9 | 51.9 |
| Energy efficiency class | --- | A | A |
| Energy consumption per washing and drying cycle at rated capacity ( WWD,full ) | kWh/cycle | 3.201 | 3.661 |
| Energy consumption per washing and drying cycle at half load ( WW,1/2 ) | kWh/cycle | 1.776 | 2.193 |
| Weighted energy consumption per washing and drying cycle ( WWD ) | kWh/cycle | 2.631 | 3.074 |
| Weighted energy consumption per 100 washing and drying cycles ( SCEWD ) | kWh | 3.972 | 4,594 |
| Energy efficiency index of the washing and drying cycle (EEIWD) | --- | 66.2 | 66.9 |
| Energy efficiency class | --- | D | D |
| Water consumption of ECO programme 40-60 at rated capacity (Ww,full) | L/cycle | 65.3 | 74.0 |
| Water consumption of ECO 40-60 programme at half of rated capacity (Ww,1/2) | L/cycle | 40.2 | 49.0 |
| Water consumption of ECO 40-60 programme at one quarter of the rated capacity (Ww,1/4) | L/cycle | 31.3 | 36.0 |
| Washing cycle weighted water consumption (Ww) | L/cycle | 47 | 51.0 |
| Water consumption per washing and drying cycle at rated capacity (WWD,full) | L/cycle | 90.5 | 100.0 |
| Water consumption per washing and drying cycle at half rated capacity (WWD,1/2) | L/cycle | 60.0 | 72.0 |
| Weighted water consumption per washing and drying cycle (WWD) | L/cycle | 78 | 89 |
| Washing efficiency rating of ECO 40-60 programme at rated capacity (IW) | — | 1.031 | 1.031 |
| Washing efficiency rating of ECO 40-60 programme at half rated capacity (IW) | — | 1.031 | 1.031 |
| Washing efficiency rating of ECO programme 40-60 at one quarter of the rated capacity (IW) | — | 1.031 | 1.031 |
| Washing efficiency index of washing and drying cycle at rated capacity (JW) | --- | 1.031 | 1.031 |
| Washing efficiency index of washing and drying cycle at half rated capacity (JW) | --- | 1.031 | 1.031 |
| Rinsing efficiency of ECO 40-60 programme at rated capacity (IR) | g/kg | 5.0 | 5.0 |
| Rinsing efficiency of ECO 40-60 programme at half the rated capacity (IR) | g/kg | 5.0 | 5.0 |
| Rinsing efficiency of ECO 40-60 programme at one quarter of the rated capacity ( IR ) | g/kg | 5.0 | 5.0 |
| Rinsing efficiency of the wash and dry cycle at rated capacity (JR) | g/kg | 5.0 | 5.0 |
| Rinsing effectiveness of washing and drying cycle at half rated capacity ( JR ) | g/kg | 5.0 | 5.0 |
| ECO 40-60 programme duration at rated capacity ( tW ) | (h:min) | 3:38 | 3:59 |
| ECO 40-60 programme duration at half rated capacity ( tW ) | (h:min) | 2:47 | 3:00 |
| ECO 40-60 programme duration at one quarter of nominal capacity ( tW ) | (h:min) | 2:47 | 3:00 |
| Washing and drying cycle time at rated capacity ( tWD ) | (h:min) | 7:00 | 7:30 |
| Washing and drying cycle duration at half rated capacity ( tWD ) | (h:min) | 5:00 | 5:30 |
| Temperature reached for at least 5 min within the load during ECO 40-60 programme at rated capacity (T) | °C | 35 | 35 |
| Temperature reached for at least 5 min inside the load during ECO 40-60 programme at half rated capacity (T) | °C | 25 | 30 |
| Temperature reached for at least 5 min within the load during ECO 40-60 programme at one quarter of the rated capacity (T) | °C | 20 | 22 |
| Temperature maintained for minimum 5 minutes within the load during washing phase of wash and dry cycle at rated capacity (T) | °C | 25 | 30 |
| Temperature maintained for minimum 5 minutes within the load during washing phase of wash and dry cycle at half rated capacity (T) | °C | 20 | 22 |
| Spin speed in the spin phase of the ECO 40-60 programme at rated capacity (S) | RPM | 1400 | 1400 |
| Spin speed in the spin phase of the ECO programme 40-60 at half rated capacity (S) | RPM | 1400 | 1400 |
| Spin speed in the spin phase of the ECO programme 40-60 at one quarter of the nominal capacity (S) | RPM | 1400 | 1400 |
| Weighted residual moisture content after washing (D) | % | 62 | 62.9 |
| Airborne acoustic noise emissions during ECO 40-60 programme (spin phase) | dB(A) re 1 Pw | 76 | 76 |
| Power consumption in off mode ( Po ) (if applicable) | W | 0.50 | 0.50 |
| Standby mode power consumption ( Psm ) (if applicable) | W | --- | --- |
| Is information displayed in standby mode? | — | No | No |
| Standby mode power consumption ( Psm ) in mains standby conditions (if applicable) | W | ---- | --- |
| Power consumption in Delay start ( Pds ) (if applicable) | W | 4.00 | 4.00 |
8. RECYCLING OF ELECTRICAL AND ELECTRONIC EQUIPMENT
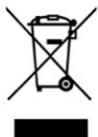
This symbol indicates that, according to the applicable regulations, the product and/or battery must be disposed of separately from household waste. When this product reaches the end of its shelf life, you should dispose of the batteries/accumulators and take them to a collection point designated by the local authorities.
For detailed information on how to properly dispose of electrical and electronic equipment and/or the corresponding batteries, consumers should contact their local authorities.
Information regarding national packaging recycling systems and their marking can be found on our website.
Compliance with the above guidelines will help protect the environment.
9. Technical support and warranty
Cecotec shall be liable to the end user or consumer for any lack of conformity that exists at the time of product delivery under the terms, conditions and deadlines established by applicable regulations.
Repairs should be carried out by qualified personnel.
If at any moment you detect any problem with your product or have any doubt, do not hesitate to contact the official Cecotec Technical Support Service at +34 96 321 07 28.
10. COPYRIGHT
The intellectual property rights over the texts in this manual belong to CECOTEC INNOVACIONES, S.L. All rights reserved. The content of this publication may not, either in part or in its entirety, be reproduced, stored in a retrieval system, transmitted or distributed by any means (electronic, mechanical, photocopying, recording or similar) without prior authorisation from CECOTEC INNOVACIONES, S.L.
11. SIMPLIFIED EU DECLARATION OF CONFORMITY
CE Cecotec Innovaciones hereby declares that this appliance complies with the essential requirements and other relevant provisions of the regulations applicable in the European Union. This appliance has been designed, manufactured and tested in compliance with required safety and quality standards. The full text of the EU Declaration of Conformity can be found on the following website: https://cecotec.es/es/information/declaration-of-conformity
FRANÇAIS
1. PIÈCES ET COMPOSANTS
Image 1
| Programmes de lavage | Temp °C (Max) | Charge de lavage maximale (kg) | Charge de séchage maximale (kg) | Lessive universelle | Lessive spéciale | Adoucissant |
| Mixte | 60 | 8 | 5 | L/P | --- | 0 |
| Coton (Cotton) | 60 | 8 | 5 | L/P | --- | 0 |
| Anti-allergique (Anti-Allergy) | 85 | 3 | 3 | L/P | --- | 0 |
| Laine (Wool) | 40 | 1 | --- | --- | L | 0 |
| Vêtements de bébé (Baby Care) | 85 | 5 | 5 | L/P | --- | 0 |
| Chemises (Shirts) | 60 | 3 | --- | L/P | L | 0 |
| Linge de lit (Bedding) | 60 | 6 | 3 | L/P | --- | 0 |
| ECO 40-60 | 40 | 8 | 5 | L/P | --- | 0 |
| 20°C | 30 | 2 | --- | L/P | --- | 0 |
| Lavage rapide (Quick Wash) | 40 | 1 | 1 | L/P | --- | 0 |
| Séchage (Drying) | --- | --- | 5 | --- | --- | --- |
| Doudounes (Down Jacket) | 40 | 2 | 2 | --- | L | 0 |
| Rinçage + Essorage (Rinse + Spin) | --- | 8 | 5 | --- | --- | 0 |
| Essorage (Spin Only) | --- | 8 | 5 | --- | --- | --- |
| Nettoyage du tambour (Drum Clean) | 85 | --- | --- | --- | --- | --- |
| Lavage intelligent (OnSmart) | 40 | 5 | --- | L/P | --- | 0 |
Ce tableau concerne les modèles EU01_129674 - Bolero DressCode Wash&Dry 106610, EU01_129675 - Bolero DressCode Wash&Dry 106610 Steel y EU01_129676 - Bolero DressCode Wash&Dry 106610 Titanium
| Programmes de lavage | Temp °C (Max) | Charge de lavage maximale (kg) | Charge de séchage maximale (kg) | Lessive universelle | Lessive spéciale | Adoucissant |
| Mixte | 60 | 10 | 6 | L/P | --- | 0 |
| Coton (Cotton) | 60 | 10 | 6 | L/P | --- | 0 |
| Anti-allergique (Anti-Allergy) | 85 | 3 | 3 | L/P | --- | 0 |
| Laine (Wool) | 40 | 1 | --- | --- | L | 0 |
| Vêtements de bébé (Baby Care) | 85 | 5 | 6 | L/P | --- | 0 |
| Chemises (Shirts) | 60 | 3 | --- | L/P | L | 0 |
| Linge de lit (Bedding) | 60 | 6 | 3 | L/P | --- | 0 |
| ECO 40-60 | 40 | 10 | 6 | L/P | --- | 0 |
| 20°C | 30 | 2 | --- | L/P | --- | 0 |
| Lavage rapide (Quick Wash) | 40 | 1 | 1 | L/P | --- | 0 |
| Séchage (Drying) | --- | --- | 6 | --- | --- | --- |
| Doudounes (Down Jacket) | 40 | 2 | 2 | --- | L | 0 |
| Rinçage + Essorage (Rinse + Spin) | --- | 10 | 6 | --- | --- | 0 |
| Essorage (Spin Only) | --- | 10 | 6 | --- | --- | --- |
| Nettoyage du tambour (Drum Clean) | 85 | --- | --- | --- | --- | --- |
| Lavage intelligent (OnSmart) | 40 | 5 | --- | L/P | --- | 0 |
FRANÇAIS
| Ciclo di lavaggio | Temp °C (Max) | Carico di lavaggio massimo (kg) | Carico di asciugatura massimo (kg) | Detergsivo universale | Detersivo speciale | Ammorbidente |
| Mix | 60 | 8 | 5 | L / P | --- | 0 |
| Cotton (cotone) | 60 | 8 | 5 | L / P | --- | 0 |
| Anti-allergy (antialler-gico) | 85 | 3 | 3 | L / P | --- | 0 |
| Wool (Lana) | 40 | 1 | --- | --- | L | 0 |
| Baby Care (vestiti da neonato) | 85 | 5 | 5 | L / P | --- | 0 |
| Shirts (camicie) | 60 | 3 | --- | L / P | L | 0 |
| Bedding (Biancheria da letto) | 60 | 6 | 3 | L / P | --- | 0 |
| ECO 4060 | 40 | 8 | 5 | L / P | --- | 0 |
| 20°C | 30 | 2 | --- | L / P | --- | 0 |
| Quick Wash (lavaggio rapido) | 40 | 1 | 1 | L / P | --- | 0 |
| Drying (asciuga-tura) | --- | --- | 5 | --- | --- | --- |
| Down Jacket (piume) | 40 | 2 | 2 | --- | L | 0 |
| Rinse + Spin (risciacquo + centrifuga) | --- | 8 | 5 | --- | --- | 0 |
| Spin Only (solo centrifuga) | --- | 8 | 5 | --- | --- | --- |
| Drum Clean (pulizia del cestello) | 85 | --- | --- | --- | --- | --- |
| OnSmart (lavaggio intelligente) | 40 | 5 | --- | L / P | --- | 0 |
Questa tabella è per i modelli EU01_129674 - Bolero DressCode Wash&Dry 106610, EU01_129675 - Bolero DressCode Wash&Dry 106610 Steel e EU01_129676 - Bolero DressCode
Wash&Dry 106610 Titanium
| Ciclo di lavaggio | Temp °C (Max) | Carico di lavaggio massimo (kg) | Carico di asciugatura massimo (kg) | Detergsivo universale | Detersivo speciale | Ammorbidente |
| Mix | 60 | 10 | 6 | L/P | --- | 0 |
| Cotton (cotone) | 60 | 10 | 6 | L/P | --- | 0 |
| Anti-allergy (antialler-gico) | 85 | 3 | 3 | L/P | --- | 0 |
| Wool (Lana) | 40 | 1 | --- | --- | L | 0 |
| Baby Care (vestiti da neonato) | 85 | 5 | 6 | L/P | --- | 0 |
| Shirts (camicie) | 60 | 3 | --- | L/P | L | 0 |
| Bedding (Biancheria da letto) | 60 | 6 | 3 | L/P | --- | 0 |
| ECO 4060 | 40 | 10 | 6 | L/P | --- | 0 |
| 20°C | 30 | 2 | --- | L/P | --- | 0 |
| Quick Wash (lavaggio rapido) | 40 | 1 | 1 | L/P | --- | 0 |
| Drying (asciugatura) | --- | --- | 6 | --- | --- | --- |
| Down Jacket (piume) | 40 | 2 | 2 | --- | L | 0 |
| Rinse + Spin (risciacquo + centrifuga) | --- | 10 | 6 | --- | --- | 0 |
| Spin Only (solo centrifuga) | --- | 10 | 6 | --- | --- | --- |
| Drum Clean (pulizia del cestello) | 85 | --- | --- | --- | --- | --- |
| OnSmart (lavaggio intelligente) | 40 | 5 | --- | L / P | --- | 0 |
| Ciclo de lavagem | Temp °C (máx.) | Carga máx. Lavagem (kg) | Carga máx. secagem (kg) | Detergente universal | Detergente especial | Amaciador |
| Mistura | 60 | 8 | 5 | L/P | --- | 0 |
| Algodão | 60 | 8 | 5 | L/P | --- | 0 |
| Anti-alergia | 85 | 3 | 3 | L/P | --- | 0 |
| Wool (lã) | 40 | 1 | --- | --- | L | 0 |
| Baby Care (roupa de bebé) | 85 | 5 | 5 | L/P | --- | 0 |
| Camisas (camisolas) | 60 | 3 | --- | L/P | L | 0 |
| Roupa de cama | 60 | 6 | 3 | L/P | --- | 0 |
| ECO 40-60 | 40 | 8 | 5 | L/P | --- | 0 |
| 20 | 30 | 2 | --- | L/P | --- | 0 |
| Lavagem rápida | 40 | 1 | 1 | L/P | --- | 0 |
| Secagem | --- | --- | 5 | --- | --- | --- |
| Casaco de penas | 40 | 2 | 2 | --- | L | 0 |
| Enxágue + Centrifugação | --- | 8 | 5 | --- | --- | 0 |
| Spin only (apenas centrifugação) | --- | 8 | 5 | --- | --- | --- |
| Drum clean (limpeza do tambor) | 85 | --- | --- | --- | --- | --- |
| OnSmart (lavagem inteligente) | 40 | 5 | --- | L/P | --- | 0 |
Esta tabela é para os modos EU01_129674 - Bolero DressCode Wash&Dry 106610, EU01_129675 - Bolero DressCode Wash&Dry 106610 Steel e EU01_129676 - Bolero DressCode Wash&Dry 106610 Titanium
| Ciclo de lavagem | Temp °C (máx.) | Carga máx. Lavagem (kg) | Carga máx. secagem (kg) | Detergente universal | Detergente especial | Amaciador |
| Mistura | 60 | 10 | 6 | L / P | --- | 0 |
| Algodão | 60 | 10 | 6 | L / P | --- | 0 |
| Anti-alergia | 85 | 3 | 3 | L / P | --- | 0 |
| Wool (lã) | 40 | 1 | --- | --- | L | 0 |
| Baby Care (roupa de bebê) | 85 | 5 | 6 | L / P | --- | 0 |
| Camisas (camisolas) | 60 | 3 | --- | L / P | L | 0 |
| Roupa de cama | 60 | 6 | 3 | L / P | --- | 0 |
| ECO 40-60 | 40 | 10 | 6 | L / P | --- | 0 |
| 20 | 30 | 2 | --- | L / P | --- | 0 |
| Lavagem rápida | 40 | 1 | 1 | L / P | --- | 0 |
| Secagem | --- | --- | 6 | --- | --- | --- |
| Casaco de penas | 40 | 2 | 2 | --- | L | 0 |
| Enxaguamento + Centrifugação | --- | 10 | 6 | --- | --- | 0 |
| Apenas centrifugação | --- | 10 | 6 | --- | --- | --- |
| Drum clean (limpeza do tambor) | 85 | --- | --- | --- | --- | --- |
| OnSmart (lavagem inteligente) | 40 | 5 | --- | L / P | --- | 0 |
Fig./Img./Abb./Afb./Rys.1

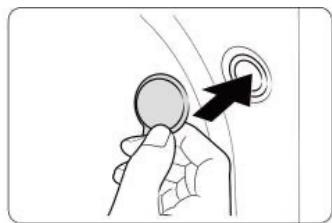
Fig./Img./Abb./Afb./Rys. 2
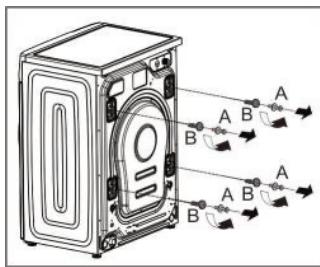
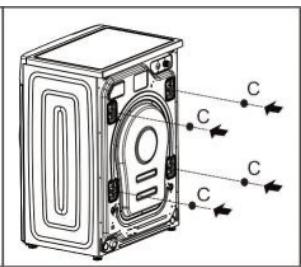
Fig./Img./Abb./Afb./Rys. 3


Fig./Img./Abb./Afb./Rys. 5


Fig./Img./Abb./Afb./Rys. 6
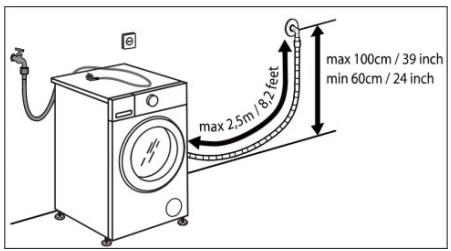
Fig./Img./Abb./Afb./Rys. 7
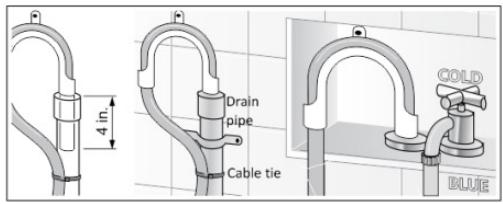
Fig./Img./Abb./Afb./Rys. 8

Fig./Img./Abb./Afb./Rys. 9

Fig./Img./Abb./Afb./Rys. 10
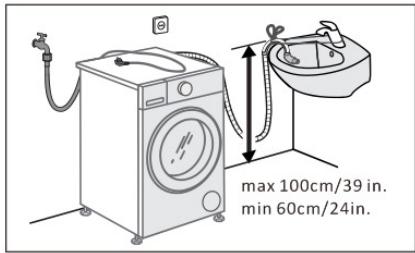
Fig./Img./Abb./Afb./Rys. 11

Fig./Img./Abb./Afb./Rys. 12

Fig./Img./Abb./Afb./Rys. 13

Fig./Img./Abb./Afb./Rys. 14

Fig./Img./Abb./Afb./Rys. 15
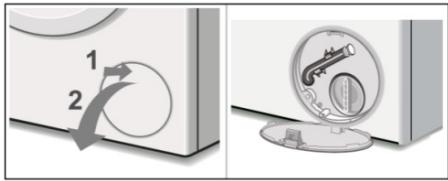
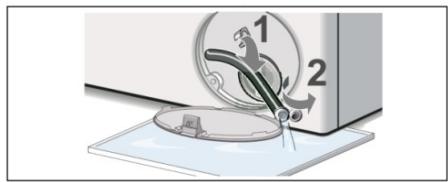
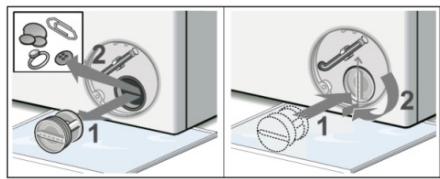
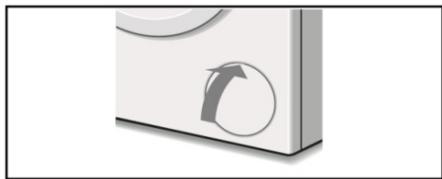
Fig./Img./Abb./Afb./Rys. 16
www.cecotec.es
- SOMMAIRE
- INSTRUCTIONS DE SÉCURITÉ
- ESPAÑOL
- NOTE
- BEFORE USE
- BOX CONTENTS
- INSTALLATION
- REMOVING THE TRANSPORT BOLTS
- PROCEDURE
- FIG. 3
- LOCATION REQUIREMENTS
- SPACE REQUIREMENTS
- LEVELLING THE APPLIANCE
- FIG. 5
- ADJUSTABLE FEET LEVELLING PROCEDURE
- ENGLISH
- WATER SUPPLY HOSE CONNECTION
- FIG. 6
- DRAIN HOSE CONNECTION DRAIN OUTLET HEIGHT
- FIG. 7
- CONNECTION TYPES
- VERTICAL TUBE
- CONNECTION TO THE SINK TRAP
- FIG. 9
- WASHBASIN OR SINK
- DRAINAGE INSTALLATION RECOMMENDATIONS
- ELECTRICAL CONNECTION
- GENERAL ELECTRICAL USE AND SAFETY
- OPERATION
- CONTROL PANEL
- FIG. 12
- DISPLAY AND INDICATORS
- PREPARING THE LAUNDRY (BEFORE WASHING)
- PREPARING THE LAUNDRY FOR DRYING (DRYING FUNCTION ONLY)
- TEXTILES THAT MUST NOT BE TUMBLE-DRIED
- SORTING BY COLOUR AND SOIL LEVEL
- SOIL LEVEL (TO HELP SELECT THE PROGRAMME AND TEMPERATURE)
- SORTING BY CARE LABEL
- SPECIAL FUNCTIONS AND CYCLES
- ONSMART CYCLE
- DRYING
- WASHING + DRYING PROGRAMME
- ONLY DRYING PROGRAMME
- DOWN JACKET PROGRAMME WITH DRYING
- PRECAUTIONS FOR THE DRYING PROGRAMME
- STEAM FUNCTION
- DELAY END FUNCTION
- CHILD LOCK FUNCTION
- ADD GARMENTS DURING PROGRAMME
- BUZZER CANCELATION (ACOUSTIC)
- LOAD BALANCING SYSTEM
- INNER DRUM LIGHT
- DAILY USE. PREPARING THE LAUNDRY
- HOW TO USE THE APPLIANCE
- FIG. 13 KEY
- PAUSE AND OPEN THE DOOR (IF NECESSARY)
- CANCEL A RUNNING PROGRAMME (IF NECESSARY)
- CLEANING AND MAINTENANCE
- WARNING: RISK OF ELECTRIC SHOCK
- CUTTING OFF WATER AND ELECTRICITY SUPPLIES
- CLEANING THE APPLIANCE EXTERIOR
- DRUM CLEANING
- DESCALING (LIMESCALE REMOVAL)
- DOOR AND DRUM CARE
- CHECKING THE WATER INLET HOSE
- CLEANING THE DETERGENT DRAWER
- FIG. 14
- FIG. 15
- FIG. 16
- NOTES
- TECHNICAL SPECIFICATIONS
- TECHNICAL SHEETS
- RECYCLING OF ELECTRICAL AND ELECTRONIC EQUIPMENT
- TECHNICAL SUPPORT AND WARRANTY
- COPYRIGHT
- SIMPLIFIED EU DECLARATION OF CONFORMITY
- FRANÇAIS
- PIÈCES ET COMPOSANTS
- IMAGE 1
Brand : CECOTEC
Model : Bolero Dresscode Washdry 106610
Category : Refrigerator