
DVD 569 - DVD player CLATRONIC - Free user manual and instructions
Find the device manual for free DVD 569 CLATRONIC in PDF.

| Product Type | DVD Player / Compact Audio System |
| Brand | CLATRONIC |
| Model | DVD 569 |
| Dimensions (W x D x H) | 326 x 360 x 60 mm |
| Weight | 3.6 kg |
| Power Supply | AC 220-240 V, 50 Hz |
| Power Consumption | 40 W |
| Supported Disc Formats | DVD, CD, MP3, JPEG (Photo CD) |
| Video System | PAL / NTSC |
| Main Functions | DVD/CD playback, AM/FM tuner with RDS, 5.1-channel amplifier (10W x 5 + 30W subwoofer), AUX1/AUX2 inputs, coaxial and optical digital audio inputs |
| Video Outputs | Composite, S-Video, YUV, SCART (RGB), P-Scan |
| Audio Outputs | Analog 2-channel, coaxial and optical digital, 3.5 mm headphone |
| Tuner | FM (87.5-108 MHz) and AM (522-1620 kHz), 50 presets each |
| Care and Cleaning | Clean with a soft, dry cloth. Do not use solvents. For discs, wipe radially with a damp cloth. |
| Safety | Class 1 laser product. Do not open the casing. Keep away from moisture and heat sources. |
| Spare Parts and Repairability | Repair by a qualified professional. For wear parts (remote control, etc.), contact after-sales service. |
| General Information | Manual available in several languages (FR, DE, EN, ES, CZ). 24-month warranty. |
Frequently Asked Questions - DVD 569 CLATRONIC
User questions about DVD 569 CLATRONIC
0 question about this device. Answer the ones you know or ask your own.
Ask a new question about this device
Download the instructions for your DVD player in PDF format for free! Find your manual DVD 569 - CLATRONIC and take your electronic device back in hand. On this page are published all the documents necessary for the use of your device. DVD 569 by CLATRONIC.
USER MANUAL DVD 569 CLATRONIC
High quality digital audio
PROGRAMM:SPUR (01-08)
2ch mixed Output: 1 System
Kenndaten des Audio-Signal-Outputs:
- Frequenzresponds:
DVD (linear audio): 4Hz-22kHz (48kHz Muster)
4Hz-22kHz (96kHz Muster)
CD audio: 2Hz-20kHz (EIAJ) - S/N ratio CD audio: 115dB (EIAJ)
- Dynamikbereich: DVD (linear audio): 102dB CD audio: 99dB (EIAJ)
- Totale harmonische Verzerrung: CD audio: 0.025% (EIAJ)
Remote control unit 3/21
Safety informations 22
Precautions 22
Features 23
Selecting the type of disc compatible with your TV 23
Connection of equipment 24
Connection to TV 24
Connection to ANTENNA 24
Connection to the speaker system 25
Connect to other AV equipment 25
Headphone connection 25
Installation of the Surround Loudspeakers 25
Remote control preparation 26
Basic operation:
Preparations 26
Basic play 26
Standby 26
Stopping play 27
Volume adjust 27
Every channel adjust 27
Reverberation mode select 27
EQ function 27
Skipping + or - 27
Fast FWD/RWD 27
Pause/Step picture 27
Slow play 27
Control reference guide
Front cabinet
-
STANDBY SWITCH
-
DISPLAY WINDOW
-
REMOTE SENSOR
-
STANDBY INDICATOR
-
VOLUME CONTROL
-
DISC TRAY
-
PHONES JACK
-
FUNCTION BUTTON
-
BAND BUTTON
10.1 PREV BUTTON
11.▶NEXT BUTTON
- STOP BUTTON
13.II PAUSE BUTTON
14.▶ PLAY BUTTON
15.▲ OPEN/CLOSE BUTTON
Back cabinet
-
VIDEO OUTPUT JACK
-
DVD YVIDEO OUTPUT JACK
-
FM ANTENNA INPUT JACK
-
AUX1 V1/R1/L1 INPUT JACK
-
AM ANTENNA INPUT JACK
-
COAXIAL DIGITAL AUDIO OUTPUT JACK
-
COAXIAL DIGITAL AUDIO INPUT JACK
-
EURO SCART OUTPUT JACK
-
5.1 CH SPEAKER OUTPUT JACK
-
POWER SWITCH BUTTON
11.DVD MONITOR S-VIDEO OUTPUT JACK
12.DVD Cb/Pb VIDEO OUTPUT JACK
13.DVD Cr/PrVIDEO OUTPUT JACK
14.AUX2 V2/R2/L2 OUTPUT JACK
15 LINE L/R OUTPUT JACK
16 OPTICAL DIGITAL AUDIO OUTPUT JACK
17 OPTICAL DIGITAL AUDIO INPUT JACK
MENU and TITLE 27
Changing SUBTITLE language 28
Changing audio soundtrack language 28
Viewing from another ANGLE 28
On screen DISPLAY 28
Repeat 29
Random 29
Repeat A-B 29
Search function 29
How to use CLR button 29
ZOOM picture 29
PROGRAM playback 29
Mute function 30
Playback of MP3 files 30
VIDEO OUT MODE SELECT 30
FUNCTION select 30
Presetting Radio Stations and listening 30
RDS (radio data system) DISPLAY function 31
PTY (program type) SEARCH function 31
Digital in work status 31
AUX1,AUX2 work status 31
Initial setting:
GENERAL SETUP 32
AUDIO SETUP 33
VIDEO SETUP 33
PREFERENCE SETUP 34
34
For your reference:
Disc handling and maintenance 35
Troubleshooting 36
Definition of terms 37
Specifications 37
REMOTE CONTROL UNIT
-
STANDBY BUTTON
-
UP CURSOR BUTTON
-
LEFT CURSOR BUTTON
-
ENTER/PLAY BUTTON
-
STOP BUTTON
-
DOWN CURSOR BUTTON
-
SKIP BUTTON
-
SKIP BUTTON
-
MENU BUTTON
-
DISPLAY BUTTON
-
NUMERIC BUTTON
12.PROGRAM BUTTON
-
A—B REPEAT BUTTON
-
EQ BUTTON
-
RANDOM BUTTON
-
VOL - BUTTON
-
VOL + BUTTON
-
LEVEL BUTTON
-
TONE BUTTON
-
OPEN/CLOSE BUTTON
-
RIGHT CURSOR BUTTON
-
PAUSE/STEP BUTTON
23.▶ FAST FWD BUTTON
-
FAST RWD BUTTON
-
SETUP BUTTON
-
PTY/RETURN BUTTON
-
V-MODE BUTTON
28.SEARCH BUTTON
-
SLOW BUTTON
-
TITLE BUTTON
-
ANGLE BUTTON
-
REPEAT BUTTON
-
SUBTITLE BUTTON
-
ZOOM BUTTON
-
AUDIO BUTTON
36 MUTE BUTTON
-
FUNC BUTTON
-
BAND BUTTON
Dear Customers
May we take this opportunity to thank you for purchasing this compact AV system.
We strongly recommend that you carefully study the operating instructions before attempting to operate the unit and that you note the listed precautions.
Safety information
Note:
This unit can be used only where the power supply is AC 220-240V, 50Hz. It cannot be used elsewhere.
CAUTION:
DVD PLAYER IS A CLASS 1 LASER PRODUCT. HOWEVER THIS PLAYER USES A VISIBLE LASER BEAM WHICH COULD CAUSE HAZARDOUS RADIATION EXPOSURE IF DIRECTED. BE SURE TO OPERATE THE PLAYER CORRECTLY AS INSTRUCTED.
- WHEN THIS PLAYER IS PLUGGED TO THE WALL OUTLET, DO NOT PLACE YOUR EYES CLOSE TO THE OPENINGS TO LOOK INTO THE INSIDE OF THIS PLAYER.
- USE OF CONTROLS OR ADJUSTMENTS OTHER THAN THOSE SPECIFIED HEREIN MAY RESULT ON HAZARDOUS RADIATION EXPOSURE.
DO NOT OPEN COVERS OR ATTEMPT TO REPAIR THIS PRODUCT BY YOURSELF. ALWAYS REFER SERVICING TO QUALIFIED PERSONNEL.
WARNING:
- TO REDUCE THE RISK OF FIRE OR ELECTRIC SHOCK, DO NOT EXPOSE THIS EQUIPMENT TO RAIN OR MOISTURE.
- TO REDUCE THE RISK OF FIRE, ELECTRIC SHOCK OR PICTURE & SOUND INTERFERENCE, USE THE RECOMMENDED ACCESSORIES ONLY.
This product incorporates copyright protection technology that is protected by method claims of certain U.S. patents and other intellectual property rights owned by Macrovision Corporation and other rights owners. Use of this copyright protection technology must be authorized by Macrovision Corporation, and is intended for home and other limited viewing uses only unless otherwise authorized by Macrovision Corporation. Reverse engineering or disassembly is prohibited.
Manufactured under license from Dolby Laboratories. "Dolby", "Pro Logic" and the double-D symbol are trademarks of Dolby laboratories. Confidential Unpublished Works, Copyright 1992-1997 Dolby laboratories, Inc. All rights reserved.
Precautions
Please read these precautions before operating this unit.
Power cord protection
To avoid a malfunction of this product and to protect against electric shock, fire or personal injury, please observe the following.
- Hold the plug firmly when connecting or disconnecting the AC power supply to this unit.
- Do not connect or disconnect the AC power supply when your hands are wet.
- Keep the AC power cord away from heating appliances.
- Never put heavy objects on the power cord.
- Do not attempt to repair or reconstruct the power cord in any way.
Placement
Avoid placing the unit in areas of:
- Direct sunlight.
High temperature (ov er 35^ ) or high humidity (over 90% )
High levels of dust
The internal parts may be damaged as a result.
Non-use Periods
- When not in use, switch off the unit.
- When left unused for a long period of time, the unit should be unplugged from the household AC supply.
Foreign Objects
- Touching internal parts of this unit is dangerous and may damage the player. Never attempt to disassemble the unit.
- Do not put any foreign objects on the disc tray.
Keep away from water / magnetic fields
Keep the unit away from flower vases, tubs, sinks, etc. If liquids are spilled into the unit, serious damage will occur.
- Do not place magnetic objects (such as speakers) close to this unit.
Stacking
- Place the unit in a horizontal position. Do not place anything heavy on top of it.
Do not place the unit on amplifiers or other appliances which may generate heat.
Condensation
Moisture may form on the lens in the following conditions: -
- Immediately after a heater has been turned on.
In a steamy or very humid room. - When the unit is moved from a cold environment to a warm one.
If moisture forms inside this unit, it may not operate properly. In this case, turn on the power and wait about one hour for the moisture to evaporate.
If there is noise interference on your TV channels
Depending on the reception conditions of the broadcast, interference may appear on the TV while you are watching a channel with the DVD player on. This is not a malfunction of the unit or the TV. Should this occur, simply switch off the DVD player.
IMPORTANT
AS SOON AS THE EQUIPMENT HAS BEEN CONNECTED, PLEASE REFER TO THE INITIAL SETTINGS CHAPTER AT PAGE 31.
Features
6 function select:
DVD, TUNER, AUX1, AUX2, COAXIAL, OPTICAL
Fully compatible with DVD,CD-R,CD-I ,Phone-CD and MP3 DISC.
Zoom of smooth scan/still picture.
Full function remote control.
AM/FM band tuner with RDS receiving.
AUX1/AUX2 external video and 2ch audio input or external Coxial/optical digital audio input
6ch digital audio amplify:
power output: 10 W X 5 + 30 W (subwoofer).
Separate level adjustment: every channel.
Seven mode reverberation.
Seven mode EQ.
DVD: a completely new dimension in video entertainment
- Subtitles may be displayed in one of a maximum of 32 languages.
- The audio soundtrack can be heard in up to 8 languages.
- The multi-angle function allows you to choose the viewing angle of which scenes were shot from many different angles (limited to DVD discs recorded with multiple camera angles).
The number of the languages recorded is dependent on the software.
High quality digital audio
- The Dolby Digital/MPEG2 audio/Linear PCM decoder is built into the player which makes it possible to enjoy Multi-Channel Surround sound.
- With linear PCM sound of a 48 kHz/16 bit through 96 kHz/24 bit, audio quality exceeding that of Audio CD becomes possible.
- With linear PCM sound of a 48kHz / 16 bit through 96kHz / 24 bit, audio quality exceeding that of Audio CD becomes possible.
Many convenient features
- Direct access of favorite scenes (title/chapter/time/track search).
- Parental lock setting to prevent play of discs unsuitable for some audiences. (DVD only)
Compatible with PAL DVD and NTSC DVD
- This player can play discs recorded in either PAL or NTSC format. However, the player must be connected to a Multi-system TV to play both PAL DVD and NTSC DVD.
The use of a Multi-system TV is recommended.
Compatible with audio CDs as well as DVD.
Disc formats supported by this player:
MP3
CD recorded in MP3 file

DVD (8 cm disc/12 cm disc)

CD (8 cm disc/12 cm disc)

CD recorded in JPEG or Photo CD
Selecting the type of disc compatible with your TV
Both DVD discs have material recorded in either PAL or NTSC format. Refer to the table below to select the disc type compatible with your TV.
| The type of connected TV | Disc | TV Monitor |
| Multi-system | PAL NTSC | Played in the PAL-System. Played in the NTSC-System. |
| NTSC | PAL NTSC | No clear images are showed on the screen. Played in the NTSC-System. |
| PAL | PAL NTSC | Played in the PAL-System. No clear images are showed on the screen. |
CONNECTION OF EQUIPMENT
Connection to TV
- When playing DVD disc, there are several ways to connect as below:
- Connect VIDEO input terminal of TV set to DVDVIDEO output terminal (1 see Back cabinet) of this unit with video connection cable (yellow).
- When the TV set has S-VIDEO input terminal, connect S-VIDEO input terminal of TV to DVD S-VIDEO output terminal (11, see Back cabinet) of this unit with S-video connection cable.
- When the TV set has EURO SCART input terminal, connect EURO SCART input terminal of TV to DVD EURO SCART output terminal (8, see Back cabinet) of this unit with EURO SCART connection cable.
- When the TV has Y/Cb/Cr or Y/Pb/Pr input termial, connect Y/Cb/Cr or Y/Pb/Pr input termial of TV to DVD Y/(Cb/Pb)/(Cr/Pr) output termial (2,12,13 see Back cabinet) of this unit with Y/Cb/Cr or Y/Pb/Pr connection cable.
- When AUX1, 2 audio/video input are applied, only connect VIDEO input terminal of TV set to VIDEO output V terminal (1, see Back cabinet) of this unit with VIDEO connection cable (yellow), or connection EURO SCART input terminal of TV to DVD EURO SCART output terminal (25, see Back cabinet) of this unit with EURO SCART connection cable.
Connection to ANTENNA
- Connect the enclosed connection terminal of FM ANTENNA to FM input jack (3) of this unit.
- Connect the enclosed connection terminal of AM ANTENNA to AM ANTENNA input jack (5) of this unit (shield lead (black) connects to the "ground" terminal, core lead (white) connects to the AM terminal.).
Note:
- In order to prevent the interference of noise, please leave away the enclosed AM antenna cable from this unit and adjust the direction to get the best receiving effect.
- FM antenna cable should be extended fully and adjust the direction to get the best receiving effect.
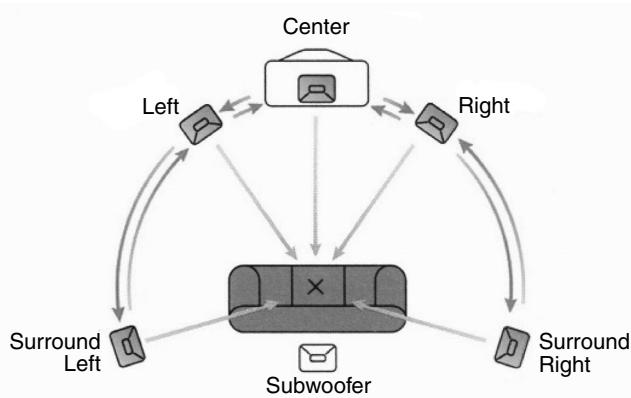
The ideal loudspeaker arrangement for the perfect cinema experience.
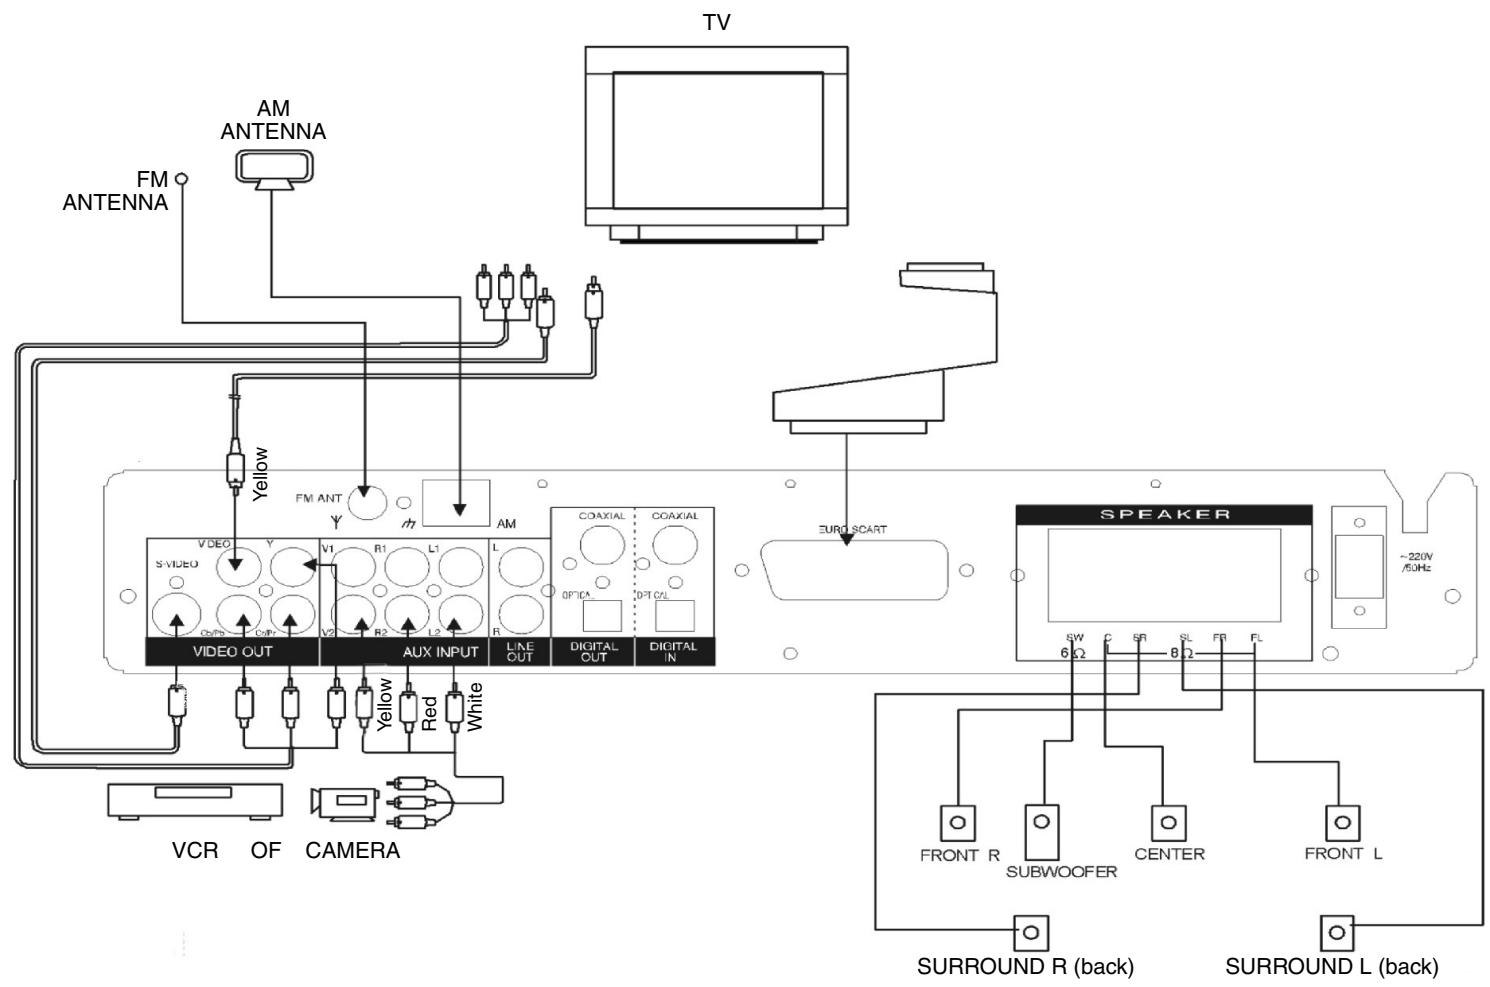
Connection to the speaker system
Connect a to the
Front L speaker FL Jack
FR Jack
CENTER speaker C Jack
SURROND L speaker SL Jack
SURROND R speaker SR Jack
SUBWOOFER speaker SW Jack
NOTE:
- This unit should connect to speaker system with 8 impedance and the maximal power 10 W except that SUBWOOFER connects to speaker with 6 and the maximal power of every speaker should not less than 30 W.
- Connect "+" terminal (red) of the speaker to "+" output terminal (red) of this unit. Connect "-" terminal (black) of the speaker to "-" output terminal (black) of this unit.
- Connect the terminal wire tightly to prevent several copper wire leave out to create short circuit.
- Shut down the power of this unit before connecting the speaker system.
Connect to other AV equipment
- When other AV signal source are necessary to connect to this unit, use video cable (yellow) and audio cable(red and white) to connect the video output terminal and audio L ,R output terminal of other AV equipment such as VCR ,CAMERA to AUX1 V1/R1/L1 input Jack or AUX2 V2/R2/L2 input Jack of this unit.
- When needing to rebroadcast or record AV signal of this unit, please connect the video input terminal and audio L, R input terminal of rediffusion or record equipment such as Amplifier ,VCR to AV V/R/L output Jack of this unit.
- When this unit is needed to output digital audio signal to other equipment to record or play, connect the coaxial or optical input terminal of other equipment to coaxial or optical output Jack of this unit with coaxial or optical connection cable.
- When digital audio signal of other equipment is needed to input this unit to play, connect coaxial or optical output terminal of other equipment to coaxial or optical input jack(7.17)of this unit with coaxial or optical connection cable.
Headphone connection
The "PHONES" socket is suitable for all commercially available headphones with a 3.5 millimetre jack plug. For other plugs it is possible to buy the corresponding adapters in specialist shops.
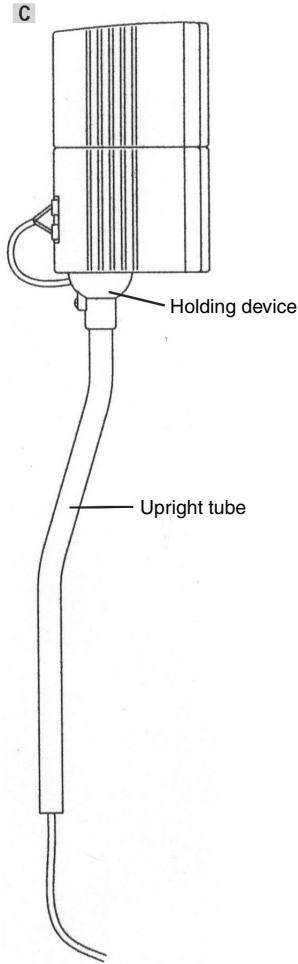
Installation of the Surround Loudspeakers
- Pass the loudspeaker cable through the mounting device as shown in illustration A. Please allow 100mm of the cable to protrude out of the holding device.
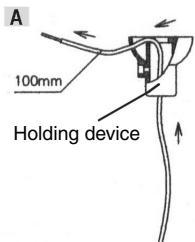
- Position the loudspeaker on the holding device and fix it in place with the screw - see illustration B.
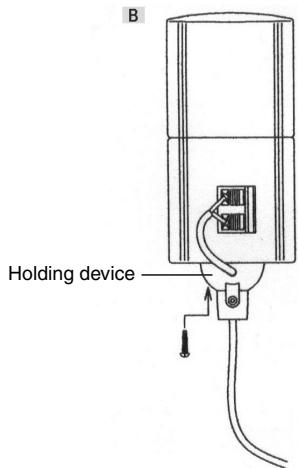
- Now pass the loudspeaker cable through the upright tube and place the holding device on top as shown in illustration C.
Remote control preparation
Battery installation (A)
Insert the batteries while observing the correct (+) and (-) polarities as illustrated.
Service life of batteries
- The batteries normally last for about one year although this depends on how often and for what operations the remote control is used.
- If the remote control unit fails to work even when it is operated near the player, replace the batteries.
- Use 2 x 'AA' type batteries.
Notes:
- Do not use rechargeable (Ni-Cd) batteries.
- Do not attempt to recharge, shot-circuit or disassemble batteries. Never place batteries close to a heat source such as radiators or heaters.
- Dispose of batteries in a responsible manner. Never throw batteries on a fire.
- Do not drop or step on the remote control unit. This may damage the parts or lead to malfunction.
- Do not mix old and new batteries.
- If the remote control unit is not going to be used for long time, always remove the batteries to prevent leakage.
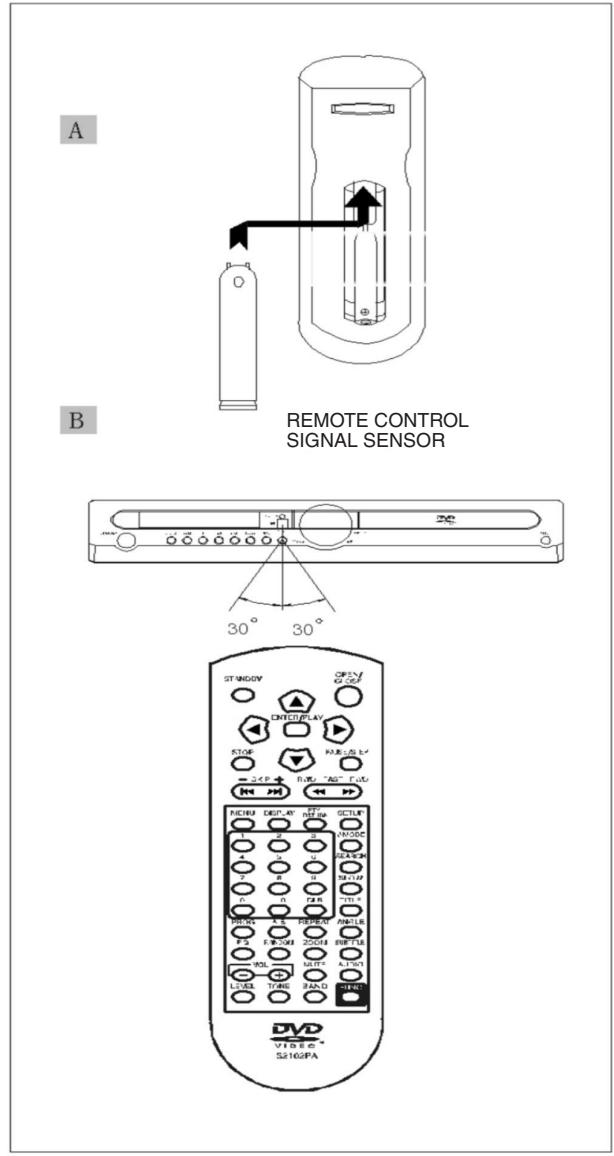
Remote control operation range (B)
Point the remote control unit no more than about 7m from the remote control sensor and within 60^ from the front of the unit.
- The operating distance may vary according to the brightness of the room.
Notes:
- Do not point bright lights at the remote control sensor.
- Do not place objects between the remote control unit and the remote control sensor.
- Do not use this remote control unit while simultaneously operating the remote control unit of any other equipment.
Basic operation
Preparations
- Connect to the TV set, turn on the POWER and set the TV/AV switch of TV to AV mode
Basic play
- Press POWER SWITCH button by the back-cabinet unit to switch on the power. VFD display "DVD". The unit is in DVD play mode.
- Press OPEN/CLOSE button by the front-cabinet unit or remote control unit to open the disc tray.
- Place a disc onto the disc tray. Hold the disc without touching either of its surfaces, position it with the printed side facing up, align it with the guides and place it on the disc tray.
-
Press the OPEN/CLOSE button again or PLAY on the front-cabinet unit or remote control will close the disc tray and playback.
-
If the disc is a DVD, the player will automatically play.
- If the disc is a CD, the player will automatically play.
- In case of interactive DVDs with playback control, a menu screen appears on the TV, with DVDs, you can use CURSOR to select which item you want to enjoy and press ENTER key.
STANDBY
Press STANDBY button on the front-cabinet or the remote control unit to switch the unit from ON to STANDBY mode. In standby mode, the unit is still consuming a small amount of power. Press STANDBY button again for resume the unit.
Note:
- The disc continues to rotate while the menu is displayed even after the player has finished playing a particular item. When no further selections are to be played, be sure to press the STOP button to clear the menu display.
- If the disc is placed in the tray upside down (and it is a single sided disc), the DVD display will indicate "NO DISC".
For your reference:
When appears while a button is being operated, it means that the corresponding operation is prohibited by the player or the disc.
Stopping play
Press STOP
For you convenience:
Memory Stop. DVDs can utilize a function called Memory Stop. This allows you to temporarily stop a movie and restart it from the same point later. While playing a disc, pressing STOP button once will set the player into Memory Stop mode. At this point, pressing PLAY button re-starts the movie from the same point. Pressing STOP button a second time will stop the disc completely (i.e. the Stop Memory is lost). Note that some DVD discs will not allow the use of Memory Stop.
VOLUME ADJUST
Turn the Volume knob by the front cabinet unit or press VOL+,-- button on the remote control unit to adjust volume. The volume level is showed from MIN 0 to MAX 50 on the VFD screen. The volume of this unit is set to 25, once the power is ON.
EVERY CHANNEL ADJUST
Press LEVEL button on the remote control unit, it shows circularly on the VFD screen as fellows:
| V-FL | → | V-FR | → | V-LS |
| ↑ | ↓ | |||
| V-SW | ← | V-C | ← | V-RS |
When one item is showed on the VFD, press VOL+, button to adjust its level. There are ten levels up and down for every channel volume level.
Reverberation mode select
Press TONE button on the remote control unit, it shows circularly on the VFD screen as fellows:
| OFF | → CONCERT | → | LIVING | → | HALL |
| ↑ | ↓ | ||||
| CHRCH | ← ARENA | ← | CAVE | ← | BATH |
- The adjustment of tone can be memorized after the power is turned off. The function is unactivated in the TUNER status.
EQ function
When playing, press EQ button on the remote control unit, VFD screen Display as follow:
| SOFT → NONE → ROCK → POP ↑ CLASSIC ← TENO← DACE ← LIVE |
The adjustment of EQ can be memorized after the power is turned off.
The function is unactivated in the TUNER status.
Skipping ^+ or -
Skipping +
Press SKIP+ button on remote control unit or press NEXT button on the front-cabinet unit during play. A chapter (DVD) or a track (CD) is skipped each time the button is pressed.
Skipping -
Press skip- button on remote control unit or press PREV button on the front-cabinet unit during play.
When the button is pressed once midway through a chapter/track, a chapter/track will be skipped to previous chapter/track each time the button pressed.
Fast FWD/RWD
Using either the Remote Control, press FAST FWD (▶) or FAST RWD (▲) during play.
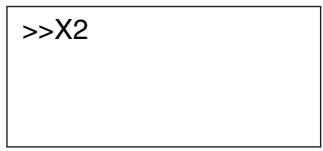
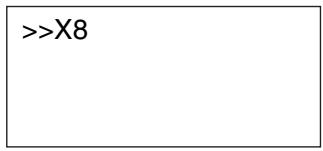
For you reference:
Press FAST FWD or FAST RWD button once, the disc will be played forward or backward at double (x2) speed. With each subsequent press, the disc will be played back at x4, x8, x16 or x32 speed and PLAY. Press PLAY button to return to normal play.
Pause/Step picture
Press PAUSE/STEP during play.


For your reference:
- When playing, pressing the PAUSE button pause playback. Press the PAUSE button again to enter step status. The picture will go ahead frame by frame. To return to normal play, press the PLAY button.
SLOW PLAY
Press SLOW button when playing, you can play the disc ahead or back at 1/2, 1/4, 1/8, 1/16 of normal speed. If you want stop it, you can press PLAY button to play normally again.
MENU and TITLE
Press MENU or TITLE by the remote control unit
DVD discs usually are divided into several titles and subdivided into chapters.
- Press TITLE on the remote and the disc playing will automatically return to the title program. Press the CURSOR buttons on the remote to select the option, then press ENTER button to play it. Note it is possible that some DVD discs will not have this function.
- Press MENU button on the remote, the disc playing will automatically return to the chapter menu. Press CURSOR buttons on the controller to select chapter and then press the ENTER button to play.
Changing SUBTITLE language [DVDs only]
- It is possible to change the subtitle language from the one selected, if available. This operation works only with discs on which multiple subtitle languages have been recorded.
- Press the SUBTITLE button on the remote. The alternative language subtitle will appear with each press,
, , , (The different disc have different display.)
![CLATRONIC DVD 569 - Changing SUBTITLE language [DVDs only] - 1](/content/2019/07/157802/images/c6f22729294b37041f41601eaef5eb35b6e5a62eedb7386ba19defad8d8b8ca8.jpg)
- When no subtitles are recorded, “ ” will be displayed on the TV screen.
For your reference:
If the subtitle language selected by you is not available on the DVD, the standard language of the DVD is played back.
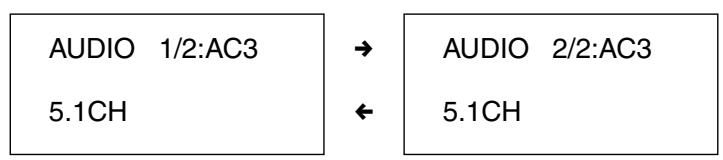
Changing the audio soundtrack language
DVD:
- It is possible to change the audio soundtrack language from the default standard to another, if available. This operation works only with discs on which different audio soundtrack languages are recorded.
Some DVDs have multi-audio output function. Pressing the AUDIO button on the controller repeatedly selects the available audio tracks.
When no audio soundtrack language are recorded, "O" will be displayed on the TV screen.
CD:
For CD pressing the AUDIO button on the controller repeatedly selects the available audio tracks.
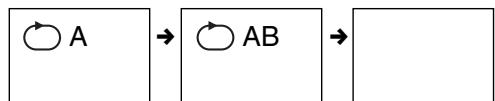
Viewing from another ANGLE [DVDs only]
- Some DVDs may contain scenes that have been shot simultaneously from a number of different angles. For these discs, the same scene can be viewed from each of these different angles using the ANGLE button. The recorded angles will differ depending on the disc being played.
- When playing a DVD with multi-angle viewing. For example, if the disc has two angles available, pressing the ANGLE button on the controller will step you through all available views. The screen OSD will show 1/3 then 2/3 then 3/3 and then back to 1/3 again etc.
![CLATRONIC DVD 569 - Viewing from another ANGLE [DVDs only] - 1](/content/2019/07/157802/images/d293b3009be748014125d99f24e6e0106026502aba896b332557c9a1966c0885.jpg)
![CLATRONIC DVD 569 - Viewing from another ANGLE [DVDs only] - 2](/content/2019/07/157802/images/4f4f800db6d9c39fbb31540db0be77eb6d448704163ba1458f84a24e9b4aca02.jpg)
- When no multi-angle are recorded, “ ” will be displayed on the TV screen.
On screen DISPLAY
During playback, you can press the DISPLAY button on the remote to show the various information available.
- For DVDs, the DISPLAY function button will allow you to view:

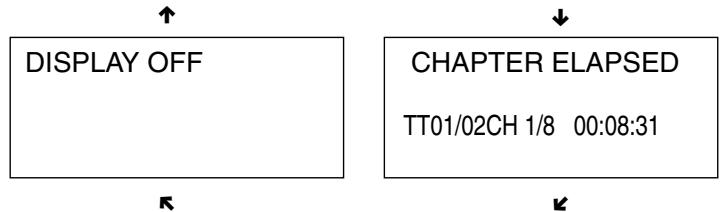
CHAPTER REMAIN TT 01/02CH 1/8 00:01:57
- For CD discs, the DISPLAY function allows you to view follows:
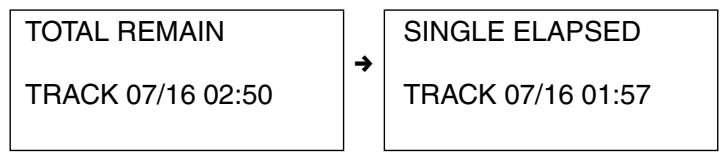
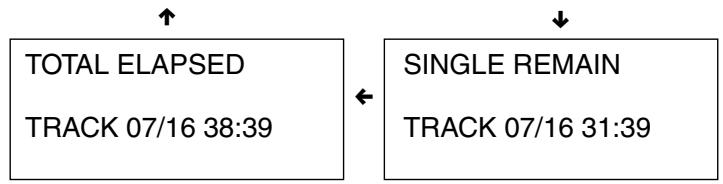
Elapsed play & remain times of the present program.
Press the DISPLAY button to no display and cancel this function.
REPEAT
If you play a DVD disc, you can press the REPEAT button on the remote control unit, the screen will display:

If you play a CD disc, the screen will display:

RANDOM
You can use the RANDOM function (button 15 on the remote control) for both DVDs and CDs.

Repeat A-B (allows you to play a small section of the disc repeatedly)
- Press the A-B button on the remote at the point where you wish the repeat play to start. The display will show REPEAT A-. Press A-B button again at the point where you wish the repeat play to finish. The display will show REPEAT A-B SET. The A-B segment will now repeat continuously until the A-B button is pressed for a third time.
SEARCH function
You may directly enter a time, title or chapter number to search fast on a disc, the player plays from that point.
- For DVD discs, press SEARCH button on the remote, the display will show the following:
TITLE
01/02
CHAPTER
/28
Press SEARCH button again you can see
TITLE
01/02
TIME
中
Press SEARCH button three times you can see
CHAPTER
01/28
TIME
-
-
-
For CD discs, press SEARCH button on the controller, the following will be displayed:
DISC
GO TO:
Press SEARCH button again you can see:
TRACK
GO TO:
Press SEARCH button three times you can see:
SELECT TRACK:
16
Press NUMERIC button to enter the digits on the remote control unit for start time, or Title/Chapter track digits you wanted to start playback.
How to use CLR button
If you enter a wrong number in selecting a track, title, or password etc, you can press CLR to delete the number you enter.
ZOOM picture
- Depending on the disc being played, you can press the ZOOM button repeatedly allowing the picture to increase accordingly: ZOOM2, ZOOM3 and ZOOM 4, ZOOM1/2, ZOOM1/3, ZOOM1/4 and ZOOM OFF.
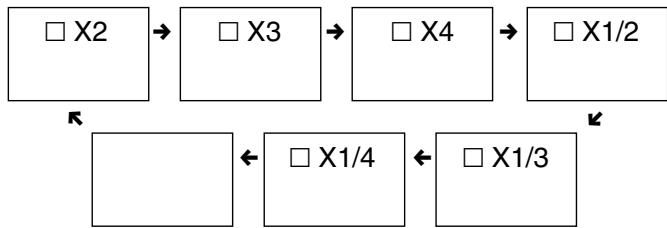
- In the ZOOM mode, you can use CURSOR buttons to move the picture for optimum viewing.
PROGRAM playback
You can press the PROG button on the remote control unit, the screen will display program menu. For DVD disc will show the following:
PROGRAM: TT(02)/CH(--)
01
TT:
CH:
06
TT: CH:
02
TT:
07
TT: CH:
03
TT:
08
TT: CH:
04
TT:
09
TT: CH:
05
TT:
10
TT: CH:
EXIT
START
NEXT
For CD disc will show the following
PROGRAM: TRACK (01-08)
1
一
6
2
一
7
3
-
8
一一
4
一
9
3
一
10
EXIT
START
NEXT
Press CURSOR and NUMERIC button on the remote control unit. To enter the Title/Chapter digit (DVD) or Track digit (CD) needed. Then select START and press ENTER button to begin program playback. It will automatically stop when finished. In order to cannel Program playback status, press the PROG button on the remote control unit, select Exit ,then press ENTER to exit.
MUTE function
Press MUTE button on the remote control unit to mute as the program is still playing. The VFD displays "MUTE", press MUTE button again to resume sound play.
Playback of MP3 files
This unit is compatible for the reproduction of recorded pieces in MP3 format. Refer to the following instructions for a correct use:
- Press the Power button and then the OPEN/CLOSE button to open the drawer. Insert the disc containing the recorded passages in MP3 format with the label facing upwards. Press the OPEN/CLOSE button again to close the drawer. After some seconds, on the TV screen will appear a menu with all the directory in the disc like the picture
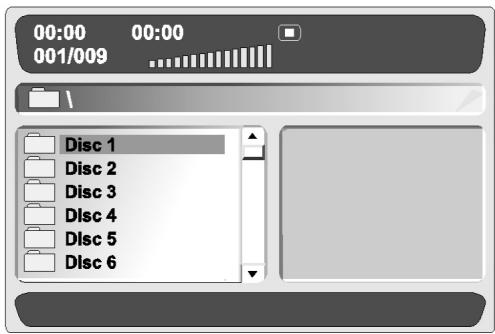
MENU1
You can select the Disc with up/down cursor you wanted. If you select disc 1, you can see the menu like this:
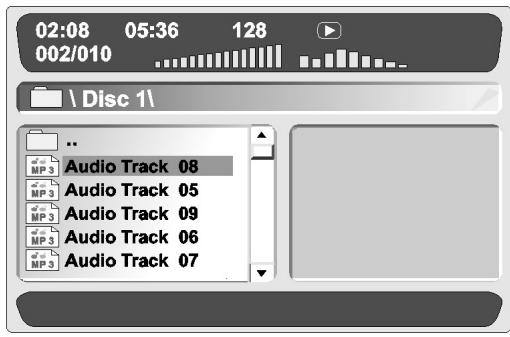
MENU2
In this menu you can select the song you wanted. The first line you can see some times. There is the current time of the playing song you selected, the total time of the playing song from left to right. You also can see the number 128 in the first line, it indicates the total songs in the MP3. The second line is the song you selected in the disc. The third line is the disc you selected in all the discs the MP3 have. The last five lines is the name of the song.
-
Press left button to go back to the menu 1, then you can select the disc you wanted.
-
Press REPEAT button time by time you can select the play mode:

- Press the DISPLAY button you can see some change in the menu 2. In the menu's first line the number 128 and the sign will be changed into "Folder". The second line will be replaced by the current play mode.
Press the DISPLAY button again it can go back to the menu 2. - When the song is playing you can use UP/DOWN button to select the song you want and press ENTER to choose.
- You can use FAST FWD or FAST RWD button.
VIDEO OUT MODE SELECT
Press the V-MODE button, the TV screen displays "RGB". Press the V-MODE button again, the TV screen displays "YUV".
Press the V-MODE button three times, the TV screen displays "P-SCAN".
(When it is only the TV with P-SCAN function, the TV screen displays "P-SCAN"; otherwise the picture will disappear.)
Press the V-MODE button four times, the TV screen displays "CVBS".
FUNCTION select
Press FUNCTION button on the front-cabinet or FUNC button on the remote control unit to switch the work status as below,

Press BAND button on the front-cabinet or on the remote control unit to switch the radio band only in tuner.

Press the BAND button on the remote control unit only in DVD work status.

Presetting Radio Stations and listening
- press FUNCTION button or BAND button to make the unit to be in TUNER, AM or FM band work status.
-
Auto-search all broadcasting stations. Press SEARCH button, the unit will auto-search all broadcasting stations. Once find a station, the unit will play it for 1 seconds, then search the next station. When finish searching, it will auto-memorize all the stations and listen in the first station. During searching, press SEARCH button will stop searching. The unit can memorize 50 FM stations and 50 AM stations in maximum and those can be memorized after the power is off.
-
Single broadcasting station search.
Press FAST FWD button, it will search from current frequency to higher frequency. It will stop searching when the station is found and begin to listen in it. Press FAST RWD button, it will search from current frequency to lower frequency.
- Manually search ,fine tuning and station store.
Change from the current frequency to a lower frequency using the LEFT arrow button. In the FM band range each press of the button changes the frequency in steps of 50kHz (or 100kHz ). In the AM band range the frequency changes in steps of 9kHz (or 10kHz ). In order to set a higher frequency, press the right-hand arrow button. As soon as the station has been found, press the SETUP button. Then use the NUMERIC button to enter the desired station number.
- Manually delete station.
For some false stations that auto-searched, press CLR button to delete them.
- Number select station.
Press NUMBER button to enter the station stored number and press ENTER button, the system will go to listen in that station. Press SKIP+, - button to switch the previous or next station.
- Frequency direct call.
If you know the station frequency, you can directly call (For example, press TITLE on the remote controller .then enter 8860 and press TITLE to listen in FM 88.6MHz).
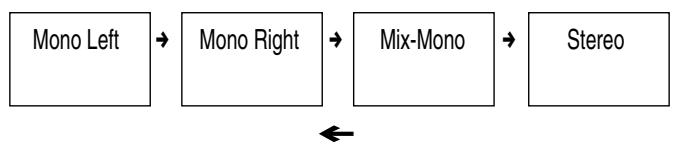
- Mono/Stereo Swithover
Using the audio button you can switch between MO-NO and STEREO.
RDS (radio dats system) display function
Since all RDS stations have PTY(program type), when find a RDS station, the VFD will show its PTY. After 5 seconds, return to display the station frequency. If it is not RDS station, display "NOT RDS".
Radio text(RT) is the information that the launch station sends out temporarily, such as weather forecast. Once DVD receiver gets RT, it will scroll displaying the RT on the VFD.
PS (program Service Name) is the station number of the launch station. Press DISPLAY button to switch VFD display receiving frequency, PTY or PS. If PS signal doesn't received, it will display "NO PS".
PTY (program type) SEARCH function
Press PTY/RETURN button then press UP/DOWN cursor on the remote control unit, various program types are displayed on the TV screen circularly.
NEWS
AFFAIRS (Current Affairs)
INFO (Information)
SPORT
EDUCATE (Education)
DRAMA
CULTURE (Cultures)
SCIENCE
VARIED (Varied Speech)
POPM (Pop Music)
ROCK M (Rock Music)
EASY M (Easy Listening)
LIGHT M (Light Classics M)
CLASSICS (Serious Classics)
OTHER M (Other Music)
WEATHER
FINANCE
CHILDREN (Children's Progs)
SOCIAL (Social Affairs)
RELIGION
PHONE IN
TRAVEL (Travel&Touring)
LEISURE (Leisure&Hobby)
JAZZ (Jazz Music)
COUNTRY (Country Music)
NATION M (National Music)
OLDIES (Oldies Music)
FOLK M (Folk Music)
DOCUMENT (Documentary)
TEST (Alarm Test)
ALARM!
After one PTY is selected, press SLOW or FWD/RWD button on the remote control unit, the unit then begins from minimum frequency or from current frequency to search the station with specified PTY. It will play as it finds the station. Otherwise, it will display "NOT FIND" After several seconds, it will automatically listen in the first station that is found.
After one PTY is selected, press FAST FWD or FAST RWD button on the remote controller to search the specified PTY station from current place forward or backward.
DIGITAL IN work status
Press FUNCTION button, make the unit work on DVD status. Press BAND button select OPTICAL or COAXIAL status. The unit will work on OPTICAL or COAXIAL digital signal input status.
AUX1, AUX2 work status
Press FUNCTION button, make the unit work on DVD status Press BAND button, make the unit work on AUX1 or AUX2 status. The unit will play double channel AV signal input from AUX1 or AUX2.
Initial settings
Once the initial setting have been set, the player will always operate with the same parameters. The setting will be retained in the memory even after switching off the power.
- Initial settings must be in the setup mode, but function can be set in all mode.
- Using the setup menu, you may choose the play mode setting, the various outputs, etc.
- During STOP or PLAY mode, press SETUP button on the remote, you will see on the screen like picture 1.
Press SETUP button again to quit the setup menu and return to the TV DISPLAY.
- Select the menu item desired by using up/down CURSOR button, and then press the ENTER button. You should see such as picture 2. In each menu page, the menu items are showed on the left. Use the right CURSOR button on the remote to the option list or setting on the right. Then use up/down CURSOR button on the option list, press ENTER to choose. Use the left CURSOR button to go back to the left menu item to change others.

- Use RIGHT/LEFT CURSOR button to select General Setup Page, Audio Setup Page, Video Setup Page, Preference Page, Password Setup Page. If you in the menu like picture 2, you must use left cursor first to go back to the menu like picture 1, then use RIGHT/LEFT CURSOR to select the Audio Setup Page and so on.
NOTE:
When you select the function on the Menu, the notation of the function is showed at the bottom. If you want to select the Preference Page the DVD must during the Stop mode.
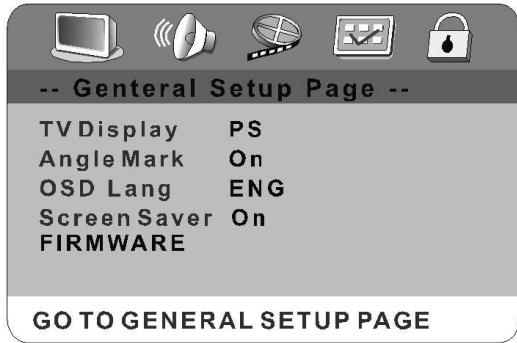
GENERAL SETUP
Press SETUP on the remote control, the screen shows GENERAL SETUP PAGE. You can use up/down CURSOR to select TV DISPLAY, ANGLE MARK, OSD LANG and SCREEN Saver
TV DISPLAY
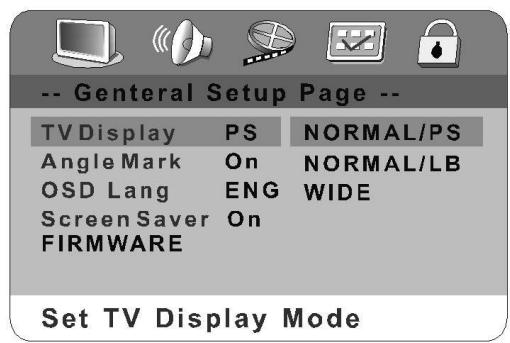
- NORMAL/PS—4X3 Pan Scan Choose this setting you will see the movie fill the entire screen of your TV. But you won't see part of the picture (particularly the right and left edge).
- NORMAL/LB—4x3 Letterbox Choose this setting if you want to see movies in their original aspect ratio. You will see the entire frame of the movie, but it will occupy a smaller portion of the screen.
- WIDE—16x9 Wide screen Choose this setting if your DVD player is connected to a wide-screen TV.
ANGLE MARK

The ANGLE button on the controller is active when this function is on.
OSD LANG
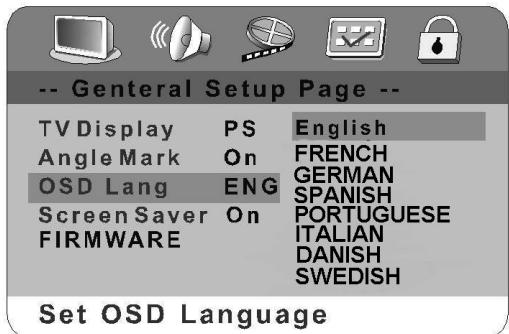
The On Screen Display language can be English or other languages delegated by the factory's design.
SCREENSAVER
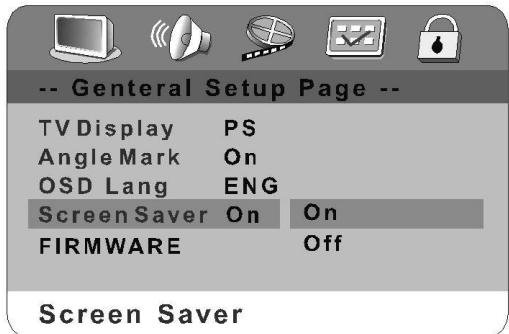
When this DVD player is idle (after about 8 minutes of inactivity), the screen saver can be activated to prolong the TV monitor's life. You can press any button on the remote to continue.
FIREWARE
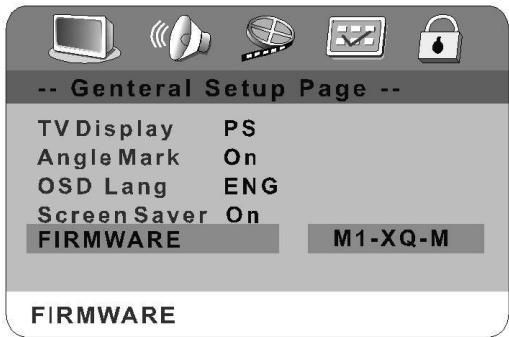
It display the version.
AUDIO SETUP
Speaker Setup
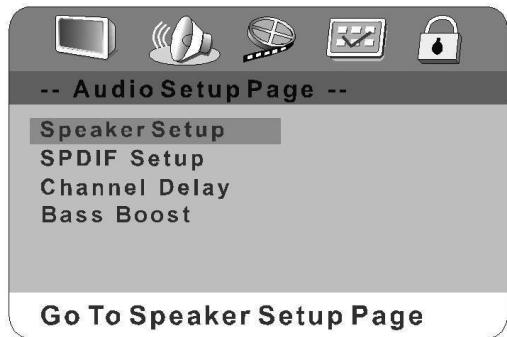
Press UP/DOWN CURSOR to select the items in the Speaker Setup.
DOWNMIX
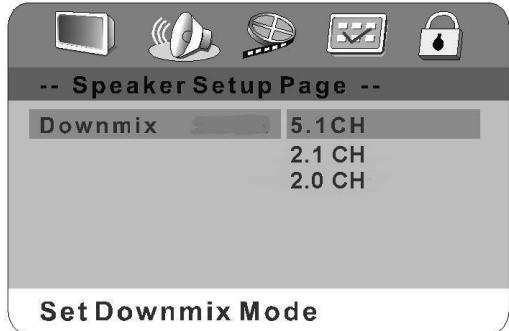
2.1 CH or 2.0 CH:
If the DVD works with 2.1ch speakers or connect to TV, you should choose these.
5.1 CH:
When the DVD works with 5.1ch speakers, you should choose the best.
- There are right and left channels working in the tuner status.
SPDIF OUTPUT
Press the LEFT button go back to the Audio Setup Page, then use up/down to select SPDIF setup.

OFF:
the output signal is Analog format, the default setting. You should select this when you are playing the disc through the LINE OUTPUT Right & Left jacks on your DVD player. No signal output from the coaxial port when selecting this function.
SPDIF/RAW:
Select this when the DVD player is connected with a power amplifier through DIGITAL OUT coaxial or optical port. The power amplifier to be connected must have Dolby Digital decoding.
SPDIF/PCM:
Select this when the DVD player is connected with a 2-CHANNEL DIGITAL MODE or STEREO AMPLIFIER. When a Dolby Digital or MPEG disc is played, the coaxial port will output in PCM 2-channel format. These program features an uncompressed digital stereo sound track for improved fidelity, when played, discrete stereo sound will be heard from the front right and left speakers.
Channel Delay
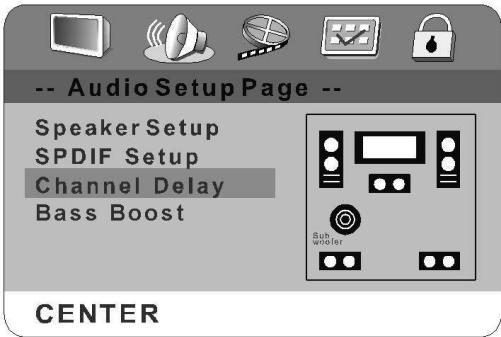
It is now possible to adjust the signal delays. This means that in the case of large rooms the sound of the front loudspeakers reaches the ear later than the sound from the surround loudspeakers. In this case the sound from the surround loudspeakers has to be played back after a delay so that an acoustic balance is produced.
BASS AMPLIFICATION (not shown)
When the function BASS AMPLIFICATION is turned to "ON" the deep tones are amplified.
VIDEO SETUP
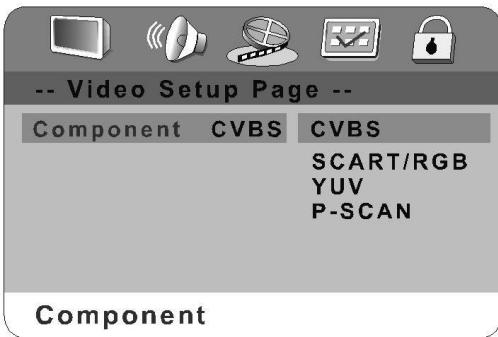
Component
You will get CVBS,RGB, YUV or P-SCAN of Component signal if you choose different item .
- CYBS: The video signal output has video and S-video.
- YUV: The video signal output has video, S- video and YUV.
- SCART/RGB: The video signal output has video, S- video and RGB(SCART).
P-SCAN: The video signal output only has P-SCAN.
NOTE:
In the interlacing television broadcasts, if you select the P-SCAN in the TV MODE. The interlacing television will not broadcast the pictures, the pictures will disappear. then press the V-MODE button on the remote control. You will go back to the other mode.
PREFERENCE SETUP
The DVD player must be in the stop mode or have the DVD door open to access the preference menu. To put the player in the stop mode, you must press the STOP button twice.
TV Type
According to the system of TV to be connected, set the type of the video output to match the TV.

- If the TV used is PAL, select PAL output signal;
- Select MULTI if the multi-system;
- If it is NTSC, select NTSC output signal.
Note:
To obtain the best DVD picture, it is strongly recommended to use Multi-system TV to play DVD movies at 'multi' mode
PBC
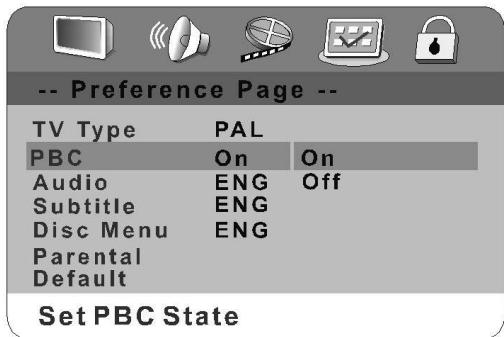
When PBC is on, the TV display the menu..
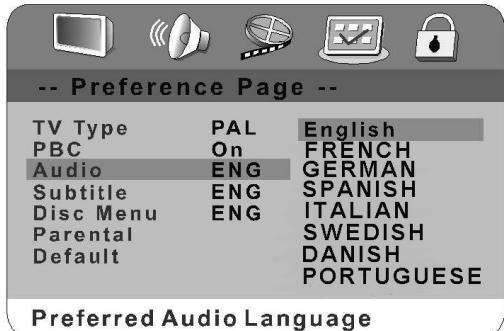
AUDIO/SUBTITLE/DISC MENU
The DVD player will play with your selected language at the AUDIO SUBTITLE or DISC MENU. If the disc not recorded your selected language, the played will use defaults of the disc.
PARENTAL CONTROL
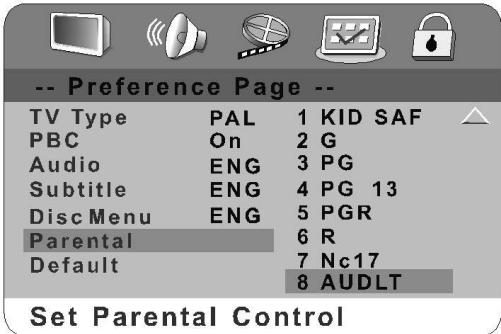
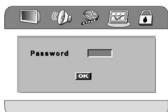
When selecting one of the PARENTAL items, the screen will be changed to the PASSWORD VERIFY PAGE.
When playing disc with parent lock function, you may select an age control grade according to grade of dis
sc and your desired. For example: Select PG
R, you could see picture like right, input the
password to set the parental level, and then
you cannot play DVD video disc rate higher
the PG-R grade. Parental control grades are listed from low
too high, kids is lowest grade adults is the highest grade.
RESET
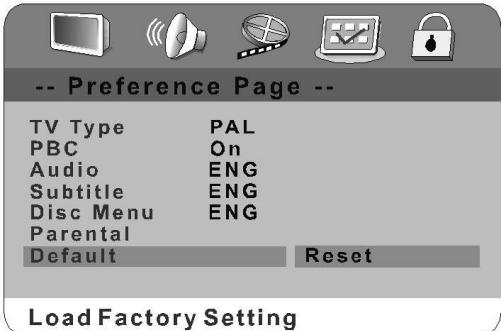
If you select the RESET, each function setting returns to the initial status setting by the factory.
password setup
password MODE Picture
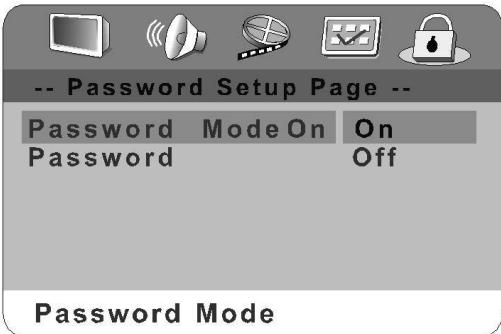
If you want to change the PASSWORD MODE, you must input password.
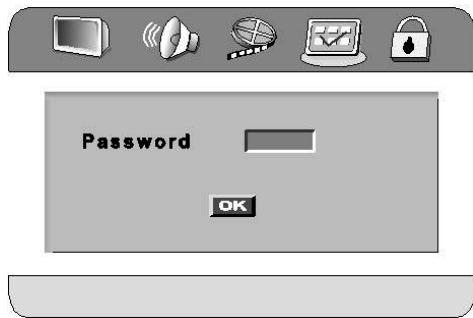
password
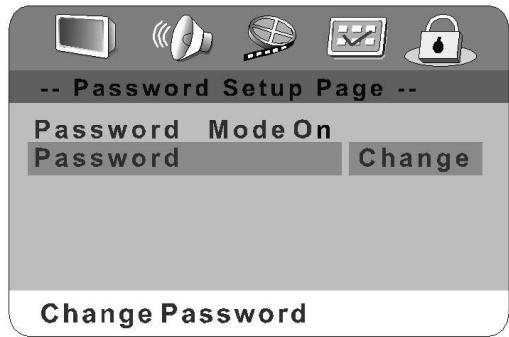
Select this to adapt the code, the screen shows: You may enter the old password first, then input new password, at last enter new password again to confirm.
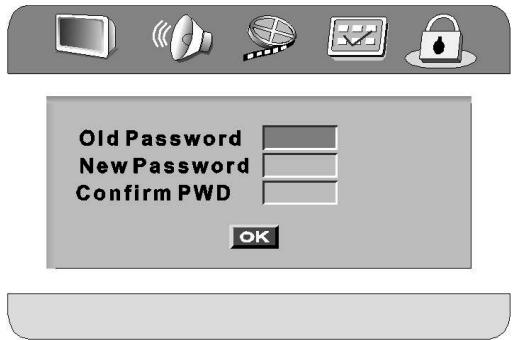
Notes:
The original password is 000000 when the unit is first time turned on.
For Your Reference:
Disc handling and maintenance
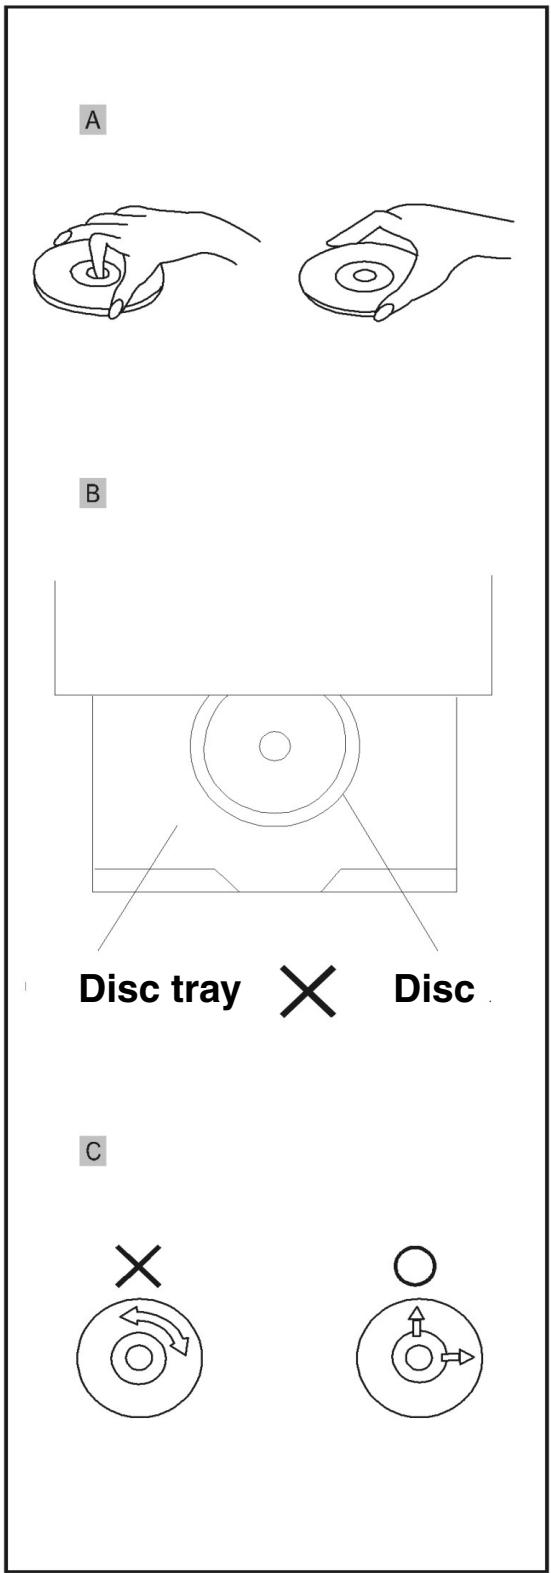
Handling precautions
- Hold the disc by the edges so the surface will not be soiled with fingerprints. (A) Fingerprints, dirt and scratches can cause skipping and distortion.
- Do not write on the label side with a ballpoint pen or other writing utensils.
- Do not use record cleaning sprays, benzine, thinner, static electricity prevention liquids or any other solvent.
- Be careful not to drop or bend the disc.
- Do not install more than 1 disc on the disc tray.
- Do not try to close the disc tray when the disc is not installed properly. (B)
- Be sure to store the disc in its exclusive case when not in use.
If the surface is soiled (C)
Wipe gently with a soft, damp (water only) cloth.
When wiping discs, always move the cloth from the center hole toward the outer edge.
(If you wipe the discs using a circular motion, circular scratches are likely to occur, which will cause noise.)
If the disc is brought from a cold to a warm environment, moisture may form on the disc.
Wipe this moisture off with a soft, dry, lint-free cloth before using the disc.
Improper disc storage
You can damage discs if you store them in the following places:
- Areas exposed to direct sunlight
- Humid or dusty areas
- Areas directly exposed to a heat outlet or heating appliance
Maintenance
- Be sure to turn the unit off and disconnect the AC power cord before maintaining the unit.
- Wipe this unit with a dry soft cloth. If the surfaces are extremely dirty, wipe clean with a cloth, which has been dipped in a weak soap-and-water solution and wrung out thoroughly. Then wipe again with a dry cloth.
- Never use alcohol, benzine, thinner, cleaning fluid or other chemicals. Do not use compressed air to remove dust.
Troubleshooting
Before requesting service for this unit, check the chart below for a possible cause of the problem you are experiencing.
Some simple checks or a minor adjustment on your part may eliminate the problem and restore proper operation.
| Symptom (Common) | Remedy |
| No power | Insert the power plug securely into the power outlet. |
| I Play fails to start even when PLAY is pressed. | • Condensation has formed: wait about 1 to 2 hours to allow the player to dry out. • This player cannot play discs other than DVDs, CDs. |
| I Play commences but then stops immediately. | • This disc may be dirty and may require cleaning. • Ensure that the disc is installed with the label side up. |
| No picture. | • Ensure that the input setting for the TV is "Video". |
| • No sound. • Distorted sound. | • Ensure that the speaker is connected properly. • Adjust the master volume using the buttons on the remote control. |
| Picture is distorted during rapid advance or rapid reverse. | The picture will be somewhat distorted at times: this is normal. |
| No rapid advance (or rapid reverse) play. | Some discs may have sections, which prohibit rapid advance (or rapid reverse). |
| No 4:3 (16:9) picture. | Choose the correct setup "TV Display" item that matches the TV set used. |
| No surround sound. | Choose the correct setup at the "Downmix" on "5.1ch" mode. |
| No operations can be performed with the remote control. | • Check the batteries are installed with the correct polarities(+ / -) • The batteries are depleted: replace them with new ones. • Point the remote control unit at the remote sensor and operate. • Operate the remote control unit at a distance of not more than 7 meters from the remote control sensor. |
| No key operation (either front panel and/or remote control). | • Remove the obstacles between the remote control unit and remote control sensor. • Turn the unit off and then back to on. Alternatively, turn off the unit, disconnect the AC power cord and then reconnect it. (The player may not be operating properly due to lightning, static electricity or some other external factor.) |
| OSD menu not displayed or only partially displayed on the TV Screen. |
| Symptom (DVD) | Remedy |
| Play does not commence even when title is selected. | Confirm the "Ratings" setting. |
| Audio soundtrack and/or subtitle language is not the one selected at the initial settings. | If the audio soundtrack and/or subtitle language does not exist on the disc, the language selected at the initial settings will not be seen/heard. |
| The menu is displayed in French (for example). | The setup "Menu" of "Language" is set to French: select English. |
| No subtitles. | • Subtitles appear only with discs, which contain them. • Subtitles are cleared from the TV monitor. Press "SUBTITLES" button to display the subtitles. |
| Alternative audio soundtrack (or subtitle) languages fail to be selected. | • An alternative language is not selected with discs, which do not contain more than one language. • In the case of some discs, the alternative language cannot be selected by operating the AUDIO or SUBTITLE button. Try selecting it from the DVD menu if one is available. |
| Angle cannot be changed. | This function is dependent on software availability. Even if a disc has a number of angles recorded, these angles may be recorded for specific scenes only (when the ANGLE indicator on the unit lights up.) |
| Symptom (TUNER) | Remedy |
| Can not find radio station | Check if FM, AM antennas are connected properly. |
| Radio receiving effect is poor | • FM antenna cable should be extended fully and adjust the direction to get the best receiving effect. • Please leave away the enclosed AM antenna cable from this unit and adjust the direction to get the best receiving effect. |
Definition of terms
Angle
Recorded onto some DVD discs are scenes, which have been simultaneously shot from a number of different angles (the same scene is shot from the front, from the left side, from the right side, etc.). With such discs, the ANGLE button can be used to view the scene from different angles.
Chapter number
These numbers are recorded on DVD discs. A title is subdivided into many sections, each of which is numbered, and specific parts of video presentations can be searched quickly using these numbers.
DVD
This refers to a high-density optical disc on which high-quality pictures and sound have been recorded by means of digital signals. Incorporating a new video compression technology (MPEG) and high-density recording technology, DVD enables esthetically pleasing full-motion video to be recorded over long periods of time (for instance, a whole movie can be recorded).
Subtitle
These are the printed lines appearing at the bottom of the screen, which translate or transcribe the dialogue. They are recorded on DVD discs.
Time number
This indicates the playtime recorded on DVD discs. When a disc contains two or more movies, these movies are numbered as title 1, title 2, etc.
Track number
These numbers are assigned to the tracks which are recorded on CDs. They enable specific tracks to be located quickly.
Specifications
| Power Requirements: | AC 220-240V, 50Hz |
| Power Consumption: | 40W |
| Signal system: | PAL/NTSC |
| Weight: | 3.6 kg |
| Dimensions: | 326(B) x 360(T) x 60(H) mm |
| Operating temperature range: | +5 bis +35° |
| Operating humidity range: | 5 bis 90% |
| (without condensation) |
Discs played:
| 1. DVD-VIDEO disc |
| 12cm single-sided, single-layer |
| 12cm single-sided, double-layer |
| 12cm double-sided, double-layer (one layer per side) |
| 8cm single-sided, single-layer |
| 8cm single-sided, double-layer |
| 8cm double-sided, double-layer (one layer per side) |
| 2. Compact Disk (CD-DA) |
| 12cm disc / 8cm disc |
S-video output:
Y output level: 1 Vp-p (75Ω)
C output level: 0.300 Vp-p (75Ω)(PAL)
0.286 Vp-p (75Ω)(NTSC)
Output connector: S-Terminal (1 system)
Video output:
Outputlevel: 1 Vp-p (75Ω)
Output connector: Pin jack (2 systems)
Audio output:
Output level: 2 Vrms (1kHz, 0dB)
Output connector: Pin jack
2ch mixed output: 1 system
Audio signal output characteristics:
| 1. (1) Frequency response: DVD (linear audio): 4Hz-22kHz (48kHz sampling) CD audio: 4Hz-22kHz (96kHz sampling) | |
| 2Hz-20kHz (EIAJ) | |
| 2. S/N ratio CD audio: | 115dB (EIAJ) |
| 3. (2) Dynamic range: DVD (linear audio): CD audio: | 102dB 99dB (EIAJ) |
| 4. (3) Total harmonic distortion: CD audio: | 0.025% (EIAJ) |
Digital audio input:
| Coaxial digital input: | Pin jack |
| Optical digital input: | Optical connector |
Digital audio output:
| Coaxial digital output: | Pin jack |
| Optical digital output: | Optical connector |
Phone Jack: Stero 3.5 jack
Accept 32 Ω impedance
Pickup: Wave length: 655nm
Laser power: CLASS 1
Tuner section
System: PLL quartz-locked digital synthesizer system
| Tuning range: | FM: 87.50—108.00MHz(50KHz step AM: 522—1620KHz(9KHz interval) |
| Preset stations: | FM 50 stations |
| AM 50 stations |
Amplifier section
| Power-Output: | |
| 2ch mode: | Front L, R: 10W+10W |
(8 ohms at 1KHz, THD 10% )
Subwoofer: 30W
(6 ohms at 1KHz, THD 10% )
Front L,R: 10W+10W
Center: 10W
Surround L,R: 10W+10W
(8 ohms at 1KHz, THD 10% )
Subwoofer: 30W
(6 ohms at 1KHz, THD 10% )
Input: AUX1, AUX2 Audio L, R: Sensitivity: 500mv
Impedance: 10 k _s
AUX1, AUX2 Video:1 Vp-p
Specifications are subject to change without notice.
Weight and dimensions are approximate.
Índice
Mantener el aparato alejado de floreros, bañeras, lavabos, etc. Si llegara a penetrar liquido en el aparato,SEOSEOSEOSEOSEOSEOSEOSEOSEOSEOSEOSEOSEOSEOSEOSEOSEOSEOSEOSEOSEOSEOSEOSEOSEOSEOSEOSEOSEOSEOSEOSEOSEOSEOSEOSEOSEOSEOSEOSEOSEOSEOSEOSEOSEOSEOSEOSEOSEOSEOSEOSEOSEOSEOSEOSEOSEOSEOSEOSEOSEOSEOSEOSEOSEOSEOSEOSEOSEOSEOSEOSEOSEOSEOSEOSEOSEOSEOSEOSEOSEOSEOSEOSEOSEOSEOSEOSEOSEOSEOSEOSEOSEOSEOSEOSEOSEOSEOSEOSEO SEOEO SEOEO SEOEO SEOEO SEOEO SEOEO SEOEO SEOEO SEOEO SEOEO SEOEO SEOEO SEOEO SEOEO SEOEO SEOEO SEOEO SEOEO SEOEO SEOEO SEOEO SEOEO SEOEO SEOEO SEOEO SEOEO SEOEO SEOEO SEOEO SEOEO SEOEO SEOEO SEOEO SEOEO SEOEO SEOEO SEOEO SEOEO SEOEO SEOEO SEOEO SEOEO SEOEO SEOEO SEOEO SEOEO SEOEO SEOEO SEOEO SEOEO SEOEQ
High quality digital audio
jack FL jack FR jack C jack SL jack SR jack SW
Aviso:
EASY M (easy listening)
- Con性和技巧
- Con性和技巧
- Con ]. In the case of a teclá, the key to the success of the technique is understanding how to use the two types of menus. The first type is called "teles" and the second one is called "teles de". It is important to understand that these two types are not always the same. For example, you may find a teles de in general (see below).
DVD (linear audio): 102dB
CD audio: 99dB (EIAJ)
Salida coaxial digital:
Salida optica digital:
Jack de clavija
Conexión optica
Jack de auriculares:
Jack estéreo 3.5
Pickup:
Sedm dozvukovych stapnú
High quality digital audio
EASY M (Easy Listening)
LIGHT M (populární klasika)
CLASSICS (klasická hudba)
OTHER M (jinyhudebnizanr)
WEATHER (počasi)
COUNTRY (country huda)
This device has been tested according to all relevant current CE guidelines, such as electromagnetic compatibility and low voltage directives, and has been constructed in accordance with the latest safety regulations.
Subject to technical changes without prior notice!
Guarantee
The device supplied by our Company is covered by a 24 month guarantee starting on the date of purchase (receipt).
During the life of the guarantee any fault of the device or its accessories *) ascribable to material or manufacturing defects will be eliminated free of charge by repairing or, at our discretion, by replacing it. The guarantee services do not entail an extension of the life of the guarantee nor do they give rise to any right to a new guarantee!
Proof of the guarantee is provided by the proof of purchase. Without proof of purchase no free replacement or repair will be carried out.
For repairs or replacement during the life of the guarantee return the device in its original packing together with the proof of purchase to your dealer.
*) Damage to accessories does not mean automatic free replacement of the whole machine. In such cases please contact our hotline. Broken glass or breakage of plastic parts are always subject to a charge.
Defects to consumables or parts subject to wearing (e.g. motor pistons, kneading blades, drive shafts, spare remote control, spare toothbrushes, saw blades, etc.) as well as cleaning, maintenance or the replacement of said parts are not covered by the guarantee and hence are to be paid!
The guarantee lapses in case of unauthorized tampering.
After the expiry of the guarantee
After the expiry of the guarantee repairs can be carried by the competent dealer or repair service against the payment of the ensuing costs.