COMPACT - Steam iron LAURASTAR - Free user manual and instructions
Find the device manual for free COMPACT LAURASTAR in PDF.
User questions about COMPACT LAURASTAR
0 question about this device. Answer the ones you know or ask your own.
Ask a new question about this device
Download the instructions for your Steam iron in PDF format for free! Find your manual COMPACT - LAURASTAR and take your electronic device back in hand. On this page are published all the documents necessary for the use of your device. COMPACT by LAURASTAR.
USER MANUAL COMPACT LAURASTAR
Operating Instructions
Description 1
- Safety precautions 1
Installation 2
Preparing to use your iron 3
Starting to use your iron 4
Hints for using your iron 4
Practical hints 6
- Refilling 6
- Safety and storage 7
- Maintenance 8
- Checking and repairing 9
Problems/solutions 10
Technical data 10
- Customer service 11
Declaration of CE conformity 11
LauraStar International Warranty 12
Warranty card 12
#
Chere cliente, cher client,
Nosusyouremercionsde laconfiance que younousavezacordedee etvoufelicitons d'avoirchoisiLauraStar COMPACT.
International Business Park, F-74160 Archamps
NL 076 5710025
Divelit Belgium SA / LauraStar
Industrieweg 5, B-3001 Heverlee
River International SA
International Business Park, F-74160 Archamps
E 34 932013777
Divelit Belgium SA / LauraStar
River International SA
Beethoven, 15 atico 7e, E-08021 Barcelona
Thank you for showing confidence in our company and congratulations for choosing LauraStar COMPACT.
Allow us to give you a word of advice about using your LauraStar COMPACT. Please read these instructions carefully before using the unit for the first time.
English
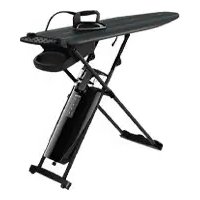
Description
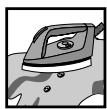
① Table
(2) Iron
③ Storage box
4 Instructions for use
⑤ Cover
6 Silicon mat
⑦ Measuring beaker
⑧ Steam generator
⑨ Iron switch
⑩ Steam generator switch
⑪ Steam indicator green light
⑫ Refill indicator red light
⑬ Filling cap
14 Mains plug
⑤ Mains electrical cable
16 Monotube
⑦ Iron thermostat
18 Steam control button
19) Safety clips
20 Handle for adjusting the height of the table
②1 Storage box lid
Important safety considerations
Please read the following pages carefully and make all new users of the appliance aware of the contents


- Do not use the appliance for anything but ironing.
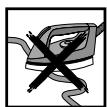
- The appliance is an electrical device and parts of it become very hot when used. Contact with hot surfaces can cause severe burns to users or damage objects in the vicinity.
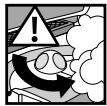
- The appliance contains steam under pressure. Under no circumstances open the cap without having first read the instructions for use. Contact with the pressurized steam can cause severe scalding.
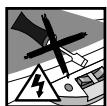
- Keep children away from the appliance. Store it where children cannot reach it. Do not leave the appliance unattended during using.
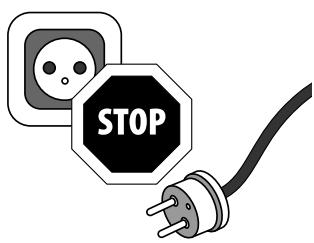
- Switch off all switches on the appliance before plugging in or removing the plug from the socket, filling or emptying the steam generator, or before carrying out maintenance.
- Only use the appliance if both iron and mains electrical cable are in good condition. Inspect electrical cord and steam tube weekly for any fraying or damage; do not use with damages cord or steam tube.
- To avoid the risk of electrocution you must not open the appliance yourself or change the mains cord. In the event of damage or doubt about its operation return the iron immediately to a registered service agent.
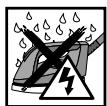
- The appliance can cause severe electric shocks if it is placed in water or any other liquid.
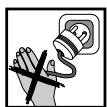
- Do not unplug your appliance by pulling on the mains cord. Grip the plug firmly and withdraw it from the socket.
- The mains electrical cable and monotube must not be allowed to come into contact with hot surfaces.
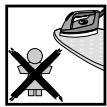
- To avoid the iron falling and causing scalding under no circumstances pull on the monotube.
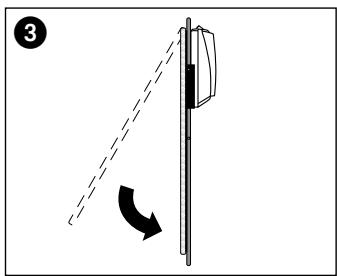
Installation
Setting up
Ensure the lid is closed.
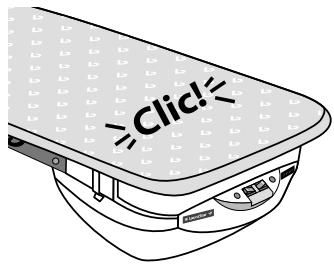
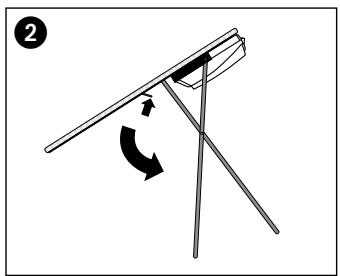
Place the board vertically on its point with the steam generator facing upwards.

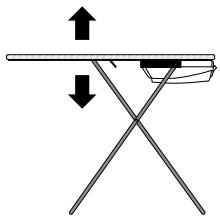
Tip the board forward while depressing on the handle for adjusting the height of the table.
ennnn
4 Open your board to the desired height. Fit the cover according to the instructions below.
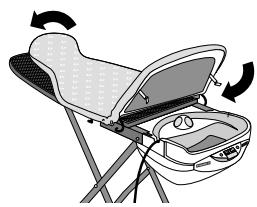
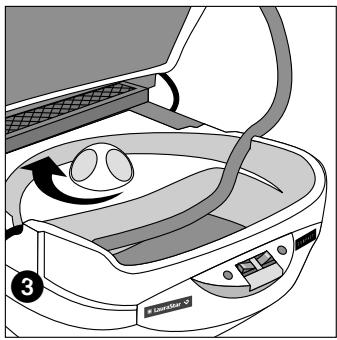
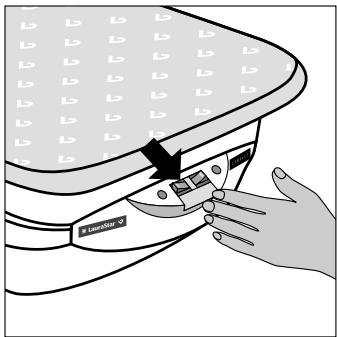
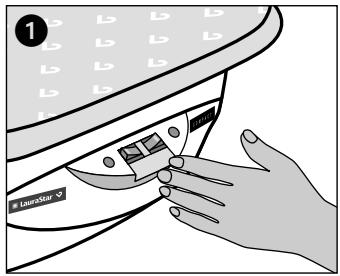
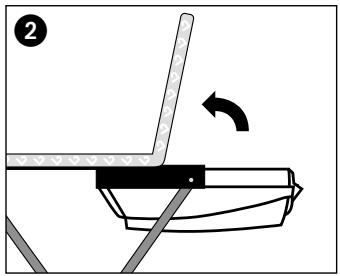
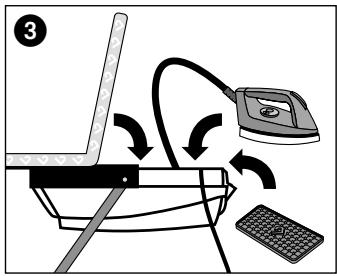
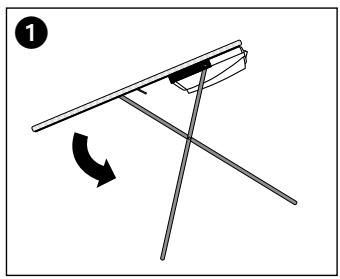
Lift the lid of the storage box and gently remove the clips. Take out the iron, the monotube, the silicon mat and the power cord.

6 Close the lid ensuring that it is firmly in place.

Cover
Slide the cover over the ironing board passing the rubber strap under the lid, between the board and the lid. Adjust it on the lid of the storage box. Then adjust it at the front of the board.
If you require a new cover contact your retailer or customer service agent.
Accessories
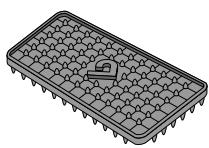
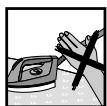
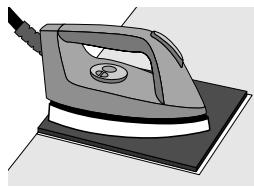
Silicon mat (code 508.0001.703): The logo on the mat should be facing upwards. The mat is used to place the hot iron on. Do not place the iron on any other surface. This could cause severe damage.
Measuring beaker: the beaker allows you to refill the steam generator reservoir easily.
Preparing to use your appliance
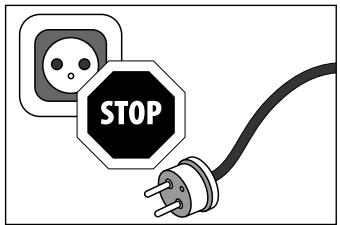
Ensure the appliance is unplugged
Always pull the mains plug from the socket before filling the steam generator.
English
Choice of water
Use hot or cold tap water. You can use de-mineralised or filtered water if the tape water is very hard (high calcium content).

CAUTION: Do not use water with added chemicals, water softened with salt, deionised water, or softened sea water because they do not give good quality steam and could damage the appliance.
Filling the iron before using for the first time
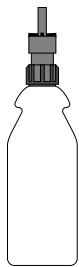
Ensure the iron is unplugged from the mains supply. 1. Unscrew the filling cap. 2. Fill the steam generator by pressing on the bottle. 3. Carefully retighten the filling cap. Caution: avoid overfilling the steam generator; refill carefully.


Caution

- Ensure that there is always water in the steam generator. If the steam generator is switched on without water this might invalidate the warranty for your system.
- If the steam generator is over-filled it might spit when starting to iron.
- In no circumstances must the cap of the water tank be unscrewed when the appliance is being used. To fill the appliance during ironing, follow the instructions on page 6.
Starting to use your appliance
Plugging in your appliance
To avoid electric shock make sure that you push the mains plug into a socket fitted with an earth.
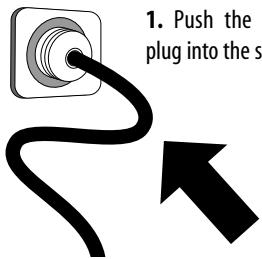
1. Push the mains plug into the socket.
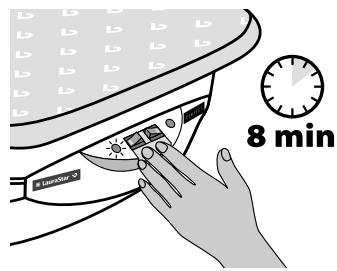
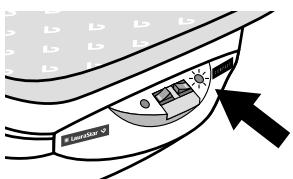
2. Switch on the two switches and wait until the green steam light illuminates (about 8 minutes).
The green steam indicator light illuminates when the appliance is ready for use.
45
Hints for use
Thermostat control
The disc controls the temperature of the soleplate only.
Ironing without a Teflon soleplate: Adjust the temperature according to the material to be ironed.
Steam ironing: Black sector.

Before starting to iron.
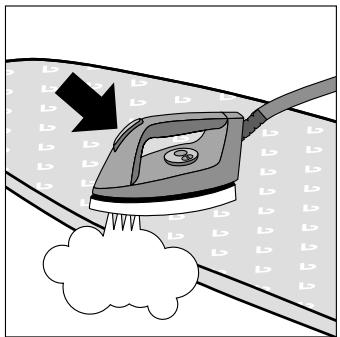
- Give 2 or 3 bursts of steam to eject water condensed in the tube, then test your iron on a piece of material. If it still spits water increase the temperature slightly.
- If the iron doesn't emit steam, lower the temperature slightly.
CAUTION: After adjusting the temp- erature it takes about 2 minutes for the new temperature to stabilize.
Steam control button
This button allows you to control the emission of steam from the iron.
Before starting to iron:
Give 2 or 3 bursts of steam, pointing the iron away from the material, to eject water condensed in the tube.
General guidance
You can steam iron all materials, but some materials can be ironed without steam. To iron without steam, switch the iron on but don't turn on the steam generator button.
To improve the quality of ironing and increase the effectiveness of your iron, steam iron the material first and then re-iron it without steam, in order to dry the material.
Silk
Steam iron silk in the normal way.
In the case of dark silk you are advised to use a Teflon® soleplate, which can be purchased separately from your supplier.
Angora/Wool
- Steam iron about 10cm from the surface of the material, in order not to damage it.
- Shake the garment by hand so that it regains its normal volume.
English
CAUTION
Using a hot iron with steam under pressure can cause severe burns.
Vertical removal of creases

Hand the garment on a coat hanger or hold it up.
With a sweeping movement from top to bottom lightly touch the material while giving short bursts of steam.
Note: It is easy to remove creases from most materials, except for cotton, linen and some silks.
If it is difficult to remove the creases from a material, iron it as normal on the ironing board.
Special materials
Velvet, Corduroy, Jersey
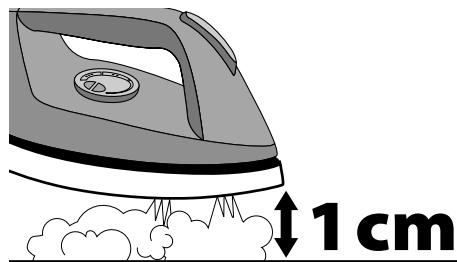
If you are not using a Teflon® soleplate, steam iron 1cm from the surface of the material, then smooth by hand.
Practical hints
Using the Teflon® soleplate
The Teflon® soleplate must be used for dark materials that are likely to become shiny and synthetic materials that might stick to the soleplate.
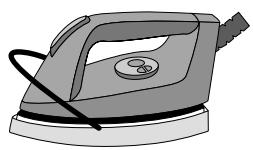
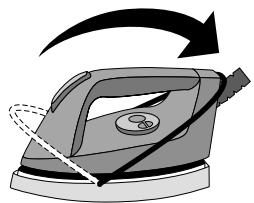
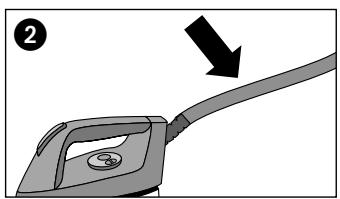
To use the Teflon® soleplate: 1. Place the iron in the soleplate. 2. Pull the spring towards the end of the iron as shown in the drawing. Wait for about 1 minute for the soleplate to reach the same temperature as the iron. This avoids droplets of condensation falling onto the material. Do not forget to remove the Teflon® soleplate after use.
1
2
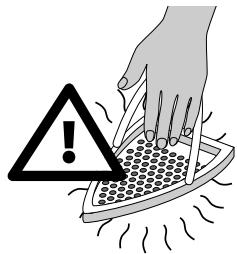
CAUTION: Contact with the Teflon soleplate can cause severe burns and damage nearby objects.
Refilling
Low water indicator
A red indicator light illuminates when the water in the steam generator drops to the minimum level.
Refilling while ironing
The red water empty light illuminates to indicate that there is insufficient water in the steam generator to continue ironing.
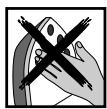
CAUTION: To avoid the risk of serious burns do not open the filling cap without following these instructions:
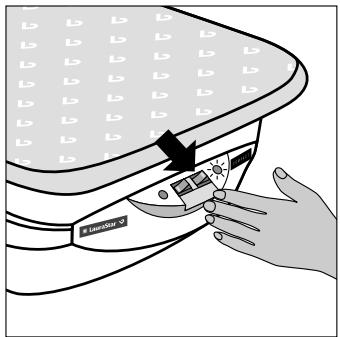
1. Switch off the steam generator switch.
2. Depress the steam control button and hold it down until no more steam is emitted.
3. Switch off the iron switch.
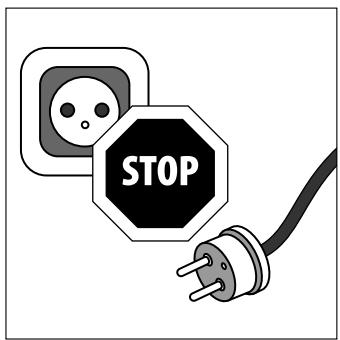
4. Remove the mains plug from the wall socket.
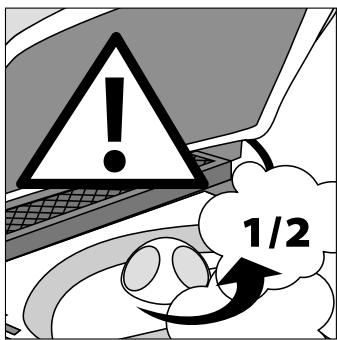
5. Gently unscrew the refill cap a half turn (using a cloth to avoid direct contact with the steam) and wait until any residual steam has escaped.

6. Unscrew the cap completely and refill as instructed on page 3.
Safety and storage
Even when it is hot, the iron, can be stored with the mains cord and the monotube in the storage box under the ironing board. The danger of being burnt or tipping over the hot iron is therefore avoided. The storage box is fitted with two clip hooks that ensure the lid is firmly closed.
Storage
After using the unit: 1. Switch off the switches and remove the mains plug from the wall socket. 2. Open the lid. 3. Place the following items in the storage box in this order: a) the iron. b) the monotube. c) the mains cord. d) the silicon mat. If the iron is still hot be careful not to touch the plastic parts of the storage box.
Note: you can now store the unit even if the iron is still hot.
Ensure that the storage box lid is correctly fitted in order to avoid an accident if the unit is tipped over.
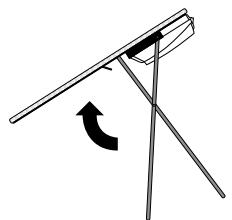
- Tip the board with the point of the board facing downwards. 2. Depress the height adjustment lever to release the catch.
- Close the board. Your unit is now ready for storage.
Note: You can leave water in the steam generator until the next ironing session. Once it has boiled the water does not change in any way.
Maintenance
Cleaning the iron
IMPORTANT: Do not use a de-scaler or other chemical product as they may damage the steam generator and the iron. Do not immerse the iron in liquid of any sort. Do not hold the iron under running water from the tap.
Use our Poli-Fer cleaning cloth which you can obtain from your supplier.
- Clean the soleplate more often if you use starch when ironing (even if the starch deposit is not visible).
Cleaning the appliance
CAUTION:
To avoid the danger of burns or electric shock when cleaning the appliance make sure the appliance is cold and the mains plug is removed from the wall socket.
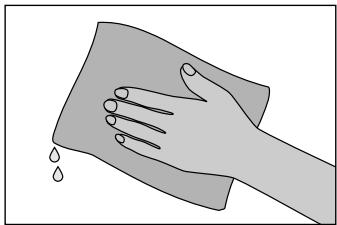
To remove dust and other dirt from the appliance use a soft, damp cloth. Do not douse the appliance with water.
Do not use chemical products.
Rinsing the steam generator
To prolong the efficiency of the steam generator and avoid calcium deposits, you must rinse the steam generator regularly. To avoid the danger of burns or electric shock when you rinse out the steam generator make sure the appliance is cold and the mains plug is removed from the wall socket.
CAUTION: Ensure the mains plug is removed from the wall socket and follow the rules for refilling shown on page 3 when you remove the refill cap.

- Remove the steam generator according to the instructions on page 11 (send the steam generator to your customer service agent).
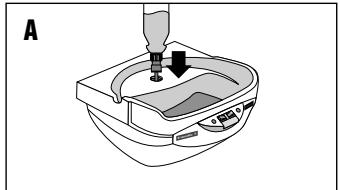
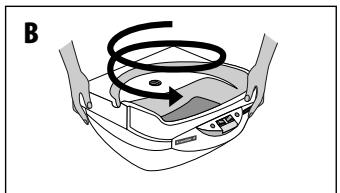
- Fill the steam generator with hot tap water using the measuring beaker (A) 3. Rinse it out using a circular motion (B). 4. Empty the steam generator as shown above (C).
IMPORTANT: Do not use a de-scaler or other chemical product as they may damage the steam generator. Do not immerse the appliance in liquid of any sort.
Inspection and repair
Hints
You are advised to regularly check: 1. The state of the mains electrical cable 2. The monotube 3. The filling cap seal
The appliance must only be opened and repaired by a qualified, registered technician.
Problems/Solutions
| Problems | Possible causes | Solutions |
| Water comes out of the holes in the soleplate | ·The temperature of the steam is too low or the iron is not hot enough | ·Increase the temperature of the iron using the thermostat ·Make sure the iron swith is on |
| ·Water has condensed in the tube because you are using the steam for the first time or you have not used the iron for some time | ·Depress the steam control button until the iron emits steam | |
| ·The thermostat is not adjusted properly: the temperature is always too low | ·Contact your customer services department | |
| Brown or white liquids come out of the holes in the soleplate and stain the material | ·You are using chemical de-scaling products | ·Do not use these types of product: they will damage your iron |
| ·Your are putting additives into the water (lavender water, fabric dress-ings or finishers) | ·Do not add anything to the steam generator | |
| ·Small pieces of material are stuck to the holes in the soleplate and have become charred | ·Clean the soleplate and wipe it with a damp cloth | |
| The soleplate is dirty (or brown); it can stain the material | ·The iron is set to too high a temperature | ·Adjust the thermostat correctly ·Clean the soleplate and wipe it with a damp cloth |
| ·The items you are ironing are not rinsed properly or you are using starch | ·Always crush the starch on the opposite side of the surface to iron | |
| There is insufficient, or no, steam | ·The steam generator is not working | ·Turn on the steam generator switch ·Wait until the steam indicator light illuminates |
| ·The steam generator is empty | ·Fill the reservoir according to the instructions | |
| The soleplate is scratched or damaged | ·You have put your iron down on a rough surface | ·Always put the iron down on the silicon mat |
| ·Your iron has been dropped or suffered a hard knock | ·To change the soleplate contact your customer service agent | |
| Steam is escaping from the filling cap | ·The cap is not screwed on properly | ·Retighten the cap correctly |
| ·The cap is broken | ·Do not use your unit any more and contact your customer service agent | |
| The iron is not getting hot | ·The mains plug is not pushed into the wall socket | ·Plug the mains into the wall socket |
| ·The switches are switched off | ·Switch on the switches | |
| ·The thermostat is set to minimum | ·Adjust the thermostat correctly | |
| The iron is too hot | ·The thermostat is badly adjusted | ·Lower the temperature using the thermostat |
| The handle is becoming hot | ·The thermostat is set to maximum | ·Lower the temperature using the thermostat |
| Steam keeps coming out of the iron | ·The iron switch is stuck | ·Depress the steam control button rapidly and repeatedly |
| Steam comes out irregularly | ·The monotube is broken | ·Call your customer service agent |
| The steam is not under pressure | ·The holes in the soleplate are blocked | ·As soon as the iron is cold clean them |
| ·The steam generator is empty | ·Refill the steam generator |
45s16u3
Technical Data
| Steam pressure | 3,5 bar | Iron power | 800 W |
| Vertical ironing | Yes | Total weight | 13.5 kg |
| Steam generator capacity | 0,85 l | Weight of iron | 1 kg |
| Able to use tap water | Yes | Dimensions of the closed unit | H135 x W44 x D18 cm |
| Mains supply | 230V / 50 Hz | Height of the table | 65 - 94 cm |
| Steam generator power | 1000 W |
Customer service agent
- If it is not possible to determine the cause of a breakdown contact your customer service agent who is there to help you.
CAUTION: Do not try to dismantle the appliance.
Returning the steam generator to the customer service agent
English

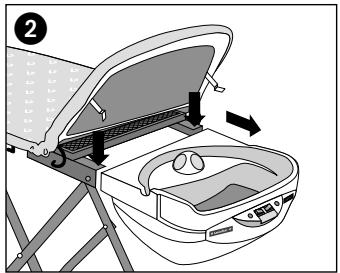
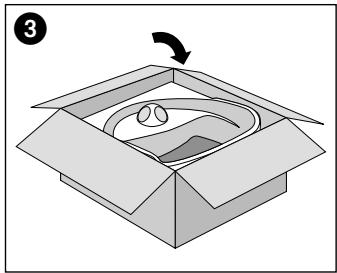
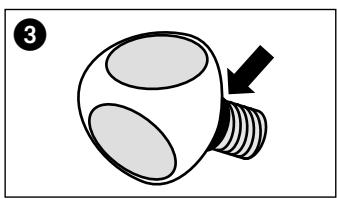
- Lift the lid by removing the steam generator security clips. 2. Remove the steam generator from the board by depressing the two buttons and pulling it towards you. 3. To return the steam generator to the customer service agent, use the box that he will have sent you.
Addresses
CH 0800558448
Divelit SA Production / LauraStar
Centro Nord-Sud 2C, CH-6934 Bioggio
International Business Park, F-74160 Archamps
B 016 400 400 Divelit Belgium SA / LauraStar
CE Declaration of conformity
Description: Ironing system
Model/type: Compact
We declare on our own responsibility that this product conforms to the following standards or standards documents:
EN 60 335-1, EN 60 335-2-3, EN 55014, EN 61000-3-2/-3.
Teflon®: DuPont registered trade mark
LauraStar international warranty
- This LauraStar unit is guaranteed for 12 months from the date of purchase. The warranty is valid from the date shown on the invoice or checkout ticket.
- Normal wear and tear of the appliance, the cords or the soleplate is excluded from the warranty. Damage due to dropping, water damage, or use of the incorrect mains voltage is not covered by the warranty. The unit is intended for household use. Not using the unit for its intended purpose, not following the directions for use and maintenance contained in the instructions for use, as well as any unauthorized repair means that the warranty is revoked. Professional use of the unit will involve reduced rights under the warranty.
- If a LauraStar unit is given to an authorised service agent for repair outside the clauses of the warranty then this will be considered to be a 'repair outside the provisions of the warranty and will have to be paid for.
- The defective unit must be delivered to an authorized service center.
- According to the country where the iron is sold other benefits may be applicable over and above the manufacturer's warranty. The current regulations in each country are valid. This owner's manual is not intended, in any way, to provide any written, express or implied warranties on the part of the manufacturer, including any implied warranty of merchantability or fitness for a particular purpose, but only to instruct users on the safe use of the product. Any and all warranties are provided by the authorized distributor. Please contact the authorized distributor from whom you purchases this product for customer service.
- If you wish to dispose of the unit take it to an approved agent. Do not dispose of the unit by throwing it away indiscriminately or by burning it.
Warranty Card

LauraStar
SWISS MADE
Vendor's stamp:
Date:
Receipt N°:
Art. N°:

Please attach a copy of this warranty card when sending in your unit.
Gentile clientele,
International Business Park, F-74160 Archamps
NL 076 5710025
Divelit Belgium SA / LauraStar
Industrieweg 5, B-3001 Heverlee
River International SA
Beethoven, 15 atico 7e, E - 08021 Barcelona
LauraStar Nederland
River International SA
Beethoven, 15 atico 7e, E-08021 Barcelona
NL 076 5710025
LauraStar Nederland
River International SA
Beethoven, 15 atico 7e,E - 08021 Barcelona
LauraStar Nederland
Päfylling under stryking
International Business Park, F-74160 Archamps
B 016 400 400 Divelit Belgium SA / LauraStar