Smart U - Iron LAURASTAR - Free user manual and instructions
Find the device manual for free Smart U LAURASTAR in PDF.

User questions about Smart U LAURASTAR
0 question about this device. Answer the ones you know or ask your own.
Ask a new question about this device
Download the instructions for your Iron in PDF format for free! Find your manual Smart U - LAURASTAR and take your electronic device back in hand. On this page are published all the documents necessary for the use of your device. Smart U by LAURASTAR.
USER MANUAL Smart U LAURASTAR
text_image
LAURASTAR www.laurastar.com LAURASTAR SMART 2017 LAGRASTAR SMART © 2017 LAURASTAR SMART © 2017 LAURASTAR SMART © 2017 LAURASTAR SMART © 2017 LAURASTAR SMART © 2017 LAURASTAR SMART © 2017 LAURASTAR SMART © 2017 LAURASTAR SMART © 2017 LAURASTAR SMART © 2017 LAURASTAR SMARTMise en marche rapide - Quick start guide - Kurzanleitung - Snelle ingebruikname - Messa in funzione rapida - Puesta en marcha rápida - Iniciação rápida - Strybki start - Kapatkan instructución для начала работы - 快速数用指南 - 快速应用指南 - 背론 시작 설명서 - تنتغير مربع - Snabubstart - Hurtig start
text_image
Diagram illustrating the step-by-step installation of a table lamp mechanism, labeled with numbered steps and warning symbols.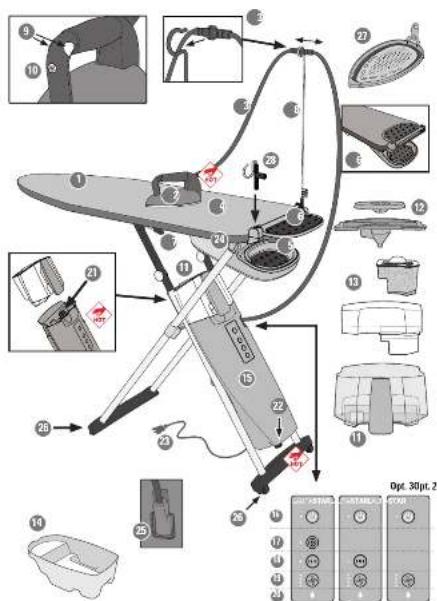
text_image
Technical diagram of an air conditioner fan with numbered parts and a control panel for Opt. 30pt.2 device.IMPORTANT SAFETY INSTRUCTIONS
When using an iron, basic precautions should always be followed, including the following:
READ ALL INSTRUCTIONS BEFORE USING
-
Only use an iron for its intended use.
-
To avoid the risk of electric shock, do purpore the ice in water or other liquids
-
Always turn the iron OFF before plugging or unplugging the iron from the electrical outlet. Never pull on the cord to disconnect the iron from the electrical outlet; instead, grasp the plug and pull on the plug to disconnect the iron.
-
Do not let the cord touch hot surfaces. Let the iron cool completely before putting the iron away. Go the cord loosely around the iron when storing.
-
Always disconned the iron from the electrical outlet before filling the iron with water, emptying the water from the iron, and when the iron is no in use.
-
Donut operate the iron with damaged cord or in the vent the iron has been dropped or damaged. To avoid the risk of electric shock, do not disassemble the iron. Take it to a qualified serviceman for examination and
• This appliance is intended for private household use only.
- Only use this appliance indoors and for ironing textile items in accordance with this Operator Manual
• In an emergency, immediately unplug the plug from the wall socket.
- The appliance must ONLY be connected to a grounded wall socket outlet. We recommend FI circuit breakers. The power plug must be easily accessible in case of emergency.
- The iron soleplate and steam jet are very hot. DO NOT iron or apply steam to clothing while it is being worn.

repair. Incorrect assembly might result in a check of electric shock when the iron is used after reassembly.
Close supervision is required for any appliance used by or near children. Do not leave the iron unattended while the iron is connected or on an ironing board.
Burns can occur from touching hot metal parts, hot water, or steam. Use caution when youtum a STEAM FON upsidedown, there might be hot water in the reservoir.
To avoid a circuit overload, do not operate an iron on the same circuit with another high-voltage appliance.
If an extension cord is absolutely necessary, a cord with an ampere rating equal to or greater than the maximum rating of the iron shall be used. A corrusted for less ampere can result in a risk of fire or electric shock due to overheating. Case shall be taken to arrange the cord so that it cannot be pulled or as tripped over
Do not point steam in the direction of people or pets during vertical steaming
This appliance produces heat. Kett your hands and body away from the iron solplate and steam jet while in use - they will be HOT. Takes care when returning the steam iron to the iron rest.
CONTACT WITH STEAM UNDER PRESSURE CAN RESULT IN SEVERE BURNS
DO NOT open the steam generator cap or the drain cap while operating the appliance
Never leave the appliance unattended while switched on.
- ALWAYS allow the appliance to cool down for at least 2 hours before emptying.
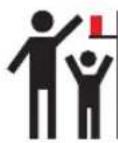
- Keep the iron and its cord out of reach of children less than 8 years of age when it is energized or cooling down.
- This appliance is NOT intended for use by children, or persons with reduced physical, sensory or mental capacity, or lack of experience, unless they are supervised by a person responsible for their safety. This appliance is NOT intended to be used by children under the age of 8 regardless of supervision or training.
Keep out of reach of children. Children must be supervised to ensure that they do not play with the appliance.
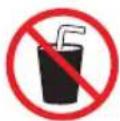
DO NOT drink filtered water. Keep out of reach of children. DO NOT ingest the demineralization granules. They may be disposed of with household waste.
- Always place the iron on a flat, stable and fire-resistant surface. NEVER rest the iron on the ironing board cover or clothes. To avoid risk of fire, ensure that the iron is placed only on the iron rest.
• Take care when removing and setting down the protective soleplate after use. Place the hot soleplate on the heat-resistant iron rest. - Cleaning, repairs, and maintenance on the appliance should ONLY be performed when the iron is switched off, cold and allowed to cool down for at least 2 hours. Unscrew the caps with care: any pressurized steam present will begin to escape after a few turns, posing a risk of burns.
- Allow the iron to cool down completely before storing.
-
DO NOT operate the appliance without water.
-
Clean the exterior of the appliance with a soft, damp cloth. DO NOT use solvents, oil or petrol.
- DO NOT attempt to insert objects into the openings of the appliance. If water or a foreign body enters the appliance, immediately unplug the iron from the wall socket. Contact an authorized Laurastar Customer Service representative for information on repair.
- To avoid risk of electric shock, DO NOT pull the electric cable from the wall socket – take a firm hold of the plug and remove it.
- Position the electric cable and the steam hose so that they cannot be pulled or caught to avoid a tripping hazard.
The filling, or decalcifying, or rinsing, or inspection apertures that are under pressure, shall not be opened during use. - Do not use the appliance if it has been damaged in a fall, shows visible signs of damage, or has a faulty steam hose or electric cable. To avoid the risk of electric shock, do not open or disassemble the appliance. Contact an authorized Laurastar Customer Service representative for information on repair. Incorrect reassembly can cause a risk of electric shock when the appliance is used.
• Environmental information and waste disposal measures :
DO NOT dispose of the used appliance with normal household waste!
Ask your municipal or local authorities about appropriate environmentally-friendly disposal facilities.
SAVE THESE INSTRUCTIONS
FCC Statement
This device complies with part 15 of FCC Rules. Operation is subject to the following two conditions: (1) This device may not cause harmful interference, and (2) this device must accept any interference received, including interference that may cause undesired operation
Caution: The user is cautioned that changes or modifications not expressly approved by the party responsible for compliance could void the user's authority to operate the equipment.
Note: This equipment has been tested and found to comply with the limits for a Class B digital device, pursuant to part 15 of the FCC Rules. These limits are designed to provide reasonable protection against harmful interference in a residential installation. This equipment generates, uses and can radiate radio frequency energy and, if not installed and used in accordance with the instructions, may cause harmful interference to radio communications. However, there is no guarantee that interference will not occur in a particular installation. If this equipment does cause harmful interference to radio or television reception, which can be determined by turning
the equipment off and on, the user is encouraged to try to correct the interference by one or more of the following measures:
- Reorient or relocate the receiving antenna.
- Increase the separation between the equipment and receiver.
- Connect the equipment into an outlet on a circuit different from that to which the receiver is connected.
- Consult the dealer or an experienced radio/TV technician for help.
This equipment complies with radiation exposure limits set forth for uncontrolled equipment and meets the FCC RF exposure guidelines. This equipment has very low levels of RF energy that are deemed to comply without testing of specific absorption ration.
ISED statements
This device complies with Industry Canada license-exempt RSS standard(s). Operation is subject to the following two conditions: (1) this device may not cause interference, and (2) this device must accept any interference, including interference that may cause undesired operation of the device.
This equipment complies with Canada radiation exposure limits set forth for uncontrolled environments. This transmitter must not be co-located or operating in conjunction with any other antenna or transmitter.
Congratulations! You have just purchased a high-quality Laurastar ironing system that combines Swiss design and technology. Please read this instruction manual and the safety instructions carefully before using your appliance for the first time and retain this instruction manual for future use. Find all our tutorial videos and suggestions on www.laurastar.com
WARNING: Your Laurastar™ product generates heat and steam. Various parts of the appliance may become very hot during operation and can cause burns.

NOTE: This appliance generates heat and can cause burns. Those parts which get very hot are marked with this symbol.
Overview and features
- Ironing board
- Iron
- Steam Hose
- Special Laurastar cover
- Safety storage box
- Folding iron-rest
- Adjustable height handles
- Steam hose holder
- Steam buttons
- Vacuum/blower button
- Water reservoir
- Small and large water reservoir lid
- Filter compartment and anti-scale filter
- Drain tray
- Steam generator
- Main ON/OFF button with indicator light
- Laurastar SenSteam button (option)
- Pulsed steam button (option)
- Fan speed button (4 speeds)
- Empty water indicator light
- Steam generator cap
- Drain cap
- Power plug and Electric cable
- Fan
- Fan plug
- Wheels
- Protective soleplate
- Protective soleplate hook (option)
Table of Contents
Safety instructions 3
Laurastar Smart App 7
Installation and storage 7
Start up 9
Ironing 10
Filling 12
Maintenance 13
Customer service 14
Problems and solutions 15
Laurastar App: Q & A 16
Technical information 16
Guarantee / Limited Warranty
for the United States and Canada 17
Warning: Failure to comply with this instruction manual and the safety instructions may result in serious injury or damage to property. The manufacturer accepts no responsibility for such injury or damage in the event that these safety instructions are not followed. Keep this instruction manual for reference by any and all persons who may use the appliance.
LAURASTAR SMART APP

DOWNLOAD the Laurastar App

Download on the App Store

GETITON Google Play
If you have it already, make sure that the App is up to date.

LAUNCH the App
Launch the Laurastar App and follow the instructions on your smartphone or tablet.
text_image
A B CInstallation and storage
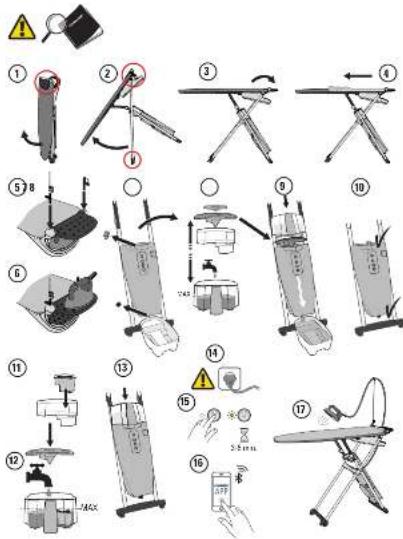
Installing your ironing system
- Remove the appliance from the box and position it vertically on the ground in a closed position.
- Hold the table with one hand on the iron rest side (6). Hold the middle of the table (1) with the other hand and pivot it to a horizontal position (maximum height). A B
- Unfold the iron-rest to the open position. ©
- Fit the ironing board cover (4), securing it from the side of the iron rest to the tip of the ironing board, then adjust. The cover supplied with this product is specially designed to ensure uniform distribution of air over the whole board in vacuum or blower mode. Use only a Laurastar approved cover to ensure that its effectiveness is not impaired. The cover is washable at 30°C (warm water); do not spin dry.
• Take the iron (2) out of its safety storage box (5) and place it on the iron-rest (6). - You can fold the iron-rest into the close position (6a) if you desire.
- Insert the steam hose holder(8) in one of the two holes beside the iron-rest (6), fix the steam hose on the steam hose holder (3a). Insert the protective soleplate hook (option) (28) in the other hole.
- You can lower the table height by clamping the handles (7). There are six levels. To lift the table, simply pull it up without using the handles.
• To move your Laurastar, simply raise the tip of the board and roll.
text_image
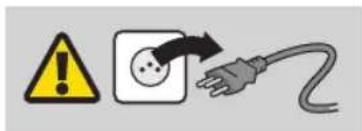
Warning symbol and electrical hazard icon: yellow warning triangle with exclamation mark, black square with plug, and gray cable with plug.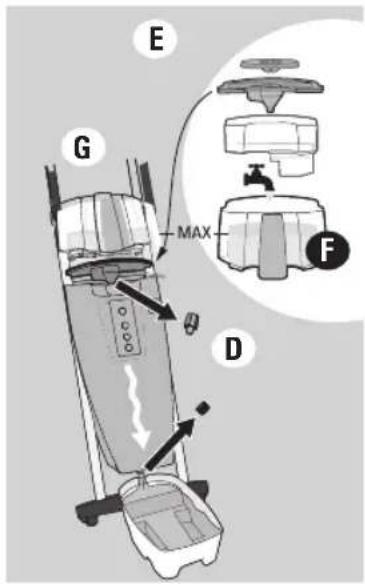
text_image
E G MAX F D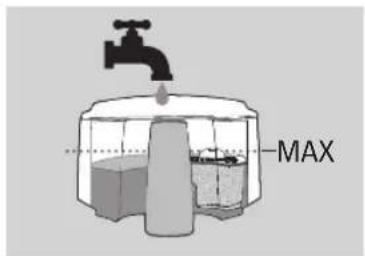
text_image
MAX
text_image
Warning symbol and electrical hazard icon: yellow warning triangle with exclamation mark, white plug with plug symbol, and black arrow indicating current warning.
text_image
Diagram illustrating two mechanical device states (H and I) with red circles highlighting specific states of motion, showing rotational and linear movement.Preparing the appliance
We recommend that you rinse out the steam generator (15) before using it for the first time:
- Check that the plug (23) is disconnected from the mains socket.
- Set the ironing board (1) to its highest position, then remove the water reservoir (11).
- Place the drain tray(14) beneath the drain cap (22).
- First unscrew the steam generator cap (21), then unscrew the drain cap (22).
- Remove the small and the large lid (12) from the water reservoir. Remove the filter compartment with the filter (13).
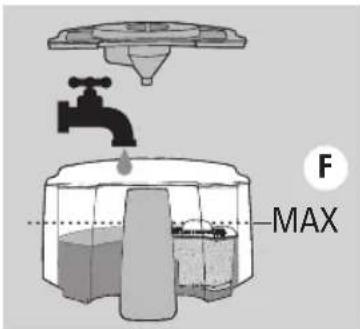
- Fill the water reservoir with warm tap water up to the MAX level.
- Position the large funnel shaped lid (12) at the place of the water reservoir (11) on top of the steam generator (15) and place the water reservoir above it.
- Once all the water has flown through and the reservoir is empty, screw the two caps in place again.
- Dispose of the water.
Which water should be used?
Your Laurastar has been designed for use with tap water. It is still absolutely necessary to use the supplied anti-scale filter (13) in order to benefit fully and longer from your Laurastar.

NOTICE: Never use additives (e.g. perfumed water), water containing chemical products or water from tumble dryers as these products will have a detrimental effect on the function of your Laurastar.
Storing your system
- To turn your appliance off, press the main ON/OFF button (16).
- Remove the power plug (23) and roll the electric cable around the feet of the table. If your model has the automatic rewind, pull on the cable in order to activate the rewind. Automatic cable rewind is not available in the USA and in Taiwan.
- Place the steam hose holder (8) horizontally in the hole designed for this purpose.
- Place the iron in the iron safety storage box (5). Fold the iron-rest into the "close" position on top of the table. Hold the table with one hand on the iron rest side (6). With the other hand grasp the ironing board (1), tilt the table into the vertical position. Ⓗ I
- Store your system in a vertical position. You can leave the water in the reservoir until the next usage.
- NOTE: if you store your system in a horizontal position, you must empty the water reservoir (11).
text_image
Warning symbol and electrical hazard icon with warning triangle, square, and plug symbol
natural_image
Mechanical assembly diagram showing a component being inserted into a housing (no text or labels)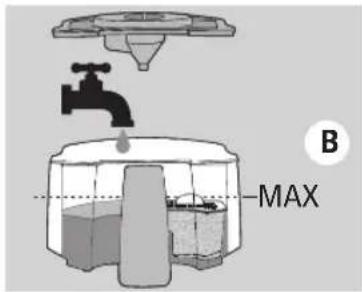
text_image
B MAX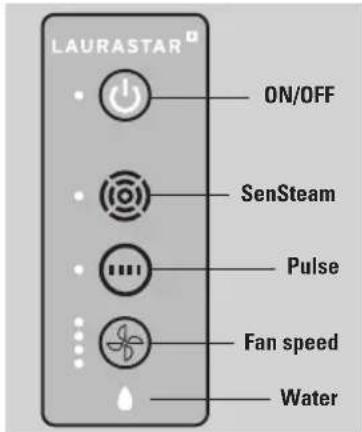
text_image
LAURASTAR ON/OFF SenSteam Pulse Fan speed Water
text_image
C 3-6 min.
text_image
AUTO STOP 10 min.Start up

CAUTION: Always fill the water reservoir (11) completely before turning on your Laurastar. Operating the appliance without water could damage the appliance.
PLEASE NOTE: Operating the appliance without water will void any limited warranties provided with your appliance.
Installation of the anti-scale cartridge and filling
- Check that the power plug is disconnected from the mains socket.
- Set the ironing board to its highest position.
- Take the water reservoir (11) out. Take off the water reservoir lids. Install the anti-scale filter (13).
- Fill the reservoir with tap water. The filtered water has to reach the MAX level. Ⓑ
- Close the water reservoir with the lids and put the reservoir back on the steam generator (15).
- If the water does not flow, soak the anti-scale filter in cold water for 3 minutes.
User interface
- ON/OFF = the green indicator light flashes until the appliance is ready to be used.
- (10) = Option Laurastar SenSteam. If your appliance is equipped with the Laurastar SenSteam option (17), the white indicator light signals that the function is on.
- 📄 = Option Pulsed Steam. If your appliance is equipped with the Pulsed Steam option (18), the white indicator light signals that the function is ON. Fan speed button (19) = choice of four speeds. The white indicator light signals the intensity chosen.
- Empty water light (20) = the red drop shaped indicator light signals that there is no more water in the reservoir (11).
Switching on your appliance
- Insert the power plug (23) in the socket. If your model is equipped with the automatic rewinder, first pull the electric cable until the end-of-cable mark is visible at the rewinder opening.
- Press the main ON/OFF button (16), the green indicator light will flash for 3-6 minutes. ©
- When the green indicator light stops flashing and stays on, the appliance is ready. You can start ironing.
- NOTE: For your comfort and safety, your Laurastar system will switch off after 10 minutes of non-use.
text_image
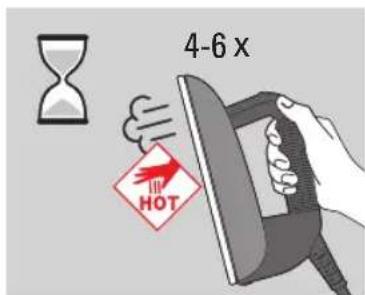
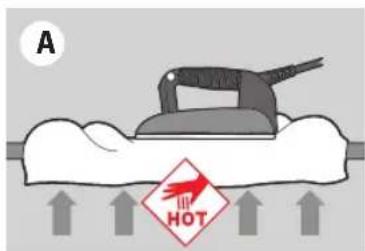
4-6 x HOTNOTE: Before ironing, or after an extended break, press the iron's steam button (9) 4 or 6 times, while pointing it away from the clothes. This will release any condensation from the iron and prevent water marks on the clothes.

CAUTION : Do not point the iron at people or pets while using vertical steam.
text_image
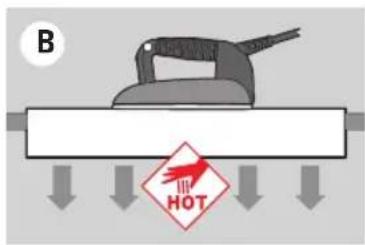
A HOTIroning
Two ironing modes
For the best possible steam ironing result, we offer two modes of ironing :
- Blower mode: Ⓐ Pressing the vacuum/blower button (10) on the iron activates the fan (24) in blower mode. this blows air into the fabric from below, helping to reduce unwanted creases.
- Vacuum mode : Ⓑ Pressing the vacuum/blower button (10) again, activates the fan (24) in vacuum mode. This draws in air, holding the garment in place on the board to facilitate perfect pleats.
Press the vacuum/blower button (10) to switch from blower to vacuum mode and vice versa. You can adjust the intensity (4 speeds) pressing the fan speed button (19) on the user interface of the steam generator.
text_image
B HOT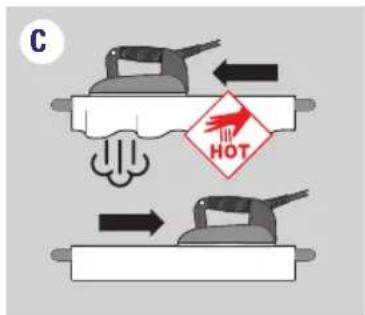
text_image
C HOTLAURASTAR SENSTEAM (17) (certain models only)
Laurastar SenSteam (17) allows you to obtain an automatic steam diffusion without pressing the steam button (9). The steam is automatically activated when the iron moves forward and stops when the iron rests or moves back Ⓒ. To switch back to regular mode, press the Laurastar SenSteam button (17) again.
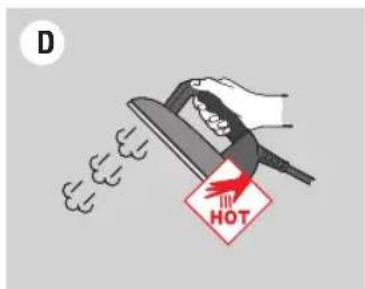
PULSE (18) (certain models only)
Press the pulsed steam button (18) to activate the pulse function. Then press the steam button (9) to automatically generate small and regular steam jets ①. To switch back to regular mode, press the pulsed steam button again (18).
text_image
D HOTSteam principle
Perfect ironing requires diffusion of steam across the fabric, in order to relax the fibres, and drying to fix them in place. Creases can only be completely removed if these conditions are present.
Advice: For best results, first iron the item with steam and then iron it again without steam, thereby enabling the iron to dry the fabric.
| Fabric type |  |  |  |  | [2A0D] |  | Velvet |
| Blower Back Darts | Inside and linings, sleeves | Top and pleats | √ | √ | √ | ||
| Vacuum | Buttons and collar | Turn-ups and pleats | Buttons and collars | Pleats | √ |
text_image
E HOT CLICK F HOT
text_image
G 10cm/4in HOTProtective soleplate (27)
The protective soleplate is indispensable for dark-coloured fabrics which can become shiny, for delicate fabric like silk and synthetic fabrics which have a tendency to stick to the iron.
Using the protective soleplate (27):
- First place the tip of the iron (2) at the front of the protective soleplate (27) and lower the iron to fix it in place in the soleplate. Ⓔ
- Wait approximately 2 minutes for the soleplate to reach the correct temperature.
To remove the protective soleplate, pull on the tab and remove the iron while it is still hot. F

WARNING: The protective soleplate is hot! Use caution when you remove the protective soleplate.
NOTICE: ALWAYS remove the protective soleplate after use.
Advice: For mohair, cashmere, velvet and angora: do not allow the fabric to come into contact with the protective soleplate (27). Iron the fabric at a distance of approximately 10 cm (4 in) while diffusing steam, so that the fabric does not become felted. G Then take the item of clothing in your hand and shake it to restore its volume.
For velvet, corduroy and jersey, we recommend steaming without the protective soleplate (27) at around 2-3 cm (1-2 in) from the fabric, then levelling out by hand.

text_image
H HOTVertical smoothing out
Suspend the item of clothing on a hanger or on the vertical support bracket (available on www.laurastar.com or at your approved Laurastar retailer). Moving the iron from top to bottom, lightly touch the fabric using short bursts of steam. Note: almost all fabrics smooth out easily, with the exception of cotton, linen and certain silks. H If a fabric is difficult to smooth out, place it on the ironing board and iron it normally.

WARNING: Do not iron or vertical steam clothes that are being worn. Do not point vertical steam in the direction of people or pets.
text_image
-bip- CALIFASTAR AFilling
Empty water indicator light (20) and warning tone
A warning tone sounds and the empty water indicator light (20) flashes to signal that there is no water left in the steam generator's reservoir. A As soon as the warning tone sounds, the steam stops and you must refill the water reservoir (11).
text_image
B MAXHow to fill the water reservoir (11)
- Remove the water reservoir (11) from its place. Take off the reservoir lids.
- Fill the reservoir with tap water. The filtered water must reach the MAX level.
- Close the lids and put the reservoir back in its place on top of the steam generator (15). B
text_image
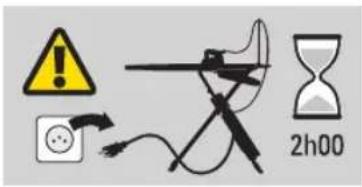
! 2h00Maintenance
To extend the life of your appliance, we recommend that you rinse the steam generator and clean your iron every month or after every 10 hours of ironing.
text_image
Diagram illustrating three-step steps of hair ironing: pressing, holding a cloth, and rotating with a screwdriver.WARNING: the appliance should be UNPLUGGED, OFF and COLD before cleaning. Switch off and unplug the appliance. Allow your appliance to cool down for at least 2 hours. Always make sure your appliance is cold before cleaning!
NOTICE! Only rinse the appliance with water. NEVER use descaling products or other chemical products.
Cleaning the iron (2)
If the iron's soleplate is dirty, use the cleaning mat in accordance with the instructions. This can be obtained at www.laurastar.com or from your approved Laurastar retailer.
Stubborn stains can be cleaned using an abrasive dishwashing sponge. After completing this operation, remove the aluminium oxide present under the soleplate by cleaning it with a damp cloth. B
Clean the steam holes in the iron's soleplate as soon as they become blocked up or calcified. ©
flowchart
graph TD
    A["Component D"] --> B["Component E"]
    B --> C["Component D"]
    style A fill:#f9f,stroke:#333
    style B fill:#f9f,stroke:#333
    style C fill:#ccf,stroke:#333
Anti-scale filter change (13)
The anti-scale filter has to be changed when the granules are completely brown.
- Remove the water reservoir (11) from its place. Take off the water reservoir lids. Remove the anti-scale filter (13).
- Dispose of the filter (13) in the regular household garbage and rinse the compartment. Install a new anti-scale filter in the water reservoir.
- Fill the reservoir with tap water. The filtered water must reach the MAX level. Then put the reservoir back in its place on top of the steam generator (15).
text_image
F MAXNote: you can wash the plastic elements of the water reservoir (11).
text_image
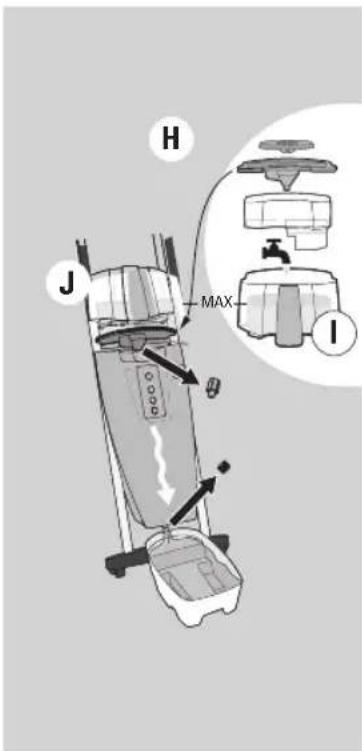
! 2h00Rinsing the steam generator (cold iron only)
In order to prolong the effectiveness of your appliance and avoid any traces of limescale, you must rinse the steam generator (15) on a regular basis.
text_image
H J MAX IWARNING: Only rinse with water. NEVER use descaling products or other chemical products.
Rinse the steam generator in accordance with the following instructions:
- Check that the power plug (23) is disconnected from the mains socket.
- Set the ironing board (1) to its highest position, then remove the water reservoir (11). Place the drain tray(14) beneath the drain cap(22).
- First unscrew the steam generatorcap (21) then the drain cap (22).
- Remove the small and the large lid from the water reservoir (12). Remove the filtercompartment with the filter (13).
- Fill the water reservoir with warm tap water up to the MAX level. ①
- Position the large funnel shaped lid (12) at the place of the water reservoir (11) on top of the steam generator (15) and position the water reservoir above it. Then let the water flow through. Ⓙ
- Repeat the operation until the water coming out of the steam generator is free of residues. If no water comes out of the drain opening, call the Laurastar Customer Service department.
- Once all the water has flown through and the reservoir is empty, screw the two caps in place again. Dispose of the water. Place the filter back in the water reservoir, close with the lids and put the reservoir back in its place on top of the steam generator(15).
Customer Service
To contact Laurastar, visit the Consumer Service menu of our website: www.laurastar.com
You will find other addresses of official importers and service partners, as well as the complete list of the Laurastar accessories.
IMPORTANT: before returning any product to the Customer Service department, please refer to the Problems and Solutions section.
Problems and solutions
Before calling the Laurastar Customer Service department, please check the following points:
| Symptom Likely cause | Remedy | ||
| GENERATOR | Makes a buzzing noise when steam is emitted from the iron. | Vibration from the appliance. This noise is normal for a new appliance, it will disappear in the course of use. | |
| Makes a crackling noise when the appliance is switched on. | The appliance has been set to heat up but has not been filled with water. | Fill the water reservoir (11) | |
| The iron no longer emits steam. The pressure has fallen. | The steam generator is empty.The appliance is switched off.The plug (23) is disconnected from the mains socket. | Fill the water reservoir (11)Turn the main switch ON (16)Connect the power plug (23) to the mains socket. | |
| Symptom Likely cause | Remedy | ||
| IRON | The soleplate drips. • The appliance has not been rinsed out recently.• The steam generator has been rinsed with a product other than water. | • Rinse out the Steam generator (15) until the rinsing water does not contain any more residues.• Call the Laurastar Consumer Service. | |
| The iron does not heat up. • The plug (23) is disconnected from the mains socket.• The appliance is switched off. | • Plug in the appliance.• Switch on the appliance. | ||
| Symptom Likely cause | Remedy | ||
| FAN | There is no sound from the fan. The fan plug (25) is disconnected from the mains socket. | Reconnect the fan plug (25) to the mains socket. | |
| The tip of the ironing board table becomes wet when folded. | There is condensation inside the ironing board table (1). | Leave the appliance open until the water has completely evaporated.Use less steam. Please refer to the instruction manual, paragraph «Steam principles». | |
Return to the Customer Service department
Switch off the appliance and disconnect the plug (23) from the mains socket. Locate your purchase contract, invoice or receipt. Call the Customer Service department and follow the instructions given.
Laurastar App: questions and answers
Question Answer Additional information
| APP LAURASTAR | How can I keep in memory the settings I have made with the App? | All the settings made with the Laurastar App are automatically stored in your Laurastar's memory and you will find them each time you turn on your appliance. | If several smartphones/tablets have been connected, your Laurastar will recognize the closest smartphone/tablet if the Bluetooth function is activated. |
| How many smartphones or tablets can I connect to my Laurastar? | It is possible to connect an unlimited number of different smartphones or tablets. When you start your Laurastar, you will find the settings of the last smartphone or tablet used. | Your Laurastar automatically loads the settings of the closest smartphone or tablet, if different from the last used and if the Bluetooth function is activated. | |
| How can I restore the factory settings (factory reset)? | Make a simultaneousz long press on the main ON/OFF and the fan speed button. Keep the two buttons pressed for 10 seconds. When all the LEDs of the user interface start to blink, the factory settings are reset. | WARNINGIntended or unintended incorrect handling might cause erasing of the factory settings. This voids the Laurastar warranty and possible costs of repair will be in charge of the user. |
Technical information
Technical characteristics
| CE | US | |
| Total output | 2200 W 1600 W | |
| Generator output | 1400 W 1000 W | |
| Iron output | 800 W 600 W | |
| Steam pressure | 3,5 bar 50 psi | |
| Steam generator capacity | 1,1 l 37,2 oz. | |
| Electricity supply | 220-240 VAC / 50-60 Hz 120 VAC / 60 Hz | |
| Weight of iron | 1,1 kg 2,4 lb | |
| Total weight | 23,1 kg 51 lb | |
| Board height | 82-102 cm 32.3-40.2 in | |
| Dimensions when folded (H x W x D) | 132 x 42 x 22 cm 52 x 16.6 x 8.7 in |
Designation: Pressure steam ironing system
Laurastar international guarantee
The present guarantee does not, in any way, affect the statutory rights of the user pursuant to the national legislation in force governing the sale of consumer goods, including the rights set out by Directive 2011/83/EU of the European Parliament and of the Council of 25 October 2011 on certain aspects of sales and guarantees for consumer goods, or the rights held by the user, by virtue of the sales contract, with regard to the respective vendor. In the event that an appliance sold by Laurastar contains manufacturing defects, Laurastar shall be liable for the complete elimination of these defects within the scope defined below.
1. Scope of cover
This guarantee only applies to products manufactured by or on behalf of Laurastar, which may be identified by the brand, the trade name or the Laurastar logo affixed to the product. The guarantee does not apply to non-Laurastar products, accessories or spare parts.
This guarantee shall be applicable only if the appliance becomes unusable, or if its use is significantly hindered, due to a manufacturing defect, an assembly defect or a defect in the material of the appliance, and if this defect was already in existence when the appliance was supplied to the user.
It shall not be applicable, in particular:
- if the hindrance to use of the appliance is due to professional use of the appliance, namely intensive use for which the user receives monetary remuneration
- to normal wear and tear of the appliance's components and accessories
- to an intervention by a third party or a repairer not approved by Laurastar
- to failure to comply with the instructions contained in the instruction manual, specifically the warnings concerning start-up, use and maintenance of the appliance
- to non-compliant use.
The concept of "non-compliant use" notably includes damage caused by:
• the fall of the appliance or of a component
- blows or marks resulting from negligence
- keeping the protective soleplate on the iron permanently
- failure to rinse the boiler
• use of water that does not comply with the specifications
- use of non-Laurastar products, accessories and spare parts.
- Continuous connection of the power plug to the mains socket.
2. Entitlements held by the user
When a user asserts, in a manner compliant with the present guarantee, an entitlement arising from the said guarantee, Laurastar shall be free to implement the most appropriate method for eliminating the defect. This guarantee does not grant the user any entitlement or any additional right; in particular, the user may not claim for reimbursement of expenses in relation to the defect, or compensation for any consequential loss or damage. Moreover, transportation of the appliance from the user's place of residence to Laurastar's premises, and return transportation, shall be carried out at the user's risk.
3. Term of validity
This guarantee is only valid for the entitlements that it accords to the user and that the user has asserted against Laurastar within the guarantee term.
The guarantee term is one year for countries that are not members of the European Union and two years for European Union Member States and Switzerland, calculated from the date of delivery of the appliance to the user. If defects are notified after the guarantee term has come to an end, or if the documents or items of evidence that are necessary to assert the defects in accordance with the present declaration are not present until after the end of the guarantee term, the user shall not hold any rights or entitlements by virtue of this guarantee.
4. Immediate notification of defects
When the user discovers a defect in the appliance, he / she undertakes to communicate this to Laurastar without delay. If the user does not do so, he / she shall lose the entitlements afforded by the present guarantee.
5. Methods for asserting entitlements arising from the present declaration
In order to assert the entitlements resulting from this guarantee, the user must contact the Laurastar Customer Service department, either:
- by telephone
- by e-mail
• by fax.
He / she must follow the instructions from the Customer Service department and send, at his / her own risk:
• the appliance with the defect(s)
- a copy of the purchase contract, of the invoice, of the till receipt or any other suitable document as evidence of the date or place of purchase.
The Customer Service department is available to provide any additional information on this subject.
You will find other addresses for importers and official service partners at www.laurastar.com.
If an appliance is returned to the Laurastar approved service centre when there is no defect present, the user shall be liable for the dispatch and return costs.
6. Laurastar™ after-sales service
If a Laurastar appliance is delivered to an agreed service centre for an intervention that is not covered by any warranty clause or after the warranty period, said intervention will be considered as a «out-of-warranty repair» and shall be invoiced.
Special clause only applicable in France:
In addition to the contractual guarantee detailed above, customers benefit from the legal guarantee for hidden defects set out in Article 1641 et seq. of the French Civil Code.
Special clause only applicable in China/Taiwan:
The aforementioned guarantee does not apply if the faulty product return or request for repair or exchange is made in China/Taiwan, except if all of the following conditions apply:
- The customer must provide all required evidence, such as the official sales receipt, guarantee certificate, etc. in order to prove that the product in question was purchased from the official sales channel in China/Taiwan that is directly or indirectly authorised by Laurastar; and
- A compulsory certification sticker must be affixed to the respective product by Laurastar with regard to its sale and use in China/Taiwan.
Special clause only applicable in the Republic of Korea:
The aforementioned guarantee does not apply if the faulty product return or request for repair or exchange is made in the Republic of Korea, except if all of the following conditions apply:
- The customer must provide all required evidence, such as the official sales receipt, guarantee certificate, etc. in order to prove that the product in question was purchased from the official sales channel in the Republic of Korea that is directly or indirectly authorised by Laurastar; and
- A compulsory certification sticker that is specific to the Republic of Korea must be affixed to the product in question.
- The exclusion of the Republic of Korea from the international guarantee went into effect in June 2017.
Laurastar™ limited warranty for USA & Canada
Laurastar warrants its product to be free from defects in materials and workmanship under normal customer use as described in the instruction manual for 1 year from the date of purchase as identified on the invoice or cash receipt. This limited warranty extends only to the original purchaser and is not transferable. Laurastar, at its option, will at no charge repair or replace defective equipment during the period of this limited warranty. To obtain warranty service, the damaged equipment must be sent or taken to an authorized Laurastar customer service center. This limited warranty is the customer's exclusive remedy and applies only to new Laurastar products.
This limited warranty does not cover normal wear and tear, wear of the electric cable, wear of the soleplate, or wear of the appliance's components and accessories. Damage caused by improper operation or storage, misuse or abuse, unauthorized repair by non-Laurastar specialists, accident or neglect, alteration, or connecting to a power source outside the specified voltage. Equipment used for a commercial or any other non-domestic or household purpose is not covered by this limited warranty. "Misuse or abuse" of the product includes the use of the equipment for any purpose, or in any manner, not in accordance with the instructions contained in the instruction manual provided with the equipment. Examples of "misuse or abuse" of the product include, but are not limited to, damage caused by the appliance or one of its components falling to the floor, failure to rinse the water reservoir, failure to remove the protective soleplate, use of any liquid other than water, the fact of not unplugging the power plug from the mains socket after each usage and the use of products, accessories and spare parts not supplied by Laurastar. The present limited warranty does not cover damages caused by non-respect of the instructions stipulated by this instruction manual.
ANY IMPLIED WARRANTIES, INCLUDING WITHOUT LIMITATION THE IMPLIED WARRANTIES OF MERCHANTABILITY AND FITNESS FOR A PARTICULAR PURPOSE, SHALL BE LIMITED TO THE DURATION OF THIS LIMITED WARRANTY. LAURASTAR SHALL UNDER NO CIRCUMSTANCES BE LIABLE FOR DAMAGES IN EXCESS OF THE PURCHASE PRICE OF THE PRODUCT OR FOR ANY INCIDENTAL OR CONSEQUENTIAL DAMAGES OF ANY KIND ARISING OUT OF THE CUSTOMER'S ABILITY OR INABILITY TO USE THE PRODUCT.
Some states and jurisdictions do not allow the limitation or exclusion of incidental or consequential damages, or limitation on the length of an implied warranty, so the above limitations or exclusions may not apply to you. This limited warranty gives the customer specific legal rights, and you may have other rights that vary from state to state.
LAURASTAR™ AFTER-SALES SERVICE
If you have a claim under this limited warranty, please contact the Laurastar Customer Service department, either by telephone, e-mail or fax. You must follow the instructions from the Customer Service department and send, at your own risk:
- the appliance;
- a copy of the purchase contract, invoice, till receipt, or any additional information on this subject.
You will find other addresses for importers and official service partners at www.laurastar.com.
If an appliance is returned to the Laurastar approved service center when there is no defect present, the user shall be liable for the dispatch and return costs
If a Laurastar appliance is entrusted to the approved service center for work outside the provisions of this limited warranty, or after the limited warranty one-year term has come to an end, this shall be deemed a "repair outside limited warranty" and shall form the subject of an invoice.
IMPORTANTES CONSIGNES DE SÉCURITÉ
text_image
Warning symbol and electrical hazard icon: yellow exclamation mark pointing to a plug with power outlet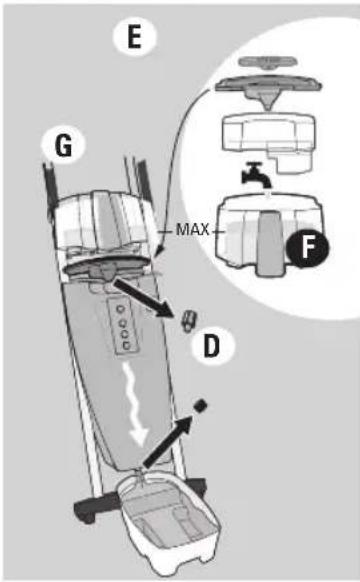
text_image
E G MAX D F
text_image
MAX
text_image
Warning symbol, electrical warning sign, and plug icon indicating hazard, socket, and power connection
text_image
Diagram illustrating mechanical assembly steps with labeled components H and I, showing directional arrows and circular annotations.text_image
Warning symbol, warning sign, and electrical plug icon with arrows indicating electrical hazard
natural_image
Mechanical assembly diagram showing a component being inserted into a housing (no text or labels)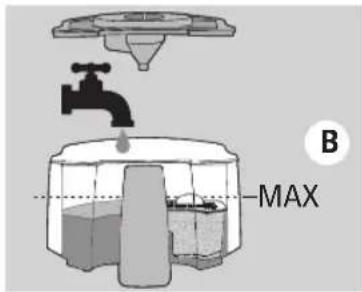
text_image
B MAX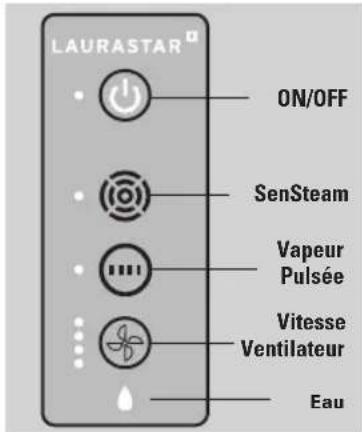
text_image
4-6 x HOTtext_image
E HOT CLICK F HOT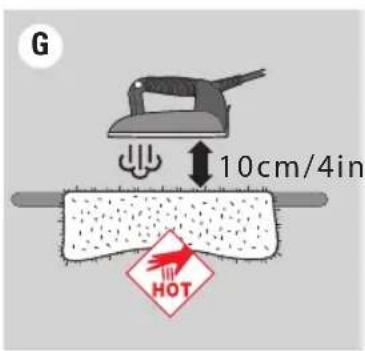
text_image
G 10cm/4in HOTSemelle protectrice (27)
text_image
-bip- LUNIPOTAR ARemplissage
text_image
Diagram illustrating three-step steps of hair ironing: pressing, holding a cloth, and rotating with a screwdriver.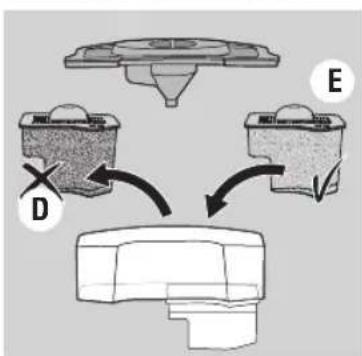
flowchart
graph TD
    A["Component D"] --> B["Component E"]
    B --> C["Final Component"]

text_image
F MAXEntretien
text_image
H J MAX I
text_image
Warning symbol, warning sign, and electrical plug icon with arrows indicating electrical hazard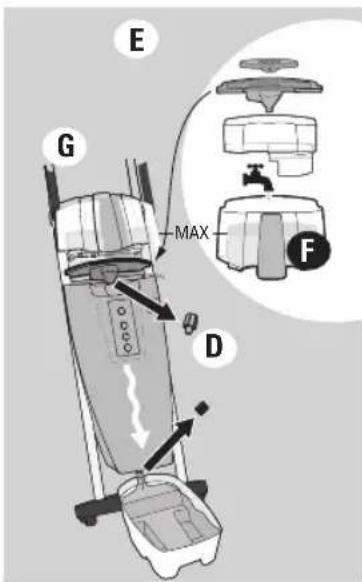
text_image
E G MAX D F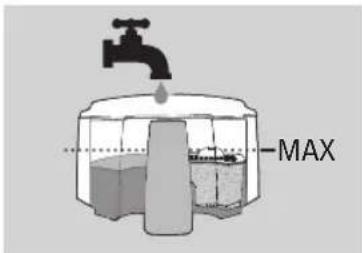
text_image
MAX
text_image
Warning symbol, warning sign, and electrical plug icon with arrows indicating current flow
text_image
Diagram illustrating mechanical assembly steps with labeled components H and I, showing rotational movement and component positioning.text_image
Warning symbol and electrical hazard icon: yellow exclamation mark pointing to a socket, with an orange arrow indicating current warning.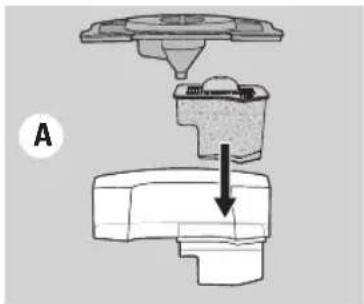
natural_image
Mechanical assembly diagram showing a valve and base component with an arrow indicating direction (no text or symbols)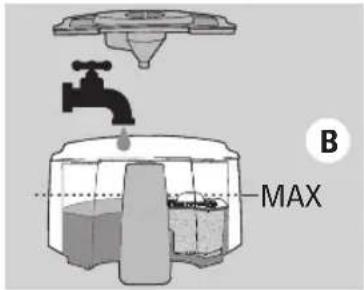
text_image
B MAX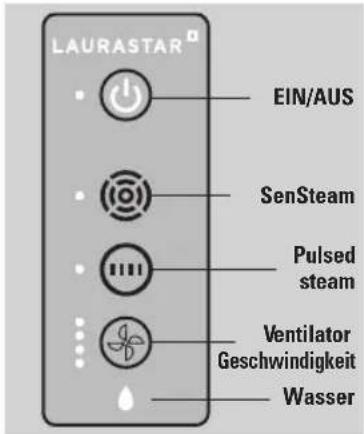
text_image
LAURASTAR EIN/AUS SenSteam Pulsed steam Ventilator Geschwindigkeit Wasser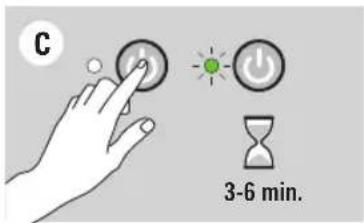
text_image
C 3-6 min.
text_image
AUTO STOP 10 min.Inbetriebnahme

text_image
4-6 x HOTtext_image
E HOT CLICK F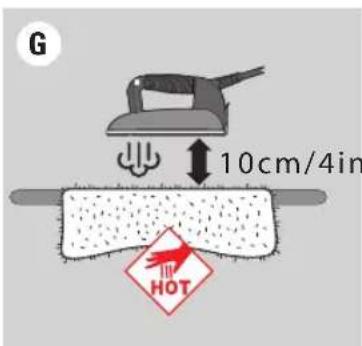
text_image
G 10cm/4in HOTSchutzsohle (27)
text_image
-bip LAU-VERTAR A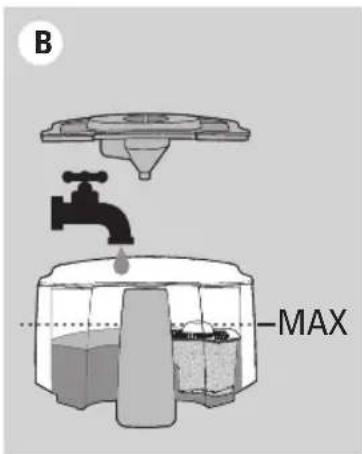
text_image
B MAXVertikales Glätten
text_image
H J MAX I
text_image
Warning symbol and electrical hazard icon with warning triangle, power plug, and plug plug symbol
text_image
E G MAX D F
text_image
MAX
text_image
Warning symbol and electrical hazard icon: yellow warning triangle with exclamation mark, black arrow pointing to plug symbol
text_image
Diagram illustrating mechanical assembly steps with labeled components H and I, showing directional arrows and circular annotations.text_image
Warning symbol, warning sign, and electrical plug icon with arrows indicating electrical hazard
natural_image
Mechanical assembly diagram showing a component being inserted into a housing (no text or labels)
text_image
B MAX
text_image
LAURASTAR AAN/UIT SenSteam Pulserende stoom Ventilator-snelheid Water
text_image
C 3-6 min.
text_image
AUTO STOP 10 min.Ingebruikname

text_image
4-6 x HOTtext_image
E HOT CLICK F HOT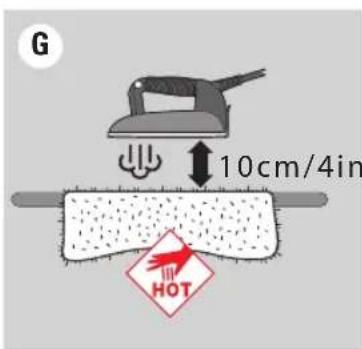
text_image
G 10cm/4in HOTBeschermzool (27)
text_image
-bip- LIFR/BATAR AVullen
Verklikkerlichtje leeg waterreservoir (20) en geluidssignaal
text_image
Diagram illustrating three-step steps of a hair ironing process: pressing, holding, and rotating the blade.
flowchart
graph TD
    A["Component D"] --> B["Component E"]
    B --> C["Component C"]
    style A fill:#f9f,stroke:#333
    style B fill:#f9f,stroke:#333
    style C fill:#ccf,stroke:#333

text_image
F MAXOnderhoud
text_image
H J MAX I
Download on the App Store

GETTON Google Play
text_image
Warning symbol and electrical hazard icon: yellow warning triangle with exclamation mark, black square with plug, and gray plug with fuse.
text_image
E G MAX D F
text_image
MAX
text_image
Warning symbol, electrical warning icon, and plug symbol indicating electrical hazard, voltage, and plug
text_image
Diagram illustrating mechanical assembly steps with labeled components H and I, showing rotational movement and component positioning.text_image
Warning symbol and electrical hazard icon with warning triangle, square, and plug symbol
natural_image
Mechanical assembly diagram showing a valve or fitting with a downward arrow indicating motion (no text or symbols present)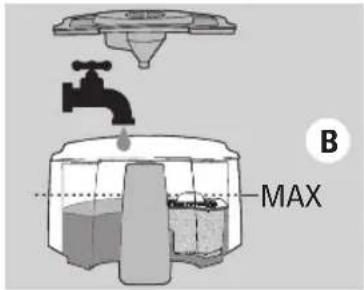
text_image
B MAX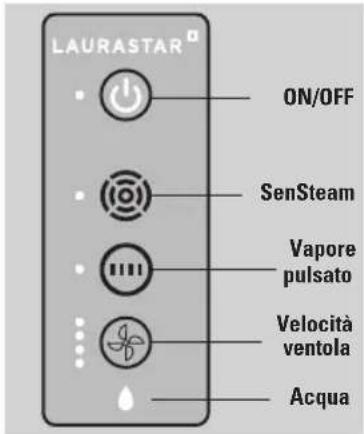
text_image
4-6 x HOTtext_image
E HOT CLICK F HOT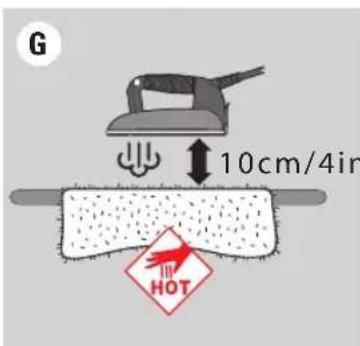
text_image
G 10cm/4in HOTtext_image
Diagram illustrating three-step steps of hairpin cleaning: pressing, holding a brush, and rotating the blade.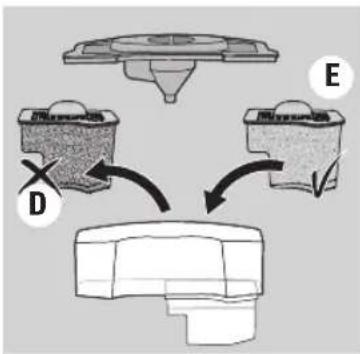
flowchart
graph TD
    A["Component D"] --> B["Component E"]
    B --> C["Final Component"]
text_image
F MAXManutenzione
text_image
H J MAX IDownload on the App Store

GETTON Google Play
text_image
Warning symbol and electrical hazard icon with warning triangle, socket, and plug symbols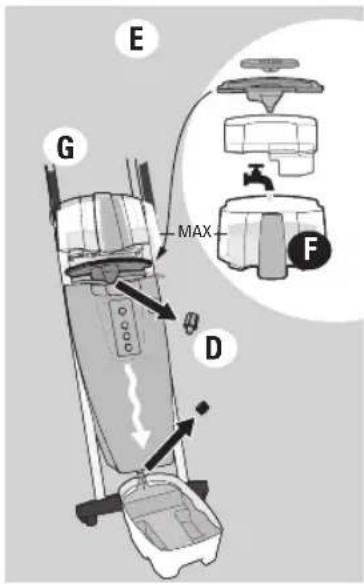
text_image
E G MAX D F
text_image
MAX
text_image
Warning symbol and electrical hazard icon with warning triangle, socket, and plug symbols
text_image
Diagram illustrating mechanical assembly steps with labeled components H and I, showing directional arrows and circular annotations.text_image
Warning symbol, warning sign, and electrical plug icon with arrows indicating electrical hazard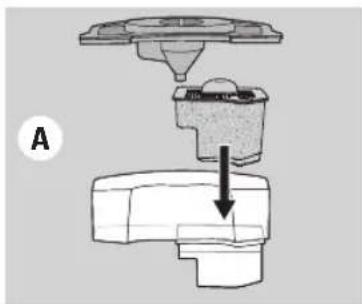
natural_image
Mechanical assembly diagram showing a component being inserted into a housing (no text or labels)
text_image
B MAX
text_image
LAURASTAR ON/OFF SenSteam Vapor Pulsado Velocidad Ventilador Agua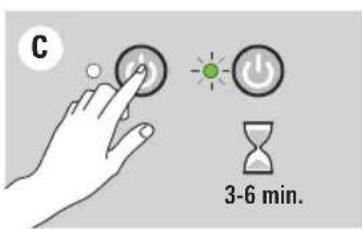
text_image
C 3-6 min.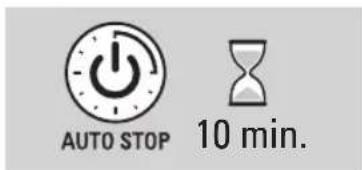
text_image
AUTO STOP 10 min.Puesta en marcha
text_image
4-6 x HOTtext_image
E HOT CLICK F HOT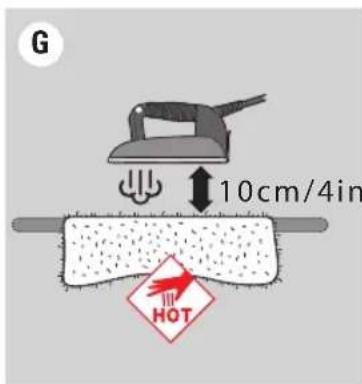
text_image
G 10cm/4in HOTSuela protectora (27)
text_image
-bip- UNPARTAR ALlenado
text_image
H J MAX IDownload on the App Store

GETTON Google Play
text_image
Warning symbol and electrical hazard icon: yellow warning triangle with exclamation mark, black square with plug, and gray plug with fuse.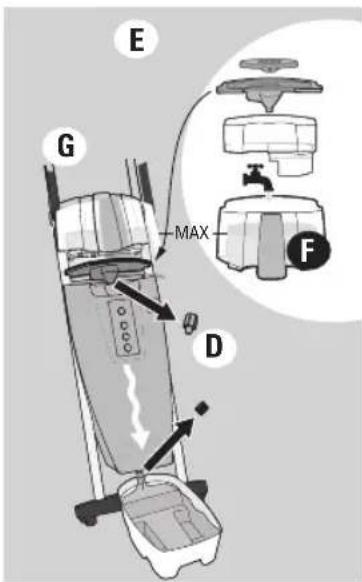
text_image
E G MAX D F
text_image
MAX
text_image
Warning symbol, warning sign, and electrical plug icon with arrows indicating current flow
text_image
Diagram illustrating mechanical assembly steps with labeled components H and I, showing rotational motion and component positioning.text_image
Warning symbol and electrical hazard icon with warning triangle, square, and plug symbol
natural_image
Mechanical assembly diagram showing a valve and base component with an arrow indicating direction (no text or labels)
text_image
B MAX
text_image
LAURASTAR ON/OFF SenSteam Vapor Pulsado Velocidade Ventilador Água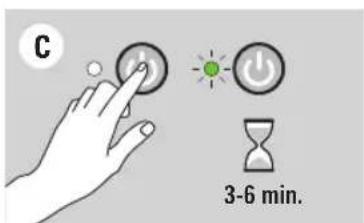
text_image
C 3-6 min.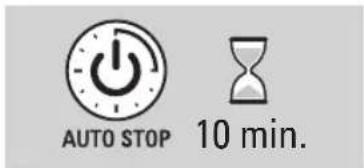
text_image
AUTO STOP 10 min.text_image
4-6 x HOTtext_image
E HOT CLICK F HOT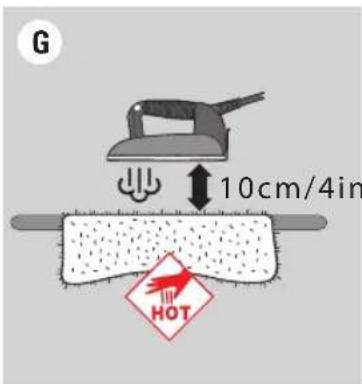
text_image
G 10cm/4in HOTtext_image
Diagram illustrating three-step steps of hairpin cleaning: pressing, holding a brush, and rotating with arrows.
flowchart
graph TD
    A["Component D"] --> B["Component E"]
    B --> C["Component D"]
    style A fill:#f9f,stroke:#333
    style B fill:#f9f,stroke:#333
    style C fill:#ccf,stroke:#333

text_image
F MAXManutenção
text_image
H J MAX IDownload on the App Store

GETTON Google Play
text_image
Warning symbol, warning sign, and electrical plug icon with arrows indicating electrical hazard
text_image
E G MAX D F
text_image
MAX
text_image
Warning symbol, electrical warning icon, and plug symbol indicating electrical hazard, fuse, and plug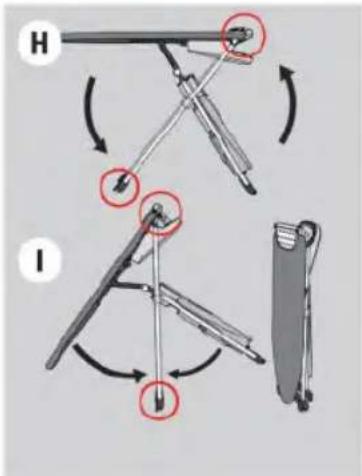
text_image
Diagram illustrating two mechanical folding or folding steps labeled H and I, with arrows indicating movement and red circles highlighting specific points.text_image
Warning symbol, warning sign, and electrical plug icon with arrows indicating electrical hazard
natural_image
Mechanical assembly diagram showing a component being inserted into a housing (no text or labels)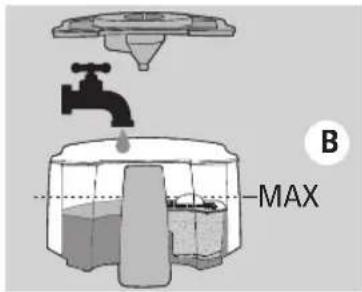
text_image
B MAX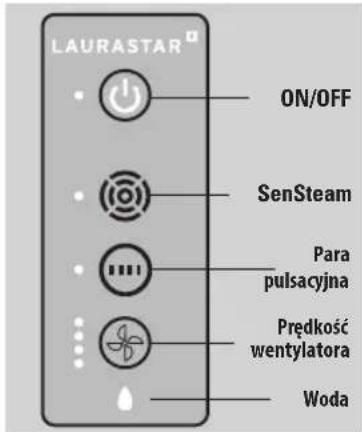
text_image
4-6 x HOTtext_image
E HOT CLICK F HOTtext_image
G 10cm/4in HOT
text_image
-bip- LAYERSTAR Atext_image
Diagram illustrating three-step steps of hair ironing: pressing, holding a cloth, and rotating with a screwdriver.
flowchart
graph TD
    A["Component D"] --> B["Component E"]
    B --> C["Component C"]
    style A fill:#f9f,stroke:#333
    style B fill:#f9f,stroke:#333
    style C fill:#ccf,stroke:#333

text_image
F MAXKonserwacja
text_image
H J MAX IDownload on the App Store

GET IT ON Google Play
text_image
Warning symbol and electrical hazard icon: yellow warning triangle with exclamation mark, black square with plug, and gray plug with power plug.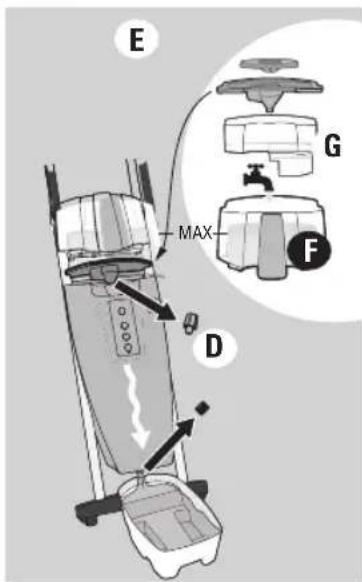
text_image
E G MAX F D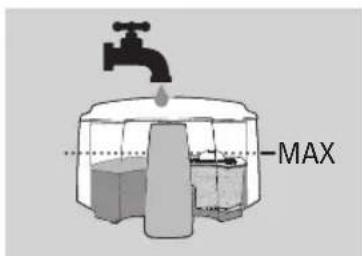
text_image
MAX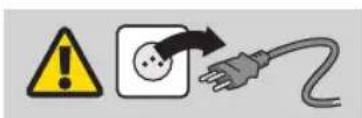
text_image
Warning symbol, warning sign, and electrical plug icon with Chinese label
text_image
Diagram illustrating mechanical assembly steps with labeled components H and I, showing directional arrows and component positioning.Подготовка прибора
text_image
Warning symbol and electrical hazard icon: yellow exclamation mark pointing to a socket, with a black arrow indicating current warning.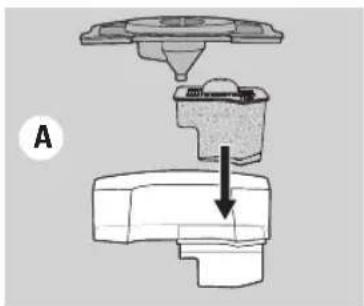
natural_image
Mechanical component diagram showing a valve assembly with a downward arrow indicating force or direction (no text or symbols present)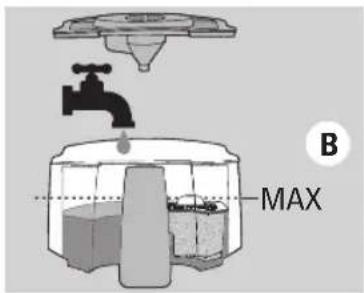
text_image
B MAX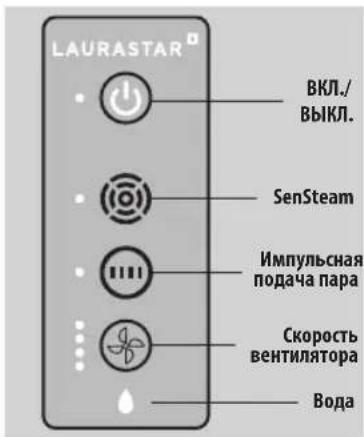
text_image
4-6 x HOTtext_image
E HOT CLICK F HOT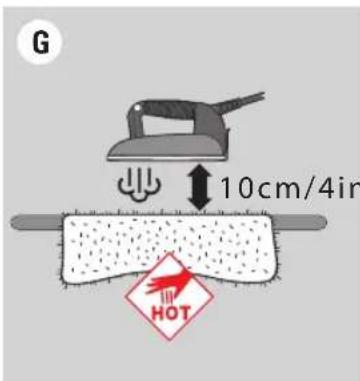
text_image
G 10cm/4in HOTtext_image
-bip LAUNMATAN AНаполнение водой
text_image
Diagram illustrating three-step steps of a hair ironing or cleaning procedure, labeled A, B, and C.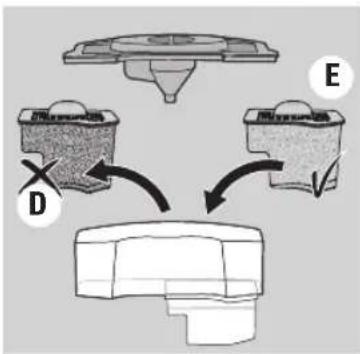
flowchart
graph TD
    A["Component D"] --> B["Component E"]
    B --> C["Final Component"]

text_image
F MAXУход
text_image
H J MAX Itext_image
Warning symbol and electrical hazard icon with warning triangle, power plug, and plug cable
text_image
E G MAX D F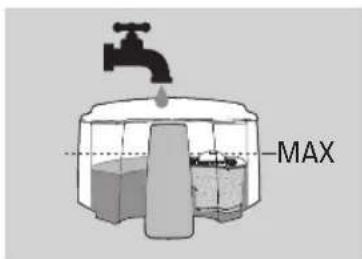
text_image
MAX
text_image
Warning symbol and electrical hazard icon: yellow warning triangle with exclamation mark, black arrow pointing to plug plug symbol
text_image
Diagram illustrating mechanical assembly steps with labeled components H and I, showing rotational movement and component positioning.备设的准备
建议在首次使用前清洗蒸汽炉(15):
text_image
Warning symbol and electrical hazard icon with warning triangle, square, and plug symbol
natural_image
Mechanical assembly diagram showing a valve or pump component with a downward arrow indicating motion (no text or symbols present)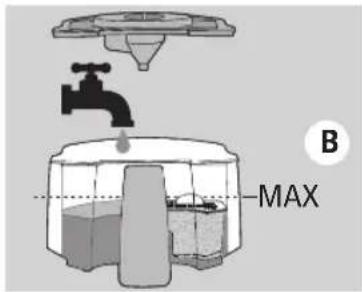
text_image
B MAX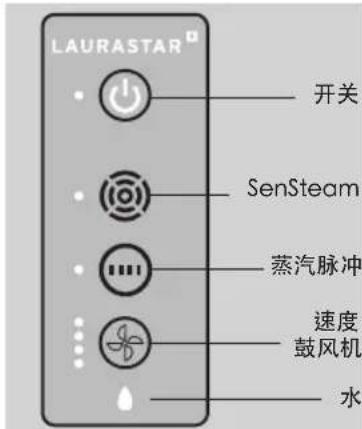
text_image
4-6 x HOTtext_image
E HOT CLICK F HOT熨斗活动底板(27)
text_image
G 10cm/4in HOTtext_image
-bip- LUXEMSTAR A注水
缺水指示灯(20)和声音提示
text_image
Diagram illustrating three-step steps of hair ironing: pressing, holding a cloth, and rotating with a screwdriver.
flowchart
graph TD
    A["Component D"] --> B["Component E"]
    B --> C["Component D"]
    style A fill:#f9f,stroke:#333
    style B fill:#f9f,stroke:#333
    style C fill:#ccf,stroke:#333

text_image
F MAX维护
text_image
H J MAX I清洗步骤如下:
RoHS declaration for China
名称和产品中有害物质的含量
Name and content of hazardous substances in products
| 组件名称Component Name | 有害物质Hazardous substance | |||||
| 铅Lead(Pb) | 汞Mercury(Hg) | 镉Cadmium(Cd) | 六价铬Hexavalent chromium(Cr (VI)) | 多溴联苯Polybrominated biphenyls(PBB) | 多溴二苯醚Polybrominated diphenyl ethers(PBDE) | |
| 塑料外壳和底盘Plastic enclosure and chassis | ○ | ○ | ○ | ○ | ○ | |
| 印刷电路板组装Printed Circuit Board Assembly | X | ○ | ○ | ○ | ○ | |
| 电机、阀门Motors, valves | X | ○ | ○ | ○ | ○ | |
| 电缆和电线Cable and wiring | X | ○ | ○ | ○ | ○ | |
| 金属零件Metall parts | X | ○ | ○ | ○ | ○ | |
| 此表编制 SJ/T 11364 年规定。This table is prepared in accordance with the provisions of SJ/T 11364.○: 中所有均质材料中的这类组件这种有害物质的含量是下文要求 GB/T 26572 的极限值。○: The content of such hazardous substance in all homogeneous materials of such component is below the limit required by GB/T 26572.X: 这种有害物质在某些均质材料中这种组件的内容是超出 GB/T 26572 要求的极限值。X: The content of such hazardous substance in a certain homogeneous material of such component is beyond the limit required by GB/T 26572. | ||||||
此产品的环境友好使用期是:
The Environment Friendly Using Period for this product is:

重要安全須知
使用熨斗時,應時刻遵守基本的預防措施,
包括下列各項:
使用前請閱讀所有須知
text_image
Warning symbol and electrical hazard icon showing a warning triangle, a plug with a dot, and an electric plug.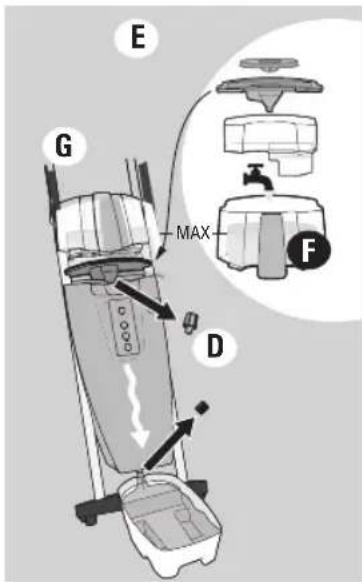
text_image
E G MAX D F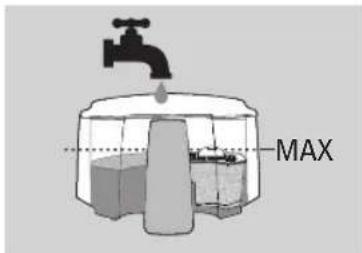
text_image
MAX
text_image
Warning symbol and electrical hazard icon with warning triangle, square, and plug symbol
text_image
Diagram illustrating mechanical assembly steps with labeled components H and I, showing rotational and linear motion patterns.使用設備前的準備
text_image
Warning symbol, warning sign, and electrical plug icon with arrows indicating electrical hazard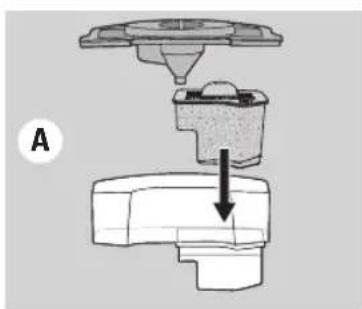
natural_image
Mechanical assembly diagram showing a valve and base component with an arrow indicating direction (no text or symbols)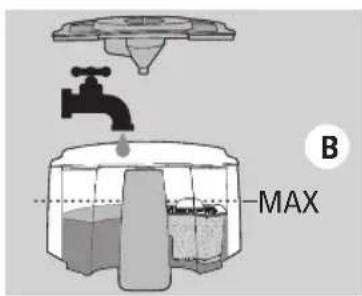
text_image
B MAX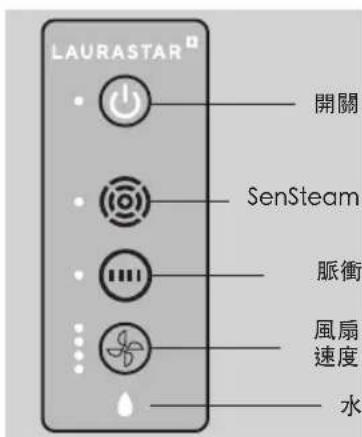
text_image
4-6 x HOTtext_image
E HOT CLICK F HOT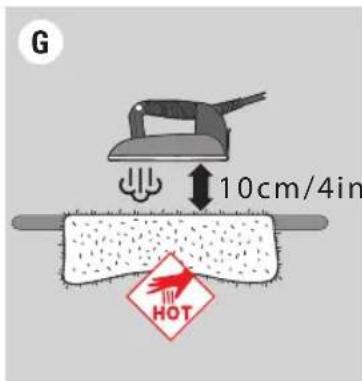
text_image
G 10cm/4in HOT護防底板(27)
text_image
Illustration showing three-step steps of a hair ironing process: pressing, holding, and rotating.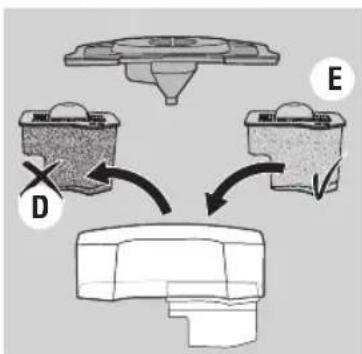
flowchart
graph TD
    A["Component D"] --> B["Processing Unit"]
    C["Component E"] --> B
    B --> D["Final Output"]

text_image
F MAX保養
text_image
H J MAX I請按照以下步驟清洗蒸汽產生器:
RoHS declaration for Taiwan
產品中有害物質的名稱與含量
Name and content of hazardous substances in products
| 設備名稱:高壓蒸汽熨燙系統型號(型式):SMART U Model 800SMART M Model 805SMART i Model 810Equipment nameType designation (Type) | ||||||
| 單元Unit | 限用物質及其化學符號Restricted substances and its chemical symbols | |||||
| 鉛Lead(Pb) | 汞Mercury(Hg) | 鎘Cadmium(Cd) | 六價鉻Hexavalent chromium(Cr+6) | 多溴聯苯Polybrominated biphenyls(PBB) | 多溴二苯醚Polybrominated diphenyl ethers(PBDE) | |
| 塑料外殼和底盤Plastics enclosures and chassis | ○ | ○ | ○ | ○ | ○ | |
| 印刷電路板組合Printed circuit board assembly | ○ | ○ | ○ | ○ | ○ | |
| 馬達、閥門Motors, valves | ○ | ○ | ○ | ○ | ○ | |
| 電纜和電線Cable and wiring | ○ | ○ | ○ | ○ | ○ | |
| 金屬零組件Metal parts | ○ | ○ | ○ | ○ | ○ | |
| 備考1.“超出0.1 wt %”及“超出0.01 wt %”係指限用物質之百分比含量超出百分比含量基準值。Note 1:“Exceeding 0.1 wt %” and “exceeding 0.01 wt %” indicate that the percentage content of the restricted substance exceeds the reference percentage value of presence condition.備考2.“○”係指該項限用物質之百分比含量未超出百分比含量基準值。Note 2:“○” indicates that the percentage content of the restricted substance does not exceed the percentage of reference value of presence.備考3.“-”係指該項限用物質為排除項目。Note 3 The “-” indicates that the restricted substance corresponds to the exemption. | ||||||
此產品的環境友好使用期是:
The Environment Friendly Using Period for this product is:

안전 사항
text_image
Warning symbol and electrical hazard icon: yellow exclamation mark, black plug with plug symbol, and warning arrow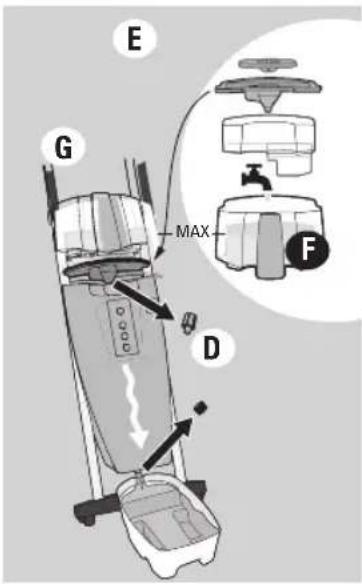
text_image
E G MAX D F
text_image
MAX
text_image
Warning symbol and electrical hazard icon with a plug, indicating electrical hazard or hazard
text_image
Diagram illustrating mechanical assembly steps with labeled components H and I, showing directional arrows and circular annotations.기기 준비
text_image
Warning symbol and electrical hazard icon with warning triangle, square, and plug symbol
natural_image
Mechanical assembly diagram showing a component being inserted into a housing (no text or labels)
text_image
B MAX
text_image
4-6 x HOTtext_image
E HOT CLICK F HOT보호용 밀판(27)
text_image
G 10cm/4in HOTtext_image
-bip- UNPARTAR A채우기
text_image
Diagram illustrating three-step steps of hair ironing: pressing, holding a cloth, and rotating with a screwdriver.text_image
H J MAX Itext_image
H J I MAXخدمة الزبان
text_image
Illustration showing three-step steps of a hair ironing process: pressing, holding, and rotating.natural_image
Illustration of a shirt with a hand holding a hot metal tag, next to a hanger (no text or symbols)التعبئة
text_image
-bip LAJABASTAR Atext_image
G 10cm/4in HOTtext_image
4-6 x HOTالكى
أسلوبان للكى
text_image
Warning symbol, warning triangle, and electrical plug icon with Chinese labelnatural_image
Mechanical assembly diagram showing a valve or actuator with a downward arrow indicating motion (no text or symbols present)text_image
Warning symbol and electrical hazard icon with a plug and cable, indicating electrical hazard or warning.
text_image
MAX G Dtext_image
Warning symbol and electrical hazard icon with warning triangle, power outlet, and plug symbolتوضيب نظام الكى
text_image
Four black-and-white pictograms showing food waste and transportation symbols: a drink, a person holding a fan, a trash bin, and a no-drawn trash bin.text_image
Warning symbol and electrical hazard icon: yellow warning triangle with exclamation mark, black square with plug, and gray plug with fuse.
text_image
E G MAX F D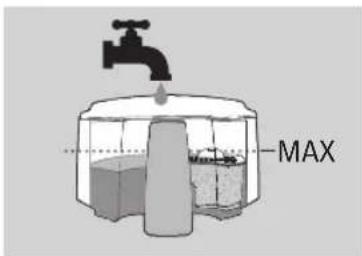
text_image
MAX
text_image
Warning symbol, electrical warning sign, and plug icon indicating hazard, power outlet, and plug
text_image
Diagram illustrating two mechanical assembly steps labeled H and I, showing motion directions with red circles highlighting specific components.Forberede apparatet
Vi anbefaler at du skyller dampgeneratoren (15) før du bruker den for første gang:
text_image
Warning symbol and electrical hazard icon with a plug, indicating electrical hazard or warning against current safety.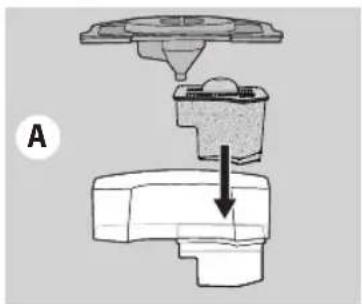
natural_image
Mechanical assembly diagram showing a valve or fitting with a downward arrow indicating motion (no text or symbols present)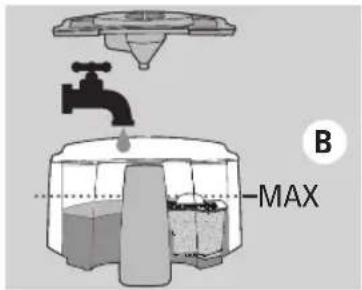
text_image
B MAX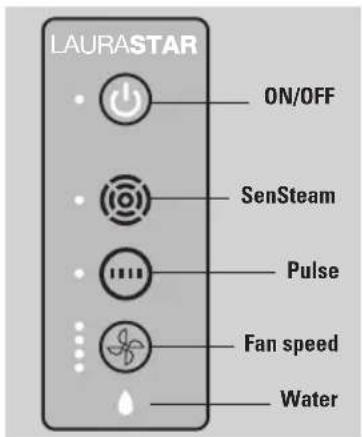
text_image
LAURASTAR ON/OFF SenSteam Pulse Fan speed Water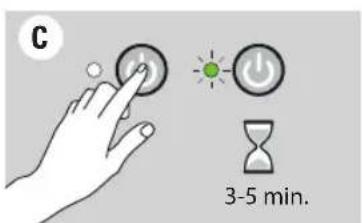
text_image
C 3-5 min.
text_image
AUTO STOP 10 min.Oppstart
text_image
E HOT CLICK F HOTBeskyttende såle (27)
text_image
G 10cm/4in HOTtext_image
-bip- LAURWETAR AFylling
text_image
Diagram illustrating three-step steps of hair ironing: pressing, holding a cloth, and rotating the edge.ADVARSEL: Apparatet skal ha kontakten AVKOBLET, være AV og KALD før det vaskes. Slå av og trekk ut kontakten på apparatet. La apparatet kjøles ned i minst 2 timer. Forsikre deg om at apparatet er kaldt før du vasker!
MERK! Skyll apparatet med rent vann. Bruk ALDRI kjelsteinfjernende produkter eller andre kjemiske produkter.
text_image
H J MAX IADVARSEL: Skyll bare med vann. Bruk ALDRI kjelsteinfjernende produkter eller andre kjemiske produkter.
text_image
Four symbolic icons representing food waste and waste management, including a drink ban, trash bin, and no litter.Download on the App Store

GETTON Google Play
text_image
Warning symbol, warning sign, and electrical plug icon with arrows indicating electrical hazard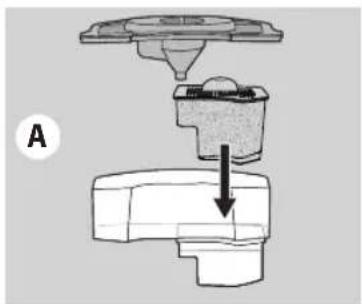
natural_image
Mechanical assembly diagram showing a valve or fitting with a downward arrow indicating motion (no text or symbols present)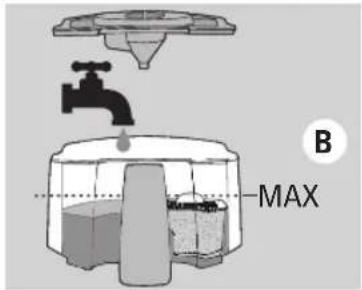
text_image
B MAX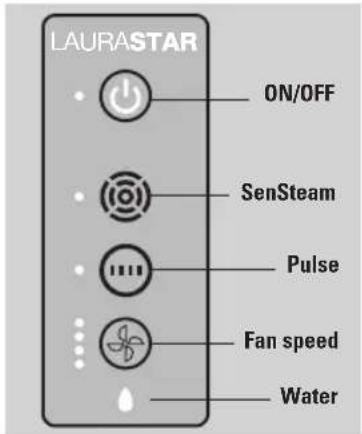
text_image
LAURASTAR ON/OFF SenSteam Pulse Fan speed Water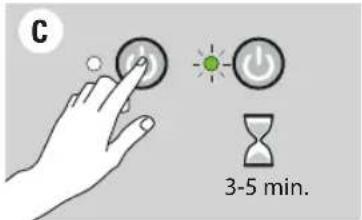
text_image
C 3-5 min.
text_image
AUTO STOP 10 min.Opstart
text_image
E HOT CLICK F HOTBeskyttende strygesål (27)
text_image
G 10cm/4in HOTtext_image
Diagram illustrating three-step steps of hair ironing: pressing, holding a cloth, and rotating with arrows indicating rotation.text_image
H J MAX I
ADVARSEL: Skyl kun med vand. Anvend ALDRIG afkalkningsprodukter eller andre kemiske produkter.
6. Laurastar™ after salgsservice
text_image
Four black-and-white pictograms showing food and waste symbols: a drink ban, a trash bin with a stopper, a person holding a hand, and a no-waste sorting bin.text_image
Warning symbol and electrical hazard icon with a plug, indicating electrical hazard or warning against current safety.
natural_image
Mechanical assembly diagram showing a valve or fitting with a downward arrow indicating force or direction (no text or symbols present)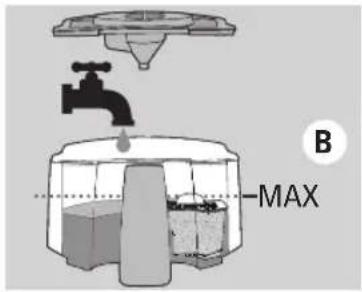
text_image
B MAX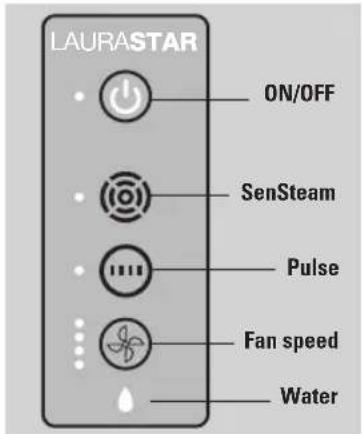
text_image
LAURASTAR ON/OFF SenSteam Pulse Fan speed Water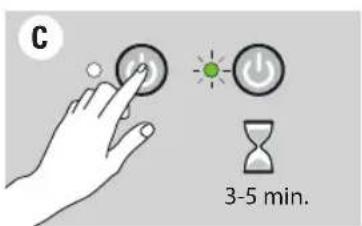
text_image
C 3-5 min.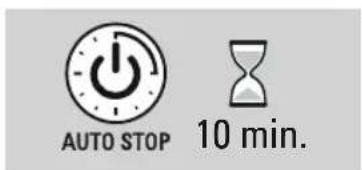
text_image
AUTO STOP 10 min.Att Starta