
T6 - Sports Watch SUUNTO - Free user manual and instructions
Find the device manual for free T6 SUUNTO in PDF.

| Product type | Sports watch / wrist computer |
| Brand | Suunto |
| Model | T6 |
| Power (watch) | CR2032 lithium battery, 3V |
| Power (transmitter belt) | CR2032 lithium battery, 3V |
| Battery life (watch) | 4 to 14 months depending on usage |
| Battery life (belt) | Approximately 300 hours of use |
| Main functions | Time, date, alarm, altimeter, barometer, compass (via accessory), heart rate, stopwatch, lap counter, session recording, PC compatibility |
| Available modes | Time, Alti/Baro, Training, Spd/Dst (with accessory) |
| Built-in sensors | Altitude, barometric pressure, temperature |
| Connectivity | Wireless ANT for transmitter belt and speed/distance sensors; USB cable for data transfer to PC |
| Included software | Suunto Training Manager (on CD-ROM) |
| Water resistance | Yes (maintained by careful battery replacement) |
| Maintenance | Replace battery with new gasket; do not bend contact tabs |
| Safety | Medical consultation recommended for pacemaker wearers; do not open battery |
| Spare parts | Suunto batteries with cover and gasket, transmitter belt, Spd/Dst sensors |
| Repairability | Warranty repair by Suunto; unauthorized repair voids warranty |
| Warranty | 2 years (material and manufacturing defects) |
| Standards | CE, FCC Class B, ISO 9001 |
Frequently Asked Questions - T6 SUUNTO
User questions about T6 SUUNTO
0 question about this device. Answer the ones you know or ask your own.
Ask a new question about this device
Download the instructions for your Sports Watch in PDF format for free! Find your manual T6 - SUUNTO and take your electronic device back in hand. On this page are published all the documents necessary for the use of your device. T6 by SUUNTO.
USER MANUAL T6 SUUNTO
This is the User's Guide for Suunto t6 wristop computer. It contains brief introductions to all the modes, and guidelines on where and when to use their functions. It also contains more detailed instructions on how to use the most important functions. However, it does not include all the information on Suunto t6, and the information it contains is not always given in full detail. In other words, the User's Guide should be used alongside the User's manual. Therefore you should first read the User's manual carefully before using the User's Guide. You can find the User's manual on the CD-ROM supplied with your Suunto t6.
Checklist
Make sure the package contains the following items in addition to the User's Guide:
Suunto t6
Transmitter belt (Suunto ANT-transmission compatible)
PC-interface cable
- CD containing the Suunto Training Manager and the Suunto t6 User's manual Should any of these be missing from the package, contact the representative who sold you the package.
NOTE: This User's Guide refers to speed and distance (Spd/Dst) functions. These are only available with separate Spd/Dst accessories. The references to these functions are in italics.
2. BASIC MENU STRUCTURE
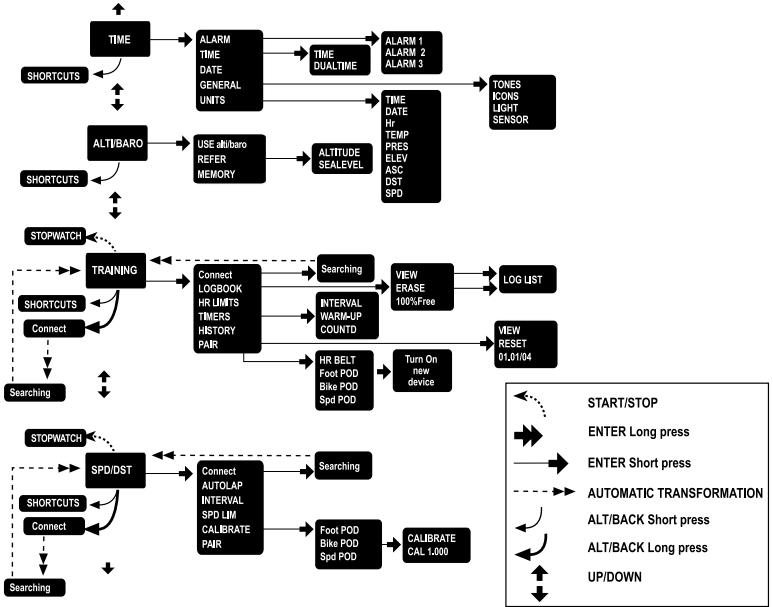
To navigate the menus:
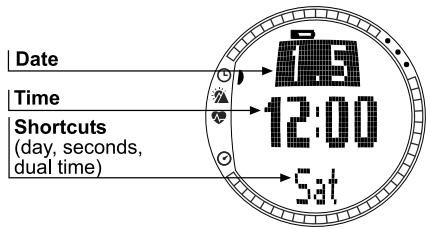
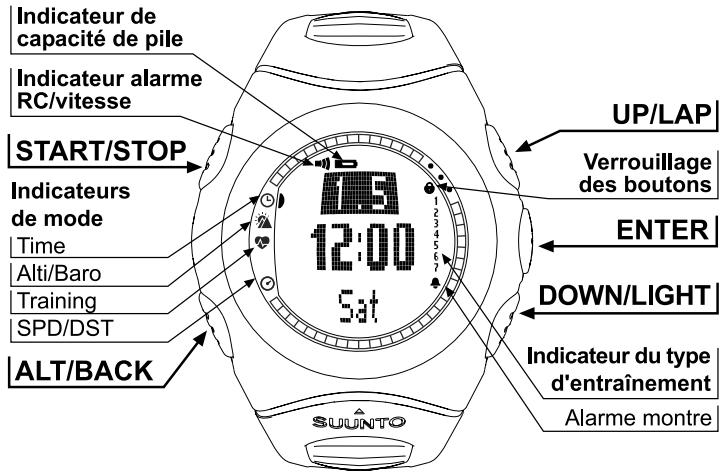
- Scroll from one mode to another with UP/DOWN buttons. The name of the new mode is displayed for a short while before the main display opens. The indicator bar on the left side of the display tells you which mode you are in.
- Press ENTER to open the selected menu. Three menu items are displayed at the same time. The menu item that is currently selected is highlighted in reversed color.
- To move deeper in the hierarchy, select (highlight) a menu item and press ENTER.
- To return one step up in the hierarchy, press ALT/BACK. Remember that if you only press ALT/BACK after making a change, the change will not be saved. To save changes, you first have to accept your changes with ENTER.
- If you want to return to the main display of the active mode, press either ENTER (saves the changes) or ALT/BACK (discards the last change) for more than 2 seconds.
3. WATCH SETTINGS
Before starting to use your Suunto t6, you need to set the correct time and date. You can also customize all the necessary units and settings.
These instructions show you how to set the time and date. The process to adjust other settings and functions is similar, and begins from the main display of each mode.
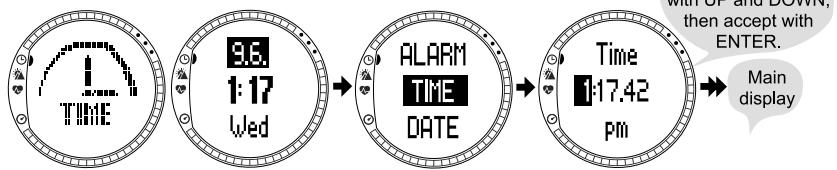
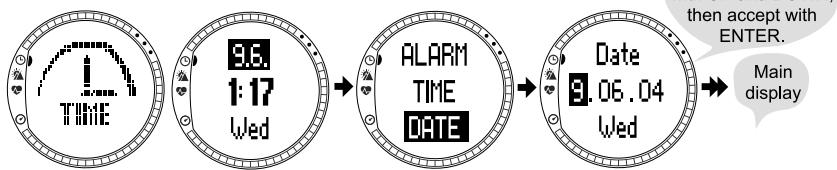
Setting the time
Setting the date
4. TIME MODE
The Time mode includes normal watch functions such as time, date and alarm. In the Time menu, you can define the measuring units for the data displayed in the other modes and adjust the general settings.
Functions:
- Alarm: Set the time alarms (e.g. wake up time).
- Time: Set the time and the dual time.
- Date: Set the date.
- General: Set the general settings (button tones, icons, backlight, sensor calibration).
- Units: Set the units (time, date, Hr, temperature, pressure, elevation, asc/dsc speed, distance, speed).
5. ALTI/BARO MODE
The Alti/Baro mode has to alternate displays: 1) Altitude and related parameters in Alti use; and 2) weather data, such as barometric pressure and temperature, in Baro use. The Alti/Baro mode also contains the weather memory and the reference setting needed to relate the current barometric pressure to your current altitude. When the Baro use is on, altitude reading remains constant. When the Alti use is on, sealevel reading remains constant.
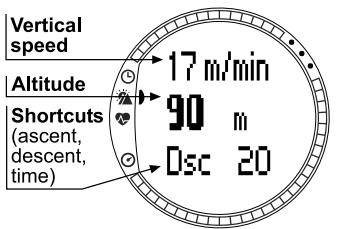
Alti use
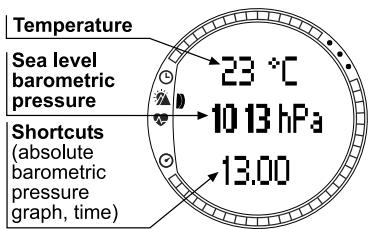
Baro use
Functions:
- Use: Define the Alti or Baro use for the mode.
Refer: Set the reference altitude or sea level pressure. - Memory: View the weather information (temp. and pressure) for the last 48 hours.
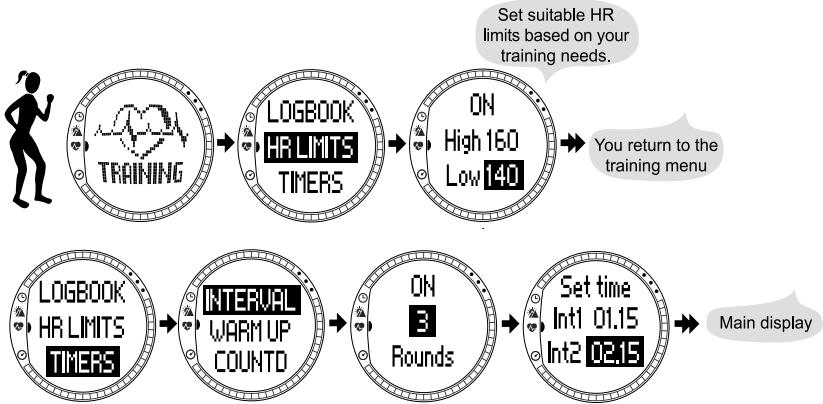
6. TRAINING MODE
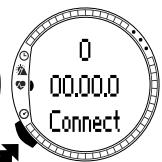
The Training mode contains the functions you need during a training session. It displays stopwatch and heart rate data; offers a number of control functions for reaching ideal training intensity; and records your session for further analysis. Each logbook gives an overview of your performance during individual training sessions, while the history function sums up your training over a longer period of time.
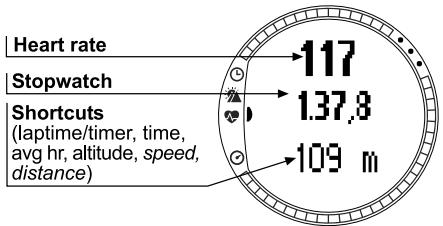
Functions:
- Connect: Connect your Suunto t6 to the transmitter belt or a wireless speed and distance sensor. (You can also do this by long pressing ALT/BACK.)
- Logbook: View and erase logbook information. Logbook information is recorded whenever the stopwatch is on.
HR Limits: Set your high and low heart rate limits. -
Timers: Set timers for interval training, a warm-up period, or for countdown.
-
History: View and reset cumulative training log history information.
- Pair: Pair your Suunto t6 with a new transmitter belt or a wireless speed and distance sensor.
NOTE: If the altitude is not correct when the training starts, set it in the Alti/Baro mode.
7. SPD/DST MODE
The Speed/Distance mode is available when you pair your Suunto t6 with an external speed and distance sensor. These sensors are designed for running and cycling and will be available at your Suunto dealer.
This mode displays the speed and distance information of your activity and offers a combination of distance-based training tools. You can, for instance, set alarm limits for your target speed or pace, record automatic lap times at regular distances, and define by distance the work and recovery cycles of interval training.
The use of the stopwatch is identical and synchronized with the stopwatch used in the Training mode.
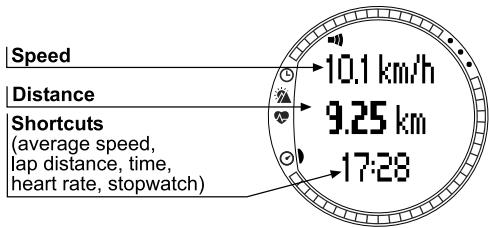
Functions:
- Connect: Connect your Suunto t6 to the transmitter belt or a wireless speed and distance sensor. (You can also do this by long pressing ALT/BACK.)
- Autolap: Set the lap lengths for automatic lap time recording.
- Interval: Set the stopwatch to record and alert lap times.
Spd Lim: Set the high and low limit alarm tone for your speed. - Calibrate: Calibrate the wireless speed and distance sensor.
- Pair: Pair your Suunto t6 with a new transmitter belt or a wireless speed and distance sensor.
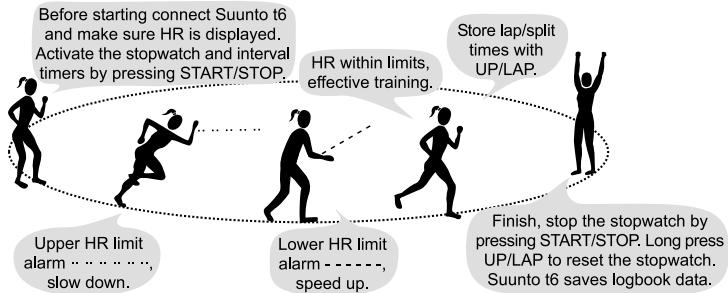
8. SUUNTO t6 DURING TRAINING
To use your Suunto t6 in training:
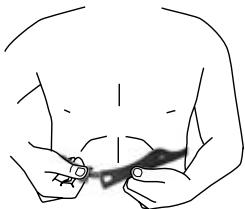
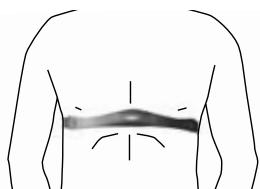
- Put on your HR transmitter belt and ensure it fits snugly against your chest.
- Ensure the electrodes of the transmitter belt are lightly wet.
1.
2.
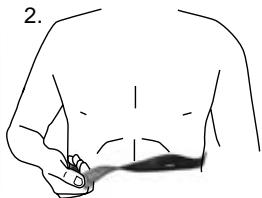
- Connect your Suunto t6 to the heart rate transmitter belt.
Wait until HR belt has been found. Suunto 16 displays "FOUND HR BELT".
Long press enter
- If you want to use timers or HR limits, set them in the Training mode.
5. Start your training.
When the stopwatch is on, UP/LAP is dedicated for taking lap times and DOWN/ LIGHT switches between modes.
- Download the information from your training to Suunto Training Manager PC software for analysis.
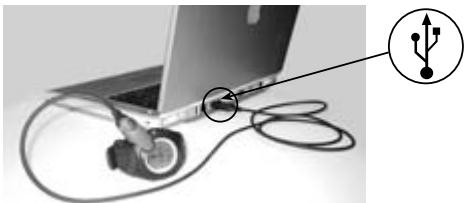
A) Attach your Suunto t6 to the USB port.
B) Transfer the log files to Suunto Training Manager.

to establish the connection.
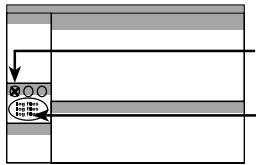
- Log files appear in the t6 Device window.

- Select the log files you want to transfer and click to transfer them to Suunto Training Manager.

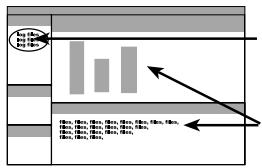
- The log files appear in the My Training window.
- Select the files you want to analyze.
- You can view and analyze the files in the Graph and Properties windows.
9. SUUNTO TRAINING MANAGER
9.1. Installing the software
To install Suunto Training Manager:
- Insert the Suunto Training Manager CD-ROM into the drive.
- Wait for the installation to begin and follow the installation instructions.
Note: If the installation does not automatically start, click Start --> Run, and type D:\setup.exe.
During the installation process Suunto Training Manager asks for your personal background data such as Age, Weight, Height, Gender, and Activity class. The software uses these parameters to calculate your personal Training Effect levels and for analyzing your training logs.
9.2. Installing the USB drivers
These instructions assume that you are installing Suunto Sports Instrument drivers on a clean system, i.e. one that does not contain any Suunto Sports Instrument drivers. If this is not the case, uninstall the previously installed drivers before proceeding with the installation. See Suunto t6 User Manual for more information.
The installation is in two parts. First you install the drivers for the Suunto Sports Instrument and then for the virtual USB serial port.
To install the Suunto Sports Instrument on Windows 98/2000/XP:
- The drivers are located on your PC software installation CD-ROM. Insert the CD-ROM into your computer.
- Attach the Suunto Sports Instrument PC interface cable to your computer's USB port. The Wizard activates automatically. Click Next.
- Search for a suitable driver on your system and click Next. If you are using Windows XP, select Install the software automatically in the Wizard and click Next. If an Installation warning is displayed, click Continue anyway.
- Browse for the driver folder on the installation CD-ROM and click Next.
- Click Next to install the located driver.
- Click Finish to end the first part of the installation.
To install the USB serial port:
This should follow automatically once the Suunto Sports Instrument installation is complete and take a couple of seconds. For Windows 98 the installation will start automatically. For Windows 2000 and XP, repeat steps 3-6 to install the USB serial port and click Finish to close the Wizard.
Do not interrupt the installation before both parts of the installation are finished.
Once the installation of the serial port is completed, check that it has been successful. Select Start - Settings - Control panel - System - (Hardware) - Device Manager and View - Devices by Connection. The device should have been installed as Suunto USB Serial Port (COMx), attached to Suunto Sports Instrument.
9.3. Software and personal settings
To adjust the software settings or to update your personal data, click in the Tree view.
- Settings: Select the units you want to use, for example m or ft, kg or lbs. Under Activities create a list of all the sports you practice. From this list you can select an activity for each of your training logs to more easily keep track of your training.
- Personal: To update your Activity class, weight and other personal data, enter the new values here. Click Calculate to receive new Training Effect levels.
9.4. Downloading logs from Suunto t6
You can transfer single or multiple files from your wristop computer to Suunto Training Manager by dragging and dropping the files to suitable folders or using the icon.
9.5. Viewing log graphs
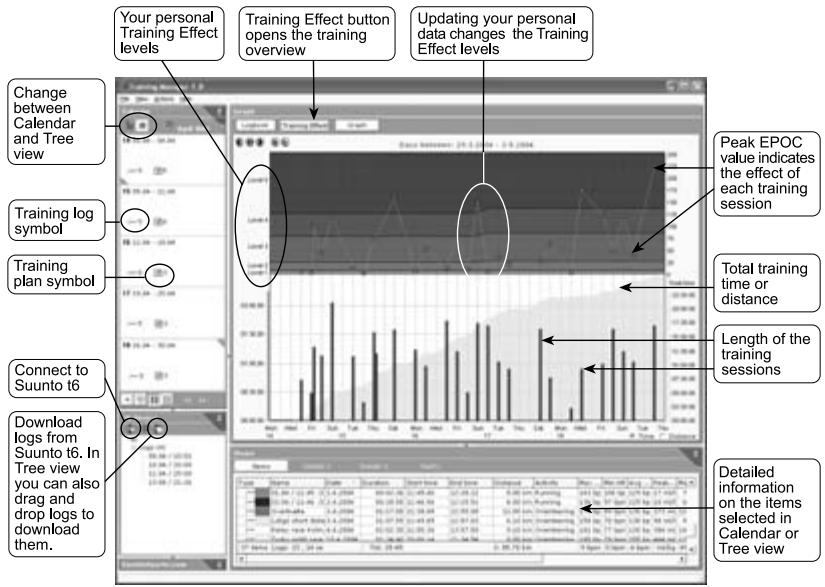
To view a log graph, select one or more logs in the My Training or Calendar window. Double-click the selected log or click the Graph button in the graph window to open the graph. To view and compare multiple logs, hold down the Ctrl button while selecting the logs. The default view shows the heart rate graph and the EPOC graph of your training session. The EPOC graph is related to your personal Training Effect levels. The peak value of EPOC, indicated with a red dot, defines the effect of the training session on your physical condition. To view the other graphs
(Ventilation, VO2, Respiratory rate, Energy consumption and Altitude), click the respective buttons in the Graph window. You can find information on EPOC and other body parameters in the Training Guidebook.
9.6. Viewing overall progress
To have an overview of your training, choose Month or Year in the Calendar view and click the Training effect button in the Graph window. This graph shows all training sessions during the selected period of time. The lower part of the graph shows the length of each log with the cumulative time or distance in the background. The upper part shows the Training Effect of the sessions. This helps you to estimate whether your training includes enough variation. Here you can see the need for recovery if the Training Effect of your sessions is always on a high level (3-5).
9.7. Training programs
Suunto Training Manager contains examples of training programs that you can use when planning your training. You will find these training programs in the Tree view in the Training plans folder.
To add a training program into your calendar, right-click the program and select Send to Calendar. Then define the date when you want to start the program and how many times you want to repeat it, then click OK. You can also create your own programs by right-clicking a folder or by downloading training programs created by others from SuuntoSports.com.
9.8. Importing and exporting logs and training programs
You can export logs and training programs by right-clicking on the log file and selecting Export. This allows you, for instance, to send your training logs by email to your coach or friends. To import a log, right-click on a folder and select Import.
If your computer is online, you can also transfer the log files and training programs to and from SuuntoSports.com by dragging and dropping them between SuuntoSports.com and My Training windows.
10. TRAINING WITH SUUNTO t6
10.1. General
Suunto t6 is perfect for monitoring and motivating endurance training. Top athletes often balance between the best possible training effect and overtraining. The Training Effect calculators of Suunto t6 provides a new tool for finding this balance by objectively measuring the load and the effect of training sessions.
Sports enthusiasts and athletes training without the support of a coach will often face a situation where there is no progress and training does not improve performance. With the help of Suunto t6 you can make sure that your training includes a number of hard training sessions that will improve your physical condition.
10.2. Learning the new information
Suunto t6 will give you the type of information during training that was earlier available only in laboratory tests. When you start regular training with Suunto t6, you should first learn the values of EPOC and other body parameters in your normal training sessions. This will familiarize you with the measurements and you will learn to assess what type of training will help you to reach your goals.
10.3. Finding your personal level
To evaluate your starting point, Suunto Training Manager asks you to fill in your personal parameters during installation. Based on these parameters, the program calculates your personal Training Effect levels and the default values for your maximum HR and some other physiological values.
If you have had any of these values measured before, you should use these values instead of the ones calculated by Suunto Training Manager. Note that especially the maximum HR is very individual and it may differ considerably from the value suggested by Training Manager. Using the correct personal maximum HR value will improve the Training Effect calculation.
The maximum performance capacity measured in a laboratory test is sometimes given as ml/kg/min (VO2max). If you want to compare the maximum performance value calculated by the program in Metabolic Equivalents (METs) to your measured VO _2 max, use the relation 1 MET = 3.5 ml/min/kg.
When you start training regularly, your physical condition will improve quickly. Because of this it is important that you check your personal parameters on the Personal page once a month and update them if necessary. This helps the software to adjust to your training and adapt the Training Effect levels to your physical condition. This will ensure that you will train at an optimal level and you will reach the desired training effect in the best possible way.
When your condition improves and you update your personal parameters, the EPOC levels representing your training level will rise. This means that you will have
to train harder than before for your condition to keep improving. At the same time you will be able to handle the increased training load.
After a couple of months of training you can define your maximum HR and performance with the help of a control training session. This will help you to reach more accurate assessments and training level management. You can read more on Control Training sessions in the Training Guidebook.
10.4. Planning optimal training
To improve your condition in an optimal way, your training sessions will have to be versatile and vary in intensity. With the help of Suunto t6 you will reach this goal when you train between Training Effect levels from minor/recovery (1) to overreaching (5). You should also remember the importance of rest and recovery. Note that low intensity endurance training usually has a low Training Effect level (1-2) even if the session is long and tiring. This type of training does not have an immediate effect on maximal performance but it is needed to create a basis for more intensive training sessions.
To reach the best possible training effect you should vary the number of training sessions you do each week and the length and intensity of each session. Your training program should consist of different types of sessions so that all the components of physical condition, like endurance, strength, agility and speed, will develop.
Suunto Training Manager includes examples of weekly programs for a beginner for the first six months of training. These programs have been developed on the basis of recommendations given by the American College of Sports Medicine (ACSM). They contain both hard and easy training sessions in the correct relation, and can be used as a model when planning your own training programs.
10.5. Following your progress
When you follow your progress with Suunto Training Manager, the Training Effect graph in the calendar view is an important tool. It shows if your training includes enough variation and whether you rest enough after hard training sessions. It also shows the general exertion level of your training program: if the Training Effect of your sessions is often very high (3-5), the risk of overtraining will increase.
10.6. Control training sessions
You can follow the improvement of your physical condition with control training sessions. A control training session is always performed in the same way in the same place in as stable conditions as possible. Control sessions include intensive parts so you should do your first control session after you have been training regularly for at least two months. If you are not used to this type of training, you should first check with your doctor. You can find the instructions of control training sessions in the Training Guidebook.
10.7. Deeper understanding with the Training Guidebook
The guidebook "How Not to Rely on Luck when Optimizing Your Training Effect" includes a lot of valuable information on how to improve the quality of training with Suunto t6. It also explains the physiological parameters measured by Suunto t6 and gives basic guidelines on endurance training. You can find the book on the Suunto t6 product CD (version 1.1. or newer) and on the website www.suunto.com.
11. REPLACING THE BATTERY
Suunto t6 works with a three-volt CR 2032 lithium battery. The battery life depends to a large extent on how much the different functions are used and in what kind of conditions the device is used. The reception from the heart rate belt or the data from the speed and distance sensor, altitude measurement, backlight and alarm consume more power than, for instance, the Time mode on its own. See the table below for guidelines for battery life with different usage profiles at room temperature. In cold conditions, for instance when the device is worn over the sleeve during winter, the battery life will be shorter.
Use
Approximate battery life
Used only as a watch; no heart rate, backlight or alarm 14 months
Training 2 x 1 h/month, wake-up alarm 30 s/day, backlight 30 s/day 11 months
Training 2 x 1 h/week, wake-up alarm 30 s/day, backlight 30 s/day 9 months
Training 1 h/day, HR alarm 1.5 min/day, backlight 30 s/day 6 months
Training 2 h/day, HR alarm 3 min/day, backlight 30 s/day 4 months
To reach the estimated battery life, we recommend using only original Suunto batteries. Their performance and quality guarantees the best possible operation for your device, and the longest battery life in all conditions. In order to ensure water tightness, we recommend also replacing the battery cover and seal when the battery is replaced. Original Suunto batteries always come packed with a new battery cover and seal.
The low-battery warning indicator is activated on the display when approximately 5 - 15 percent of the battery capacity is still available. Extremely cold weather may activate the low-battery warning indicator even when the battery still has sufficient capacity. If the low-battery warning indicator is activated in temperatures over 10^ ( 50^ ), replace the battery.
To replace the battery:
- Turn the battery compartment cover of the Suunto t6 to the open position using a coin or the battery compartment key
- Open the battery compartment cover and remove the old battery.
- Install the new battery carefully underneath the contact spring at the side of the battery compartment with the positive side (+) facing up. Be careful not to bend the contact, as it will damage the device.
- Check that the O ring is in the correct position around the battery compartment cover. If you use the old battery cover, make sure that the O ring and all surfaces are clean and dry. Do not stretch the O ring.
- Replace the cover and turn it until the groove is aligned with the close position marker.
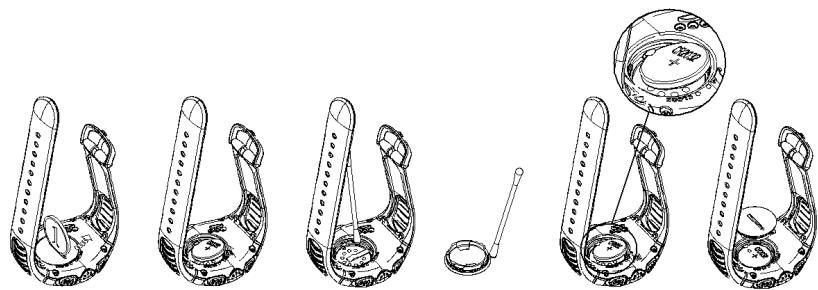
NOTE! Replace the battery with extreme care to ensure that your Suunto t6 remains water-resistant. Careless battery replacement may void the warranty.
NOTE! Recycle the old batteries or dispose of them properly. If a battery is mechanically damaged, burned or dropped in water, there is a risk of fire or burns.
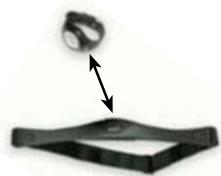
12. REPLACING THE BATTERY OF THE TRANSMITTER BELT
The transmitter belt operates on a three-volt CR 2032 lithium cell. The average expected battery life of the transmitter belt is around 300 hours. If your Suunto t6 is not receiving an HR signal when the transmitter belt is worn, you might need to replace the battery. We recommend using only original Suunto batteries in your transmitter belt, as they come with a new battery cover and O ring, and replacing the battery cover each time you replace the battery. This ensures the best possible battery life and the water resistance of the transmitter belt.
Replacing the battery:
- Use a coin or the battery compartment key to turn the battery compartment cover of the transmitter belt to the open position or slightly over it, making the cover easier to open.
- Open the battery compartment cover and remove the old battery.
-
Install the new battery in the battery compartment with the positive side (+) facing up.
-
Check that the O ring is in the correct position around the battery compartment cover. If you use the old battery cover, make sure that the O ring and all surfaces are clean and dry. Do not stretch the O ring.
- Replace the cover and turn it until the groove is aligned with the close position marker.
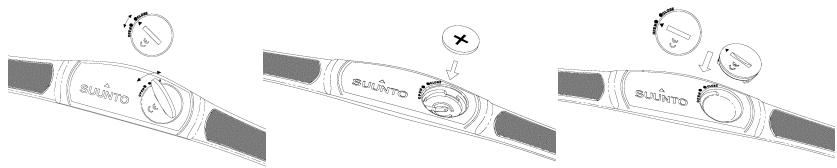
NOTE! The battery covers of the transmitter belt and the wristop computer are not interchangeable.
13. INTELLECTUAL PROPERTY
13.1. Trademark
Suunto, Wristop Computer, Suunto t6, Replacing Luck, their logos, and other Suunto brand trademarks and made names are registered or unregistered trademarks of Suunto Oy. All rights are reserved.
13.2. Patent notice
This product is protected by WO2004016173 and WO03099114 patent applications.
14. DISCLAIMER
14.1. User's responsibility
This instrument is intended for recreational use only. Suunto t6 must not be substituted for obtaining measurements that require professional or industrial precision and must not be used to obtain measurements when skydiving, hang gliding, paragliding, gyrocopter riding or flying an aircraft.
14.2.Warnings
People who have a pacemaker, defibrillator, or other implanted electronic device use the Suunto t6 transmitter belt at their own risk. Before starting the initial use of the transmitter belt, we recommend an exercise test under a doctor's supervision. This will ensure the safety and reliability of the pacemaker and transmitter belt when being used simultaneously.
Exercise may include some risk, especially for those who have been sedentary. We strongly advise consulting your doctor prior to beginning a regular exercise program.
This Suunto product contains a Lithium cell battery. To reduce risk of fire or burns, do not disassemble, crush, puncture, short external contacts, or dispose of in fire or water. Replace only with manufacturer specified batteries. Recycle or dispose of used batteries properly.
14.3. CE
The CE mark is used to mark conformity with the European Union EMC directives 89/336/EEC and 99/5/EEC.
14.4. Limits of liability and ISO 9001 compliance
If this product should fail due to defects in materials or workmanship, Suunto Oy will, at its sole option, repair or replace it with new or rebuilt parts, free of charge, for two (2) years from the date of its purchase. This warranty is only extended to the original purchaser and only covers failures due to defects in materials and workmanship that occur during normal use while in the period of the warranty.
It does not cover battery, battery replacement, damage or failures resulting from accident, misuse, neglect, mishandling, alteration or modifications of the product, or any failure caused by operation of the product outside the scope of its published specifications, or any causes not covered by this warranty.
There are no express warranties except as listed above.
The client can exercise the right to repair under the warranty by contacting Suunto Oy's Customer Service department to obtain a repair authorization. Suunto Oy and
its subsidiaries shall in no event be liable for any incidental or consequential damages arising from the use of or inability to use the product. Suunto Oy and its subsidiaries do not assume any responsibility for losses or claims by third parties that may arise through the use of this device.
Suunto's Quality Assurance System is certified by Det Norske Veritas to be ISO 9001 compliant in all Suunto Oy's operations (Quality Certificate No. 96-HEL-AQ-220).
14.5. After sales service
If a claim under warranty appears to be necessary, return the product, freight prepaid, to your Suunto dealer who is responsible for having your product repaired or replaced. Include your name, address, proof of purchase and/or service registration card, as required in your country. The claim will be honored and the product repaired or replaced at no charge and returned in what your Suunto dealer determines a reasonable amount of time, provided that all necessary parts are in stock. All repairs that are not covered under the terms of this warranty will be made at the owner's expense. This warranty is non-transferable from the original owner. If it is not possible to contact your Suunto dealer, contact your local Suunto distributor for further information. You can locate your local Suunto distributor in www.suunto.com.
14.6. FCC compliance
This device complies with Part 15 of the FCC limits for class B digital devices. This equipment generates, uses, and can radiate radio frequency energy and, if not installed or used in accordance with the instructions, may cause harmful interference to radio communications. There is no guarantee that interference will not occur in a particular instance. If this equipment does cause harmful interference to other equipment, try to correct the problem by relocating the equipment.
Consult an authorized Suunto dealer or other qualified service technician if you cannot correct the problem. Operation is subject to the following conditions:
(1) This device cannot cause harmful interference.
(2) This device must accept any interference received, including interference that may cause undesired operation.
Repairs should be made by authorized Suunto service personnel. Unauthorized repairs will void warranty.
Tested to comply with FCC standards.
For home or office use.
FCC WARNING: Changes or modifications not expressly approved by Suunto Oy could void your authority to operate this device under FCC regulations.
14.7. Disposal of the Device
Please dispose of the device in an appropriate way, treating it as electronic waste. Do not throw it in the garbage. If you wish, you may return the device to your nearest Suunto representative.

GUIDE DE L'UTILISATEUR SUUNTO t6
1. INTRODUCTION
14.5. After sales service
10.4. Planering for optimal training
This product is warranted to be free of defects in material and/or workmanship to the original owner for the above noted period (does not include battery life). Keep a copy of the original purchase receipt and make sure to get this warranty card stamped at the place of purchase. The warranty originates from the date of purchase.
All warranties are limited and are subject to the restrictions given in the instruction manual. This warranty does not cover the damage to the product resulting from improper usage, improper maintenance, neglect of care, alteration, improper battery replacement or unauthorized repair.
Model of
Wristop computer:
number:
1
1
1
1
1
1
1
Country
m - 1 0 ;
se
Store stamp with date of purchase
Serial
number:
| | | | | | |
1 1 1 1 1 1 1
1 1 1 1 1 1 1
1 1 1 1 1 1 1
1
180^
(1)
Country
se
47
COPYRIGHT
This publication and its contents are proprietary to Suunto Oy.
Suunto, Wristop Computer, Suunto t6, Replacing Luck and their logos are registered or unregistered trademarks of Suunto Oy. All rights reserved.
While we have taken great care to ensure that information contained in this documentation is both comprehensive and accurate, no warranty of accuracy is expressed or implied. Its content is subject to change at any time without notice.