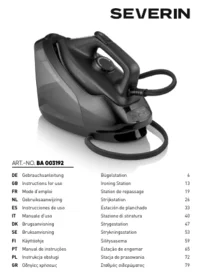
BA r1 - Kitchen appliance SEVERIN - Free user manual and instructions
Find the device manual for free BA r1 SEVERIN in PDF.


| Product type | Kitchen appliance |
| Brand | Severin |
| Model | BA r1 |
| Dimensions (L x D x H) | 20 x 15 x 25 cm |
| Weight | 1.2 kg |
| Power supply | 220-240 V ~ 50/60 Hz |
| Power | 500 W |
| Bowl capacity | 1.5 L |
| Bowl material | Glass or plastic |
| Main functions | Blend, chop, emulsify, grind |
| Speeds | 2 speeds + pulse |
| Blades | Stainless steel blades |
| Maintenance and cleaning | Bowl and accessories dishwasher safe; wipe base with a damp cloth |
| Safety | Automatic shut-off in case of overload; operation lock if bowl not properly positioned |
| Spare parts and repairability | Bowl, lid, blades and seals available |
| Warranty | 2 years |
| Included accessories | Bowl, lid, whisk, spatula |
| General information | Household use only; do not immerse base |
Frequently Asked Questions - BA r1 SEVERIN
User questions about BA r1 SEVERIN
0 question about this device. Answer the ones you know or ask your own.
Ask a new question about this device
Download the instructions for your Kitchen appliance in PDF format for free! Find your manual BA r1 - SEVERIN and take your electronic device back in hand. On this page are published all the documents necessary for the use of your device. BA r1 by SEVERIN.
USER MANUAL BA r1 SEVERIN
ART.-NO. BA 003192
GB Instructions for use Ironing Station 13
Technical information on the operating states in accordance with ecodesign requirements (EU Regulation 2023/826) can be accessed using the QR code or at the link ‘https://severin.com/de-de/oekodesign-richtlinie’.
Bügelstation
Before using the appliance, please read the following instructions carefully and keep this manual for future reference. The appliance must only be used by persons familiar with these instructions.
Connection to the mains supply
The appliance should only be connected to an earthed socket installed in accordance with the regulations. Make sure that the supply voltage corresponds with the voltage marked on the rating label. This product complies with all binding CE labelling directives.
Familiarisation
- Steam Iron
- Indicator light
- Steam button
- Handle
- Control knob
- Connection hose
- Control panel
- Power cord with plug
- Nameplate (appliance underside)
- Water tank
- Water-filling opening
- Soleplate
- Iron rest
- Iron lock button
Important safety instructions
- Only use the appliance under supervision. Do not leave the appliance unattended while it is connected to the mains.
- Do not use the appliance if it has been dropped, shows any visible damage or is leaking.
- Always use and place the appliance on a flat, stable and waterproof surface.
- Place the iron only on the designated iron rest of the base unit. Never lay the iron on its side.
- To prevent hazards and to comply with safety regulations, repairs to the appliance, the power cord or the connection hose must only be carried out by our customer service. In the event of a fault, return the appliance to our customer
service (see separate warranty statement).
- Before cleaning the appliance, ensure it is disconnected from the power supply and has cooled down completely.
- To avoid the risk of electric shock, do not clean the appliance with water and do not immerse it in water.
- Always unplug the appliance before filling the water tank.
- This appliance may be used by children (at least 8 years of age) and by persons with reduced physical, sensory or mental capabilities, or lacking experience and knowledge, provided they have been given supervision or instruction concerning the use of the appliance and fully understand all dangers
and safety precautions involved.
- Children must not be permitted to play with the appliance.
- Children must not be permitted to carry out any cleaning or maintenance work on the appliance unless they are supervised and at least 8 years of age.
- Keep the appliance and its power cord out of reach of children under 8 years of age while it is heating up or cooling down.
- Allow the appliance to cool down completely before storing it.
- Caution: Keep any packaging materials well away from children – these are a potential source of danger, e.g. of suffocation.
- Do not operate the appliance if the power
cord or the connection hose has been subjected to excessive tension or strain. Damage is not always visible from the outside; therefore, have the appliance inspected before using it again.
- This symbol indicates that the casing and the soleplate may become very hot during operation and can cause burns if touched. Additional hazards may result from escaping steam or hot water. Never direct the steam towards people. Always handle the appliance using the handle provided.
- The iron should only be placed on heat-resistant surfaces, never near hot surfaces (eg hot-plates) or in the vicinity of open gas flames.
- The power cord and the connection hose must not come into contact with hot parts of the appliance and must not be wrapped around it.
• After use, allow the appliance to cool
down to room temperature before moving, cleaning or storing it.
- Never carry the locked iron by its handle; always support it from underneath the water tank.
-
Always remove the plug from the wall socket
-
after use,
- in case of any malfunction,
-
before cleaning the appliance.
-
Do not take the power plug out of the socket by pulling on the power cord, but hold the power plug to take it out. Never touch the mains plug with wet hands.
- No responsibility is accepted if damage results from improper use, or if these instructions are not complied with.
Intended Use
- The appliance is designed for smoothing textiles using heat and steam.
- Do not iron garments while they are being worn.
-
This appliance is intended for household use and similar applications, such as
-
in shops, offices and similar work environments,
- in agricultural settings,
- by customers in hotels, motels and other typical residential environments,
- in establishments offering bed and breakfast.
Filling with water
- Fill the appliance only with fresh, clear tap water or distilled water. Do not use water from a tumble dryer, water containing additives, perfumed water or cleaning agents.
- The appliance is generally resistant to limescale up to medium water hardness. If the tap water in your area is hard, we recommend using demineralised water. If you are unsure about local water hardness levels, your water supplier can provide this information.
- Ensure that the power plug is disconnected.
- Grip the recess on the water tank and pull the tank forward to remove it.
- Fill the water tank with water through the central opening up to the MAX mark (max. 1.8 l).
- Refit the water tank onto the base from the front until it audibly locks into place.
- For dry ironing, the tank may remain empty.
General information about ironing
Always check first whether a label with ironing instructions is attached to the article to be ironed.
- The meaning of the ironing symbols is as follows:
• synthetics
(low temperature)
• silk and wool
(medium temperature)
••• cotton and linen (high temperature)
- These symbols also appear as dot markings on the iron's control knob.
- Laundry to be ironed should be sorted according to the fabric ironing temperature. Follow the ironing symbols and start with the lowest temperature.
- When ironing highly sensitive fabrics, or if you are not sure about the fabrics, you may carefully test-iron at a non-visible point, e.g. inside of seam. Start with the lowest temperature.
- If the laundry is being dried in a dryer before ironing, the temperature should be adjusted to "iron dry". Very dry fabrics are difficult to iron.
Start up
Before first use, clean the appliance as described in the “Cleaning and Care – Descaling” section. This removes any residual dust from the soleplate and eliminates the appliance’s initial odour. Ensure adequate ventilation during this process.
ECO and MAX mode
After switching on, the appliance starts in ECO mode. To switch to MAX mode for maximum steam output, press the Mode button.
Automatic shutdown
- The iron will automatically switch off if it is not moved for 10 minutes. The indicator light on the iron will flash.
- To switch the iron back on, press the button.
- If the iron remains unmoved, it will switch off completely after a further 10 minutes and must then be restarted.
Ironing
- Fill the water tank as described under "Filling with Water".
- Place the iron on the iron rest of the base unit and plug the appliance into the mains.
- Press the Power button for approximately 1 second.
- The indicator light on the iron flashes, and the ECO function light illuminates.
- If required, select MAX mode using the Mode button.
- Set the desired temperature on the control knob, referring to the ironing symbols.
- The appliance heats up, and the indicator light on the iron continues to flash. Once the selected temperature has been reached, the indicator light remains steadily lit. This process takes approximately 60 seconds.
- Press the lock button 🔒 on the base and lift the iron off.
- Steam ironing is only possible at higher temperature settings. No steam is released at the Ⓧ setting on the control knob.
- For steam ironing, keep the ⏻ button pressed.
- Tip! Before ironing garments, iron over an old cloth and press the ⏻ button several times to clear any dust residues from the steam outlets.
- After use, place the iron on the iron rest of the base unit and wait briefly until no more steam is emitted.
-
Switch the appliance off by pressing the Power button.
-
Disconnect the power plug from the socket.
- Allow the appliance to cool down to room temperature before moving, cleaning or storing it.
- Press the lock button ☑ before storage to secure the iron.
Steam Jet
- The steam shot function releases a powerful burst of hot steam from the soleplate, helping to smooth stubborn creases.
- The steam jet function may also be used with the iron held vertically, to restore the surface of fabrics.
- For a steam shot, set the control knob to the SHOT position and wait until the indicator light on the iron remains steadily lit.
- Then press the ⏻ button. The steam shot will be released.
- Before performing another steam shot, wait until the indicator light is steadily illuminated again.
Cleaning and Care
- Before cleaning the appliance, ensure it is disconnected from the power supply and has cooled down completely.
- To avoid the risk of electric shock, do not clean the appliance with water and do not immerse it in water.
- If required, wipe the appliance only with a slightly damp, lint-free cloth.
- To remove limescale or other residues from the soleplate, simply rub it with a woollen or cotton cloth soaked in a vinegar-water solution.
- Do not use abrasives or harsh cleaning solutions.
Descaling
- Depending on the hardness of your water, limescale deposits may build up inside the appliance. For this reason, the appliance should be descaled regularly.
- The warranty will be void if the appliance malfunctions due to insufficient descaling.
- The appliance features an automatic reminder when descaling is required. The Self Clean indicator will flash, and audible signals will sound.
- Place the appliance near a sink or washbasin.
- Fill the water tank with clean water up to the MAX mark. Do not add descaling solutions or any other cleaning agents!
- Place the appliance on the iron rest and plug it into a mains socket.
- Switch on the appliance and set the control knob to any position.
- Hold the appliance horizontally over a sink or washbasin.
- Press and hold the 🔊 button for approximately 3 seconds. The Self Clean indicator will flash, and audible signals and pump noises will be heard.
- Gently move the appliance back and forth until the Self Clean indicator and signals stop and no more steam or hot water is emitted. This process takes around 4 minutes. The appliance will switch off automatically.
- The descaling process cannot be interrupted.
• After descaling, unplug the iron and place it on the base unit to cool.
- Allow the soleplate to cool down before cleaning it with a damp, lint-free cloth.
Storage
- Unplug the appliance and allow it to cool down completely.
- Remove the water tank and discard any remaining water.
- For storage, place the iron on the iron rest of the base unit and secure it with the lock button 🔒.
Disposal

Devices marked with this symbol must be disposed of separately from your household waste, as they contain valuable materials
which can be recycled. Proper disposal protects the environment and human health. Your local authority or retailer can provide information on the matter.
Station de repassage
Chère cliente, Cher client,
- ART.-NO. BA 003192
- Bügelstation
- Connection to the mains supply
- Familiarisation
- Important safety instructions
- Intended Use
- Filling with water
- General information about ironing
- Start up
- ECO and MAX mode
- Automatic shutdown
- Ironing
- Steam Jet
- Cleaning and Care
- Descaling
- Storage
- Disposal
- Station de repassage
- Chère cliente, Cher client,
Brand : SEVERIN
Model : BA r1
Category : Kitchen appliance