
ReadyWarm 2000 Power Ceiling - Fan heater CECOTEC - Free user manual and instructions
Find the device manual for free ReadyWarm 2000 Power Ceiling CECOTEC in PDF.


| Product type | Ceiling fan heater |
| Brand | Cecotec |
| Model | ReadyWarm 2000 Power Ceiling |
| Heating power | 2000 W |
| Power supply | 220-240 V ~ 50/60 Hz |
| Dimensions (L x W x H) | 30 x 30 x 15 cm |
| Net weight | 2.5 kg |
| Heating modes | 2 power levels + fan only |
| Thermostat | Adjustable ambient |
| Control type | Manual switch control |
| Material | Heat-resistant plastic |
| Installation | Ceiling mounting included |
| Overheat protection | Yes, automatic shutdown |
| Protection rating | IP21 |
| Noise level | About 45 dB |
| Recommended heating area | Up to 20 m² |
| Maintenance | Clean the grille with a dry cloth |
| Repairability | Spare parts available on request |
Frequently Asked Questions - ReadyWarm 2000 Power Ceiling CECOTEC
User questions about ReadyWarm 2000 Power Ceiling CECOTEC
0 question about this device. Answer the ones you know or ask your own.
Ask a new question about this device
Download the instructions for your Fan heater in PDF format for free! Find your manual ReadyWarm 2000 Power Ceiling - CECOTEC and take your electronic device back in hand. On this page are published all the documents necessary for the use of your device. ReadyWarm 2000 Power Ceiling by CECOTEC.
USER MANUAL ReadyWarm 2000 Power Ceiling CECOTEC
natural_image
3D rendering of a ceiling-mounted heating unit with orange and black panels, no visible text or symbolsSafety instructions 8
-
Parts and components 47
-
Before use 47
-
Operation 48
-
Cleaning and maintenance 49
-
Technical specifications 49
-
Disposal of old electrical and electronic appliances 50
-
Technical support and warranty 50
-
Copyright 50
SOMMAIRE
Read these instructions thoroughly before using the device. Keep this instruction manual for future reference or new users.
- Make sure the voltage of your mains supply matches the voltage requirements specified in the rating label of the appliance.
- When using electrical and electronic appliances, basic precautions must always be followed to reduce the risk of fire, electrical shock, and injury.
- This appliance is intended for outdoor use only.
- This device is designed for domestic use only and is not intended for bars, restaurants, farmhouses, hotels, motels, and offices.
- If the power cable is damaged, it must be replaced by the Technical Support Service of Cecotec or similar qualified personnel to avoid risks.
- Do not use the heating appliance in the immediate vicinity of a bath, shower, or swimming pool.
- Do not use this heating appliance if it has been dropped.
- Do not use if there are visible signs of damage to the heating appliance.
- Use this heating appliance on a horizontal and stable surface, or fix it to the wall, as applicable.
- Keep the device out of the reach of children under 3 years old, unless constantly supervised.
- Children between 3 and 8 years old should only switch the appliance on or off when it has been placed in its normal, intended operating position and if they have been given supervision or instruction concerning the use of the appliance in a safe way and understand the hazards involved. Children between 3 and 8 years old should not plug in, adjust, and
clean the appliance and should not carry out maintenance tasks.
- WARNING: some of the product's parts may become very hot and cause burns. Particular attention should be paid when children and/or vulnerable people are present.
- WARNING: do not use this heating device in small rooms that are occupied by people who cannot leave the room by themselves, unless permanent supervision is provided.
- WARNING: to reduce the risk of fire, keep textiles, curtains, or other flammable material at least 1 m away from the air outlet.
- Do not insert or allow objects to enter through the ventilation slots, as this may result in electric shock, fire, or damage to the appliance.
- Do not immerse the cable, plug, or any other part of the appliance in water or any other liquid. Do not expose the electrical connections to water. Always make sure that your hands are dry before operating or adjusting any switches on the product or touching the plug and socket.
- Never leave the device unattended during use.
- One of the most common causes of overheating is the building up of debris or fluff in the appliance. Be sure to clean these accumulations periodically by vacuuming the vents and grilles.
- Do not place the appliance on carpets, and do not place the cable under carpets. Position the cord in such a way as to avoid obstructing passage and cause tripping hazards.
- Do not store it until it cools down. Store it in a cool, dry place when not in use.
- Do not use the heater with a timer or any other device that turns the heater on automatically.
- Never leave the appliance unattended during operation.
Always unplug the device when not in use.
- The heater must be installed at least 1.8 m above the floor and 0.5 m from the ceiling, roof and both side walls.
- The heater must not be oriented with the heating element towards the ceiling. The heater must face the area to be heated.
- Warning: do not cover the device in order to avoid overheating.
- Do not use the appliance in case of visible damage.
- Do not attempt to repair or adjust any electrical or mechanical function of this appliance. The appliance contains no user serviceable parts. Maintenance or repairs should only be carried out by a qualified electrician. Attempting to repair the unit yourself will void the warranty.
- Do not use the appliance in direct sunlight, near heat sources, in humid environments or in places near water or other liquids, such as bathrooms, showers or swimming pools.
- This product should not be left outdoors exposed to the elements for long periods of time.
- To avoid a possible fire, do not block the air outlets.
- Always place the appliance with the plug in an accessible position and avoid using extension cords, as they may overheat and cause a potential fire hazard.
- Always make sure that the heater is plugged into a suitable socket that has been tested for outdoor use.
- To turn the heater off, turn the switch to the OFF position and then disconnect the plug from the socket. Do not pull on the plug to disconnect the appliance.
- Warning: this heater is not equipped with a device to control the room temperature. Do not use this heater in small rooms if the people in the room are unable to get out by themselves; supervise them.
- Check exterior walls for damaged areas before installing the heater.
- Check exterior walls for electrical wiring. If there is a supply line in the vicinity, do not install your heater, find another place to install this product.
- -The appliance must not, under any circumstances, be covered with insulating or similar material.
- -The air discharge regulations must be complied with.
- -Beams, rafters, and joists must not be cut or notched to install the appliance.
WARNING FOR PET OWNERS:
- The health of some small pets, including birds, is extremely sensitive to the fumes produced during the first use of many appliances. These fumes are not harmful to humans, but we recommend that you do not use your heater near birds and small pets during initial use until the manufacturing corrosion layers are burned off.
INSTRUCTIONS DE SÉCURITÉ
- Hanging chain
- Power cable
- Heating element
- On/Off switch
- LED light
- Remote control
- Hook (A)
- Hanging chain
- Hook (B)
Fig. 3
- On/Off switch
- 800-W power button
- 1200-W power button
- Led light button
NOTE:
the graphics in this manual are schematic representations and may not exactly match the device.
2. BEFORE USE
- This appliance is packaged in a way as to protect it during transport. Take the device out of its box and remove all packaging materials. You can keep the original box and other packaging elements in a safe place. This will help you prevent damage to the device when transporting it in the future. In case the original packaging is disposed of, make sure all packaging materials are recycled accordingly.
- Make sure all parts and components are included and in good conditions. If there is any piece missing or in bad conditions, contact the official Cecotec Technical Support Service immediately.
Box content
- Heater
- Hanging chain
- Remote control
- Instruction manual
3. OPERATION
Assembly
WARNING: make sure that the heater is not lit before hanging it in a gazebo or under a balcony or roof.
- Make sure that hook "A" is securely attached to the heater.
- Attach hook "B" to a secure post, beam, or any solid object. You can also hook hook "B" to hook "A" to encircle an object and install the heater.
- Plug the heater into a power socket.
WARNING: wait until the heating element has cooled down before moving the heater.
- PLEASE NOTE: portable electric heaters are designed for spot heating or as a supplementary heat source. They are not designed to be the main heating source during cold months.
- Warning: if you have to use an extension cable, it must be at least 14 AWG and have a power rating of not less than 1875 W.
- Always ensure that there is at least 50 cm (20") of space above the heater, 25 cm (9") from the side and 180 cm (5") below the heater.
Fig. 2
- Ceiling
- Wall
- Floor
Operation
- Plug in the heater and press the on/off switch. The red indicator will light up and the heater will enter standby mode.
- Press ⏻ once. The green indicator will light up and the heater will operate at low power.
- Press ⏻ twice to select medium power.
- Press ⏻ three times to select high power.
- Press ⏻ four times to select high power and turn on the LED light.
- Press ⏻ five times to only turn on the LED light.
- Press ⏻ six times to return the heater to standby mode. The red indicator will light up.
Remote control functions
- Plug in the heater and press the on/off switch on the appliance. The red indicator will light up and the heater will enter standby mode.
- Press the on/off switch to turn off the appliance.
- The 800-W button is used to select low power.
- The 1200-W button is used to select medium power.
- Press both 800-W and 1200-W buttons to set the desired power.
- The - button is used to turn on and adjust the LED light.
4. CLEANING AND MAINTENANCE
Maintenance
Warning: regular and thorough maintenance of the infrared heater is necessary for long and efficient operation.
- At least once a month, check that the reflector and the infrared (IR) sensor are clean. If necessary, clean the reflector or sensor according to the cleaning and maintenance section.
- Periodic inspections should be carried out more frequently in dusty environments.
- Check if the reflector, cable, or frame are deformed while cleaning the device. In case of deformation, consult a qualified technician.
- Check the power cord and plug while cleaning the appliance. In case of deformation, consult a qualified technician.
- It is recommended to replace the reflector every two years to ensure efficient operation.
Cleaning
Warning: regular and thorough cleaning helps your heater to function efficiently for many years.
- Unplug the power cord before cleaning the appliance.
- Take out the front grid wire through the inlets on the frame using a slotted screwdriver.
- The reflector and the infrared should be cleaned with a soft cloth, a soft brush or with cold or dry air. The cloth may be damp, but never too damp, and the cleaning product must not contain any chemicals.
- Do not use cleaning agents that could damage the reflector (brush, etc.).
- Reinsert the wire mesh using a slotted screwdriver.
6. TECHNICAL SPECIFICATIONS
Product reference: 08263
Product: Ready Warm 2000 Power Ceiling
Voltage: 220-240 V
Frequency: 50/60 Hz
Energy supply: 2000 W
Technical specifications may change without prior notification to improve product quality.
Made in China | Designed in Spain
7. DISPOSAL OF OLD ELECTRICAL AND ELECTRONIC APPLIANCES
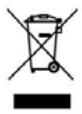
This symbol indicates that, according to the applicable regulations, the product and/or batteries must be disposed of separately from household waste. When this product reaches the end of its shelf life, you should dispose of the cells/batteries/accumulators and take them to a collection point designated by the local authorities.
Consumers must contact their local authorities or retailer for information concerning the correct disposal of old appliances and/or their batteries.
Compliance with the above guidelines will help protecting the environment.
8. TECHNICAL SUPPORT AND WARRANTY
Cecotec shall be liable to the end user or consumer for any lack of conformity that exists at the time of delivery of the product under the terms, conditions, and deadlines established by the applicable regulations.
It is recommended that repairs be carried out by qualified personnel.
If at any moment you detect any problem with your product or have any doubt, do not hesitate to contact the official Cecotec Technical Support Service at +34 963 210 728.
9. COPYRIGHT
The intellectual property rights over the texts in this manual belong to CECOTEC INNOVACIONES, S.L. All rights reserved. The contents of this publication may not, in whole or in part, be reproduced, stored in a retrieval system, transmitted, or distributed by any means (electronic, mechanical, photocopying, recording or similar) without the prior authorization of CECOTEC INNOVACIONES, S.L.
1. PIÈCES ET COMPOSANTS
Img. 1

- SOMMAIRE
- WARNING FOR PET OWNERS:
- INSTRUCTIONS DE SÉCURITÉ
- Fig. 3
- NOTE:
- BEFORE USE
- Box content
- OPERATION
- Assembly
- Fig. 2
- Operation
- Remote control functions
- CLEANING AND MAINTENANCE
- Maintenance
- Cleaning
- TECHNICAL SPECIFICATIONS
- DISPOSAL OF OLD ELECTRICAL AND ELECTRONIC APPLIANCES
- TECHNICAL SUPPORT AND WARRANTY
- COPYRIGHT
- PIÈCES ET COMPOSANTS
- Img. 1
Brand : CECOTEC
Model : ReadyWarm 2000 Power Ceiling
Category : Fan heater