
DIA - Drone PARROT - Free user manual and instructions
Find the device manual for free DIA PARROT in PDF.
| Product type | Digital photo frame |
| Brand | Parrot |
| Model | DIA |
| Screen | LCD, 800×600 pixel resolution |
| Connectivity | Wi-Fi 802.11 b/g, Bluetooth 2.0, USB 2.0, SD/SDHC/MMC card reader |
| Power supply | AC adapter (100-240 V AC) |
| Main functions | Photo display, slideshow, receiving images by email, access to online albums (RSS), PC sharing, Mover app (iOS), Internet browsing |
| Compatible storage | SD/SDHC/MMC cards, USB keys, external hard drives, cameras |
| Supported image formats | JPEG |
| Operating system | Parrot integrated software |
| Available languages | Multilingual (including French) |
| Warranty | 1 year, parts and labor |
| Operating temperature | Max 40°C |
| Maintenance and cleaning | Clean with a dry cloth |
| Safety | Follow safety instructions: do not expose to moisture, unplug during thunderstorms, etc. |
| General information | Manual available online, software updates via Wi-Fi |
Frequently Asked Questions - DIA PARROT
User questions about DIA PARROT
0 question about this device. Answer the ones you know or ask your own.
Ask a new question about this device
Download the instructions for your Drone in PDF format for free! Find your manual DIA - PARROT and take your electronic device back in hand. On this page are published all the documents necessary for the use of your device. DIA by PARROT.
USER MANUAL DIA PARROT
Before Getting Started
About This Guide

In order to limit our paper consumption, and as part of our environmentally friendly and responsible approach, Parrot prefers to put user documents online rather than print them out.
We therefore invite you to consult the Parrot DIA user guide directly on your photo frame. To do so, select Settings > Information > User guide. The legal notice is also available in the user guide.
Updating the Frame
If your frame is connected to a Wi-Fi network it will automatically download and install updates. If your frame is not connected to a Wi-Fi network, you can also download the latest update for your frame, free of charge, from our website: http://www.parrot.com in the Support and downloads section.
http://www.parrot.com/uk/support
Complete user guide, tutorials, software updates
Contents
First-Time Use . p.06
Wi-Fi® p.07
Using the Mover application. p.09
Bluetooth® p.10
USB/SD .p.11
Managing Pictures . p.12
First-Time Use
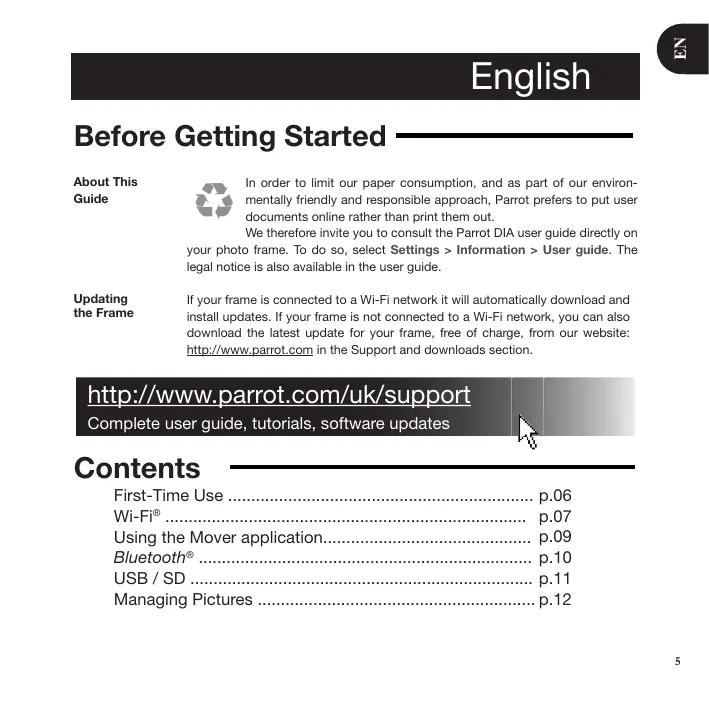
Turning On the Frame
- Connect the power cable to the adapter, then plug it into the power outlet.
- Press the button to turn the frame on / off.
Browsing the Menus
- Use the trackball to browse the menus. Press the trackball to confirm a selection.
- The button is used to access the context menu.
- The button is used to return to the previous menu.
- The button is used to return to the main menu.
Selecting the Language
The first time you use the frame, you are asked to choose a language. If you want to change this setting afterwards, select Settings > Language.
Setting the Date and Time
- The date and time are automatically set when the frame is connected to a Wi-Fi network.
- If you would rather set them manually, select Settings > Date/Time, then Adjustment > Manual.
Use of a USB keyboard or mouse
To use your frame or browse on the internet more easily you can connect a USB mouse or a USB keyboard to the frame's USB ports.
Wi-Fi
Connecting Wirelessly
- If your wireless modem/rodter does not support WPS technology:

Depending on your modemROUTer's model,pressing the synchronization button may be necessary in order to establish the connection. Check your device's documentation for more information.
- Select Settings > Wi-Fi.
- Select Configure.
The frame begins searching for Wi-Fi networks.
- Select your network from the list of results, or select Manual to configure your network manually.
- Enter your network's WEP or WPA key using the virtual keyboard, then select OK.
Once the connection has been established, a window appears containing all the information about your frame's Wi-Fi connection.
-
If your wireless modem/rodger supports WPS technology:
-
Press the WPS button on your wireless modem or router.
- Select Settings > Wi-Fi.
- Select Configure > Auto.
Disabling the Connection
Once the connection has been established, you can disable/re-enable it. To do so, select Settings > Wi-Fi > Connection > Disable / Enable.
Accessing the Web Interface

The Web interface enables you to easily assign an e-mail address, RSS feed, or computer to your frame, but you can also assign them directly from the frame.

In order to access the frame's web interface, your PC and the frame must be connected to the same Wi-Fi network.
- Take down the IP address assigned to your frame. To find it, select Settings > Information.
- Open your web browser and enter the IP address in the address bar.
Getting Images Received by E-Mail

We recommend that you create an e-mail address just for the frame.
- On the web interface, click on
- In the Email account field, click on New to assign an e-mail address to the frame.
- Enter your login and password in the corresponding fields. Check your e-mail service's documentation for information on the server and protocol.
All images that you receive in this e-mail account will then be accessible
- on the frame. To access them, select Browse > Directory > E-mail.
Viewing Photo Albums Online
- In the web interface, click on
- In the Registered feeds field, click on New to assign an RSS feed to the frame.
- Select your photo server, enter the login associated with the selected album, then the password if any, or enter the URL of the RSS feed.
- Click on Save.
The images contained in the associated album are now accessible on the frame. To access them, select Browse > Directory > RSS feeds.
Viewing Photos Stored on a PC
- On your computer, activate folder sharing for the photos that you wish to view on the frame.
- On the web interface, click on
- Click on Add a share and select your computer, then the shared folder.
The images contained in the shared folder are now accessible on the frame.
- To access them, select Browse > Directory > PC shares.
Browsing the Internet
You can browse the Internet using the frame. To do so, select Browser, then use the trackball to browse.
Using the Mover application
The Mover application allows you to easily transfer photos to the frame from your iPod touch®, iPhone® or iPad®. To do this:
- Download the Mover (or Mover Lite) application from the App Store.
- Connect the frame and the iPhone to the same Wi-Fi network.
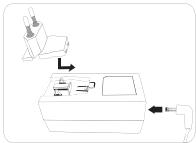
- Run the Mover application
The screen shown opposite appears.
- Press on the ^+ button then select the Add photo option.
- Select your image.
- Slide this image towards the instruction Mover on Dia.
The image gradually appears on the frame. You can then find it by selecting

Bluetooth
Sending Images from a PC Via Bluetooth
- Check that the Bluetooth® feature is enabled. To do so, select Settings > Bluetooth > Status > Enabled.
- Activate your computer's Bluetooth feature.
- Right click on the image that you want to send, and select "Send by Bluetooth".
- Select DIA from the list of available Bluetooth devices.
- Enter the code 0000 if asked for one.
Sending Images from a Phone Via Bluetooth
- Check that the Bluetooth feature is enabled on the frame. To do so, select Settings > Bluetooth > Status > Enabled.
- From your phone, select an image and choose "Send by Bluetooth". > Your phone will begin searching for Bluetooth devices.
- Select DIA from the list of available Bluetooth devices.
- Enter the code 0000 if asked for one.
USB / SD
Compatibility
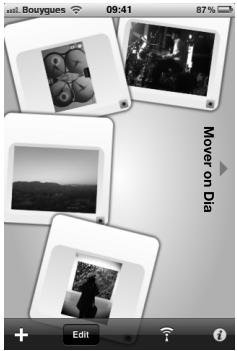
You can display images stored on the following devices:
- SD, micro SD (with adapter), mini SD (with adapter), SDHC (class 2, 4, and 6), mini SDHC (with adapter), MMC, MMC plus, MMC mobile (with adapter), MMC micro (with adapter), and RS-MMC (with adapter) cards
- USB keys
- Cameras (if your camera is recognized as a mass storage unit)
- Desktop External Hard Drives.
Using the Frame with a Storage Device
- Insert your device into the appropriate slot.
The images stored on your device will appear.
- Press the trackball.
You can now browse the contents of your device and select an image by pressing the trackball.

- Only images in JPG format may be displayed on the frame.
- Never remove the storage device while copying is under way.
Managing Pictures
| Copying/ Moving an Image | 1. Select Browse > Directory then select the folder that contains the images to be copied or moved. 2. Select the image and press the button. 3. Select Copy or Move, then select the destination folder. |
| You can also copy/move multiple images by using the Select option. | |
| Deleting an Image | 1. Select Browse > Directory, then select the folder containing the images to be deleted. 2. Select the image then press the button. 3. Select Delete. |
| You can also delete multiple images by using the Select option. | |
| Rotating Images | Press the button and select Rotate. |
| Programming a Slideshow | Run a slideshow then press the button and select Slideshow settings. You can adjust the following parameters: - Browsing mode: view your images by folder, by date, at random, or based on the Customize folder. - Timer: select how long the slideshow's images are displayed for. - Transition: select the transition that you have between each image. - Fit to screen: define whether or not the images whose format does not fit the screen must be adjusted. |
| An image can only be adjusted if its dimensions are greater than or equal to 800x600. |
Avant de commencer
http://www.parrot.com/nl/support
Complete documentation, educatieve software, updates

Inhoudsopgave
http://www.parrot.com/uk/support
改訂版ルフルウーダーガイド、チフロール

目次
本製品をご使用くださいます. p.54
ロイヤルス接続 p.55
3.Add a share to kIck. 1
http://www.parrot.com/uk/support
完全使用手册、教程、更新内容。

目錄
第一次使用 p.62
无线网络 p.63
Mover應用程式的使用 p.65
蓝牙 p.66
USB闪存和SD卡 p.67
图片管理 p.68
第一次使用
供電
A. 100% Copyright © 2017 The Author(s)
0000 5
j! 1
.Settings > Bluetooth > Status > Enabled
"Bluetooth 2
. Bluetooth 0
Bluetooth DIA 3
.0000 4
J
Bluetooth
J 1
Bluetooth

Mover
iPhone 6
:dlldy iPd 1iPod
(1) App Store (Mover Lite 3) Mover (Mover Lite 4)
.Wi-Fi 456 wu jie iPhone jgj gjj 2
.Mover 3.3
aalal aal alal alal
Add photo jj j j j j j j j j j j j j j j j j j j j j j j j j j j j j j j j j j j j j j j j j j j
( 0,34,0,14)
2j = 1

.Mover on Dia aalall oaiy bai yai 6
Jgaggl dikg. jblg lge gnnn nn nann
<olai)Browse
.Mover < (山)Folder
JyIyIyIyIyIyIyIyIyIyIyIyIy

yj 1
New Email account 2
JusjRyJyI yI yI yI yI yI yI yI yI yI yI yI yI yI yI yI yI .3
Jg jg jg jg jg jg jg jg jg jg jg jg jg jg jg jg jg jg jg jg jg jg jg jg jg jg jg jg jg jg jg jg jg jg jg jg jg jg jg jg jg jg jg jg jg
jaii ciay jaiy jaiy aiia ciiiy iay duiy gi y gaiy gill y qinai<
.Browse > Directory > E-mail
yj jai 1
Jblyu Cduy Jb New 1,Registered feeds .2
gaii i jyj 1 jie j j j j j j j j j j j j j j j j j j j j j j j j j j j j j j j j j j j j j j j j j j
.
.Save jai 4
.Browse > Directory > RSS feeds
jlllglgagn jy jy gillllal alalalalalalalalal
中
Add a share
.Browse > Directory > PC shares
Gaaill sall yss Jauil p,Browser jiall lllpail. jyl Iannnnd ci jaii Gaaiae
aalll aai
yglgll yglbll lalbll clllglll gge gss sddj jnaiy
.Wi-Fi
WPS 4gglssdlae gallgall
1.
. Settings >Wi-Fi 2
. Configure > Auto 3
jiallalaii alaiai 1aiaiai
. Settings > Wi-Fi > Connection > Disable / Enable
JU
jIyIgIgIgIgIgIgIgIgIgIgIgIgIgIgIgIgIgIgIgIgIg
.00000000000000000000000000000

1
1
Wi-Fi g1g al a 100000000000000000000000000000000000000

j1i iii. 1
. Settings > Informations
.2

14.25 25
http://www.parrot.com/uk/support
UdsUs UJdU:UJso UUsSsSoIUs
Jaa Jaa Jaa Jaa Jaa Jaa Jaa Jaa Jaa Jaa Jaa Jaa Jaa Jaa Jaa Jaa Jaa Jaa Jaa Jaa Jaa Jaa Jaa Jaa Jaa Jaa Jaa Jaa Jaa Jaa Jaa Jaa Jaa Jaa Jaa Jaa Jaa Jaa Jaa Jaa Jaa Jaa Jaa Jaa Jaa Jaa Jaa

1211 12
dill i dill ciallalll pal idilal lle la yuuy DIA g uall yjauuul lglld 13
cui jyli liu liu yu yu yu yu yu yu yu yu yu yu yu yu yu yu yu yu yu yu yu yu yu yu yu yu yu yu yu yu yu yu yu yu yu yu yu yu yu yu yu yu yu yu yu yu yu yu yu yu yu yu
y
Cuiyiyu Laiya yu (Cuiyuyi Laiya jie caiyai) Cuiyuyu Laiya jie cyuyu a 10000000000000000000000000000000000000000000000000000000000000000000000000
75 1
74 Wi-Fi
71 ...........................Bluetooth
70 BSU/DS
69 2
General Information
Warranty
Without prejudice of legal warranty, Parrot products are warranted during 1 year from the date of purchase for defects in materials and workmanship, provided that no deterioration to the product has been made, and upon presentation of proof of purchase (date of purchase, location of sale and product serial number) to the retailer or Parrot directly.
Warranty does not cover: upgrading of the software items of the Parrot products for compatibility purpose, data recovery, deterioration of the external aspect due to normal use of the product, any damage caused by accident, misuse, misapplication, or non-Parrot products.
Parrot is not responsible for storage, loss or damaged to data during transit or repair.
Any product wrongfully declared to be defective will be returned to sender and inspection, process and carriage costs will be invoiced to him.
Correct disposal of This Product
(Waste Electrical & Electronic Equipment)
(Applicable in the European Union and other Eu

ropean countries with separate collection systems).
This marking shown on the product or its literature, indicates that it should not be disposed with other household wastes at the end of its working life. To prevent possible harm to the environment or human
health from uncontrolled waste disposal, please separate this from other types of wastes and recycle it responsibly to promote the sustainable reuse of material resources.
Household users should contact either the retailer where they purchased this product, or their local government office, for details of where and how they can take this item for environmentally safe recycling. Business users should contract their supplier and the terms and conditions of the purchase contract. This product should not be mixed with other commercial wastes for disposal.
Modifications
The explanations and specifications in this guide are given for information purposes only and may be modified without prior notice. They are deemed to be correct at time of going to press. The utmost care has been taken when writing this guide, as part of the aim to provide you with accurate information.
However, Parrot shall not be held responsible for any consequences arising from any errors or omissions in the guide, nor for any damage or accidental loss of data resulting directly or indirectly from the use of the information herein. Parrot reserves the right to amend or improve the product design or user guide without any restrictions and without any obligation to notify users. As part of our ongoing concern to
upgrade and improve our products, the product that you have purchased may differ slightly from the model described in this guide.
If so, a later version of this guide might be available in electronic format at Parrot's website at www.parrot.com.
FCC Compliance Statement
This device complies with part 15 of a FCC rules. Operation is subject to the following two conditions:
(1) This device may not cause interference, and (2) This device must accept any interference, including interference that may cause undesired operation of this device.
This equipment has been tested and found to comply with the limits for a Class B digital device, pursuant to part 15 of the FCC Rules. These limits are designed to provide reasonable protection against harmful interference in a residential installation.
This equipment generates, uses and can radiate radio frequency energy and, if not installed and used in accordance with the instructions, may cause harmful interference to radio communications. However, there is no guarantee that interference will not occur in a particular installation. If this equipment does cause harmful interference to radio or television reception, which can be determined by turning the equipment off and on, the user is encouraged to try to correct the interference by one or more of the following measures:
-Reorient or relocate the receiving antenna.
-Increase the separation between the equipment and receiver.
-Connect the equipment into an outlet on a circuit different from that to which the receiver is connected.
-Consult the dealer or an experienced radio/TV technician for help.
Changes or modifications not expressly approved by the party responsible for compliance could void the user's authority to operate the equipment
"This Class B digital apparatus complies with Canadian ICES-003"
Caution: Exposure to Radio Frequency Radiation
To comply with RF exposure compliance requirements, a separation distance of at least 20~cm must be maintained between the antenna of this device and all persons.
This device must not be co-located or operating in conjunction with any other antenna or transmitter.
To prevent radio interference to the licensed service, this device is intended to be operated indoors and away from windows to provide maximum shielding. Equipment (or its transmit antenna) that is installed outdoors is subject to licensing.
Declaration of Conformity
Parrot SA, 174 quai de Jemmapes, 75010 Paris, France, declares under its own liability that the product described in the present user guide conforms to the technical standards: EN 301489-17, EN300328, EN60065, according to the provisions of the directive R&TTE 1999/5/ EC and technical standards: IEC 62087 and IEC 62301 of directive 2005/32/EC.
Protection and personal safety
Carefully read the user guide and follow the indicated procedure when setting up the device. Do not dismantle or open the device and do not touch the electronic components or the drivers. Do not attempt to dismantle or modify either of the speakers.
Never introduce any metal object to avoid the risks of electric shocks, fire, short circuits or dangerous emissions. If your device shows signs of faulty operation, call the approved Parrot technical support centre or an approved retailer. Never leave the frame exposed to rain or chemical products; do not place them in a damp area or where they are likely to be splashed with water. Never place your device on a recipient containing any type of liquid, which might seep inside the device. Doing so will reduce the risks of electric shocks, short circuits, fire and injury.
Caution: Exposure to Radio Frequency Radiation
The installer of this radio equipment must ensure
that the antenna is located or pointed such that it does not emit RF field in excess of Health Canada limits for the general population; consult Safety Code 6, obtainable from Health Canada's website at www.hc-sc.gc.ca/rpb.
Important safety instructions

The exclamation point within an equi-lateral triangle is intended to alert the user to the presence of important open-aid maintenance (servicing) instructions erature accompanying the product.

An equilateral triangle, is intended to alert the user to the presence of uninsulated "dangerous voltage"
within the product's enclosure that may be of sufficient magnitude to constitute a risk of electric shock to persons.
- This apparatus shall not be exposed to dripping or splashing and no object filled with liquid, such as vases, shall be placed on the apparatus.
- The AC/DC adaptor which provides disconnection from mains supply shall remain readily operable. Unplug this apparatus when unused for long periods of time.
- Read these instructions.
- Keep these instructions.
- Heed all warnings.
-
Follow all instructions.
-
Do not use this apparatus near water.
- Clean only with dry cloth.
- Do not block any ventilation openings. Install in accordance with the manufacturer's instructions.
- Do not install near any heat as radiators. Heat registers, stoves or other apparatus (including amplifiers) that produce heat.
- Do not defeat the safety purpose of the polarized or grounding type plug. A polarized plug has two blades with one wider than the other. A grounding type plug has two blades and a third grounding prong. The wide blade or the third prong are provided for your safety. If the provided plug does not fit into your outlet, consult an electrician for replacement of the obsolete outlet.
- Only use attachments/accessories specified by the manufacturer.
- Unplug this apparatus during lightning storms or when unused for long periods of time.
- WARNING: To reduce the risk of fire or electric shock, do not expose this apparatus to rain or moisture and objects filled with liquids, such as vases, should not be placed on this apparatus.. This apparatus is designed for indoor use only. Do not expose the frame to outside temperatures below 5^ or above 40^ . The system could be damaged or the cabinet warped. Avoid placing the system near a source of heat or exposing it to sunlight (even through a window). Similarly, excessively low temperatures and humidity could damage the device.
Copyrights
Copyright © 2010 Parrot. All rights reserved. The total or even partial reproduction, transmission or storage of this guide in any form or by any process whatsoever (electronic, mechanical, photocopy, recording or otherwise) is strictly prohibited without prior consent from Parrot.
Registered trademarks
Parrot logo and trademarks are the property of PARROT SA.
The Bluetooth® word mark and logos are owned by the Bluetooth SIG, Inc. and any use of such marks by Parrot S.A. is under license. Bluetooth QDID: B015990, B013839, B013838 Wi-Fi® is a registered mark of the Wi-Fi Alliance®. Wi-Fi CERTIFIED™ is a mark of the Wi-Fi Alliance. The Wi-Fi CERTIFIED logo is a certification mark of the Wi-Fi Alliance.
Additional typefaces for this product can be obtained at www.linotype.com.
Others trademarks and trade names are those of their respective owners.
Informations generales
Garantie
Copyright © 2010 Parrot.
Marques déposées
Copyright © 2010 Parrot.
Copyright © 2010 Parrot.
Eingetragene Marken
Copyright © 2010 Parrot.
Marchi registrati
Copyright © 2010 Parrot.
Gedeponerde merken
Our hotline is at your disposal from Monday to Friday between 9 am and 6 pm (GMT + 1)
Hot-line@parrot.com
Italy: [+39] 259901597
Spain: [+34] 902 404 202
UK: [+44] (0)844 472 2360
Germany: [+49] 900 1727768
USA: [+1] (877) 9 Parrot (toll free)
China: [+86] 755 8203 3307
Hong Kong: [+852] 2736 1169
France: [+33] 148036069
Europe: [+33] 148036069 (Spoken languages : French, English and Spanish)
DIA
Parrot By
NODESIGN


FCC ID: RKXOKIA CONTAINS FCC ID: EW4DWWM014 IC ID: 5119AOKIA CONTAINS IC ID: 4250ADWM014