SPECCHIO - Drone PARROT - Free user manual and instructions
Find the device manual for free SPECCHIO PARROT in PDF.
| Product type | Digital photo frame |
| Connectivity | Wi-Fi, Bluetooth, NFC |
| Display | Swivel screen with automatic image rotation |
| Power supply | Included power adapter |
| Supported image formats | JPEG |
| Supported video formats | 3GP |
| Internal storage | Internal memory (capacity not specified) |
| Ports and interfaces | Mini USB, USB host port, memory card reader |
| Main functions | Slideshow, receive images by email, RSS feeds, network sharing, PC connection via Wi-Fi/USB, Bluetooth pairing |
| Navigation | Buttons on back of frame, virtual keyboard, web interface |
| Care and cleaning | Clean only with a dry cloth |
| Safety | Do not expose to moisture, do not block openings, use only specified accessories |
| General information | 1-year warranty, recycling via WEEE |
Frequently Asked Questions - SPECCHIO PARROT
User questions about SPECCHIO PARROT
0 question about this device. Answer the ones you know or ask your own.
Ask a new question about this device
Download the instructions for your Drone in PDF format for free! Find your manual SPECCHIO - PARROT and take your electronic device back in hand. On this page are published all the documents necessary for the use of your device. SPECCHIO by PARROT.
USER MANUAL SPECCHIO PARROT
PARROT BY MARTIN SZEKELY
SPECCHIO
QUICK START
GUIDE
GUIDE
D'UTILISATION
RAPIDE
GUIA
DE INSTALLACION
RAPIDA
Technical specification. .p.89
General information.. .p.90
- Installing the frame
- Installation du cadre
- Instalación del marco
- Installation des Rahmens
- Installazione del marco
- Installatie
- YcmaHOBka
- Using the frame with a memory card
- Utiliser le cadre avec une carte mémoire
- Utilizar el marco con una tarjeta de memoria
- Verwendung des Rahmens mit einer Speicherkarte
- Utilizzo della cornice con una scheda di memoria
- De fotolijst gebruiken met een geheugen
-Испобьозане pamku c Kapmoиnamуm
- Using the frame via USB
- Utiliser le cadre via USB
- Utilizar el marco mediante USB
- Verwendung des Ramen via USB
- Utilizzo della cornice tramite USB
- De fotolijst gebruiken via USB
-Испοльзоанue pamku Specchio uepe3 USB
- Using the frame with a USB flash drive / digital camera.
- Utiliser le cadre avec une clé USB/ un apparéil photo numérique.
- Utilizar el marco con una memoria USB / una cámara digital.
-
Verwendung des Rahmens mit einem USB-Stick / mit einer digitalen Kamera.
-
Utilizzato della cornice con una chiave tetta USB / una fotocamera digitale.
- De fotolijst gelebruiken met een USB pen/een digitaal fototoestel.
- VcnoIb3o6aHue pAMKU c KIyoOM USB/ uΦpoBbIM fomoannapamom.
- Sending pictures from a phone via Bluetooth
- Envoyer des images depuis un téléphone via Bluetooth
- Enviar imagens desde un téléphone mediante Bluetooth
- Senden ausgehend von einem Telefon
- Invio da un Telefono tramite Bluetooth
- Foto's sturen vanaf een telefoon
- Ipepea qomoaapu c meeepoHa unu KIIK
- Using the frame with an NFC phone
- Utiliser le cadre avec un téléphone NFC
- Utilizar el marco con un téléphone NFC
-
Verwendung des Rahmens mit einem NFC-Telefon
-
Utilizzo della cornice con un Telefono NFC
- De fotolijst gebruiken met een NFC telefoon
-Испльбизанue pamku c meneфонOM NFC
English
Content
Using the Parrot frame by Szekely for the 1st time.09
Installing the frame. 09
Scrolling through the menus. 09
Using the virtual keypad. 10
Using the Wi-Fi® function 10
Connecting the frame to a Wi-Fi network 10
Accessing the web interface. 10
Receiving pictures by email 11
Display photo albums on line 12
Display pictures stored on a computer. 12
Transfer photos to the Parrot frame by Szekely via Wi-Fi... 12
Using the Bluetooth® function. 13
Pairing the frame with your phone 13
Sending pictures from a Phone or PDA via Bluetooth..... 13
Using the frame with an NFC phone. 13
Sending pictures from a PC via Bluetooth 14
Using the Parrot frame by Szekely via USB 14
Using the frame with a computer. 14
Using the frame with a USB flash drive
digital camera. 14
Using the frame with a memory card. 15
Using the video mode. 15
Sending a video to the frame 15
Managing the pictures. 15
Copying/moving pictures 15
Deleting pictures. 16
Arranging pictures. 16
Preparing a slideshow. 17
Using the Parrot frame by Szekely for the 1st time
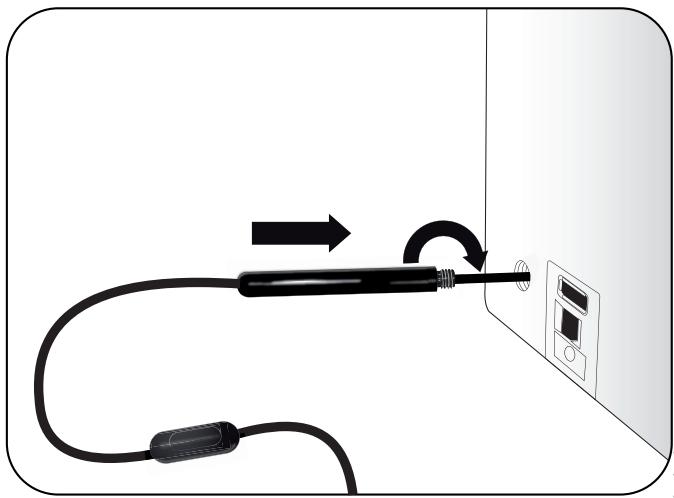
Installing the frame
Refer to the diagram p.4.
- Screw the metal rod into the back of the frame.
If you rotate the frame, the picture displayed turns to match the new position of the frame.
- Connect the power cable connector to the transformer and plug it into an electrical socket.
The frame automatically switches on.
- Select your country.
Scrolling through the menus
You can scroll through the menus using the buttons on the back of the frame.

This button allows you to access the main menu and to confirm a selection. It also allows you to enter the context menu on each picture.

Depending on the frame's orientation, these buttons allow you to select a picture or navigate through the context menus.

In slideshow mode, you can also use the navigation buttons to access the context menu.
Depending on the frame's orientation, the left or down buttons also allow you to exit the menus.

You can also navigate through the menus of the frame and browse through your pictures using your PC. To do so, select the icon on the web interface. Refer to the Accessing the web interface section for more information.
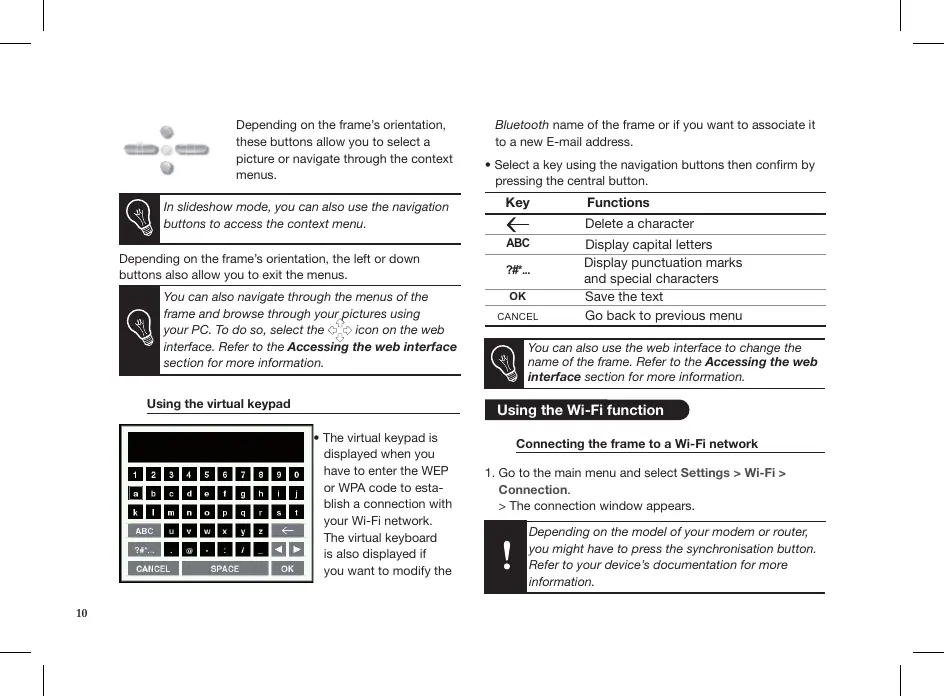
Using the virtual keypad
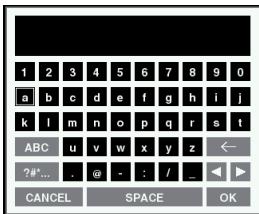
- The virtual keyboard is displayed when you have to enter the WEP or WPA code to establish a connection with your Wi-Fi network. The virtual keyboard is also displayed if you want to modify the
Bluetooth name of the frame or if you want to associate it to a new E-mail address.
- Select a key using the navigation buttons then confirm by pressing the central button.
| Key | Functions |
| ← | Delete a character |
| ABC | Display capital letters |
| ?#... | Display punctuation marks and special characters |
| OK | Save the text |
| CANCEL | Go back to previous menu |

You can also use the web interface to change the name of the frame. Refer to the Accessing the web interface section for more information.
Using the Wi-Fi function
Connecting the frame to a Wi-Fi network
- Go to the main menu and select Settings > Wi-Fi > Connection.
The connection window appears.
Depending on the model of your modem or router, you might have to press the synchronisation button. Refer to your device's documentation for more information.
- Select Configure.
A Wi-Fi network search is launched.
- Select your network from the provided list or select Others to configure your network manually.
- Enter your WEP or WPA code using the virtual keyboard then select OK.
You are now connected to your Wi-Fi network.
Once the connection has been established, a window appears containing all the information relating to the Wi-Fi connection.
- Once the connection has been established, you have the possibility to activate / deactivate the connection. You can do that by selecting Settings > Wi-Fi > Connection > Activate / Deactivate.
Accessing the web interface

In order to access the web interface, make sure that your PC is connected to the same Wi-Fi network as the frame.
- Read the IP address assigned to your frame. To do so, select Settings > Info.
- Launch your web browser and enter the IP address in the address bar.
Refer to the Connecting the frame to a Wi-Fi network section for more information.
Receiving pictures by email

We advise you to create a specific email address for your frame.
For more information about the compatible mail servers, refer to our website www.parrot.com, compatibility section.
- On the web interface, click on
- In the Email account space, click on New to associate an email address with frame.
- Enter your connection identifiers in the corresponding fields. Refer to your email service documentation for information on the server and the protocol.
All the pictures that you receive on this email account from now on can be accessed via the frame, by selecting Route > Directory > Email.

You can also associate an email address directly from the frame. To do so, select Settings > Wi-Fi > Email > Add an Email account.
Display photo albums on line
RSS Feed
An RSS (Really Simple Syndication) feed is a flow of free content coming from internet sites. Thanks to RSS feeds and photo management and sharing tools on line such as Flickr™ or Picasa™, photo albums published on the website can be displayed on your frame. Once the RSS feed is associated to your frame, the photos are automatically updated.
For more information, go to:
- http://www.flickr.com
-
http://picasa.google.com
-
Create an account on a photo server and mark the identifier associated with the album that you wish to display on the frame or note down the URL for the RSS flow associated with this album.
- On the web interface, click on
- In the Registered feeds space, click on New to associate an RSS flow with the frame.
- Select your photo server, enter the identifier associated with the selected album then the password if necessary or enter the URL address of the RSS feed.
- Click on Save.
The images contained in the associated album can then be accessed on the frame by selecting Route > Directory > RSS Flow.

You can also associate RSS feeds directly from the frame by selecting Adjustments > Wi-Fi > RSS > Add new flow.
Display pictures stored on a computer
- On your computer, activate sharing on the pictures directories you wish to display on the frame.
- On the web interface, click on
- Click on Add a share and select your computer. > The pictures contained in the shared directory are accessible from then on the frame.

You can also associate a computer directly from the frame. To do so, select Settings > Wi-Fi > PC connection > Add a share.
Transfer photos to the frame via Wi-Fi
-
If you are using:
-
a PC, click on Start > Network Favourites > Entire network > Microsoft Windows Network
-
a Mac, select Go > Network.
-
Double-click on the Frames directory.
You will access the content of the frame.

You can also transfer your images on a peripheral connected to frame.
- Transfer the pictures into the Internal Memory file.
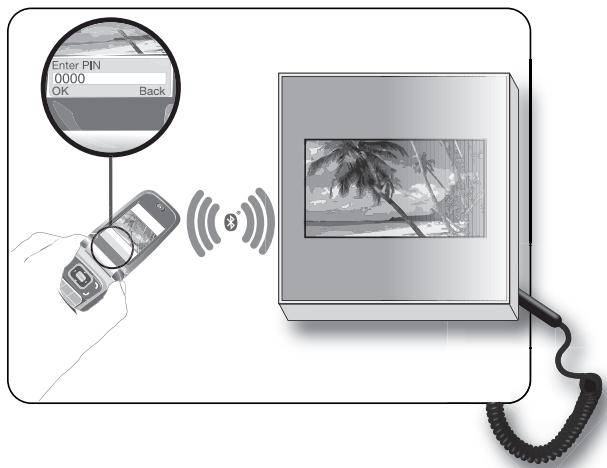
Using the Bluetooth function
Pairing the frame with your phone

Depending on the model of your phone / computer, this phase might be optional. However, it will enable you to send your photos to the frame more quickly.
- Ensure that Bluetooth is activated on the frame.
To do so, press the central button and select Settings > Bluetooth > Enabled. - Activate Bluetooth on your phone / computer then search for Bluetooth devices. Refer to the user guide of your device for more information.
- Select Parrot_Specchio in the list of Bluetooth devices proposed by your phone / computer.
- On your phone / computer, enter the code 0000.
Your two devices are now paired.
Sending pictures from a Phone or PDA via Bluetooth
- Ensure that Bluetooth is activated on the frame.
To do so, press the central button and select Settings > Bluetooth > Enabled. - Activate Bluetooth on your phone / PDA.
- On your phone/PDA, go to the Pictures menu. Select a picture and choose "Send via Bluetooth". Your device starts searching for Bluetooth peripherals.
- Once the search has finished, select Parrot_Specchio.
- If your device prompts you to enter a code, type 0000.
The picture is then sent to the frame.

Several pictures can be sent at a time, though this feature will depend on your device.
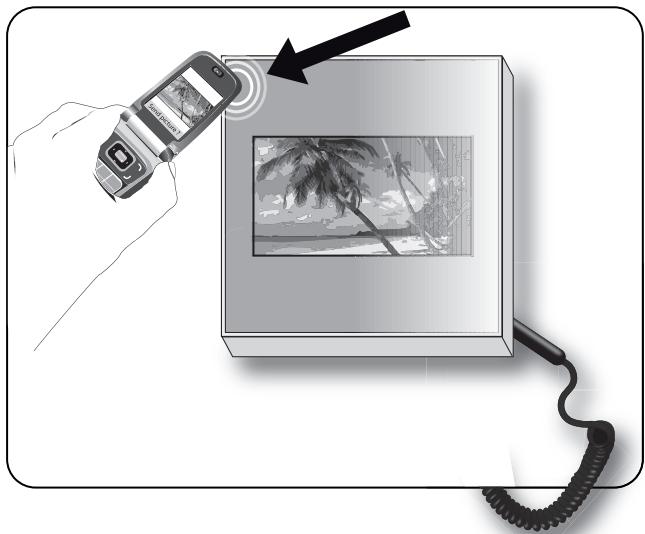
Using the frame with an NFC phone
To send a picture to the frame from an NFC phone:
-
On your phone, select the picture you want to send.
-
Touch the frame with your phone:
-
on the top left of the frame if it is in landscape mode
- on the top right of the frame if it is in portrait mode.
A confirmation message is displayed on your phone.
- Select Yes.
Sending pictures from a PC via Bluetooth
(Windows, Linux)
- Ensure that Bluetooth is activated on the frame. To do so, press the central button and select Settings > Bluetooth > Enabled.
- Activate the Bluetooth feature on your computer.
- Right-click on the picture that you wish to send and choose «Send via Bluetooth».
Your PC will search for any nearby Bluetooth peripherals.
- Select Parrot_Specchio.
- Type 0000 if your PC prompts you to enter a code.

It is also possible to send pictures from a Mac.
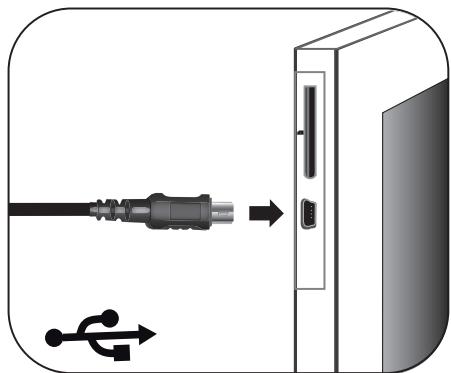
Using the Parrot frame by Szekely via USB
Refer to the diagrams p.05.
Using the frame with a computer
-
To send pictures from a computer via USB:
-
Connect the frame to your PC with the USB cable.
The computer detects a new device.
- Copy your JPEG pictures to the frame as if you were using a USB flash drive.
- Disconnect the cable from the frame.

To disconnect the frame from your computer, double click on the "Safely remove hardware" icon located at the bottom right of your task bar.
- Once connected to your computer, your frame works as a USB flash drive. It means that you can copy, move, rename and delete the pictures stored in the frame.
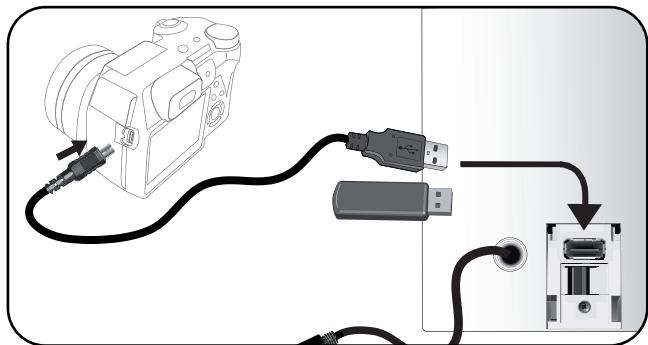
Using the frame with a USB flash drive / digital camera
- Insert your USB flash drive in the USB port located at the back of the frame or connect your digital camera using the USB cable provided with your camera. Refer to your
digital camera user guide for more information.
The JPEG pictures stored in the USB flash drive or in the memory of the digital camera are displayed.
- Press the central button and select Browse > Directory > USB.
You can now navigate through the content of your USB flash drive or digital camera using the navigation buttons and select a picture using the central button.
You can then display, rotate, select, copy or move the picture.
Refer to the Managing the pictures section for more information.
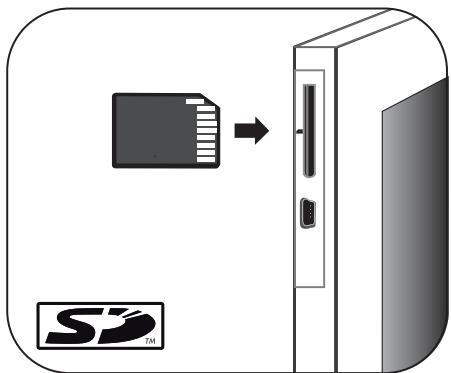
Using the frame with a memory card
Refer to the diagrams p.05.
- Insert the memory card into the appropriate slot.
The JPEG pictures stored in the memory card are displayed.
- Press the central button and select Browse > Directory
Memory card.
You can now navigate through the content of your memory card using the navigation buttons and select a picture using the central button.
You can then display, rotate, select, copy or move the picture.
Using the video mode
Sending a video to the frame
You can transfer videos in 3GP formats to the frame as if you were sending a picture.
Refer to the sections concerning the image transfer for more information.
Watching a video
- While navigating through the content of a directory, you can play a video by pressing the central button and selecting the Play option.
- In slideshow mode, you can activate the automatic reading. To do so, select Slideshow > Video > Play.
Managing the pictures
Copying / moving pictures
Pictures you can see in the USB, SD Card and RSS feed directories are not memorized in the internal memory of the frame. The frame allows you to copy or move these pictures into its internal memory. You can also copy / move your pictures from or to an USB flash drive or a memory card. To do so:
- Press the central button and select Browse > Directory then select the directory containing the pictures to copy / move.
-
Select the picture you want to copy / move and press the central button.
-
If you only want to copy / move one picture:
a. Select the Copy or Move option.
b. Select the directory in which you want to copy / move the picture.
c. Press the central button.
- If you want to copy / move several pictures:
a. Choose the Select option on each picture.
>A icon is displayed on the picture.
b. On the last picture you want to copy / move, select the Copy or Move option.
c. Select the directory in which you want to copy / move the pictures.
d. Press the central button.
Deleting pictures
- Press the central button and select Browse > Directory then select the directory containing the pictures to delete.
-
Select the picture you want to delete then press the central button.
-
If you only want to delete one picture:
a. Select the Delete option.
> A confirmation message is displayed.
b. Select Yes. - If you want to delete several pictures:
a. Choose the Select option on each picture.
b. On the last picture you want to delete, select the Delete option
> A confirmation message is displayed.
c. Select Yes.
Arranging pictures
Pictures are sorted by directory, by date or depending on your preferences. To access pictures, press the central button and select Browse.
- The Directory option allows you to access the pictures sorted by type of transfer.
-
The Date option allows you to access the pictures sorted by date.
-
The Customized option allows you to arrange pictures from every directory.
-
Select one or several pictures then select the Classify option.
A cursor appears to indicate the picture position.
- Use the cursor and press the central button to select the new pictures location.
Preparing a slideshow
- Press the central button and select Slideshow.
-
The following options are available to create your slideshow:
-
Browsing mode: visualize your pictures sorted by directory, by date or depending on your preferences.
- Timer: defines the slideshow display time.

Select the None option if you want to deactivate the slideshow.
- Transition: defines the transition effect between the photos in your slideshow.
- Video: activates / deactivates the automatic reading of videos during slideshows.
François
Navigation in den Menus
IcnoB3OBAHne BnpyaIbHO KnabNaTpybI

Bvrtyalhna Klaaunatypaa NOBBLTcB B TOT MOMHT, KOGA Heo6xOJIMO BBeCTN KIOU 630nApCHOCTn Dnra COeINHeHnC CetbIo Wi-Fi.
OHA NOBIAIETCA TAKKE, eCNI BbI XOTINTE N3MEHHTb IMMA Bluetooth paMKn INI 3aIaT bI dI PA MKN HOBBI 3IeKTOHHB aIpeC.
BbI6epIrte KnaBIMuY KnaBImaTybI, IINOpN3yHKnONKn HABIRaunu, NIOdTBePdUte HauKaTMeHa CEHTpaIbHyO KNOKy.
PnOcmOpT pOToIpaФn, coXpAnEHbIX HA KOMbltepe
- HaBaUeM KOMMbItepe akTNBIPyIte COBMECTHOE HcONb3OBAHHe nanOK FOtORpaФИ, KOtOpBie BbXOTYE BIDETb B PAMKc.
2.B web-ntepceie 电KHNTe KhoKoMbIuN IO

- 英甸HKTE KHOIKK MbluN DoBabbCBMCECTHoe NcONb3OBAHMe HbB6epBe BAU COMBIbOTep.
I3o6paXeHnI, IMHeOJIneC8 B COBMeCTHO nONIb3yEmO nAnKe, DOCtYNbI OTHbIe B pAmKe. JIa 3TOrO BbIbepTe PpocMoTp PAnKa POnkJIuOeHne K NK.

Bb maKke moXeMe 3aDam b Komblbomep HnOncpeCmEHNu u3 pAMku. JnA 3moEO bIbepume Hacmpouk > Wi > IoKnluHoe K Pk> Obaaumb coeMecmHoe ucnlon3oaeHue.
Ipehenoc foToTpaΦn B paMky uee3 Wi-Fi
-
EcIn Bbl nCnObl3yeTe:
-
ПК, сижнге Кноков MSIN NO Пук >ИЗбарноетс >Вcertс >Сcert Microsoft Windows
-MAC, BbIepeTe IepexoD > CeTb.
2.ДовинбIM ueHcOMMbIIN OTKpoTe nanky Pamkn.
BbI nepeuIN K coepKIMOMy paMKN.
NcnoB3oBaHne pAMKn C TeJefoHOM NFC
Ipehenoc oToTporpaHn B pamky c TeJefoHa NFC:
-
B TepeOHe BbIepeHte n3obpaXeHne, KOTOpoe Bbl XOTnTe nepeHeCTn.
2.ДOTpoHbTeCbdo paMKn TeJefoHOM: -
BéveXP CJIeBA, eCNI OHa hAcTpoEHa npeKIM «NeɪəZ»
-
Bépyx cnpaba, ecni OHa hactpoeha ha peximn《noptert》
Ha Tepeone NoBnTc cooBHeHne noTbeKdEHHa.
-
BbIepeTe Da.
OTnpabka c komnbioTepa yepe3 Bluetooth
(Windows, Linux)
- Y6eIntecb, YTO yCTPOIcTBo Spechio HacTpoEHO Ta, Y60be Iero MoXNo bIo no ObHApKHTB BCEMNI yCTPOIcTBaMI Bluetooth. JyA 3Toro BbIbepiTe HAcTPOIKN >Bluetooth >OtoctynHocb.
- BkIIOHnTe ΦyHKcIIo Bluetooth Ha BaIeM KOMnbIyTepe.
- 曹鍾NHITE npABOY KHONKO MbluHa HnO6paXeHN, KOTOpoe Bbl XoTHTe nepeAdTb, NblbEepnte «IpePeadTb uee3 Bleothout»...
BaW KOMNbTeP nauHET nonck yctpoiC b Bluetooth.
-
BbIbepuTe Parrot_Specchio.
-
Ecnn KOMnbIOpTe 3anpaunBaET KO, BBeDnTe 0000.
BoBpempepaHn3o6paXeHnHa 3KpaHne nOBAIPTc3NaOHK Bluetooth n 3o6paXeHne.
Icnonb3obanpe pamk Specchio uepez USB
CM.cxemblcmp.05.
OTnpaBk c KOMNbIOpTepaYepe3 USB
- Пождкочпс Specchio К komьотеру рп пошни USB-кабел.
Kommbhotep o6hapyKHT HOBoe nepuΦepnHoe yCTpoIcTBO.
2.Скпоичут eибобрахени в Форmate JPEG(KpOME CMYK)ил GIF на Spechio. - OToeDInHInTe KaBebIb ot Specchio.
Specchio coxpaHNT n ABTOMATUeCKn N3MeHNT pa3Mep N3O6paXeHNI.
Ymbobl omknHoumbpamky okmblomepa 0aJbIeKnHHeMbIbIO n3HaNKy «Ee3onacoe u3eienue HcmpoUcmeA, kompU haxoDumc r npaoom Huxhem yany naHenu 3aay.
ailll jll lcll all cwwy wdy
.
a
A
a 1
Jusuill
gall gll gll gll gll
Jzll Jzjj Jxssyblg lll
eaiiie 1
01j<g#d<#j#l#.
joll
J 1
pall lallll jali lal y s aas
.(RSS) LdLdLdLdLdLdLdLdLdLdLdLdLdLdLdLdLdLdLdLdLdLdLdLdLdLdLdLdLdLdLdLdLdLdLdLdLdLdLdLdLdLdLdLdLdLdLdLdLdLdLd
y
jIyJyS1yI yssall Jia jg j
ailll 1lll no yall lalil kll
.3s1s2a1b1y
y
S AOB = S ADB + S_ CEA

sll sbb Jlss
dai aaiai 1
.5JlJIJIJI JPGEJJJJJJJ>
<1>
(SD) 与 z = 123 L_ < 12 L_
aLgJgSdI dIeIy gJgJgJgJgJg
jll bcally lo sssg jlll j
.
jglg jglg jglg jglg jglg
L = L
Jdall Jlae
yue zhaobai
.3y 1 y Lk JbI J 3GP aiaaieae Jai k
aall jai aal l lai jai 1

J/1
4
Parrot Frame by Szekely
jii JJJ Joo. @Bluetooth 8oJg
<Bluetooth<
Jybltoe
J L J 1
- Bluetooth
blall Bluetooth waiu jc uuws
1.Parrot_Specchio
.1j0j 1j0j
Ldlle Bluetooth joll sssie
Liiiei iis sall
Jusisla Jssjie jie jie jie jies

-PDA/daIa/ Bluetooth
aJyJ. yJdPDA /daLa-
. Bluetooth 3c
Bluetooth waiu
.Parrot_Specchio
00001jz1,1jzrjdzjjz0b1j-0
JyI JyI JyI JyI JyI
yss sssssssssssssssssssss
ailllll lde Bluetooth joll
y

"NFC" Jy jzj 1a JbJ Jaa
NFCJLdLa Js
-
-
-
-
-
-
-
-
-
-
-
-
-
-
-
-
-
-
-
-
-
-
-
-
-
-
-
-
-
-
- 1.
-
-
-
-
-
-
-
-
-
-
-
-
-
-
-
-
-
-
-
-
-
-
-
-
-
-
-
-
-
:lailljy1y1y1-9
gaiy
y
JLa Jy
1 1 1 1 1 1 1 1 1 1 1 1 1 1 1 1 1 1 1 1 1 1 1 1 1 1 1 1 1 1 1 1 1 1 1 1 1 1 1

Lj J Parrot Frame by Szekely 1o j -1 < bia j1, dji j1 o. @Bluetooth .< Bluetooth
().dawla/daIaLgBluTeothdawlaJdi-1
ciyyIle liagoeae pailpwBjpyi sl daIa
JbUe Bluetooth waiiae jie liyj .www.parrot.com
.duwla/daIa
Bluetooth 5.0/5.0 Parrot Frame by Szekely 1-4 .dguwla / dguLa jaojai11 .0000 jaoJI JIoJdGuwla / dguLa Jc
Bluetooth yPDA/
LjSjRParrot Frame by Szekely 10000000000000000000000000000000000000000000000000000000000000000000000000
. 1521 j 3 3 3 3 3 3 3 3 3 3 3 3 3 3 3 3 3 3 3 3 3 3 3 3 3 3 3 3 3 3 3 3 3 3 3 3 3 3 3 3 3 3 3 3 3 3 3 3

Wi-Fi gla glll a bawb w y b
:Jaiui ciS 1j.1
< jduill l yle jai: jgsjg" pliuuiu uuaiu Lg-
gswgSLo zu < kdl Js < alall iKu
.2111 < 1111111111111111111111111111111111111111111111
Jusaa Jzj 1d jai Lii d

$$ \therefore \text {a l l} \quad \text {a d} \quad \text {a l l} \quad \text {a d} \quad \text {a l l} \quad \text {a d} \quad \text {a l l} \quad \text {a d} \quad \text {a l l} \quad \text {a d} \quad \text {a l l} $$
$$ \begin{array}{l} i d i a g \left{I _ {1} I _ {2} I _ {3} \right} \text {l o w} \quad \circ \quad \mathrm {g l e} \quad j i d i a g \quad \left{I _ {1} I _ {2} I _ {3} \right} \text {l o w} \quad \mathrm {j i d i a g} \quad \left{I _ {1} I _ {2} I _ {3} \right} \text {l o w} \quad \mathrm {g l e} \quad j i d i a g \quad \left{I _ {1} I _ {2} I _ {3} \right} \ \therefore \Delta D E F \sim \Delta \ \end{array} $$
$$ \begin{array}{l} \text {s a m e l} \quad \text {p a r t} \quad \text {b u b b l i n g} \quad \text {p o w} \quad \text {d i s t} \quad \text {p r e d} \quad \text {d o l a l} \quad j i z i. \ \left. \right.\left. \right.\left. \right.\left. \right.\left. \right.\left. \right.\left. \right.\left. \right.\left. \right.\left. \right.\left. \right.\left. \right.\left. \right.\left. \right.\left. \right.\left. \right.\left. \right.\left. \right.\left. \right.\left. \right.\left. \right.\left.\left.\left.\left.\left.\left.\left.\left.\left.\left.\left.\left.\left. \text {i} _ {j} ^ {j} j ^ {j} j ^ {j} j ^ {j} j ^ {j} j ^ {j} j ^ {j} j ^ {j} j ^ {j} j ^ {j} j ^ {j} j ^ {j} j ^ {j} j ^ {j} j ^ {j} j ^ {j} j ^ {j} j ^ {j} j ^ {j} j ^ {j} j ^ {j} \right] _ {\mathcal {A}} \right) _ {\mathcal {B}} \right) _ {\mathcal {B}} \right) _ {\mathcal {B}} \right) _ {\mathcal {B}} \right) _ {\mathcal {B}} \right) _ {\mathcal {B}} \right) _ {\mathcal {B}} \right) _ {\mathcal {B}} \right) _ {\mathcal {B}} \right\rangle_ {\mathcal {B}}\right) _ {\mathcal {B}}\right) _ {\mathcal {B}} \ \therefore \angle A D E = 1 8 0 ^ {\circ} \ j i a _ {i} \leq j a _ {i} 0 \ \end{array} $$
$$ \begin{array}{l} \left. \right.\left. \right.\left. \right.\left. \right.\left. \right.\left.\left.\left.\left.\left.\left.\left.\left.\left.\left.\left.\left.\left.\left.\left.\left.\left.\left.\left.\left.\left.\left.\left.\left.\left.\left.\left.\left.\left.\right.\right.\right.\right.\right.\right.\right.\right.\right.\right.\right.\right.\right.\right.\right.\right.\right.\right.\right.\right.\right.\right.\right.\right.\right.\right.\right.\right.\right. \ < \downarrow \downarrow \downarrow < \downarrow \downarrow \downarrow \downarrow \downarrow \downarrow \downarrow \downarrow \downarrow \downarrow \downarrow \downarrow \downarrow \downarrow \downarrow \downarrow \downarrow \downarrow \downarrow \downarrow \downarrow \downarrow \ . (R S S) \text {c l} \downarrow \downarrow \downarrow \downarrow \downarrow \downarrow \downarrow \downarrow \downarrow \downarrow \downarrow \downarrow \ \end{array} $$
$$ \begin{array}{l} \therefore \lim _ {b \to 0} \frac {\sin^ {2} {b} + \cos^ {2} {b}}{3} \ (W i - F i) \left{G _ {i} ^ {a} G _ {j} ^ {b} < C _ {i j} \right} \ \therefore \lim _ {x \to 0} \frac {\sin^ {2} x}{\cos^ {2} x} = \frac {1}{2} \ \end{array} $$

a 1 a 1
$$ j \downarrow \downarrow j \downarrow \downarrow j \downarrow \downarrow j \downarrow \downarrow j \downarrow \downarrow j \downarrow \downarrow j \downarrow \downarrow j \downarrow \downarrow j \downarrow \downarrow j \downarrow \downarrow j \downarrow \downarrow j \downarrow \downarrow j \downarrow \downarrow j $$
$$ \therefore \vert l k y \vert = \vert k l \vert $$
$$ \therefore \text {a g l} \text {a g l} \text {a g l} \text {a g l} \text {a g l} \text {a g l} \text {a g l} \text {a g l} \text {a g l} \text {a g l} \text {a g l} \text {a g l} \text {a g l} $$
$$ . \Delta \text {g a w} \Delta j \Delta l \Delta i \Delta j \Delta l \Delta u \Delta l \Delta l \Delta l \Delta l \Delta l \Delta l \Delta l \Delta l \Delta l \Delta l $$
$$ \begin{array}{l} \dot {a} \dot {a} \dot {a} \dot {a} \dot {a} \dot {a} \dot {a} \dot {a} \dot {a} \dot {a} \dot {a} \dot {a} \dot {a} \dot {a} \dot {a} \dot {a} \dot {a} \dot {a} \dot {a} \dot {a} \dot {a} \ \downarrow \downarrow \downarrow < \downarrow \downarrow \downarrow (s) \downarrow \downarrow \downarrow \downarrow \downarrow j i! \downarrow d i j \downarrow l k l l. \ \therefore \text {g a w} \text {a l l y} J L \text {a d} Y < \ \end{array} $$
$$ \begin{array}{l} \left. \text {i t a l l} \right| \text {j r a r r o w} \left. \right.\left. \right.\left. \right.\left. \right.\left. \right.\left. \right.\left. \right.\left. \right.\left. \right.\left. \right.\left. \right.\left. \right.\left. \right.\left. \right.\left. \right.\left. \right.\left. \right.\left. \right.\left. \right.\left. \right.\left. \right.\left.\left.\left.\left.\left.\left.\left.\left.\left.\left.\left.\left.\left. 1 0 0 0 0 0 0 0 0 0 0 0 0 0 0 0 0 0 0 0 0 0 0 0 0 0 0 0 0 0 0 0 0 0 0 0 0 0 0 0 0 0 0 0 0 0 0 0 0 0 0 1 2 5 6 7 8 9 9 9 9 9 9 9 9 9 9 9 9 9 9 9 9 9 9 9 9 9 9 9 9 9 9 9 9 9 9 9 9 9 9 9 9 9 9 9 9 9 9 9 9 9 9 9 9 9 9 8 \right| ^ {2} \right| ^ {2} \right| ^ {2} \right| ^ {2} \right| ^ {2} \right| ^ {2} \right| ^ {2} \right| ^ {2} \right| ^ {2} \right| ^ {2} \right| ^ {2} \right| ^ {2} \right| ^ {2} \ \left. \frac {1}{2} \right| < \frac {1}{2} \left(\frac {1}{2} + \frac {1}{2}\right) \left(\frac {1}{2} + \frac {1}{2}\right) \ \therefore \frac {1}{2} \cdot \frac {1}{2} = \frac {1}{2} \cdot 1 = \frac {1}{2} \ \end{array} $$

$$ \begin{array}{l} \begin{array}{l} \text {i s .} \quad \text {J b y} _ {1} ^ {\prime} \quad \text {i s o} \quad \text {j a l y} _ {2} ^ {\prime} \quad \text {(S a y)} _ {3} ^ {\prime} \quad \text {i s k a r d i k a r d i k a r d i k a r d i k a r d i k a r d i k a r d i k a r d i k a r d i k a r d i k a r d i k a r d i k a r d i k a r d i k a r d i k a r d i k a r d i k a r d i k a r d i k a r d i k a r d} \ (\mathrm {W i - F i}) \quad \text {i s} \quad \text {s g} < \text {c h i l d} \quad \text {c h i l d} \quad \text {i s} \quad \text {d i f} \quad \text {d i f} \quad \text {d i f} \quad \text {d i f} \quad \text {d i f} \quad \text {d i f} \quad \text {d i f} \quad \text {d i f} \quad \text {d i f} \quad \text {d i f} \quad \text {d i f} \quad \text {d i f}. \end{array} \ \therefore \frac {1}{2} g (x) = \frac {1}{2} \frac {1}{2} g (y) = \frac {1}{2} \frac {1}{2} g (z) < \frac {1}{2} g (3) = \frac {1}{2} g (4) = \frac {1}{2} g (5) < \ \end{array} $$
#
RSS 1
aRss
ylyllly jiyil l yjyyl yjgo jao
JIO (hll) Lg 25jllg gall
gll lalglj gck PicasaTM jFlickrTM
silll bllb! bby aalb! 1e agll
.
all
- http://www.flickr.com
- http://picasa.google.com
LaiyI pWJ Ljw Jyssal yso Lpuiu y Lluu
y
y
ylll 1 yll
J 1 J 1 J 1 J 1 J 1 J 1 J 1 J 1 J 1 J 1 J 1 J 1 J 1 J 1 J 1 J 1 J 1 J 1 J 1 J 1 J 1 J 1 J 1 J 1 J 1 J 1 J 1 J 1 J 1 J 1 J 1 J 1 J 1 J 1 J
!
Llly Llal. Jy Cgai1 IP ci jui jSj gij jsiie Jus . .Lglal < iJjji
IP uji Jgjgi jigie Jai i gll dhaoia Jai .Jglal
iJill (Wi-Fi gla gla gla gla gla gla gla gla gla gla
y
JbNlly Jalz gjki, jyjie lii daiin

yIgai yIgai yIgai yIgai yIgai yIgai yIgai yIgai yIgai yIgai yIgai yIgai yIgai yIgai yIgai yIgai yIgai yIgai yIgai yIgai yIgai yIgai yIgai yIgai yIgai yIgai
Wi-Fi gJgJgJgJgJ
Wi-Fi gla 2k
Without prejudice of legal warranty, Parrot products are warranted during 1 year from the date of purchase for defects in materials and workmanship, provided that no deterioration to the product has been made, and upon presentation of proof of purchase (date of purchase, location of sale and product serial number) to the retailer or Parrot directly.
Warranty does not cover: data recovery, deterioration of the external aspect due to normal use of the product, any damage caused by accident, misuse, misapplication, or non-Parrot products. Parrot is not responsible for storage, loss or damaged to data during transit or repair.
Any product wrongfully declared to be defective will be returned to sender and inspection, process and carriage costs will be invoiced to him.
Correct disposal of This Product (Waste Electrical & Electronic Equipment)
(Applicable in the European Union and other European countries with separate collection systems).

This marking shown on the product or its literature, indicates that it should not be disposed
with other household wastes at
the end of its working life. To prevent possible harm to the environment or human health from uncontrolled waste disposal, please separate this from other types of wastes and recycle it responsibly to promote the sustainable reuse of material resources.
Household users should contact either the retailer where they purchased this product, or their local government office, for details of where and how they can take this item for environmentally safe recycling. Business users should contract their supplier and the terms and conditions of the purchase contract. This product should not be
mixed with other commercial wastes for disposal.
Modifications
The explanations and specifications in this guide are given for information purposes only and may be modified without prior notice. They are deemed to be correct at time of going to press. The utmost care has been taken when writing this guide, as part of the aim to provide you with accurate information. However, Parrot shall not be held responsible for any consequences arising from any errors or omissions in the guide, nor for any damage or accidental loss of data resulting directly or indirectly from the use of the information herein. Parrot reserves the right to amend or improve the product design or user guide without any restrictions and without any obligation to notify users. As part of our ongoing concern to upgrade and improve our products, the product that you have purchased may differ slightly from the
model described in this guide.
If so, a later version of this guide might be available in electronic format at Parrot's website at www.parrot.com.
FCC Compliance Statement
This device complies with RSS 210 of Industry Canada. Operation is subject to the following two conditions:
(1) This device may not cause interference, and
(2) This device must accept any interference, including interference that may cause undesired operation of this device.
Caution: Exposure to Radio
Frequency Radiation
To comply with RF exposure compliance requirements, a separation distance of at least 20~cm must be maintained between the antenna of this device and all persons.
This device must not be co-located or operating in conjunction with any other
antenna or transmitter.
To prevent radio interference to the licensed service, this device is intended to be operated indoors and away from windows to provide maximum shielding. Equipment (or its transmit antenna) that is installed outdoors is subject to licensing.
Declaration of Conformity
We, Parrot S.A. of 174 quai de Jemmapes, 75010 Paris, France, declare under our sole responsibility that our product, the Parrot Specchio by Martin Szekely to which this declaration relates, is in conformity with appropriate standards EN 300328, EN 301489-17, EN60950 following the provision of Radio Equipment and Telecommunication Equipment directive, with requirements covering EMC directive 89/336/EEC and Low Voltage directive 73/23/EEC. Identification N. 394 149 496 R.C.S. PARIS Parrot S.A.
Protection and personal safety
Carefully read the user guide and follow the indicated procedure when setting up the device. Do not dismantle or open the device and do not touch the electronic components or the drivers. Do not attempt to dismantle or modify either of the speakers. Never introduce any metal object to avoid the risks of electric shocks, fire, short circuits or dangerous emissions. If your device shows signs of faulty operation, call the approved Parrot technical support centre or an approved retailer. Never leave the frame exposed to rain or chemical products; do not place them in a damp area or where they are likely to be splashed with water. Never place your device on a recipient containing any type of liquid, which might seep inside the device. Doing so will reduce the risks of electric shocks, short circuits, fire and injury.
Caution: Exposure to Radio
Frequency Radiation
The installer of this radio equipment must ensure that the antenna is located or pointed such that it does not emit RF field in excess of Health Canada limits for the general population; consult Safety Code 6, obtainable from Health Canada's website at www.hc-sec.gc.ca/rpb.
Copyrights
Copyright © 2008 Parrot. All rights reserved. The total or even partial reproduction, transmission or storage of this guide in any form or by any process whatsoever (electronic, mechanical, photocopy, recording or otherwise) is strictly prohibited without prior consent from Parrot.
Important safety instructions
The exclamation point within an equilateral triangle is intended to alert the user to the presence of important operating and maintenance (servicing) instructions in the literature accompanying the product.
An equilateral triangle, is intended to alert the user to the presence of uninsulated "dangerous voltage" within the product's enclosure that may be of sufficient magnitude to constitute a risk of electric shock to persons.
- This apparatus shall not be exposed to dripping or splashing and no object filled with liquid, such as vases, shall be placed on the apparatus.
- The AC/DC adaptor which provides disconnection from mains supply shall remain readily operable. Unplug this apparatus when unused for long periods of time.
- Read these instructions
-
Keep these instructions
-
Heed all warnings
- Follow all instructions
- Do not use this apparatus near water.
- Clean only with dry cloth.
- Do not block any ventilation openings. Install in accordance with the manufacturer's instructions.
- Do not install near any heat as radiators. Heat registers, stoves or other apparatus (including amplifiers) that produce heat.
- Do not defeat the safety purpose of the polarized or grounding type plug. A polarized plug has two blades with one wider than the other. A grounding type plug has two blades and a third grounding prong. The wide blade or the third prong are provided for your safety. If the provided plug does not fit into your outlet, consult an electrician for replacement of the obsolete outlet.
- Only use attachments/accessories specified by the manufacturer.
-
Unplug this apparatus during lightning storms or when unused for long periods of time.
-
WARNING: To reduce the risk of fire or electric shock, do not expose this apparatus to rain or moisture and objects filled with liquids, such as vases, should not be placed on this apparatus.. This apparatus is designed for indoor use only.
Do not expose the frame to outside temperatures below 5^ or above 40^ . The system could be damaged or the cabinet warped. Avoid placing the system near a source of heat or exposing it to sunlight (even through a window).
Similarly, excessively low temperatures and humidity could damage the device.
Licences
Parrot logo and trademarks are the property of PARROT SA.
The Bluetooth® word mark and logos are owned by the Bluetooth SIG, Inc. and any use of such marks by Parrot S.A. is under license.
Bluetooth QDID: B014408, B013839, B013838
Wi-Fi is a registered mark of the Wi-Fi Alliance. Wi-Fi CERTIFIED is a mark of the Wi-Fi Alliance. The Wi-Fi CERTIFIED logo is a certification mark of the Wi-Fi Alliance.
Mac is a trademark of Apple Computer, Inc., registered in the U.S. and other countries.
Additional typefaces for this product can be obtained at www.linotype.com.
All trademarks and trade names are those of their respective owners.
Copyright © 2007 Parrot.
Our hotline is at your disposal from Monday to Friday between 9 am and 6 pm (GMT + 1)
Hot-line@parrot.com
Italy: [+39] 02 59 90 15 97
Spain: [+34] 902 404 202
UK: [+44] (0)870 112 5872
Germany:09001727768
USA: [+1] (877) 9 Parrot (toll free)
China: [+86] (0)21 6460 1944
Hong Kong: [+852] 2736 1169
France:0148036069
Europe: [+33] 1 48 03 60 69 (Spoken languages: French, English, Spanish and German)


CERTIFIED


Federal
Communications
Commission
CONTAINS FCCID: EW4DWMW014
CONTAINS IC: 4250A-DWMW014
FCC ID: RKXMSZ
IC: 5119A-MSZ


Parrot
move wireless
Parrot S.A. - 174, quai de Jemmapes - 75010 Paris - France
Fax +33 1 48 03 06 66 / Phone +33 1 48 03 60 60
www.parrot.com

* TERMS & CONDITIONS: WWW.PARROT.COM (GAGNEZ DES MUSIQUES AU FORMAT MP3 ET DES PRODUITS SANS FIL PARROT)