
PRO2 CAR RADIO MD 80403 - Car stereo MEDION - Free user manual and instructions
Find the device manual for free PRO2 CAR RADIO MD 80403 MEDION in PDF.

| Product type | Car radio with CD/MP3 player, radio tuner, USB connectivity |
| Brand | MEDION |
| Model | PRO2 CAR RADIO MD 80403 |
| Power supply | DC 12 V, negative ground |
| Dimensions (L × P × H) | 178 × 155 × 50 mm |
| Output power | 4 × 50 W (peak) |
| Fuse | 0.5 A (red) for memory, 15 A (pink) for power supply |
| Radio bands | FM, MW (PO), LW (GO) |
| FM range | 87.5 – 108 MHz |
| MW range | 522 – 1620 kHz |
| LW range | 144 – 288 kHz |
| Playable audio formats | Audio CD, MP3 CD, WMA CD, MP3/WMA files via USB |
| RDS functions | AF, TA, PTY, EON, regional |
| Equalizer | Presets: FLAT, CLASSICS, POPM, ROCKM, DSP OFF |
| Connections | Front USB connector, ISO connector, stereo RCA outputs (front/rear), antenna input |
| Front panel | Removable with flashing red anti-theft indicator |
| Station memory | 6 stations per band, manual or automatic memory (AMS) |
| Recording function | Record radio/CD to USB drive in WMA format |
| Operating temperature | Avoid extreme temperatures (direct sunlight, heater vents) |
| Max. installation angle | 30° from horizontal |
| USB compatibility | Supports up to 1 GB, max. 1024 folders, 4096 files, 8 levels depth |
Frequently Asked Questions - PRO2 CAR RADIO MD 80403 MEDION
User questions about PRO2 CAR RADIO MD 80403 MEDION
0 question about this device. Answer the ones you know or ask your own.
Ask a new question about this device
Download the instructions for your Car stereo in PDF format for free! Find your manual PRO2 CAR RADIO MD 80403 - MEDION and take your electronic device back in hand. On this page are published all the documents necessary for the use of your device. PRO2 CAR RADIO MD 80403 by MEDION.
USER MANUAL PRO2 CAR RADIO MD 80403 MEDION
PI: Program Identification Code
EON: Enhanced Other Networks Information
PTY: Program Type Code
- OPEN Opens the control panel
- SEL: Activates individual functions
- MULTIJOG sets volume, bass, treble, balance and fader
- DISPLAY
- DSP/0: Queries program, time, frequency and PTY settings/number key 0.
- BND/LOU/ENT: Volume range selection/volume/confirm
- EQ: Equalizer
- POWER/DIM: On/off switch, dims the display panel
- USB USB connection for external data storage media
- RESET Return to factory settings
- AF: Switches on RDS mode
- TA/REC: Traffic Announcement Identification / detect traffic updates Start recording
- PTY: Program Type Code
-
- 19.: Station selection keys
- PAU: Pause in CD/MP3 mode / number key 1
- SCN: Title scan with 10 sec. sample play (in CD/MP3 mode) / number key 2
- RPT: Repeat (in CD/MP3 mode) / number key 3
- SHF: Shuffle (in CD/MP3 mode) / number key 4
- Number key 5
- Number key 6
- MODE: Mode switch: radio / CD / MP3 / number key 7
- AMS/D-AUD automatic station storage / MP3 search
- 一 < < : Tuning search/downwards / number key 8
- + > > : Tuning search upwards/Number key 9
- Red LED (anti-theft protection LED)
- CD compartment: To insert the CD
- EJECT eject CD
SAFETY INSTRUCTIONS
- Insert the unit into the proper shaft or select a location to install the unit that will not affect the driver's ability to drive.
- Connect the cable briefly before finally installing the unit. Verify that these are installed properly and that the system functions properly.
- If changes have to be made to the vehicle, consult your vehicle dealer/repair shop.
- Install the unit in such a manner that no injury can be caused during heavy braking.
- If the unit is installed out of balance by over 30^ from horizontal it may affect the output.

5
- Avoid installing the unit near high temperatures (e.g. direct sunlight or hot air), dust, pollution or excessive vibrations.
INDEX
PRIOR TO OPERATING 5
INSTALLATION 5
INSTALLING THE RADIO INTO THE ISO SLOT OF YOUR VEHICLE 5
- Removing and inserting the control unit. 6
ISO ADAPTER PLUGS 6
Antenna relay cable 6
- Stereo-cinch output 6
CABLE CONNECTIONS 7
BASIC OPERATION 8
- Switching on/off 8
Volume 8
Bass 8
Treble. 8
Balance. 8
Fader 8
·Loudness 8
- Display 8
Mode 8
Equalizer. 8
- Reset 8
RADIO 9
-
Select band. 9
-
Select station 9
-
Pre-set stations 9
-
Store station. 9
Recall station 9
-
Store to memory (AMS) 9
-
Move through pre-set programs 9
Regional program mode 10
-
PTY (Program type) 10
-
TA traffic announcement 10
EON TA regional mode 10
EONDXmode 10
- RDS (Radio Data System) 11
CD PLAYER 12
- Inserting and removing CDS 12
·Skip titles 12
- Pause CD PLAYER 12
Forward and reverse 12
- Play all titles. 12
Repeat a title 12
- Random playback 12
MP3 PLAYBACK 13
Search for titles (numbers) 13
Search for artists 13
-
Play WMA files. 13
-
Recording chart keys. 14
ID3 TAG FUNCTION 14
PLAY DATA FROM USB 15
- Recording function 15
TROUBLESHOOTING 16
SPECIFICATIONS 17
PRIOR TO OPERATING
Before installation always remove the two transportation safety screws in the top radio casing (recognizable by their red flags)!
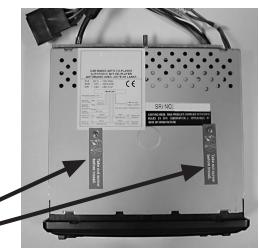
Transport locking
ASSEMBLY
This car radio can easily be installed in any standard ISO radio slot. If your vehicle does not have a standard ISO radio slot, please contact your vehicle dealer.
Insert the radio into your vehicle's ISO slot.
Remove the mounting frame from the radio.
Insert the mounting frame into the radio slot on your vehicle's dashboard.
Bend the flaps in the mounting frame with a screwdriver so that it is fixed firmly in place in the vehicle.
Check the frame is held securely.
Connect the ISO socket block to the vehicle's ISO plugs.
Connect the vehicle's antenna cable
to the antenna plug of the car radio.
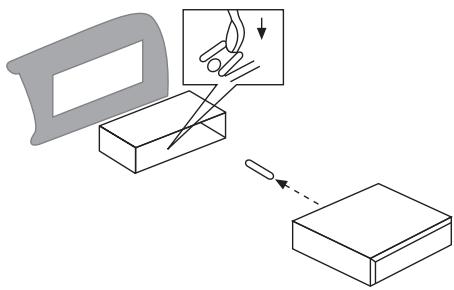
Carefully insert the radio into the mounting frame. Verify that the cables are not jammed! Press the RESET BUTTON (10) using a ballpoint pen or a similar pointed object. Insert the control unit.
WARNING!
During installation please use the car radio's ISO sockets to connect the car radio. The corresponding ISO adapter plugs (car counterparts) can be bought from a dealer depending on the vehicle model.
Your guarantee lapses if you disconnect the adapter socket from the cable or cut the cable!
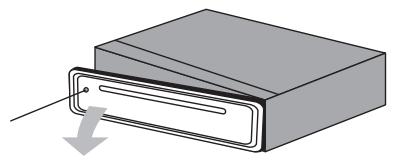
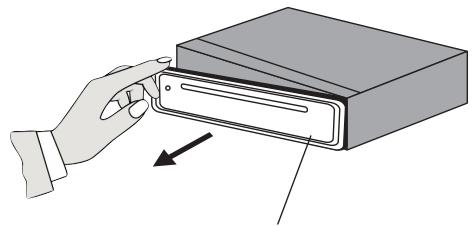
REMOVING AND INSERTING THE CONTROL UNIT
Press the OPEN button (1) and remove the control unit. Store the control unit in the transportation bag provided.
A red LED light flashes when the control unit has been removed (24).
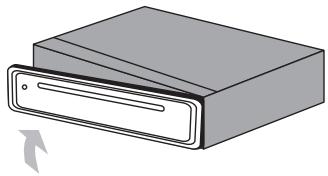
First place the right side of the control unit into the frame for installation. Then press the left side until it locks in. Verify that the control unit is properly located. If the control unit is not installed properly, error messages appear in the display and/or several keys will not function properly.
front slot cover
ISO adapter plugs
Note!
Use the car radio's ISO adapter plug to produce a secure electrical connection.
Important!
Ensure that the pink backup cable is pointed towards the steady plus (for station memory). After making all the connections, press the RESET button (10).
Antenna relay cable
The yellow cable is available for a relay-controlled antenna.
The relay will extend the antenna automatically when the unit is switched on and retract it again when the unit is switched off.
Caution:
Do not connect the yellow cable to the engine cable because this may damage the unit.
Stereo-cinch output
You can connect external units (e.g. amplifiers) to these connections (red and white cinch connections).
CABLE CONNECTIONS
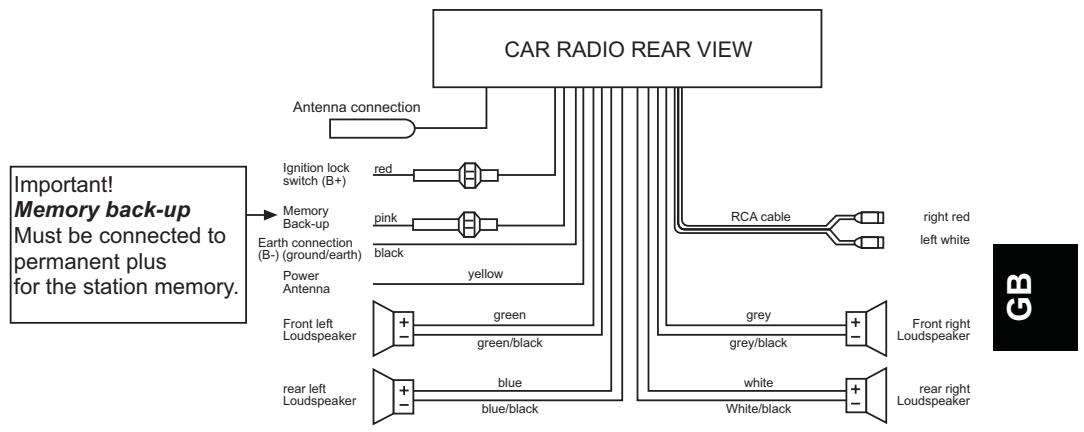
For four loudspeaker (Quad) system
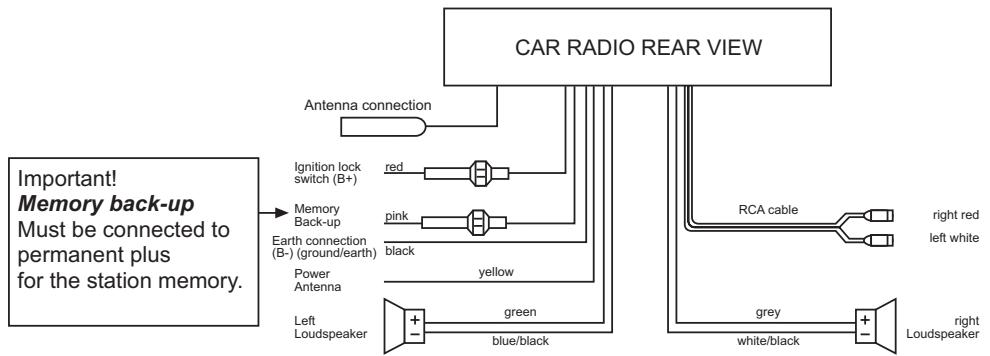
for two loudspeaker (dual) system
BASIC OPERATION
- Switching on/off
Press the POWER/DIM button (8) to switch the unit on or off.
Volume
Select the VOLUME function by pressing the SEL (2) button and turn the multijog control (3), in order to set the desired volume.
Only set the volume so that you are still able to hear the sirens of any approaching rescue/fire/police vehicles!
Bass
Press the SEL button (2) once to adjust the bass. Increase or lower the bass by turning the multijog control (3).
- Treble
Press the SEL button (2) twice to adjust the treble. Increase or lower the treble by turning the multijog control (3).
Balance
Press the SEL button (2) three times to adjust the balance. You can adjust the balance between the right and the left loudspeaker by turning the multijog control (3).
Fader
Press the SEL button (2) four times to adjust the fader. You can adjust the fader between the front and the rear loudspeakers by turning the multijog control (3).
- Loudness
Press the BND/LOU/ENT button (6) until you hear a signal tone. LOUD ON or LOUD OFF will appear in the display. This is how you increase the deeper frequencies at a low volume.
- Display
You can request the following information by pressing the DSP/0 button (5): Name of program
Frequency
Time (will be set automatically when receiving RDS)
PTY settings
(These RDS functions are transmitted by the stations in various qualities and ranges. You will find more detailed information under RDS in the RADIO chapter).
Mode
You can switch between the radio and the CD and/or the USB connection by using the mode button (20).
Equalizer
Press the EQ (7) button to sequentially open the following sound settings:
FLAT CLASSICS POPM ROCKM DSP OFF
- Reset
In order to reset you car radio to its original setting, press the RESET button (10) using a ball-point pen. This button can be found behind the control unit!
Please press the RESET button
-
for first operation, after connecting the cables.
-
if not all function keys are working,
-
when an error message appears in the display.
RADIO
- Select band
Press the BND/LOU/ENT button (6) to switch between VHF (F1, F2, F3), medium wave (MW) and long wave (LW). You can store up to 6 stations in each band.
- Select station
Press the station search (tuning buttons) I<< (22) or >>I buttons (23) briefly; the unit will automatically search for the next station. Switch to manual station search by pressing the TUNE button for two seconds. MANUAL will appear in the display.
You can now select and store the station with the TUNE button. The unit switches to the automatic station search function after a brief delay.
- Pre-programmed stations
You can store six stations in each transmission range and recall them by using the station buttons 1-6 (14-19).
- Store station
- Select the band with the BND/LOU/ENT button (6).
- Select a station with the TUNE button I < C (22) or I > > button (23).
- Press one of the station buttons 1-6 (14-19) for approximately 3 seconds.
A signal tone confirms the station storage.
- Recall station
- Select the band with the BND/LOU/ENT button (6).
- Press the station button (14-19) to recall the pre-programmed station.
- Store to memory (AMS)
Press the AMS/D-AUD button (21) until you hear a signal tone. SEARCH appears in the display. The search continues for approximately 5 seconds after locating each station.
The number flashing in the display shows the number of the station button to which the appropriate station will be stored.
The search continues automatically on weak stations.
- Move through pre-set programs
Automatic search of your stations stored in the transmission range.
- Select the band with the BND/LOU/ENT button (6).
- Briefly press the AMS/D-AUD button (21). All stations are now briefly selected. Briefly press the AMS/D-AUD button (21) when arriving at the desired station.
Regional Program Mode
Some stations broadcast different regional programs. In order to select only the alternative frequencies of the desired regional program; press the AF button (11) a little longer until a signal sounds, in order to switch the mode on or off. REG ON/REG OFF will appear in the display.
- PTY (Program type)
To activate the menu, press the PTY button (13).
You can now search your stations according to the following categories:
| MUSIC | LANGUAGE | |
| 1 | POP M, ROCK M | NEWS, AFFAIRS (current affairs), INFO (information) |
| 2 | EASY M, LIGHT M | SPORT, EDUCATE (education), DRAMA |
| 3 | CLASSICS, OTHER M | CULTURE, SCIENCE, VARIED (miscellaneous) |
| 4 | JAZZ, COUNTRY | WEATHER, FINANCE, CHILDREN |
| 5 | NATION M, OLDIES | SOCIAL, RELIGION, PHONE IN (telephone reception) |
| 6 | FOLK M | Travel, Leisure, Document |
(This information varies with the station.)
- TA radio traffic service
Hold down the TA/REC button (12) briefly to switch the TA mode on or off.
When the TA mode is switched on and the radio traffic service is being transmitted while the CD or USB is connected, it will switch automatically to radio. If EON cannot find any radio traffic service in another program, it occasionally switches to the EON relay station. If the volume level is below the threshold, it will be increased. The TA function for ongoing radio traffic service is interrupted by pressing the TA/REC button (12). This will not switch off the TA mode. If the TA/REC button (12) is pressed for a longer period, the EON TA LOCAL/EON TA DISTANCE mode will be selected.
EON TA information may be assigned with this mode, for example, you are listening to a station that does not provide traffic reports but a traffic report is broadcast on another station frequency, so the unit will automatically switch over for the duration. The unit will switch back to the previous station as soon as this report is completed.
- EON TA local mode
EON TA LO flashes for several seconds on the display when the EON TA LOCAL mode has been selected. The mode for the local area has been selected.
EON DX Mode
EON TA DX flashes for several seconds on the display when the EON DX mode has been selected. The mode for a more distant area has been selected.
RDS (Radio Data System)
RDS is a service provided by radio stations. In addition to the familiar music and voice services they also send additional information in the form of encrypted digital signals and these are analysed by the car radio.
Briefly press the AF button (11) to switch the RDS mode on or off. When activating RDS mode the AF symbol appears on the screen. When a station is received now, the station's name and other information is displayed on the screen (14).
This information varies with the station.
Various kinds of RDS services are on offer:
PI: Program Identification Code
The PI code is used by the radio to identify the station that is being received.
PS: Program Service Name
The program service function allows the station's name to be displayed.
AF: Alternative Frequencies
The radio automatically selects the best alternative
frequency for the station of the same program.
TP/TA: Traffic Programme/Traffic Announcement
EON: Enhanced Other Network Information
If you are listening to a station that does not provide traffic reports and there is a traffic
report it is played by switching to another station.
PTY: Program Type Code
The radio can search for stations with pre-set program content, e.g. sports, news, rock, pop etc., by using the program type.
CD PLAYER
- Inserting and removing CD's
Push the CD into the CD slot (25). The CD will now be played.
S—CDP (meaning, search "titles") appears now in the display. Press the EJECT button (26) to remove the CD.
Playback is interrupted and the CD is ejected. The unit will switch back to radio mode.
- Skip titles
Press TUNE |<< (22) or >> button (23) to skip to the next title.
The track number is shown on the display (4).
- Pause CD
Push the PAU button (14) during playback to pause CD playback.
Press the PAU button (14) again to restart CD.
Forward and reverse at high speed
Press the TUNE |<< (22) or >> button (23) longer during playback to start fast forward/reverse.
- Play all titles
Press the SCN button (15) and the first 10 seconds of each title are played.
Press the SCN button (15) again and normal playback is started.
Repeat a title
Press the RPT button (16) in order to hear the same title continuously.
Press the RPT button (16) again and this function will be deactivated.
- Random playback
Press the SHF button (17) to play all titles on the CD in random sequence.
Note:
- Driving on uneven streets may cause CD to skip. A brief response time will improve performance. Skipping will not damage the CD.
- Moisture and high humidity may cause the CD player to malfunction.
Switch the vehicle heater on and let the moisture evaporate prior to use. - Never expose the CD player to extremely high or low temperatures.
- Do not drive with a CD protruding from the slot.
MP3 PLAYBACK
An MP3 CD ROM will start to play automatically as soon as it is inserted in the player. Please refer to the "CD PLAYER" chapter for the button functions.
You can select the titles or artists directly. Please note that the MP3 functions are generally dependent on how the MP3 CD was produced.
- Search for titles (numbers)
Press the AMS/D-AUD button (21) once. MP3T will appear in the display.
Enter the numbers of the desired title with the buttons listed in the chart.
Confirm the input by using the BND/LOU/ENT button (6) or wait approximately 5 seconds until the unit skips automatically to the selected title.
Search for artists
Press the AMS/D-AUD button (21) twice. A flashing..... appears in the display .
Enter the numbers of the desired artists with the buttons listed in the chart.
Please note that the SEL button (2) must be pressed after every letter, so that the next letter may be entered (moving between characters).
Confirm the input by pressing the BND/LOU/ENT button (6).
The unit will now search for the appropriate title.
Press the BND/LOU/ENT button (6) again, when the unit has located the desired artist.
The title will now be played.
WMA files
You can also play WMA files on your car radio. The operation functions in the same way as for MP3 files.
Note:
The search function depends on the manufacture of the MP3 CD.
- Recording chart keys
| AMS/D-AUD (21) | select setting |
| BND/LOU/ENT (6) | confirm |
| 1 (14) | A, B, C, 1 |
| 2 (15) | D, E, F, 2 |
| 3 (16) | G, H, I, 3 |
| 4 (17) | J, K, L, 4 |
| 5 (18) | M, N, O, 5 / 10 Next track down |
| 6 (19) | P, Q, R, 6 / 10 Next track up |
| MODE (20) | S, T, U, 7 |
| |<< (22) | V, W, X, 8 |
| >>| (23) | Y, Z, blank, 9 |
| SEL (2) | move character to the right |
| DSP/0 (5) | 0,_, -, +, |
| ▲(5) ▼(6) | scrolling function A-Z / 0-9 |
Note:
When producing your MP3 CD ROM please ensure that the tracks are listed either individually or in folders. Never mix titles and folders as this may lead to problems during playback. All standard MP3 codings can be played by the unit.
ID 3-TAG FUNCTION
You can store additional information when producing an MP3 CD. This may include information concerning the artist, title, name of the album and year that the music was produced, as well as a brief comment. We recommend an ID3 Tag Editor for input.
This information is displayed on the screen upon request during playback.
The name of the title or the artist may also be displayed in addition to the title number (depending on the information stored on the MP3 CD) when playing the MP3 CD's.
Press the DSP/0 button (5) for listings. An ID3 tag entry for the current playback appears whenever a button is pressed.
- TITLE
- ARTIST
- NAME OF ALBUM
- YEAR OF RELEASE
- NOTES
PLAY DATA FROM USB
You can connect an MP3 player or another data medium to the USB connection on the front of the unit.
Your car radio can process USB data media up to 1GB.
The directory structure may contain up to 1024 folders, 4096 files and a directory depth of 8 levels.
As soon as the external unit is connected, the car radio will search for MP3 or WMA files on the data medium and the message USB will appear on the screen (4). Files on the external data medium and search functions work in the same way as for MP3 CD's.
Recording function
You can also record data from the radio and the CD player to the external USB data medium with your car radio.
In order to begin recording, press the TA/REC button (12) in the appropriate mode. Audio data is now stored on the USB drive in the WMA format. The FILE NAME message will appear during recording. In order to stop recording, briefly press the TA/REC button (12) again.
You can play the data again by switching to the USB mode with the MOD E button (20) and request individual titles from the USB drive.
TROUBLESHOOTING
| Problem | Cause | Remedy |
| The unit cannot be switched on. | The ignition is not switched on. | Switch on the ignition by turning the key. |
| The fuse is defective. | Replace the fuse. | |
| The CD cannot be loaded or ejected | There is already a CD in the unit. | Remove the CD from the CD play Then insert another CD. |
| The CD has been put in upside down. | Insert the CD with the label facing up. | |
| The CD is very dirty or damaged. | Clean the CD or try to play another one. | |
| The temperature in the car is too high. | Let it cool off, until the ambient temperature returns to normal. | |
| Condensation. | Switch the player off for a few hours and then retry | |
| No sound | Volume is set to minimum. | Set the volume at the desired level. |
| Cables are not properly connected. | Check cable connections | |
| Function buttons do not work. | The installed microcomputer cannot function due to interference. | Press the RESET button. |
| The control unit is not properly located. | Verify that the control unit is located properly. | |
| The CD skips. | The installation angle exceeds 30°. | Set the installation angle to less than 30°. |
| The CD is very dirty or damaged. | Clean the CD or try to play another one. | |
| Errors in self-made CD's | Check the CD in another unit. | |
| The radio does not work. The automatic station selection does not work. | The antenna cable is not connected. | Plug in the antenna cable. |
| The station signals are too weak. | Select the station manually. | |
| Station memory does not work | The pink cable is not connected to the permanent plus. | Check the cable connections |
TECHNICAL DATA
General instructions
| Operating voltage: |
| Frame dimensions: |
| Power consumption: |
| Fuse: |
| DC 12V, negative earth connection 178 x 155 x 50mm (WxDxH) |
| Peak music output 4 x 20 W R.M.S. |
| 0.5 amp (red); 15 amp (pink) |
MP3/CD Player
MPEG rate
64-320K
Frequency range MP3Playback
20Hz~20kHz
ISO 9660 & Joliet format of MP3
Radio
| For 3 Frequency bands | |
| Frequency range of IF | FM 87.5 to 108MHz |
| Sensitivity of (Signal-to-noise ratio = 30 dB) | 10.7MHz |
| Stereo separation of > 30dBu | 3μV |
| Frequency range of IF | MW 522 to 1620kHz |
| (Signal-to-noise ratio = 30 dB) | 45kHz |
| Stereo separation of | 32 dBu |
| Frequency range of IF | LW 144 to 288kHz |
| Sensitivity (Signal-to-noise ratio = 30 dB) | 450kHz |
| 35dBu |
CD Player
Please only use CDs that are marked as follows:

Laser class 1

Subject to technical changes.

FONCTIONS
PI: Program Identification Code
EON: Enhanced Other Networks Information
PTY: Program Type Code
PI: Program Identification Code
EON: Enhanced Other Networks Information
PTY: Program Type Code
PI: Program Identification Code
EON: Enhanced Other Networks Information
PTY: Program Type Code
PI: Program Identification Code
AF: Alternatively frequencies
EON: Enhanced Other Networks Information
PTY: Program Type Code
DC 12V, negative massaverbinding
Afmetingen:
178 × 155 × 50 ~mm (BxTxH)
Vermogen: