
LM 2151 CMD - Lawn mower JONSERED - Free user manual and instructions
Find the device manual for free LM 2151 CMD JONSERED in PDF.
| Product type | Rotary wheeled gasoline lawn mower |
| Brand | JONSERED |
| Model | LM 2151 CMD |
| Engine | 4-stroke gasoline |
| Starting | Manual (recoil) and electric (key) |
| Engine oil capacity | 0.6 L |
| Cutting height | Adjustable by levers (6 positions) |
| Cutting system | Rotary blade |
| Grass catcher | Yes, included |
| Mulching function | Yes, with specific plug |
| Self-propulsion | Yes, with clutch |
| Engine brake | Yes, immediate stop when releasing handle |
| Under-deck cleaning | Via integrated water connection |
| Fuel type | Unleaded (recommended) |
| Tank volume | Approximately 1.5 L (estimate) |
| Handle adjustment | Adjustable height |
| Safety | Safety device on handle, protection against projections |
| Periodic maintenance | Check oil level, replace blade, tighten screws |
| Warranty | 2 years (subject to conditions, see manual) |
| Country of manufacture | Italy (Husqvarna Outdoor Product Italia) |
Frequently Asked Questions - LM 2151 CMD JONSERED
User questions about LM 2151 CMD JONSERED
0 question about this device. Answer the ones you know or ask your own.
Ask a new question about this device
Download the instructions for your Lawn mower in PDF format for free! Find your manual LM 2151 CMD - JONSERED and take your electronic device back in hand. On this page are published all the documents necessary for the use of your device. LM 2151 CMD by JONSERED.
USER MANUAL LM 2151 CMD JONSERED
The present manual constitutes an integral part of the product and it should be kept for all future reference.
Due to a constant product improvement programme, the factory reserves the right to modify technical details mentioned in this manual without prior notice.
This manual has been prepared for use with different models of lawn mowers having different shapes and equipment.
We wish to thank you for choosing our lawn mower. We are confident that the high quality of our machine will meet with your satisfaction and appreciation and that your lawn mower will give you long-lasting service. Before starting to use your machine, make sure to read with care this manual, which has been purposely drawn up to provide you with all the necessary information for proper use, in compliance with basic safety requirements.
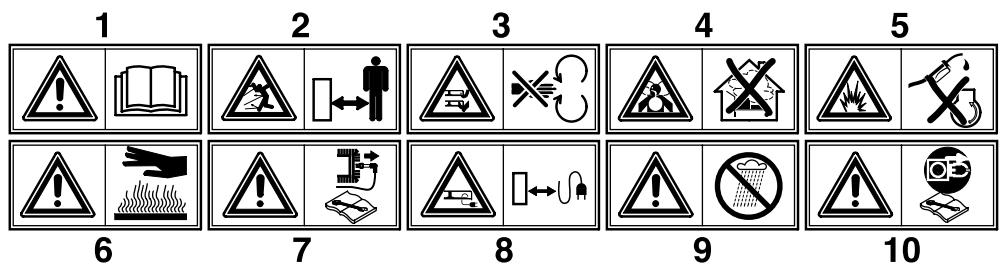
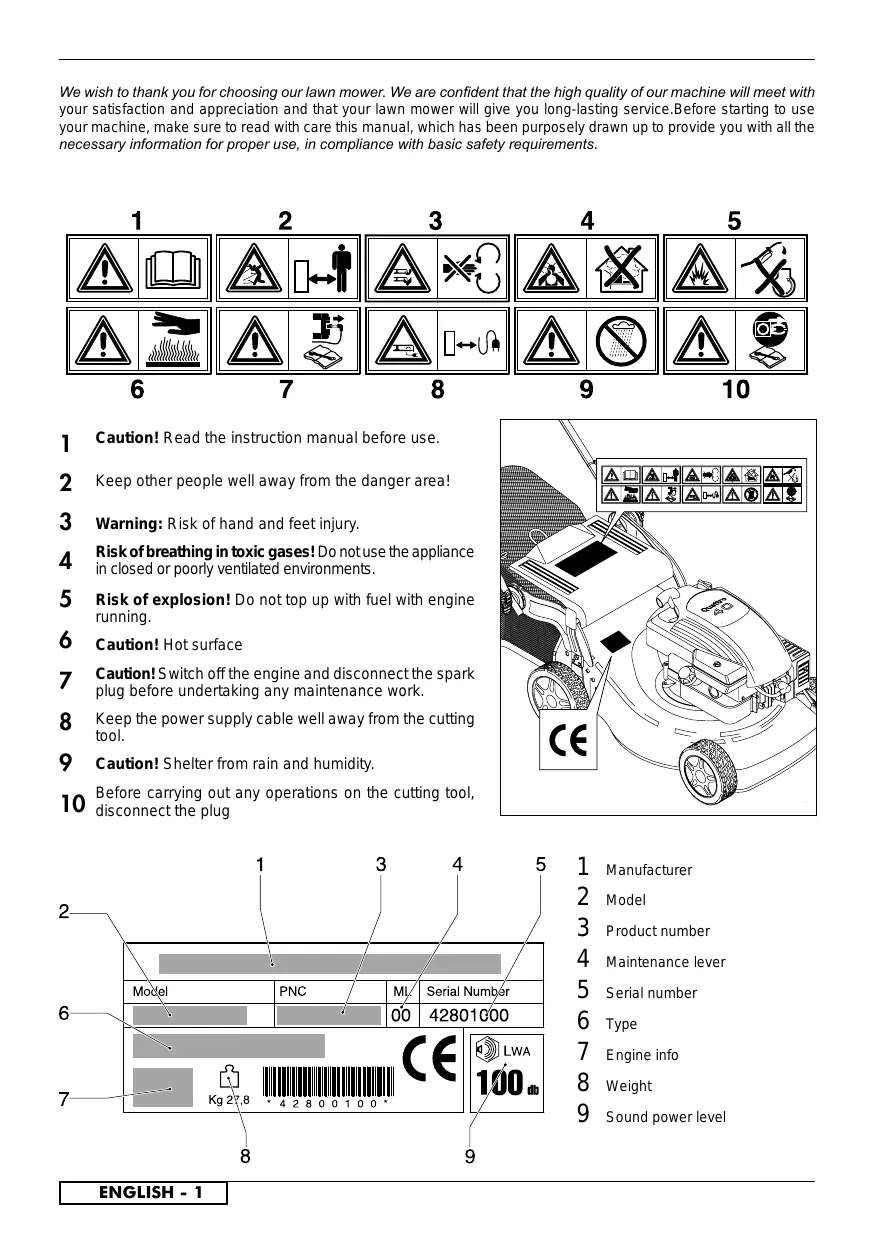
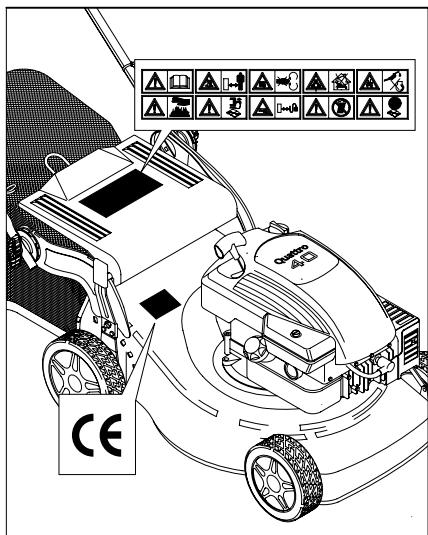
1 Caution! Read the instruction manual before use.
2 Keep other people well away from the danger area!
3 Warning: Risk of hand and feet injury.
4 Risk of breathing in toxic gases! Do not use the appliance in closed or poorly ventilated environments.
5 Risk of explosion! Do not top up with fuel with engine running.
6 Caution! Hot surface
7 Caution! Switch off the engine and disconnect the spark plug before undertaking any maintenance work.
8 Keep the power supply cable well away from the cutting tool.
9 Caution! Shelter from rain and humidity.
10 Before carrying out any operations on the cutting tool, disconnect the plug
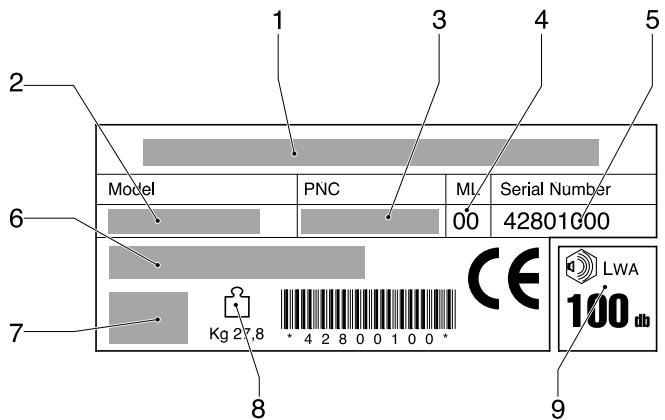
1 Manufacturer
2 Model
3 Product number
4 Maintenance lever
5 Serial number
6 Type
7 Engine info
8 Weight
9 Sound power level
SAFETY RULES
Safe Operation Practices for Pedestrian-Controlled Rotary Lawnmowers
IMPORTANT: This cutting machine is ca pa ble of amputat ng hands and feet and throwing objects. Failure to observe the following safety instructions could result in serious injury or death.
I. Training
- Read the instructions carefully. Be familiar with the controls and the proper use of the equipment.
- Never allow children or people un familiar with the instructions to use the lawnmower. Local regulations may restrict the age of the operator.
- Never mow while people, especially children, or pets are nearby.
- Keep in mind that the operator or user is responsible for accidents or hazards occurring to other people or their property.
II. Preparation
- While mowing, always wear substantial footwear and long trousers. Do not operate the equipment when barefoot or wearing open sandals.
- Thoroughly inspect the area where the equipment is to be used and remove all objects which may be thrown by the machine.
-
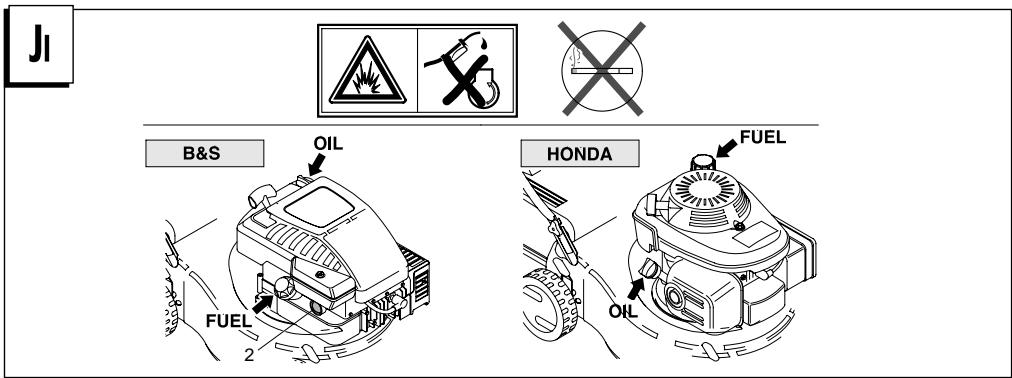
WARNING - Petrol is highly flammable.
-
Store fuel in containers specifically de signed for this purpose.
-
Refuel outdoors only and do not smoke while refueling.
-
Add fuel before starting the engine. Never remove the cap of the fuel tank or add petrol while the engine is running or when the engine is hot.
- If petrol is spilled, do not attempt to start the engine but move the machine away from the area of spillage and avoid creating any source of ignition until petrol vapors have dissipated.
-
Replace all fuel tanks and container caps securely.
-
Replace faulty silencers.
Before using, always visually inspect to see that the blades, blade bolts and cutter assembly are not worn or damaged. Replace worn or damaged blades and bolts in sets to pre serve balance. - On multibladed machines, take care as rotating one blade can cause other blades to rotate.
III. Operation
- Do not operate the engine in a confined space where dangerous carbon mon oxide fumes can collect.
- Mow only in daylight or in good artificial light.
- Avoid operating the equipment in wet grass, where feasible.
Always be sure of your footing on slopes. - Walk, never run.
- For wheeled rotary machines, mow across the face of slopes, never up and down.
Exercise extreme caution when changing direction on slopes. - Do not mow excessively steep slopes.
-
Use extreme caution when reversing or pulling the lawnmower towards you.
-
Stop the blade if the lawnmower has to be tilted for transportation when crossing surfaces other than grass, and when transporting the lawnmower to and from the area to be mowed.
- Never operate the lawnmower with defective guards, or without safety de vic es, for example defi ectors and/or grass catchers, in place.
- Do not change the engine governor settings or overspeed the engine. Operating the engine at excessive speed may increase the hazard of personal injury.
- Disengage all blade and drive clutches before starting the engine.
- Start the engine or switch on the motor carefully according to instructions and with feet well away from the blade.
- Do not tilt the lawnmower when starting the engine or switching on the motor, except if the lawnmower has to be tilted for starting. In this case, do not tilt more than absolutely nec es sary and lift only the part which is away from the op er a tor.
- Do not start the engine when standing in front of the discharge chute.
- Do not put hands or feet near or under rotating parts. Keep clear of the dis charge opening at all times.
- Never pick up or carry lawnmower while the engine is running.
-
Stop the engine and disconnect the spark plug wire: - before cleaning blockages or un clog ging chute;
-
before checking, cleaning or working on the lawnmower;
-
after striking a foreign object. Inspect the lawnmower for damage and make repairs before re starting and operating the lawnmower;
-
if the lawnmower starts to vibrate abnormally (check immediately).
-
Stop the engine:
-
whenever you leave the lawnmower;
-
before refuelling.
-
Reduce the throttle setting during en gine shut down and, if the engine is provided with a shut-off valve, turn the fuel off at the conclusion of mowing.
- Go slow when using a trailing seat.
IV. Maintenance and Storage
- Keep all nuts, bolts and screws tight to be sure the equipment is in safe working condition.
- Never store the equipment with petrol in the tank inside a building where fumes may reach an open flame or spark.
- Allow the engine to cool before storing in any enclosure.
- To reduce the fire hazard, keep the engine, silencer, battery compartment and petrol storage area free of grass, leaves, or excessive grease.
- Check the grass catcher frequently for wear or deterioration.
- Replace worn or damaged parts for safety.
- If the fuel tank has to be drained, this should be done outdoors.

DESCRIPTION
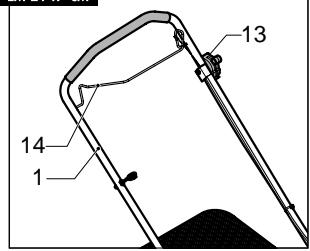
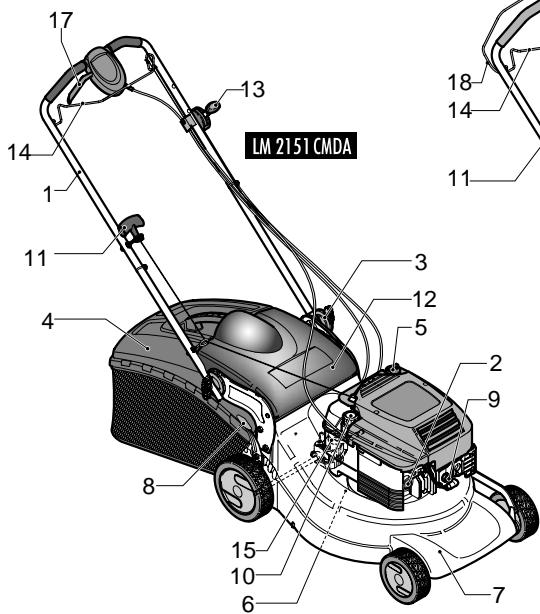
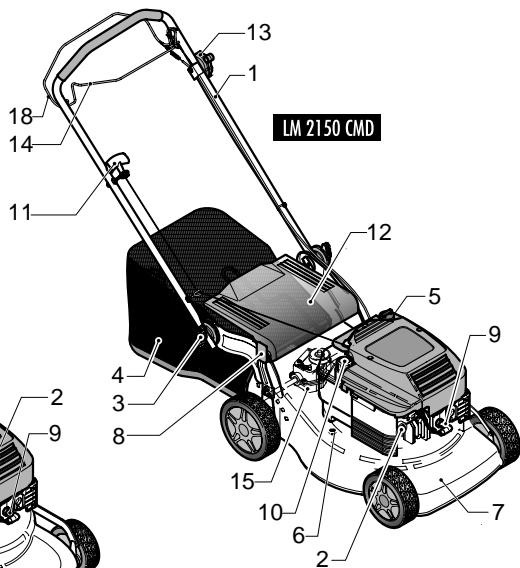
1 Upper handles
12 Rear deflector
2 Fuel-enrichment pump
13 Throttle lever
3 Fastening knobs for upper handles
14 Engine stop lever
4 Grass catcher
15 Reduction gear
5 Oil filler cap
16 Ignition key
6 Oil drain plug
17 Handle advance speed
7 Deck
18 Clutch lever
8 Adjusting levers for cutting height
9 Spark plug
10 Fuel cap
11 Engine start-grip

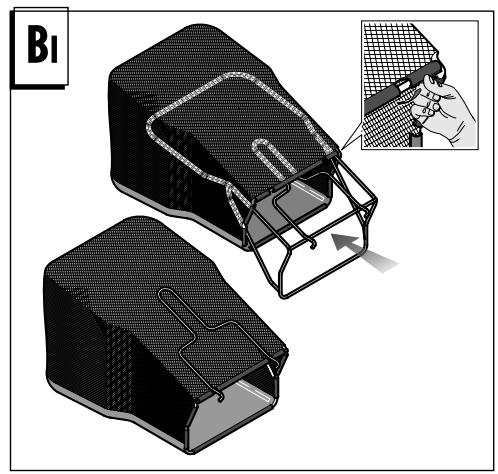
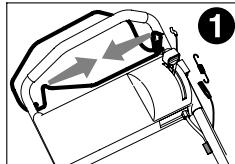
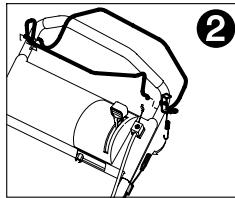
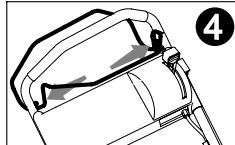
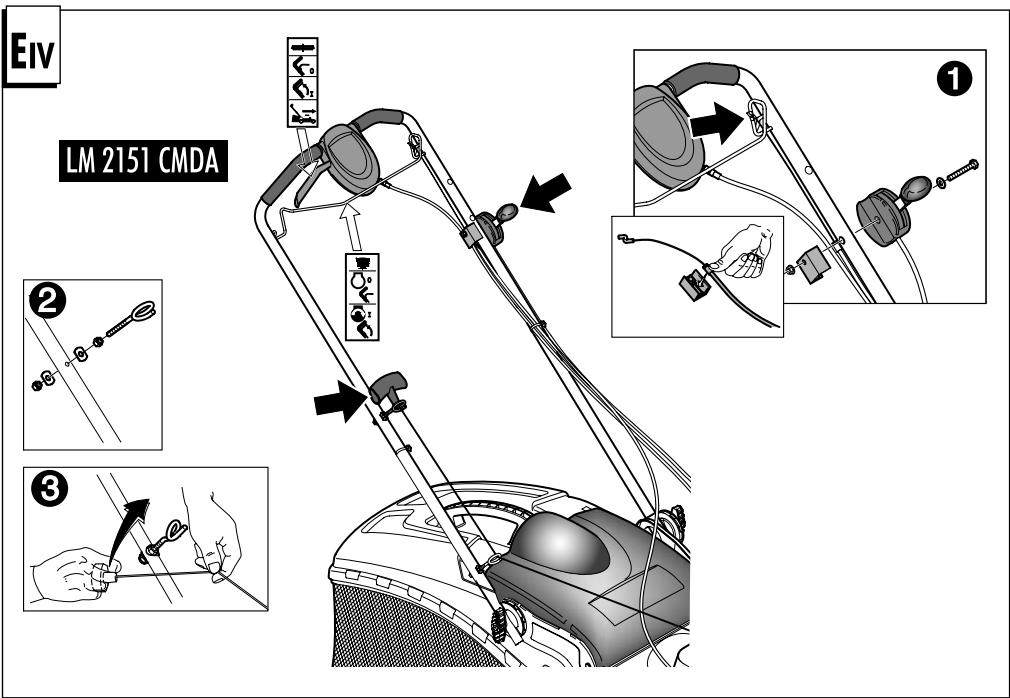
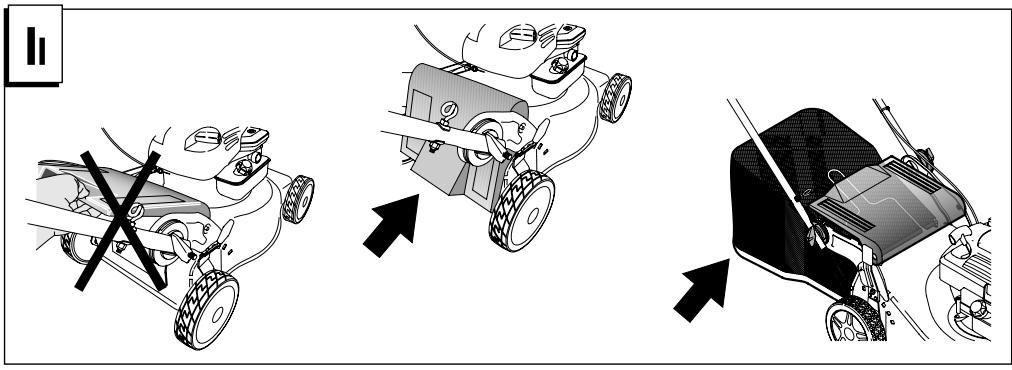
ASSEMBLY OF GRASS CATCHER
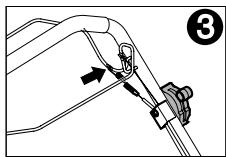
ASSEMBLY DEFLECTOR (if not already assembly)

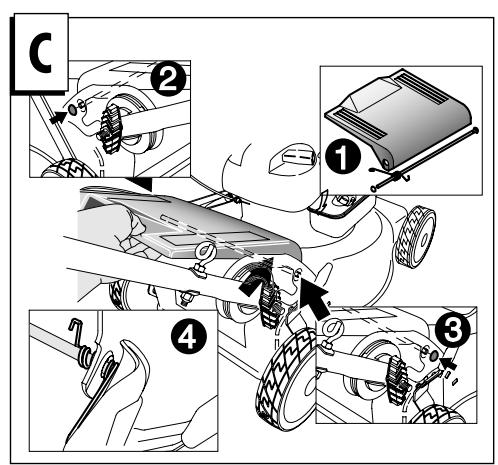
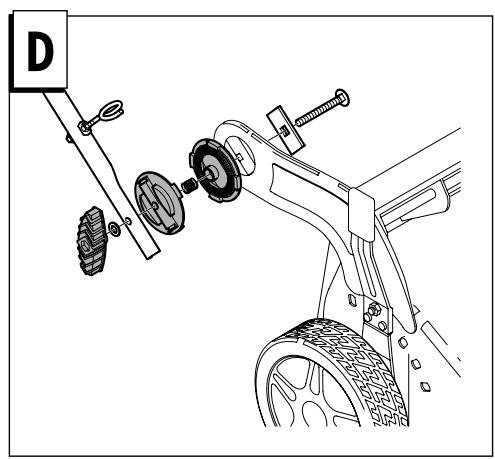
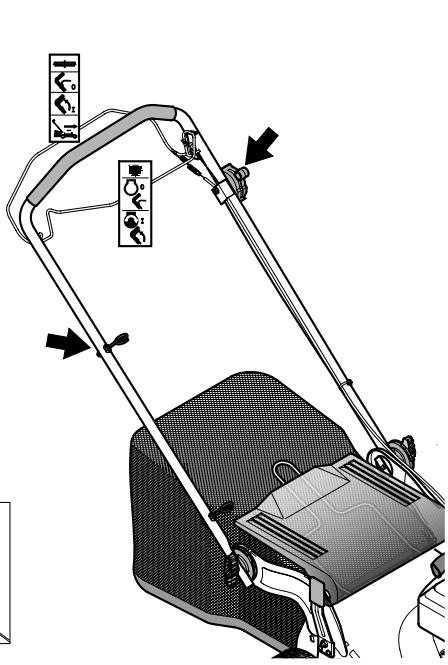
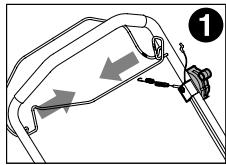
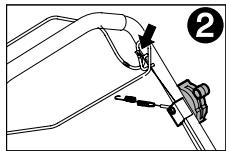
ASSEMBLYHANDLES(lower)

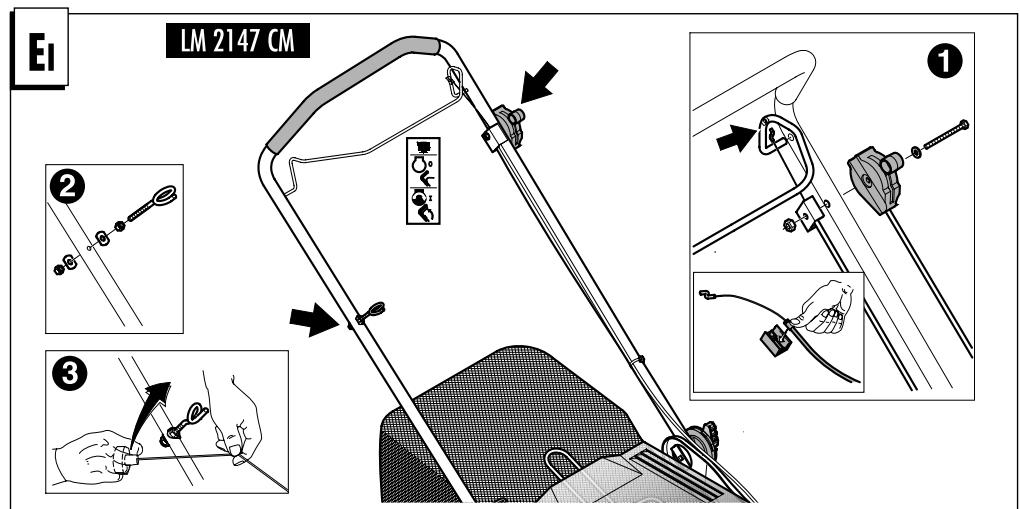
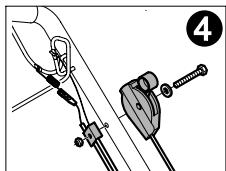
ASSEMBLYHANDLES (upper)

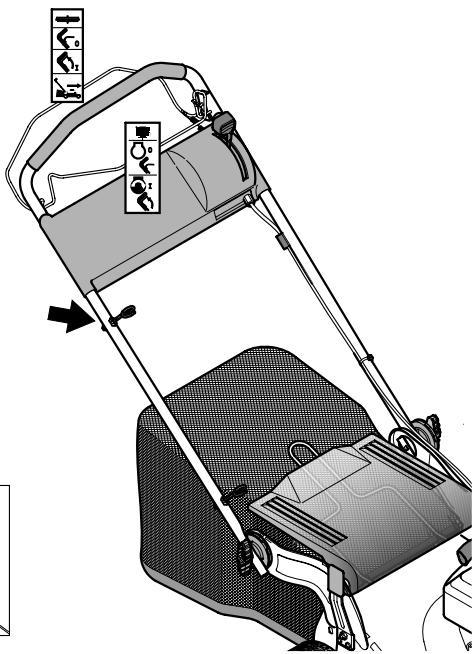
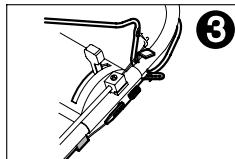
ADJUSTMENT OF HANDLES

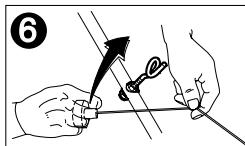
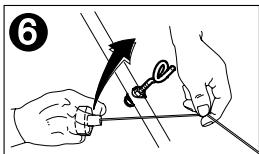
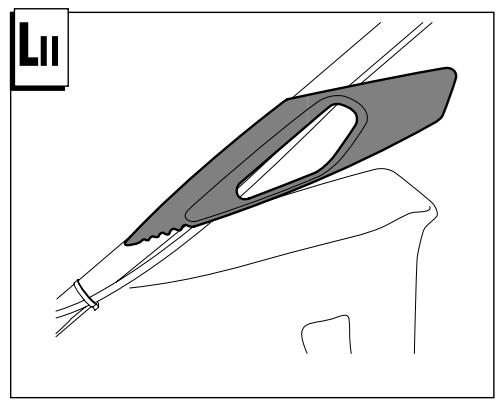
MULCHING CAP INSERTION (for the models where it is included only)
To cut the grass with the mulching system (no grass collection), lift the rear deflector panel and insert the cap by fixing it with the spring as shown in the figure.

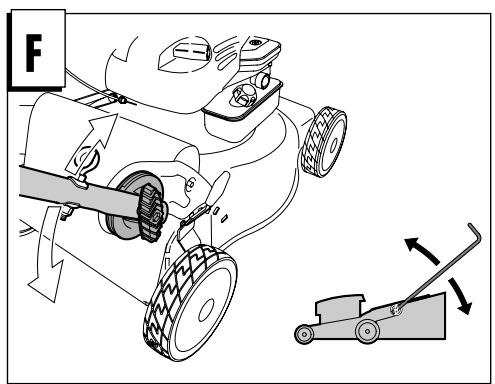
ADJUSTMENT OF CUTTING HEIGHT

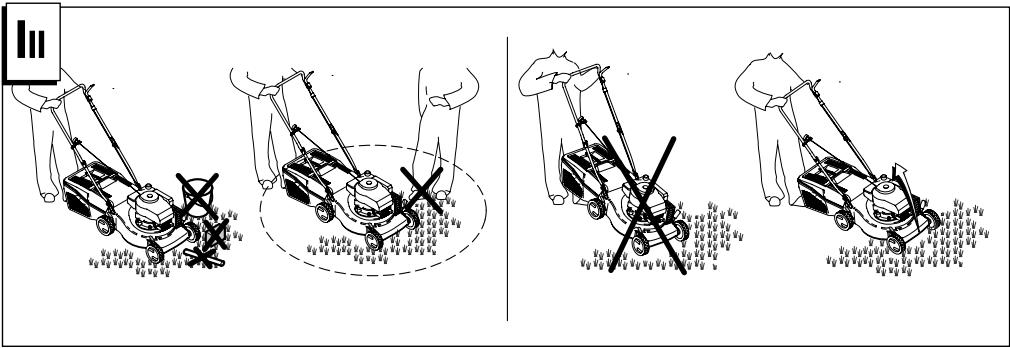
SAFETY PRECAUTIONS

- Always operate with the deflector or grasscatcher in the correct position.
- Always stop the engine before removing the grasscatcher or adjusting the height of cut.
- Never place your hands or feet underneath the deck or into the grass discharge chute while the engine is running.
Before mowing, remove all foreign objects from the lawn which may be thrown by the machine. While mowing, stay alert for any foreign objects which may have been missed.
Never lift the rear of the mower while starting the engine or during normal operation.
Never place your hands or feet underneath the deck or into the rear discharge chute while the engine is running.

OPERATION
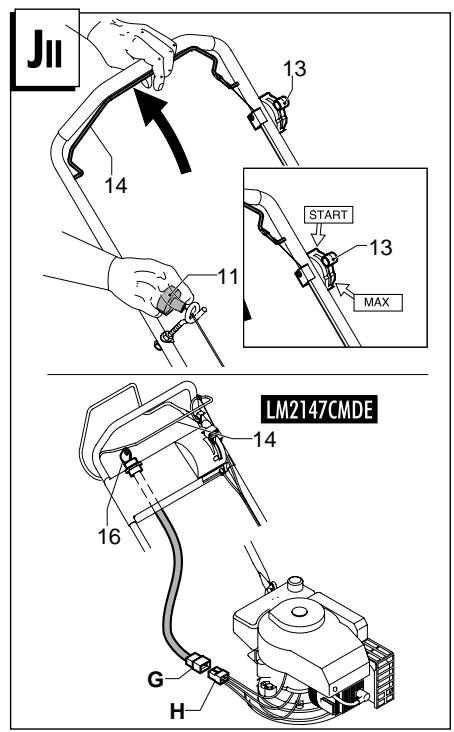
ENGINE ADJUSTMENTS (Fig.JI)
Refer to the engine manufacturer's maintenance manual.

CAUTION:- 0.6l Oil must be added to the engine before use
STARTING THE ENGINE (Fig.Jlt)
Once the machine has been set up properly, start the engine as follows:
a) Engines with choke system:
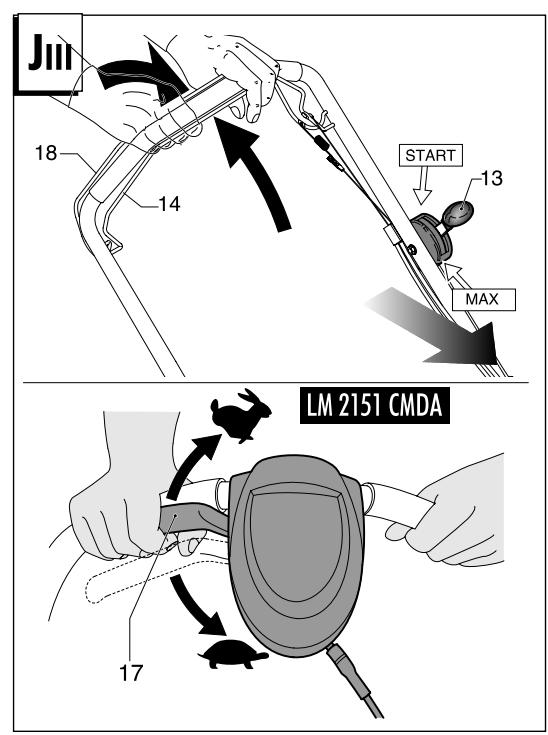
when the engine is cold, position the accelerator lever (13) on START
b)Operate the engine stop lever (14) to prepare the engine for start, keep lever pressed against handle while starting and using the machine (it operates the engine brake).
c) Engines with primer system:
Press the fuel-enrichment pump (2) located on the carburettor 3 or 4 times position the accelerator lever (13) on MAX.
For further information and explanations, read carefully the user instruction manual of the engine.
d) Start engine.
MANUAL STARTING: (While holding the engine stop lever (14)).
Hold the engine start-grip (11) and pull the starter rope gently until you feel the resistance caused by compression. Return the starter rope slowly then pull the handle firmly towards you to its full extent.
ELECTRICAL STARTING: (While holding the engine stop lever (14)).
- Insert the plug (G) in the socket (H) on the engine.
Turn the ignition key (16).

CAUTION: The blade starts turning as soon as the engine is started.
Keep the engine stop lever (14) depressed during machine operation. When the lever is released, the engine stops.
MOWING
To cut the grass, push the lawn mower manually or insert the automatic advance gear.
How to insert automatic advance (Fig. JIII): Lift up the clutch handle (17 - 18) and keep it pressed in position.

CAUTION: Engage the gear only when the engine is running.
How to disengage advance: Release the clutch handle.

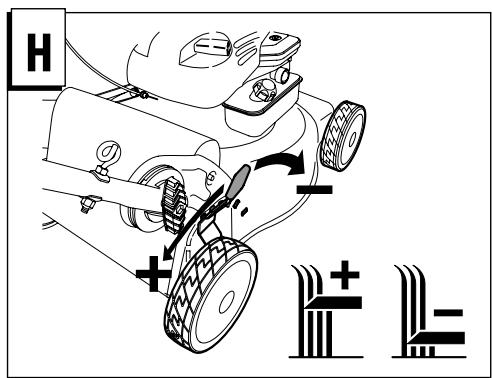
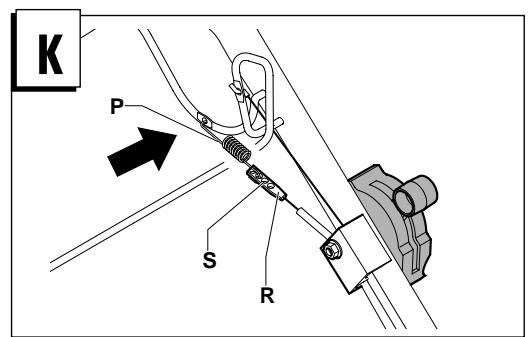
ADJUSTMENT OF CLUTCH CABLE (for self-propelled versions only)
Important: If, when you press the clutch lever, the automatic advance gear does not engage, the clutch cable should be adjusted by inserting the spring (P) in one of the subsequent holes in the plate (R) or in the hole "S".

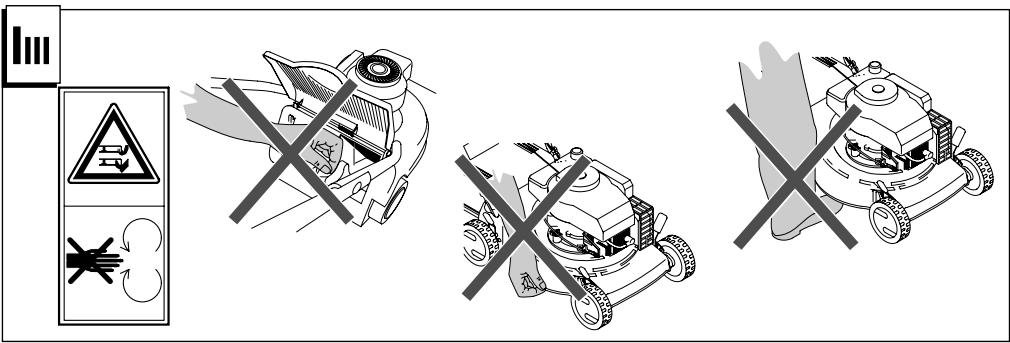
MAINTENANCE

Caution! Switch off the motor and disconnect the spark plug before undertaking any maintenance work.
- For a four stroke engine, check the oil level and change the oil when dirty. For further explanation, see ENGINE INSTRUCTION BOOK.
- Frequently check the mower and ensure that all grass deposits are removed from beneath the deck.
- Never clean the mower by pouring water over it: this may seriously damage the electric start system.
Take care, the exhaust muffler may be very hot. -
Frequently check the blade for damage.
-
The lawn mower must be checked by a SERVICE DEALER.
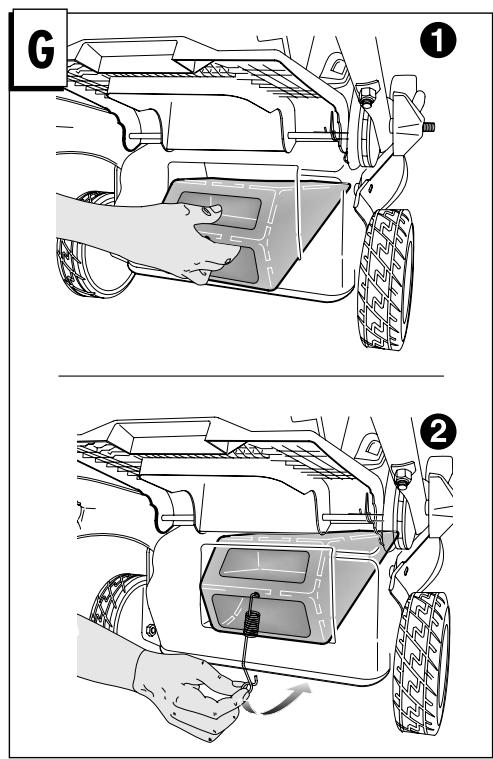
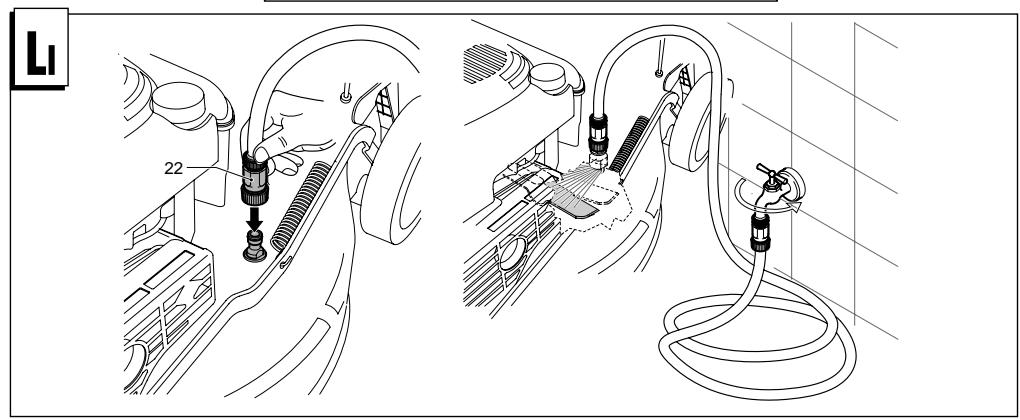
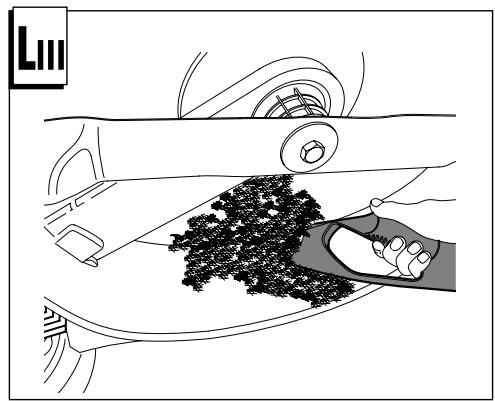
- Cleaning under the bodywork
With machine at a standstill and off.
- Attach fitting (22) on the deck to the water supply tap.
Turn on the tap. - start up the motor (blade in rotation), allowing it to warm up for a few minutes.
- at the end of cleaning switch off the motor, turn off the tap, detach the tube from the deck connection.

BLADE
To remove the blade (23) unscrew the screw (24).
-
Check the conditions of the blade-support (25), the washer (26), the key (27) and the washer (28) and replace any parts which are damaged.
-
When reassembling, make sure that the key (271) is correctly seated in the shaft and that the cutting edges face in the direction of the engine rotation. The blade screw (24) must be torqued to 5,34 Kgm (52,4 Nm).

KIT ELECTRIC STARTING
Before starting the motor for the first time, you are advised to keep the battery on charge for 2
to 3 hours.
If the battery proves to be low during starting, charge it for 24 hours.
When starting, don't keep trying to start for more than 5 seconds.
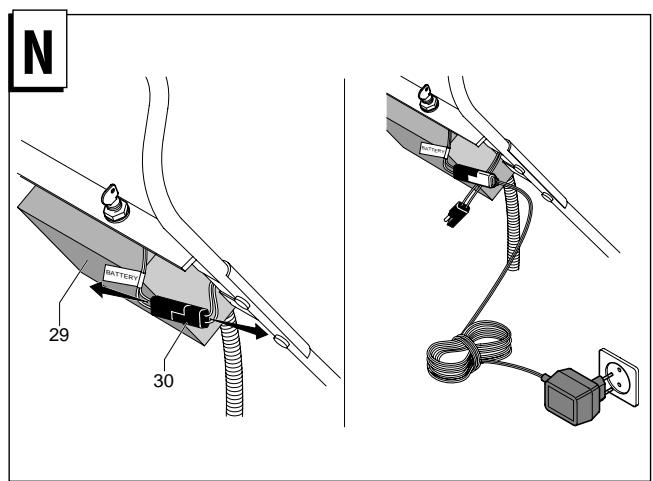
BATTERY MAINTENANCE
IMPORTANT
For correct battery maintenance (29), especially in preparation for a long period of inactivity, and for recharging, it is not necessary to remove it from its casing, but to simply proceed as follows:
1) Remove contact (30
2) Store the battery in a fresh and dry place.
3) Recharge the battery before use at room temperature for 24-36 hours.
4) Restore the contact (30) before use
BATTERY DISPOSAL

Those batteries marked with a "crossed out waste disposal bin" and bearing the chemical symbol Pb (battery containing lead) are not to be disposed in domestic waste bins.

The user is legally obliged to take the used batteries to special collection points or to return them to the retailer.
GUARANTEE AND GUARANTEE POLICY
If any part is found to be defective due to faulty manufacture within the guarantee period, Husqvarna Outdoor Products, through its Authorised Service Repairers will effect the repair or replacement to the customer free of charge providing:
a) The fault is reported directly to the Authorised Repa.
pairer.
b) Proof of purchase is provided.
c) The fault is not caused by misuse, neglect or faulty adjustment by the user.
d) The failure has not occurred through fair wear and tear.
e) The machine has not been serviced or repaired, taken apart or tampered with by any person not authorised by Husqvarna Outdoor Products.
f) The machine has not been used for hire.
g) The machine is owned by the original purchaser.
h) The machine has not been used commercially.
- This guarantee is additional to, and in no way diminishes the customers statutory rights.
Failures due to the following are not covered, therefore it is important that you read the instructions contained in this Operator's Manual and understand how to operate and maintain your machine:
Failures not covered by guarantee
- Replacing worn or damaged blades
- Failures as a result of not reporting an initial fault.
- Failures as a result of sudden impact.
- Failures as a result of not using the product in accordance with the instructions and recommendations contained in this Operator's Manual.
- Machines used for hire are not covered by this guarantee.
- The following items listed are considered as wearing parts and their life is dependent on regular maintenance and are, therefore not normally subject to a valid warranty claim: Blades, Electric Mains cable, Belt
CAUTION!
Husqvarma Outdoor Products does not accept liability under the warranty for defects caused in whole or part, directly or indirectly by the fitting of replacement parts or additional parts that are not either manufactured or approved by Husqvarma Outdoor Products, or by the machine having been modified in any way.
EC DECLARATION OF CONFORMITY
I, the undersigned Bengt Ahlund, of Husqvarna Outdoor Products Italia Spa, Via Como 72, 23868 Valmadrera (LC).
Certify that the Lawnmower:-
Category... .Petrol Wheeled Rotary
Make .Husqvarna Outdoor Products
Conforms to the specifications of Directive 2000/14/EEC
Type.
Version.
Width of cut. C
Guaranteed sound power level.
Measured sound power level.
Sound pressure livel at the ear.
Vibration of the handle.
(See the last page for references)
Type of Cutting Device . Rotary Blade
Identification of Series . See Product Rating Label
Conformity Assessment Procedure. ANNEX VI
Notified Body. .Nr. 0470 - NEMKO AS
Gaustadalleen 30 - PO Box 73 Blindern
0314 OSLO - Norway
Other Directives 98/37/EC, 93/68/EEC, 2002/88/EC, 2004/108/EC
& applicable standards normative EN836,EN ISO14982,EN1033,EN ISO 3744,EN ISO11201
Berger Ablund, Technical Manager
Husqvarna Outdoor Product Italia S.p.A.
Via Como 72 - 23868 Valmadrera (LC)
3/08/2006
EC DÉCLARATION DE CONFORMITÉ
Je sousigned Bengt Ahlund, Husqvarna Outdoor Products Italia Spa, Via Como 72, 23868 Valmadrera (LC) certifie que la tondeuse:--
Marque . Husqvarna Outdoor Products
est conforme aux specifications de la Directive 2000/14/EEC
Type. A
Version. B
Largeur de coupe. C
WERKEN MET DE MAAIMACHINE
VOORBEREIDING VAN DE MOTOR (Fig.JI)
Merk. Husqvarna Outdoor Products
Merke. Husqvarna Outdoor Products
Marca....Husqvarna Outdoor Products
Marca....Husqvarna Outdoor Products
e com as normas . EN836,EN ISO14982,EN1033,EN ISO 3744,EN ISO11201

Husqvarna Outdoor Product Italia S.p.A.
Via Como 72 - 23868 Valmadrera (LC)
3/08/2006
-性和技巧 - come to the top of the world, and it's a good idea to be able to do some of these things.
Marca. Husqvarna Outdoor Products
ELEKTROMOS INDITO KIT
AIOP02EH TOY KAALQAIOTY SYMIIAEKTH (Movo yia tis autouarE xdoos
IIooxη eav πieovtac tnv λaβn ouμλextn, n oνvdeon autóμatnc πoωθησε δev γívei, παeπ va xáveτe tnv qoθμηotou xαλδoiu ouμλextn εισχωqvατac to ελαntgio (P) σμα aπo tiç diαðoxες oπες tns πλαxtos (R) nσtnv oπ (S).

ΣYNTHPHSEH

Iqoox! v e t e tov xivntgaa kai a e t e to o u c i ngotov xavete noiaodnote evogyia oovtigonc
ELeyexTe taTixa Tny staun eoaiou To vToTaQoxoov xuvntnoe uoeotquxnXauon,Piogotet e naaceto to eaivxieiaetai. Iia neqaitow dioevuovcicououveutei to eeyioidoo oynuovtouvntnoa.
EeYxTe neqioiaTo oqiiloToov BiOov xai Toov noxoyXlM. Meta to xoohuo Toov xogtaov npeneri va XathetaicTe tyn uanavnXa oTo xawXa oTo avwmuoc. Mny aqivte xoataxa atw ao to ao.
Mn xonouoiee vgo yia to eioeua xaoaetaa taunxvns. Mtogei va poaxaleo oobae cnaes sto ouottnua naxtovng exxvnong
IoooeetovoiayoTqiaapvyngaeiovmuogei va...xaie.
ELeyexTe Ovya ta oxaiaia yia va bbaowte ot dev exov uootet qoogc.
To taoTcns TcN 0eTeoXnG XaO To eivan n nnXavn yA To yaxoVa aExyete an oEv aXevo O6gic.
Kαθασμοςνποσασι
Me tyn mnxavn obnouevn xai otatnuevn.
- Suððëte to gaxóq (22) επι του σασι με το qouμπiνετo τορθoδoia vερο. Avojεtæ to qouμπiνετo.
- Exxiviete tov xivntna (maaqi o neigtoopn) apovnto va laeiouyige iia meixa leptar.
-Apoov yiveo 0 a0aoguooc oBnveTe tov xivntnoa. Kaivete to qouuiveto, acete tov oAInva aTo to oaoxogaa.

MAXAIPI
a va to (23) TnV (24).
EeYxTeTo stngyma maagaoiou (25),Tyn go6a 0u- n(26)to xia18 (27) axn go6a (28).Eav eivat a≥ e i e ta avtixahtate.
Kata tvvuaogoloyonbetaaowteotxlaei (27 viva tvo thoovtov xivntno agova xai to uaxagivai vauuagoloynevo tve tnoxptegnloe aogoc nxtovatceuvonpiqoiotpoopngovtovxivtn
SYNTHPHEH MIIATAPIA2

\PPO OXH
Tia ma oosrn oovtnonnncmaatagiac (29),iudixa me ta aio ma eynan neigo do anqxiac xata yia tnyo qoogtnen dev Xoeiaetai va nbyalate aanto nthy npan aa Iooxoeite xata tv enx 1000
1)Bγαετετηνεπαρή (30)
2)Фуадугтгунуларогiaбngoха degosgo megoc
3)ΦoIzTeTe TnJnAtaqia qov nTynQyOne oEoqoxoA- aia ngipalaoVOn eTn 24-36 ope
4) E (30) giv nv g on
MIIATAPIA

H aataqia to "ovtaueo oovpiia diayqauevo" e evdeiogn tou Xnixoxouboaov Pb (= aataqia olaov 08) dev niovtarotov xdoov otivsiow oxovtioiv.

O xonotnsivauoxoepouvoa novuva naqabidei tiaxonotecmuataoe cstaedixka ouyvevtqotxa oneia eeneoyasiacaobnantov n otou matanlntes
ENTYIO EΓΓYH2H2
Eav eva onoiodnote ano ta meo xalaosei, eaiiacs aelattawatixng eneoyaoiaxataynegiodo tni yunong, h Husqvarna Outdoor Products, dauceow twv exosiototmeevw Kevov Etiog0eovn oov dithetai, 0a qayatotoinoe geov nEv npoxevn Tnv avtxataoan, na vta expocov:
Husqvarna Outdoor Products
Vyroba .Husqvama Outdoor Products
GWARANCJA I WARUNKI GWARANCJI
TexHHueckoe 06cIyKHBaHne aKKMyJITropHoi 6atapeH.

Bakhoe 3ameuHHe:
Длгправнльноухнчecкогооблuyжвань кakymултогибатарe(29),oc6oehnoprnpoIIOrTOBKe Длгпельноперhoeia6e3deiCTBnH,ИлгперзардК, He6o3aTeBJHo bblHMatb eHOTcKa,IproctO propeJaJIte CJIeDyHOJIee:
1) OToeINHHTe KOHTaKT (30).
2) CoXpaHnIte aKKymyIaTOpHyO 6aTapeIb B IpoXJaIaHOM H cyXOM MecTe.
3)IpeepaIHTe 6aTapeIOpeI HcIOJIb3OBaHHem IIpH KOMHaTHoI TeMIIepaTypeB TeUeHHe 24-36 Yacob.
4) BocCTaHOBHTe KOHTaKT (30) IpeEД ИСПОЛБЗВАНЕМ.
YTHJH3aHHaKKyMJIITOpHoi 6aTapeH.

JaHHbIe 6aTapEn MapKnpyOTc HaJIINHcBIO 3AMKHYtaR 6aHaKa H aTOxObl yTuINH3aINH N H
He cUHNE cHMBOJ Pb (6aTape, coEepKaIIaIa CBNHeI)
HE OIOHXy TuINH3NPOBaTbCra B KOHTeHepax IIN
6bTOBIXo XTOXIOB.

IIOJIb3OBAteJIb IO 3aKOHy O683aH nepeJaBaTb HCIOJIb3OBAHnHEe AKKYMUYIaTOpHIbe 6batapeH a CIEINAHJIbHe bCOpHbIe NHyKTb HII IN B03BpaIaTb IIX TOPTOBII.
TAPAHTHI I YCJIOBHRA TAPAHTHI
B cIyuea IIOLOMKH IIO60J uactH, B 3aBHcHMOcTH O T hKeauCTBEHHO H6o6OTKN BO bPemr IepHOda rapaHTnH, cHpMa Husqvarna Outdoor Products, NocpeIcTBOM CBOHX pa3peIeHHbX pEmoHTbIX XeHTPOB, 6yIe TB bIIOJIHNtB 6eIIaTHo pEmoHT HIN 3aMEHy, B cIyuae eCIN:
a)ПлOMka 6ыla coo6иHa npЯMo pa3peHHomy pemOHTHOMY IeHTpy.
b)IIpeIcTabJIaTeC KBrTHaHcHIO NOKyIKN.
c)IIIOJOMKa He 3aBNCHT OT HeIpaBBHbHOro IIOJIb3OBAHnIA, HbeOpHECHTH HJIH HeNpaBBHbHbIX peryIHPOBOK, BbIOJIHeHbI IOJIb3OBATeJE.M
d)IIoJIOMKa He 3aBNCHT OT O6bIuHOrO H3HOca H3-3a HCIOJIb3OBaHHJ.
e)HaMaIIHHHe He 6bIbI bblIOJIeHbI OIIpeaIIHH o6cJIyKJBAHIN, peMOHTa, OHa He 6blIa IeMOHTnPOBaHaN HIN NcKaKeHa IepcoHApOM He pa3peIeHHbIM hIpMoH HusqvarNa Outdoor Products.
f)MaHnHa He 6bila cdaHa HApokat TpBeTHM JIiAm.
g)MaIIHHa YBJIaeTc HMyIeCTbOM opHrHaJIbHOro nOKyIaTeJI.
h) MaIIHHa He HcIOJIb3yeTcI JIJI KOMMepYececkoRo yIOTpeBJIeHn.
HactoiaIra rapaTHra -doIOJIHrTe IeraJIbHbe npaba KJIHeHTn He cOKpaTHT Hx B JIO6OM CIOco6OM.
IIOJOMK, KOtOpbIe 3aBHCrT OT OJHOH HJIH 6OJIbHHe HNKeIepeHcJIeHHx IINuH HNe IIOKpblTb IpaAHTHn, IO30MY peKomeHcyTeCHTaTB BHNMaTEbHO HNCTpyKUHN Ha PyKoBOCTBe IIO JIO3OBATEJIHO HBIIOHE NOHMaTb paOToY IpoJeDpyPi IO 6cIJyKbHAHN MO MAnHHs.
OCTOPOXHO
ПлOMКн He ПOKьТы rapaHTH.
-3aMeHa H3HOceHHbIX HJIN IOBpeKJeHHbIX HOKOB.
-ПлOMК,КOTOBIe 3aBHCrT O TcYrTcTBn COO6HHeNHaHauJIbHOI ПLOlOMK.
-ПОЛOMК,ΚΟΤΟΡБΙΕ 3aВнсΑΤΟ HeOЖДаHΗΟу yДаРа.
-ПлJOМКи,КOTOPьLE 3aBnCt ON Heco6JIIOJENH NHeCTpyKuHH IN peKOMeHuaIIN yKa3AHbIX Na PykaBOdCTBe IIO ПЛьЗВОТЕЛNo
- FapaHTHHe NIOKpbIbAeT MaIIHHbI cIaHbI HApPOKaT.
- HnHexyka3AHbIe cacht cnHTaIOCTc pacXoIDHbX chaTei Hx cPoK pa6OTb 3aBHCNT OT HopMaJIbHOrO 06CJyKHBaHH, HO3OMy rapaHTHNe He NOKpbIBaet HOJH, IITaTeJIbHbHe Ka6JIu, pemHH.
BHytpn ycIOBn HAcToIe I rapaHTn Hpma Husqvarna Outdoor Products He BO3MeT Ha c6eO OTBeTCTBeHHocTb 3a DeEeKtBu, KOTOpBe BIOJIHe NIIu CaTTHNO, IIpMa OII KOCBeHNO, 3aBcSrT OT YNtOpTe6JIeHn 3aUCAteHn IIN DOIOJIHHeJIbHX UaTeH He IpnOH3BeDeHb NII He pa3peIeHb HpMoi Husqvarna Outdoor Products NII 3a Te DeEeKtBu, KOtOpBe 3aBHCsT OT N3MeHEHn BBIIOJIHeHb B IIO6OM CIOOC6e HA MaIIHNE.
EC TEKJIAPAIIH COOTBETCTBIA
Полпсаошиng Bengt Ahlund, Husqvarna Outdoor Products Italia Spa, Via Como 72, 23868 Valmadrera (LC) 3aayBlaeT, TTo ra3oHokocnIky:-
Kateropn. BpaatateJIbna, 6eH3HHo, c KOJIecamn
Marca . Husqvarna Outdoor Products
COOTBETCTBYET HOpMaTHBaM IInpeKTHB 2000/14/CEE.
THII. A
Bapnant .
IIInpuHa pe3aHnA C
TapaHHTnpoBaHHbI 3ByKOBoI yPoBeHb. D
H3mepeHHbI 3BykoBOy yPOBeHb. E
YpOBeHbAkyCTnuecKOrO DaBJIeHHN..F
Bn6paunHa pykoTke.
TnHoka .BpaIaTeJIbHbI
HHeHTnΦHkaIaIe cepHH ...CmOrpH EtHKeTKy o DaHHbIX o IpoJyKTe
IpoueDypa OuenKn COOTBeTCTBnA.. ANNEX VI
Opran 3aBJIeHn.. Nr.0470 - NEMKO AS
Gaustadalleen 30 - PO Box 73 Blindern
0314 OSLO - Norway
Дугне ДиректNBы 98/37/EC,93/68/EEC,2002/88/EC,2004/108/EC
H npTHe HOpMaTHBbI .EN836,EN ISO14982,EN1033,EN ISO 3744,EN ISO11201

Husqvarna Outdoor Product Italia S.p.A.
Via Como 72 - 23868 Valmadrera (LC)
3/08/2006
Mark....Husqvarna Outdoor Products
Vastab direktiivi 2000/14/EMU spetsifikatsoinidele.
Tuup .A
Versoon. B
Löikelaius. C
Garanteeritud murerata. D
Mödetud müratase. E
Müratase körvas. F
Druge directive 98/37/EC, 93/68/EEC, 2002/88/EC, 2004/108/EC
in po standardih. EN836,EN ISO14982,EN1033,EN ISO 3744,EN ISO11201

Husqvarma Outdoor Product Italia S.p.A.
Via Como 72 - 23868 Valmadrera (LC)
3/08/2006

A
LM2146 CD LM 2147 CMD
LM 2147 CM

EII
LM 2146 CD
LM 2147 CMD
LM 2150 CMD

EIII
LM 2147 CMDE


| A | LM2146 |
| B | CV-CC-SP-SC-SL-CL-SK |
| C | 46 cm |
| D | 96 dB (A) |
| E | 95 dB (A) |
| F | 84 dB (A) |
| G | 5 m/s² |
| A | LM2147 |
| B | |
| C | 46 cm |
| D | 96 dB (A) |
| E | 95 dB (A) |
| F | 84 dB (A) |
| G | 5 m/s2 |
| A | LM2150 |
| B | |
| C | 53 cm |
| D | 98 dB (A) |
| E | 97 dB (A) |
| F | 84 dB (A) |
| G | 5 m/s² |
| A | LM2151CMDA |
| B | |
| C | 50,2 cm |
| D | 98 dB (A) |
| E | 97 dB (A) |
| F | 84 dB (A) |
| G | 5 m/s² |


- SAFETY RULES
- Safe Operation Practices for Pedestrian-Controlled Rotary Lawnmowers
- Training
- Preparation
- Operation
- Maintenance and Storage
- DESCRIPTION
- ASSEMBLY OF GRASS CATCHER
- SAFETY PRECAUTIONS
- OPERATION
- ENGINE ADJUSTMENTS (Fig.JI)
- STARTING THE ENGINE (Fig.Jlt)
- MOWING
- ADJUSTMENT OF CLUTCH CABLE (for self-propelled versions only)
- MAINTENANCE
- BLADE
- KIT ELECTRIC STARTING
- BATTERY MAINTENANCE
- IMPORTANT
- BATTERY DISPOSAL
- GUARANTEE AND GUARANTEE POLICY
- CAUTION!
- EC DECLARATION OF CONFORMITY
- EC DÉCLARATION DE CONFORMITÉ
- WERKEN MET DE MAAIMACHINE
- ELEKTROMOS INDITO KIT
- ΣYNTHPHSEH
- MAXAIPI
- SYNTHPHEH MIIATAPIA2
- \PPO OXH
- MIIATAPIA
- ENTYIO EΓΓYH2H2
- GWARANCJA I WARUNKI GWARANCJI
- TexHHueckoe 06cIyKHBaHne aKKMyJITropHoi 6atapeH.
- Bakhoe 3ameuHHe:
- YTHJH3aHHaKKyMJIITOpHoi 6aTapeH.
- TAPAHTHI I YCJIOBHRA TAPAHTHI
- OCTOPOXHO
- EC TEKJIAPAIIH COOTBETCTBIA
Brand : JONSERED
Model : LM 2151 CMD
Category : Lawn mower