
N-4100 - Router ZYXEL - Free user manual and instructions
Find the device manual for free N-4100 ZYXEL in PDF.
| Product Type | Router, wireless access point, 4-port switch, service gateway |
| Wireless Standard | IEEE 802.11b/g/n |
| Network Interfaces | 4x 10/100 LAN ports, 1x WAN port |
| Wireless Security | WEP 64/128-bit, WPA, WPA2 |
| Subscriber Authentication | Local database, external RADIUS server |
| Management | Web configurator via http://192.168.1.1 |
| Default Credentials | Username: admin, Password: 1234 |
| Power Supply | Included AC adapter |
| Mounting | Wall mountable (80 mm spacing) |
| LED Indicators | PWR, SYS, WAN, LAN 1-4, WLAN |
| Advanced Features | Subscriber account management, receipt printer, billing |
| Antennas | 2 dedicated antennas, perpendicular to ground |
| Included Items | Router, AC adapter, antennas, Ethernet cable |
| Maintenance | Clean with a dry, non-abrasive cloth |
| Operating Temperature | 0°C to 40°C |
Frequently Asked Questions - N-4100 ZYXEL
User questions about N-4100 ZYXEL
0 question about this device. Answer the ones you know or ask your own.
Ask a new question about this device
Download the instructions for your Router in PDF format for free! Find your manual N-4100 - ZYXEL and take your electronic device back in hand. On this page are published all the documents necessary for the use of your device. N-4100 by ZYXEL.
USER MANUAL N-4100 ZYXEL
Wireless N HotSpot Gateway
Version 1.00
Edition 1, 02/2010
DEFAULT Login DETAILS
IP Address: http://192.168.1.1
Username: admin
Password: 1234
CONTENTS
ENGLISH 3
DEUTSCH 17
ESPANOL 35
FRANÇAIS 53
ITALIANO 71
PYCCKNI 89
SVENSKA 107
繁體中文 123
ZyXEL
Device Panels
Introduction
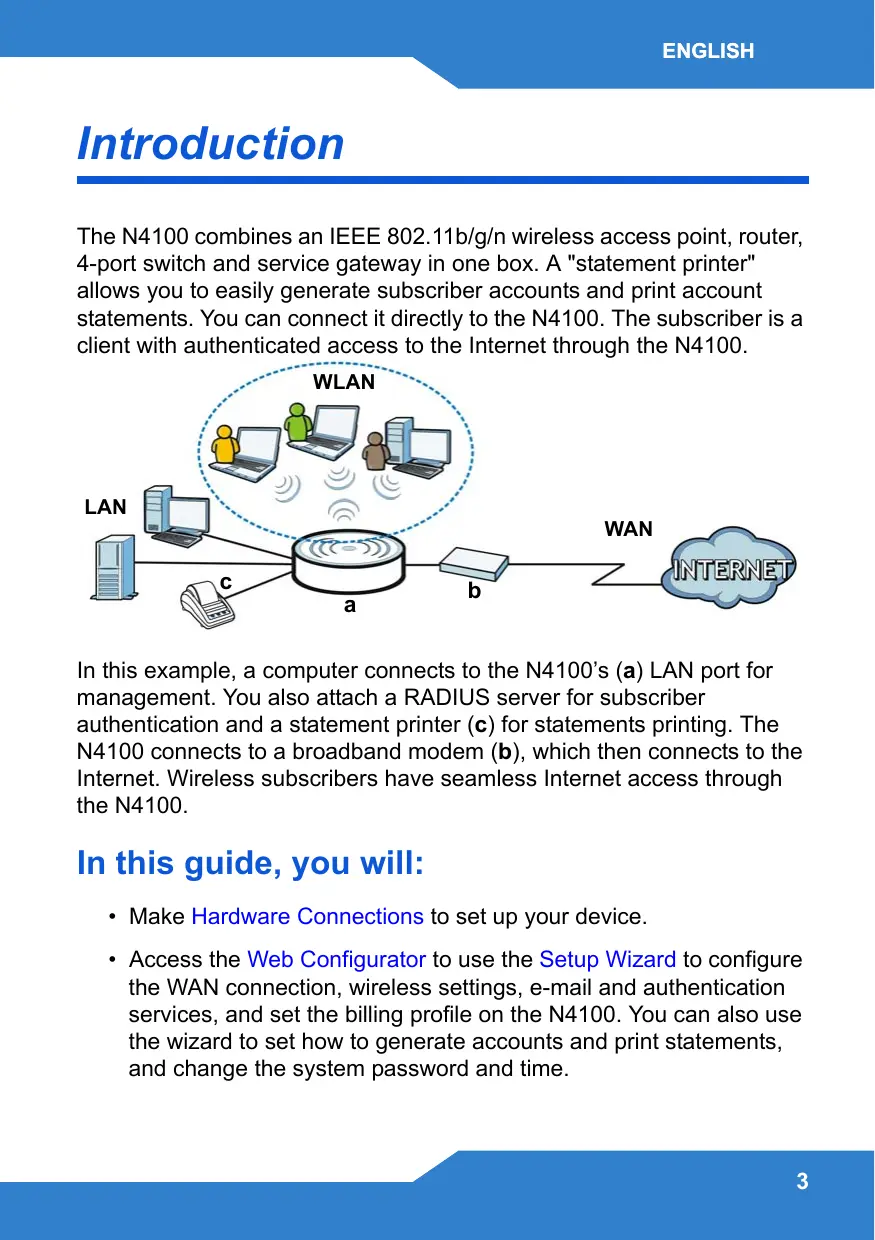
The N4100 combines an IEEE 802.11b/g/n wireless access point, router, 4-port switch and service gateway in one box. A "statement printer" allows you to easily generate subscriber accounts and print account statements. You can connect it directly to the N4100. The subscriber is a client with authenticated access to the Internet through the N4100.
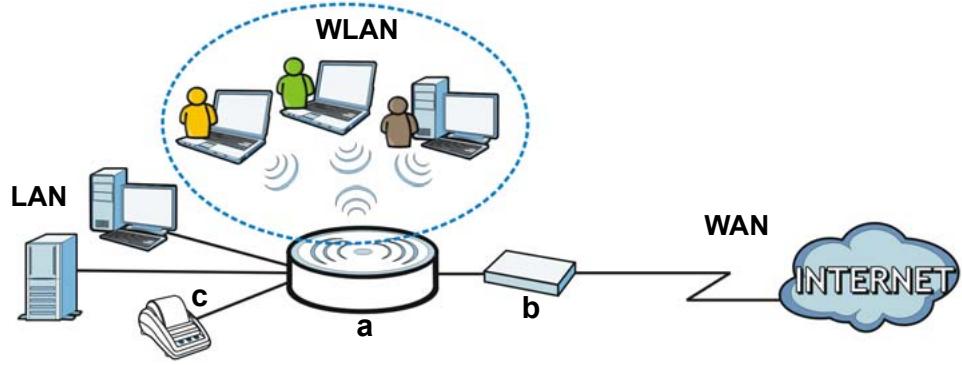
In this example, a computer connects to the N4100's (a) LAN port for management. You also attach a RADIUS server for subscriber authentication and a statement printer (c) for statements printing. The N4100 connects to a broadband modem (b), which then connects to the Internet. Wireless subscribers have seamless Internet access through the N4100.
In this guide, you will:
- Make Hardware Connections to set up your device.
-
Access the Web Configurator to use the Setup Wizard to configure the WAN connection, wireless settings, e-mail and authentication services, and set the billing profile on the N4100. You can also use the wizard to set how to generate accounts and print statements, and change the system password and time.
-
Hang the N4100 on a wall.
Hardware Connections
This section shows you how to set up your N4100.
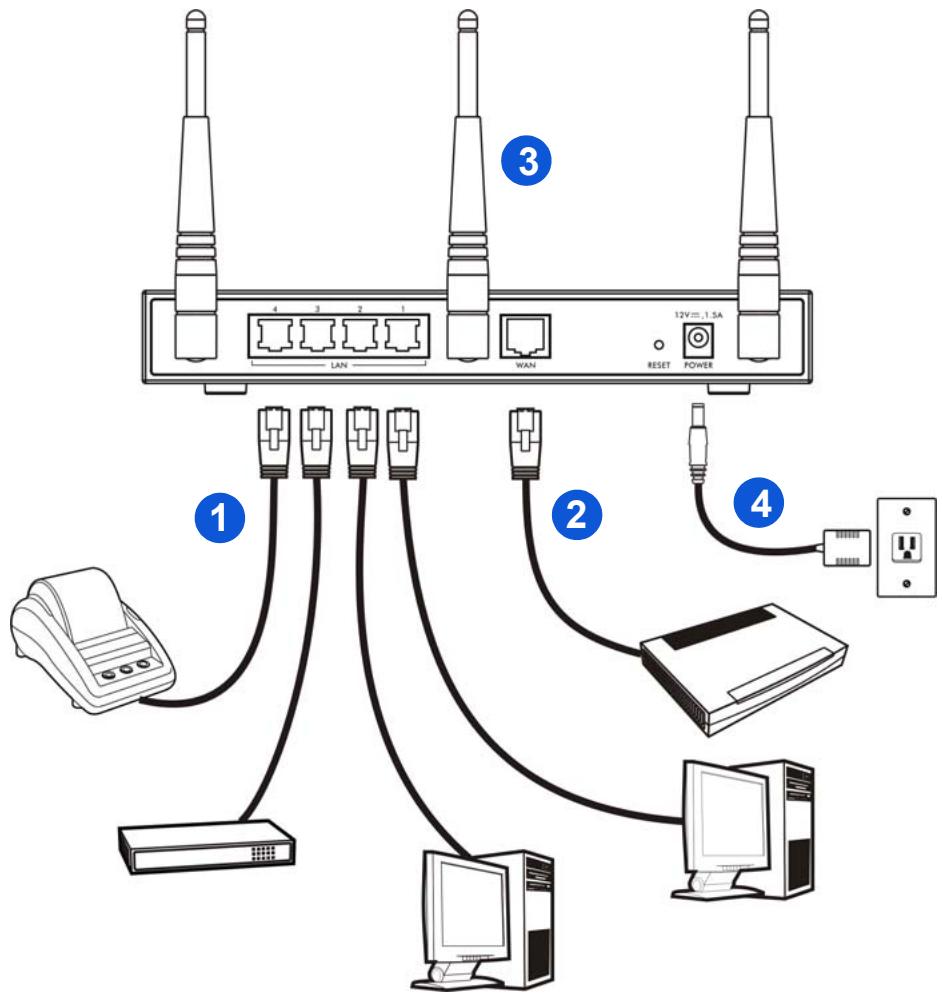
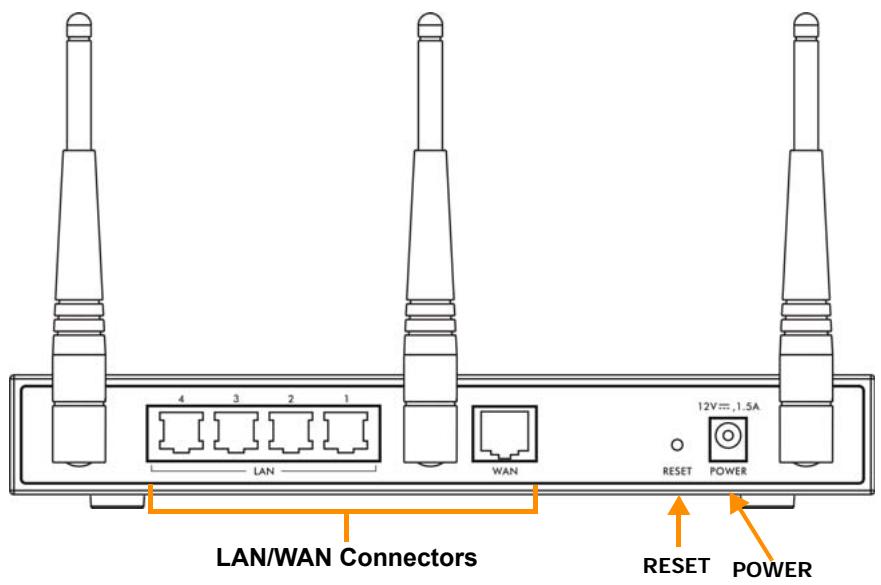
- LAN 1~4: Use Ethernet cables to connect the LAN ports to computers, switches and a statement printer (optional).
- WAN: Connect your broadband modem to this port with the Ethernet cable that came with your modem.
- Attach the included antennas to the N4100. The antennas should be perpendicular to the ground and parallel to each other.
- POWER: Connect the N4100's included power adaptor to the N4100's power socket.
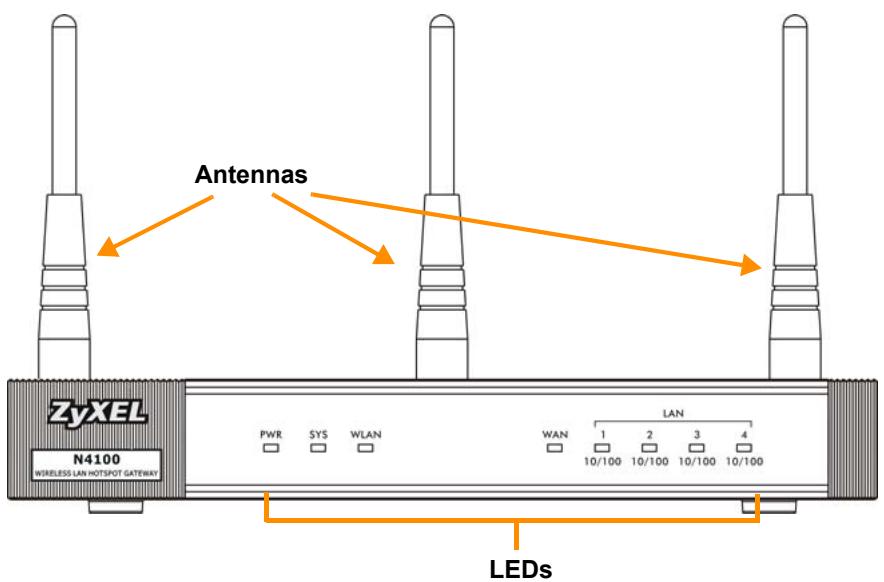
Check the LEDs (Lights)
Look at the LEDs (lights) on the front panel of the N4100.

- The PWR light (LED) turns on.
- The WAN or LAN light turns on if its corresponding port is properly connected. The lights blink when the N4100 is sending or receiving data through the corresponding port.
- The WLAN light stays green when the wireless LAN is enabled. It blinks when the N4100 is sending/receiving data through the wireless LAN.
- The SYS light turns on once the N4100 is ready.

If no lights are on, check your connections. Make sure that you have the power adaptor connected to the N4100 and plugged in to an appropriate power source. Make sure the power source is turned on. Turn the N4100 off, wait for a few seconds and turn it back on. If the LEDs are still off, contact your local vendor.
Web Configurator
This section shows you how to access and log into the Web Configurator.
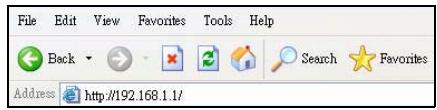
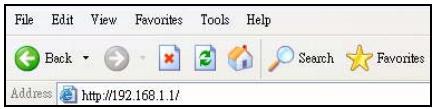
- From the computer connected to the N4100, open a web browser such as Internet Explorer or Firefox.
- Enter http://192.168.1.1 (the N4100's default LAN IP address) in the browser's address bar.
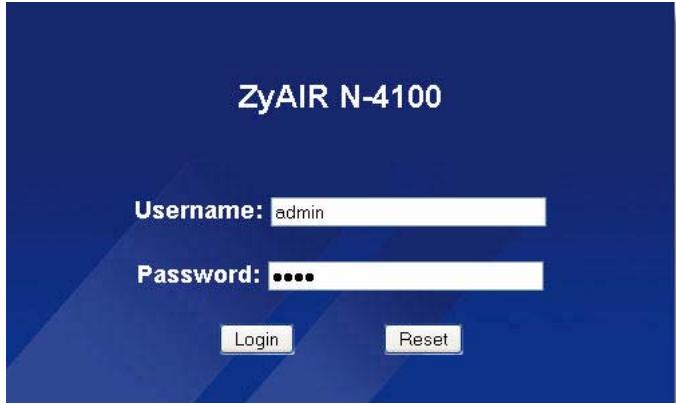
- Enter admin as the default user name and 1234 as the default password. Click Login.
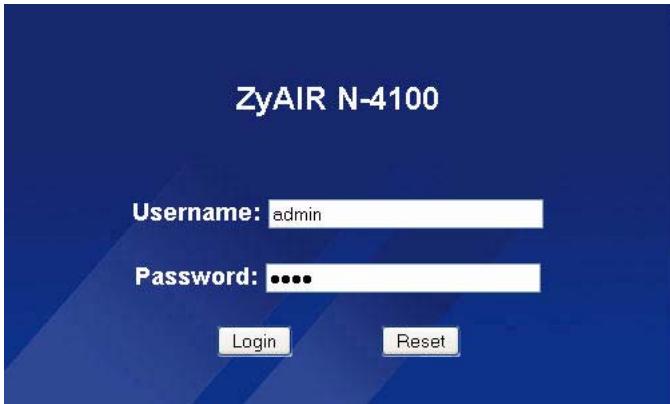

If the login screen does not display, make sure you allow web browser pop-up windows, JavaScript and Java permissions. Your computer should be also set to get an IP address automatically from a DHCP server. See the User's Guide for more information.
Setup Wizard
The wizard setup screens appear automatically after your first login.
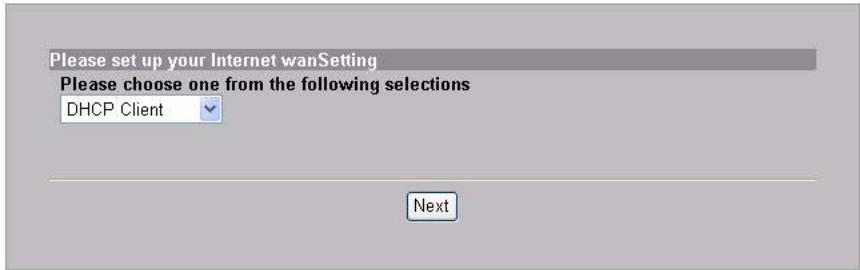
- Fill in the fields with information from your ISP. The screen varies depending on the encapsulation type you use. Leave fields set to the default if you don't have that information.
If your ISP didn't provide you any Internet access information, select DHCP Client.
INTERNET

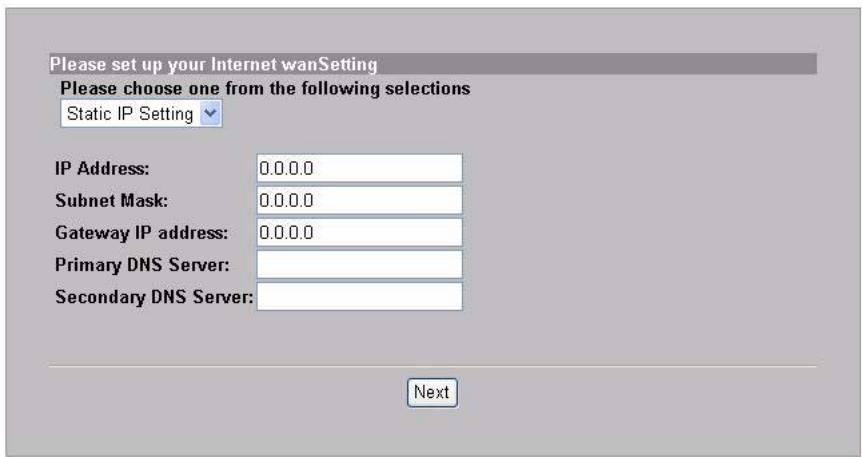
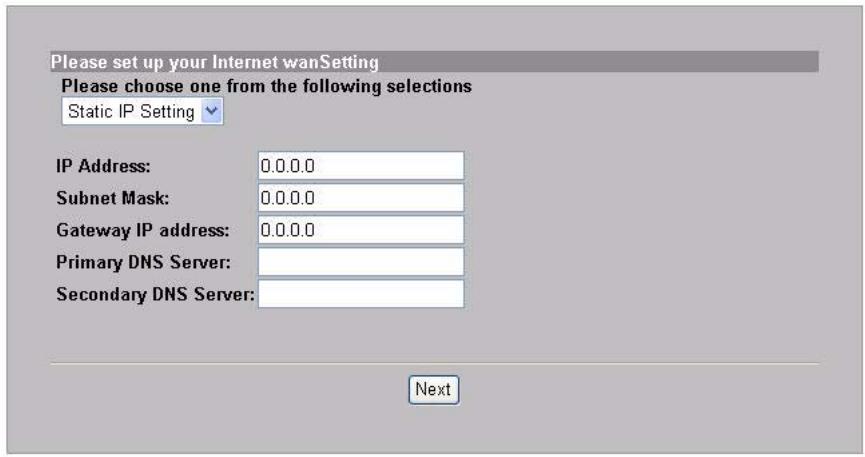
If your ISP gave you an IP address (and gateway and DNS server addresses), select Static IP Setting and enter them.
INTERNET
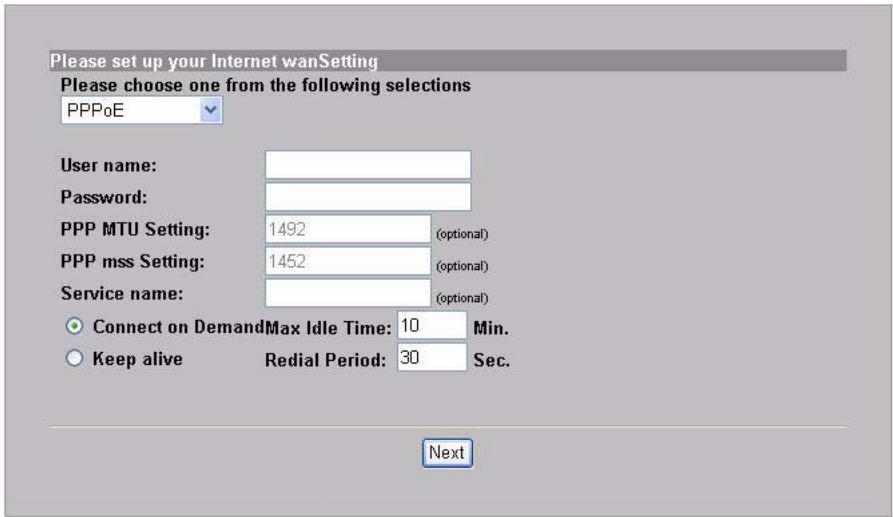
If your ISP gave you a user name and password, select PPPoE.
INTERNET

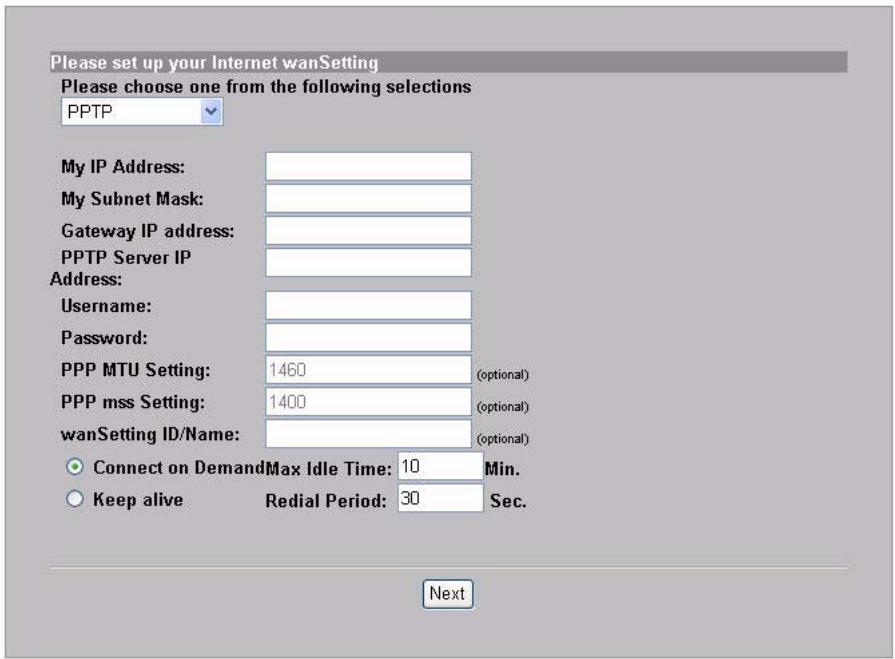
If your ISP gave you a user name, password and IP address(es), select PPTP.
INTERNET
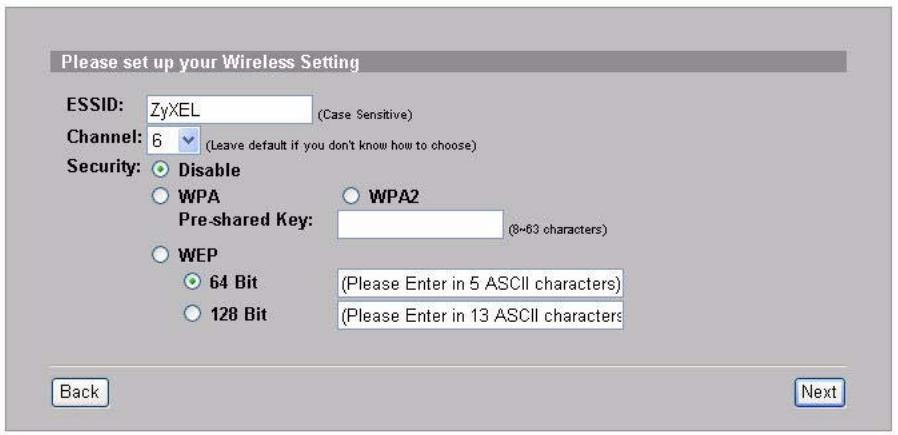
- Enter a unique name (up to 32 printable 7-bit ASCII characters) as the ESSID to identify the N4100 in the wireless LAN.
Select a channel (range of radio frequencies) that is not being used by other wireless devices in the area.
Select a security type and enter a key for data encryption. If you set Security to Disabled, any one within range can access your network wirelessly.
WPA or WPA2 provides user authentication and data encryption. Data encryption of WPA or WPA2 is stronger than WEP's. The pre-shared key is case-sensitive ASCII characters (including spaces and
symbols). Use the advanced wireless setup screen if you want to use WPA or WPA2 with a RADIUS server (see the User's Guide for details).
WEP provides data encryption only (no user authentication).
WIRELESS
- You can configure a backup e-mail server in the event that a subscriber's e-mail server is unreachable from the N4100.

- Select Yes to be able to create and use subscriber accounts that are used to authenticate clients connecting to the Internet. This wizard configures authentication and accounting settings for the N4100's built-in local subscriber database. Use the advanced RADIUS setup screen to use an external RADIUS server instead (see the User's Guide for details).
AUTHENTICATION
Please set up your Authentication Service
Do you need to authenticate users?
Yes, The users need to be authenticated before access Internet
No, The users can access Internet without authentication
Back
Next
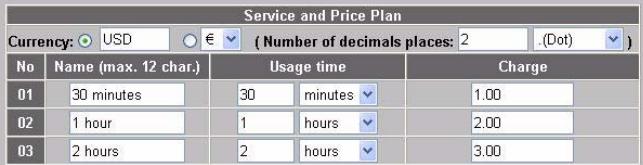
- Set the type of accounting to use. Set up Internet access time periods and their prices.
BILLING
Please set up your Billing Profile
What is your service and price plan?
Time to Finish
The subscriber can access Internet only one time with one account. Once subscriber login, the pre-defined usage time will start until run out even the subscriber stop to access the Internet before run out.
Accumulation
The subscriber can access Internet several times with one account. The system can keep and accumulate every single usage time until the pre-defined usage time run out.
| Service and Price Plan | ||||||
| Currency: USD € (Number of decimals places: 2 (Dot) ) | ||||||
| No | Name (max. 12 char.) | Usage time | Charge | |||
| 01 | 30 minutes | 30 | minutes | 1.00 | ||
| 02 | 1 hour | 1 | hours | 2.00 | ||
| 03 | 2 hours | 2 | hours | 3.00 | ||
Back
Next
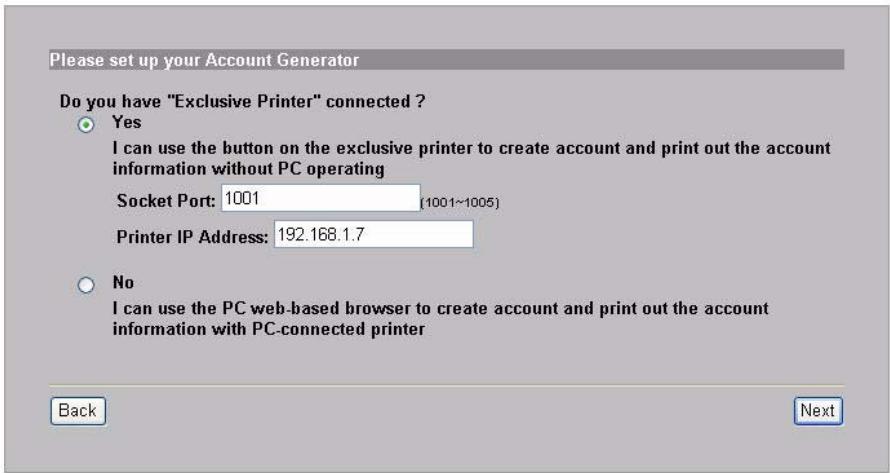
- You can use a statement printer to generate subscriber accounts and print subscriber statements. If you do so, make sure that no other devices on your network use the same IP address as the printer (192.168.1.7 by default). If you need to change the printer port number or IP address here, make sure you also change it in the printer, see the printer's user's guide for how to do this.
You can alternatively generate subscriber accounts in the web-based account generator and print the statements on your regular printer.
PRINTER
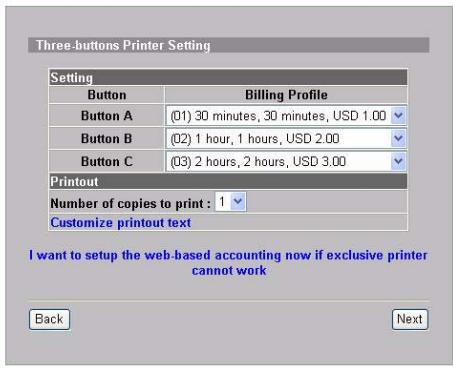
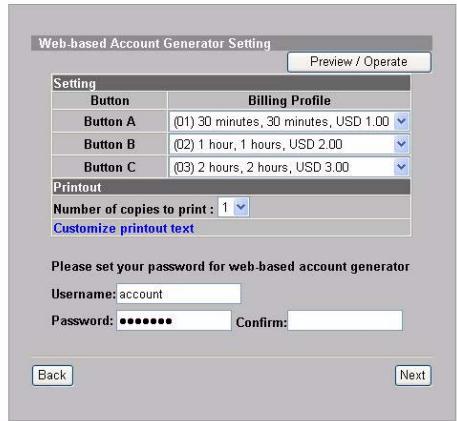
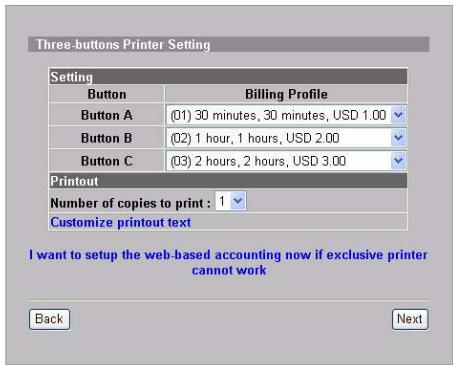
- Select a subscriber billing profile for each button on the "exclusive printer" (statement printer) or the web-based account generator. The billing profile defines the maximum Internet access time and charge per time unit.
Set how many copies of the subscriber statement to print.
Click Customize printout text to tailor the subscriber statements. See the CUSTOMIZATION > Account Printout section in your User's Guide for how to tailor what displays on the subscriber statements.
For the three button (statement) printer, click I want to setup... to also configure the web-based account generator settings.
Set the username and password for accessing the account generator.
ACCOUNTING
ACCOUNTING
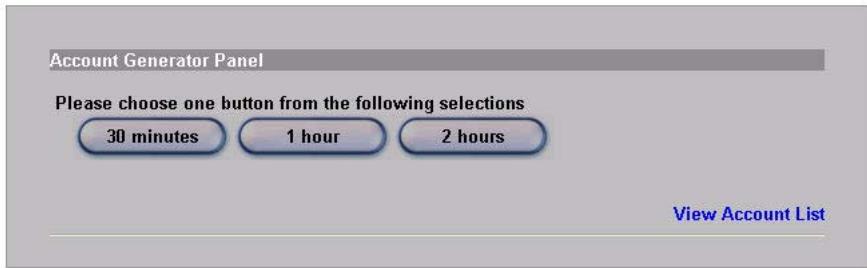
Click Preview/Operate to open the account generator. The web-based account generator panel displays. Click one or more of the buttons to generate accounts.
ACCOUNTING
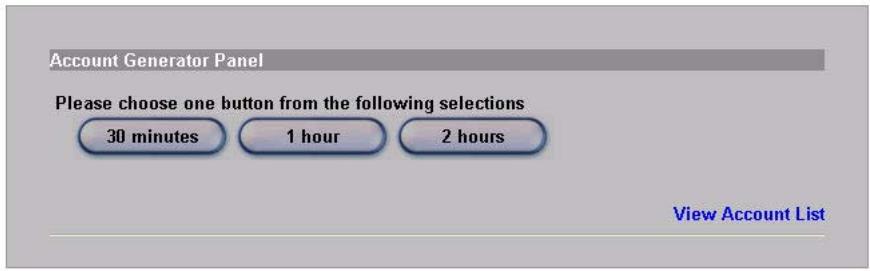
Click View Account List to see the accounts you generated.
ACCOUNT LIST

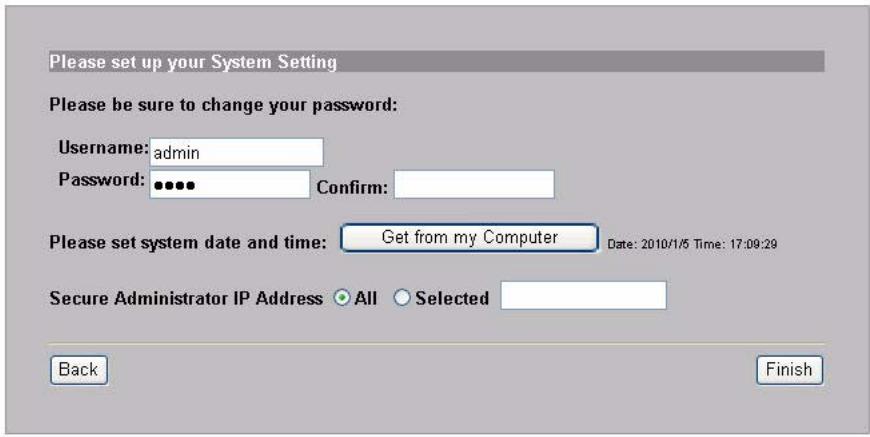
- Change the N4100's management password and update the time. You can also specify from which IP address the N4100 can be managed. Click Finish to save your changes and go back to the System Quick View screen.
SYSTEM
Generating and Printing Subscriber Account Statements
If you have a statement printer connected and turned on, simply press the buttons to generate and print subscriber account statements. If you are using a PC-connected printer, do the following.
- Launch your web browser and go to http://192.168.1.1 (as in the Web Configurator section).
- Enter the web-based account generator user name and password that you configured in the wizard (see page 13).
- Click the buttons in the screen to generate accounts.
- The details of each new account display in a separate window. Click the Print button to print out the account statement.

Hardware Installation
In general, the best location for the access point is at the center of your intended wireless coverage area. For better performance, mount the N4100 high up in a spot free of obstructions.
Do not block the ventilation holes.
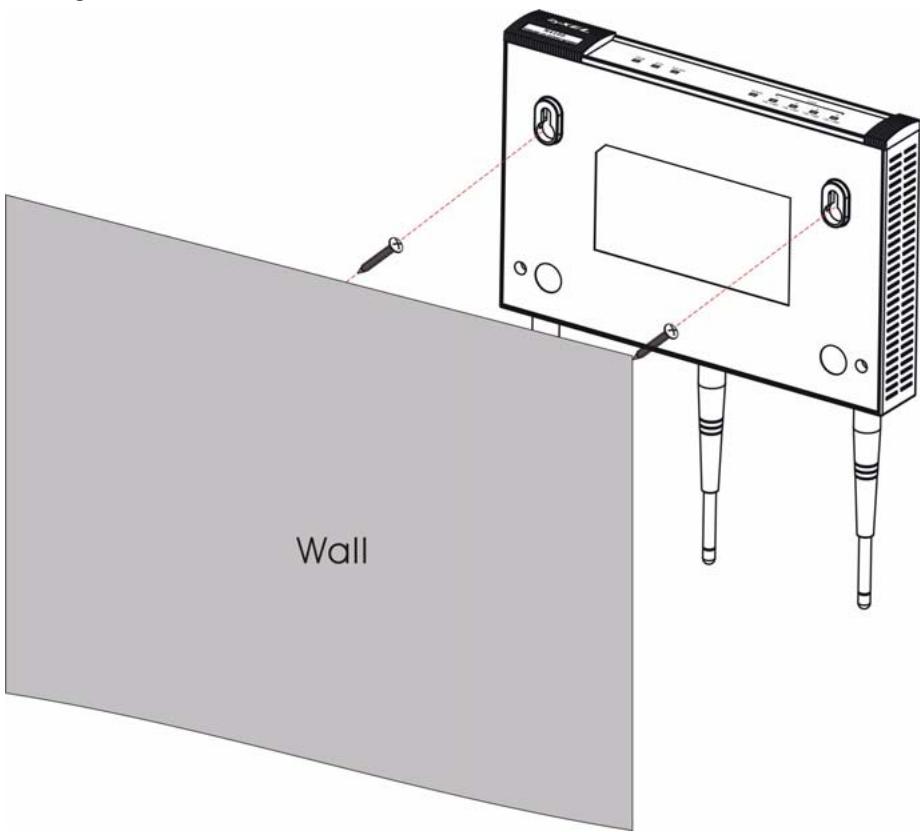
Wall-mounted Installation
- Install the two included screws in the wall 80mm (3.15") apart. Do not screw the screws all the way into the wall. Leave a small gap between the head of the screws and the wall.
- Make sure the screws are securely fixed to the wall and strong enough to hold the weight of the N4100 with the connection cables.
- Hang the N4100 on the screws.
Einführung
Concessioni hardware
Pocmotpnte Ha HndnkaTopbI (JaamnoyKn) Ha nepeedne nane N4100.

Ecnn 3TOT nHdNkATOp He ropnt, npOBepbTe coeDInHeHn.
Y6eIntecb, yTO Bbl nOdknHouJIn K N4100 cTeBoi aanTep
IN BKIOUChn erO B nOxDxOJaunn IcTouHnK 3JIeKTPoNITaHnI.
PpOBepbTe hAnuue HnnpjKeHne B 3JIeKTPocEtN.
BbIKHouHTe N4100, nOdoXdnte HeckoJbKO ckyHn ChOBa BkJIIOHTe ycTpoIcTBO. Ecnn INHdkaTopbI BCE eIe BbIKHouHebl, To o6paTInTeCb K BaIeMy NOCTaBUnKy.
Web-koHΦuazypamop
B 3TOM pa3dJeIe OINcBbAeTcR, KaK IOnyUHTb DOCTyn N BOITN B Web Configurator.
- OtkpoiTe Be6-6pay3ep, Hanpimep, Explorer uJn Firefox ha noDKJIIOUeHHOM K N4100 kOmNbIOTepe.
- Вторе http://192.168.1.1 (IP-aDépec N4100 по умочани) всторе заразець.
- BVeIte Imra admin n napoJIb 1234, yCTaHOBJIeHHbIe no yMOJUaHIO. UeIKNHTe no HAdPiCSn Login (BxOd).

EcnIOKHO BXOaB CnCTeMy He NOBJIeTcR, TO y6eIITecb,
TO B 6pay3epe pa3peWeHb BCnIbBAUoUne OKHa,
JavaScript n pa3peWeHra Java. BaW KOMNbIOTep TAKKe
DOnJxH abTomatueckn POnyuaTb IP-aDPEC c DHCP-
cepBepa. CMOTpnte INhCTpykCmIO NOpb3OBaTeIa DnI
POnyHeHn DOnONHnTEhBOHn HOpMaun.
MacTep yCTaHOBKN
OknO MaCTepa yCTaHOBKn aBTOMaTnueCKn IOnBnIeTcR npN nepBOM BXOJe B CnCTeMy.
- 3aŋoJIHnIte noJЯ nHΦopMaζnei, noJyueHNoI OT BaUeRo npOBAɪdepa. BHeuHni BnD ᵋKpɑHa 3aBnCnT OT nCnoJb3yeMOrO BamN Tɪŋa nHkɑncyIaζm. OCTaBbTe yCTaHOBnEHHbIMN NO yMOJIuaHnI0 noJЯ, dɪŋ KOTɒpBX y Bac HET nHΦopMaζn.
Ecni Baw npoBaJep He daI Bam HnKaKoHnΦOpMauNДЯdoCTyNa K INTePHeTу, To BbIbepnte DHCP Client (DHCP KJIneHT).
INTERNET
Ecn npobai dep npedoctabn Bam IP-aipec (a TaKxe uio3 n aipca cepBepa DNS), Bb6epnte 3naueHne Static IP Setting (HaCtpoKa cTaTnueckoro IP-aipeca).
INTERNET
Ecn npoBaIep npedocTaN BAM NmN pOJIb3OBaTeJn napOnB, Bbl6epnte PPPoE.
INTERNET
Ecn npoBaJep npedocTaN Bam nMa noIb3ObaTeJI, napOBn IPaDpec(a), To Bbl6epnte PPTP.
INTERNET

Cpei Tpex KHOJOK npHTepa (BbIINcOK), igeJIKNHe Ha I want to setup... (XOuy HAcTpoNTb...), YTO6bl yCTaHOBnTB HAcTpoNKn Be6reHepaTopa yYeTHoN 3aPiNCn.
BVeIte ImЯ n napoJIb dIpyonuyeHnIdoCTypa K reHepaTOpy yUeTHOJ 3aIInCn.
ACCOUNTING
ACCOUNTING

UeIKNHTe Ha IyHKTe Preview/Operate (PpocMOtp/Opepaunia), UTObI OTKpbITb rHePaTOp yYeTHbIX 3aINcesI. POnBnTcI paHJIb reHepaTopa yYeTHbIX 3aINcesI Ha OCHObE 6pay3epa. UTo6bl CO3daTb yYeTHbIe 3aINCS HaxMITE OdHy IInI HeCKOJIbKO KHOJOK.
ACCOUNTING
LJIeKHTe Ha Vay Account List (IpocMTpeTb yYeTHbIe 3aHcN),
yTO6bI npocMOTpeB CO3aHHbIe yYeTHbIe 3aINcN.
ACCOUNT LIST

Please set up your Authentication Service
Do you need to authenticate users?
Yes, The users need to be authenticated before access Internet
No, The users can access Internet without authentication
Back
Next
Please set up your Billing Profile
What is your service and price plan?
Time to Finish
The subscriber can access Internet only one time with one account. Once subscriber login, the pre-defined usage time will start until run out even the subscriber stop to access the Internet before run out.
Accumulation
The subscriber can access Internet several times with one account. The system can keep and accumulate every single usage time until the pre-defined usage time run out.
Back
Next
- Wireless N HotSpot Gateway
- Device Panels
- Introduction
- In this guide, you will:
- Hardware Connections
- Check the LEDs (Lights)
- Web Configurator
- Setup Wizard
- INTERNET
- WIRELESS
- AUTHENTICATION
- Please set up your Authentication Service
- BILLING
- Please set up your Billing Profile
- PRINTER
- ACCOUNTING
- Generating and Printing Subscriber Account Statements
- Hardware Installation
- Wall-mounted Installation
- Einführung
- Concessioni hardware
- Web-koHΦuazypamop
- MacTep yCTaHOBKN
- ACCOUNT LIST
Brand : ZYXEL
Model : N-4100
Category : Router