USER MANUAL SPORT PRO SPORT ELEC
Description of the unit
SPORT PRO (4 channels) or MULTISPORT (2 channels)
Left key :
Back or select another choice
OK key :
Validation after each selection
C key (clear) :
Back after validating
MULTISPORT
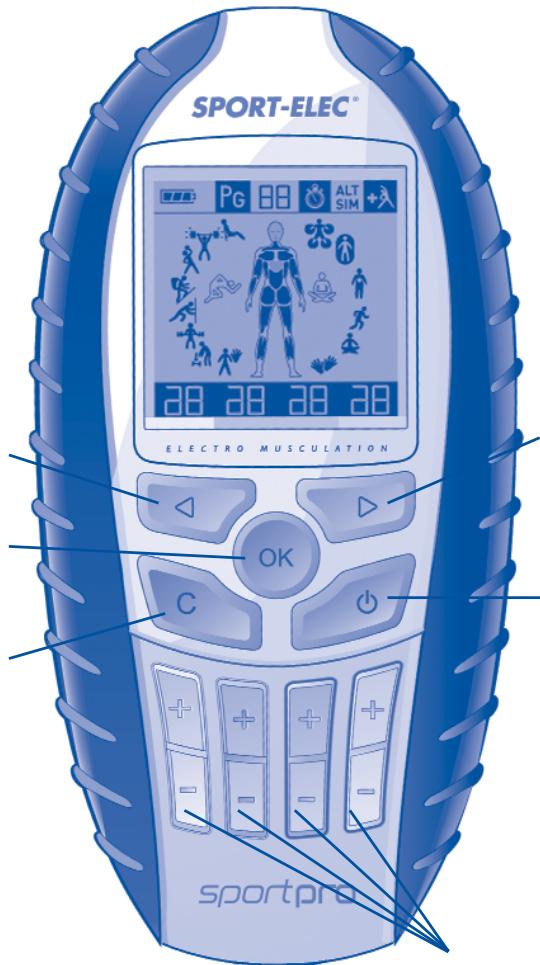
Right key :
Choice selection key (programs, muscular zones.)
ON/OFF key :
Turns the unit On and Off
Power key :
4 keys for SPORT PRO
2 keys for MULTISPORT
- : increase power / level 1 to 30
: decrease power / level 30 to 1
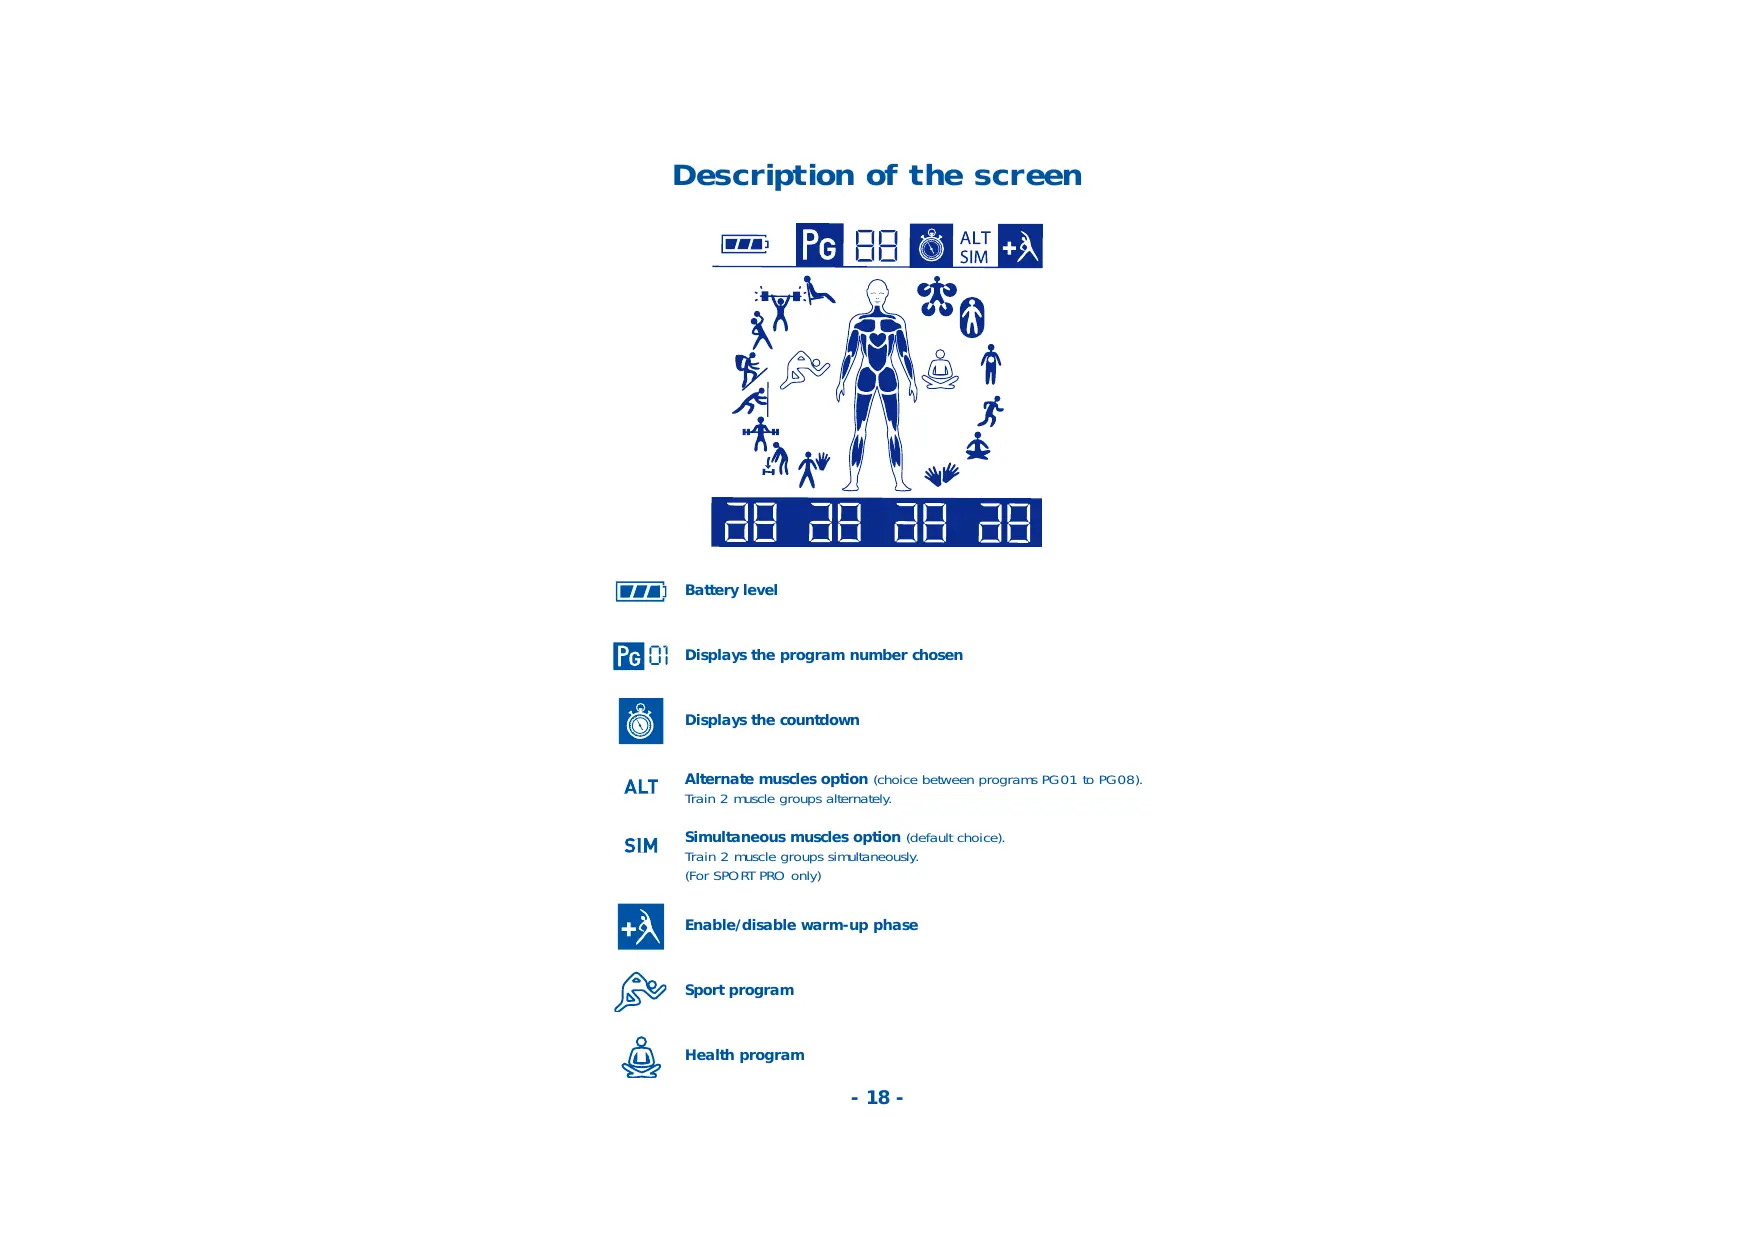
Description of the screen

Battery level

Displays the program number chosen

Displays the countdown

Alternate muscles option (choice between programs PG01 to PG08). Train 2 muscle groups alternately.

Simultaneous muscles option (default choice). Train 2 muscle groups simultaneously. (For SPORT PRO only)

Enable/disable warm-up phase

Sport program

Health program
Programs

SPORT PROGRAMS
PG01
Skin preparation

Lowers the impedance of the skin barrier. Prepares your skin for the currents emitted by the programs.
Duration: 2 min active phases
PG02
Restore muscle volume
This program prevents and fights loss of muscle volume resulting usually from a lack of use of a limb following a period of immobilisation.
Duration: 40 min active phase + 6 min recovery
PG03
Reinforce muscle volume

Apply this program only on muscles with a normal volume. PG04 and PG05 are used to develop muscle strength.
Duration: 20 min active phase + 6 min recovery
PG04
Muscle resistance
The stimulation frequencies aim at increasing the ability to sustain major muscle efforts.
Duration: 30 min active phase + 6 min recovery
PG05
Muscle endurance

After using PG04 to acquire the ability to sustain major efforts, use program PG05 to extend high intensity muscle efforts over time by maximum stimulation of slow fibres.
Duration: 30 min active phase + 6 min recovery
PG05

Muscle fitness
Use this program to maintain the level of muscle endurance, resistance, and volume acquired.
Duration: 30 min active phase + 6 min recovery
PG06

Explosive force
This program is a logical extension of PG03 and PG04. It allows reaching maximum muscle force by stimulating very high speed fibres, with maximum contraction intensity.
Duration: 30 min active phase + 6 min recovery
PG07
Recovery
Using a frequency range between 0.5 and 8Hz this program ensures muscles recover faster through relaxing, endorphin-based effects, and increases blood flow.
Duration:20minactivephase

HEALTH PROGRAMS
PG 09
Massage
This program uses frequencies modulated between 3 and 10Hz for optimum massaging effect.
Duration: 20 min active phase.
PG 10
Muscle relaxing
The frequency range between 0.25 and 3.5Hz of this program accelerates muscle relaxing.
Duration:20minactivephase

Active recovery
Use this program immediately after performing intense efforts. All frequencies generated by PG11 maintain muscle work after effort, enhancing blood flow and the release of endorphins. Each of these frequency sequences is alternated with a relaxing effect.
Duration:30minactivephase
PG 12
TENS
This program operates by across-skin nerve stimulation, delivering a range of pulse frequencies in the local area where the electrodes are placed.
Duration:20minactivephase
PG 13
Endorphinic
With a frequency range of 40 to 160Hz , this program relieves muscle tensions effectively.
Duration:20minactivephase
PG14
Vascularization
This program relieves numb legs sensation.
Duration: 26 min active phase

BEFORE USING THIS UNIT
You have just acquired an effective and powerful professional unit. Take your time to discover how to use it.
1 - Read the instructions carefully
2 - Before using it, charge the unit (see next page)
3 - Test your unit on your quadriceps using the quick test procedure below
1 - Take a 1/2 belt, apply cream on the built-in electrodes (photo III-E page 3).
2 - Connect it to the first channel (match the colours of the connectors, 2 by 2).
3 - Start the unit using the key and press the "OK" button 6 times.
4 - Increase power on this channel gradually.
5 - This discovery procedure shows your capacity in using the unit's level of performance.
CUSTOMER SUPPORT
I. CHARGING THE BATTERIES
The unit contains rechargeable batteries. Before using it, charge it during 12 hours by connecting it to mains. Do not use this unit while batteries are charging. When it is not used, charge the batteries for 12 hours every 4 months. When the batteries are empty, the unit switches to standby automatically, protecting them against untimely discharging.
To charge the unit, connect the charger supplied with the unit (photo I-E page 2)

Battery charge display
When the battery is charging, the battery indicator displays 1/3 , 2/3 , then 3/3 to show the current charging status. The charging time countdown starts, from 12 to 00.
Once charged, the number appears in the left angle of the timer pictogram. The battery pictogram displays 3/3
When the charger is disconnected, the screen switches off.
When the battery indicator is empty , this means that it is discharged.
II. STARTING THE UNIT
STEP 1 : Display - Power on
Attention while starting the device (red button 品
Push briefly (maximum 1 second) on .
All pictograms appear and blink for 3 seconds, then the front muscles blink.
If you make a long push, your screen flashes and indicates you the totality of the pictograms which it contains.
To stop the device, push briefly on .
Or to return in the menu made 2 brief pushes on 念
STEP 2: Selecting the muscle zone(s) to stimulate
The screen displays 1, meaning you can choose a first muscle zone.
- To choose the front muscles, validate with the "OK" key.
- To choose the back muscles, press the key.
- To return to the front muscles, press the key.
If you have chosen the front muscles : the 1st muscle zone at the bottom blinks: quadriceps.
If you have chosen the back muscles : the 1st muscle zone at the bottom blinks: gastrocnemius (calves)
Press the key to move upwards and scroll the different muscle zones.
To go back, press the key.
After selecting the muscle group, validate using th "OK" key.
- Choice 2nd zone : (only with the SPORT PRO) :
All pictograms blink and the screen displays 02.
The screen proposes to choose a 2^nd muscle zone :
To choose a 2nd muscle zone (only with the SPORT PRO), validate again either the front muscles or the back muscles, validate "OK". Choose again another muscle zone, then validate "OK".
If you wish one muscle zone only, press the key and go to step 3.
The muscle zone(s) selected are displayed.
STEP 3: Selecting the program
Programs on the left (SPORT programs ) blink.
If you choose the SPORT programs , validate " OK".
To choose HEALTH programs, press the key and validate "OK".
Scroll through the programs by pressing the key. The screen first displays the 1st lower pictogram while displaying the corresponding program number at the top.
To go back, press the key.
You have now chosen the muscle zone(s) to be stimulated, and the program.
STEP 4 : Choose the "Warm-up phase" + and ALT SIM option
(only for programs PG02 to PG07).
The "WARM-UP PHASE" pictogram blinks in the top right corner.
The screen proposes a warming-up phase before starting the active phase of the program.
To select it, press "OK, otherwise press the key, and validate "OK (it disappears from the screen).
Then the alt pictogram blinks.
To select "ALT", press the key, to select "SIM", press the key, then validate "OK".
If no key is pressed, the "SIM" mode is imposed by default by the "OK" key.
If you have selected the warm-up phase, "SIM" is displayed when starting the program, as the warm-up phase is only in the simultaneous mode.
The screen is displayed : the battery level, phase duration (countdown in minutes), timer pictogram, the "ALT" or "SIM" option and warm-up phase if you have selected them.
The pictogram for the program chosen is lit, the muscle zone(s) chosen blink alternately.
STEP 5 : • Launching the start - Adjusting intensity
Then, press the + buttons of the intensity keys matching the wires connected to your electrodes or your belt to start the program.
If the battery is low, do not start the program.
The power level(s) are displayed at the bottom of the screen. The intensities vary during the session according to the program's content.
A long press on the "C" key returns the power rapidly to 0.
- Use of the "C" (Clear) key:
During the program, press the "C" key during a phase to set its time to zero. The next phase starts unless you have reached the end of the program. In this case, this key allows returning to selecting the 1st muscle zone (as at normal end of program).
- Disconnecting the electrodes during the program:
If an electrode is disconnected, the channel concerned is reset to 0 and blinks for 30 sec, before returning to a fixed 0.
During these 30 sec, the electrode(s) can be reconnected, and power restored to the level required.
STEP 6: End of program - Stopping
At the end of the session, the screen proposes to start a new session by blinking the front muscles to select the 1st muscle zone. Restart the starting procedure if you wish to continue on another muscle zone.
Otherwise, press the key to stop.
The unit switches to standby after 5 minutes idle.
Recommendations :
The pictograms for upper muscles and for lower muscles are different. Avoid selecting upper muscles and lower muscles, as the unit would give priority to upper muscles, reducing somewhat the yield of work on lower muscles.
III. Using the unit
A / ELECTRODES FUNCTION
This function allows using the adhesive electrodes by connecting them to the unit
STEP 1: Take the electrodes and remove carefully their protection, dampen them one by one with water on your fingertips on the adhesive gel, and wait for 2 minutes (diagram I-A, page 2).
STEP 2 : Fit the electrodes on your body as shown in diagram II-A or B or C page 2 : Positions are shown for information only
Locate the electrodes according to the program chosen. Important: for optimum use, read each page carefully, and take the examples of use into consideration (photos II page 2).
Examples of use :
B = connector channel B (blue), C = connector channel C (orange)
A - Chest
1-Large chest
a - Do not place the electrodes close to the heart
b - Heart
B - Shoulders
2 - Medium deltoid
3 - Posterior
4 - Anterior
SUP: upper limbs - INF: lower limbs
C - Trapezius
9 - Upper trapezius
10 - Medium trapezius
STEP 3 : Take connector (CEV4 or CEV8 according to the model) (photo I-B page 2) and connect it :
1^ to the electrodes (photo I-C page 2)
2^ - then to the unit (photo I-D page 2).
STEP 4 : The unit is connected to the electrodes through the CEV4 connector, made of 4 (or 2) groups of 2 1m-long wires terminated by 2 groups of 2 connecting terminals.
Fasten your SPORT-ELEC® to the back of your clothing or underwear using its clip.
STEP 5 : Start your unit following the "Starting the unit" procedure described in paragraph II.
Contractions should be firm but never painful. If you feel an unpleasant sensation around the electrodes : bring the power-on key back to minimum, move the electrode(s) and gradually increase the power. Once the adjustments have been optimised in this way, leave your appliance to work for the full duration of the programme.
STEP 6: Once the program is complete, disconnect the electrodes from the (CEV4 or CEV8) connector, then the latter from the unit. Then pull off the electrodes gently, dampen them slightly with a few drops of water, then return them carefully onto their support. Store the adhesive electrodes in a fresh location, in a plastic bag (e.g. vegetable container in the refrigerator).
B / BELT FUNCTION
The multifunction belt can be used completer, or separated into 2 to form 2 half-belts.
The full belt must be used on the stomach, buttocks, lower back areas.
Once unfastened, the 2 "half-belts" can be used on the arms, thighs, or calf.
The multifunction belt has built-in electrodes on which the SPORT-ELEC® cream is applied.
This cream enhances contact between the electrodes and the skin. Its massaging and electro conducting properties improve comfort of use and enhance stimulation. The cream can be also used by massaging on the body. If you want to buy the SPORT-ELEC® cream, please order directly by dialing 00.33.2.32.96.50.50 or go to www.sport-elec.com, or contact your local supplier.

You may not use the belt without the cream provided.
Do not use any cream other than that provided by SPORT ELEC.
PRESENTATION OF THE BELT :
- Front side : (photo III-A page 3)
1 - Central fasteners
2 - Wire storage
3 - Connection terminals
4 - Scratch strip
- Electrodes side : (photo III -B page 3)
4 built-in electrodes
STEP 1: Connecting and fitting the belt
1 - Check your SPORT-ELEC® unit is STOPPED
2 - Take the (CEV4 or CEV8) connector (photo I-B page 2) and connect it :
- 1^ - To the belt connectors per groups of colour (e.g. yellow terminals with yellow terminals, terminals with green terminals...) (photo III - C page 3).
- 2^ - Then to the unit (photo III - D page 3).
3 - Apply a thick layer of electro conducting massaging cream onto the zone chosen then onto the electrodes built into the belt (domed part - photo III - E page 3)
4 - Place the belt or 2 half-belts onto the zone(s) to be stimulated, and adjust them using "scratch" strips to ensure the built-in electrodes are properly in contact with the skin (photos IV page 3 : A - stomach, B - back, C - arms, D - thighs, E - calf, F - back).
Move the belt slightly left or right (with device powered off) to feel the contractions on the abdominal area.
If an electrode hurts or if you feel any tingling, stop the device, and check the electrode is properly smeared with cream.
TIP :
Fitting the full belt : To position the full belt at best, cross the 2 strips to flip the 2 ends on the outer scratch part (photos V-A, B page 3).
Fitting the half-belt on the arm : Adjust at the belt mid-size, according to the outline of your arm before positioning it, then start over if necessary to ensure proper adjustment (photos V-C, D page 3).
STEP 2: Starting the belt function
Once your unit is connected, install yourself comfortably and start your unit using the procedure "Starting the unit" detailed previously in paragraph II.
STEP 3: Stopping the belt function
Once the program is completed, disconnect the unit from the (CEV4 or CEV8) connector, and the latter from the belt.
Remove the excess cream on the built-in electrodes using a wipe dampened with water, then dry them.
IV. Recommendation of use
The unit is recommended for physiotherapists for functional re-education.
WARNING :
Do not use the device by driving or by working on a machine.
Do not use this electro stimulation unit in a damp environment, a bathroom, a sauna, or close to electric machinery connected to mains and earthed, or even piping earthed.
The simultaneous connection of a patient to a high frequency surgical unit may cause burns at the points of contact of the stimulator's electrodes, and the stimulator may be damaged. Operation in close proximity of a short wave therapy unit may cause instability in the stimulator's output power.
RECOMMENDATIONS :
Please apply regulations enforced in your country when disposing your product at its end of life.
Therefore, please discard it in a location planned to this effect, ensuring it is disposed in an environment-friendly manner


PRECAUTIONS OF USE
CONTRAINDICATIONS
Do not use the SPORT-ELEC*unit :
- Close to the heart
- If you carry a pacemaker
- If you are pregnant
RECOMMENDATIONS OF USE
- You can restart a program's cycle on another muscle zone or change the program while remaining on the same muscle zone, without exceeding however 40 min use per muscle zone and per day.
- For optimum use, refer to the diagrams shown in this leaflet.
- Clean the unit and its cables with a cloth dampened with a disinfecting solution (mercyl type) diluted in water at 1/10th.
- The adhesive electrodes can be rehydrated before and after use with a disinfecting agent (e.g. hexamedine).
- The adhesive electrodes must be repositioned on their support, and stored in a fresh storage between +5^ and +10^ .
- The adhesive electrodes have a lifetime of about 40 uses, you can order them directly from the company headquarters or from your reseller.
SPORT-ELEC S.A, BP 35 Route de Rouen - 27520 BOURGTHEROULDE - FRANCE -00.33.2.32.96.50.50 www.sport-elec.com
RECOMMENDATIONS FOR MAINTAINING AND CLEANING THE BELT.


- CAUTION: NEVER wash in machine and under running water.
- Do not dry-clean
- Do not expose to bleach
- Clean the belt using a cloth dampened with a detergent, then wipe with a dry cloth.
- Clean the unit with a tissue dampened with a disinfecting solution (Mercryl type) diluted with water at 1/10th.
- Clean the electrodes with a mix of water/hypoallergenic detergent, then rinse thoroughly.
SAFETY CHECK
Every 24 months, check the following points :
1 - Check for superficial degradation of the equipment
2 - Check proper operation of the unit :
legible display
switch, contact
3 - Measure electric values :
with a 500-ohm load, the current must not exceed 100 V .
4 - Check reliability of accessories :
adhesive electrodes in good condition (no tears, no material defects)
* wire of adhesive electrodes in good condition.
V. Technical specifications
UNIT:
| Type of current | Dual phase |
| Nombre de programmes | 8 programs "SPORT" - 6 programs "HEALTH" |
| Number of program variations (or phases) | 344 |
| Number of adjustable independent outputs | 4 (Sport Pro) - 2 (Multisport) |
| Maximum intensity on a 500 Ohm load/channel | 100 mA / 500 Ω / canal |
| Frequency range | 0,25 to 160 Hz |
| Pulse width range | 70 to 360 μs |
| Power supply 4,8 V- 1300 mAh | Ni-MH rechargeable batteries |
| Mains supply Only use mains power after reticulation by the power unit. | 230 Vac / 50 Hz - 9 Vac 250 mA Class II (EN 60601-1) |
| Unit dimensions and weight | 80 x 160 x 35 mm - 980 gr |
| Automatic stop at end of each program | Yes |
| Activation safety | 100% |
| Temperature for stocking Relative humidity | 0°C to + 45°C 10% to 90% |
| Temperature for use Relative humidity | + 5°C to + 45°C 20% to 65% |
| Classification type BF | |
| Caution ! Read the manual thoroughly | |
| EC standards relative to the medical devices. | 0459 (Directive 93/42/CEE) |
| Rohs : These units are free of materials likely to have a negative impact on the environment. | RoHS (2002/95/EC) |
| Guarantee | 2 years |
BELT :
- Single size (about 150cm long) / (i.e. 2 half-belts 75cm )
- Weight : 150g
Fabric: polyester laminated on foam
Built-in electrodes : carbonated silicon.
GUARANTEE :
The belt, cream, and electrodes are designed for personal use.
For reasons of hygiene, there will be no trade-in nor exchange.
CREAM :
- Massaging, electro conducting
- 200 ml / 6,8 fl OZ

(76/768/ EEC) COSMETIC
reference manufacturer:VC 59/55-148
reference manufacturer:VC 57B/53-148
Hydrophilic and hypoallergenic adhesive electrodes : 89 x 50 mm

(93/42/ EEC)
For oppstartingen (Rd knapp 品

m = 311 ;
KONTRAINDKASJONER
Apparatet SPORT-ELEC* ma化进程
LÄS DETTA INNAN APPARATEN TAS I BRUK
For oppstartingen (Rd knapp 念
(76/768/ EEC) PRODutos COSMETICOS
STAP 3:Programmakeuze
Dziafanie relaksujace