
3000 Series XW3192 - Vacuum Cleaner PHILIPS - Free user manual and instructions
Find the device manual for free 3000 Series XW3192 PHILIPS in PDF.

 FR
FR
 BG
BG
 CS
CS
 DA
DA
 DE
DE
 EL
EL
 EN
EN
 ES
ES
 ET
ET
 FI
FI
 HE
HE
 HU
HU
 IT
IT
 KK
KK
 LT
LT
 LV
LV
 MK
MK
 NL
NL
 NO
NO
 PL
PL
 PT
PT
 RO
RO
 RU
RU
 SK
SK
 SL
SL
 SQ
SQ
 SV
SV
 TR
TR
 UK
UK
| Product type | Canister vacuum cleaner |
| Brand | Philips |
| Model | 3000 Series XW3192 |
| Maximum power | 700 W |
| Vacuum type | With bag |
| Bag capacity | 3 L |
| Operating radius | 8 m |
| Cord length | 6 m |
| Noise level | 78 dB(A) |
| Filtration | Washable HEPA filter |
| Dimensions (L x W x H) | 40 x 28 x 22 cm |
| Weight | 4.5 kg |
| Power supply | Mains, 220-240 V, 50-60 Hz |
| Main function | Vacuuming floors and carpets |
| Included accessories | Combination nozzle, crevice tool, upholstery brush |
| Maintenance | Disposable bag, washable filter every 3 months |
| Safety | Automatic shut-off in case of overheating |
| Spare parts | Bags, filters, belt available |
| Repairability | Repairability index: 8.2/10 |
| Warranty | 2 years |
Frequently Asked Questions - 3000 Series XW3192 PHILIPS
User questions about 3000 Series XW3192 PHILIPS
0 question about this device. Answer the ones you know or ask your own.
Ask a new question about this device
Download the instructions for your Vacuum Cleaner in PDF format for free! Find your manual 3000 Series XW3192 - PHILIPS and take your electronic device back in hand. On this page are published all the documents necessary for the use of your device. 3000 Series XW3192 by PHILIPS.
USER MANUAL 3000 Series XW3192 PHILIPS
English 6
Čeština 23
Dansk 40
Deutsch 57
Eesti 74
Español 91
Français 108
Hrvatski 125
Italiano 142
Latviešu 159
Lietuviškai 176
Magyar 193
Nederlands 210
Norsk 227
Polski 244
Português 261
Română 278
Shqip 295
Slovenščina 312
Slovensky 329
Srpski 346
Suomi 363
Svenska 380
Türkçe 397
Ελληνικά 414
Български 432
Македонски 450
Русский 468
Українська 486
Қазақша 503
הכלה 520
Contents
Introduction 6
General description 6
Before first use 7
Preparing for use 7
Filling the water tank 7
Initial setup and connections 8
Using the appliance with 3-in-1 Nozzle (9cm) 10
Using the appliance with Wide Nozzle (15cm) 11
Maintenance after each cleaning cycle 13
Cleaning the hose 13
Cleaning the dirty water tank 13
Storing the power cable, hose and nozzle 15
Periodic maintenance 16
Cleaning the water tank with clean detergent-added water (every month) 16
Cleaning the dirty water tank connection point (every three months) 17
Cleaning the nozzles (every month or as needed) 18
Replacement 20
User signals and their meanings 20
Troubleshooting 21
Dry cleaning 21
Introduction
Thank you for buying this product! To fully benefit from the support that we offer, register your product at www.philips.com/welcome.
General description
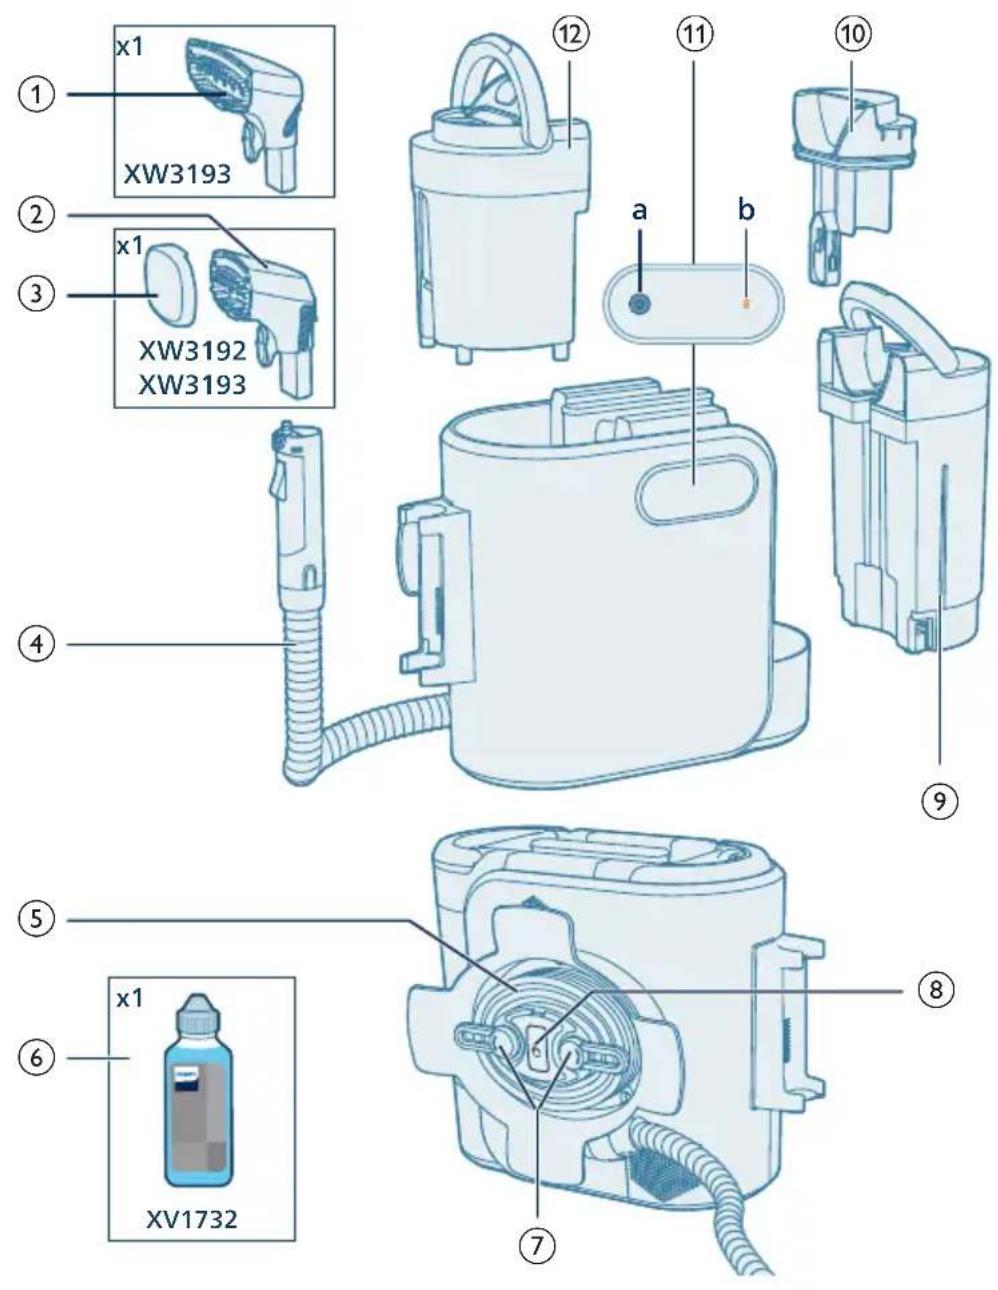
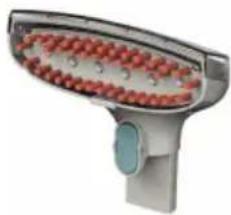
1 Wide nozzle (XW3193 only)
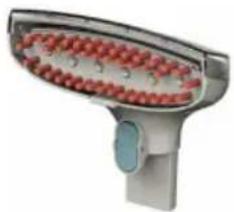
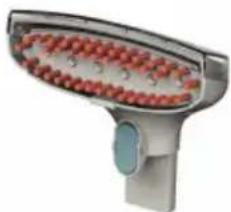
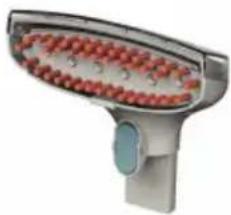
2 3-in-1 nozzle
3 3-in-1 nozzle cap
4 Hose
5 Power cord
6 250mL XV1732 detergent
7 Swivel winding hook
8 Power cable release button
9 Dirty water tank
10 Dirty water tank lid
11 LED display
a on/off button
b DWT full indicator
12 Clean water tank
Before first use

1 Attach nozzle to the hose.
Preparing for use
Filling the water tank
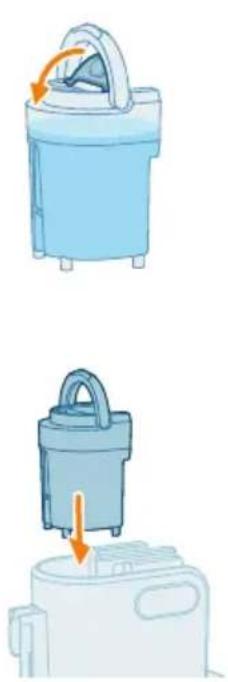
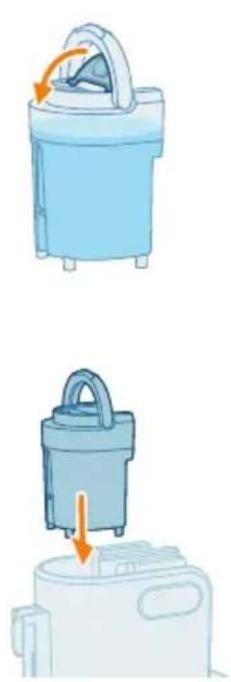
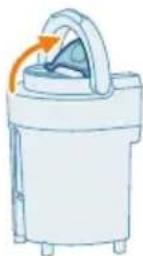
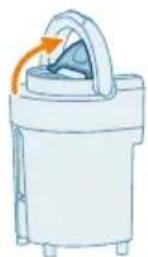
1 Lift the clean water tank handle.

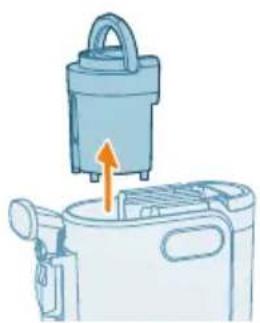
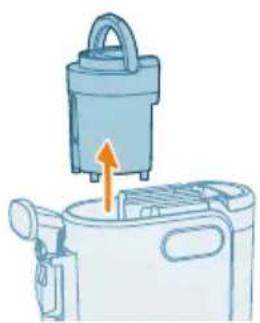
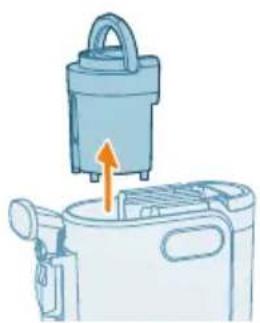
2 Remove the clean water tank by lifting it out of the appliance.

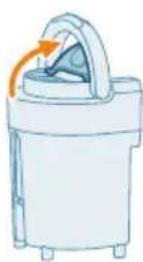
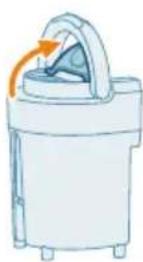
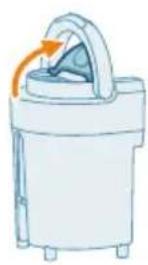
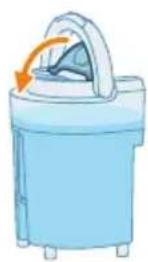
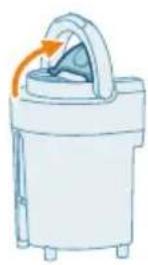
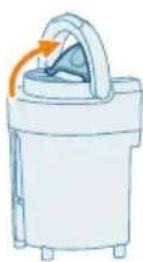
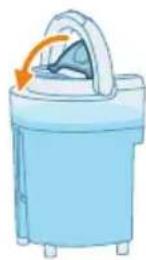
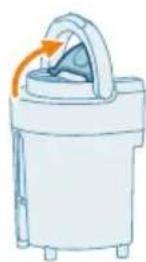
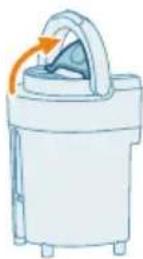
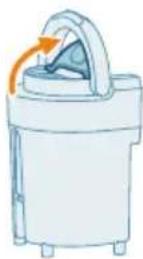
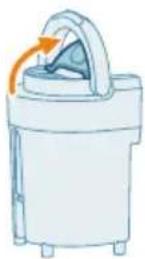
3 Lift the water tank cap to reveal tank opening.
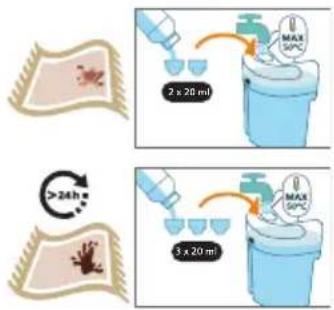
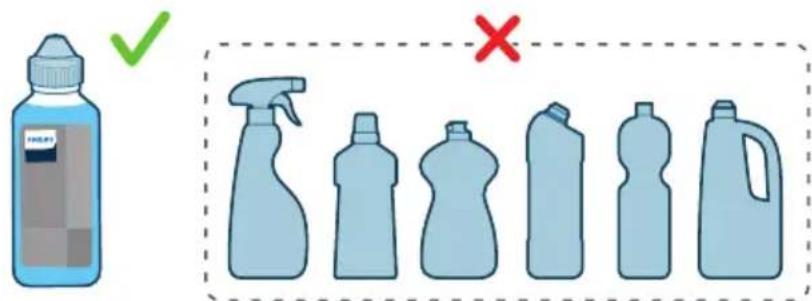
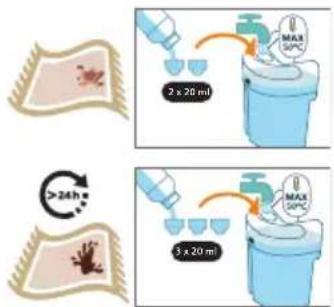
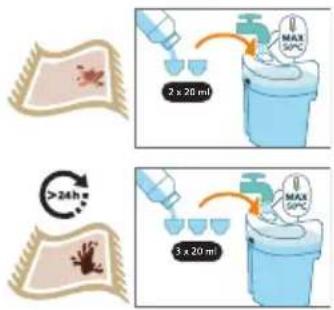
4 Based on your cleaning need, fill tap water to the MAX line. Add detergent formula Philips Stain Remover: 40 ml (2 dosage caps) for fresh stains or 60 ml (3 dosage caps) for dried / colorful stains.
Caution: The tap water that is poured into the clean water tank must not be warmer than 50°C.
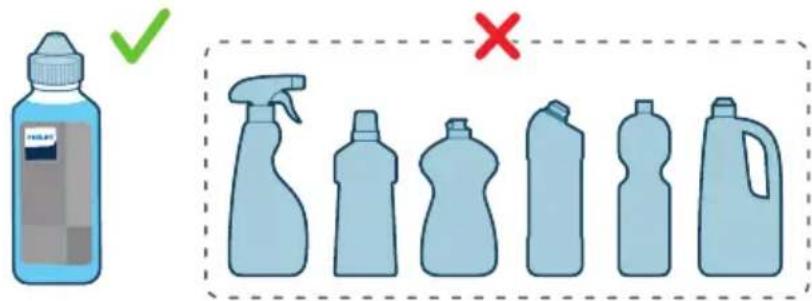
Caution: Philips has only tested this appliance with XV1732 Philips Stain Remover. Other detergents may lead to excessive foaming, which reduces performance and may cause the appliance to malfunction.

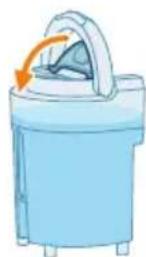
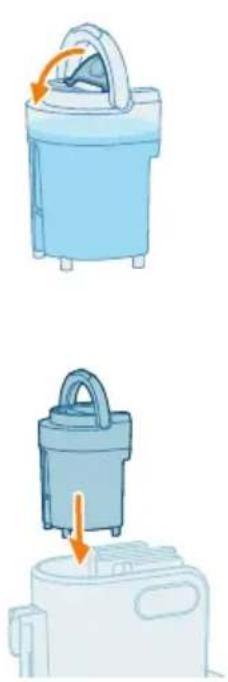
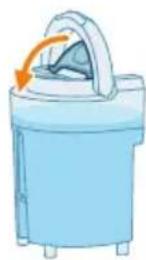
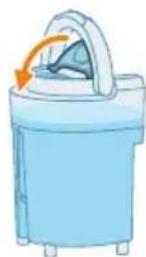
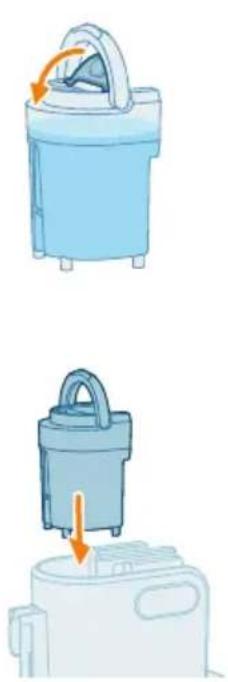
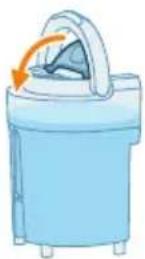
5 Close the cap of the clean water tank.

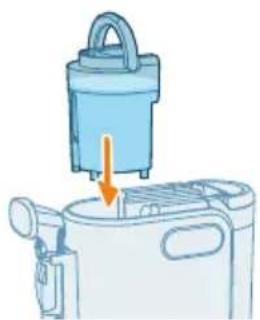
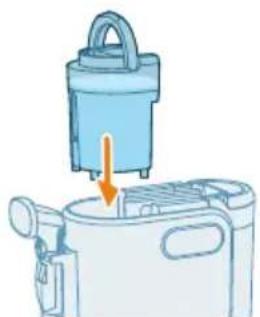
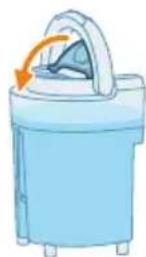
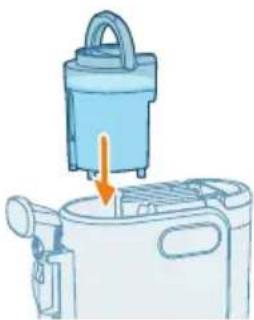
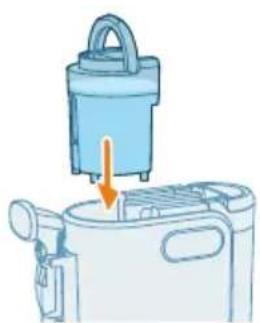
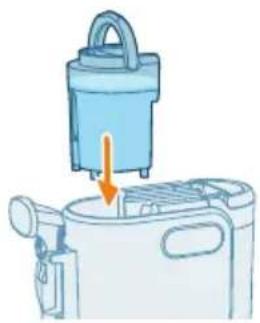
6 Place the clean water tank back in the appliance. Press down firmly on the tank to secure in position.
Initial setup and connections
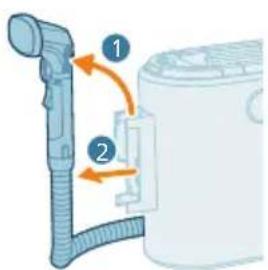
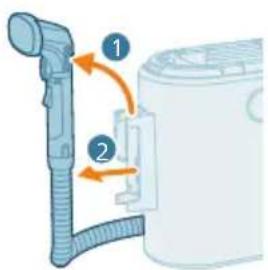
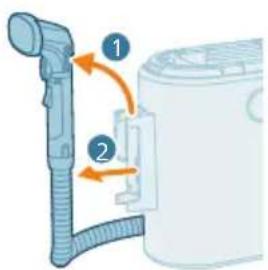
1 Release the hose from the hose grip bracket.
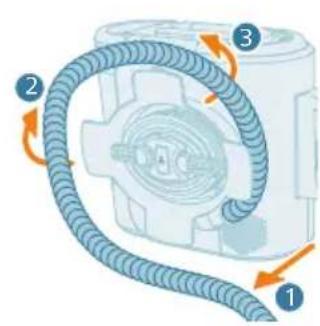
2 Unwrap the hose completely. Insert the desired nozzle on the end of the hose until it clicks into place.
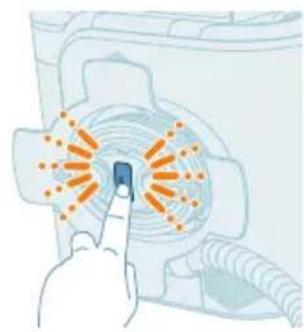
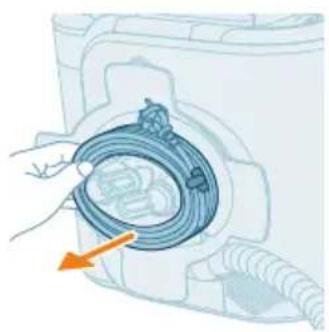
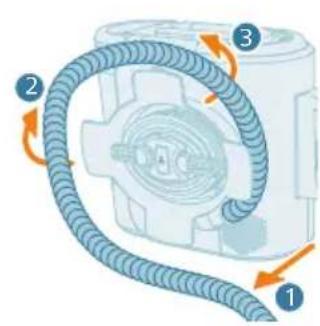
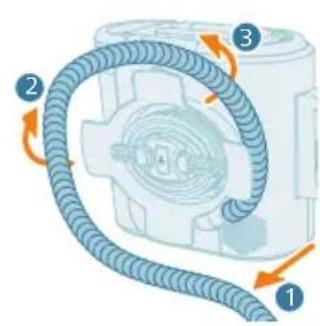
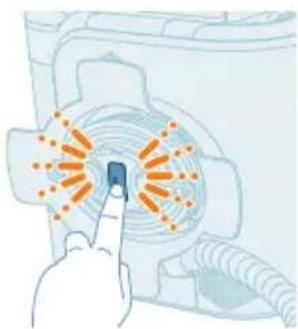
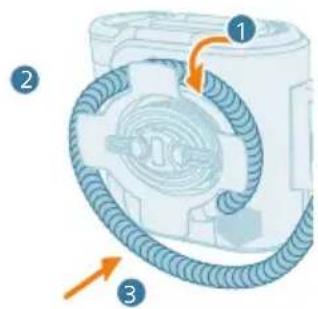
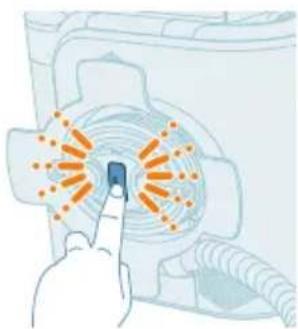
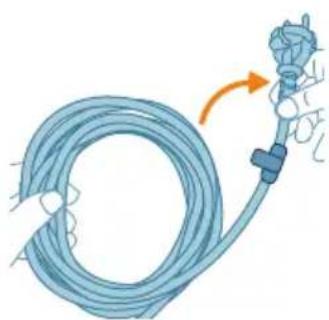
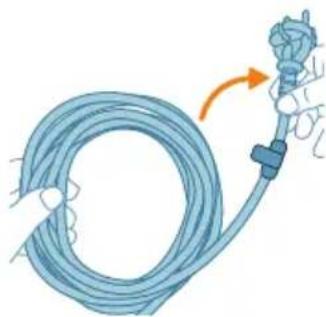
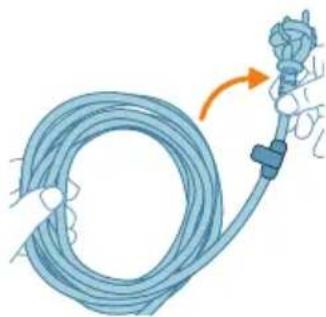
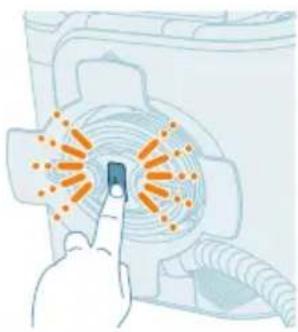
3 Press the button on the cable holder to release the cable. Unwrap the power cable from the holder.
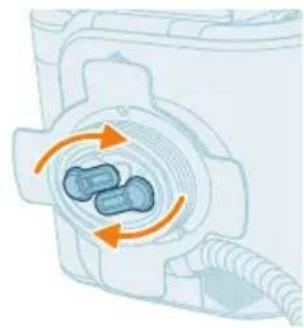
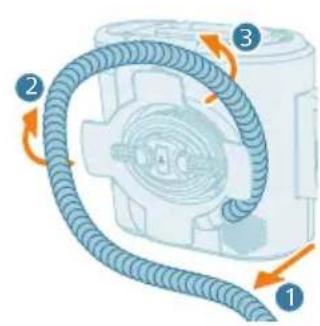
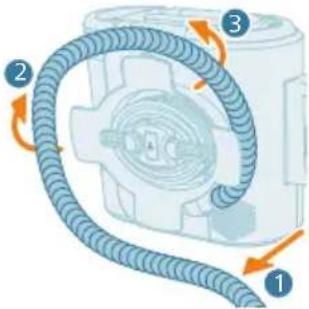
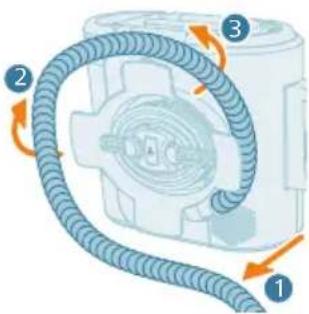
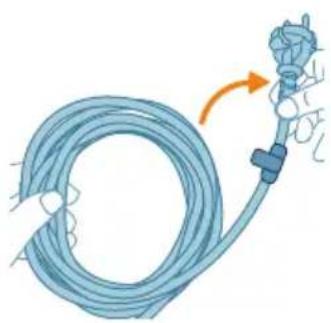
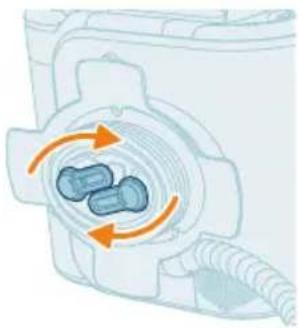
4 Rotate the swivel winding hook in the direction indicated by the arrows.
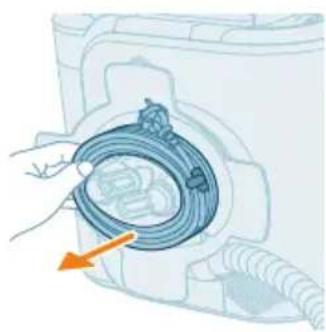
5 Unwrap the power cable from the holder.


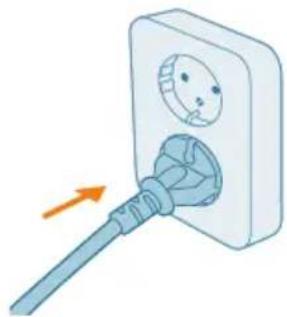
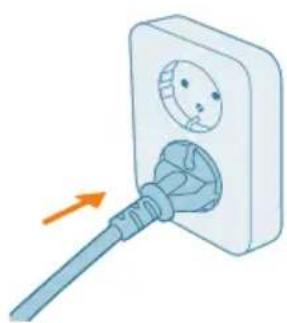
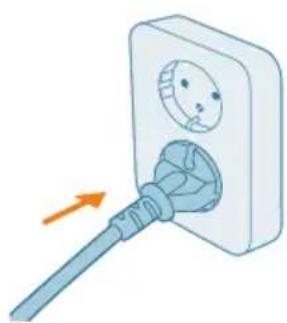
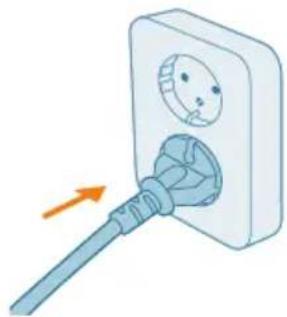
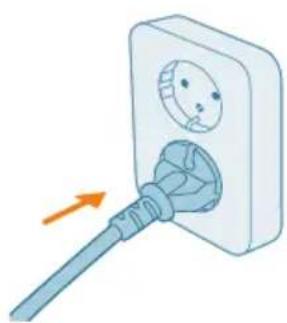
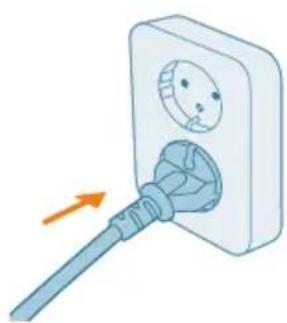
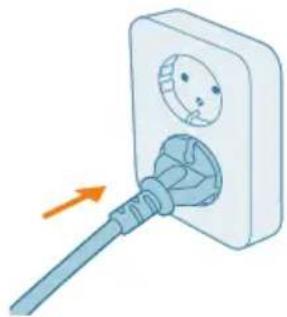
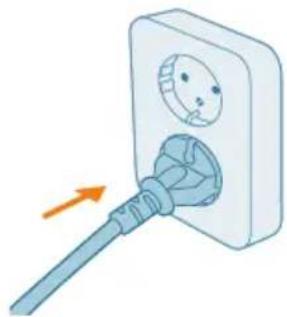
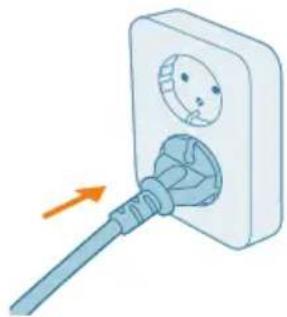
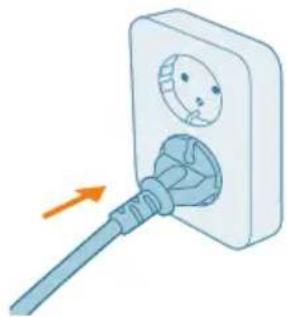
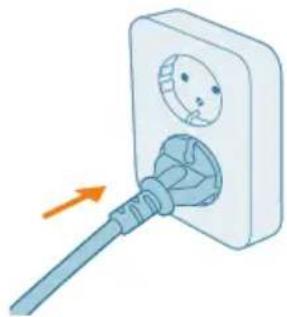
6 Plug the unit in.
Using the appliance with 3-in-1 Nozzle (9cm)

The 3-in-1 nozzle removes stains from a wide variety of soft surfaces.
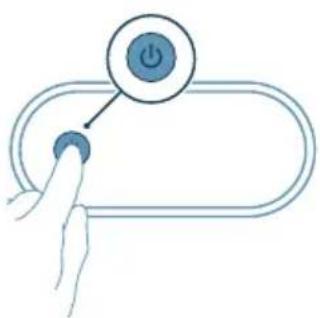
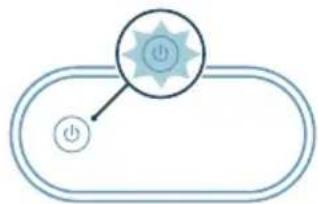
1 Turn the appliance on by pressing power icon on the LED screen.
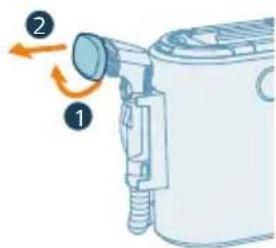
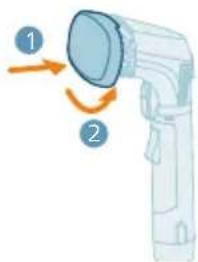
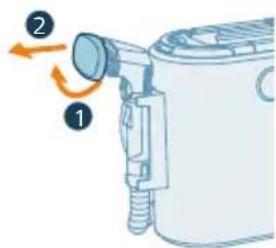
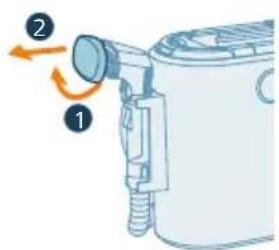
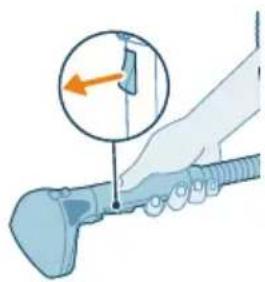
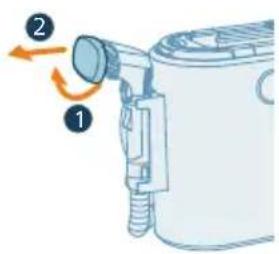
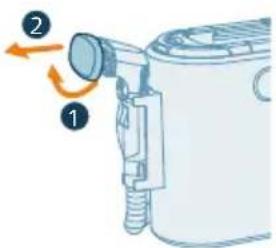
2 Remove the cap of the 3-in-1 Nozzle by pulling the bottom side (1) forward (2).

3 Tip: Test on an invisible spot first to check how the detergent reacts with the surface.
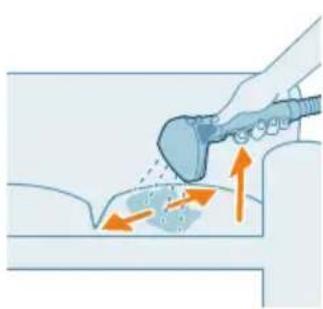
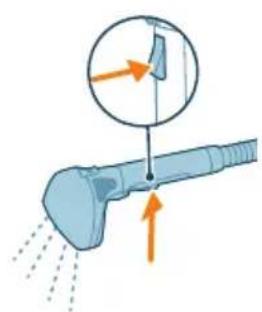
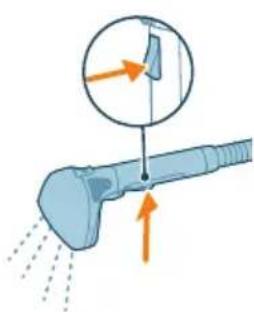
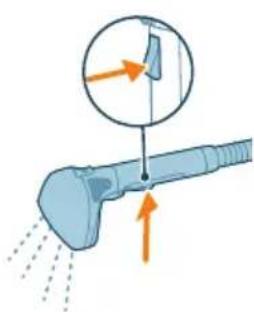
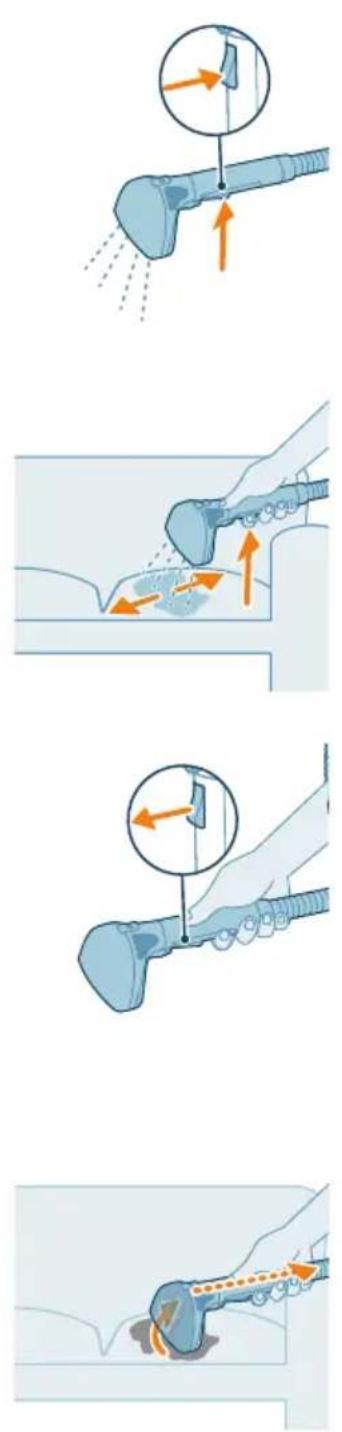
4 Hold the nozzle approximately 5 cm above the surface you want to clean. Press the spray button to apply cleaning solution to the surface.
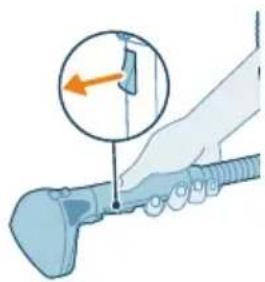
5 Release the spray button to stop the water flow.
Tip: Cleaning effectiveness on heavily stained or highly soiled areas will be enhanced if you wait 3-5 minutes before you start cleaning (step 6).

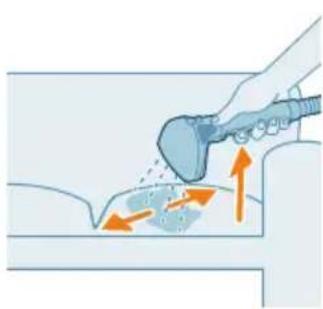
6 Gently scrub the area to be cleaned. Apply downward pressure the nozzle and pull it toward you. The suction will remove the dirt and detergent-added water. For extra thorough cleaning repeat cleaning procedure.
Using the appliance with Wide Nozzle (15cm)
The wide nozzle has the same functionality as the 3-in-1 Nozzle, but can be used for larger areas.
1 Turn the appliance on by pressing power icon on the LED screen.
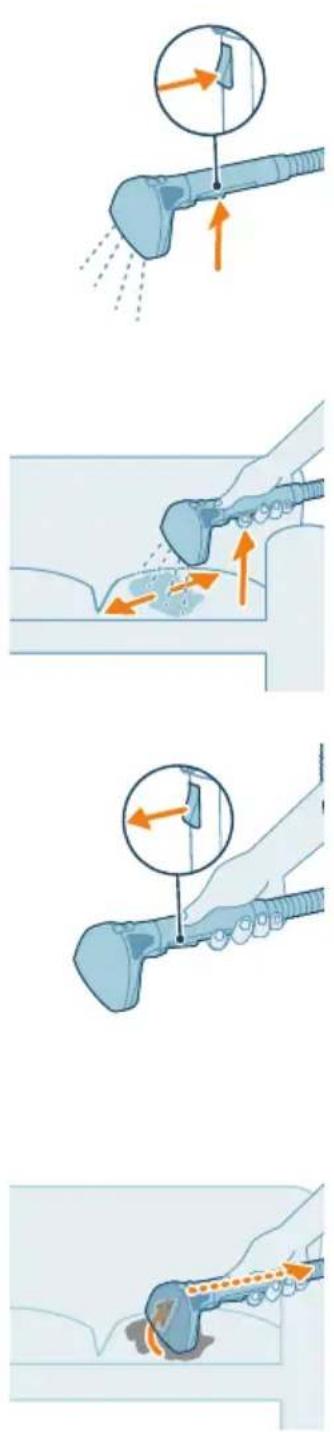
2 Tip: Test on an invisible spot first to check how the detergent reacts with the surface.
3 Hold the nozzle approximately 5 cm above the surface you want to clean. Press the spray button to apply cleaning solution to the surface.
4 Release the spray button to stop the water flow.
Tip: Cleaning effectiveness on heavily stained or highly soiled areas will be enhanced if you wait 3-5 minutes before you start cleaning (step 5)
5 Gently scrub the area to be cleaned. Apply downward pressure the nozzle and pull it toward you. The suction will remove the dirt and detergent-added water. For extra thorough cleaning repeat cleaning procedure.
Maintenance after each cleaning cycle
Cleaning the hose
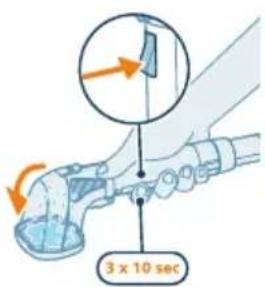
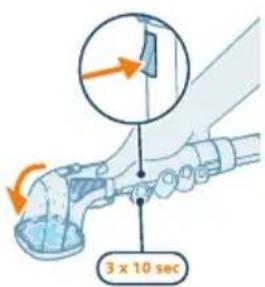
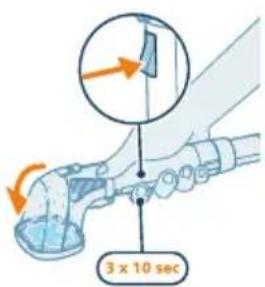
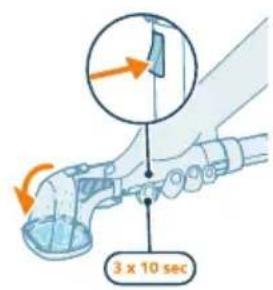
1 To clean the hose, connect the 3-in-1 Nozzle to the hose and close the cap.
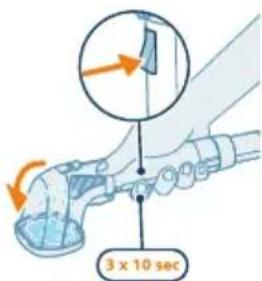
2 Press the button on the brush 3 times for 10 seconds to run water through the hose and the nozzle.
Cleaning the dirty water tank
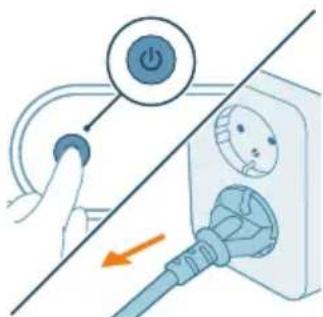
Turn off the appliance by pressing power icon on the LED screen. Before turning off appliance proceeds with Delayed Shut Off function to lift water from the hose and prevent leakage. Unplug power cable from electrical socket.
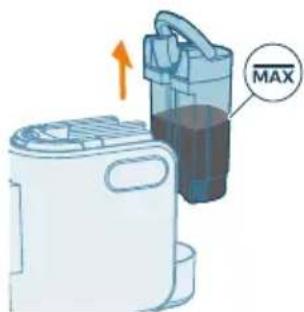
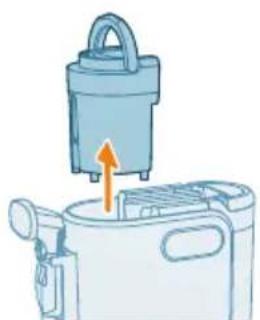
1 Remove the dirty water tank by lifting it out of the appliance.

2 Remove the lid from the dirty water tank by lifting it out of the tank.
3 Pour out any remaining water from the dirty water tank.
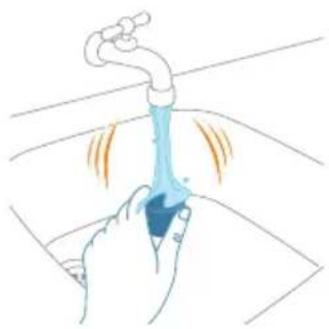
4 Rinse the dirty water tank and its lid under the tap.
5 Close the lid of the dirty water tank.
6 Place the dirty water tank back in the appliance.
Storing the power cable, hose and nozzle
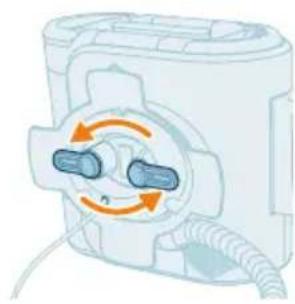
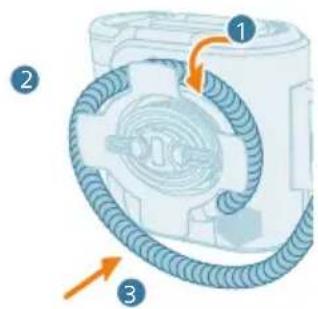
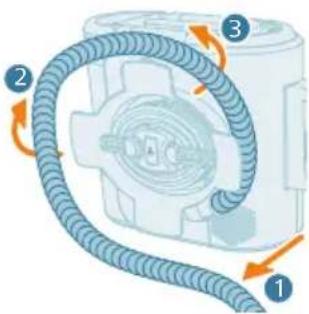
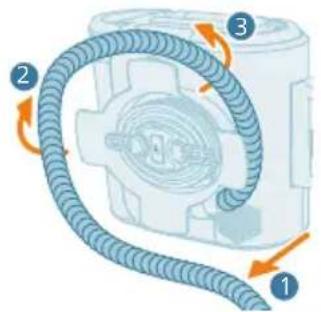
1 Rotate the swivel winding hook in the direction indicated by the arrows.
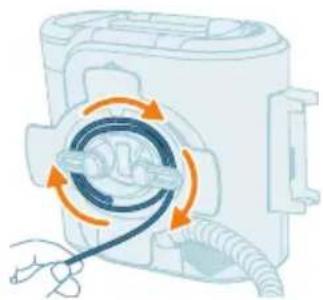
2 Wrap power cable around cable holder on back of appliance.

3 Press the cable grip bracket to fix cable on the holder.
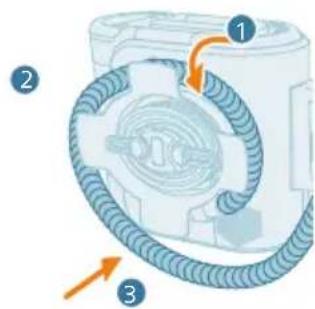
4 Wrap hose around the hose grip bracket on back of appliance.
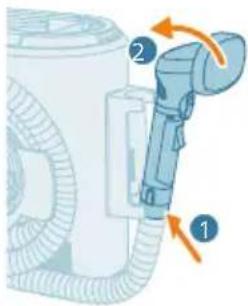
5 Put handle with 3-in-1 nozzle in the holder on the side of appliance.
Periodic maintenance
Cleaning the water tank with clean detergent-added water (every month)
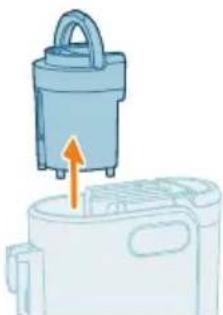
1 Remove the clean water tank by lifting it out of the appliance.
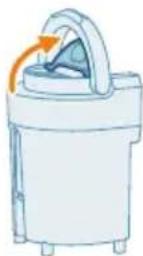
2 Lift the water tank cap to reveal tank opening.
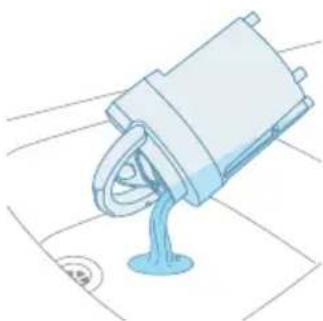
3 Pour out any remaining water from the clean water tank.
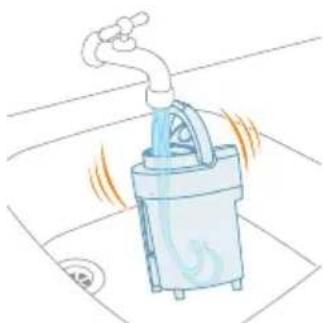
4 Rinse water tank.
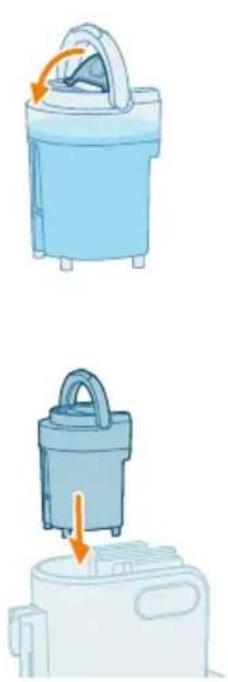
5 Close the cap of the clean water tank.
6 Place the clean water tank back in the appliance. Press down firmly on tank to secure in position.
Cleaning the dirty water tank connection point (every three months)

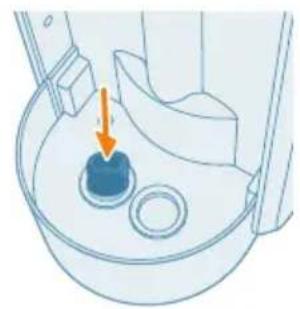
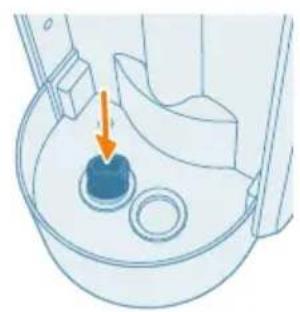
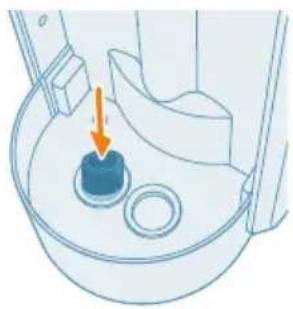
1 Remove the dirty water tank connection point.

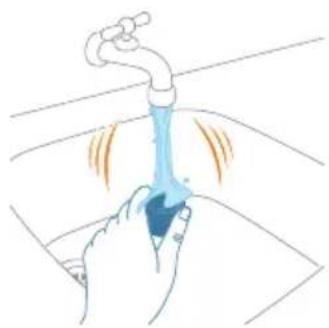
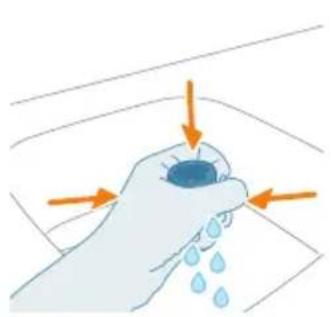
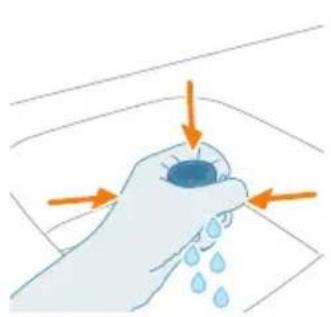
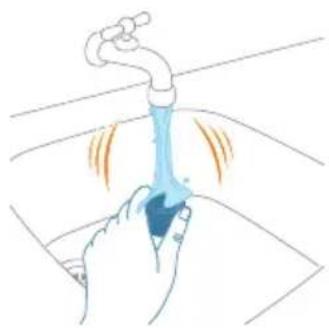
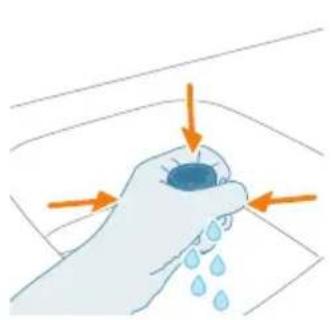
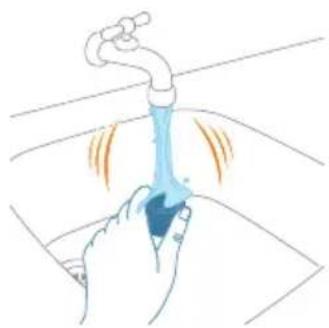
2 Rinse the part under a running tap.

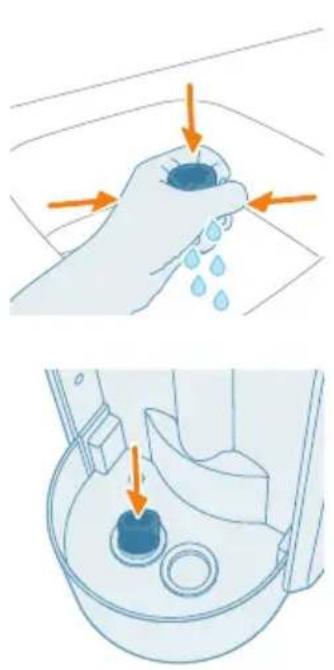
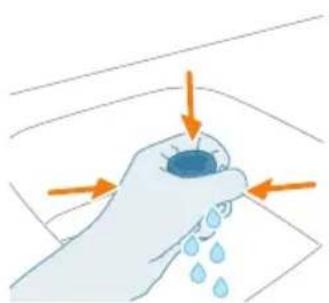
3 Squeeze it till clean water comes out.
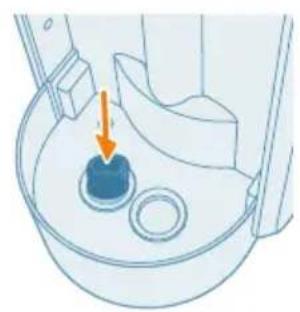
4 Place back the dirty water tank connection points.
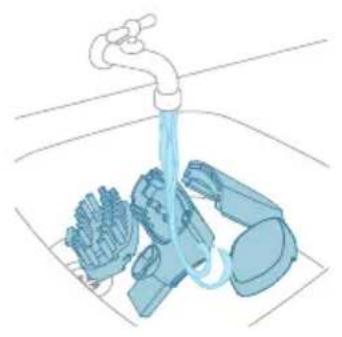
Cleaning the nozzles (every month or as needed)
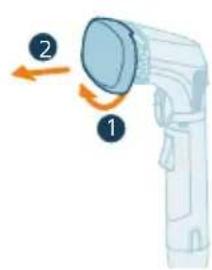
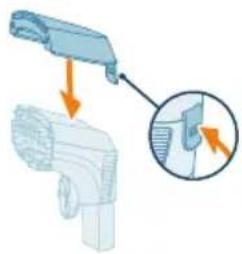
1 Remove the cap of the 3-in-1 Nozzle by pulling the bottom side (1) forward (2).
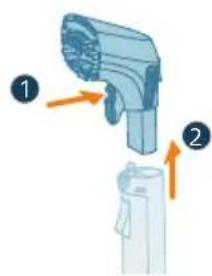
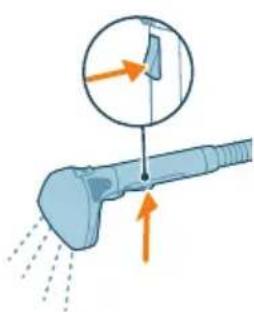
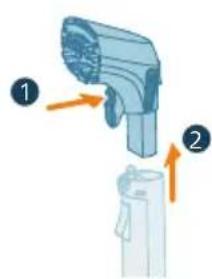
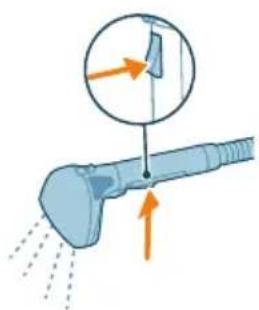
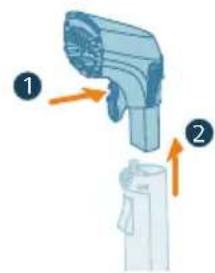
2 Remove nozzle from the hose by pressing the button (1) and pulling up the nozzle (2).
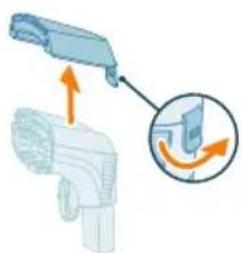
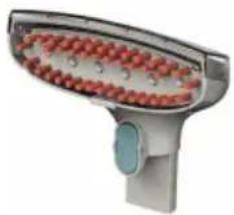
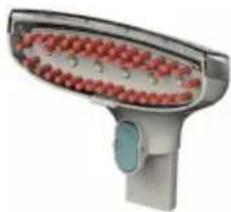
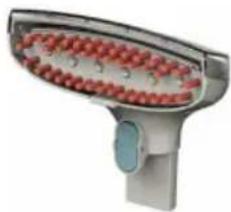
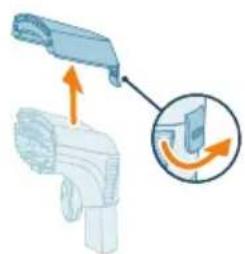
3 Remove the top part of nozzle by pulling the tab.

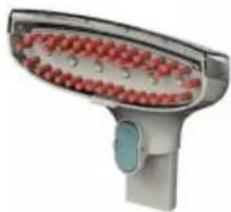
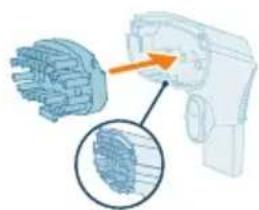
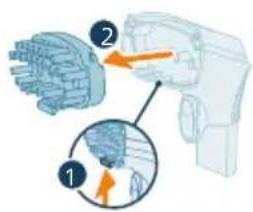
4 Remove the brush of nozzle by pulling the tab.
5 Rinse the parts under a running tap.
6 Place back the brush to the nozzle.
7 Place back the top part of nozzle by clicking it.
8 Attach the cap of the 3-in-1 Nozzle.
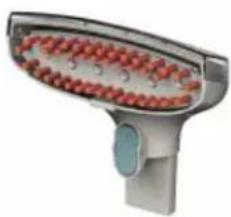
9 For the wide nozzle, follow step 2-7.
Replacement
To buy accessories or spare parts, visit www.philips.com/parts-and-accessories or go to your Philips dealer. You can also contact the Philips Consumer Care Center in your country.
Replacement parts and type numbers:
3-in-1 Nozzle brush *CRP1056/01*

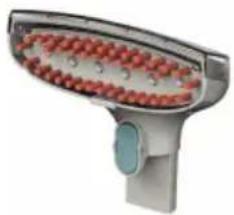
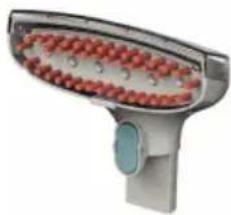
Wide nozzle brush *CRP1056/02*

User signals and their meanings
Signal Cause Solution
![graph TD A["Start"] --> B["Zoom Icon"] B --> C["Next Step"]](/content/2026/06/1387360/images/57f446b49561c301516b30335595eb9e593798388af52002b491f95d333fc7ba.jpg)
Dirty water tank is full Empty dirty water tank
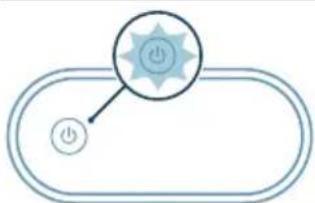
After pressing the On/off button to turn off the appliance the Delayed Shut Off function is activated
This is normal behavior of the appliance. To clean the hose, remaining water in the hose will be moved to the dirty water tank for 3 seconds. After this, the appliance will turn off
Troubleshooting
This chapter summarizes the most common problems you could encounter with the appliance. If you are unable to solve the problem with the information below, visit www.philips.com/support for a list of frequently asked questions or contact the Consumer Care Center in your country.
Dry cleaning
Problem Possible cause Solution
| Reduced spray or no spray | Spray nozzle is clogged Clean spray nozzle holes using an unfolded paper clip | |
| Clean water tank is empty Check and fill the tank | ||
| Stain Cleaner won’t pick up cleaning solution | Poor cleaning nozzle position Reposition cleaning nozzle on surface, follow recommended cleaning procedures | |
| Dirty water tank is full Empty the dirty water tank | ||
| Nozzle brush is worn Replace brush inside cleaning nozzle | ||
| Remaining dirt in hose Clean the hose (see chapter 1 “Maintenance after each cleaning cycle”) to remove the blockage | ||
| Incorrect detergent Only use Philips Stain Cleaner 3000 Series | ||
| The Stain Cleaner cannot be switched on | The mains plug is not properly connected to socket outlet | Connect the mains plug to socket outlet |
| The dirty water tank is full Empty the dirty water tank | ||
| The dirty water tank is not placed back properly | Place the dirty water tank back in cleaner properly | |
| The suction is weak / The surface being cleaned is too wet | The brush head is clogged Remove the brush head from handgrip and clean brush head | |
| Too much detergent water is dispensed on the cleaning surface | Dispense less detergent water while brush cleaning the surface | |
| The hose is clogged Clean the hose (see chapter 1 “Maintenance after each cleaning cycle”) to remove the blockage | ||
| No detergent water is dispensed from the brush | The dispense button is not kept pressed | Keep pressing dispensing button on the handgrip |
| The clean water tank is empty Fill up clean water tank | ||
Stain is not removed
Not enough detergent used Cover the complete stain with detergent. Dilute the detergent before applying. Let it soak for two minutes, then scrub again
Not enough strokes performed Make a few more strokes over the stain until extensive flow of liquid stops going through the nozzle
Obsah
Úvod 23
Všeobecný popis 23


Široká hubice s kartáčem *CRP1056/02*
5 Luk dækslet til tanken til rent vand.

6 Tilslut enheden.
5 Slip spray-knappen for at stoppe vandudstrømningen.
4 Skyl vandtanken.
5 Luk dækslet til tanken til rent vand.
1 Fjern tilslutningspunktet til tanken til snavset vand.
2 Skyl delen under rindende vand.

Børste til bred dyse *CRP1056/02*

Breite Bürstendüse *CRP1056/02*

5 Sulgege puhta vee paagi kork.
6 Asetage puhta vee paak tagasi seadmesse. Vajutage paaki tugevalt alla, et paak paigale kinnituks.
3-sisse-1-otsak eemaldab plekid erinevatelt pehmetelt pindadelt.
1 Lülitage seade sisse, vajutades LED-ekraanil toiteikooni.
2 Eemaldage3-sisse-1-otsaku kork, tömmates alumist osa (1) ettepoole (2).
4 Loputage veepaak.
5 Sulgege puhta vee paagi kork.
2 Loputage osa voolava kraanivee all.

4 Eemaldage otsaku hari, tömmates sakist.
Laia otsaku hari *CRP1056/02*

1 Embout large (XW3193 uniquement)
2 Embout 3 en 1
3 Capuchon de l'embout 3 en 1
4 Flexible
Installation et raccordements
2 Uklonite spremnik za čistu vodu tako da ga podignete iz uređaja.
3 Podignite poklopac spremnika za vodu da biste otkrili otvor spremnika.

4 Ovisno o vašim potrebama čišćenja, napunite ga vodom iz slavine do linije MAX. Dodajte sredstvo za otklanjanje mrlja Philips: 40 ml (2 čepa za doziranje) za svježe mrlje ili 60 ml (3 čepa za doziranje) za osušene/šarene mrlje.
Oprez: voda iz slavine koja se ulijeva u spremnik za čistu vodu ne smije biti toplija od 50 °C.
Oprez: tvrtka Philips ispitala je rad uređaja samo sa sredstvom za otklanjanje mrlja Philips XV1732. Ostali deterdženti mogu uzrokovati prekomjerno pjenjenje, što oslabljuje performanse i može prouzročiti kvar uređaja.
5 Zatvorite poklopac spremnika za čistu vodu.

6 Vratite spremnik za čistu vodu u uređaj. Čvrsto pritisnite spremnik da biste ga učvrstili na mjesto.
Početno postavljanje i veze
3 Pritisnite gumb na držaču kabela da biste otpustili kabel. Odmotajte kabel za napajanje iz držača.
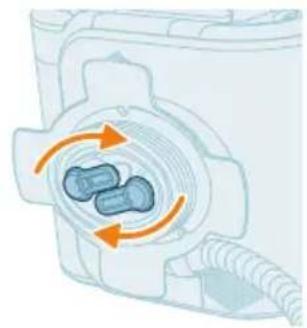
4 Zakrenite okretnu kuku za namatanje u smjeru koji je označen strelicama.
5 Odmotajte kabel za napajanje iz držača.


Nastavak 3-u-1 uklanja mrlje s raznih mekih površina.
1 Uključite uredaj pritiskom ikone napajanja na LED zaslonu.
2 Skinite poklopac nastavka 3-u-1 tako da povučete donju stranu (1) prema naprijed (2).
5 Otpustite gumb za raspršivanje da biste zaustavili protok vode.
1 Uklonite spremnik za prljavu vodu tako da ga podignete iz uređaja.
![graph TD A["Top: Top airbag with liquid"] --> B["Flow: Inlet or outlet"] B --> C["Bottom: Airbag with pipe and valve"] C --> D["Bottom: Airbag with inlet and outlet"] D --> E["Bottom: Airbag with inlet and outlet"]](/content/2026/06/1387360/images/57198ec98768aca95b9c8b9206e299280feba4b959190e7a5886fc40e35b2368.jpg)
2 Skinite poklopac sa spremnika za prljavu vodu tako da ga podignete iz spremnika.
3 Izlijte svu preostalu vodu iz spremnika za prljavu vodu.
4 Isperite spremnik za prljavu vodu i pripadajući poklopac pod mlazom vode.
4 Isperite spremnik za vodu.

5 Zatvorite poklopac spremnika za čistu vodu.
6 Vratite spremnik za čistu vodu u uredaj. Čvrsto pritisnite spremnik da biste ga učvrstili na mjesto.
1 Uklonite priključni element spremnika za prljavu vodu.
2 Isperite dio pod mlazom vode.
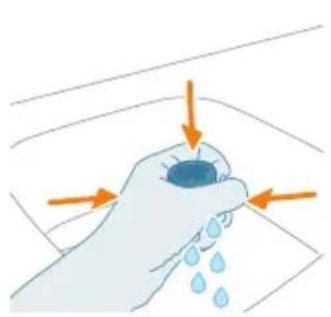
3 Stišćite ga dok ne izade čista voda.
1 Skinite poklopac nastavka 3-u-1 tako da povučete donju stranu (1) prema naprijed (2).

2 Uklonite nastavak s crijeva pritiskom gumba (1) i povlačenjem nastavka (2).
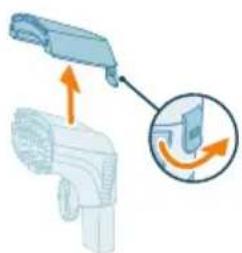
3 Uklonite gornji dio nastavka povlačenjem jezička.

9 Za široki nastavak slijedite korake 2 – 7.
Zamjena dijelova
Kako biste kupili dodatke ili rezervne dijelove, posjetite
www.shop.philips.com/parts-and-accessories ili se obratite distributeru tvrtke
Četka širokog nastavka *CRP1056/02*

Spazzola con bocchetta larga *CRP1056/02*
2 3 reizes uz 10 sekundēm nospiediet pogu uz sukas, lai ūdens izplūstu cauri šljutenei un uzgalim.
4 Izskalojiet üdens tvertni.
2 Noskalojiet dalu ar tekošu üdeni.
2 Nonemiet uzgali no šlūtenes, nospiežot pogu (1) un pavelkot uzgali uz augšu (2).

4 Nonemiet uzgala suku, pavelkot aiz izvirzijuma.
9 lzmantojot plato uzgali, veiciet veiciet 2.-7. darbību.
Nomaina
3 Pakelkite vandens bakelio dangtelj, kad pasimatytu bakelio anga.

5 Uždarykite vandens bakelio dangtelj.
4 lšskalaukite vandens bakelj.

5 Uždarykite vandens bakelio dangtelj.
1 Nuimkite nešvaraus vandens bako prijungimo dalj.
4 Vél uždėkite nešvaraus vandens bakelio prijungimo dalis.
Plataus antgalio šepetys *CRP1056/02*


12 Schoonwaterreservoir
1 Maak de slang los van de ophangbeugel.
5 Wikkel de stroomkabel los van de houder.


6 Sett rentvannsbeholderen tilbake i apparatet. Trykk beholderen bestemt ned til den sitter godt på plass.

3 Trykk på kabelbraketten for å feste kabelen i holderen.
4 Skyll vannbeholderen.

1 Fjern tilkoblingspunktet for spillvannsbeholderen.
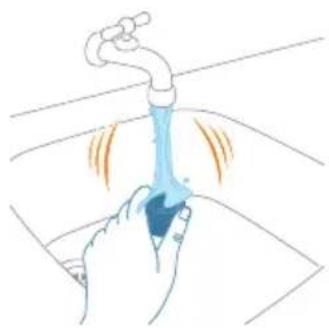
2 Skyll delen under springen.
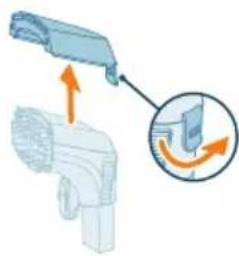
5 Skyll delene under springen.

Spillvannsbeholderen er full Tøm spillvannsbeholderen


6 Ligue a unidade.


9 Para o bocal largo, siga os passos 2 a 7.
Substituição
Escova do bocal largo *CRP1056/02*

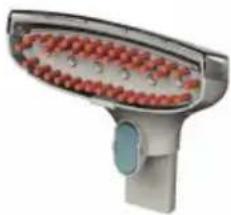
Perie cap de curățare lat *CRP1056/02*

1 Lërojeni tubin nga kllapa e kapjes së tubit.
4 Shpëlajeni rezervuarin e ujit.
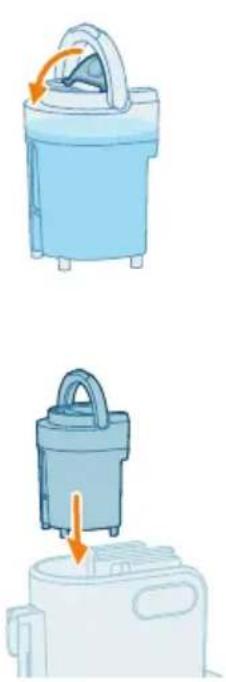
2 Posodo za čisto vodo odstranite tako, da jo dvignete iz aparata.
5 Na posodi za čisto vodo zaprite pokrov.

6 Posodo za čisto vodo vstavite nazaj v aparat. Močno pritisnite na posodo, da se zaskoči v položaj.
2 Popolnoma odvijte cev. Želeni nastavek vstavite v konec cevi in ga potisnite, da se zaskoči na mesto.
3 Pritisnite gumb na držalu kabla, da kabel sprostite. Napajalni kabel odvijte z držala.

5 Napajalni kabel odvijte z držala.


6 Priključite enoto.
Uporaba aparata z nastavkom 3 v 1 (9 cm)

2 Odstranite pokrovček nastavka 3 v 1 tako, da povlečete spodnjo stran (1) naprej (2).
3 Nasvet: Najprej preizkusite na nevidnem mestu, da vidite, kako čistilno sredstvo reagira s površino.
4 Nastavek držite približno 5 cm nad površino, ki jo želite očistiti. Pritisnite gumb za pršenje, da na površino nanesete čistilno raztopino.
5 Spustite gumb za pršenje, da ustavite pretok vode.
1 Ko želite očistiti cev, priključite nastavek 3 v 1 na cev in zaprite pokrovček.
1 Posodo za umazano vodo odstranite tako, da jo dvignete iz aparata.

2 Pokrov posode za umazano vodo odstranite tako, da ga dvignete s posode.
3 Iz posode za umazano vodo izlijte morebitno preostalo vodo.
4 Prazno posodo za umazano vodo in pokrov pomijte pod vodo iz pipe.
2 Napajalni kabel ovijte okoli držala kabla na hrbtni strani aparata.

3 Pritisnite nosilec za napajalni kabel, da kabel trdno namestite na držalo.
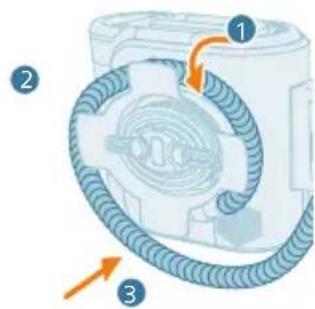
4 Ovijte cev okoli nosilca za cev na hrbtni strani aparata.

5 Ročaj z nastavkom 3 v 1 vstavite v držalo na strani aparata.
Redno vzdrževanje
1 Posodo za čisto vodo odstranite tako, da jo dvignete iz aparata.

3 Iz posode za čisto vodo izlijte morebitno preostalo vodo.

4 Izperite posodo za vodo.
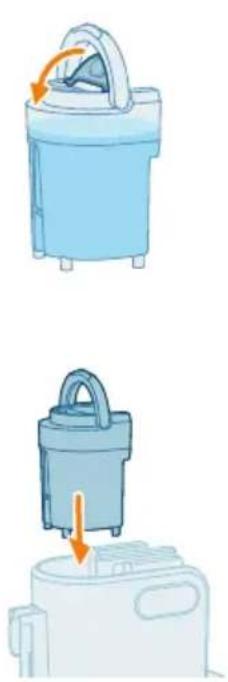
5 Na posodi za čisto vodo zaprite pokrov.
6 Posodo za čisto vodo vstavite nazaj v aparat. Močno pritisnite na posodo, da se zaskoči v položaj.
1 Odstranite priključni element posode za umazano vodo.
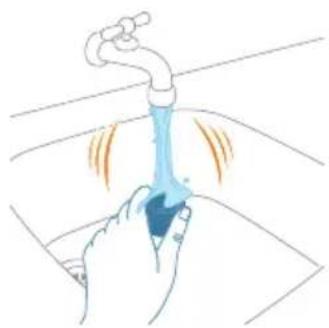
2 Izperite ga pod tekočo vodo iz pipe.
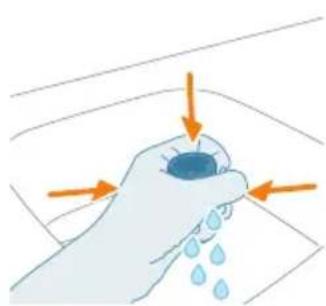
3 Stiskajte ga, dokler ne priteče čista voda.

4 Priključna elementa posode za umazano vodo vstavite nazaj.
1 Odstranite pokrovček nastavka 3 v 1 tako, da povlečete spodnjo stran (1) naprej (2).

2 Nastavek odstranite s cevi tako, da pritisnete gumb (1) in nastavek povlečete navzgor (2).

3 Zgornji del nastavka odstranite tako, da potegnete jeziček.

4 Ščetko nastavka odstranite tako, da potegnete jeziček.
Signali za uporabnika in njihov pomen
2 Zo zariadenia vyberte nádobu na čistú vodu.
5 Zatvorte uzáver nádoby na čistú vodu.
6 Vložte nádobu na čistú vodu spät do zariadenia. Na nádobu silno zatlačte, aby poriadne dosadla na miesto.
2 Hadicu úplne odmotajte. Vložte požadovanú hubicu na koniec hadice, kým nezacvakne na miesto.
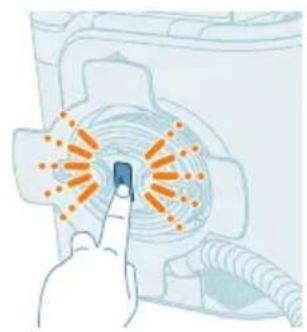

6 Zapojte jednotku do siete.
Používanie zariadenia s hubicou 3 v 1 (9 cm)
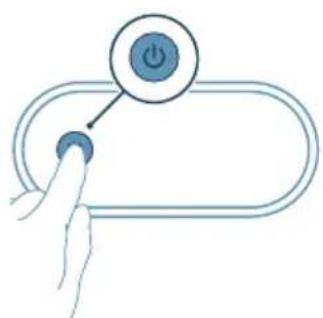
1 Na vyčistenie hadice pripojte hubicu 3 v 1 k hadici a zatvorte uzáver.
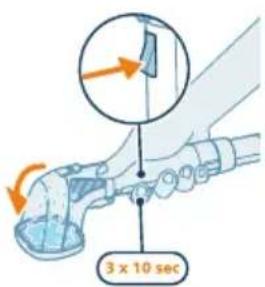
2 Stlačte tlačidlo na kefe 3-krát na 10 sekúnd, aby voda pretekala hadicou a hubicou.
2 Omotajte napájací kábel okolo držiaka kábla na zadnej strane zariadenia.
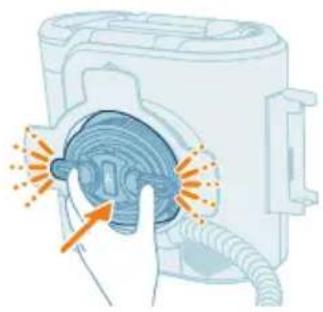
3 Stlačte držiak rukoväti kábla a pripevnite tak kábel k držiaku.
1 Zo zariadenia vyberte nádobu na čistú vodu.

Kefa širokej hubice *CRP1056/02*
3 Podignite poklopac rezervoara za vodu da biste otkrili otvor rezervoara.
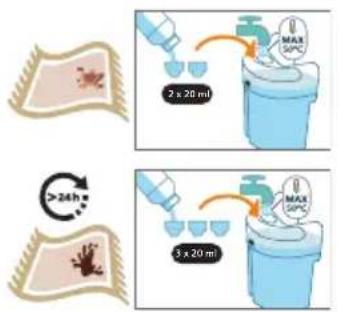
4 Napunite vodu iz slavine do linije MAX, prema vašoj potrebi čišćenja. Dodajte deterdžent (Philips sredstvo za uklanjanje mrlja): 40 ml (2 čepa za doziranje) za sveže mrlje ili 60 ml (3 čepa za doziranje) za osušene/šarene mrlje.
Oprez: Voda iz slavine koja se uliva u rezervoar za čistu vodu ne sme biti toplija od 50 °C.
Oprez: Kompanija Philips je testirala rad uređaja samo sa sredstvom za uklanjanje mrlja Philips XV1732. Drugi deterdženti mogu da stvore previše pene, što smanjuje performanse i može dovesti do kvara aparata.
5 Zatvorite poklopac rezervoara za čistu vodu.

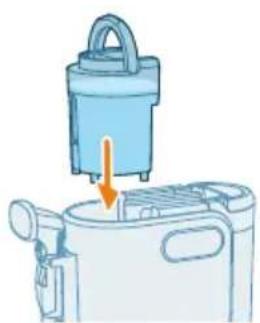
6 Vratite rezervoar za čistu vodu u uređaj. Čvrsto pritisnite rezervoar da biste ga fiksirali na mestu.
Početno podešavanje i priključci
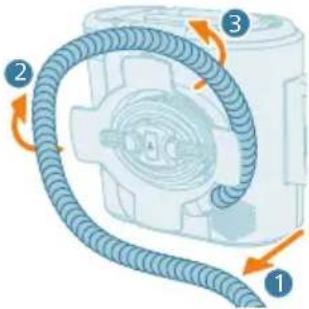
2 Potpuno odmotajte crevo. Umetnite željenu mlaznicu na kraj creva dok ne dode na mesto uz zvuk škljocanja.
3 Pritisnite dugme na držaču kabla da biste oslobodili kabl. Odmotajte kabl za napajanje sa držača.

4 Rotirajte kuku za namotavanje u smeru označenom strelicama.

5 Odmotajte kabl za napajanje sa držača.
2 Skinite poklopac mlaznice 3 u 1 povlačenjem donje strane (1) unapred (2).
3 Savet: Prvo isprobajte deterdžent na nekom mestu koje se ne vidi, kako biste videli kako deluje na površinu.
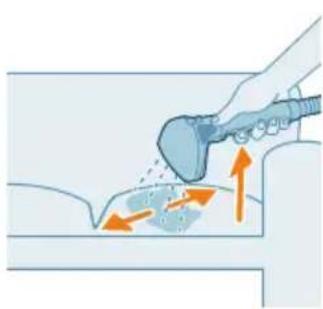
4 Držite mlaznicu oko 5 cm iznad površine koju želite da očistite. Pritisnite dugme za prskanje da biste naneli rastvor za čišćenje na površinu.

5 Otpustite dugme za prskanje da biste zaustavili protok vode.
1 Rotirajte kuku za namotavanje u smeru označenom strelicama.
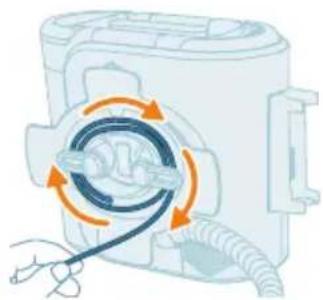
2 Obmotajte kabl za napajanje oko držača kabla na zadnjoj strani uredaja.
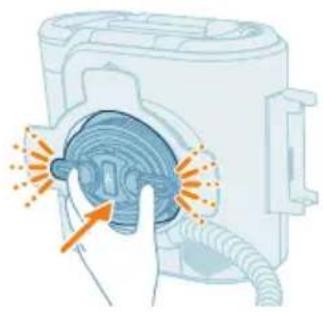
3 Pritisnite nosač kabla da biste fiksirali kabl na držaču.
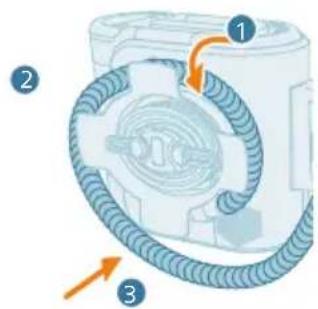
4 Obmotajte crevo oko nosača creva na zadnjoj strani uredaja.
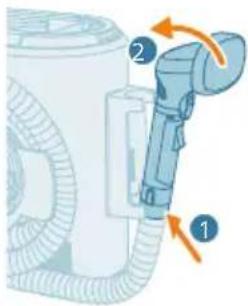
5 Stavite ručku sa mlaznicom 3 u 1 u držač na bočnoj strani uređaja.
Povremeno održavanje
3 Prospite svu preostalu vodu iz rezervoara za čistu vodu.
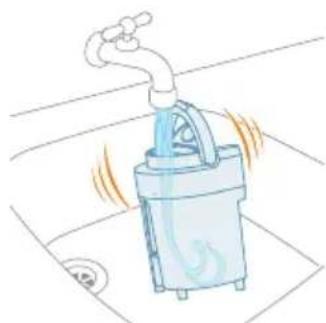
1 Uklonite priključnu tačku rezervoara za prljavu vodu.
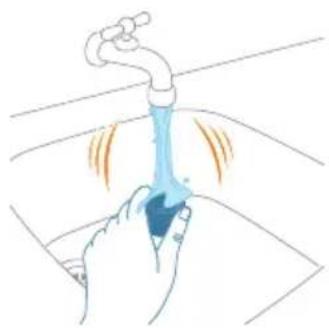
2 Isperite deo pod tekućom vodom sa slavine.
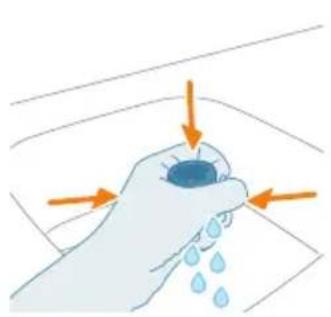
3 Stisnite ga dok ne izade čista voda.

9 Za široku mlaznicu sledite korake 2–7.
Zamena
Četka široke mlaznice *CRP1056/02*



6 Anslut enheten.

Borste till brett munstycke *CRP1056/02*



6 Включете уреда в контакта.

4 Сполосните резервуар.

4 Су ыдысын шайыңыз.

6 Щетканы кайтадан саптамafa салыңыз.
2.

3.70n
47'0r
5.□"17

6'TD7
הַרְׁבָר 523
21017
.תִרְשָׁ


37nu
.717070
4.ロ'YI
5.1711

2019
.(2)
3'9 [
.noun
4'TD

5.ロウ
6171X
2'9 [
.noun
3'TD
תְרָה בְּרָה
277T


• LED LED LED LED LED LED LED LED LED LED LED LED LED LED LED LED LED LED LED LED LED LED LED LED LED LED LED LED LED LED LED LED LED LED LED LED LED LED LED LED LED LED LED LED LED LED LED LED LED LED LED LED LED LED LED LED LED LED LED LED LED LED LED LED LED LED LED LED LED LED LED LED LED LED LED LED LED LED LED LED LED LED LED LED LED LED LED LED LED LED LED LED LED LED LED LED LED LED LED LED
- יִי

2.70r
3.□D
4.
5.□D
6.
1.ロド
2.ロウ
3.□"17
4.□D
2.הַרְשָׁ
3.刀刀
4.刀口
5.ロウ

6.

7.17y

8.1-2
9.2-7
-www.philips.com/parts-and ⁹٢٠٢, ⁹٣١٢, ⁹٤١٢, ⁹٥١٢, ⁹٦١٢, ⁹٧١٢, ⁹٩١٢, ⁹۰١٢, ⁹۱١٢, ⁹۲١٢, ⁹۳١٢, ⁹۴١٢, ⁹۵١٢, ⁹۶١٢, ⁹۷١٢, ⁹۸١٢, ⁹⁹١٢, ⁹۰١٢, ⁹۱١٢, ⁹۲١٢, ⁹۳١٢, ⁹۴١٢, ⁹۵١٢, ⁹۶١٢, ⁹⁷١٢, ⁹⁸١٢, ⁹⁹١٢, ⁹۰١٢, ⁹۱١٢, ⁹۲١٢, ⁹۳١٢, ⁹۴١٢, ⁹۵١٢, ⁹⁶١٢, ⁹⁷. Philips ⁷-10-7-7-7-7-7-7-7-7-7-7-7-7-7-7-7-7-7-7-7-7-7-7-7-7-7-7-7-7-7-7-7-7-7-7-7-7-7-7-7-7-7-7-7-7-
.Philips
*CRP1056/02*
תְרָה בְּרָה
www.philips.com/support
תְרָה בַרִי אַלְאָה
PHILIPS and the Philips Shield Emblem are registered trademarks of Koninklijke Philips N.V. and are used under license.
This product has been manufactured by and is sold under the responsibility of Versuni Holding B.V., and Versuni Holding B.V. is the warrantor in relation to this product.
(12/2024)
- CONTENTS
- INTRODUCTION
- GENERAL DESCRIPTION
- BEFORE FIRST USE
- PREPARING FOR USE
- FILLING THE WATER TANK
- INITIAL SETUP AND CONNECTIONS
- USING THE APPLIANCE WITH 3-IN-1 NOZZLE (9CM)
- USING THE APPLIANCE WITH WIDE NOZZLE (15CM)
- MAINTENANCE AFTER EACH CLEANING CYCLE
- CLEANING THE HOSE
- CLEANING THE DIRTY WATER TANK
- STORING THE POWER CABLE, HOSE AND NOZZLE
- PERIODIC MAINTENANCE
- CLEANING THE WATER TANK WITH CLEAN DETERGENT-ADDED WATER (EVERY MONTH)
- CLEANING THE DIRTY WATER TANK CONNECTION POINT (EVERY THREE MONTHS)
- CLEANING THE NOZZLES (EVERY MONTH OR AS NEEDED)
- REPLACEMENT
- USER SIGNALS AND THEIR MEANINGS
- SIGNAL CAUSE SOLUTION
- TROUBLESHOOTING
- OBSAH
- INSTALLATION ET RACCORDEMENTS
- POČETNO POSTAVLJANJE I VEZE
- ZAMJENA DIJELOVA
- NOMAINA
- SUBSTITUIÇÃO
- UPORABA APARATA Z NASTAVKOM 3 V 1 (9 CM)
- REDNO VZDRŽEVANJE
- SIGNALI ZA UPORABNIKA IN NJIHOV POMEN
- POUŽÍVANIE ZARIADENIA S HUBICOU 3 V 1 (9 CM)
- POČETNO PODEŠAVANJE I PRIKLJUČCI
- POVREMENO ODRŽAVANJE
- ZAMENA
Brand : PHILIPS
Model : 3000 Series XW3192
Category : Vacuum Cleaner