
TRAVELPILOT SOUND DOCKING - Audio Dock BLAUPUNKT - Free user manual and instructions
Find the device manual for free TRAVELPILOT SOUND DOCKING BLAUPUNKT in PDF.
| Product Type | Audio docking station with RDS radio, time display and alarm function |
| Brand | BLAUPUNKT |
| Model | TRAVELPILOT SOUND DOCKING |
| Power Supply | Mains power adapter 100-240 V~, 50/60 Hz, output 12 V / 3 A |
| Power Consumption | Not specified |
| Batteries | 1 CR2025 battery for clock/alarm (backup battery compartment) |
| Display | Digital screen for time, radio frequency and volume |
| Main Functions | FM RDS radio, alarm, charging TravelPilot battery, adaptation for TravelPilot 300/500/700, bass and treble adjustment (via remote control) |
| Connectivity | ANTENNA jack (FM antenna), AUX jack (audio input), AUDIO INPUT and VIDEO IN jacks, AUDIO OUTPUT jack, headphones jack, DC POWER jack |
| Speakers | 2 integrated speakers with bass-reflex port |
| Remote Control | Included, requires CR2025 battery (remove safety strip before use) |
| TravelPilot Compatibility | TravelPilot 300, 500 and 700 with dedicated adapter (A for TP300, B for TP500/700) |
| Maintenance and Cleaning | Clean with a soft, dry cloth; do not use abrasive products or solvents |
| Safety | Do not expose to humidity, water or heat sources; use only the supplied power adapter; do not open the casing |
| Spare Parts and Repairability | Contact Blaupunkt after-sales service; use original parts for the power adapter or cable |
| General Information | Manufacturer warranty valid in the EU; see www.blaupunkt.de for terms |
Frequently Asked Questions - TRAVELPILOT SOUND DOCKING BLAUPUNKT
User questions about TRAVELPILOT SOUND DOCKING BLAUPUNKT
0 question about this device. Answer the ones you know or ask your own.
Ask a new question about this device
Download the instructions for your Audio Dock in PDF format for free! Find your manual TRAVELPILOT SOUND DOCKING - BLAUPUNKT and take your electronic device back in hand. On this page are published all the documents necessary for the use of your device. TRAVELPILOT SOUND DOCKING by BLAUPUNKT.
USER MANUAL TRAVELPILOT SOUND DOCKING BLAUPUNKT
Safety notes 11
Operation. 11
Technical data. 95
FRANÇAIS 15
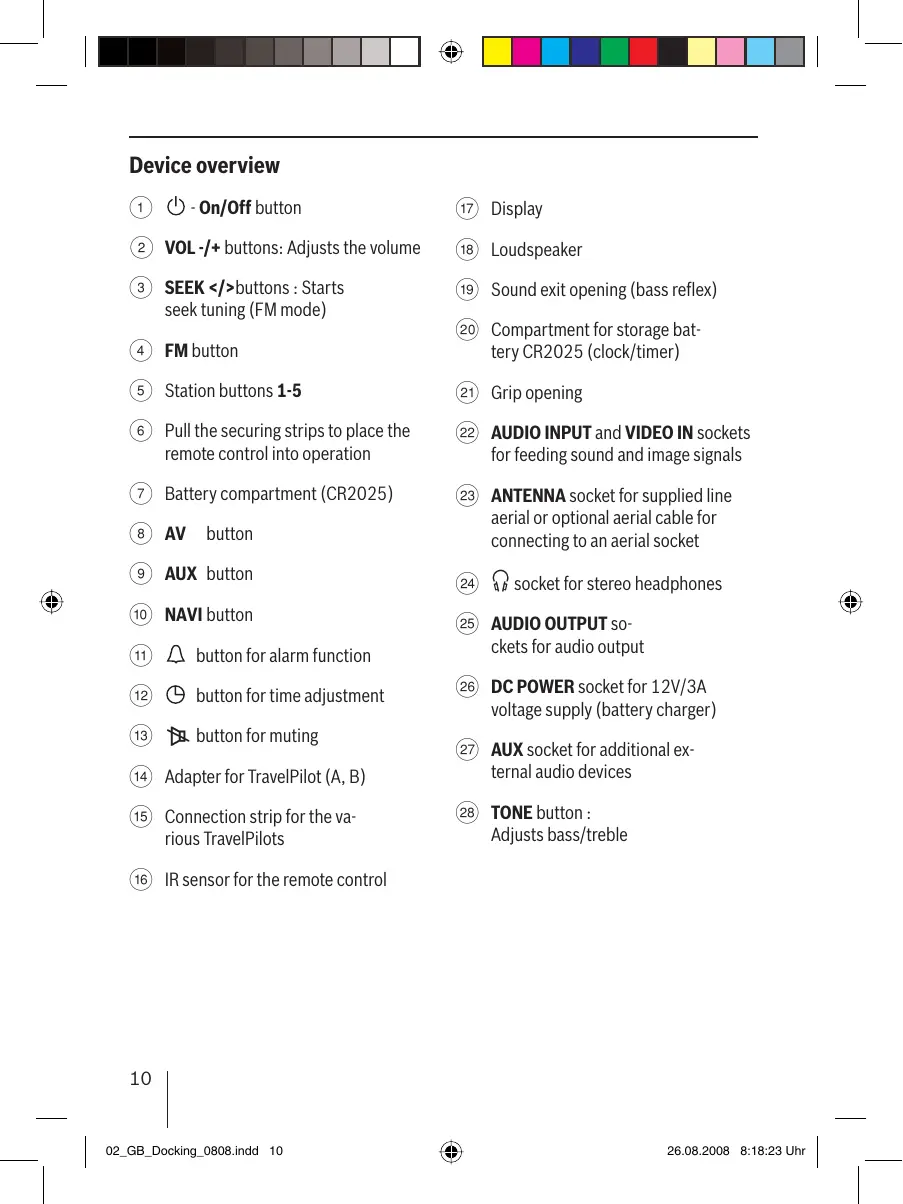
① -On/Off button
② VOL-/+ buttons: Adjusts the volume
③ SEEK</>buttons:Starts seek tuning (FM mode)
④ FM button
⑤ Station buttons 1-5
(6) Pull the securing strips to place the remote control into operation
⑦ Battery compartment (CR2025)
⑧ AV button
AUX button
10 NAVI button
⑪ button for alarm function
12 button for time adjustment
13 button for muting
(14) Adapter for TravelPilot (A, B)
15 Connection strip for the various TravelPilots
16 IR sensor for the remote control
17 Display
18 Loudspeaker
Sound exit opening (bass reflex)
20 Compartment for storage battery CR2025 (clock/timer)
Grip opening
22 AUDIO INPUT and VIDEO IN sockets for feeding sound and image signals
23 ANTENNA socket for supplied line aerial or optional aerial cable for connecting to an aerial socket
(24) socket for stereo headphones
25 AUDIO OUTPUT so- ckets for audio output
DC POWER socket for 12V/3A voltage supply (battery charger)
27 AUX socket for additional external audio devices
28 TONE button : Adjusts bass/treble
ENGLISH
We provide a manufacturer's warranty for our products purchased within the European Union. You can view the warranty terms at www.blaupunkt.de or request them directly from:
Blaupunkt GmbH
Hotline
Robert Bosch Str. 200
D-31139 Hildesheim
Safety notes
Securely setting up the TravelPilot Sound Docking
Place the system on a form, level surface. The system is not designed to be operated in rooms with high humidity (e.g. bathrooms).
Ensure that
- children to not play with TravelPilot Sound Docking without supervision. Children cannot always correctly identify possible dangers.
- the packaging material, e.g. films, is kept away from children. Misuse may lead to the risk of suffocation.
- no direct heat sources (e.g. heating systems, electrical stoves) impact the system;
- the contact with moisture, water or splash water is avoided;
- no open fire sources are close to the system.
- the mains adapter or the mains cables or plugs attached to it are neither scorched nor damaged. Replace the defective mains cable/adapter with original parts. They may not be repaired in any case.
- whether the housing of the TravelPilot Sound Docking is damaged or liquids entered it. Have the TravelPilot Sound Docking first checked by the customer service.
Power supply
- Do not open the housing of the mains adapter. Danger from electric shock exists if the housing is open.
- Operate the mains adapter only with earthed sockets with 100-240 VAC, 50/60 Hz.
- Use only the enclosed mains adapter and mains connecting cable.
Cabling
- Route the cable so that nobody can step on it or stumble over it.
- Do not place any objects on the cables since they could be damaged.
Operation
Use as directed
The device is designed for the stationary connection of the TravelPilot 300 / 500 and 700. It features a built-in RDS radio with clock and alarm function. In addition, the battery is charged in the TravelPilot to be connected. Various connections at the rear allow its variable use.
Connection
Connect the supplied mains adapter with the device. Next, connect the mains cable with the adapter and then connect it with an outlet (100-240 VAC, 50/60 Hz).
All operating functions can be performed via the remote control or at the device (except for bass/ treble).
Switching the device on/off
To switch on the device,
Press the On/Off button ① for longer than 2 seconds.
To switch off the device,
Press the On/Off button ① again for longer than 2 seconds
Standby mode
Briefly press the On/Off button ①
- The display illumination goes out and the clock function is visible.
Changing time settings
Setting the time
To set the clock, the device must be in Standby mode.
Press the button 12
- until the hour display flashes.
Press the
Press the button 12 again
- until the minute display flashes.
Press the
After approx. 5 seconds, the adjusted time appears.
In operation, the time can be displayed by pressing the button 12.
Setting the alarm time
To set the alarm time, the device must be in Standby mode.
press the button 12
- until the hour display flashes.
press the < SEEK> buttons ③ to set the hours.
Press the button again
- until the minute display flashes.
Press the
After approx. 5 seconds, the regular time display appears again.
Adjusting the volume
Note
- The device plays the audio source with the volume you previously listened to.
Always set the device to a moderate volume.
Briefly press the VOL-/+ button ② to adjust the volume in increments of 00-20.
The current volume is shown on the display and used for all audio sources.
Sound settings
Adjusting bass and treble
Settings can be performed only on the remote control.
To change the setting, press the TONE button 28
Briefly press the VOL-/+ button ② to adjust the bass level from -3 to +3.
Briefly press the TONE button (28). Switching from bass to treble setting.
Briefly press the VOL-/+ button ② to adjust the treble from -3 to +3.
After approx. 6 seconds or pressing the TONE button (28), the menu item is exited.
Mute
To mute the device,
Briefly press the Mute button (13).
The display shows
To cancel the mute function,
press the Mute button 13 again.
Tuner mode
This device can be used to receive radio stations in the FM frequency range and adjust and store FM radio stations.
Tuning into a station
There are three ways of tuning into a station:
- Tuning into stations automatically (station seek tuning)
Tuning into stations manually - Selecting stored stations
Station seek tuning (up/down)
Press the
The tuner searches for the next receivable station in the waveband.
Tuning into stations manually
Briefly press the < SEEK> button (3) up or down to change the frequency in 50-kHz increments.
Selecting stored stations
Press one of the station buttons 1-5 (5).
The stored station is called up, provided that it can be received at the current location.
The frequency of the station or the station name appears on the display.
Storing stations
After tuning into a station, it can be stored as follows:
Press one of the station buttons 1-5 repeatedly until, e.g. "P1", appears flashing on the display.
Mono-Stereo switching
Press the FM button ④ for longer than 1 second.
- MONO display
Press the FM button 4 for longer than 1 second.
- "AUTO" display (automatic switching of Mono/Stereo).
Operation with TravelPilot
TravelPilot adapter
Depending on the TravelPilot type, adapt the adapter 14 (A for TP 300 or B for TP 500/700) (see Installation Adapter).
Switching on the TravelPilot,
by pressing the On/Off button ① on the TravelPilot or the remote control.
by pressing the button NAVI⑩, AUX⑨ or AV⑧.
Switching off the TravelPilot,
by pressing the On/Off button ① on the TravelPilot or the remote control.
by pressing the FM button 4
Switching audio sources
Press the NAVI button (10).
The audio signals of the TravelPilot are now also played back via the docking station.
Press the AV button ⑧.
- The video signal of theVIDEO IN socket (22) is played back via the TravelPilot if it is set to "My VIDEOS".
- The audio signals of the video are played back via the AUDIO-INPUT socket (22) of the docking station.
Rear sockets
AUX
External devices can be connected to it.
Press the AUX button ③.
The AUX signals of the AUX-IN socket are played back via the docking station.
AUDIO INPUT
The signals of the AUDIO-INPUT sockets (22) are played back via the docking station.
VIDEO IN
See Operation with TravelPilot
AUDIO OUTPUT
External devices can be connected to it.
Socket for stereo headphones
When using the stereo headphones, the loud-speakers of the docking station are switched off.
ANTENNA
Socket for supplied line aerial or optional aerial cable for connecting to an aerial socket
DC POWER
Connection for the supplied power supply.
Compartment for storage battery
The battery type CR2025 ensures that the clock continues to operate upon separation from mains.
To replace the battery, turn the cap in the direction of the arrow. Remove the battery and insert the new one with the minus side first.
Recycling and disposal
Please use the return and collection systems available to dispose of the product.
Subject to changes!
Indstille station manuelt
Tryk kort op erler ned pa < SEEK> -tasten ③ for at aendre frekvensen i trin pa 50kHz
Valg af lagret station
Tryk pα en af stationstasterne 1-5⑤.
Piattote yia Liyo to PAnKtpo ON/OFF ①
O c Tc, oOvnc 0Bnvei kai n Ieitoupyia poayio' eivai opatn.
Alambda'twvpuθmuεωvpoλoyuó
Pθμη ωρας
Tia n puθiun tnc ωapac npéi n ouokueu va Bioketai otn leitoupyia etoiotntac (Stand-by).
Piathote to pAnktopo ①
- éxpi va avaβoβhνει n ενδειξωρας.
PiTnOte Ta nnKtpa
Tatnote Ea yia liyo To nknpto ①
- éxvi avaobnvei n evdien lamwv.
Piattote ta nλnktpa
- Meta nepinou ano 5 δειτερολεπτα εμφaviε-Tai n ρuθμιαμένη ωρα.
TpooapouoyeaCTravelPilot
Avaloya me tov tuno tou TravelPilot, ouv6oTe ro tv npooapoyea (14) A yia TP 300 n B yia TP 500/700) (Bene Ekyatadtaon npooapoyea).
Evepyonoin TravelPilot,
PntWvTACTo PAnKtPO ON/OFF 1 OTOTravelPilot nTo TnAeipriopio,
πatovtac to nKtpo NAVI 10,AUX 9 AV8.
Anevepyonoin TravelPilot,
Pntawvtao tonlntpo ON/OFF ① OTO TravelPilot n ot nlexeiopnio,
πatovvtaoTPOFM.
Alambdayn nnyov hxou
PiTtoTeToPiAnkTroPONAVI10
Ta nntika onjata tou TravelPilot avaetabiobvtai wpa enionc meow tou Docking Station.
TnTto TnAiktpo AV⑧.
To anu ma bivteo nuc unoboxnC VIDEOIN 22 avaetaibetai meow Tou TravelPilot,otav auto elvai puthetaquevo stoMy VIDEOS".
Ta nxtnka anmuata tou bivteo avapetadobvtai meow tnc unodoxnC AUDIO-INPUT 22 Tou Docking Station.
Ynoboxec niow nλeupac
AUX
E6w mnpovv va ouv6e0ouv eXtepiKec oukeu- c.
Pnntote to nAHTPO AUX ③.
Ta orjmuAUX tnc uno doxnC AUX-IN 27 avametadibovtai meow tou Docking Station.
AUDIO INPUT
Ta onmuata twv unoboxwv AUDIO-INPUT 22 avametadibovtai meoaw Tou Docking Station.
VIDEO IN
Blaene Aetroupyia TravelPilot
AUDIO OUTPUT
E6w mopovva ouv6e0ouv eXtepiKc oukeu- c.
Ynodoxniua oTepeoopwivka akouotikKaKepaIc
Asemanhaku (eteenpain/taaksepain)
06paTmTE BHHMaHHe Ha cAeMyoOee:
He octablante Hrpaioxnx DeTeoDnHex PAnOM CdoK-CTaHnei DAA bTOHaBnRaTopOB TravelPilot. AeH He BcERda MOryt paCIO3-HaTb ONaCHOctb.
He daabaTe DeTm yIaKOBOuHbIe MaTePnA bI, HATPIMeP TLEHKy. IPrn HeITpABINbHom 6baueHN C yIaKOBKc CyUeCTByET OITacHOCTb ydyBja.
HeIIOBdEprAHTe yCTpoHCTBO BO3aEInCTBHO nCTOuHNka TEIIa (HaIPnMep 6aTapeN OTONAEHHN NAN 3aEKTPoNTbI).
- 136e9aTe KOHTaTayctpoIcTBa CBOO, BlaorHn6pb3ram.
- He yctaHaBaMaBaIte yctpoIcTBo B6Ma3n IcTOUHKnOB OTKpbIToIOrO OrH.
He nIcIOb3yIe cTeBOI aAaITep I cTeBOI Ka6eMb CTOBpeXeHnIM Hn IOaTOpEwHIM KOnHTaKtAmN. 3aMeHNTE IOBpeXeHbI aAaITep/ka6eMb Ha opINHaIbHbI HObII.
Hn B Koem clyuae He peMoHTnpyTe Ka6eIb nn aadTtep.
He BkIoUaHte DOK-CTaHcIIO DA ABOToHaBnRatopOB TravelPilot,ecm eE KOpTyc TOBpeXdEHN BNYTpB ITOIaBA ODA.IPoBepbTe DOK-CTaHcIO DA ABOToHaBnRatopOBTravelPilot B cepBncOH cLyX6e.
Питаннe
He BcKpbBaIte KopTyc cTeBOrO aadIe- pa. PIn OTKpbITOM KOpTyce Bo3HnKaet OTac-HocTb IopAkeHIN 3AEKTPNueCKM TOKOM.
BkIoUaHte CeTeBOAaIITep ToIbKO Bpo3eTknIpeMeHHoroToKa 100-240 B~,50/60 Tc3a3eMaIOJIMKoHTAKTOM.
- IcTIOb3yIte TOaKo CeTeBOA aadTep H cTeBO Ka6eλB, BXOaIuNE B KOMTIaEkT Toc-TaBKn.
Ka6eAn
IpoaoXnTeKa6eMaTakmO6pa30M,UTo6bl NCKAIOHTbBO3MOXHOCTbHaCTyTIHTbHaHIN HAN CITOKHYBCa.
He yctahabnbaHTe Ha Ka6eAnPiPeMaTbI, B IPTINBHOM CAYue BMOxTe IOBpeNTb Ka6eA.
3KcTnayataua
HcTIOb3OBAHHe Tn Ha3HaueHHIO
YcTPOINCTBO TpeHa3HaueHO DIA CTAUHOAPHO IIOKIOUeyHn ABTOHABIRATOPOB TravelPilot 300/500 n700. YcTPOINCTBO HmeeT BCTPOEHn bpaHIOPTneMHNc C yHKUeRDS, qacbI n 6yHbHK. DIOIOANHTeALHO TPOIN3BOAHTCra 3a-prKa aKKyMAYTopa B IOKAIQUeHHOM aTOHABIRATope. Pa3MUnhBe rE3da Ha 3aHHeI TaHEnn 06ecTeuHBAOT pa3Hoo6pa3Hoe NcTIOB3OBAHHe yCTPOINCTBa.
TIODKAIUOyHHe
TIOKIAOHTe K yCTPOHCTBY BXOAAIIN B KOMTIAEKT IOCTABKN CTeBOI aAITep. ITOE 3TO TcOeAHN
Te CeTeBOI Ka6eA b C a4aITpeOM H 3aTeM TIOKaHOUH Te ero Kpo3eTke (AC 100-240 B\~,50/60 Γu).
Bce doctythbe dyHKun MOYr Bbl3bBaTbcra cep3IyabT Ayn6oHa yctpoiCTBe (Kpome Bass/Treble).
BklueyHne/BbIKluoyHne yctpoiCTBa
AaBkIoUeHn yctpoIcTbA,
HaxmteN ydepxnBaHTe KHOITky BbIKA ①60ae e 2cekyHa
AaBbIKAOUeHnYcTPOICTBa,
CHOBA HauKMITE H ydePKNBaHTe KHOITKY BKL/ BbIKL. ① 6olee 2 cekyHd
PexHM OxndaHna
HaXMMTE KpaTkoBpeMeHHO KHOITKY BKA/ BbIKA. ①.
ПОДСВЕТКА ДИСТΙΑЕ ПΙΟΓΑСΗТ, И ВΚΑΙΥΑΤ-CΥΑСБΙ.
Изменынскримк усан.
HactpoKaBpeMeHH
Дан hactpoiKN BpeMeHn yCTPOIcTBOdoXHO Ha- XOaHTbCBypeKHeOxHaHn.
HaXMMHTe KHOINKU 12
TOKA He HaHET MInaTb HAnKaTOp YacOB.
HaxMMTE KNOTKY
CHOBA HaxMMTe KpatKOBpeMeHHO KHONKy
TOKA He HaHET MNaTb HAnKaTOp MNHyT.
HaxMMTE KHOITKY
-Плпмерно чered5спогвтся устов-<|im_start|>assistant
- Ально
Врем.
OTo6paXeHne BpeMeHN MoXHO BKIAUOnTHbpeKHe Me pa60Tb HaxaTHEm KHOITKN ⑫
HactpoKa 6yAnbHnKa
JaHacTpoiKn6yDnAIBNHaYcTPOICTBO DOANHO HAXOHTbCByPexnmeOxHaAHJ.
HaxMMTe KHTIKY 12
- TOKa He NaHET MNaTb HnDnKaTOp YacOB.
HaxMMTE KHOITKY
CHOBA HAXMHTe KpaTKOBpeMeHHO KHOTKY 12
TOKA He HaHET MNaTb HAnKaTOP MNHT.
HaxMMTE KHOITKY
-Пгимерно урета 5 с chова погвпсяTekу-шee Врем.
PeryAnpOBKa rPOMKoCTn
TpimmeaHne
- UCTPOICTBO3aTOMHnHaetrPOMKoCTbBOCTIPOI N3BVEeHnHnIOBCTPOIN3BOADNTCnHnAayDHO- NCTOUYHnKaHaTOJKe rPOMKoCTn.
Bcerda yctaHaBaIbMaTe ymepeHHbI ypoBeHb IromKoCTN.
HaxMMTe KpatKOBpeMeHHO KHOITKY VOL-+ - ②, YTO6bI yCTaHOBtB XeLaemyIO rPOMKOCTb Ha3HAueHHe O T0 Do 20.
Tekyuyn npovBeHb rpoMkoCTn OTo6paXaetcHa ⅡNCTIe, OH DeiCTByeT DAy BCEx ayDIOHCTOCHN-KOB.
HactpoKn 3Byka
HactpoKa Hn3KNx H BbICOKx YactOT
HaCToPOKa MoXeT BbIIOAHTbC TToBko C NyAb-Ta AY.
UTo6bI H3MeHHTb HaCTpoiKy,HaKMITE KHOI Ky TONE②8.
HaxMMTe KpataKOBpeMeHHO KHOTKY VOL-+ - ②, yTO6bI yCTaHOBtB JKeAeMBIyPOBeHb Hn3KNX YactOT Ha 3HaueHne OT-3do +3.
HaxMMTE KpataKOBpeMeHHO KHOTKY TONE 28. Ipeekluoyehne HactpoKN Hn3Knx/BblCOKHX YaCTOT.
HaxMMTe KpatKOBpeMeHHO KHOTky VOL-/+ ②, YTO6bI yCTaHOBt bXeAAeMbI yPOBeHb BBICOKHX aCTOT Ha 3HaueHne OT-3D0+3.
Плпимерно чеге 6 сизл посан fixaTNK HOTIKI TONE-ITYHKT 28 MEHIO 3aKpoeTcA.
Bbiklouyen3Byka
YtO6bI OTKIAIOHTb 3ByK Ha yctpoiCTbe,
HaxMMTe KpaTkoBpeMeHHo KhoTIky Mute 13.
Ha nchnaee OTo6paKaetc
YtO6bIOTKIAOUHTbPnHrAyuWeHne3BvKa,
CHOBa HaXMITE KpaTkoBpeMeHHO KHOTKY Mute 13.
PexHM TIOhepa
C TIOMOUbO DaHHoro YcTpoCTBa Bbl MOKeTe IINHMaTb paNHOCTaHUNB DnAHTa3OHe YaCTOT FM (UKW), a TaKxhe HAcTPOntb paNHOCTaHUN UKW uCOxpaHHTb HX.
HactpoKa cTaunCn
IIMEOTCA TPHCIOO6a HACTPOKCNCTAHIN:
- ABTomatuecka hactpoika ctaHcN (IO-HCK cTAHcN)
- Hac troka ctaunin Bpyhom pexnme
BbI6Op coXpaHHeHHbIX cTahUIN
TOnck paAnocTaHcN (BtpeA/ha3aA)
HaXMMTe N yDepeKxNBAuTe KHOITKY
TIOHEP NHTB TKeUeM DnAHaIa3OHe BOAN CLeAyo- ⅢIIO PPNHIMMaEMyIO CTaHIO.
Hactpoika ctaunB pyuHOM pexnme
HaxMMTE KpaTkoBpeMeHHO KHOTKY
Bb16op coxpanehHbIX cTahn
HaxMMte OdHy H3 KHOIOK TAmTn CtaHcN 1-5⑤.
CoxpaHenna CtaHnB Bb3bBAeTc Pn yCLOBn, ECn aBTOMo6nB hXoNTcB 30He eE PnEma.
Ha dncnnee oTo6paxaetcnaCTota nn Ha3BaHne cTaHnn.
3aTOMHHaHHe cTaHcN
TTOKAKBbHACtpoanKakyo-AN6OCTAHIO,BbMOKeTeCOxpaHHTbHAcTpOkyCaeDyUOuM06p30M:
HaXMMTe HydePKNBaTte OAnHy N3 KHOITOK TAMrTH CTaHcN1-5 ⑤, TOKa HaDcTIaee He 3aMnIraet, HapnPmEp, "P1".
Tepekkuoyehne MoHO-ctepeo
HaxMMTe HyapeKXBaYte 60Aee 1 c KHOITky FM 4.
- INHKAtop DCNTAER MONO
HaxMMTe HyapeKbAte 60aee 1 c KhoTky FM 4.
- INHdkaTOp dncTae ATOO (aBtOMaTHueckoe TpeekAnoueHne MOHO/CTepeo).
Pa60Ta c aBTOHaBHraTopoM TravelPilot
Aaantep TravelPilot
B 3aBnCmOCTH OT MOeAIN aBTOHaBnIgATopAp TravelPilot yCTaHOBnTb COOTBETCTBYIOuIN aAaITep 已 A DAA TP 300 mN B dA TP 500/700 (cm."YCTaHOBka aAaITepa").
ABTOHABRAtopTravelPilotBkLIOucaTcA:
TIPIN HaKaTHNI KHTIKN BKA./BbIKA. ①HaabTOHaBnArTope HnITyIbTe dy.
ПИΝΗΚΑΤΗΝΚΟΥΙΝΑΝΙ - ⑩ , AUX - ⑨ ένη AV - ⑧ .
ABTOHABRaTop TravelPilot
BbIKIouaETc8:
ПИн Нжати КНOTКИ BKA./BblKA. -①Ha aTOHabnIaTope HnIyIbTe DY.
ПИЗHAЖКТУKHOTКINFM.
Tepekluoyehne aydnohctouHHKOB
Haxmite KHTIKY NAVI10.
AynoocnHaC aBTOHaBnTaTopa TravelPilot 6ydt TAKKe TEpeDaBaTbCn Ha DOK-CTaHcNIO.
HaxMMTe KhoTky AV 8.
BnAeOCHHaH BxOda VIDEOIN 22)6yAETTpepeDaBaTbCa Ha aBTOHaBnAraTop,ecm OH bIpaH KaueCTBe "My VIDEOS".
AydnochHaBnDaeo6yAdTpeBaBatcyepe3BXoA AUDIO-INPUT-22HaDOK-CTAHIIO.
THe3da Ha 3aDHe TnHeI
BxoA AUX
K Hemy MoryT 6bIb TIOAKIOUeHbI AOIOAHHTeAbHbIyCTpOICTBa.
HaxMMTe KHOITky AUX- ③
CnHnAUXcTHe3daAUX-IN-(27)6yDetpepeDaBaTbcyaape3doK-CTaHcIHO.
AUDIO INPUT
OTCEK DAA 3AemeHTa THTAHN
3aemeHTIITAHN:TITCR2025,o6ecTeuHbae pa60TyacOBIIINIIpeKpaueHNcTeBOrO TITAHN.
Aa 3aMeHbI TIOBepHnTe KpbIiHKy ITO yacOBoCTpeAke. IV3BAeKNTe 3AeMeHTIITaTHNIGYcTaHOBtE HObbl, Co6AIOaR TIOAerPHocTb.
YTHAN3aunn Hnepepa60ka
Aynytnn3aun CTapo aTnpaTypbBocnoB- 3yTEcb DOCTYINbIMN TYNKTAMN INPnEma n C6opa BTOPCbIpb.
Rad's TravelPilot-om
TravelPilot-adapter
Ovisno o tipu TravelPilot-a primjenite adapter (A za TP 300 ili B za TP 500/700) (vidi ugradnja adaptera).
Uključivanje TravelPilot-a,
- FRANÇAIS 15
- ENGLISH
- Safety notes
- Securely setting up the TravelPilot Sound Docking
- Ensure that
- Power supply
- Cabling
- Operation
- Use as directed
- Connection
- Switching the device on/off
- To switch on the device,
- To switch off the device,
- Standby mode
- Changing time settings
- Setting the time
- Setting the alarm time
- Adjusting the volume
- Note
- Sound settings
- Adjusting bass and treble
- Mute
- To mute the device,
- To cancel the mute function,
- Tuner mode
- Tuning into a station
- Station seek tuning (up/down)
- Tuning into stations manually
- Selecting stored stations
- Storing stations
- Mono-Stereo switching
- Operation with TravelPilot
- TravelPilot adapter
- Switching on the TravelPilot,
- Switching off the TravelPilot,
- Switching audio sources
- Rear sockets
- AUX
- AUDIO INPUT
- VIDEO IN
- AUDIO OUTPUT
- Socket for stereo headphones
- ANTENNA
- DC POWER
- Compartment for storage battery
- Recycling and disposal
- Indstille station manuelt
- Valg af lagret station
- Alambda'twvpuθmuεωvpoλoyuó
- Pθμη ωρας
- TpooapouoyeaCTravelPilot
- Evepyonoin TravelPilot,
- Anevepyonoin TravelPilot,
- Alambdayn nnyov hxou
- Ynoboxec niow nλeupac
- Ynodoxniua oTepeoopwivka akouotikKaKepaIc
- Asemanhaku (eteenpain/taaksepain)
- 06paTmTE BHHMaHHe Ha cAeMyoOee:
- Питаннe
- Ka6eAn
- 3KcTnayataua
- HcTIOb3OBAHHe Tn Ha3HaueHHIO
- TIODKAIUOyHHe
- BklueyHne/BbIKluoyHne yctpoiCTBa
- AaBkIoUeHn yctpoIcTbA,
- AaBbIKAOUeHnYcTPOICTBa,
- PexHM OxndaHna
- Изменынскримк усан.
- HactpoKaBpeMeHH
- HactpoKa 6yAnbHnKa
- PeryAnpOBKa rPOMKoCTn
- TpimmeaHne
- HactpoKn 3Byka
- HactpoKa Hn3KNx H BbICOKx YactOT
- Bbiklouyen3Byka
- YtO6bI OTKIAIOHTb 3ByK Ha yctpoiCTbe,
- YtO6bIOTKIAOUHTbPnHrAyuWeHne3BvKa,
- PexHM TIOhepa
- HactpoKa cTaunCn
- TOnck paAnocTaHcN (BtpeA/ha3aA)
- Hactpoika ctaunB pyuHOM pexnme
- Bb16op coxpanehHbIX cTahn
- 3aTOMHHaHHe cTaHcN
- Tepekkuoyehne MoHO-ctepeo
- Pa60Ta c aBTOHaBHraTopoM TravelPilot
- Aaantep TravelPilot
- ABTOHABRAtopTravelPilotBkLIOucaTcA:
- ABTOHABRaTop TravelPilot
- BbIKIouaETc8:
- Tepekluoyehne aydnohctouHHKOB
- THe3da Ha 3aDHe TnHeI
- BxoA AUX
- OTCEK DAA 3AemeHTa THTAHN
- YTHAN3aunn Hnepepa60ka
- Rad's TravelPilot-om
- TravelPilot-adapter
- Uključivanje TravelPilot-a,
Brand : BLAUPUNKT
Model : TRAVELPILOT SOUND DOCKING
Category : Audio Dock