
HBS 65 - Sander AEG - Free user manual and instructions
Find the device manual for free HBS 65 AEG in PDF.
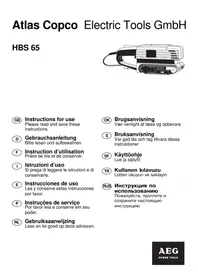


| Product type | Belt sander |
| Brand | AEG |
| Model | HBS 65 |
| Supply voltage | 230 V ~ 50 Hz |
| Rated power | 650 W |
| No-load belt speed | 300 m/min |
| Belt dimensions | 75 x 457 mm |
| Weight | 3.5 kg |
| Sound pressure level (LpA) | 85 dB(A) |
| Sound power level (LWA) | 96 dB(A) |
| Vibrations (hand) | 5.5 m/s² |
| Dust reservoir capacity | 1 L |
| Variable speed function | No, fixed speed |
| Dust extraction system | Yes, with vacuum adapter |
| Ergonomic handle | Yes, with softgrip coating |
| On/off switch with lock-off | Yes |
| Tool-free belt change | Yes, tension lever |
| Repairability | Spare parts available (brushes, belt, etc.) |
| Maintenance | Regular cleaning of dust collector and ventilation slots |
| Included accessories | One abrasive belt grain 80, suction adapter |
Frequently Asked Questions - HBS 65 AEG
User questions about HBS 65 AEG
0 question about this device. Answer the ones you know or ask your own.
Ask a new question about this device
Download the instructions for your Sander in PDF format for free! Find your manual HBS 65 - AEG and take your electronic device back in hand. On this page are published all the documents necessary for the use of your device. HBS 65 by AEG.
USER MANUAL HBS 65 AEG
GB Instructions for use Please read and save these instructions.
| You have high standards and expect to purchase quality goods – quality offered by Atlas Copco.We have built a durable and reliable electric power tool for you.Please read the instructions for use before first operation so you can handle your power tool effectively and safely.We are sure that buying an AEG Electric Power Tool from Atlas Copco was the right choice! | ||
| Technical Data | Nominal power 600 W......Belt speed no load 190 m/min......Sanding width 65 mm......Belt length 410 mm......Sanding surface 65x110 mm......Weight 2,2 kg...... | |
| Advice for your safety | ■ Please pay attention to the safety instructions in the attached leaflet!■ Dust that arises when working in wood or using the tool on industrial material can be dangerous to health. In this case connect the tool to a suction device (e.g. Atlas Copco absorption system AS 3 W).■ Appliances used at many different locations including open air must be connected via a current surge preventing switch.■ Always wear goggles when using the machine. It is recommended to wear gloves, sturdy non slipping shoes and apron.■ Sawdust and splinters must not be removed while the machine is running.■ Do not pierce the motor housing as this could damage the double insulation (use adhesives).■ Always disconnect the plug from the socket before carrying out any work on the machine.Only plug-in when machine is switched off.■ Keep mains lead clear from working range of the machine. Always lead the cable away behind you.■ When sanding metal the dust suction facility should not be used, because of the risk of fire from flying sparks. | |
| Measured sound value | Typically the A-weighted noise levels of the tool are:Sound pressure level = 89 dB (A).Sound power level = 102 dB (A).Wear ear protectors!Measured values determined according to EN 50 144. | |
| Measured vibration value | Typically the hand-arm vibration is below 2.5 m/s 2 .Measured values determined according to EN 50 144. | |
| Mains connection | Connect only to a single-phase AC current supply and only to the mains voltage specified on the rating plate. Connection to sockets without earth protection is possible as the appliance features protective insulation to DIN 57 740/ VDE 0740 and CEE 20. Radio suppression complies with the European standard EN 55014.When fitting the plug, make sure that the brown (live) wire of this appliance is connected to the plug terminal marked L or coloured red, and the blue (neutral) wire of this appliance is connected to the plug terminal marked N or coloured black. Under no circumstances must the wires of this appliance be connected to the earth terminal of the plug marked either E, with the earth symbol or coloured green or green/yellow. | |
| Use | The belt sander can be used for sanding wood, plastics and metal.Do not use this product in another way as stated for normal use. | |
| ENGLISH | 1 | HBS 65 |
Brief description
Dust bag
Clamping lever
Sanding belt support
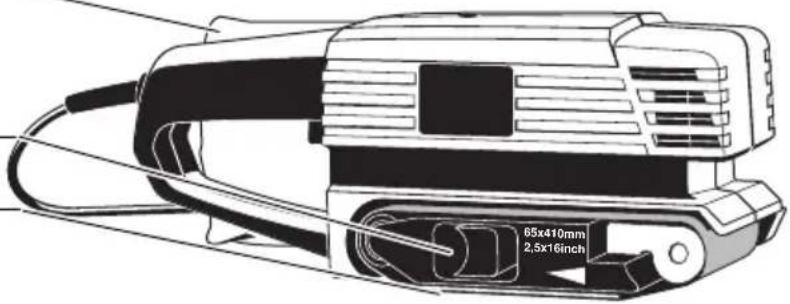
Locking button
On-/off switch
Suction connector
Adjusting screw for belt
Integrated dust removal

Modifications: Text, diagrams and data are correct at the time of printing. In the interest of continuous improvement of our products, technical specifications are subject to alteration without prior notice.
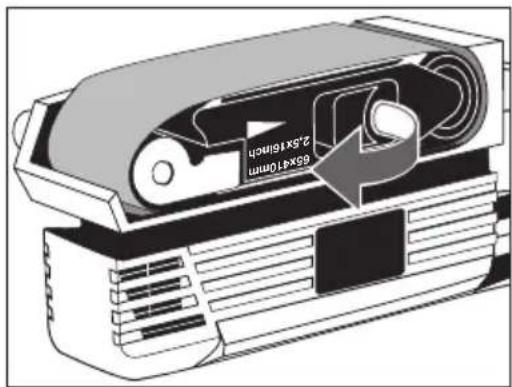
Changing the belt

Prior to changing the belt, adjust the sanding belt by turning the belt adjusting screw approx. 2–3 cm in the direction of the open side of the machine beyond the rollers, whilst the machine is running, as the new sanding belt can sometimes brush against the machine housing.
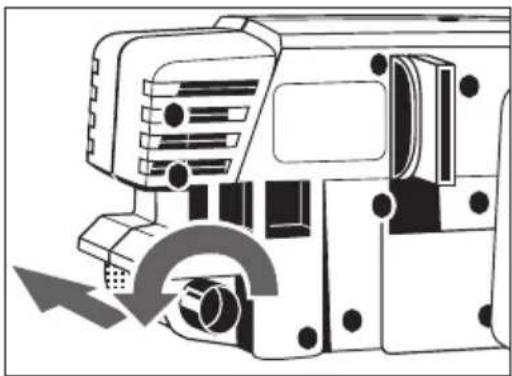

Always disconnect the plug from the socket before carrying out any work on the machine.
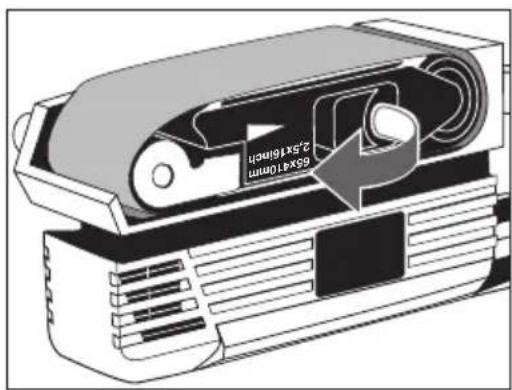
- Pull the clamping lever forwards
- Remove the worn belt and fit the new one, ensuring that the inside of the belt is pointing in the same direction as the arrow on the machine.
- Push the clamping lever back again
- For a test run, position the sanding belt with the aid of the belt adjusting screw so that it is flush with the outer edge of the sanding belt support.
| Switching the machine on and off | Intermittent useSwitching on: Press On-/off switchSwitching off: Release On-/off switchContinuous useSwitching on: Press the On-/off switch and then the locking button, after that release on-off switch.Switching off: Press the On-/off switch and then release.Always hold machine firmly with both hand prior to switching on. Only switch on in raised position. |   | |
| Dust extraction | Position the connection piece with the dust bag over the machine outlet.When suction performance becomes less effective empty dust bag. |  | |
| If large quantities of dust are being produced, a hose-pipe can be connected to the dustbag connector. Use the 26 mm diameter Atlas Copco hose-pipe, which fits the Atlas Copco wet-and-dry vacuum cleaner as well as ordinary household vacuum cleaners.When sanding metal the dust suction facility should not be used, because of the risk of fire from flying sparks. |  | ||
| Advice for operation | When sanding, guide the machine without applying special pressure. The weight of the machine itself is quite sufficient for good sanding results. | ||
| Stationary device (Accessory*) | By attaching the stationary mounting device, sanding can be carried out both horizontally and vertically. Screw the two plastic parts together and fasten the longer part to the uppermost side of the machine with the capstan-head screw. Secure the machine with the two clamps to a work top.*Not included in standard equipment, available as an accessory. |  | |
| ENGLISH | 3 | HBS 65 | |

GERMAN
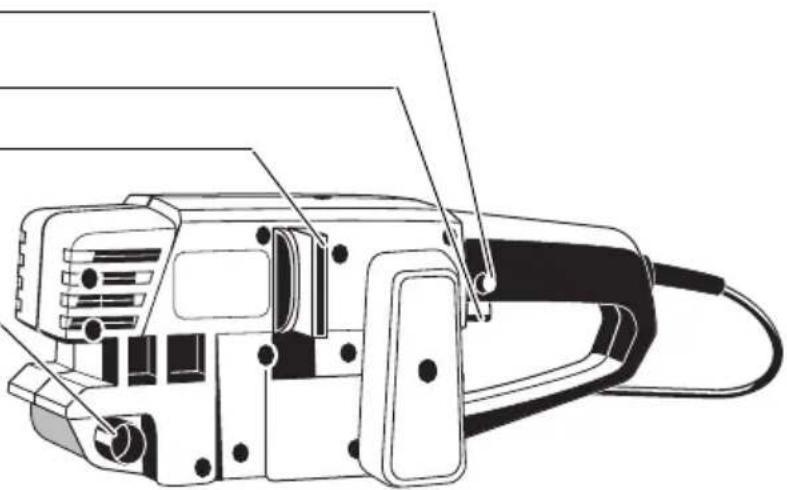
Locking button
Switch

Switch lock
Switch
Dust extraction connection

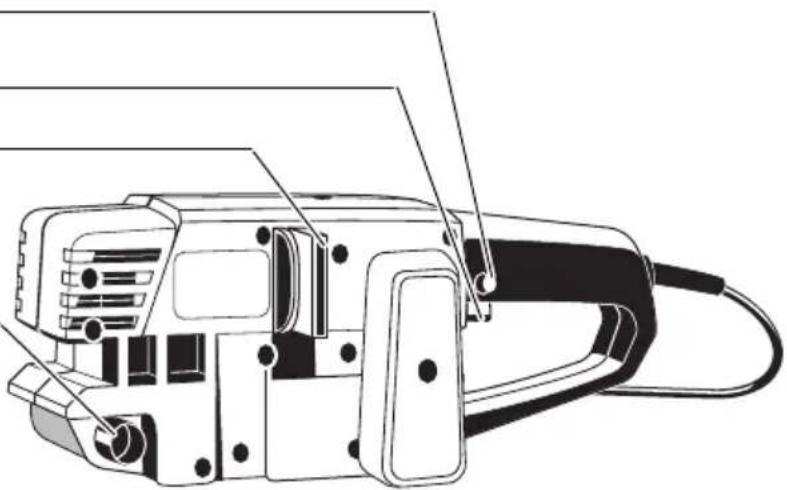

Locking button
Switch

Lock button
Switch
Extraction piece

Lock button
Switch
Extraction piece

Lock button
Switch
Extraction piece


EC-DECLARATION OF CONFORMITY
We declare under our sole responsibility that this product is in conformity with the following standards or standardized documents. EN 50144, EN 55014-1, EN 55014-2, EN 61000-3-2, EN 61000-3-3, in accordance with the regulations 98/37/EC, 73/23/EEC, 89/336/EEC
GERMAN
EC DECLARATION OF CONFORMITY
Manager Product Marketing and Development


Copyright 2002
Atlas Copco Electric Tools GmbH
P.O. Box 320
D-71361 Winnenden Germany
www.atlascopco.de

Brand : AEG
Model : HBS 65
Category : Sander