
EBM 8000, EBM8000, EBM8000 - Bread maker ELECTROLUX - Free user manual and instructions
Find the device manual for free EBM 8000, EBM8000, EBM8000 ELECTROLUX in PDF.

| Product type | Bread machine |
| Brand | Electrolux |
| Model | EBM 8000 |
| Maximum capacity | 1 kg (bread pan), 270 g (cake pan) |
| Number of programs | 16 programs (White bread, whole wheat, French, brioche, rapid, gluten-free, dough, jam, bake only, cakes) |
| Browning levels | 3 (light, medium, dark) |
| Delayed start | Up to 12 hours (except rapid, dough, jam, gluten-free programs) |
| Keep warm | Up to 60 minutes after baking |
| Display | LCD with program, browning, weight, and pan presence indicators |
| Included accessories | Bread pan, cake pan, self-folding paddle, graduated container, double measuring spoon |
| Ingredient addition | Audible signal for manual addition during cycle |
| Pan material | Non-stick (not specified, but likely) |
| Cleaning | Unplug before cleaning; do not immerse the appliance; wash pans with warm water |
| Safety | Hot surface; do not touch moving parts; use oven mitts |
| Power supply | 230 V, 50 Hz (confirm on rating plate) |
| Power | Approximately 650 W (estimate) |
| Weight | Approximately 5 kg (estimate) |
| Dimensions (W x D x H) | Approximately 35 x 25 x 30 cm (estimate) |
| Repairability | Spare parts available from Electrolux customer service |
Frequently Asked Questions - EBM 8000, EBM8000, EBM8000 ELECTROLUX
User questions about EBM 8000, EBM8000, EBM8000 ELECTROLUX
0 question about this device. Answer the ones you know or ask your own.
Ask a new question about this device
Download the instructions for your Bread maker in PDF format for free! Find your manual EBM 8000, EBM8000, EBM8000 - ELECTROLUX and take your electronic device back in hand. On this page are published all the documents necessary for the use of your device. EBM 8000, EBM8000, EBM8000 by ELECTROLUX.
USER MANUAL EBM 8000, EBM8000, EBM8000 ELECTROLUX
Read the following instruction carefully before using machine for the first time.
- This appliance is not intended for use by persons (including children) with reduced physical, sensory or mental capabilities, or lack of experience and knowledge, unless they have been given supervision or instruction concerning use of the appliance by a person responsible for their safety.
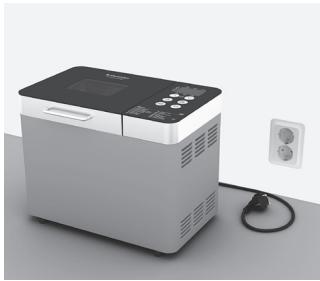
Children should be supervised to ensure that they do not play with the appliance. - The appliance may only be connected to a power supply whose voltage and frequency comply with the specifications on the rating plate!
- Never use or pick up the appliance if
- the supply cord is damaged,
- the housing is damaged."
- The appliance must only be connected to an earthed socket. If necessary an extension cable suitable for 10A can be used.
- If the appliance or the supply cord is damaged, it must be replaced by the manufacturer, its service agent or similarly qualified person, in order to avoid hazard.
Always place the appliance on a flat, level surface.
- The mains plug must be withdrawn each time after use, before cleaning and maintenance.
- The appliance and accessories become hot during operation. Use only designated handles and knobs. Always use oven gloves to remove the hot bread pan. Allow to cool down before cleaning or storage.
- The mains cable must not come into contact with any hot parts of the appliance.
- Never obstruct the air vents and ensure adequate ventilation around the appliance during operation. Failing to do so could damage the appliance and result in hazard.
- Never touch any moving parts with your hand or any tools while the appliance is plugged in.
- Do not immerse the appliance in water or any other liquid.
- Do not exceed the maximum capacity stated in the example recipes for the respective baking pans, as this could damage the appliance and result in hazard.
- This appliance is intended for domestic use only. The manufacturer cannot accept any liability for possible damage caused by improper or incorrect use.
F
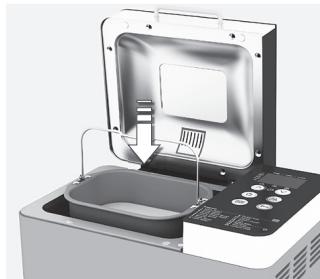
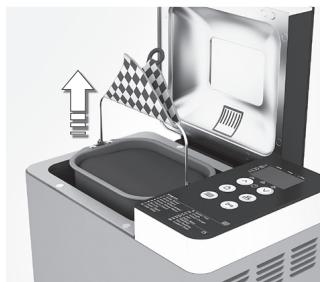
- Before first use. Remove all packaging and labels. Mounting of the lid: hold lid with upper part of hinge in a vertical position. Slide down into slots on the lower part of the hinge. Lift out bread or cake pan, clean and dry. Put kneader into place.
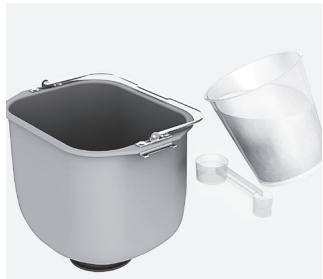
- Measure of ingredients (it is important to follow the given order of ingredients in the recipe, see page 18-20). For best result, make sure to use accurate amounts of ingredients given in the recipes. Add all ingredients into bread or cake pan according to selected programme.
-
a. Put the bread pan into place in baking compartment, push down until locked in position. Close lid. b. Put the cake pan into place in baking compartment and close lid. During startup, the cake pan will automatically be fixed.
-
Avant la première utilisation. Retrez tous les emballages et les étiquettes. Montage du couvercle: tenez le couvercle de façon à ce que la partie supérieure de la charniere soit à la verticale. Faites-la glisser dans les encoches de la partie inférieure de la charniere. Retrez le moule à pain ou à gâteau, nettoyez-le et séchez-le. Installez la pale auto-rabatable dans le moule.
-
Mesure des ingredients (il est important de respecter l'ordre d'incorporation des ingredients fourni dans la recette, voir page 27-29). Pour un résultat optimal, assurez-vous de respecter précisé les quantités indiquées dans la recette. Incorporez tous les ingrediants dans le moule à pain ou à gâteau en fonction du programme sélectionné.
-
a. Mettez le moule à pain en place dans la cavité et enforcez-le jusqu'à ce qu'il soit maintainu en position. Fermez le couvercle. b. Mettez le moule à gâteau en place dans la cavité et fermez le couvercle. Le moule à gâteau est fixé automatiquement lors du démarrage.
-
Operazioni preliminari al primo utilizzo. Rimuovere completenessl'imballaggio e qualsiasi etichetta. Montare il coperchio tenendo la parte superiore della cerniera in posizione verticale. Introduire negli appositi alloggamenti la parte inferiore della cerniera. Estrarre lo stampo per pane o per dolci, pulire e asciugare. Posizione l'impastatrice.
-
Dosi degli ingredienti. É importante aggiuungere gli ingredienti nell'ordine indicate nelle ricette (vedere aagina 36-38). Per ottenere i migliori risultati, seguire scrupolasamente leindicazioni relative alle dosi degli ingredienti riportate nelle ricette. Aggiungere tutti gli ingredienti dello stamo per pane o per dolci in base al programma selezionato.
-
a. Posizione lo stampo per pane nel compartimento di cottura e spinnerlo verso il basso fino a farlo scattare in posizione. Chidere il coperchio. b. Posizione lo stampo per dolci nel compartimento di cottura e chiudere il coperchio. Lo stampo per dolci viene fissato automaticamente in posizione durante l'avvio.
-
Antes del primer uso. Retire todos los embalajes y etiquettes. Montaje de la tapa: Sujete la tapa con la parte superior de la bisagra en posicion vertical Encajela en las ranuras de la parte inferior de la bisagra. Extraiga el molde para pan o tartas, limpielo y sequelo. Coloque la amasadora en su situ.
-
Medida de ingredientes (es importante seguir elorden de ingredientes indicado en la receta, consulte la page 45-47). Para Obtener el mayor的结果, asegúrese de usar las cantidades de ingredientes precisas que se indicaten en las recetas. Anada todos los ingredientes en el molde para pan o tartas de acuerdo con el programa selectionado.
-
a. Coloque el molde para pan en el compartmento de cocción y empujé hasta encasarlo en su situ. Cierre la tapa. b. Coloque el molde para tartas en el compartmento de cocción y ciderre la tapa. Durante el inico, el molde para tartas se sujará de forma automatística.
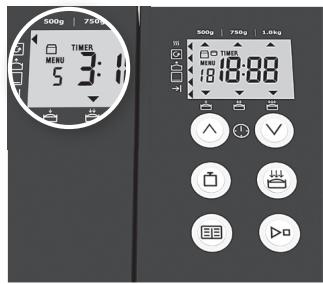
4. Plug in cord and choose baking programme by pressing Menu repeatedly until required programme appears.
4. Branchez le cordon d'alimentation et sélectionné le programme de préparation en appuyant sur le bouton de menu à plusieurs reprises jusqu'à ce que le programme souhaïte s'affiche.
4. Collegare il cavo di alimentazione e scegliere il programma di cottura premendo ripetutamente il pulsante Menu fino a visualizzato il programma desiderato.
4. Conecte el cable y elija el programa de cocccion pulsando el boton de menu repetidas vezes hasta que aparezca el programa que necessita.
5. When using bread pan: Step 1 - choose loaf size and crust colour by pressing buttons repeatedly until indicators show required choices. Step 2 - press and hold "Start" for 2-3 seconds. An alert will sound before the programme starts. When using cake pan, go directly to step 2.
5. Avec le moule à pain: Étape 1 - sélectionné le poids du pain et le brunissement de la croite en appuyant sur les boutons de sélection correspondants. Étape 2 - maintenance enforcé le bouton "marche/arrêt" pendant 2 à 3 secondes. UneAlerte sonore retentit avant le démarrage du programme. Avec le moule à gâteau, commencez directement à l'étape 2.
5. Quando si utilizes lo stampo per pane: Passaggio 1: scegliere le dimensioni del pane e il colore della crosta premendo ripetutamente i relativi pulsanti fino a visualizzare le opzioni desiderate sugli indicatori. Passaggio 2: tenerem premuto il pulsante di avvio per 2-3 secondi. Prima dell'avvio del programma viene emesso un segnale acustico. Quando si utilizes lo stampo per dolci, andare direttemente al passaggio 2.
5. Si utilizes un molde para pan: Paso 1: elija el时间为 del pan y el color de la corteza pulsando los botones varias vezes hasta que los indicadores muestren las OPCIONES elegidas. Paso 2: pulse, sin soltarlo, el boton de marcha durante 2 o 3segundos. Sonar una alerta antes de que comience el programa. Si utilizes un molde para tartas, vaya directamente al paso 2.
6. 1) To pause the programme, press the start/stop button a. 2) To stop or cancel the programme, press the stop button for 1 sec. When baking cycle is finished, unplug cord. Lift out bread or cake pan using oven gloves, turn out onto a plate and leave bread to cool for at least 30 minutes before slicing it. Immediately clean bread pan and kneader after use (see Cleaning section).
6. 1) Pourmettre en pause le programme, appuyez sur le bouton Start/ Stop > 0 2) Pour arrerou annuler le programme, appuyez le bouton Start/ Stop 1s.Lorsquele cycle de préparation est terminé,debranchez le cordon d'alimentation.Retirezle moule a pain ou agateau a'aide de maniques,démoulez la préparation sur une assiette et laissezla refroidir au moins 30 minutes avant de la découvert.Nettoyezle moule et le pétisseur immidiatement après usage (voir la section Nettoyage).
6. 1) PerMETTERe inpasa ilprogramma, premerei pulsante di avvio/arresto 2)Per interrompere o annullare ilprogramma, tenere premuto il pulsante STOP per 1Secondo.Al terminale del ciclo di cottura, scollegare i cavodi alimentazione.Estrarre lo stampo per pane o per dolci utilizzando dei guanti da forno, rovesciario su un pietto e lasciar raffredare il prodotto da forno per almeno 30 minuti prima di affettarulo.Pulire lo stamo e l'impastatrice immediamente aftero I'uso (vedere la sezione Pulizia).
6. 1) Para hacer una suspensa en el programa, pulse the botón de marcha/parada ▷q. 2) Para parar o cancelar el programa, pulse the botón de parada. Una vez finalizo el ciclo de coccción,desconecte el cable.Extraiga el molde para pan o tartas con quantes para horno, déle la vuelta sobre un plato y espere a que se enfièr el pan durante al menos 30关键时刻 antes de cortarlo en rebanadas.Limpie de immediatio el molde para pan y la amasadorauponés de su uso (consulte la sección de limpieza).
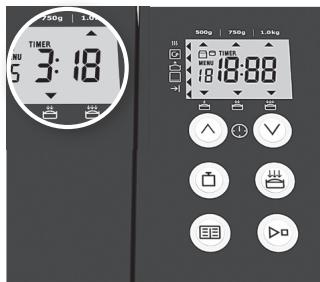
Delayed start / Départ différé Ritardo di avvio / Inicio aplazo
GB
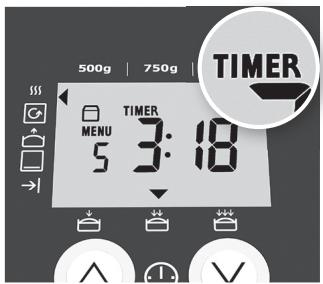
The delayed start ① enables delay of bread making process up to 12 hours (cannot be used with the Super Rapid programme and is not recommended for use with dough, jam or gluten free settings). Do not use delayed start if using programme 8 to 16 and perishable ingredients (milk, eggs, yeast, etc).
F
Cleaning / Nettoyage
Pulizia / Limpieza
-
Always unplug bread maker and allow to cool before cleaning. Do not immerse the bread maker body in water. Do not use dishwasher, abrasive scouring pads or metal implements.
-
Débranche systématiquement la machine et laissez-la refroidir avant de la nettoyer. Ne pas utiliser de tampons à récurer abrasifs ni d'instruments metalliques.
-
Scollegare sempre l'apparecchio dall'alimentazione e lasciarlo raffreddare prima di pulirlo. Non immershere il corso dell'apparecchio in acqua. Non utilizzato lavastoviglie, spugnette abrasive o utensili di metallo.
-
Desconecte siempre la panificadora y espere a que se enfrie antes de limpiarla. No suerja el cuero de la panificadora en el agua. No utilise lavaplatos, estropajos abrasivos ni utensilios de metal.

- To remove kneader, lift off. If kneader cannot be removed after 10 minutes, hold shaft from underneath pan and twist back and forth until kneader is released. Clean, rinse and dry. (When the blade folds down automatically from a 30^ angle it is completely cleaned.)
- Pour-retirer la pale auto-rabattable, soulevez-la. Si vous ne parvenez pas à-retirer la pale 10 minutes après l'interruption de la machine, maintenance l'axe sous le moule et exercer un mouvement de va-et-vient jusqu'à ce que la pale se libre. Nettoyez, rincez et séchez la pale. La pale est parfaitement nettoyée lorsqu'elle se rabat sans effort.
- Per rimuovere l'impastatrice, sollevarla. Se dopo 10 minuti non è possible rimuovere l'impastatrice, tenere l'albero da fatto lo stampo e ruotare avanti e indietro fina a provocare il rilascio dell'impastatrice. Lavare, sciacquare e asciugare. Quando la lamà si ripiega automaticamente da un angolo di 30^ l'impastatrice è completenesse pulita.
- Para extraer la amasadora, levántela. Si nodea sacarla despues de 10 instantos, sujepte el eje por la parte de abajo del molde, y gire atrás y adelante hasta liberar la amasadora. Limpiela, acárela y sequela. (Cuando la cucilla se piaga hacía abajo automatistically desde un ángulo de 30^ ,estara totalmente limpia.)
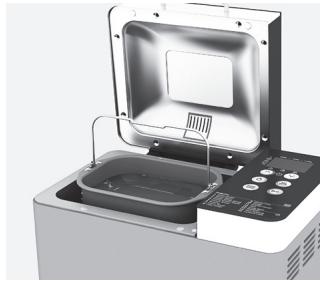
- To clean bread or cake pan. Do not immerse the outside base of the pan, just partially fill with warm soapy water. Leave to soak for 5 to 10 minutes. Outside and inside surfaces are cleaned with a soft damp cloth. Lid can be lifted off for cleaning.
- Pour nettoyer le moule à pain ou à gâteau, ne plongez pas sa base extérieure dans l'eau, il vous suffit de le replir partiellement d'eau chaude savonnue. Laissez l'eau agir pendant 5 à 10 minutes. Nettoyz les surfaces extérieures et interieures de la machine avec un chiffon doux humide. Le couvercle peut être retire si nécessaire.
- Per pulire lo stampo per pane o per dolci, non immershere la base esterna dello stampo, ma riempirla solo parzialmente con acqua saponata calda. Lasciare in ammollo per 5-10 minuti. Per la pulizia delle superfici esterne e interne, utilizzare un panno morbido inumidito. Per le operazioni di pulizia il coperchio più essere sollevato e rimioso.
- Para limpiar el molde para pan o tartas. Nosumaja la base exterior del molde,sole Ilenela parcialmente con agua jabonosa caliente.Dejela a remojo entre 5 y 10 minutos.Las superficies exteriores e interiores se limpian con un paño suave y humedo. Se pueda retirar la tapa para la limpieza.
Disposal / Mise au rebut
Bread/dough programme chart
| BREAD PAN ☐ | |||||||
| Index | Type | Crust | Size | Total | Extras | Warm | Delay max |
| 8 | Cake 500gr | N/A | 500g | 01:22 | - | 22 | 12:00 |
| 9 | Gluten Free | Medium | 750g | 02:54 | 02:37 | 60 | 12:00 |
| 1.0kg | 02:59 | 02:42 | 60 | 12:00 | |||
| 10 | Dough | - | ≤1.0kg | 01:30 | 01:14 | - | 12:00 |
| 11 | Artisan Dough | - | - | 05:15 | 04:39 | - | 12:00 |
| 12 | Jam | - | ≤1.0kg | 01:25 | - | 20 | 12:00 |
| 13 | Extra Bake | - | - | 10-90 | - | 60 | - |
| CAKE PAN ☐ | |||||||
| 14 | Moelleux | - | 270g | 01:28 | - | 22 | - |
| 15 | Rice Pudding | - | 270g | - | 22 | - | |
| 16 | Custard | - | 270g | - | 22 | - | |
| Notes | 1. An alert will sound (8 buzzes) to add ingredients if the recipe recommends doing so. | ||||||
| 2. Extra Bake default time set is 10 minutes, and Max delay time is 90 minutes (1:30) | |||||||
| 3. For the bread pan programmes (excl. programme 10 and 11), the bread maker will automatically go into the keep warm mode at the end of the baking cycle. It will stay in this mode for up to 1 hour or until the machine is turned off. | |||||||
| PROGRAMME STATUS INDICATOR | ||
| Symbol | Name | Explanation |
| Pre-heat feature | Used only for the wholewheat, wholewheat rapid and gluten free settings to warm ingredients before kneading. | |
| Kneading symbol | Indicates dough is in first or second kneading stage or being knocked back between rising cycles. A buzz will tell when to add additional ingredients manually. | |
| Rise symbol | Indicates dough is either in first, second or third rising cycle. | |
| Bake symbol | Indicates loaf is in the final baking cycle. | |
| → | Keep warm mode | Automatically starts when baking cycle ends. Keep warm mode continues for one hour or until machine is turned off. |
Troubleshooting
GB
| BREAD PAN ☐ | ||
| LOAF SIZE AND SHAPE | ||
| Problem | Possible cause | Solution |
| Bread does not rise enough | Wholemeal breads will be lower than white breads due to less glutenforming protein in whole wheat flour. | Normal situation, no solution. |
| Not enough liquid. | Increase liquid by 15ml/3 tsp. | |
| Sugar omitted or not enough added. | Assemble ingredients as listed in recipe. | |
| Wrong type of flour used. | You may have used plain white flour instead of strong bread flour which has a higher gluten content. Do not use all-purpose flour. | |
| Wrong type of yeast used. | For best results use only fast action "easy blend" yeast. | |
| Not enough yeast added or too old. | Measure amount recommended and check expiry date on package. | |
| Rapid bread cycle chosen. | This cycle produces shorter loaves. This is normal. | |
| Yeast and sugar came into contact with each other before kneading cycle. | Make sure they remain separate when added to bread pan. | |
| Flat loaf, no rising. | Yeast omitted or too old. | Assemble ingredients and check expiry date. |
| Liquid too hot. | Check recipe for correct liquid temperature. | |
| Too much salt added. | Use amount recommended. | |
| If using timer, yeast got wet before bread making process started. | Place dry ingredients into corners of pan. Protect yeast from liquids by making slight well in centre of dry ingredients. | |
| Top inflated – mushroom-like in appearance. | Too much yeast. | Reduce yeast by 1/4 tsp. |
| Too much sugar. | Reduce sugar by 1 tsp. | |
| Too much flour. | Reduce flour by 6 to 9 tsp. | |
| Not enough salt. | Use amount of salt recommended in recipe. | |
| Warm, humid weather. | Reduce liquid by 15ml/3 tsp and yeast by 1/4 tsp. | |
| Top and sides cave in. | Too much liquid. | Reduce liquid by 15ml/3 tsp next time or add a little extra flour. |
| Too much yeast. | Use amount recommended in recipe or try a quicker cycle next time. | |
| High humidity and warm weather may have caused dough to rise too fast. | Chill water or add milk straight from fridge. | |
| Gnarly, knotted top – not smooth. | Not enough liquid. | Increase liquid by 15ml/3 tsp. |
| Too much flour. | Measure flour accurately. | |
| Tops of loaves may not all be perfectly shaped, however, this does not affect wonderful flavour of bread. | Make sure dough is made under the best possible conditions. | |
| Collapsed while baking. | Machine was placed in a draught or may have been knocked or jolted during rising. | Reposition bread maker. |
| Exceeding capacity of bread pan. | Do not use more ingredients than recommended for large loaf (max. 1Kg). | |
| Not enough salt used or omitted (salt helps prevent the dough over proving). | Use amount of salt recommended in recipe. | |
| Too much yeast. | Measure yeast accurately. | |
| Warm, humid weather. | Reduce liquid by 15ml/3 tsp and reduce yeast by 1/4 tsp. | |
| Loaves uneven, shorter on one end. | Dough too dry and not allowed to rise evenly in pan. | Increase liquid by 15ml/3 tsp. |
| Foldable blade does not stand up during kneading process. | Blade was not cleaned very well. | Clean the blade (see cleaning section). |
Troubleshooting
| BREAD PAN ☐ | ||
| BREAD TEXTURE | ||
| Problem | Possible cause | Solution |
| Heavy dense texture | Too much flour. | Measure accurately. |
| Not enough yeast. | Measure accurately. | |
| Not enough sugar. | Measure accurately. | |
| Open, course, holey texture. | Salt omitted. | Assemble ingredients as listed in recipe. |
| Too much yeast. | Measure right amount of recommended yeast. | |
| Too much liquid. | Reduce liquid by 15ml/3 tsp. | |
| Centre of loaf is raw, not baked enough. | Too much liquid. | Reduce liquid by 15ml/3 tsp. |
| Power cut during operation. | If power is cut during operation for more than 8 minutes you will need to remove unbaked loaf from pan and start again with fresh ingredients. | |
| Quantities were too large and machine could not cope. | Reduce amounts to maximum quantities allowed. | |
| Bread doesn't slice well, very sticky. | Sliced while too hot. | Allow bread to cool on rack at least 30 minutes before slicing. |
| Not using proper knife. | Use a good bread knife. | |
| CRUST COLOUR AND THICKNESS | ||
| Problem | Possible cause | Solution |
| Dark crust colour/too thick | DARK crust setting used. | Use medium or light setting next time. |
| Loaf of bread is burnt. | Bread maker malfunctioning. | Refer to "Service and customer care" section. |
| Crust too light. | Bread not baked long enough. | Extend baking time. |
| No milk powder or fresh milk in recipe. | Add 15ml/3 tsp skimmed milk powder or replace 50% of water with milk to encourage browning. | |
| PAN PROBLEMS | ||
| Problem | Possible cause | Solution |
| Kneader cannot be removed. | Kneader is stuck due to dried dough remains. | Add water to bread pan and allow kneder to soak. Then you may need to twist kneder slightly to remove it (see cleaning section). |
| Bread sticks to pan/difficult to shake out. | Can happen over prolonged use. | Lightly wipe the inside of bread pan with vegetable oil. |
| Refer to "Service and customer care" section. | ||
Troubleshooting
GB
| CAKE PAN | ||
| LOAF SIZE AND SHAPE | ||
| Problem | Possible cause | Solution |
| Cake does not rise enough. | Eggs were not mixed to viscous material. | Use egg breaking machine to mix eggs. |
| Sugar omitted or not enough added. | Mix the ingredients as listed in recipe. | |
| Wrong type of cake flour used. | Do not use all-purpose cake flour. | |
| Flat loaf, no rising. | Eggs were not mixed even enough. | Use egg breaking machine to mix eggs. |
| Required standard recipe was not used. | Apply standard recipe. | |
| Cake surface is cracked. | Not correct amounts of sugar, salt, flour and/ or liquid. | Check recipe ingredients. |
| Top and sides cave in. | Too much liquid. | Reduce liquid amount. |
| Eggs were not mixed even enough. | Use egg breaking machine to mix eggs. | |
| Gnarly, knotted top - not smooth | Not enough liquid. | Add more milk or water. |
| Too much cake flour. | Reduce cake flour. | |
| Tops of loaves may not all be perfectly shaped - no effect on flavour. | Make sure cake is made under the best possible conditions. | |
| Collapsed while baking. | Machine was placed in a draught or may have been knocked or jolted during rising. | Reposition cake. |
| Exceeding capacity of cake pan. | Do not use more ingredients than recommended. | |
| Salt omitted or not enough used. | Use amount of salt recommended in recipe. | |
| Too much cake flour. | Measure the cake flour accurately. | |
| Warm, humid weather. | Reduce liquid amount. | |
| CRUST COLOUR AND THICKNESS | ||
| Problem | Possible cause | Solution |
| Dark crust colour/crust too thick. | Cake was not removed immediately after baking. | Remove immediately after baking. |
| Loaf of cake is burnt. | Bread maker malfunctioning. | See "Service and customer care" section. |
| Crust too light. | Cake was not baked long enough. | Extend baking time. |
| CAKE PAN | ||
| Problem | Possible cause | Solution |
| Kneader cannot be removed. | Kneader is stuck due to dried dough remains. | Add water to bread pan and allow kneader to soak. Then you may need to twist kneader slightly to remove it (see cleaning section). |
| Cake cannot be poured out. | The blade was stuck in the cake. | Wear gloves and rotate the fork by hand to separate blade from cake. |
| The cake is sticking to the cake pan. | Not enough cake oil. | |
| Cake pan cannot be lifted up. | Base for cake pan and bottom base coupling may be deformed or some foreign body inside. | Carefully rotate cake pan in left and right direction to loosen it. |
Troubleshooting
| MACHINE MECHANICS | ||
| Problem | Possible cause | Solution |
| Bread maker not operating/Kneader not moving. | Pan not correctly located. | Check the pan is locked in place. |
| Delay timer selected. | Bread maker will not start until count down reaches programme start time. | |
| Ingredients not mixed. | Did not start bread maker. | After programming control panel, press start button to turn bread maker on. |
| Pan not correctly locked in place. | Check pan is in accurate position. | |
| Forgot to put kneader in pan or blade did not stand up. | Always make sure kneader is on shaft in the bottom of the pan before adding ingredients. Also make sure blade is completely clean. | |
| Burning odour noted during operation. | Ingredients spilled inside oven. | Be careful not to spill ingredients when adding to pan. Ingredients can burn on heating unit and cause smoke. |
| Pan leaks. | See "Service and Customer care" section. | |
| Exceeding capacity of bread pan. | Do not use more ingredients than recommended in recipe and always measure ingredients accurately. | |
| Machine unplugged by mistake or power lost during use. How can I save the bread? | If machine is in knead cycle, discard ingredients and start again. | |
| If machine is in rise cycle, remove dough from bread pan, shape and place in greased 23 x 12.5cm/9 x 5 in. loaf tin, cover and allow to rise until doubled in size. Use bake only setting 13 or bake in pre-heated conventional oven at 200°C/400°F/Gas mark 6 for 30-35 minutes or until golden brown. | ||
| If machine is in bake cycle, use bake only setting 13 or bake in pre-heated conventional oven at 200°C/400°F/Gas mark 6 and remove top rack. Carefully remove pan from machine and place on bottom rack in oven. Bake until golden brown. | ||
| E:01 appears on display and machine cannot be turned on. | Baking compartment too hot. | Unplug and allow to cool down for 30 minutes. |
| H:HH & E:EE appears in display and machine does not operate. | Bread machine is malfunctioning. Temperature sensor error. | See "Service and Customer care" section. |
| E:00 appears on display during program 15 | Baking compartment too cold | Start program 13 (Bake) for 3-5 minutes to warm up the machine and then restart program 15. |
GB
| BREAD PAN ☐ | |||
| WHITE BREAD – setting: 1 and 2 | |||
| Ingredients | 1 kg | 750 g | 500 g |
| Water | 360 ml | 310 ml | 205 ml |
| Oil | 2 tbsp | 1 1/2 tbsp | 1 tbsp |
| Salt | 2 tsp | 1 1/2 tsp | 1 tsp |
| Sugar | 3 tbsp | 2 tbsp | 1 1/2 tbsp |
| Dried skimmed milk powder | 2 tbsp | 1 1/2 tbsp | 1 tbsp |
| White bread flour | 4 1/2 cups | 3 1/4 cups | 2 1/4 cups |
| Dried yeast | 2 tsp | 1 1/4 tsp | 1 + 1/3 tsp |
| WHOLE WHEAT BREAD – setting: 3 and 4 | |||
| Ingredients | 1 kg | 750 g | 500 g |
| Water | 360 ml | 310 ml | 205 ml |
| Butter/Margarine | 3 tbsp | 2 tbsp | 1 1/2 tbsp |
| Salt | 2 tsp | 1 1/2 tsp | 1 tsp |
| Soft brown sugar | 4 tbsp | 3 tbsp | 2 tbsp |
| Dried skimmed milk powder | 3 tbsp | 2 tbsp | 1 1/2 tbsp |
| Whole wheat bread flour | 4 1/3 cups | 3 1/4 cups | 2 cups |
| Dried yeast | 2 1/2 tsp | 1 1/2 tsp | 1 tsp |
| FRENCH BREAD – setting: 5 | |||
| Ingredients | 1 kg | 750 g | 500 g |
| Water | 330 ml | 290 ml | 165 ml |
| Olive oil | 2 tbsp | 1 tbsp | 1 tbsp |
| Salt | 1 1/2 tsp | 1 tsp | 3/4 tsp |
| Sugar | 2 tbsp | 1 1/4 tbsp | 1 tbsp |
| White bread flour | 4 cups | 3 1/4 cups | 2 1/4 cups |
| Dried yeast | 2 tsp | 1 1/2 tsp | 1 1/4 tsp |
| BRIOCHE – setting: 6 | |||
| Ingredients | 1 kg | 750 g | 500 g |
| Water | 310 ml | 250 ml | 155 ml |
| Oil | 2 tbsp | 1 tbsp | 1 tbsp |
| Salt | 2 tsp | 1 1/2 tsp | 1 tsp |
| Sugar | 2 tbsp | 2 tbsp | 1 tbsp |
| Dry milk | 2 tbsp | 1 1/2 tbsp | 1 tbsp |
| Bread flour | 4 1/4 cups | 3 cups | 2 1/2 cups |
| Active dry yeast | 3 tsp | 1 tsp | 1 tsp |
| SUPER RAPID – setting: 7 | |
| Ingredients | 1 kg |
| Water | 330 ml |
| Oil | 2 tbsp |
| Salt | 2 tsp |
| Sugar | 2 tbsp |
| Dry milk | 2 tbsp |
| Bread flour | 4 cups |
| Active dry yeast | 2 tsp |
Recipes (add ingredients according to listed order)
| BREAD PAN ☐ | |
| CAKE 500 g – setting: 8 | |
| Ingredients | 500 g |
| Milk | 1 cup |
| Butter | 2 tsp |
| Eggs | 2 |
| Sugar | ¼ tbsp |
| Essence | ¾ tsp |
| Cake flour | ¾ cups |
| Baking yeast | ½ tsp |
| GLUTEN FREE – setting: 9 | ||
| Ingredients | 1 kg | 750 g |
| Water | 310 ml | 250 ml |
| Oil | 3 tbsp | 3 tbsp |
| Salt | 1 1/2 tsp | 1 1/2 tsp |
| Sugar | 3 tbsp | 3 tbsp |
| Eggs | 3 | 2 |
| Vinegar | 1 tsp | 1 tsp |
| Mix flour | 450 g | 390 g |
| Xanthan gum | 1 tbsp | 1 tbsp |
| Dried yeast | 1 1/2 tsp | 1 1/2 tsp |
| DOUGH – setting: 10 and 11 | |
| Ingredients | |
| Water | 290 ml |
| Oil | 2 tbsp |
| Salt | 1 1/2 tsp |
| Sugar | 2 tbsp |
| Dried milk | 1 1/2 tbsp |
| White bread flour | 3 1/2 cups |
| Dried yeast | 1 1/2 tsp |
| JAM - setting: 12 | |||
| Ingredients | |||
| Water | 2 tbsp | ||
| Lemon juice | 2 tbsp | ||
| Sugar | 2 tbsp | ||
| Jam | 2 tbsp | ||
| Orange | 500 g | ||
| EXTRA BAKE BREAD – setting: 13 | |||
| Ingredients | 1 kg | 750 g | 500 g |
| Water | 310 ml | 250 ml | 155 ml |
| Oil | 2 tbsp | 2 tbsp | 1 tbsp |
| Salt | 2 tsp | 1 1/2 tsp | 1 tsp |
| Sugar | 2 tbsp | 2 tbsp | 1 tbsp |
| Dry milk | 2 tbsp | 1 1/2 tbsp | 1 tbsp |
| Bread flour | 4 1/4 cups | 3 cups | 2 1/2 cups |
| Active dry yeast | 3 tsp | 2 tsp | 1 tsp |
GB
| CAKE PAN ☐ | |||
| MOELLEUX – setting: 14 | |||
| Ingredients | |||
| Butter | 75 g | ||
| Lemon juice | 100 ml | ||
| Sugar | 50 g | ||
| Egg | 1 | ||
| Flour | 190 g | ||
| Baking powder | ½ tbsp | ||
| Bicarbonate soda | ½ tsp | ||
| Salt | 1 pinch | ||
| RICE PUDDING - setting: 15 | |||
| Ingredients | |||
| Milk (fat 3%) | 0.5 l | ||
| Round rice | 90 g | ||
| Sugar | 60 g | ||
| Vanilla bean | ½ | ||
| CUSTARD CAKE – setting: 16 | |||
| Ingredients | |||
| Milk | 400 ml | ||
| Sugar | 30 g | ||
| Eggs | 3 | ||
| Vanilla beans | |||
F
MOULE A PAIN
| Réf. | Désignation | Croûte | Taille | Temps de préparation | Ajout d'ingredients | Maintien au chaud | Départ différé |
| 1 | Pain blanc | Claire | 500 g | 02:57 | 02:37 | 60 | 12:00 |
| 750 g | 03:00 | 02:40 | 60 | 12:00 | |||
| 1 kg | 03:03 | 02:43 | 60 | 12:00 | |||
| Moyenne | 500 g | 03:05 | 02:45 | 60 | 12:00 | ||
| 750 g | 03:10 | 02:50 | 60 | 12:00 | |||
| 1 kg | 03:15 | 02:55 | 60 | 12:00 | |||
| Foncée | 500 g | 03:20 | 03:00 | 60 | 12:00 | ||
| 750 g | 03:25 | 03:05 | 60 | 12:00 | |||
| 1 kg | 03:30 | 03:10 | 60 | 12:00 | |||
| 2 | Blanc rapide | Claire | 500 g | 02:32 | 02:12 | 60 | 12:00 |
| 750 g | 02:35 | 02:15 | 60 | 12:00 | |||
| 1 kg | 02:38 | 02:18 | 60 | 12:00 | |||
| Moyenne | 500 g | 02:40 | 02:20 | 60 | 12:00 | ||
| 750 g | 02:45 | 02:25 | 60 | 12:00 | |||
| 1 kg | 02:50 | 02:30 | 60 | 12:00 | |||
| Foncée | 500 g | 02:55 | 02:35 | 60 | 12:00 | ||
| 750 g | 03:00 | 02:40 | 60 | 12:00 | |||
| 1 kg | 03:05 | 02:45 | 60 | 12:00 | |||
| 3 | Pain complet | Claire | 500 g | 04:15 | 03:31 | 60 | 12:00 |
| 750 g | 04:19 | 03:35 | 60 | 12:00 | |||
| 1 kg | 04:23 | 03:39 | 60 | 12:00 | |||
| Moyenne | 500 g | 04:20 | 03:36 | 60 | 12:00 | ||
| 750 g | 04:25 | 03:41 | 60 | 12:00 | |||
| 1 kg | 04:30 | 03:46 | 60 | 12:00 | |||
| Foncée | 500 g | 04:29 | 03:45 | 60 | 12:00 | ||
| 750 g | 04:35 | 03:51 | 60 | 12:00 | |||
| 1 kg | 04:39 | 03:55 | 60 | 12:00 | |||
| 4 | Complet rapide | Claire | 500 g | 02:29 | 02:10 | 60 | 12:00 |
| 750 g | 02:33 | 02:14 | 60 | 12:00 | |||
| 1 kg | 02:37 | 02:18 | 60 | 12:00 | |||
| Moyenne | 500 g | 02:34 | 02:15 | 60 | 12:00 | ||
| 750 g | 02:39 | 02:20 | 60 | 12:00 | |||
| 1 kg | 02:44 | 02:25 | 60 | 12:00 | |||
| Foncée | 500 g | 02:43 | 02:24 | 60 | 12:00 | ||
| 750 g | 02:49 | 02:30 | 60 | 12:00 | |||
| 1 kg | 02:53 | 02:34 | 60 | 12:00 | |||
| 5 | Pain français | Claire | 500 g | 03:12 | 02:53 | 60 | 12:00 |
| 750 g | 03:23 | 03:04 | 60 | 12:00 | |||
| 1 kg | 03:34 | 03:15 | 60 | 12:00 | |||
| Moyenne | 500 g | 03:32 | 03:13 | 60 | 12:00 | ||
| 750 g | 03:36 | 03:17 | 60 | 12:00 | |||
| 1 kg | 03:40 | 03:21 | 60 | 12:00 | |||
| Foncée | 500 g | 03:35 | 03:16 | 60 | 12:00 | ||
| 750 g | 03:42 | 03:23 | 60 | 12:00 | |||
| 1 kg | 03:44 | 03:25 | 60 | 12:00 | |||
| 6 | Brioche | Claire | 500 g | 03:17 | 02:57 | 60 | 12:00 |
| 750 g | 03:19 | 02:59 | 60 | 12:00 | |||
| 1 kg | 03:21 | 03:01 | 60 | 12:00 | |||
| Moyenne | 500 g | 03:19 | 02:59 | 60 | 12:00 | ||
| 750 g | 03:22 | 03:02 | 60 | 12:00 | |||
| 1 kg | 03:25 | 03:05 | 60 | 12:00 | |||
| Foncée | 500 g | 03:23 | 03:03 | 60 | 12:00 | ||
| 750 g | 03:26 | 03:06 | 60 | 12:00 | |||
| 1 kg | 03:29 | 03:09 | 60 | 12:00 | |||
| 7 | Pain rapide | Moyenne | 750 g | 00:58 | - | 60 | - |
GB
F
1
E
P
S
NL
FI
N
RU
SK
CZ
HR
PL
RO
HU
No 06CnykINBaHnIO NInI dpynIM
Bcerda ctabbe yctpoiCTBO Ha nloCKyo rOpnoHTaJIbHyIO nOBepXHOCTb.
IpeedobcnymbaHmNCHtKoY6eNTecb,TOBnKaBHyTaN3cTeN.
BoBpMa pa60tbyycTpoIcBO npHADJNEKHOCTN HArpeBAIOCTC. IOnb3yIeTcBToLbKO HxHybIMn pyKoRTkAMn IHONKAMn.BcerdaI OInb3yIeTcBnpNXBaTKAMn,BbIHmamra rotpuyoΦOmydJeXne6a.Ipepe YCHCTKOn I XpaHeHem DaTe MaunHe OCTBtB.
- UHyp PnIaTHaN He OJOLjKeH cOpNPKacTaBcra TROPYHMn CaTAmy UCTPOJCTBA.
He 3akpbibaTe OTBepctnIa B03dynxHa o6eCneUte BENTINJIACIO BOKpyr pa6oTaIoero yCTpoiCTBa.He co6NIOJAA 3nYcNOBnB, Bb pNUCKyete NOBpeDInb yCTpoiCTBO.
He tropaTte DBeNkUyIeNecA CTaHpyKAMn IINu INCTpyMeHTAmn, ECNJIYCTPOJTHBO BVKNUOHEO B CTeB.
He norgykaIte yctpoIcTBo B Body nn Hnyo JxndKocTb.
- П repbillaЯ МakcmaJbHbIy 6bem, yka3aHbI b peCNTax
COOTBeTCTBHyUOxHΦOpM DЯ BbIeUcKb, Bbl pNCKyTe NOBpeJtB yCTpoICTBO.
ДанhoeустбToРepdHa3aHcHoe 对NcNoB3ObAHnT OJbKO B DOMaUHHx UcOBnXu.N3rOToBtIeNb He HecET OTBeTBcHeHocHTn 3a BO3MOxKhIbe NObpeKdEHNiI3a HeHaJIeKaAeero PnpMeHEnHn.

SK
OuICTe BHeHIne N BHTpeHHne noBepxHocn YBaJXHEHHO MAFKOI TKAhblO.KpblKU MOXHO CHRTb H BblMbitL.
MHДКATOP COCTOHHI PIOPTPAMMbI
Share more of our thinking at www.electrolux.com
3484E EBM8000 02021209
Brand : ELECTROLUX
Model : EBM 8000, EBM8000, EBM8000
Category : Bread maker