
BABYPHONE DECT 570/00 - Baby monitor PHILIPS AVENT - Free user manual and instructions
Find the device manual for free BABYPHONE DECT 570/00 PHILIPS AVENT in PDF.
User questions about BABYPHONE DECT 570/00 PHILIPS AVENT
0 question about this device. Answer the ones you know or ask your own.
Ask a new question about this device
Download the instructions for your Baby monitor in PDF format for free! Find your manual BABYPHONE DECT 570/00 - PHILIPS AVENT and take your electronic device back in hand. On this page are published all the documents necessary for the use of your device. BABYPHONE DECT 570/00 by PHILIPS AVENT.
USER MANUAL BABYPHONE DECT 570/00 PHILIPS AVENT
Always here to help you
Register your product and get support at
www.philips.com/welcome
SCD570

User manual
ENGLISH 6
DANSK 14
DEUTsCH 22
EAAHNIKA 31
ESPANOL 40
SUOMI 48
FRANÇAIS 56
ITALIANO 65
NEDERLANDS 73
NORSK 81
PORTUGUES 89
SVENSKA 98
TÜRKÇE 106
122
Introduction
Go to www.philips.com/welcome to register your product and to read the detailed user manual.
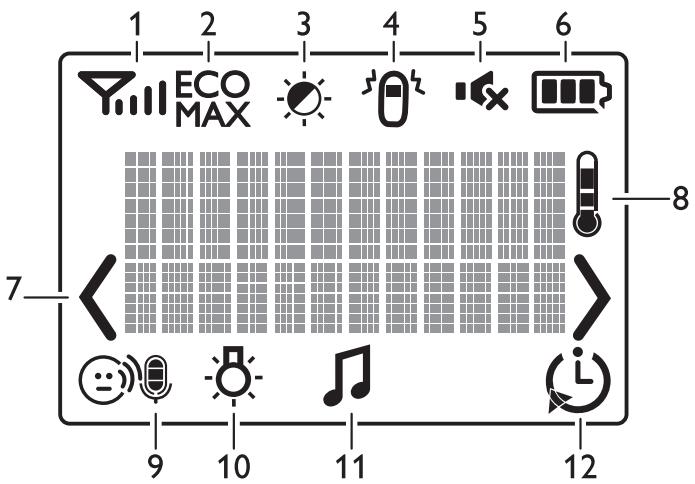
Display of the parent unit (Fig.1)
1 Signal strength indicator
2 Eco Max indicator
3 Night dim mode symbol
4 Cry alert indicator
5 Mute symbol
6 Battery status indicator
7 Navigation arrow
8 Temperature symbol
9 Microphone sensitivity indicator
10 Nightlight symbol
11 Lullaby symbol
12 Timer or timer repeat symbol
Preparing for use
IMPORTANT: Read the safety instructions carefully before you use the baby monitor and keep them for future reference.
Baby unit
We advise you to use the baby unit from the mains. To guarantee automatic power backup in case of mains failure, you can insert four 1.5V AA alkaline batteries (not included).
Do not use rechargeable batteries. The baby unit does not have a charging function and rechargeable batteries discharge slowly when they are not in use.
Parent unit
The parent unit runs on two rechargeable batteries that are supplied with the baby monitor.
Charge the parent unit before you use it for the first time and when the batteries are low.
Please note that you have to charge the parent unit for the full 10 hours to have a cordless operating time of 18 hours.
Note: When you start using the baby monitor, it takes four charge and discharge cycles before the rechargeable batteries reach their full capacity.
Using the baby monitor
Positioning the baby monitor
Keep the baby unit out of the reach of the baby. Never place the baby unit inside the baby's bed or playpen.
- Because the cord of the baby unit presents a potential strangulation hazard, make sure that the baby unit and its cord are at least 1 metre/3.5 feet away from your baby.
- To prevent a high-pitched sound from one or both units, make sure the parent unit is at least 1 metre/3.5 feet away from the baby unit.
Linking parent unit and baby unit
Press and hold the button on the baby unit for 2 seconds until the power-on light goes on.
Press and hold the button on the parent unit for 2 seconds until the display lights up.
The 'link' light on the parent unit starts flashing red and the message 'I AM LINKING' appears on the display.
- When the parent unit and baby unit are linked, the 'link' light turns solid green. The signal strength indicator and the message 'LINKED' appear on the display.
If no connection is established, the message NOT LINKED is displayed and the parent unit starts to beep.
What to do if no link is established
- If the parent unit is out of range, place it closer to the baby unit, but not closer than 1 metre/3.5 feet.
- If the baby or parent unit is too close to another DECT appliance (e.g. a cordless phone), switch off this appliance or move the unit away from this appliance.
- If the baby unit is switched off, switch it on.
Operating range
- The operating range is 330 metres/1000 feet outdoors and up to 50 metres/150 feet indoors.
- The operating range of the baby monitor varies depending on the surroundings and factors that cause interference. Wet and moist materials cause so much interference that the range loss is up to 100% . For interference from dry materials, see table below
| Dry materials | Material thickness | Loss of range |
| Wood, plaster, cardboard, glass (without metal, wires or lead) | < 30cm (12in) | 0-10% |
| Brick, plywood | < 30cm (12in) | 5-35% |
| Reinforced concrete | < 30cm (12in) | 30-100% |
| Metal grilles or bars | < 1cm (0.4in) | 90-100% |
| Metal or aluminium sheets | < 1cm (0.4in) | 100% |
Functions and feedback on the baby unit
Nightlight
The nightlight produces a soft glow that comforts your baby.
1 Press the button on the baby unit to switch on the nightlight.
Press the button again to switch off the nightlight.
Lullaby function
1 Press the button on the baby unit to play the last selected lullaby. (Fig. 2)
The selected lullaby repeats for 15 minutes.
Press the button to select another lullaby from the list. (Fig. 3)
3 To adjust the sound level of the lullaby, press the volume + or the volume - button on the baby unit (Fig. 4).
Note: You can only set the loudspeaker volume on the baby unit when a lullaby is playing. If you set the volume for the lullaby higher, the sound will also be louder when you use the talk function on the parent unit.
4 To stop lullaby playing, press the button on the baby unit.
Paging the parent unit
If you have lost the parent unit, you can use the FIND button on your baby unit to locate the parent unit. This function only works when the parent unit is switched on.
1 Press FIND on the baby unit and the parent unit produces a paging alert tone (Fig. 5).
To stop the paging alert tone, press FIND on the baby unit again or press any button on the parent unit. The paging alert tone stops automatically after 2 minutes.
Battery status light
1 The battery status light is solid green when the baby unit runs on battery power and the batteries contain enough energy.
The battery status light flashes red quickly when the batteries run low while the baby unit is running on battery power.
- Replace the batteries when they run low.
Functions and feedback on the parent unit
Volume
The volume can be set if the menu is not active. There are seven volume levels and a 'volume off' setting.
Setting the volume level
1 Press the ^+ button or the - button once.
The current volume level appears on the display.
2 Press the ^+ button to increase the volume or press the - button to decrease the volume.
If no button is pressed for more than 2 seconds, the volume level indication disappears and the volume setting is saved.
Volume off
Below the lowest volume setting, there is a 'volume off' setting.
1 Press the + button or the - button once.
The current volume level appears on the display.
Press and hold the - button for more than 2 seconds to set the volume to off.
The message 'MUTE' and the mute symbol appear on the display (Fig. 6).
Note: If the volume is off, only the sound level lights show that the baby produces sounds.
Talk function
1 If you want to comfort your baby, press TALK on the parent unit and talk clearly into the microphone on the front from a distance of 15-30cm (0.5-1ft) (Fig. 7).
Note: If you have set the volume for the lullaby higher on the baby unit, the sound will also be louder when you use the talk function on the parent unit.
The 'link' light starts flashing green and 'TALK' appears on the display.
2 Release TALK when you have finished talking.
Night dim mode
In night dim mode, the light intensity of the lights and the display is reduced and the volume of alert sounds is decreased.
Press the night dim button to activate the night dim mode. The night dim mode symbol appears on the display (Fig. 8).
2 To switch back to normal operating mode, press the night dim button again.
Baby unit battery low alert
1 When the baby unit runs on battery power and its batteries are low, the parent unit beeps and the text 'Baby unit Change batteries' appears on the display.
2 When you do not replace the batteries in time, the link with the baby unit will be lost.
Battery status indications
The battery charge status is indicated on the display by the battery status indicator and by text messages.
Battery low
When the rechargeable batteries are low, 'BATTERY LOW' appears on the display, the status indicator is empty and flashes, and the parent unit beeps. The remaining operating time is at least 30 minutes.
Battery empty
1 If the rechargeable batteries are almost empty, the battery status light flashes red quickly (Fig. 9).
2 If you do not connect the parent unit to the mains, it switches off.
Menu of the parent unit
Navigating the menu
Note: Some menu functions only work when the baby unit and the parent unit are linked.
1 Press the MENU button to open the menu and to make the first menu option appear (Fig. 10).
Use the + button to go to the next option or the - button to go to the previous option. The arrow on the display indicates in which direction you can navigate (Fig. 11).
3 Press the OK button to confirm your selection (Fig. 12).
Note: Press the MENU button if you want to leave the menu without making any changes. If there is no input in the menu for more than 20 seconds, the menu closes automatically.
Sensitivity
This option in the parent unit menu allows you to set the microphone sensitivity of the baby unit. The microphone sensitivity determines what noise level the baby unit picks up, e.g. you will want to hear when your baby cries, but you may be less interested in its babbling.
1 Select 'Sensitivity' in the menu with the + and - buttons and press OK to confirm.
2 Use the + and - buttons to increase or decrease the microphone sensitivity. The number of filled segments shows the sensitivity level selected. Press OK to confirm the setting.
Sensitivity levels and indications
| Icon | Sensitivity | Description |
| ●● | highest | Hear everything from your baby. The speaker of the parent unit is continuously on. |
| ●● | high | Hear all sounds from soft babbling and louder. If your baby does not make any sound, the speaker of the parent unit is off. |
| ●● | medium | Hear sounds from soft cries and louder. If your baby makes softer sounds, the speaker of the parent unit does not go on. |
| ●● | low | The speaker of the parent unit only goes on if the baby makes loud sounds, for instance because it is crying. |
Eco Max mode
Smart Eco is a standard feature on this baby monitor. It automatically reduces the DECT signal from the baby unit to save energy. To save even more energy, activate the Eco Max mode. In this mode, the DECT signal of the baby unit is switched off as long as the baby does not make a sound.
Caution: When the baby makes a sound, there may be a slight delay in response because the DECT signal has to switch on again before the baby unit can send feedback to the parent unit.
Please note the following:
- In Eco Max mode you do not receive feedback when the parent unit is out of range of the baby unit. You can check the link by pressing any button on the parent unit.
- You cannot switch on the Eco Max mode if the microphone sensitivity is set to level 4.
Activating Eco Max mode
1 Select 'Eco Max' in the menu with the + and - buttons and press OK to confirm.
2 When the display shows 'Turn On', press OK to switch on the Eco Max mode.
3 The warning message '!No alert if out of range, OK?' appears on the display. Press OK to confirm.
Note:The warning message scrolls across the display twice. If you do not press OK, the parent unit leaves the menu and the Eco Max mode remains off.
The Eco Max indication flashes on the display and the 'link' light flashes green slowly (Fig. 13).
- When the parent unit receives a DECT signal from the baby unit because the baby makes a sound, the 'link' light turns solid green.
Deactivating Eco Max mode
1 Press the MENU button
2 Use the + and - buttons to select 'Eco Max' and press OK to confirm.
3 When the display shows 'Turn Off', press OK to confirm.
Nightlight
1 To switch the nightlight on the baby unit on, select 'Nightlight' in the menu with the + and - buttons and press OK to confirm.
2 Use the + and - buttons to choose 'Turn On'. The nightlight symbol appears on the display.
3 When the nightlight is on and you want to switch it off, press OK to choose 'Turn Off'. The nightlight symbol disappears from the display
Lullaby
1 To play one or more lullabies on the baby unit, select 'Lullaby' in the menu with the + and - buttons. Press OK to confirm.
Press OK again to play the first lullaby. Use the + and - buttons to select one of the lullabies or 'Play all'.
The display shows the lullaby symbol and the number of the lullaby that is playing. The selected lullaby repeats continuously for 15 minutes, unless you select 'stop' in the menu (Fig. 14).
If you select 'Play all', all pre-stored lullabies are played for 15 minutes. The display shows the number of the lullaby that is playing.
3 To stop playing, select 'Stop' in the menu and press OK to confirm.
Feed timer
You can set the feed timer to alert you that it is time to feed your baby. The timer can be set from 1 minute to 23 hours and 59 minutes.
1 To open the feed timer submenu, select 'Feed Timer' in the menu. Press OK to confirm.
2 Select 'Set Timer' in the feed timer submenu. Press OK to start setting the timer.
3 Set the hour and the minutes and press OK to confirm.
4 To start the feed timer, select 'xx:xx Start' in the feed timer submenu. Press OK to confirm. The timer symbol appears on the display and the timer starts counting down (Fig. 15).
5 When the timer has reached 00:00, the feed timer alert goes off, the timer symbol starts flashing on the display and the message 'TIMER END' scrolls across the display (Fig. 16).
6 To stop the timer, select 'Stop & Reset' in the feed timer submenu and press OK to confirm. Setting the feed timer repeat
1 To make the feed timer go off after the same set time, select 'Timer repeat' in the feed timer submenu after you have set the timer. Press OK to confirm.
2 Choose 'Repeat ON' or 'Repeat OFF' and press OK to confirm. The timer repeat symbol appears on the display (Fig. 17).
3 If 'Repeat ON' is set, the feed timer starts counting down again after you stop the alert. Setting a feed timer alert
1 To set an alert, select 'Timer Alert' in the feed timer submenu. Press OK to confirm.
2 Choose one of the alert options. The options available are sound only, sound and vibration and vibration only.
3 Press any key to stop the alert or the alert stops automatically after 2 minutes.
Temperature
A baby sleeps comfortably at a temperature between 16^ / 61^ and 20^ / 68^ . You can set a minimum and a maximum temperature range. You can also set a temperature alert.
1 To open the temperature submenu, select 'Temperature' in the menu. Press OK to confirm.
2 Select 'Temp Range' in the temperature submenu and press OK to confirm.
3 Use the + and - buttons to set the minimum temperature range between 10^ / 50^ and 19^ / 66^ and the maximum temperature range between 22^ / 72^ and 37^ / 99^ . Press OK to confirm.
4 Select 'Alert' in the temperature submenu. Press OK to confirm.
5 Choose one of the alert options. The options available are sound only, sound and vibration, vibration only and display only. Press OK to confirm. The temperature alert symbol appears on the display.
6 Select 'Temp Scale' in the temperature submenu. Press OK to confirm.
7 Select 'Celsius' or 'Fahrenheit' and press OK to confirm.
The temperature in the set scale appears on the display. If the temperature is within the set range, the temperature alert symbol has two segments.
If the temperature is below or above the set range, the temperature alert symbol on the display has only one segment and flashes. The message 'TOO COLD' or 'TOO HOT' appears on the display (Fig. 18).
Cry alert
You can set a cry alert to warn you that the baby is crying.
1 Select 'Cry alert' in the menu with the + and - buttons. Press OK to confirm.
2 When the display shows 'Vibration ON', press OK to confirm.
The cry alert indicator appears on the display.
The cry alert goes off when the sound in the baby room is loud enough to make the fourth sound level light go on. The parent unit vibrates and the message 'Cry alert' appears on the display for 4 seconds. The cry alert repeats every 8 seconds until the sound becomes less loud or you deactivate the cry alert (Fig. 19).
3 To deactivate the cry alert, select 'Cry alert' in the menu. When the display shows 'Vibration OFF', press OK to confirm.
Clock
The default setting for the clock is hidden. You can choose to show the clock and set the clock time in the menu of the parent unit.
1 Select 'Set clock' in the menu with the + and - buttons. Press OK to confirm.
2 Select 'Show Time' and press OK to confirm.
3 Select 'Set the time' and press OK to confirm.
4 Set the hour and the minutes and press OK to confirm.
The clock time alternates with other indications in the message field of the display.
Language
You can use this menu option to change the language setting.
1 Select 'Set language' in the menu with the + and - buttons. Press OK to confirm.
2 Use the + and - buttons to select your language and press OK to confirm.
Key lock
You can activate the key lock to prevent the buttons from being pressed accidentally while you carry the parent unit around.
1 To activate the key lock, press OK.
Press the ^+ button within 2 seconds.
Note: If you do not press the + button within 2 seconds, the instruction remains on the display.
After you have pressed the + button, the message 'Keys locked' appears on the display (Fig. 20).
3 To deactivate the key lock, press OK. When the display shows the instruction message, press the + button within 2 seconds.
Notes
- When you press a button other than OK while the key lock is active, the display goes on and the second line on the display tells you how to deactivate the key lock.
- When you press OK while the key lock is active, the second line on the display tells you what second step is necessary to unlock the buttons.
Guarantee and support
If you need information or support, please visit the Philips website at www.philips.com/support or contact the Philips Consumer Care Centre in your country (see the worldwide guarantee leaflet for contact details). If there is no Consumer Care Centre in your country, go to your local Philips dealer or a Philips service centre.
Introduktion
Função "Talk" (Conversar)
aill ggoJe bdoal. aalll Je "ggo, gblil 1s l j 2" is all all
aall yoo oolll l aag css, golgo le bealll pue all . . . . . . . . . . . . . . . . . . . . . . . . .
Eco 00
JwjX laa jy aai 11111111111111111111111111111
(15)
J"blj" 1 Jg jy, y slwll Jw! b w w eel! jall a w g o a! jlll g a w g Jaiwi loi
.
Eco no wosdall lllgwhl
.(aolall)MENUJJlbc
llggoIe bawol "Eco o wosd" 111" uul -g + jp wssu
golgo bdo “jiaa al” aillllo jai
aizil
aog aclwrr aa 1 no cagall bdo fao. labll plebckgll alc ell iill qieill cgo bao
aillgol. aalall . aalall
aagall aiaaiill ao gaoiia 10000000000000000000000000000000000000000000000000000
aill lgl aegall jyjg jy jll gol jbdo jg "jSll gl" g "jSll j
aill l a 10 y jlll 100 "jll" bdo
aieill aegoo aee b
aill golge bdo. aqjoll qjioi l cgo aoia f "cogall duiu" sduo
. (\text{巴} \text{巴} \text{巴} \text{巴} \text{巴} \text{巴} \text{巴} \text{巴} \text{巴} \text{巴} \text{巴} \text{巴} \text{巴} \text{巴} \text{巴} \text{巴} \text{巴} \text{巴} \text{巴} \text{巴} \text{巴}
a a a a a a a a a a a a a a a a a a a
aill gao lbc aol. aoll o "oJolal aoo Joo, aoe all oJolal aoo aolj cial
lll golgo l baoal ag aall ayall aai aia “aill aai jilz”
a@b a,b
.(r·S)aeyyra 100lll aylbll all e gdo aoggy, aclj nall aale ayll lal ylll cil
1a
| ### | ### | ### | ### | ### |
aall Jaiill
gll alzll aalll lge glllgl 1 jlll -jllglll jlll + jll
.rr [Saw] all! Jaiil
(rr)dlaololgolb
glj! gij pai jll .cjjg jglj 9g aotall gogj tll jci jil (aotall) MENJ jle bdoi: abdo
aalaaalall al! aaii r. aoiaa
gssnnggagall aalusu .jabll dgg lgc nggagall aalusu bau ynnll gdlg aglslia gauy .aexial aoLpipx x jg y lai Jabll elaw pji stio Jabll agd abatitill
1
aullll gaiu aiaoll 1jz21 1n nnnn nn nnnn nn nnnn nn nnnn nn nnnn nn nnnn nn nnnn nn nnnn nn nnnn nn nnnn nn nnnn nn nnnn nn nnnn nn nnnn nn nnnn nn nnnn nn nnnn nn nnnn nn nnnn nn nnnn nn nnnn nn nnnn nn nnnn nn nnnn nn nnnn nn nnnn
1
dawluuall algwaag yjwgo
oo a jlll DECT a! Jai Jie Jia Jai Jai Jai Jai Jai Jai Jai Jai Jai Jai Jai Jai Jai Jai Jai Jai Jai Jai Jai Jai Jai Jai Jai Jai Jai Jai Jai Jai Jai Jai Jai Jai Jai Jai Jai Jai Jai Jai Jai
labll 100000000000000000000000000000000000000
jabllouiie.ajtio jaball aag no cllslo nllg all Jaiwi Eco no sddl ldl goll :
a aal lal alal lal 1 1 1 1 1 1 1 1 1 1 1 1 1 1
:Jlll a bdo Jy
JabllgjI jIyI yIyI yIyI yIyI yIyI yIyI yIyI yIyI yIyI yIyI yIyI yIyI yIyI yIyI yIyI yIyI yIyI yIyI yIyI yIyI yIyI yIyI yIyI yIyI yIyI yIyI
aagaaag aagaaagaaagaaagaaagaaagaaagaaagaaagaaagaaagaaagaaagaaagaaagaaagaaagaaagaaagaaagaaagaaagaaagaaagaaagaaagaaagaaagaaagaaagaaagaaagaaagaaagaaagaaagaaagaaagaaagaa
.8gssll 10goggsall aaww baa eEco oon waii dai gao
Eco oo
1
Jc bai jgjgl g Jab jg jd c 1a aal aal aal aal aal aal aal aal aal aal aal aal aal aal aal aal aal aal aal aal aal aal aal aal aal aal aal aal aal aal aal aal aal aal aal aal aal aal aal aal aal aal aal aal aal aal aal aal aal aal aAL
JyIJIJIaIaIaIaIaIaIaIaIaIaIaIaIaIaIaIaIaIaIaIaIaIaIaIaIaIaIaIaIaIaIaIaIaIaIaIaIaIaIaIaIaIaIaIaIaIaIaIaIaIaIaII Jaaia I aai I aai I aai I aai I aai I aai I aai I aai I aai I aai I aai I aai I aai I aai I aai I aai I aai I aai I aai I aai I aai I aai I aai I aai I aai I aai I aai I aai I aai I aai I aai I aai I aai I aai
jabll aiei
aiei ciog ywig jabll aiei jaiu wjdl aedl aodls
(15 Jall) Jall aiei ci jus Je Jaiu wll aoial g Jall aiei aolss
"JlI Jaiu" uuii dlls Jy. laaia aixall jieal aia ioo yiaicil yao aia jiaia jiaia jiaia jiaia jiaia jiaia jiaia jiaia jiaia jiaia jiaia jiaia jiaia jiaia jiaia jiaia jiaia jiaia jiaia jiaia jiaia jiaia jiaia jiaia jiaia jiaia jiaia jiaia jiaia jiaia jiaia jiaia jiaia jiaiae
J 1 J 1 J 1 J 1 J 1 J 1 J 1 J 1 J 1 J 1 J 1 J 1 J 1 J 1 J 1 J 1 J 1 J 1 J 1 J 1 J 1 J 1 J 1 J 1 J 1 J 1 J 1 J 1 J 1 J 1 J 1 J 1 J 1 J 1 J
j)LINKED "ailllllglb. jabll aag bnnnllglaag bpyloie cullasllllll"
"(b)J JI 1
ylll oep aell f 1gllgdo
p1r0/2o 1 no o jol gabll aag no o jai aluog lpeo, gblil jss jllg aag cui5 lij
aajll aqbiall aylswll cixlaxi qiaay Jaejrljgs no aalll aayjns yllg all aeg gl abll aag cui5 lij
jglall liq ne iy aagll Jai gl jjll liq Jaiuiaia p (Jwux cale s) DECT .jauuie u Jaill dug Jauuie u
.
jiai jbi
aalol 10/100 o jll Jgag aieoall 50xl g pdd /jio rr g Jaill glab - aIgall Jlalil lwiill Jolgall aball alwl lalall qalol Jaiell Jaiell Jaiell glaiog - aelal jglalgall Jlgjll jbl .11 jglbill g dall aas Jai - Jlalll no ayaf aayw waaal g
| الbartان محيى | الbartان الحرفية | الbartان الحرفية |
| \( \% 1\dots \) | \( \ddot{a} o g: 1\% /p\omega r\cdots < \) | \( \ddot{a} l j g s o a\ddot{a}\ddot{a}\ddot{a}\ddot{a}\ddot{a}\ddot{a}\ddot{a}\ddot{a}\ddot{a}\ddot{a}\ddot{a}\ddot{a}\ddot{a}\ddot{a}\ddot{a}\ddot{a}\ddot{a}\ddot{a}\ddot{a}\ddot{a}\ddot{a} \) (\( \omega \dot{a} \),\( g \dot{a} \),\( d \dot{a} \),\( f \dot{a} \),\( g \dot{a} \),\( d \dot{a} \),\( g \dot{a} \),\( d \dot{a} \)) |
| \( \% r0\cdots 0 \) | \( \ddot{a} o g: 1\% /p\omega r\cdots < \) | \( \ddot{a} l j g s o a\ddot{a}\ddot{a}\ddot{a}\ddot{a}\ddot{a}\ddot{a}\ddot{a}\ddot{a}\ddot{a}\ddot{a}\ddot{a}\dddot{\ddot{a}} \) |
| \( \% 1\dots r \) | \( \ddot{a} o g: 1\% /p\omega r\cdots < \) | \( \ddot{a} l j g s o a\ddot{a}\ddot{a}\ddot{a}\ddot{a}\ddot{a}\ddot{a}\ddot{a}\ddot{a}\ddot{a}\ddot{a}\ddot{a} \) |
| \( \% 1\dots 9 \) | \( \ddot{a} o g: \varepsilon /\rho \omega 1 < \) | \( \ddot{a} i s e a l l \ddot{a} i s e a l l \ddot{a} i s e a l l \ddot{a} i s e a l l \ddot{a} i s e a l l \ddot{a} i s e a l l \ddot{a} i s e a l l \ddot{a} i s e a l l \ddot{a} i s e a l l \ddot{\ddot{a}} \) |
| \( \% 1\dots \) | \( \ddot{a} o g: \varepsilon /\rho \omega 1 < \) | \( \rho i s i a l l \ddot{g} i \ddot{a} i s e a l l \ddot{c} i s a l l \ddot{a} i s e a l l \ddot{c} i s a l l \ddot{a} i s e a l l \ddot{c} i s a l l \ddot{a} i s e a l l \ddot{c} i s a l l \ddot{a} i s e a l l \ddot{c} i s a l l \ddot{a} i S \ddot{a} i s e a l l \ddot{c} i s a l l \ddot{a} i s e a l l \ddot{c} i s a l l \ddot{a} i s e a l l \ddot{c} i s a l l \ddot{a} i s e a l l \ddot{c} i s a l l \ddot{a} i \ddot{a} i s e a l l \ddot{c} i s a l l \ddot{a} i s e a l l \ddot{c} i s a l l \ddot{a} i s e a l l \ddot{c} i s a l l \ddot{a} i s e a l l \ddot{c} i s a l l \ddot{a}\ddot{a}\ddot{a}\ddot{a}\ddot{a}\ddot{a}\ddot{a}\ddot{a}\ddot{a}\ddot{a}\ddot{a}\ddot{a}\ddot{a}\ddot{a}\ddot{a}\ddot{a}\ddot{a}\ddot{a}\ddot{a}\ddot{a}_{\text{实}} \) |
jabll dglge jgogall lall alll
a
aalil aJleclau aaiiae oao
Lgai gai aaii aei xj Iaui jabiil aag Jc jll bc bai 1
jabll aaii aiibg
(1J) aoll Jgbl aoll aizj jy jp .Laeo p j aiei j 1 jall jall jgl
.(J)aassall 0saii auiuai jill beal
(εJ)jabllg jc-g+ogall gssuooj le bdoiaaio 00g sssuobal
a a a a a a a a a a a a a a a a a a a a a a a a a a a a a a a a a a a a a a a a a a a a a
Jalal jagj lbejai jaiy
g
jglgll jzss no aess lgey pi aglo ago Jlly aaglig ellab acso ciSao
aal aall alal lal gaaag aal aag aal abg aal abg x . aal aalee dall alal alal pax
pluxxix u 105i xloic aty ay
#
Jolssuul jaaaallg aaww wai. Jabll aayo aaiw ge ayag g wll aJe yllb yj n yllg aeg Ja
a a a c l l bll 10gJ Looic j0j g
aJyIbIyIe Jzoo o0d yOg 1oJyIyIcIe I aJyIyIyIg d
.
a a a a a a a a a a a a a a a a a a a a a a a a a a a a a a a a a a a
.105111111111111