
RC-3 - Looper ROLAND - Free user manual and instructions
Find the device manual for free RC-3 ROLAND in PDF.

| Product Type | Looper (recording pedal) |
| Brand | ROLAND / BOSS |
| Model | RC-3 |
| Category | Looper |
| Dimensions | 73 (W) x 129 (D) x 59 (H) mm |
| Weight | 450 g (with battery) |
| Power Supply | DC 9 V: alkaline battery 6LR61 or PSA series AC adaptor (sold separately) |
| Current Draw | 70 mA |
| Maximum Recording Time | Approx. 3 hours (total for all phrases) |
| Maximum Number of Phrases | 99 |
| Audio Format | WAV (44.1 kHz, 16-bit linear, stereo) |
| Inputs | INPUT A/B (1/4 inch phone jack), AUX IN (3.5 mm stereo mini jack) |
| Outputs | OUTPUT A/B (1/4 inch phone jack) |
| USB Connectivity | USB 2.0/1.1, mass storage |
| Built-in Rhythms | 10 types (Hi-Hat, Rock, Pop, Funk, etc.) |
| Main Functions | Recording, overdub, loop playback, one-shot playback, undo/redo, auto recording, count-in, Memory Shift |
| Pedal | Switch recording / overdub / playback |
| Display | 2-digit numeric display |
| External Footswitch | STOP/MEMORY SHIFT jack for FS-5U or FS-6 |
| Power Save | Automatic after 10 hours (configurable) |
| Included Accessories | Owner's manual, safety brochure, 9V alkaline battery |
| Options | PSA series AC adaptor, FS-5U/FS-6 footswitch |
| Maintenance | Clean with a soft, dry cloth. Do not use solvents. |
| Safety | Follow the provided safety instructions. Use the recommended AC adaptor. |
| Repairability | Repair by a qualified technician. Contact your dealer. |
Frequently Asked Questions - RC-3 ROLAND
User questions about RC-3 ROLAND
0 question about this device. Answer the ones you know or ask your own.
Ask a new question about this device
Download the instructions for your Looper in PDF format for free! Find your manual RC-3 - ROLAND and take your electronic device back in hand. On this page are published all the documents necessary for the use of your device. RC-3 by ROLAND.
USER MANUAL RC-3 ROLAND
- This device contains demo phrases (90–99). Once you delete these, they cannot be recovered. Please back them up as described in "Backing up to your computer" (p. 14).
- This device will enter Sleep mode (power conservation mode) when ten hours have elapsed since the last operation, or since the last audio input while in Stop mode.
If you want to prevent the device from entering Sleep mode, hold down the pedal while you turn on the power, and continue holding down it down for five seconds (p. 18).

Main Features
Welcome to the Loop Station!
The RC-3 is a pedal-type recorder that lets you record audio phrases from your guitar or bass, and play them back by operating the pedal. You can create a wide variety of performances by layering sound while you record and carry out play back in real time.
It's easy to create loop phrases.
- Up to 99 different loop phrases can be saved in phrase memory, for a total of approximately 3 hours (* total for all phrases).
- You can input audio in stereo.
Sound from a digital audio player connected to the AUX IN jack can easily be recorded.
- Recorded phrases can be copied via USB to your computer, or WAV files from your computer can be loaded into the RC-3 and played back as loops (p. 14).
Before using this unit, carefully read the sections entitled: "USING THE UNIT SAFELY" and "IMPORTANT NOTES" (supplied on a separate sheet). These sections provide important information concerning the proper operation of the unit. Additionally, in order to feel assured that you have gained a good grasp of every feature provided by your new unit, this manual should be read in its entirety. The manual should be saved and kept on hand as a convenient reference.
Panel Descriptions
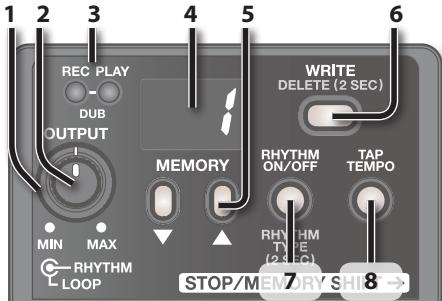
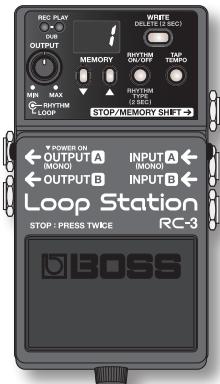
1. [OUTPUT LOOP] knob
This adjusts the volume level of the loop phrase being played back.
- This knob does not adjust the input level of the INPUT and AUX IN Jacks.
2. [OUTPUT RHYTHM] knob
This adjusts the volume level of the rhythm sound (p. 12).
3. REC, PLAY (DUB) indicator
This lights during recording, playback, and overdubbing.
| Indicator | Explanation |
| REC (red) | During recording |
| PLAY (green) | During playback (while loading phrase memory, or during an internal memory operation: blinks rapidly) |
| Both | During overdubbing |
4. Display
This indicates the current phrase memory number, or various other information (p. 20).
5. [▼] (DOWN) / [▲] (UP) buttons
These decrement or increment the number shown in the display.
6. [WRITE] button
Press this to save the recorded phrase to internal memory (p. 8).
7. [RHYTHM ON/OFF] button
This button turns the rhythm sound on/off (p. 12).
8. [TAP TEMPO] button
Press this button at the desired timing to set the tempo (p. 12).
![ROLAND RC-3 - [TAP TEMPO] button - 1](/content/2024/12/131003/images/b6506bec89b3e59d8a617acc5643d1abd0f852ebadb57a733753e73205342c6d.jpg)
9. Pedal Switch
This pedal switches you between phrase recording, overdubbing, and playback. Press the pedal twice in succession to stop playback (p. 6).
10. Thumbscrew
When this screw is loosened, the pedal will open, allowing you to change the battery.
- If you're using the RC-3 only on a battery, the display will indicate "bL" when the battery runs low. Replace the battery as described on p. 22.
- A battery was installed in the unit before it left the factory. The life of this battery may be limited, however, since its primary purpose was to enable testing.
USB connector
You can use a commercially available USB cable to connect the RC-3 to your computer, and use the computer to read/write RC-3 phrases (WAV files) (p. 14).
DCIN jack
Accepts connection of an AC Adaptor (PSA series; optional). By using an AC Adaptor, you can play without being concerned about how much battery power you have left.
- Use only the specified AC adaptor (PSA series), and connect it to an AC outlet of the correct voltage. Do not use any other AC adaptor, since this may cause malfunction.
OUTPUT A/B jacks
Connect these jackets to your amp or monitor speakers.
If your system is monaural, use only the OUTPUT A jack. Sound that was input in stereo will also be output monaurally.
The OUTPUT A jack also operates as
a power switch. The power will be on if a plug is inserted in the OUTPUT A jack. Remove the plug when you're not using the RC-3.
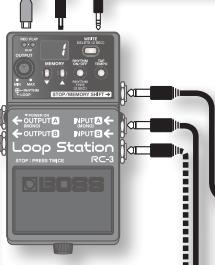
AUX IN jack

Use a stereo mini-plug cable to connect your audio player here.
By using the Auto recording function (p. 11), you can start recording the moment your audio player begins playback.
STOP/MEMORY SHIFT jack

You can connect a separately available foot switch (FS-5U, FS-6) here, and use it to stop playback or to switch phrases (p. 16).
INPUT A/B jacks
Connect your guitar, bass, or effects unit to these jacks.
Use the INPUT A jack and INPUT B jack when connecting a stereo-output effects unit. Use only the INPUT A jack if you're using a monaural source.

NOTE
- To prevent malfunction and/or damage to speakers or other devices, always turn down the volume, and turn off the power on all devices before making any connections.
- Before connecting or disconnecting any connection cables, be sure all the volume controls in your system are set to minimum.
- Use connection cables that do not contain a built-in resistor. If you use cables that contain a resistor, there might be insufficient volume from the device connected to the AUX IN jacks, or it might be inaudible.
- Do not connect headphones to the OUTPUT jack. Doing so may damage the headphones.
Turning On the Power
Inserting a connecting plug into the OUTPUT A jack turns on the power to the unit.
Once the connections have been completed, turn on power to your various devices in the order specified. By turning on devices in the wrong order, you risk causing malfunction and/or damage to speakers and other devices.
| When powering up | Turn on the power to your guitar amp last. |
| When powering down | Turn off the power to your guitar amp first. |
- This unit is equipped with a protection circuit. A brief interval (a few seconds) after power up is required before the unit will operate normally.
Caution when turning off the power
While the RC-3 is in the following states, you must never turn off the power (i.e., disconnect the plug from the OUTPUT A jack).
Doing so may cause all the saved data to be lost.
- While the REC or PLAY indicator is lit
(during phrase recording/playback/overdubbing)
- While the PLAY indicator is blinking rapidly
while phrase memory is being read, or an internal memory operation is occurring)
Basic Operation
To perform recording, overdubbing, and playback, press the pedal as shown in the diagram.
Selecting a Phrase Memory
Use the [ ] / [ ] buttons to select a phrase memory (1-99).

| Display | Explanation |
| Only number displayed | Empty phrase Press pedal to start recording |
| Dot in lower right | Phrase containing data Press pedal to start loop playback |
| Number and "○5" displayed alternately | One-shot phrase Press pedal to play phrase only once (not loop) |
- When shipped from the factory, phrases 90-99 contain demo phrases.

Recording
Record your guitar or bass performance, or the sound from an audio player connected to the AUX IN jack.

- Auto recording (p. 11) lets you start recording the moment you begin performing.
- You can also record along with rhythm sounds (p. 12).
Refer to"Saving a Phrase for One-Shot Playback" (p. 10).

Overdubbing
Layer your performances while the phrase plays as a loop.
Pressing the pedal switches the unit to playback.
You can Undo and Redo (p. 10).


LoopPlayback
Play back phrases as loops.
Pressing the pedal switches the unit to overdubbing.
To use the Memory Shift function, press the [ ] / [ ] buttons while a phrase is playing; the phrase memory number will blink, allowing you to select the next phrase (p. 17).

Press twice

Stop
During overrubbing or loop playback, you can stop by pressing the pedal twice in succession.
- Press the pedal twice within one second.
NOTE
- While phrase memory is being read, the PLAY (green) indicator will blink rapidly. Never turn off the power while the PLAY indicator is blinking rapidly.

- The minimum recording time for a loop phrase is approximately 1.5 seconds. If you press the pedal within approximately 1.5 seconds after you start recording, recording will continue until the phrase is at least approximately 1.5 seconds long.
- The maximum recording time for a loop phrase is approximately 3 hours (total for all phrases). When the maximum recording time is exceeded, the display will show "FL" to indicate that internal memory is full, and recording or overdubbing may end before you intended. If this occurs, delete unneeded phrases (p. 9) and then try the operation again.
- If you use the Memory Shift function before saving a phrase, that phrase will be erased. For details on how to save a phrase, refer to p. 8.
Saving a Phrase
If you select a different phrase memory or turn off the power after recording or overdubbing, the phrase you recorded will be lost. If you want to keep the phrase, you must save it.
- Press the [WRITE] button.
The display will indicate "Br" (wr).
- Use the [ ] / [] buttons to specify the save-destination phrase memory.
You can skip this step if you want to save to the currently selected phrase.
You can't select a phrase memory in which a phrase has already been saved.
The maximum recording time is a total of approximately 3 hours for all phrases (including the phrase that has not been saved). If the phrase cannot be saved because there is insufficient free memory, the display will indicate "FL" alternately with the phrase memory number. In this case, delete unneeded phrases (p. 9) and then try the operation again.
- Press the [WRITE] button once again; the phrase will be saved.
If you decide not to save the phrase, press the [TAP TEMPO] button, the [RHYTHM ON/OFF] button, or the pedal.
While the phrase is being saved, the number in the display and the PLAY indicator will blink rapidly.
NOTE
- Never turn off the power while the PLAY indicator is blinking rapidly. This may cause all saved data to be lost.
- Please be aware that the contents of memory can be irretrievably lost as a result of a malfunction or improper operation of the unit. You should back up important data as described in "Backing up to your computer" (p. 14).
- All due care is taken during repairs to avoid the loss of data. However, in certain cases, such as when there is damage to the memory, it may not be possible to restore the data.
- Unfortunately, it may be impossible to restore the contents of data that was stored in the unit's memory once it has been lost. Roland Corporation assumes no liability concerning such loss of data.
Deleting a Phrase
-
This device contains demo phrases (90–99). Once you delete these, they cannot be recovered. Please back them up as described in "Backing up to your computer" (p. 14).
-
Use the [ ] / [ ] buttons to select the phrase memory that you want to delete.
- Hold down the [WRITE] button for at least two seconds.
The display will indicate "DL."
- At this point, you can't change the phrase memory number that will be deleted.
- Press the [WRITE] button to delete the phrase.
If you decide not to delete the phrase, press the [TAP TEMP] button, the [RHYTHM ON/OFF] button, or the pedal.
While the phrase is being deleted, the number in the display and the PLAY indicator will blink rapidly.
- Never turn off the power while the PLAY indicator is blinking rapidly. This may cause all saved data to be lost.
Saving a Phrase for One-Shot Playback
One-shot playback will play the phrase once from the beginning to the end, and then stop automatically.
- Hold down the [TAP TEMPO] button and press the [WRITE] button.
The display will indicate "a5."
- Use the [ ] / [] buttons to specify the save-destination phrase memory.
- Press the [WRITE] button once again; the phrase will be saved as a one-shot phrase.
If you decide not to save the phrase, press the [TAP TEMPO] button, the [RHYTHM ON/OFF] button, or the pedal.
- Over dubbing is disabled when one-shot playback is in effect. If the pedal is pressed during playback of the phrase, the phrase starts playing from the beginning again (retrigger playback). If you want to over dub, you must re- save the phrase as a Loop phrase.
- If you want to stop a One-Shot phrase while it is playing back, press the pedal twice within a period of 0.5 seconds.
Cancelling an Overhub (Undo/Redo/Clear)
You can undo/redo/clear by holding down the pedal for at least two seconds.
| Operation | Display | Explanation |
| Undo | Un | Hold down the pedal for at least two seconds during playback or over dubbing; the recording or the most recent over dubbing will be cancelled. |
| Redo | RE | If you want to restore the cancelled sound, hold down the pedal for at least two seconds once again. * You can't Redo after Undoing a recorded phrase. |
| Clear | CL | Hold down the pedal for at least two seconds while stopped; the current phrase will be cleared. (Clear is temporary; phrases saved in phrase memory will not be deleted.) |
During Undo/Redo, the PLAY and REC indicators will blink rapidly. During Clear, the PLAY indicator will blink rapidly.
Auto Recording/Count-In Recording Functions
"Auto recording" starts recording the moment you begin playing your guitar or play back your audio player. "Count-in" sounds the rhythm for one measure before recording starts.
- Hold down the [TAP TEMPO] button for at least two seconds.
The display will indicate "no." - Use the [] / [] buttons to select the desired recording mode, and then press the pedal to start recording.
| Display | Mode | Explanation |
| na | Normal recording | Recording will begin the instant you press the pedal. |
| RU | Auto recording | The REC indicator will blink rapidly, and the RC-3 will enter recording-standby mode. When you begin playing, the REC indicator will light and recording will start. |
| Display | Mode | Explanation |
| E | Count-in recording | The [RHYTHM ON/OFF] button will blink. When you press the pedal, the REC indicator will blink rapidly, and the rhythm will sound for one measure. (You can stop by pressing the pedal during this time.) When the one measure of playback has ended, recording will start. (The rhythm will continue sounding even after recording has begun.) For more about the rhythm settings, refer to "About Rhythm" (p. 12). |
The recording mode will be reset to Normal recording when you turn off the power.
About Rhythm
Sounding a Rhythm
-
Press the [RHYTHM ON/OFF] button to switch the rhythm sound between playing and stopped.
-
Use the [OUTPUT RHYTHM] knob to adjust the volume of the rhythm.
- The [TAP TEMP] button will blink in time with the rhythm (red on the first beat, green on subsequent beats).
- When you save a phrase (p.8), the rhythm type and time signature selected at that time will also be saved.
Setting the Tempo
When recording, you can set the tempo before you start recording. When playing back a saved phrase, you can change the playback tempo without changing the pitch of the phrase.
- Use the [ ] / [ ] buttons to select the phrase memory whose tempo you want to set.
- Press the [TAP TEMPO] button several times at the desired tempo.
The tempo will be set to the interval at which you press the button.
-
If the RC-3 is stopped, the rhythm ([RHYTHM ON/OFF] button) will turn on after you set the tempo.
-
You can only change the tempo of phrases that have been saved in phrase memory. If you want to change the tempo of a phrase immediately after recording or over dubbing, you must first save it to phrase memory (p. 8).
- There are limitations on the proportion of the possible tempo change.
- You can't specify a tempo that would cause the phrase to loop in a shorter time than the minimum recording time (approximately 1.5 seconds).
The tempo setting is stored when you save the phrase (p. 8).
Setting the Rhythm Type
- Hold down the [RHYTHM ON/OFF] button for at least two seconds.
The display will indicate "r" - r; the RC-3 is now in rhythm type selection mode.
- Use the [ ] / [ ] buttons to select the desired rhythm type (r - 0 - r9)
- Press the [RHYTHM ON/OFF] button to return to normal operation.
| Rhythm Type List | |
| r0 | Hi-Hat |
| r1 | Kick & Hi-Hat |
| r2 | Rock 1 |
| r3 | Rock 2 |
| r4 | Pop |
| r5 | Funk |
| r6 | Shuffle |
| r7 | R & B |
| r8 | Latin |
| r9 | Percussion |
Setting the Time Signature
You can set the time signature before you start recording.
-
You can't change the time signature after recording.
-
Hold down the [RHYTHM ON/OFF] button for at least two seconds.
The display will indicate "r" - "r"; the RC-3 is now in rhythm type selection mode.
- While in rhythm type selection mode, hold down the [RHYTHM ON/OFF] button once again for at least two seconds.
The display will indicate "b4" or "b3"; the RC-3 is now in time signature selection mode.
| Display | Explanation |
| b4 | 4/4 beat (default) |
| b3 | 3/4 beat |
- Use the []/[] buttons to select the desired time signature.
- Press the [RHYTHM ON/OFF] button to return to normal operation.
Recording with the rhythm sound
If you record while the rhythm sound is on, recording will start from the beginning of the measure the instant you press the pedal to initiate recording.
By using the "Count-in recording" function (p. 11), you can start recording after the rhythm sound has played back for one measure.
Regardless of the timing at which you press the pedal to end recording, the length of the phrase will automatically be adjusted to units of one measure.
Recording without the rhythm sound
If you record while the rhythm sound is off, the tempo of the phrase will be automatically specified after recording has ended.
The automatic tempo setting is calculated by assuming that you have recorded ^n1,2,4,8,16, measures in the specified time signature (p. 13).
Connecting to Your Computer via USB
You can connect the RC-3 to your computer via a commercially available USB cable, and back up RC-3 phrases (WAV files) to your computer or load WAV files from your computer to the RC-3.
Playable WAV file formats
| Data Format | WAV |
| Bit Rate | 16-bit linear, stereo |
| Sampling Frequency | 44.1 kHz |
Maximum WAV file size is 1.7 GB (total of all files), maximum time is approximately 3 hours (total of all phrases), and minimum time is approximately 1.5 seconds.
-
Turn on the RC-3's power (insert a plug into the OUTPUT A jack).
-
The RC-3 will not operate on USB bus power. We recommend that you use an AC adaptor (sold separately) to ensure that the power does not turn off while connected via USB.
-
Use a commercially available USB cable to connect the RC-3's USB connector to your computer's USB connector (a connector that supports USB 2.0 Hi-Speed).
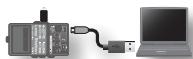
-
You can't make USB connections if the RC-3 is not stopped, or if there is a phrase that has not been saved.
-
Back up the phrases as described below.
Windows users
Within My Computer (or Computer), open "BOSS_RC-3" (or Removable Disk).
Mac OS users
On the desktop, open the "BOSS_RC-3" icon.
Backing up to your computer
Copy the entire "ROLAND" folder from the BOSS_RC-3 drive to your computer.
Recovering backed-up data from your computer to the RC-3
- Performing this operation will erase all phrases that are currently saved in the RC-3. Be sure to make a backup before you proceed.
In the BOSS_RC-3 drive, delete the "ROLAND" folder, and then copy the baked-up "ROLAND" folder from your computer to the BOSS_RC-3 drive.
Writing individual WAV files from your computer to the RC-3's phrase memory
You can copy WAV files from your computer to the "001_1"-"099_1" folders within the "ROLAND"-"WAVE" folder in the BOSS_RC-3 drive. (The XX in "0XX_1" is the phrase memory number.)
NOTE
- Do not delete the folders inside the BOSS_RC-3 drive unless you are performing a recovery operation.
- You can use the following characters in file names. A-Z (uppercase letters), 0-9 (numerals), _ (underscore)
-
Do not place more than one WAV file in any folder. If a folder already contains a WAV file, do not overwrite it. Write your WAV files into empty folders.
-
When you've finished copying WAV files, disconnect the USB drive as follows.
When you have disconnected the USB drive, the display will indicate "dL" and the [RHYTHM ON/OFF] button will blink.
Windows 7 users
In the lower right of your screen, click the [ ] icon → [ ] icon, and then click "Remove BOSS_RC-3 (or Removable Disk)."
Windows Vista/Windows XP users
In the lower right of your screen, click the [ ] icon ([ ] in XP) and then click " Safely Remove BOSS_RC-3 (or Removable Disk)."
Mac OS users
On the desktop, right-click (or [Control] + click) the USB drive icon, and then click "Remove BOSS_RC-3."
- Press the [RHYTHM ON/OFF] button to return to normal operation.
The "dE" indication will disappear from the display, and the RC-3 will return to normal operation.
- Disconnect the USB cable from your computer.
NOTE
- Never perform the following actions until you have completed steps 4-5. Doing so might make your computer freeze, or might result in the loss of all of the RC-3's data.
- Disconnect the USB cable.
- Allow your computer to enter suspend (standby) or hibernate mode, restart it, or shut it down.
-
Turn off the RC-3's power.
-
Unfortunately, it may be impossible to restore the contents of data that was stored in the unit's memory once it has been lost. Roland Corporation assumes no liability concerning such loss of data.
Connecting to an External Footswitch
Connect your foot switch to the STOP/MEMORY SHIFT jack as shown in the illustration, and set its POLARITY switch.
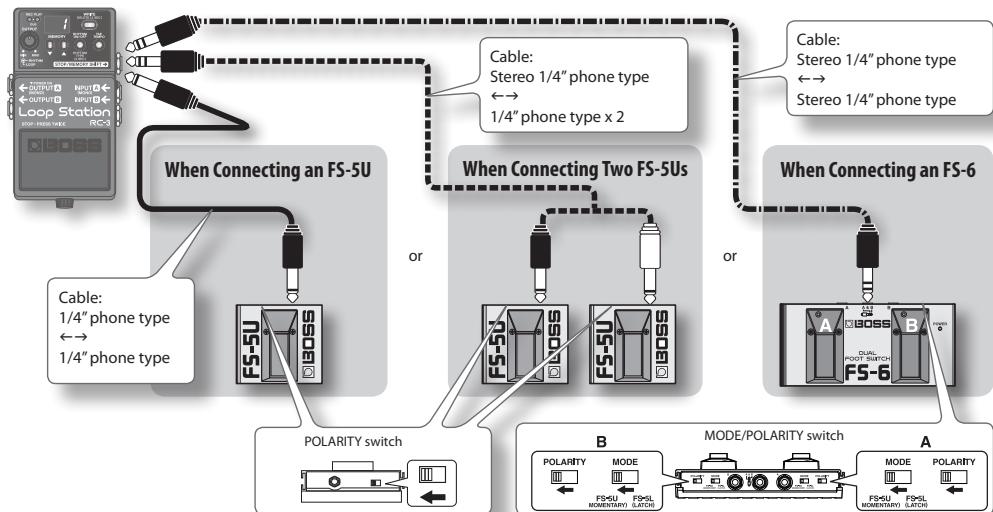
When Connecting an FS-5U
- The FS-5L cannot be used.
| Operation | Explanation |
| Stop | While recording/playing/overdubbing, press the foot switch to stop. |
| Tempo setting | While stopped, you can press the foot switch several times to set the tempo. |
| Clear phrase | To clear the phrase, hold down the foot switch for at least two seconds (p. 10). |
When Connecting Two FS-5Us or an FS-6
When you operate an FS-5U connected to the white plug (stereo L side) or pedal B of an FS-6
The operation will be the same as when a single FS-5U is connected.
When you operate an FS-5U connected to the red plug (stereo R side) or pedal A of an FS-6
| Operation | Explanation |
| Memory shift (up) | When you press the foot switch, the next-numbered phrase memory will be selected. If you press the foot switch during playback, the newly selected phrase memory number will blink in the display, and the phrase memory will be changed when the currently playing phrase has ended. |
| Memory shift (down) | When you hold down the foot switch for at least two seconds, the previous-numbered phrase memory will be selected. |
- If the current phrase has not been saved, that phrase will be lost when you perform the memory shift. For details on how to save a phrase, refer to p. 8.
- If you perform the memory shift operation near the end of the phrase, there may be cases in which the shift-destination phrase memory will not be selected.
- You can also perform memory shift operations by pressing the [] / [] buttons.
About Sleep Mode
When ten hours have elapsed since the last operation or audio input, the RC-3 will enter sleep mode (power conservation mode; only the bypass sound will be output). From sleep mode, you can press the pedal to return to normal mode.
- Battery power continues to be consumed even in sleep mode. To prevent battery consumption, turn off the power by removing the plug from the OUTPUT A jack.
- The RC-3 will not enter sleep mode if there is a phrase that has not been saved.
Disabling Sleep Mode
- While holding down the pedal, turn on the power (insert a plug into the OUTPUT A jack).
- Continue holding down the pedal for five seconds. The display will blink"---".
- Release the pedal; the RC-3 will resume normal operation.
Enabling Sleep Mode (default setting)
- While holding down the pedal, turn on the power (insert a plug into the OUTPUT A jack).
- Within two seconds, press the pedal twice.
The display will blink "SL."
After two seconds, the RC-3 will resume normal operation; sleep mode will be enabled.
Changing the Switching Order of Recording Over dubbing Playback
When you press the pedal, the RC-3 will switch its operation in the order of recording overdubbing playback (default setting) (p. 6). However, you can change this so that the order is recording playback overdubbing (RC-2 compatible).
- While holding down the [TAP TEMPO] button, turn on the power (insert a plug into the OUTPUT A jack).
- Use the [] / [] buttons to select the desired mode.
| Display | Explanation |
| r d | Operation will switch in the order of Recording → Overdubbing → Playback (default setting). |
| r P | Operation will switch in the order of Recording → Playback → Overdubbing (RC-2 compatible). |
- Press the [TAP TEMPO] button to return to normal operation.
Formatting the Internal Memory
-
When you format the RC-3's internal memory, all phrase memories that were saved will be erased, and cannot be recovered. Do not format the internal memory unless the display indicates "Er" and the RC-3 has stopped operating correctly.
-
While holding down the [WRITE] button and the [RHYTHM ON/OFF] button, turn on the power (insert a plug into the OUTPUT A jack).
The display will indicate "FII."
- Press the [RHYTHM ON/OFF] button once again.
The display will blink "FNI."
- Press the [WRITE] button; formatting of the internal memory will begin.
The indication "F ^ in the display and the PLAY indicator will blink rapidly. When formatting is completed, the RC-3 will return to normal operation.
- Never turn off the power while the PLAY indicator is blinking rapidly.
Troubleshooting
| Problem | Action |
| Recording does not end immediately when you press the pedal | If rhythm is on, or if you recorded a phrase that is shorter than the minimum recording time (approximately 1.5 seconds), the length of the phrase is adjusted automatically; this may mean that recording does not end immediately when you press the pedal. |
| Recording started immediately even though Auto recording mode is selected | If due to distortion or other causes there is a significant amount of noise, that noise may be enough to trigger the beginning of recording. Reduce the noise, for example by lowering the distortion level. |
| Cannot change the playback tempo | You cannot change the playback tempo in the following situations. • If the phrase has not been saved. • While phrases are being switched (PLAY indicator blinking rapidly). • When you attempt to set the tempo for a phrase that is looped over an interval shorter than the minimum recording time (approximately 1.5 seconds). |
Error Message List
| Display | Meaning | Action | Page |
| bct | The battery has run low. | Replace the battery. | p. 22 |
| FL | Memory is full. | Delete unneeded phrases. | p. 9 |
| LF | This WAV file is unreadable. | Check the format of the WAV file. | p. 14 |
| EF | Further overdubbing is not possible. | Re-save the phrase. | p. 8 |
| Er | Internal memory must be formatted. | Format the RC-3's internal memory. | p. 19 |
| dfl | The RC-3 has malfunctioned. | Contact your dealer. | |
Other Display Indications
| Display | Explanation | Page |
| I-99 | Phrase memory number | p. 6 |
| .(dot) | Phrase memory containing data | |
| a5 | One-shot phrase | p. 10 |
| Un | Undo | p. 10 |
| rE | Redo | |
| CL | Clear | |
| Br | Save phrase | p. 8 |
| dL | Delete phrase | p. 9 |
| na | Normal recording | p. 11 |
| RU | Auto recording | |
| Ct | Count-in recording | |
| r0-r9 | Rhythm type | p. 12 |
| b3-b4 | Time signature | p. 13 |
| Cn | USB connected | p. 14 |
| dC | USB disconnected | |
| SL | Sleep mode enabled | p. 18 |
| -- | Sleep mode disabled |
| Display | Explanation | Page |
| r d | Switch in the order of record/overdub/play | p. 19 |
| r P | Switch in the order of record/play/overdub | |
| F f | Format internal memory | p. 19 |
Changing the Battery
If the display indicates "bL," the battery has run low. Replace the battery as described below.
- The use of an AC adaptor is recommended as the unit's power consumption is relatively high. Should you prefer to use batteries, please use the alkaline type.
- Rechargeable Ni-MH batteries cannot be used.
- The contents of internal memory will not be lost when you replace the battery, but we recommend that you make regular backups (p. 14) for safety's sake.
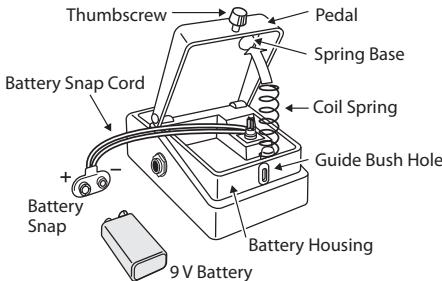
- Incorrect handling of batteries, rechargeable batteries, or a battery charger can cause leakage, overheating, fire, or explosion. Before use, you must read and strictly observe all of the precautions that accompany the batteries, rechargeable batteries, or battery charger.

- Loosen the thumbscrew at the front of the pedal, then lift the pedal upwards to open the unit.
- The thumbscrew can be left in the pedal while changing the battery.
- Remove the old battery from the battery housing, and remove the battery snap connected to it.
- Connect the battery snap to the new battery, and place the battery inside the battery housing.
- Be sure to carefully observe the battery's polarity (+ versus -).
- Slip the coil spring onto the spring base on the back of the pedal, then close the pedal.
- Carefully avoid getting the snap cord caught in the coil spring.
-
Finally, insert the thumbscrew into the guide bush hole and fasten it securely.
-
Recording, duplication, distribution, sale, lease, performance, or broadcast of copyrighted material (musical works, visual works, broadcasts, live performances, etc.) belonging to a third party in part or in whole without the permission of the copyright owner is forbidden by law.
- Do not use this product for purposes that could infringe on a copyright held by a third party. We assume no responsibility whatsoever with regard to any infringements of third-party copyrights arising through your use of this product.
- The copyright of content in this product (the sound waveform data, style data, accompaniment patterns, phrase data, audio loops and image data) is reserved by Roland Corporation.
- Purchasers of this product are permitted to utilize said content for the creating, performing, recording and distributing original musical works.
-
Purchasers of this product are NOT permitted to extract said content in original or modified form, for the purpose of distributing recorded medium of said content or making them available on a computer network.
-
BOSS and Loop Station are either registered trademarks or trademarks of Roland Corporation in the United States and/or other countries.
- All product names mentioned in this document are trademarks or registered trademarks of their respective owners.
- The screen shots in this document are used in compliance with the guidelines of the Microsoft Corporation.
- MMP (Moore Microprocessor Portfolio) refers to a patent portfolio concerned with microprocessor architecture, which was developed by Technology Properties Limited (TPL). Roland has licensed this technology from the TPL Group.
- The SD logo (SD) and SDHC logo (SDC) are trademarks of SD-3C, LLC.
- This product contains eCROS integrated software platform of eSOL Co.,Ltd.
eCROS is a trademark of eSOL Co., Ltd. in Japan. - Featuring digital fonts by Yourname, Inc. Digital font: Copyright © Yourname, Inc.
Copyright © 2011 BOSS CORPORATION
All rights reserved. No part of this publication may be reproduced in any form without the written permission of BOSS CORPORATION.
| Nominal Input Level | INPUT: -20 dBU AUX IN: -10 dBU |
| Input Impedance | INPUT: 1 M ohm AUX IN: 22 k ohms |
| Nominal Output Level | -20 dBU |
| Output Impedance | 1 k ohm |
| Recommended Load Impedance | 10 k ohms or larger |
| Recording/Playback | Maximum recording time: Approx. 3 hours Maximum number of stored phrases: 99 phrases Data format: WAV (44.1 kHz, 16-bit linear, stereo) |
| USB Interface | USB 2.0/1.1 mass storage device class |
| Power Supply | DC 9 V: Alkaline battery (9 V, 6LR61), AC Adaptor (PSA-series: sold separately) * Rechargeable Ni-MH batteries cannot be used. |
| Current Draw | Maximum 70 mA (DC 9 V) Alkaline battery (9 V, 6LR61): Approx. 3 hours * These figures will vary depending on the actual conditions of use. |
| Dimensions | 73 (W) x 129 (D) x 59 (H) mm 2-7/8 (W) x 5-1/8 (D) x 2-3/8 (H) inches |
| Weight | 450 g/1 lb (including battery) |
| Accessories | Owner's Manual, Leaflet ("USING THE UNIT SAFELY", "IMPORTANT NOTES," and "Information"), Alkaline battery (9 V, 6LR61): already installed in unit * The battery that was supplied with the unit is for temporary use, intended primarily for testing the unit's operation. We suggest replacing this with an alkaline dry cell. |
| Options (sold separately) | AC Adaptor (PSA series) Foot Switch: FS-5U, FS-6 |
- 0 dBu=0.775 Vrms
- In the interest of product improvement, the specifications and/or appearance of this unit are subject to change without prior notice.
RC-3
Loop Station
Bedienungsanleitung
5. [Taster▼] (DOWN) / [▲] (UP)
8. [TAP TEMPO]-Taster
Copyright © 2011 BOSS CORPORATION
5. Boutons [▼] (DOWN) / [▲] (UP)
7. Bouton [RHYTHM ON/OFF]
Copyright © 2011 BOSS CORPORATION
Copyright © 2011 BOSS CORPORATION
5. [Botones▼] (DOWN) / [▲] (UP)
Copyright © 2011 BOSS CORPORATION
7. Botão [RHYTHM ON/OFF]
Esse botao liga/desligo o accompanying rtmico (pag. 12).
O visor indicará "Br" (wr).
Copyright © 2011 BOSS CORPORATION
3. REC, PLAY (DUB)-indicator
5. [▼] (OMHOOG-) / [▲] (OMLAAG)-knoppen
STOP/MEMORY SHIFT-connector
Copyright © 2011 BOSS CORPORATION
DECLARATION OF CONFORMITY Compliance Information Statement
Model Name: RC-3
Type of Equipment : Effector
Responsible Party: Roland Corporation U.S.
Address: 5100 S. Eastern Avenue, Los Angeles, CA 90040-2938
Telephone: (323) 890-3700
BOSS
