
MCP-45 - Multicooker FAGOR - Free user manual and instructions
Find the device manual for free MCP-45 FAGOR in PDF.
| Product type | Rechargeable hair clipper |
| Brand | FAGOR |
| Model | MCP-45 |
| Power supply | Rechargeable Ni-MH battery, mains adapter (charge only) |
| Initial charging time | 16 hours |
| Subsequent charging time | 12 hours |
| Battery life | Approximately 45 minutes |
| Blade type | Steel |
| Cutting adjustment | Adjustable guide comb, 6 positions: 15, 17, 20, 23, 26, 29 mm |
| Functions | Hair cutting with or without comb, progressive adjustment, corded or cordless use |
| Included accessories | Guide comb, scissors, cleaning brush, lubricant, adapter |
| Cleaning and maintenance | Clean blades with brush, lubricate regularly with special oil, clean exterior with soft cloth |
| Safety | Unplug before cleaning, do not immerse, keep out of reach of children, use only on dry hair |
| Electromagnetic compatibility | Compliant with EMC directives |
| Weight | Approximately 200 g (estimated) |
Frequently Asked Questions - MCP-45 FAGOR
User questions about MCP-45 FAGOR
0 question about this device. Answer the ones you know or ask your own.
Ask a new question about this device
Download the instructions for your Multicooker in PDF format for free! Find your manual MCP-45 - FAGOR and take your electronic device back in hand. On this page are published all the documents necessary for the use of your device. MCP-45 by FAGOR.
USER MANUAL MCP-45 FAGOR
The manufacturer reserves the right to modify the models described in this User's Manual
6. LIMPEZA E MANUTENÇA
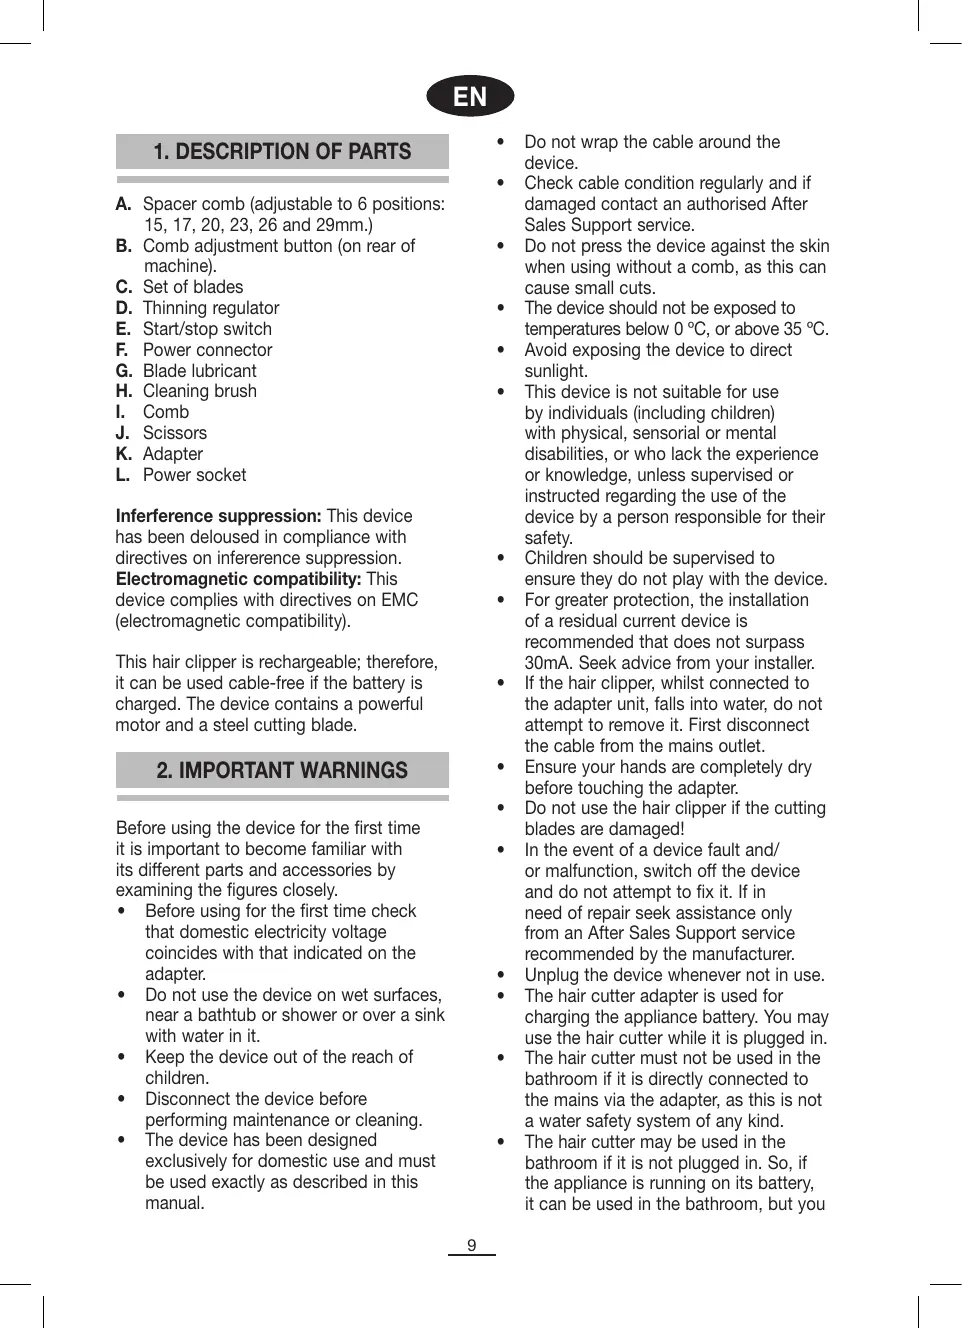
A. Spacer comb (adjustable to 6 positions: 15, 17, 20, 23, 26 and 29mm .)
B. Comb adjustment button (on rear of machine).
C. Set of blades
D. Thinning regulator
E. Start/stop switch
F. Power connector
G. Blade lubricant
H. Cleaning brush
I. Comb
J. Scissors
K. Adapter
L. Power socket
Inferference suppression: This device has been deloused in compliance with directives on inference suppression.
Electromagnetic compatibility: This device complies with directives on EMC (electromagnetic compatibility).
This hair clipper is rechargeable; therefore, it can be used cable-free if the battery is charged. The device contains a powerful motor and a steel cutting blade.
2. IMPORTANT WARNINGS
Before using the device for the first time it is important to become familiar with its different parts and accessories by examining the figures closely.
- Before using for the first time check that domestic electricity voltage coincides with that indicated on the adapter.
- Do not use the device on wet surfaces, near a bathtub or shower or over a sink with water in it.
- Keep the device out of the reach of children.
- Disconnect the device before performing maintenance or cleaning.
-
The device has been designed exclusively for domestic use and must be used exactly as described in this manual.
-
Do not wrap the cable around the device.
- Check cable condition regularly and if damaged contact an authorised After Sales Support service.
- Do not press the device against the skin when using without a comb, as this can cause small cuts.
- The device should not be exposed to temperatures below 0^ , or above 35^ .
- Avoid exposing the device to direct sunlight.
- This device is not suitable for use by individuals (including children) with physical, sensorial or mental disabilities, or who lack the experience or knowledge, unless supervised or instructed regarding the use of the device by a person responsible for their safety.
Children should be supervised to ensure they do not play with the device. - For greater protection, the installation of a residual current device is recommended that does not surpass 30mA . Seek advice from your installer.
- If the hair clipper, whilst connected to the adapter unit, falls into water, do not attempt to remove it. First disconnect the cable from the mains outlet.
- Ensure your hands are completely dry before touching the adapter.
- Do not use the hair clipper if the cutting blades are damaged!
- In the event of a device fault and/or malfunction, switch off the device and do not attempt to fix it. If in need of repair seek assistance only from an After Sales Support service recommended by the manufacturer.
- Unplug the device whenever not in use.
- The hair cutter adapter is used for charging the appliance battery. You may use the hair cutter while it is plugged in.
- The hair cutter must not be used in the bathroom if it is directly connected to the mains via the adapter, as this is not a water safety system of any kind.
- The hair cutter may be used in the bathroom if it is not plugged in. So, if the appliance is running on its battery, it can be used in the bathroom, but you
must never submerge it in water.
- If you wish to clean the blades, you may submerge them in water. For more thorough cleaning, remove the cutting head and clean the appliance using the cleaning brush (H) which comes in the box. Never place the appliance in water!
3. HOW TO CHARGE THE HAIR CLIPPER
- The battery is only charged if the switch is down, i.e. in "off" position (Fig. 1).
- With switch (E) off, connect the device to the mains. The battery is only charged if the switch is off (see Fig. 1).
- Leave the device to charge for 16 hours the first time. 12 hours is sufficient for subsequent charges. When fully charged, the battery will run for around 45 minutes.
- When the batteries are completely charged, unplug the device from the power supply and use unplugged. When the batteries become depleted again, repeat the charging cycle.
- Recharge the device only when it is apparent that the hair clipper is not operating normally.
NOTE: The battery will reach its maximum efficiency after various charges and discharges. - The hair clipper can be used connected to the mains when the battery is depleted. If the device does not initially start working switch off and charge the battery for five minutes.
4. HAIR CUTTING INSTRUCTIONS
Before starting to cut:
Take hold of the device whilst unplugged and adjust the spacer comb (A) as desired, changing according to the cut required.
(see Fig. 2).
When a different length is required, simply unlock the spacer comb (A) by pressing the clip (B) and slide it to the point desired by moving the spacer comb either upwards or
downwards (A) (Fig. 2).
Ensure there is no hair or dirt in the hair clipper. Turn on the hair clipper and check that it works properly.
Place a towel around the neck of the person whose hair you are going to cut.
Seat the person so that their head is at eye level, so you can see better and work more comfortably. If necessary, use books or cushions to raise the person to eye height.
First comb the hair, removing knots or ties. Then hold the clippers in the most comfortable manner possible.
Relax and work with precision, making short "passes". Do not cut the side or the rear of the hair in a straight line; work gradually over the entire head.
It is best to remove a small amount each time. You can always remove more later. Before starting, and when working, comb hair regularly in the desired hairstyle.
Start cutting
When working with the hair clipper for the first time, cut just a small part of the hair until you become familiar with the amount of hair that is cut with a particular setting. After combing hair in the direction of natural hair growth, proceed as follows to achieve a fluid gradual haircut:
Step 1. The neck section
Use the spacer comb (A), hold the hair clipper with the cutting edge facing upwards and start cutting at the middle, at the bottom of the neck. Press the hair clipper lightly against the head with the teeth of the comb accessory facing upwards. Gradually move the hair clipper upwards, work upwards and outwards through the hair, removing only a small amount each time. Whilst working, gradually move the head of the hair clipper towards you. Then cut the rear section from the start of the neck to above the ears.
Step 2. Rear of head
Use the spacer comb to cut the rear of the head.
Step 3. Side of head
Use spacer comb short settings (A) to cut
the sides - the hair directly above the ears. Then set the spacer comb (A) to a longer length and continue cutting the top of the head.
Step 4. Top of head
Use the spacer comb (A) to cut the hair on the top of the head from the back to the front, against the direction of the hair growth. In some cases you may have to work backwards from the front. If you observe that the spacer comb (A) is cutting the hair too short, use comb (I). Cut with the hair clipper above the comb, or hold the hair between our fingers and cut it to the length desired. Always work from the rear of the head. Cut the hair shorter by gradually reducing the distance between the comb, or fingers, and the head. Use comb (I) regularly to check if irregular locks of hair remain and to remove cut hair.
Step 5. The final touch
Lastly, to achieve a precise and good cut, remove the comb and rotate the clipper (with the bottom facing up), so that it can touch the bottom of the neck area, the sides and the area around the ears. Set the adjustable cutting length button to the lowest position. Hold the hair clipper at a right angle to the head, with the tips of the cutting blade lightly touching the skin, and work downwards.
This will produce as soft result as if a razor blade had been used.
Cut hair longer
If you want a haircut with gradually diminishing hair, first divide and comb the hair as normal. Then divide the hair from the front in three equal sections around the head. Fix the two upper layers with clips, so that they do not interfere when cutting the lower layer. After this, cut with scissors or a hair clipper combined with a comb.
5. GENERAL ADVICE
- Check that the hair clipper is clean, lubricated and that the battery is charged.
- Hold the hair clipper such that the flat side of the comb points towards the head and move it slowly and uniformly over the head.
In general, start with the sides or the neck, and cut towards the crown. Then cut the fringe towards the centre. - Until you gain experience, start cutting the hair longer and reduce gradually.
- Stop cutting every now and then, clean cut hair with the comb and check how it looks so far.
The hair must be clean, dry and untangled.
6. CLEANING AND MAINTENANCE
After use, disconnect the power cable, extract the comb (A) and clean hair remains from the clipper with the brush.
- Clean the outside of the clipper with a soft cloth. Do not use solvents or abrasive products. Do not put the clipper in water.
- Release the set of blades and use the brush to clean inside (Fig. 3). Hold the set of blades and extract by pulling outwards. Use a cloth to avoid injury.
- MCP-45: For an optimum cut, it is important that you lubricate the set of blades frequently with machine lube oil (Fig. 4) After cleaning and lubricating mount the blades again.
7. ENVIRONMENT
The hair clipper contains a rechargeable Ni-MH (Nickel and metal hydride) battery. To preserve the environment, do not discard with domestic refuse when the device is at the end of its life.
Extract the battery from the hair clipper as indicated in the figures and deposit it
at the collection point assigned for this purpose (Figs. 5, 6, 7, 8 and 9). To extract the battery follow as indicated in the figures indicated.
8. INFORMATION FOR THE CORRECT DISPOSAL OF ELECTRICAL AND ELECTRONIC APPLIANCES
At the end of its working life, the product must not be disposed of as urban waste. It must be taken to a special local authority differentiated waste collection centre or to
a dealer providing this service. Disposing of a household appliance separately avoids possible negative consequences for the environment and health deriving from inappropriate disposal and enables the constituent materials to be recovered to obtain significant savings in energy and resources.
To remind you that you must collaborate with a selective collection scheme, the symbol shown appears on the product warning you not to dispose of it in traditional refuse containers.
For further information, contact your local authority or the shop where you bought the product.
FR
1.DESCRIPTION DES PIECES
Ctbnka 2.3aHaTa Yact Ha rnaBaTa
N3PON3BaIte pa3dJIeNTeINHrpe6eH, 3a Da nOCTpIXKeTe 3aHaTa CtpaHa Ha rIbAbaT.
Ctbnka 3. OtcpaHn Ha JIneTo
N3no3BaIte Kbcnte KOhpyaunna na pa3dJInteHnra rpe6en (A), 3a da nOdctpnxKeTe Kocata OTcTpaHn Ha IInceTo, HenoCpeDCTBeHOHa yuHne. CneTobA, HarIacTe pa3dJInteHnra rpe6en (A) Ha no-rolMa DbJxHnHa nPpOdbJxKeTe da nOdctpIRBaTe rOpHATA qact Ha rJaBata.
Ctbnka 4. Topnata yact Ha fJnaBata
(15,17,20,23 26,29: eio 6 Jus) aolal Ia. (A
(jieill ) biuill Jua . (B
_n = 1^_k = 1^_m = 1^_n = 1^_k = 1^_m = 1^_n = 1^_k = 1^_m = 1^_n = 1^_k = 1^_m ≥slant 0
aJ.(D
J / J. (E
J. (F
jG
iill 1
biio. (1)
J
Jauo. (K
Jz#.L
jll jil jil jil jil jil jil jil jil jil jil jil jil jil jil jil jil jil jil jil jil jil jil jil jil jil jil jil jil jil jil jil jil jil jil jil jil jil jil jil jil jil jil jil jil jil jil jil jil jil
ailll lal aall
(ajyblaiall aojial)
jlll jssi laoie blll lnnnll aalaxnl uay lgl yaaa jss jess ll
a
aegc 2
jizill 4i jso JScie i jzill jn oJ jzll Jiaaiin
aaiialpssjll
g jlll jilj gai jial ljj jna Jia Jai
jies
alall Juae glc plaoa 1j 1aia aia aiaa glg jaaaiy
Jabla Uglua jalil
a a a a a a a a a a a a a a a a a a a a
jail 1iLac iXe Jy jUkui Juaia ayjball: abai
jolll Jlloic 1oic jollic oioi jolll oioic jolilly jolll Jorai
jgl jgl jgl sds yj bll jg w jill "0" jgl bcil
J 1
aaii 4
:
Aa (A) aalall baaal Jc y 1000000000000000000000000000
(2 kai jai)
(B)Jall biai (A)gall biall g jil lgy
(2K) (A) all
a 1
e 1
a a a a a a a a a a a a a a a a a a a a a a a a a a
g jll aaiial all aluall g Juaal yj lo Jaaiil
gilllll lllll jllll llll glll glll glll glll glll
Kui Juciaa aaiy jay cilll y gll lal
jaii jia
a a a a a a a a a a a a a a a a a a a a
Jusll jill aiaa g aaii laiic 1sll
a
Ji jia jia jia jia jia jia jia jia
jaiy jaiy jaiy jaiy jaiy jaiy jaiy jaiy jaiy
Jg 10
jusii jusiall jusiall
aeg jing gnnn jy j
aalgl 6
abillabwgyai (A) bialg jil jllj no biall lal
jgljgljgljgljgljgljglj
aBilS 100
S OBC = S COD + S BOC - S BOC
wulwall (3) 1alall alal gldl jiaizig wullg jil
jzll jzil jzil jzil jzil jzil
JSCLLL 1000000000000000000000000000000000000000000000000000000000000000
Slll 4 (4) jglgall
wll 7
IcblalllgallglgNi-Mh ggi jnnnnaaiaaia aiaaie aie j
Jaaal 1a Jgai jiai Iooie ayjiall xiaill gao jy jui bjaill
a a a a a a a a a a a a a a a a a a a a a a a a
aJ 8,7,6,5)

a g jg jg jg jg jg jg jg jg jg jg jg jg jg jg jg jg jg jg jg jg jg jg jg jg jg jg jg jg jg jg jg jg jg jg jg jg jg jg jg jg jg jg
a jlll clll g a jy jgall lgl a glll sll gj ic
j 1
e 1
aall 1
10
jglal jil 120 jla lal lal wll Jai jai jai
