USER MANUAL 3CFT-DEEP90 X FAGOR
UK - Instruction on mounting and use
Consult the designs in the front pages referenced in the text by alphabet letters.
Closely follow the instructions set out in this manual. All responsibility, for any eventual inconveniences, damages or fires caused by not complying with the instructions in this manual, is declined.
Note: the elements marked with the symbol (^*) are optional accessories supplied only with some models or elements to purchase, not supplied.
Use
The hood is designed to be used either for exhausting or filter version.
Ducting version
The hood is equipped with a top air outlet B for discharge of fumes to the outside (exhaust pipe and pipe fixing clamps not provided).
Attention!
If the hood is supplied with carbon filter, then it must be removed.
Filter version
Should it not be possible to discharge cooking fumes and vapour to the outside, the hood can be used in the filter version, fitting an activated carbon filter and the deflector F on the support (bracket) G, fumes and vapours are recycled through the top grille H by means of an exhaust pipe connected to the top air outlet B and the connection ring mounted on the deflector F (exhaust pipe and pipe fixing clamps not provided).
Attention!
If the hood is not supplied with carbon filter, then it must be ordered and mounted.
The models with no suction motor only operate in ducting mode, and must be connected to an external suction device (not supplied).
Installation
The minimum distance between the supporting surface for the cooking vessels on the hob and the lowest part of the range hood must be not less than 50cm from electric cookers and 65cm from gas or mixed cookers.
If the instructions for installation for the gas hob specify a greater distance, this must be adhered to.

Electrical connection
The mains power supply must correspond to the rating indicated on the plate situated inside the hood. If provided with a plug connect the hood to a socket in compliance with current regulations and positioned in an accessible area. If it not fitted with a plug (direct mains connection) or if the plug is not located in an accessible area apply a bi-polar switch in accordance with standards which assures the complete disconnection of the mains under conditions relating to over
current category III, in accordance with installation instructions.
IMPORTANT: Before re-connecting the hood circuit to the mains supply and checking the efficient function, always check that the mains cable is correctly assembled.
Mounting
Before beginning installation:
- Check that the product purchased is of a suitable size for the chosen installation area.
- To facilitate installation, remove the fat filters and the other parts allowed and described here, dismantle and mount it.
To remove see also the relative paragraphs.
- Remove the active carbon (*) filter/s if supplied (see also relative paragraph). This/these is/are to be mounted only if you want to use the hood in the filtering version.
- Check (for transport reasons) that there is no other supplied material inside the hood (e.g. packets with screws (), guarantees (), etc.), eventually removing them and keeping them.
- If possible, disconnect and move freestanding or slide-in range from cabinet opening to provide easier access to rear wall/ceiling. Otherwise put a thick, protective covering over countertop, cooktop or range to protect from damage and debris. Select a flat surface for assembling the unit. Cover that surface with a protective covering and place all canopy hood parts and hardware in it.
- Disconnect the hood during electrical connection, by turning the home mains switch off.
- In addition check whether near the installation area of the hood (in the area accessible also with the hood mounted) an electric socket is available and it is possible to connect a fumes discharge device to the outside (only suction version).
- Carry out all the masonry work necessary (e.g. installation of an electric socket and/or a hole for the passage of the discharge tube).
Expansion wall plugs are provided to secure the hood to most types of walls/ceilings. However, a qualified technician must verify suitability of the materials in accordance with the type of wall/ceiling. The wall/ceiling must be strong enough to take the weight of the hood. Do not tile, grout or silicone this appliance to the wall. Surface mounting only.
Installation wall model
Fig. 5
- Using a pencil, draw a line on the wall, extending up to the ceiling, to mark the centre. This will facilitate installation.
- Rest the drilling template against the wall: the vertical centre line printed on the drilling template must correspond to the centre line drawn on the wall, and the bottom edge of the drilling template must correspond to the bottom edge of the hood.
- Place the lower support bracket on the perforation diagram making it coincide with the traced triangle, mark the two external holes and perforate.
Note: Always make the holes indicated on the template. The upper 2 are for hooking the hood up while the lower holes (generally 1 central or more lateral) are for the definitive and safety fixing.
Remove the perforation diagram, insert the wall-dowels and fix the support bracket of the hood with two 5x45 mm screws.
4. Apply the flues support bracket G to the wall adherent to the ceiling, use the flues support bracket as a perforation diagram (if present, the small slot on the support must coincide with the line drawn previously on the wall) and mark two holes with a pencil. Make the holes (Ø8mm), and insert 2 dowels.
5. Fix the chimney support bracket to the wall using two 5 × 45 ~mm screws.
6. Hang the hood onto the lower bracket.
7. Adjust the distance of the hood from the wall.
8. Adjust the horizontal position of the hood.
9. Fix the hood into its final position on the wall (ABSOLUTELY ESSENTIAL).
10. Connect a pipe (pipe and pipe clamps not provided, to be purchased separately) for discharge of fumes to the connection ring located over the suction motor unit. If the hood is to be used in ducting version, the other end of the pipe must be connected to a device expelling the fumes to the outside. If the hood is to be used in filter version, then fix the deflector F to the chimney support bracket G and connect the other extremity of the pipe to the connection ring placed on the deflector F.
11. Connect the electricity.
12. Apply the chimney stacks and fasten them at the top to the chimney support ^ (12b) using 2 screws (12a)
13. Slide the bottom section of the chimney down until it completely covers the suction unit and slots into the housing provided on top of the hood.
Remount the carbon filter frame and the fat/s filter/s and check the perfect functioning of the hood.
Description of the hood
Fig. 1
- Control panel
- Grease filter
- Grease filter release handle
- Halogen lamp
- Vapour screen
- Telescopic chimney
- Air outlet (used for filter version only)
Operation
Use the high suction speed in cases of concentrated kitchen vapours. It is recommended that the cooker hood suction is switched on for 5 minutes prior to cooking and to leave in operation during cooking and for another 15 minutes approximately after terminating cooking.
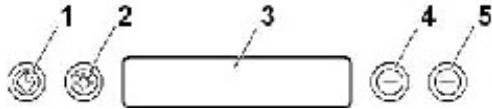
Control panel
The timer value can be increased or decreased in steps of 1 minute; the default time period is set to 10 minutes. The value can be set to a time period of anywhere between 20 minutes and 1 minute.
Within 5 seconds of the "TIMER" button being pressed, the system will enter its programming mode and the user will be able to set the timer countdown period using the "-" and "+" buttons. If none of the buttons are pressed within a period of 5 seconds from when the Timer function was selected or the time period programmed, the countdown will begin.
The timer countdown can be activated as follows:
Once the timer has begun counting down, it may be cancelled by pressing the TIMER button.
Light ON/OFF button.
3. Display
Indicates the status of the hood.
The OFF status can be achieved by pressing the " - button and decreasing the motor speed until it stops.
The ON status can be achieved by pressing the "+" button; the motor will start at the lowest speed level.
The speed sequence is 1-2-3-4, therefore every time the "+" button is pressed the motor moves on to the next speed level.
If the motor is at the 4^th speed level and the "+" button is pressed, you will hear a beep.
The 4^th motor speed level is the intensive function and is timer-operated.
The standard period of time is 5' , at the end of which the hood reverts to speed level 2.
To deactivate the function before the set time has elapsed, simply press the " - " button.
SPECIAL FUNCTIONS
Programming the Clock
The clock may be set at any time, apart from when the timer function is active.
The clock may be displayed in a 12-hour format, indicating a time between 1:00 and 12:59.
The clock may be reset by pressing and holding the "Timer" button for 5 seconds, then pressing the "-" and "+" buttons to adjust the time.
The user may increase/decrease the time in steps of 1 minute; however, if the "+" or "+" button is pressed for 1 second, the time is decreased/increased in steps of 5 minutes. In this case, the control panel rounds the time off to the nearest 5 minutes.
The user can end the clock resetting stage by pressing the "Timer" button.
If none of the buttons are pressed for 1 minute, the control panel accepts the set value and adds on 1 minute, then begins to operate normally.
Grease filter warning
After 40 hours of operation, "Grease Filter" appears on the display. When this text appears, the filter needs to be washed. To reset the grease filter warning, the user should press and hold the "+" button for 5 seconds. After this action, the "Grease Filter" text will disappear, a "beep" will be emitted to indicate the process is compete and the display will return to showing its normal operating functions.
The grease filter counter will reset after this procedure is complete.
Charcoal filter warning
After 160 hours of operation, "Charcoal Filter" appears on the display. When this text appears, the filter needs to be replaced.
To reset the charcoal filter warning, the user should press and hold the "." button for 5 seconds. After this action, the "Charcoal Filter" text will disappear, a "beep" will be emitted to indicate the process is complete and the display will return to showing its normal operating functions.
The charcoal filter counter will reset after this procedure is complete.
Enabling/disabling the charcoal filter warning
The charcoal filter may be enabled or disabled by pressing and holding the " - " and "+" buttons simultaneously for 5 seconds. The inclusion or exclusion
of the charcoal filter must be selected while the motor and light are OFF.
Charcoal filter excluded: the filter alarm is disabled.
Enabling/disabling the sound signal
The sound signals may be activated or deactivated by pressing and holding the "Light" button for 5 seconds.
If the sound signal has been activated, it should emit a beep and the text "Snd" should appear on the display for 2 seconds.
If the sound signal has been deactivated, the text "Snd" should appear on the display for 2 seconds and no beep should be emitted.
Temperature alarm
The hood is fitted with a temperature sensor which activates the motor at speed level 2 in the event that the temperature in the display area exceeds 70^ (the system monitors the data recorded by the sensor every 250 ms).
If the motor is OFF or at speed level 1 and the alarm intervenes, the motor will move to speed level 2 and the text "care" will appear on the display. While the appliance is in its alarm operating status, the user may only increase the motor speed (3^rd and 4^th levels). When the temperature of the cooker hood returns to a level below the alarm threshold, the motor will return to the status which was set before the alarm condition occurred.
3 minutes after the intervention of the alarm, the system will check the temperature in the display area again: if it is lower than 70^ , the operating conditions set prior to the intervention will be restored.
Maintenance
ATTENTION! Before performing any maintenance operation, isolate the hood from the electrical supply by switching off at the connector and removing the connector fuse.
Or if the appliance has been connected through a plug and socket, then the plug must be removed from the socket.
Cleaning
The cooker hood should be cleaned regularly (at least with the same frequency with which you carry out maintenance of the fat filters) internally and externally. Clean using the cloth dampened with neutral liquid detergent. Do not use abrasive products. DO NOT USE ALCOHOL!
Warning:
Failure to carry out the basic cleaning recommendations of the cooker hood and replacement of the filters may cause fire risks.
Therefore, we recommend oserving these instructions.
The manufacturer declines all responsibility for any damage to the motor or any fire damage linked to inappropriate maintenance or failure to observe the above safety recommendations.
Grease filter
Fig. 2
This must be cleaned once a month (or when the filter saturation indication system - if envisaged on the model in possession - indicates this necessity) using non aggressive detergents, either by hand or in the dishwasher, which must be set to a low temperature and a short cycle.
When washed in a dishwasher, the grease filter may discolour slightly, but this does not affect its filtering capacity.
Remove the filter holder frame by turning the knobs (g) 90^ that affix the chimney to the cooker hood.
Charcoal filter (filter version only)
Fig. 3
It absorbs unpleasant odours caused by cooking.
The charcoal filter can be washed once every two months (or when the filter saturation indication system - if envisaged on the model in possession - indicates this necessity) using hot water and a suitable detergent, or in a dishwasher at 65^ (if the dishwasher is used, select the full cycle function and leave dishes out).
Eliminate excess water without damaging the filter, then put it in the oven for 10 minutes at 100^ to dry completely. Replace the mattress every 3 years and when the cloth is damaged.
Assembly
Place the mat around the grease filter and fix it in place using the devices provided.
Position the upper cap and fix it in place using the fixing pin.
To disassemble, perform the steps in the reverse order.
Replacing lamps
Fig. 4
Disconnect the hood from the electricity.
Warning! Prior to touching the light bulbs ensure they are cooled down.
- Using a flat head screwdriver or equivalent tool, carefully pry loose the light cover.
- Remove the damaged light and replace with a new 12 Volt, 20 Watt (Maximum) halogen light made for a G-4 base SuITABLE FOR USE IN OPEN LUMINAires. Follow package directions and do not touch new light with bare hands.
- Reinstall the light cover. (it will snap shut).
If the lights do not work, make sure that the lamps are fitted properly into their housings before you call for technical assistance.

Caution
WARNING! Do not connect the appliance to the mains until the installation is fully complete.
Before any cleaning or maintenance operation, disconnect the hood from the mains by removing the plug or disconnecting the home mains switch.
The appliance is not intended for use by children or persons with impaired physical, sensorial or mental faculties, or if lacking in experience or know-how, unless they are under
supervision or have been trained in the use of the appliance by a person responsible for their safety.
Children should be monitored to ensure that they do not play with the appliance.
Never use the hood without effectively mounted grating!.
The hood must NEVER be used as a support surface unless specifically indicated.
The premises must be sufficiently ventilated, when the kitchen hood is used together with other gas combustion devices or other fuels.
The suctioned air must not be conveyed into a conduit used for the disposal of the fumes generated by appliances that combust gases or other fuels.
The flaming of foods beneath the hood itself is severely prohibited.
The use of exposed flames is detrimental to the filters and may cause a fire risk, and must therefore be avoided in all circumstances.
Any frying must be done with care in order to make sure that the oil does not overheat and burst into flames.
As regards the technical and safety measures to be adopted for fume discharging it is important to closely follow the relations provided by the competent authorities.
The hood must be regularly cleaned on both the inside and outside (AT LEAST ONCE A MONTH, it is in any event necessary to proceed in accordance with the maintenance instructions provided in this manual)..
Failure to follow the instructions as concerns hood and filter cleaning will lead to the risk of fires.
Do not use or leave the hood without the lamp correctly mounted because of the possible risk of electric shocks.
We decline any responsibility for any problems, damage or fires caused to the appliance as the result of the non-observation of the instructions included in this manual.
This appliance is marked according to the European directive 2002/96/EC on Waste Electrical and Electronic Equipment (WEEE). By ensuring this product is disposed of correctly, you will help prevent potential negative consequences for the environment and human health, which could otherwise be caused by inappropriate waste handling of this product.

The symbol on the product, or on the documents accompanying the product, indicates that this appliance may not be treated as household waste. Instead it shall be handed over to the applicable collection point for the recycling of electrical and electronic equipment. Disposal must be carried out in accordance with local environmental regulations for waste disposal.
For more detailed information about treatment, recovery and recycling of this product, please contact your local city office, your household waste disposal service or the shop where you purchased the product.
Poka3bIbaeT peXIM BbITaXKN.
4. 一 KhoNka yMeNbIeHnC kOpocTn/BblKJI. DBratet
Дыгател bblKIOHuaeTcnopeIcTBOM yMeHbIeHnckOPOCTN pni NOMOUI KHOJIKN «-» BnIOTb DObIKJIOUeHnI DByrataTeIa.
5. + Khonka yBeIuIeHnIeCKoPocTn /BKJI.ДИВaTeIeIa
ДВИГАТЕЛВ BKILQUHYAETCA NOCpeIcTBOM yBENUHENNACKOPOCTN ПИ NOMOUIK KHOIIKN «+» BINOTB DOBKILUHENHA DIBRATATELA H1-ОI CKOPoCTN.
IocneobateIbHocTbCKopocTn 1-2-3-4BbIbpaetcnpn NOMOUI KHOKNK 念 + 力 ,Pn KaKdOM HaxaTm KOtopoDDBrataIb NepeKJIuOaTeCn Ha CneDuOyU CKOpocTb.
Ecnn DniratEnb paBoTaet Ha 4-0nCKOpocTn, npn Haxatm KNHKn + BKNHOaETcKOPOTkn 3yMMep.
4-aa CKOPoCTb DnBraTeJIa COOTBeTCTBye TcAMOBI BICOKOI CKOPoCTNI IMeET FHKINPOBaHHyIO npOdoJKNtJIbHOCTb.
Ctahapthn npoJnxntelbHocTb yHKUHOHPOBaHna 4-0n ckOpoCTn -5 MNHT, n0 npoIeCTBn KOTOpbIX bItjKa nepeKIIIOuHaetcNa 2-yu ckOpoCTb.
ПЯ OTКИОЧЕНИ 3TOД ФУнкUILI Do INCTeUHENI 3aYka3aHHOFO BpeMeHи DOCTaTOHNO HaxaTb KHOKNy «-».
CNEILNAHbHbIE ΦYHKLIIN
PnozpaMmuBaHue yacos
Yacbl MoryT 6bItb Hactpoehbl BJIIOoe Bpemr, Ho He B peKIMe TaMepa.
BpemHa yacax moKet noka3bBaTbcBΦopMaTe 12 acob co 3naueHnmaO t 1:00 do 12:59.
YacbI MOryT bIbIb HAcTpoeHbI, HaxkAB KHOKNY《TaMnep》 Ha 5 cekyHd, a 3aTeM HaxkAB KHOKN «+» I «-» JnA HAcTpOKn BpemeHn.
Ponb3OBaTeB MoKET yBeJIuINBaTb/YMeHbIaTb BpEmr no 1 MInHyTe. EcNJe KHOJIK «+»/ «» HAKIMAHTc Ha 1 cKeYHdy, yBeJIuINeHne/YMeHbIeHne BpEmEH npOn3BOoNTcno 5 MNHyT. B npOceCe hAcToPoIKMBpeMeHn 3aJaHHoe 3HaueHne OkpyIraTeC T nNoTb Do 5 MNHyT.
CnHnHaI3aIy yOrIbHoro fNIIbTpa NCKJIouHeA: npn erocatypaun CnHnHaI3aIy He BkNIOHaETcR.
BkHoueHe/OmKlHoueHe 38yko6o cuHaIu3auu
3ByKOBaCnHaIImaZma MoXeT 6bItb BkHIOUeHa HIN OTKnOHeHa, HaxKaB KhoNky «Light» Ha 5 cekyHd.
Ecni 3bkyoBa CnHaJIIn3aIe BkHIOyeHa, HbKlIOyaeTcra 3ymMep n Ha DnCIIpee Ha 2 cekyHdbI IPOBnEeTc CmBOIg «Snd».
Ecni 3bkyoBa CnHaiin3aun OTKIouHe, CMBON «Snd» NOBIAETcHa DnCIIe Ha 2 cekyHbI, Ho 3ymMep He BKIOUyaeTc.
CuZHaIuaZaun nepezpeea
BbITRAKka yKOMNKeTObaHa TeMnepaTpHbIM DaTHNKOM, nepeKIOuHOzIM DIBrAteNB Ha 2-уO CKOpOCTb, ecNI TEMnepatya B 30He DnCnIe NpeBbICNT 70^ (cNCTema KaKdIbe 250 McEK NOKa3bIbAE T3NaHeHne, n3MepeReMoE daTHNKOB).
Ecnn DbrnateIb BblKIOHEn IIN pa60Taet Ha 1-oi ckOocTn, IN BkIIIOuAeTcN CnIHaNIs3aUma NpeperpeBa, DbrnateIb nepeKIOUoAeTcHa 2-yOCKOpocTb, a H aDncnnee nOKa3bIBaETc COo6ueHne «Care» (BHNMaHne). B coCTOHN CnIHaNIs3aUm NpIb3OBATElb MOKeT TOnbKO yBENuHTb ckOpctb DbrnateIa (Ha 3-bIO IIN Ha 4-yO CKOpocTb). KOrda TemNepaTypa BblrKaNN PONHImNTcN HNke nopora cpa6aTbIBAHNA CnIHaNIs3aUma NpeperpeBa, DbrnateIb BEpHcTeB PexKM, PnpDeIeCTByIOUmm CnIHaNIs3aUma. Upeez 3 MInyIbIocne CpabaTBiBAHNA CnIHaNIs3aUma NpeperpeBa CNCTema BHOBI npObepaTe TMNepaTyB V3OHe DnCnNe: ecNI TEmNepaTypa HNke 70^ , BblrKa Ka Bo3BpaUaTeCBA peKIM, PeIeSCTByIOUmm CnIHaNIs3aUma.
yxog
Ppexkde Yem BbIOnHnTb IIO6yO onepauno no yxOdy OTOeDHHTE BbITRkKy OT3NeKTPOcETN.
OuInCTka
BbITXKdOJIKNHnIOIeBepraTbCSaCTOn OUChTKe KaK BHyTpN, TAK n Chapxyn (No KpaIneH Mepe C ToT Ke Npe MPODmUHOCTbO, YTO uYXo3 a Fmbltpamn dna 3aedpkm Xnpa).ДЯчSTKn IcNOIb3yTe CneuMaNbHYo TpRkny, CMOueHHyO HeITpbAhlBM XnDkMm MOOuMm CpeCTbOM. He pImeHnTe cpeCTda, coepzauane ab6pa3NBhle MaTePmaIbI.
HE IPIPMEHRAITE CnIPT!
BHHMaHHe: He co6bIIODeHne npabIN pUcSTKn npu6Opa n3aMeHbI pINbTPOB MOKET npuBeCTN K pNCky BO3HNKHOBeHnnoJokapa. I03ToMpyekOMeHdyem Co6bIIODaTb npuBeHnble INCHCTpykUnn.
CHHMAETCJIIO6AOTBETCTBeHHOCTbBCB3N CBO3MOXHBIMNOBPExDeHnARIMDINrAteTnI CNOxKApAMN,BO3NHKUHMNCIEcDETBHe HnpaBnIbHOrPeMOHTaIIN Heo6JIIODeHnBBIeONUCAHbIX npedynpexDeHn.
Φиьтpbi 3aDépЖикра
Pnc.2
ФильтсдуETЗаиштExeMeMecryH(ИнКогДССТЕм
ИнДКАПМНЯСБЕНИЗФильтPOR,ECINОHAIMeTcB
Вашей МODEЛ,Уka3ыBaETHaДанHyTOHeo6xOДmOCtB)
HearpeccNBbIMMOUIMCpEcdTBAMN,BpyHyTOИNBI
NocyDOMOeHOnH MaIhne Prn Hn3KOr TemnepaType N
3KOHOMHOMUKNKIIMbITя.
PnMbTBe B NocydomoEHOH MaUNHe MOKET MmEB MeCTO HEKTOPOe OecuBcYbMaBHMe HФNtpa 3aJeDxKm XkpA, HO eroФнБТуюа XapakTepIcNTka OCTaetcA abCOHHTHO HENMEHNOH.
CHIMMTE onophyo pamy noD pfNbTp, noBepHyBa 90° pyKoTKn (g), KOTOpIe KpeIrE rO K BbITkKe.
YrOJIbHbI ΦnIbTp (ToIbKO BpeXIme peuRpyJau)
Pnc.3
YdAaIeT He npraThbIe 3aapan KyxHn.
YroJIbHbI pKIOBTO IpOMbIBaTb Upe3 KaKdbIe DBa Mecra, INI KAKDbI pa3, KOrda CnCTema CNHaINImaUN HacblEHN HpNtPoB (ecIn IMeOuAocy B Ac MoEnb Chabxega HUka3bIAeT HA 3Ty Heo6XoIMOCtB. MoITe PhINbTp B TENlON BOCe HADJLKeAaUMM MOUcMM CpeDCTBAMN INI B NocyDmOeUHOn MaUnHe npi TemNepatype 65^ (B nocneHem Cnyae, BbINOJIHnTe NOHbI cIKI MoKn 6e3 nocyDb BVHTPm MaunHbI).
YdJInte N3bIToCHyIO BDOy OCToPoxHO, YTO6bI He NOBpeINbФnIbTp, nOcne Yero DaIte FInIbtpy OKOHaTeNb HO COxHytB CyuINike B TeueHene 10 MInHyT npi TemNepaType 100^
3aMeHnTe PInbTPOBaIbHbI 3JIeMENT Chepe3 KaKdIbe 3 rOda n KaKdIb pa3, KOrDa O6HapyXmBaETcN NOBpeXdHne nONOTHa.
MOHTAX
Iomectne npoklaiky Bokpyf nIbtpa-koipoynOBnTeTn 3aKpeHnTE ee CneuaJIbHbIM KpEnexHbIM 3JMeHtAMn.
BCTabBe BepxHIOU 3aIyUkU N 3akpeiTe ee 6bokpoBOuHO npykHoH.
Дя demoHTaxa BbIIOHnTe BblIeONHcHHbIe OepaunB 6paTHOM npAJIke.
3aMeHaJamn
Pnc.4
OtkluohTe np6op ot 3neKtpocetn.
BnmaHHe!PpExe Yem npKacTbC K JAmnam y6eNTecb B TOM, YTO OHN OCTblIN.
- BbHbTe 3aunThbI 3JEMeHT npn NOMOu He6oBbOu OTBeptKn C HOKeBOI rOIOBKn IIN NOo6HOr HCHTpymEHTa.
- 3amehnTe neperepeBwUo lamny. IcnoIb3yIe dIra 3TOI rIoIb raIOReHHbIe daMnbl Ha 12V-20W mKc-G4,He pniKaacarcb K Hm pykAmi.
- 3akpoTe nlafoh (KpeIeHne 3aueIkoJ).
Ecnn cnCTema nOcBETK He pa6oTaET, npOBepbTe KoppekTHyU yCTaHOBky JAmn B rHe3dax, npExde Yem ObaPntbCBy B CEHTp TEXHnuecko NMOU.

BhimaHne!
BnmaHHe! He nodknOuHTe np6Op K 3eKtpuecko cTe, noka onepaunio no yctaHOBe noHIOCTbU He 3aBepuHbI.
Ipejde cem npicTuyntb K onepaLmno OoucTe nIn yxOJeOTcoeMHNTBeBtJAKy OT CETN, BByHB BNky NIN BbIKIOHNB 6uHn BBKIOUateJIb 3NeKtpnueckO CETN.
Ipi6bOp He nOxOHTnIcN0JIb3OBAHnI DeTbMn IINI
LIaAMn, HENOLHOeHHbIMn IO CBOUM YmCTBEHNbIMn INI
CECOPbHM ChOCo6HOCTAmn, INI HE OJNaDAHOUzMMn
IOCTaTOOHbIM ONbITOM INI 3HaHnAMyn, ECNI He NOd
PncCMOTpM, INI ECNI OHN He 6blN OObYeHbI NJIb3OBAHINO
AnnapaTpyo Co CTOpOBHl Niua, OTBeauOJeo 3a IN
6e3OnaNoCHctB.
He octabte detei 6e3 npncmTopa, yTo6bI OHn He nrgpAln C np6opom.
He nCOnIb3yIte BbITaKky, ecIn peIeTka HnpaBnIbHo CMOHTnpoBaHa!
Kateropnueckn 3anpeuetaTcNIOIb3OBAbBbITRAKy KaueCTBe ONOPHON PLOCKOCTN,ecn3TO CNEuaJIbHO He OROBOpeHO.
Oepe Ta Hnepaun Bo3yXoo6MeH NomeeHna, KOrda BblncjIb3ynte BbITJkky B KyxHe OndHOBpeMeHHo C npBpMn npBopamn Cra0Bm CkRHaHem NnC nTtAnm DpymnnrTopoumm.
BbITaNBAeMbI Bo3DyH He DoJXHe BbI6PcBaTbCn HApKy Upe3 Bo3DyXOBOD, NcIONb3yeMbI DnB BbI6PoCa DbIMOB OT np60OB C r3OBBIM CxNraHnEM mN C nNTaHnEM dpymIMrTopuymn.
Kateropnueckn 3anpeaetcra roTOBn6bnoa "noi nIamHeM"POCKoJIbky CBO6OdHoe IINAMr MOKeT NOBpeNTb fNtTpbl nCTaT npUHHo NOKapa; IO3Tomy, BO3depKJBauTeCb O T30To B LIO6OM cJyae.
KapeHBe B obuNbHom MacIe DOJIXHO Ipon3BODnTbCnIO NOCTOHHbIM KOHTPOJIem, IMeB B BVy, YTO NepeIpeTeOE MACNo MOKeT BOCIIaMeHrTBcR.
Yto kacaetc TExnuecknx Mep u yCIOBn no Texnke 6e3oNaChOCTn npn OTBOe DbIMOB,TO npnEepKbAaTEcb cTporo npaBnI, npdeyCMOTpeHHbIX peIaMeHToM MeCThBix KOMNETHTbIX BnActei.
Ipon3BOIDITE nepmoDnueckyo OuchKy BbTTKm KaBbHTPn, TAK n Chapykn (IO KPAHEN MEPE PA3 B MECAL, BO
BCJKOM Cnyae C CObIHOeHHeM YcIOBNI, KOtOpBIE CNEUJIbHo NpeDyCMOTpeHb I INHCTpyKJnxN O6CJyKmbAHIO daHHORO pyKOBoDCTBa).
HecobJIOeHHe IHCTpyKuIIN OoNCTKe BbITaKIn I no 3aMeH N OOCTKe FInbTPOB MOXET CTaB PnUHHoN IOXapa. He nCnOJIb3OBAt MIn OCTABnTb BbITaKc63 npAunBHo yctAHOBIIeHHbIX JAMNoCTK B C83n C BO3MOxHbIM pNCKom Ydapa 3NEKTPIUECKM TOKOM.
Mblchnmaem Cce6BaCcykOyOTBETCTBEHOCt 3a HeNoIaIKN, yuepe nIin crotapHanne pnpbopa BCNECTBne HecobJIOJeHnHCTpyKlni, pnpBeDeHHbIX B daHHom pyKOBoDCTBE.
Данhoe Изделпгорк immobу BO COOTBETCTBUN CБрпсько Диpektmbо 2002/96/EC NO ytniin3aunn 3neKTpueeCKoro n
3JleKtpoHnOro obOpyDobAnra (WEEE).
O6ecneuB npaBnBHy yTuINIaCNU daHnHO n3dEIny, Bbl NOMOXETe PpeoTbPAATNb NOTEHuaNBhIE HeraTnHBie NocleDCTBn DnOKpyKaIOUeI cpeDuN 3doPobBry HeJOBeka, KOTOpBe MOIN 6bl IMetb MecTo B npotNBOM Cnyae.

CnMBoI Ha cAMOM n3dEnm nIN COpOBODntbHOJ DOKyMeHTaun yka3bIaBcT, YTO pRn yTNlN3aUN DaHNOr H3dEHN C HMM HeN53 o6paUaTcB KAK C O6bYHbIMn 6bIbObIMn OTXdAMn BMeCTO 3ToT, erO cLeDyET cDaBaTb COOTBeTCTByUOuN pyHK T pNEMKn 3NeKtpueeCKOrO n 3NeKTPoHnOro 06OpyDoBaHnA JnNoCJeDyUOeYtINM3aUN.
CdaHa HcNOM DoJXHa PpON3BOJNTbCBy B COOTBETCTBN C MECTbIMn PpABNJAMN NO YTINJ3aUIN OTXoIOB.
3a 6oIe neopno6HOn HnΦopMaJne O npabInax oBpaueHn C taKIMN 3dEJIaMn, IN yTNIIN3aUN n nepepa60TNbOpaauaiTeCB B MeCTHbE opraHb IBaactN, B Cnyk6y no yTNIIN3aUN OTXODOB INB Mgar3HN, B KOTOpOM Bbl npino6pei nn daHnoe IN3deJIne.