
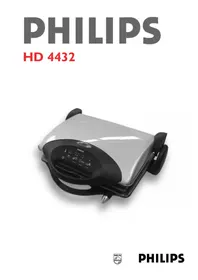
HD4432 - Barbecue PHILIPS - Free user manual and instructions
Find the device manual for free HD4432 PHILIPS in PDF.


| Product type | Electric barbecue |
| Brand | Philips |
| Model | HD4432 |
| Dimensions (L x W x H) | 45 x 30 x 15 cm |
| Weight | 2.5 kg |
| Power supply | 220-240 V, 50-60 Hz |
| Power | 2000 W |
| Body material | Plastic and stainless steel |
| Plate coating | Non-stick |
| Capacity | Up to 4 people |
| Adjustable thermostat | Yes, with light indicator |
| Indicator light | Heating indicator |
| Grill function | Even cooking |
| Cleaning | Removable plate, dishwasher safe |
| Safety | Automatic shut-off in case of overheating |
| Included accessories | Drip tray, spatula |
| Warranty | 2 years |
| Product code | HD4432 |
Frequently Asked Questions - HD4432 PHILIPS
User questions about HD4432 PHILIPS
0 question about this device. Answer the ones you know or ask your own.
Ask a new question about this device
Download the instructions for your Barbecue in PDF format for free! Find your manual HD4432 - PHILIPS and take your electronic device back in hand. On this page are published all the documents necessary for the use of your device. HD4432 by PHILIPS.
USER MANUAL HD4432 PHILIPS
Keep pages 3 and 66 open when reading these operating instructions.
- Read the directions for use carefully and look at the illustrations before you start using the appliance.
- Check if the mains voltage indicated on the bottom of the appliance corresponds to the mains voltage in your home before you connect the appliance.
- Place the appliance on a firm, level surface.
- Do not place the appliance under wall-mounted kitchen cupboards, under a shelf or close to flammable materials such as blinds or (net) curtains.
- Do not use any metal kitchen utensils on this appliance, nor any aggressive or abrasive cleaning agents; these can damage the non-stick coating of the grilling plates. Always unplug the appliance and allow it to cool down before you start cleaning it.
- Never immerse the appliance in water. You can clean it with a damp cloth.
- For thorough cleaning, you can remove the grilling plates and wash them.
- Make sure the mains cord does not come into contact with the hot grilling plates.
- Connect the appliance to an earthed wall socket.
- Be careful when the appliance is hot! Keep an eye on children.
- Do not let the cord hang over the edge of the surface the appliance is standing on.
- Be careful of spattering fat when you are grilling fatty meat or sausages.
- Do not let food stick out of the grill during grilling.
- Fully unwind the cord when you use the appliance. Let the appliance cool down properly before you wind the cord around the hooks in the base.
- The accessible surfaces may be hot when the appliance is operating.
- If the mains cord is damaged, it must be replaced by Philips, a service centre authorised by Philips or similarly qualified persons in order to avoid a hazard.
General description (see fig. 1 on page 3)
A Upper grilling plate B Lower grilling plate C Handle D Fixing clip of grilling plate E Temperature pilot light F Temperature control G Hinges (2 pivots: high and low) H Draining groove I Cord storage facility
Before you use the appliance for the first time
- Put the contact grill in the “party grill” position (see figs. 7, 11 and 12).
- Remove the grilling plates (fig. 2, 3) and wash them separately in hot soapy water (fig. 4).
- Rinse and dry the grilling plates.
- Reassemble the grilling plates. Place the rear edge of the grilling plates on the appliance (fig. 5). Lower the plates and press them down under the fixing clip.
- Find a place for the contact grill where it can be used safely. Bear in mind that fatty meats and sausages may spatter while being grilled.
- Grease the grilling plates lightly with some vegetable oil.
Grilling
- When you intend to grill juicy or fatty meat and/or use a lot of oil or butter, do not forget to place a cup or tray under the draining groove(s) to catch the fat or juice (fig. 6).
- Grill meat and fish dry and unsalted. You can add salt after grilling.
- Before grilling: dry fish or meat thoroughly.
The contact grill can be used in three positions:
In this position the Contact Grill offers a large grilling surface for the preparation of all kinds of snacks, such as shashlik, saté, vegetables, fruits etc.
- Set the temperature control to position 5 (fig. 8).
- Preheat the grill for about 15 minutes in closed position (fig. 9).
- Pull the hinges up to the highest position (fig. 10) and put the Contact Grill in the open position (fig. 11). Be careful: the grilling plates are hot!
- Spread the food on top of the grilling surface.
- Turn the food from time to time by means of wooden spatulas.
"Hotplate" (fig. 12)
Set the Contact Grill in the “party grill” position, cover the grilling plates with aluminium foil with the shiny side facing upwards and set the temperature control to a low position (2 or 3). You have now converted the Contact Grill into a thermostatically controlled hotplate which will automatically keep your dishes at the required temperature.
"Contact grill" (fig. 13)
This position is especially suitable for intense and quick grilling (rump steaks, hamburgers etc.) and for making toasted sandwiches.
- Set the temperature control to position 4 or 5 (fig. 14).
- Preheat the grill for about 15 minutes in closed position (fig. 15).
- Open the grill halfway (fig. 16).
- Put the food (meat, toasted sandwiches etc.) in the middle of the lower grilling plate (fig. 17).
- Lift the upper grilling plate slightly and then close the grill (fig. 18).
- The upper grilling plate now rests on the food, causing it to be grilled equally strong on both sides.
"Gratin grill" (fig. 19)
This is the ideal position for grilling and cooking au gratin at the same time.

The gratin position is also suitable for the preparation of all kinds of “open” toasts, e.g. with egg, tomato, peppers and/or onion rings covered with cheese. However, it is not suitable for preparing breadcrumbed dishes.
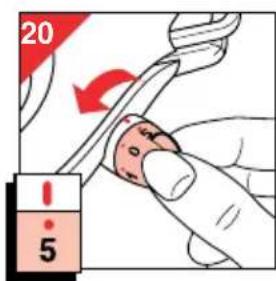
- Set the temperature control to position 5 (fig. 20).
- Preheat the grill for about 15 minutes in closed position (fig. 21).
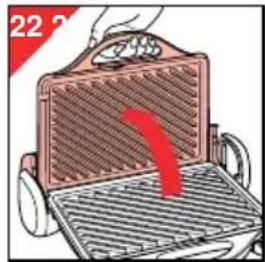
- Open the grill halfway (fig. 22).
- Put the food in the middle of the lower grilling plate (fig. 23).
- Pull the upper grilling plate to its highest position (fig. 24).
- Put the upper grilling plate in horizontal position (fig. 25).
Note: the upper grilling plate should not be in contact with the food!
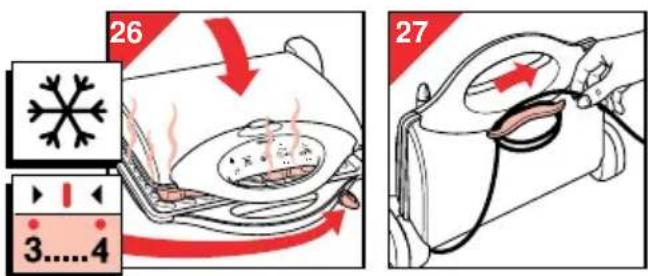
Frozen food (fig. 26)
You can also use this position to defrost frozen food. Wrap the frozen food in aluminium foil and set the temperature control to a low position (3 or 4). The defrosting time depends on the weight of the food.
Which temperature, how long and which position?
In the table you will find a number of dishes you can prepare with the Contact Grill.
The table shows which temperature to select, how long the food should be grilled and the appropriate position of the grill.
The time necessary to preheat the appliance has not been included in the indicated grilling time.
During the grilling process the temperature pilot light will go on from time to time. This means that the contact grill is adjusting the grilling temperature to the preset position. When this happens, you can simply continue grilling.
You can of course adapt the grilling time and temperature to your own taste.
The settings also depend on the kind of food that is being prepared (e.g. meat), its thickness and its temperature.
See also the indications on the contact grill.
Tips
- When you are preparing saté, chicken, pork or veal, first sear the meat at a high temperature (position 5). If necessary, you can then set the temperature control one position lower and grill the food until it is done.
- Sausages tend to burst when they are being cooked. To prevent this, punch a few holes in them with a fork.
- Fresh meat gives better grilling results than frozen or defrosted meat.
- Do not put salt on the meat until after you have grilled it. This will help to keep the meat juicy.
- The contact grill is unsuitable for grilling breaded food.
- For the best result, make sure the pieces of meat you are going to prepare are not too thick (approx. 1.5 cm).
Cleaning
- Unplug the appliance and let it cool down until the grilling plates are no longer hot to the touch.
- Put the grill in the “party grill” position and remove the grilling plates (fig. 26) by pressing on the fixing clips.
- Soak the grilling plates in hot soapy water for five minutes to loosen any residues that might have caked onto it.
- Clean the grilling plates in hot soapy water or put them in the dishwasher.
- You can clean the outside of the appliance with a damp cloth. Do not use any scouring cleaning agents or materials.
Reassembling the grilling plates
- Put the grill in the "party grill" position (fig. 7).
- Place the rear edge of the grilling plates on the appliance (fig. 5).
- Lower the grilling plates onto the appliance and press them down under the fixing clip.
Storage
To save space, you can store the appliance in upright position.
- Put the appliance in vertical position. Wind the cord around the hooks in the base of the grill (fig. 27).
| Type of food | Position of the grill | Grilling time(minutes) | Temperature setting | ||
| Salmon or tuna steak ●Gambas ●Fish (small pieces) ●Sausage ●Hamburger (frozen, ●precooked)Lamb chop ●Meat that takes little ●time to cook (e.g. steaks) | ● | 5-73-44-68-106-84-6depending on the thickness of the meat and your personal preference | 4-54-544-54-55 | ||
| Pieces of meat ●Vegetables/fruit ●covered with cheeseMixed grill (small ●pieces)Open toast ●Pineapple slices ●Shashlick ●Toasted sandwich ●Turkey/chicken fillet ●(250 g) | ● | 4-54-58-105-63-48-103-46-8 | 5555554-554-54-54-5 | ||
| Keeping warm ●Defrosting ● | 2-33-4 | ||||
Important







- GENERAL DESCRIPTION (SEE FIG. 1 ON PAGE 3)
- BEFORE YOU USE THE APPLIANCE FOR THE FIRST TIME
- GRILLING
- THE CONTACT GRILL CAN BE USED IN THREE POSITIONS
- HOTPLATE" (FIG. 12)
- CONTACT GRILL" (FIG. 13)
- GRATIN GRILL" (FIG. 19)
- FROZEN FOOD (FIG. 26)
- WHICH TEMPERATURE, HOW LONG AND WHICH POSITION
- TIPS
- CLEANING
- REASSEMBLING THE GRILLING PLATES
- STORAGE
- IMPORTANT
Brand : PHILIPS
Model : HD4432
Category : Barbecue