
TVAC19100A - Surveillance Camera ABUS - Free user manual and instructions
Find the device manual for free TVAC19100A ABUS in PDF.


| Product Type | HD Outdoor Surveillance Camera |
| Brand | ABUS |
| Model | TVAC19100A |
| Resolution | 1920 x 1080 pixels (Full HD) |
| Viewing Angle | 90° (horizontal) |
| Night Vision | Infrared LED up to 15 meters |
| Power Supply | 12 V DC / PoE (Power over Ethernet) |
| Power Consumption | 5 W max |
| Dimensions (L x H x D) | 70 x 180 x 70 mm |
| Weight | 300 g |
| Protection Rating | IP67 (waterproof, dust-resistant) |
| Operating Temperature | -20 °C to +50 °C |
| Connectivity | Ethernet RJ45, Wi-Fi 2.4 GHz (optional) |
| Storage | MicroSD up to 128 GB, NAS, Cloud (subscription) |
| Main Features | Motion detection, push notification, two-way audio |
| Maintenance and Cleaning | Clean the lens with a dry microfiber cloth; check the sealing gaskets |
| Security | AES 256-bit encryption, two-factor authentication |
| Spare Parts and Repairability | Power cable, wall mount; repair by authorized center |
| Warranty | 2 years |
| Included Accessories | Mounting kit, power adapter, user manual |
| Certifications | CE, RoHS |
Frequently Asked Questions - TVAC19100A ABUS
User questions about TVAC19100A ABUS
0 question about this device. Answer the ones you know or ask your own.
Ask a new question about this device
Download the instructions for your Surveillance Camera in PDF format for free! Find your manual TVAC19100A - ABUS and take your electronic device back in hand. On this page are published all the documents necessary for the use of your device. TVAC19100A by ABUS.
USER MANUAL TVAC19100A ABUS
natural_image
Exterior view of a silver security camera with visible sensor and antenna (no text or symbols)D Bedienungsanleitung
UK User guide
© Notice d'utilisation
NL Gebruikershandleiding
① Istruzioni per l'uso
This user guide contains important information on starting operation and using the device.
Make sure that this user guide is handed over when the product is given to other persons.
Keep this user guide to consult later.
A list of contents with the corresponding page number can be found in the index on page 30.
Français
natural_image
Exterior view of a silver security camera with antenna and control panel (no visible text or symbols)Bedienungsanleitung
natural_image
Technical line drawing of a mechanical component with no visible text or symbolsnatural_image
Technical line drawings of three electronic components: a cylindrical device, two circular bases with pins, and a multi-pin terminal (no text or symbols)natural_image
Pure electrical circuit lines without any symbolsLAN Adapterkabel

Kamerahalterung inkl. Montagematerial
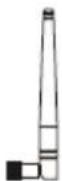
Antenne
| 1 | Antenne |
| 2 | Power LED |
| 3 | Fix-Objektiv |
| 4 | IR LED |
| 5 | Kamerahalterung |
| 6 | PIR Sensor |
| 7 | Status LED |
natural_image
Technical line drawing of a mechanical assembly with screwdriver and tool, no text or symbols presentnatural_image
Technical line drawing of a mechanical device with labeled parts (b and c), no readable text or symbols present.natural_image
Pure mechanical assembly diagram showing a lever and shaft assembly without any text or symbolsWandmontage
natural_image
Simple line drawing of a mechanical linkage or support system (no text or symbols)natural_image
Two white circular icons on a dark blue background: one with a sensor and signal waves, the other with a magnifying glass (no text or symbols)
natural_image
Two white circular icons on a dark blue background: one with a sensor and signal, the other with a magnifying glass (no text or symbols)
natural_image
Forest scene with trees and a blue circular signboard above, no readable text or symbols on the main image area.
Kamera hinzufügen
Ereignisliste filtern
natural_image
Exterior view of a silver security camera with antenna and control panel (no visible text or symbols)User manual
Important information and FAQs about this product and other products can be found on the website
www.abus.com/eng/Self-installed-security
Introduction
Dear Customer,
Thank you for purchasing this product.
This device complies with the requirements of the following EU directives, the EMC Directive (2014/30/EU), the R&TTE Directive (2014/53/EU), the Low Voltage Directive (2014/35/EU) and the RoHS Directive (2011/65/EU). The declaration of conformity can be obtained from:
To ensure this condition is maintained and that safe operation is guaranteed, it is your obligation to observe this user manual.
Read the entire user manual carefully before putting the product into operation, and pay attention to all operating instructions and safety information.
All company names and product descriptions are trademarks of the corresponding owner. All rights reserved.
If you have any questions, please contact your specialist installation contractor or specialist dealer.

Data storage is subject to national data privacy guidelines.

Warning as required by §201 StGB (German Criminal Code):
Whosoever unlawfully makes an audio recording of the privately spoken words of another; or uses, or makes a recording thus produced accessible to a third party, shall be liable to imprisonment or a fine.
Whosoever unlawfully overhears with an eavesdropping device the privately spoken words of another not intended for his attention; or publicly communicates, verbatim or the essential content of, the privately spoken words of another, recorded or overheard, shall incur the same penalty.

Disclaimer
This user guide has been produced with the greatest of care. Should you discover any missing information or inaccuracies, please contact us under the address shown on the back of the manual. ABUS Security-Center GmbH does not accept any liability for technical and typographical errors, and reserves the right to make changes to the product and user guide at any time and without prior warning.
ABUS Security-Center GmbH is not liable or responsible for direct or indirect damage resulting from the equipment, performance and use of this product. No forms of guarantee are accepted for the contents of this document.
Explanation of symbols
 | The triangular high voltage symbol is used to warn of the risk of injury or health hazards (e.g. caused by electric shock). |
 | The triangular warning symbol indicates important notes in this user manual which must be observed. |
 | This symbol indicates special tips and notes on the operation of the unit. |
Important safety information
 | All guarantee claims are invalid in the event of damage caused by non-compliance with this user manual. We cannot be held liable for resulting damage. |
 | In the event of material or personal damage caused by improper operation or non-compliance with the safety information, we cannot be held liable. All guarantee claims are void in such cases. |
This device has been manufactured in accordance with international safety standards.
Please read the following safety information carefully.
Safety information
1. Power supply
Only operate this camera through a power source which supplies the mains voltage specified on the type plate. If you are unsure of the installation location's power supply, contact your power supply company. Disconnect the device from the mains power supply before carrying out maintenance or installation work.
2. Overloading
Avoid overloading electrical sockets, extension cables, and adapters, as this can result in fires or electric shocks.
3. Cleaning
Only use a damp cloth to clean the camera. Do not use corrosive cleaning materials. Disconnect the device from the power supply before cleaning.
4. Ventilation
The camera's ventilation openings must not be covered or obstructed. Ensure that no objects penetrate the device, e.g. through the ventilation openings.
5. Accessories
Only connect devices expressly designed for use with the camera. Otherwise hazardous situations or damage to the device may result.
6. Installation location
This device can be used in inside as well as outside. Do not place the camera in close proximity to heaters, ovens or other heat sources, or in direct sunlight. Only operate the device in locations with temperatures within a permissible ambient temperature range of -10^ to 50^ .
Warnings
Observe all safety and operating instructions before putting the device into operation for the first time.
-
Observe the following information to avoid damage to the power cable and plug:
-
Do not modify or manipulate the power cable or plug.
- Do not pull the cable when disconnecting the device from the power – always take hold of the plug.
-
Ensure that the power cable is positioned as far away as possible from any heating equipment, to avoid melting the plastic coating.
-
Follow these instructions. Non-compliance with these instructions could lead to an electric shock:
-
Never open the housing or power supply unit.
- Do not insert any metallic or flammable objects into the device.
-
Use surge protection to prevent damage caused by overvoltage (e.g. in electrical storms).
-
Disconnect defective devices from the power supply immediately and contact your specialist dealer.

If in doubt, have a specialist technician carry out assembly, installation and connection of the device. Improper or unprofessional work on the power supply system or domestic installation puts both you and other persons at risk.
Connect the installations so that the mains power circuit and low-voltage circuit always run separately from each other. They should not be connected at any point or become connected as the result of a malfunction.
Avoid the following adverse conditions during operation:
- moisture or excess humidity
• temperatures outside of the permissible range - direct sunlight
- dust or flammable gases, vapors or solvents
- strong vibrations
• strong magnetic fields (e.g. next to machines or loudspeakers)
Unpacking the device
Handle the device with extreme care when unpacking it.

If the original packaging has been damaged, you must start by inspecting the device. If the device shows signs of damage, return it in the original packaging and inform the delivery service.
Contents
- Intended use 31
- Scope of delivery 31
- Features and functions ...... 31
- Device description.... 32
4.1. Overview....32
4.2. Camera description 32
- Installation.... 33
- Operation and configuration via app 35
- Maintenance and cleaning 46
7.1. Maintenance 46
7.2. Cleaning....46
- Disposal 46
- Tips for troubleshooting 47
- Technical data.... 48
1. Intended use
The day & night PnP IP camera enables high-quality monitoring. This camera is designed for indoor or outdoor installation. The built-in infrared LEDs enable day and night monitoring of object distances up to a maximum of ten meters away.
Since the camera features protection class IP66, it can be used both indoors and outdoors.
The camera is easy to configure and operate using the app, meaning that it can be accessed anywhere in the world.
For a detailed functional description, see Chapter "3. Features and functions".
2. Scope of delivery
natural_image
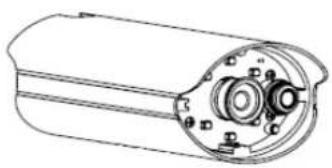
Technical line drawing of a mechanical component with no visible text or symbolsWi-Fi outdoor camera & app

natural_image
Technical line drawings of electrical connectors and terminal blocks (no text or symbols)Power supply unit including EU, Australian and
UK adapters
5 V DC/1.5 A

natural_image
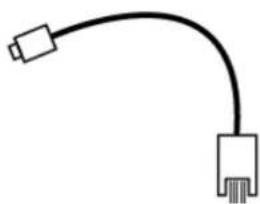
Pure electrical circuit lines without any symbolsLAN adapter cable Camera mount including mounting material


Antenna
3. Features and functions
• for effective all-round monitoring of interior spaces
- compact IP66 outdoor camera with infrared night vision function
• guided step-by-step installation via app (iOS, Android)
• HD 720p resolution and infrared night vision function for brilliant image quality
• recording on microSD card
4. Device description
4.1. Overview
| Item number TVAC19100A | |
| Resolution 720p | |
| IR LEDs | √ |
| IR swivel filter (ICR) | √ |
| Operational voltage 5 V DC |
4.2. Camera description
Front:
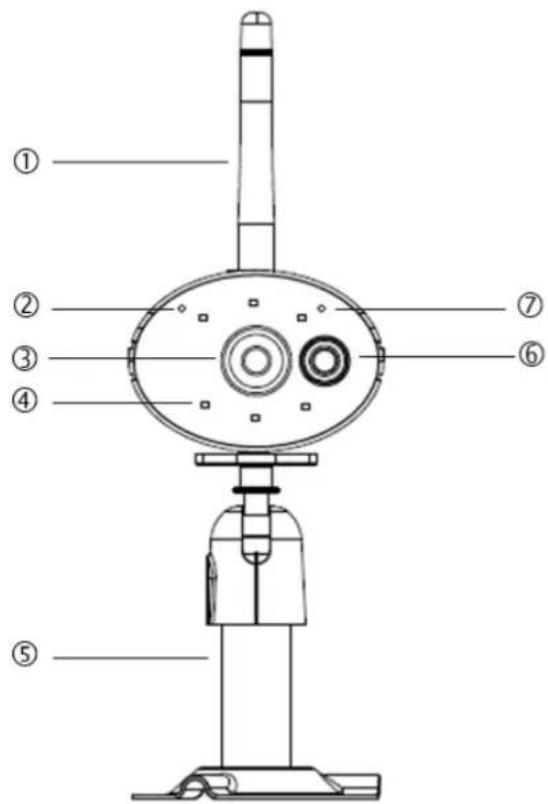
| 1 | Antenna |
| 2 | Power LED |
| 3 | Fixed lens |
| 4 | IR LED |
| 5 | Camera mount |
| 6 | PIR sensor |
| 7 | Status LED |
Description of the LED(s)
| LED Status Meaning | ||
| Status LED | Flashing | Camera in AP mode, camera connected to WLAN |
| Rapid flashing 4x/s (green) | Reset | |
| Off Camera is not connected to WLAN | ||
| Power LED | On | Camera on |
| Flashing (red) Reset | ||
| Off Camera off | ||
Rear:
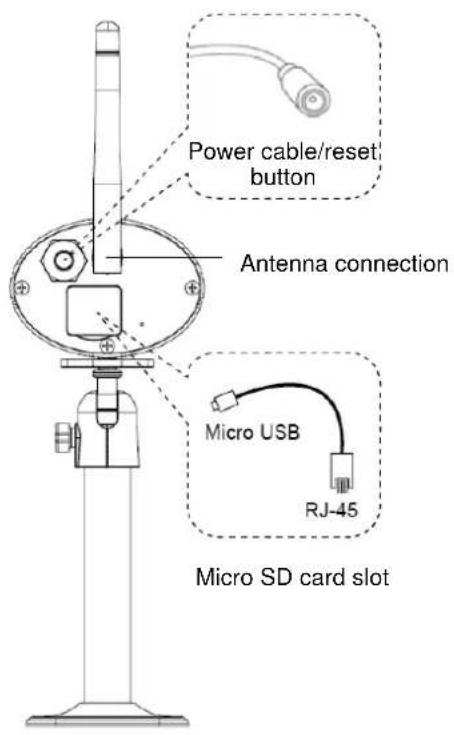
5. Installation
Using the camera mount, select a suitable installation site. Mark the drilling holes on the surface and drill the holes. First, insert the supplied screw anchors and attach the mount using the screws.

natural_image
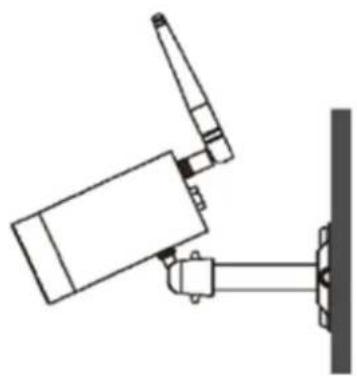
Technical line drawing of a mechanical assembly with screwdriver, nut, and clamped components (no text or symbols)You can swivel the mount by up to 90^ to select the desired position. First, loosen the screw at the side and adjust the camera to the desired angle of view. Next, tighten the screw to fix the camera in the desired position.

Then screw the camera onto the mount and connect the power supply unit to the camera.
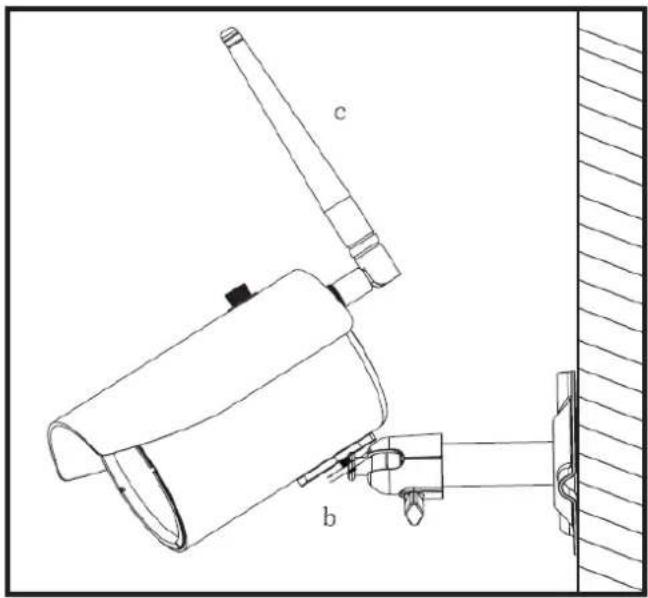
natural_image
Technical line drawing of a mechanical device with labeled parts (b and c), no readable text or symbols present.Installation options:
Ceiling installation

natural_image
Pure mechanical assembly diagram without any text, numbers, or symbolsWall installation

natural_image
Simple line drawing of a mechanical linkage or support system (no text or symbols)6. Operation and configuration via app
The TVAC19100 Wi-Fi outdoor camera & app gives you the option of switching to live on the cameras and to configure the recorder. The app for this device can be found in the App Store under the name of "App2Cam".
To configure access to the camera, proceed as follows:
| 1 | Set-up – preparation | |
 | Download the "App2Cam" app and install it on your smartphone.Check that your smartphone or tablet is connected to the Internet. | |
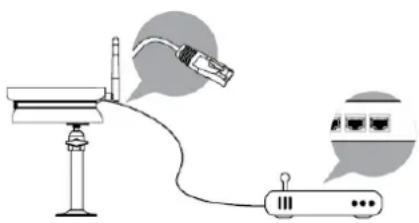 | There are two ways to connect the camera to the network:Option 1:(Wireless set-up)Connect the enclosed power supply unit to the camera.⚠!Do not start to set up the camera until both LEDs light up. This may take around 60 seconds.Option 2:(Wired set-up)Connect the LAN adapter cable provided to the camera. Connect the cable to your router in the next step.Then connect the enclosed power supply unit.⚠!Do not start to set up the camera until both LEDs light up. This may take around 60 seconds. | |
② Set-up – iOS app


Please note that the iOS app and the Android app require different setup processes. If you have an Android device, please refer to the set-up process described in ③.
Open the WLAN settings in your iOS device and connect to the camera's HD-XXXXXX network.
The camera's WLAN password is "12345678".
Launch the app and select the desired type of set-up.
Option 1: (Wireless set-up)

The camera is added automatically. Click on "Live view".
The app will now ask you to select the connection type for the camera.
WLAN
Select your WLAN network in the drop-down list, enter your WLAN key and click "OK".
Please wait 90 seconds for the camera to restart and connect to your WLAN network. Make sure your mobile device reconnects to your WLAN network.
AP mode
The camera remains in access point mode and can still be reached via this mode. To do this, connect to the camera's access point. The WLAN password for the camera is "12345678" and cannot be changed.

Installing several cameras using "wireless set-up" can lead to faults. Please install only one device at a time.

Option 2: (Wired set-up)

Give the camera an appropriate name.
For automatic registration of the DID, click "Search".
The DID of the camera which is currently connected to the router via a network cable is now displayed. Select to accept this DID. Alternatively, you can enter the DID manually.
Then enter the security code (standard: "123456") and add the camera by clicking "Save".

This camera is now locally accessible on your network. To connect the camera to a WLAN network, please go to menu option ⑫.
③ Set-up – Android app
natural_image
Two white circular icons on a dark blue background: one with a sensor and signal waves, the other with a magnifying glass (no text or symbols)
Please note that the Android app and the iOS app require different setup processes. If you have an iOS device, please refer to the set-up process described in ②.
Launch the app on your smartphone or tablet and click "Add new camera".
Then select the desired type of set-up.
Option 1: (Wireless set-up)

The app will search for an available HD-XXXXXX network, transmitted by the camera, and will automatically connect your smartphone to it.
If connecting manually to the HD-XXXXXX network, use the WLAN password "12345678".
Once the search has been successfully completed, click on "Live view".
The app will now ask you to select the connection type for the camera.
WLAN
Select your WLAN network in the drop-down list, enter your WLAN key and click "OK".
Please wait 90 seconds for the camera to restart and connect to your WLAN network. Make sure your mobile device reconnects to your WLAN network.
 | AP modeThe camera remains in access point mode and can still be reached via this mode. To do this, connect to the camera's access point. The WLAN password for the camera is "12345678" and cannot be changed.Installing several cameras using "wireless set-up" can lead to faults. Please install only one device at a time.Option 2: (Wired set-up) Give the camera an appropriate name.For automatic registration of the DID, click "Search".The DID of the camera which is currently connected to the router via a network cable is now displayed. Select to accept this DID. Alternatively, you can enter the DID manually.Then enter the security code (standard: "123456") and add the camera by clicking "Save".This camera is now locally accessible on your network. To connect the camera to a WLAN network, please go to menu option 12. | |
| 4 | Connection status | |
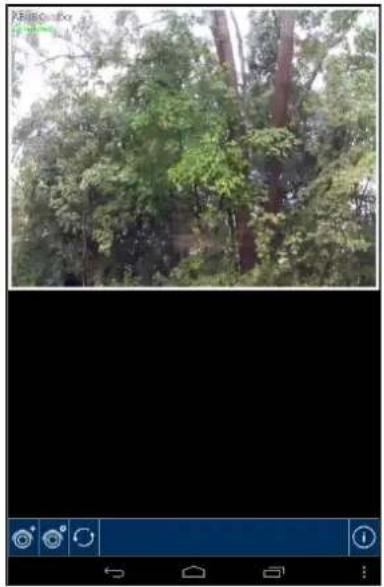 | Once you have successfully added your camera, the name of your camera and the current connection status will appear in the overview. The image displayed is the last video image displayed during the previous session. You can add to up to eight cameras in the app.Tap your chosen camera and you will be taken to the live view.The first time you access the live view, the app will prompt you to change the security code. This is automatically applied to the camera's settings.System namee.g. TestConnection statusConnected = you are connected to your systemDisconnected = there is no connection to the system | |


Adding a camera
This lets you add another system.

Camera configuration
This will display the camera configurations.

Camera settings

Remove a camera

Access recordings on the SD card
Press

return to connection status.

Updating connection
The connection is being updated.

PIN code/Push settings/
Instructions/Firmware information
Here you can store a PIN code, activate or deactivate push notifications, view the instructions for your camera as a PDF or view the firmware version of the app.
⑤ Store PIN code

To store a PIN code for this app, proceed as follows:
Open "Set PIN lock" in

Enter a four-digit PIN code and then confirm it.
Tick "Activate lock on startup".

If you have stored a PIN code, you will be asked to enter it as soon as you open the app.
⑥
Live view

Select the desired camera from the drop-down menu. You will now see the live image from the camera. The image is displayed in 4:3 mode; to display a 16:9 format, rotate your mobile device by 90°.

Snapshot
This lets you take a screenshot of your live image. The image is then saved in your photo gallery on your mobile device.
The saved images are time-stamped and saved in the photo gallery.

Audio
This lets you activate or deactivate audio.

Start recording
This lets you start recording manually on the SD card. The recording time is one minute and cannot be cut short. The icon appears during recording.

Back
This takes you back to the camera overview. You are always shown the last screenshot.
⑦
Settings

Here you can change the camera settings. Email notifications can also be activated or deactivated.
Email notification
Activating email notification in the event that motion is detected.

Please note that outdoor video surveillance can give rise to false alarms.

Click "Advanced settings" to start the configuration.
To access the settings you will need to enter the admin password (standard: "123456").
⑧
General settings

Once you have accessed the settings you will be able to configure the camera.
Admin password
The admin password gives access to the camera settings. The standard admin password is "123456".
To protect your camera from unauthorized access, change this password during initial installation.

If you have forgotten your password, you can restore factory settings on the camera by pressing the Reset button for five seconds. The red LED will start to flash.
Time zone
Global time zones are listed in the drop-down menu. Select the time zone in which the camera is being installed. If the time zone in question uses daylight saving time, activate daylight saving time.
Daylight saving time
Activate/deactivate daylight saving time.
Device security code
The security code enables the camera to be set up in the app. The standard security code is "123456".
During initial installation you will always be prompted to change this security code.

If you have forgotten your security code, you can restore factory settings on the camera by pressing the Reset button for five seconds.

Video settings
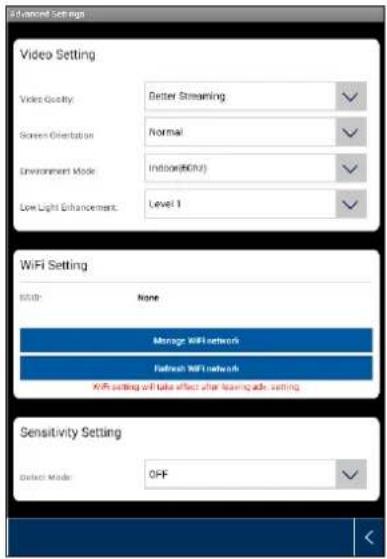
The video settings allow you to change the video quality and ambient conditions for the camera.
Video quality:
The video quality setting allows you to select the quality of video streaming.
Better streaming:
The video is displayed more smoothly.
Better image:
The video image is displayed in higher resolution.
HD video:
The video image is transmitted in HD resolution. However, there may be delays in the image display as a result of the large volume of data.

Only use the "Better image/HD video" setting if you have sufficient bandwidth (1 Mbps) and adequate system requirements, and please be aware that the different transmission technologies used for audio and video may result in asynchronous transmission due to varying network usage.
Image orientation
Here you can rotate or flip the image.
Tilt:
The image is rotated by 180 degrees.
Flip:
The image is flipped.
Tilt & flip:
The image is rotated by 180 degrees and flipped.
Ambient conditions
Here you can select the power frequency inside (50 Hz), inside (60 Hz) and outside.
Standard value for Germany: 50 Hz
Adjustment to poor light conditions
Adjusting the video image for poor light conditions in night mode. There are five levels to choose from, with Level 5 being the brightest.
⑩
WiFi settings
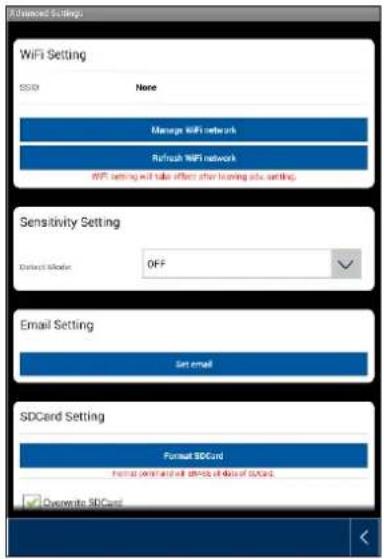
WiFi settings
In the WiFi settings you can select the desired network with which the camera should be used for Internet access.
When the menu item is selected, all the networks within range will be displayed. Choose your network and enter your own WiFi password.

To prevent access by unauthorized persons, protect your network using encryption with WPA/ WPA2/ WPA2-PSK.

After the settings have been saved, restart the camera. Please do not forget to remove the Ethernet adapter cable (if it is used during initial installation).

If no connection has been established or if you have entered the WiFi details incorrectly, press the Reset button for five seconds to restore factory settings to the camera.
⑪
Motion detection

The settings for motion detection are necessary for notification via email or push notification and for motion-controlled recording.
Detection mode
Here you can select which mode should be used for notifications.
You have a choice between "Off", "PIR" and "Software".
Off:
No notification/recording if motion is detected.
PIR:
Motion detection is performed by the camera's PIR sensor
Software:
Motion detection is performed by the camera software.
Here you can define different motion detection sensitivities for day and night-time. The higher the sensitivity, the less motion is needed in the image to trigger motion detection.
⑫
Email settings

Email settings
The email settings are required for the sending of notifications.
Using SSL:
Activate the checkbox to send the email with encryption. Your email provider can provide you with the necessary settings.
SMTP server:
Enter the SMTP server address here.
E.g. smtp.test.com
SMTP port:
Enter the SMTP port here.
E.g. 465
User name:
Enter the sender's email address here.
E.g. xxx@test.com
Password:
Enter the password for the sender's email address here.
Recipient:
Enter the recipient's email address here.
E.g. xxxx123@test.com

We recommend that you use Googlemail for sending emails.
⑬
Other settings

SD card settings
Format SD card
For formatting your SD card. If you plan to use the SD card long-term, please use a Class 10 SD card.

When the SD card is formatted, all data will be deleted. Please back up your data before formatting.
Activate ring storage
When this function is activated, the oldest recordings are overwritten by newer ones as soon as the SD card is full.
Profile settings
This function allows you to save the settings for one camera and copy them to the next camera by loading the profile.
14
Playback

Access to recordings
Here you can view recordings for the chosen camera on your smartphone. Select the desired recording and playback will begin straight away.
Press pause the recording. To return to the event list, press the button.
Using 📁 you can activate or deactivate audio.
To save a file on your smartphone, press and hold the recording and a confirmation window will appear.

The live view and the recording function will be unavailable during the download. If other users attempt to access the camera, the session will be rejected.
Deleting recordings
Select "Delete all" to delete the entire event list. A new window will appear. You will be asked whether you are sure you want to delete all events. If you do want to delete the event list, confirm this by pressing "Yes" or cancel by pressing "No".
To delete an individual file, select "Delete", then click on the desired file and confirm the process.

Filtering the event list
It is possible to filter recordings according to specific criteria. To do this, press "Search" or the 🔒 symbol.
A window will appear with various search options. You can search by start and end date and by start and end time.
Click "Search" to display the desired events.
7. Maintenance and cleaning
7.1. Maintenance
Regularly check the technical safety of the product, e.g. check the housing for damage.
If it seems that it may no longer be possible to operate the product safely, stop using it and secure it to prevent unintentional use.
It is likely that safe operation is no longer possible in the event that:
- the device shows signs of visible damage
• the device no longer works correctly.

Please note:
You do not need to perform any maintenance on the product. You do not need to check or service any of the components inside the product. Never open it.
7.2. Cleaning
Clean the product with a clean, dry cloth. The cloth can be dampened with lukewarm water if there is dirt that is hard to remove.

Do not allow any liquids to enter the device.
Do not use any chemical cleaning products as they could damage the surface of the housing and screen (discoloration).
8. Disposal

Please note: EU Directive 2011/65/EU regulates the proper return, treatment and recycling of used electronic devices. This symbol means that, in the interest of environmental protection, the device must be disposed of separately from household or industrial waste at the end of its service life in accordance with applicable legal guidelines. Used devices can be disposed of at the appropriate official recycling centers in your country. Obey local regulations when disposing of material. Further details on returns (including for non-European countries) can be obtained from your local authority. Separate collection and recycling conserves natural resources and ensures that all the provisions for protecting health and the environment are observed when recycling the product.
9. Tips for troubleshooting
| No. | Questions | Answers |
| 1 | The camera has not been found. | Check the following points:1. Make sure that your network supports DHCP.2. Are the mobile device and the camera in the same network?Make sure that both devices are in the same network at the initial configuration.3. The router has no power supply.4. The camera has no power supply.5. Try to add the camera by entering the data manually. |
| 2 | Your Wi-Fi is not shown in the selection list in the camera app. | If your personal Wi-Fi is not shown in the selection list, check the following:1. Make sure that the SSID of your router is visible.2. Change the encryption type of your router to WPA/WPA2/WPA2-PSK. |
| 3 | No picture is displayed. | Check the following points:1. Is the camera plugged in and switched on? Make sure that the power supply unit is not defective and that the power supply is connected.2. Is the camera installed in the surrounding area of the the network?3. Make sure that the camera is correctly configured.4. Make sure that your mobile end device is in the network or in the 3G network. |
| 4 | Low network signal or poor picture quality | Possible reasons are:1. Wi-Fi network devices can impair the signal transmission.Make sure there is enough distance between the camera and other Wi-Fi devices.2. Remove any dirt from the camera. This can badly affect the picture quality. |
| 5 | What could be the reasons why the device does not record when there is movement? | Possible reasons are:1. Is the SD card inserted properly?2. Is the motion detection activated?3. Format the SD card before using for the first time.4. Make sure that you use a Class 10 SD card. |
| 6 | The camera picture is obscured (white patches on the image). | The camera is equipped with IR LEDs for the night mode. The IR light is reflected on surfaces, such as glass. Do not position the camera in front of glass surfaces and ensure that it is installed in protected outdoor areas. |
| 7 | What could be the reasons for an SD card fault? | Please check the following:1. Make sure that the SD card was inserted and formatted correctly. Save important data before the formatting, as afterwards it will be no longer available.2. Make sure that you only use one Class 10 SD card. |
| 8 | The display for the time and date is not correct. | Possible reasons are:1. Are the date and time settings on your mobile end device correct?2. Is the correct time zone selected?3. The system takes the time from the internet as soon as it is connected. Make sure that the camera is connected to the internet. |
10. Technical data
| Model number TVAC19100A | |
| Wireless standard IEEE 802.11 b/g/n | |
| Network connection | Ethernet (10/100 Base-T/Base-TX); Wi-Fi |
| Network protocols | TCP/IP, UDP, SMTP, NTP, DHCP, ARP |
| Simultaneous users 3 simultaneous accesses | |
| Security | WPA/WPA2/WPA2-PSK (TKIP, 128 bit AES) |
| Image sensor | MP CMOS |
| Focal length | 2,8 mm |
| Angle of view | H: 50°±3° / V: 30°±3° |
| Antenna 3 dBi Dipol | |
| Housing material Waterproof metal | |
| Protection class IP66 | |
| Lighting conditions adjustment | Indoor (50 Hz), indoor (60 Hz), outdoor |
| Minimum Illumination | 1–8 Lux |
| Number of IR LEDs | 6 IR Power LEDs |
| Range of night vision function | approx. 5 m |
| Image compression | H.264 |
| Resolution | HD 1280 x 720 incl. audio |
| Frame rate | VGA @ 20 fps / VGA @ 25 fps / 720p @ 5 fps / 720p @ 10 fps |
| Recording | 720p @ 5/ 10/ 20 fps (max.) incl. audio |
| Power supply | 5 V DC/1.5 A |
| Operating temperature | -10 °C – 50 °C |
| Dimensions (H x W x L) | 134 mm x 67 mm x 48 mm (without mount) |
| Weight | 300 g |
Storage capacity
| Storage capacity | HD/Better image | Better streaming |
| 4 GB | 150 events/minutes | 180 events/minutes |
| 8 GB | 300 events/minutes | 360 events/minutes |
| 16 GB | 600 events/minutes | 720 events/minutes |
| 32 GB | 1200 events/minutes | 1440 events/minutes |
TVAC19100A

natural_image
Exterior view of a silver ASUS security camera with antenna and mounting base (no text or symbols visible)www.abus.com/fr/Securite-a-installer-soi-meme
Version 1.1
CE
natural_image
Technical line drawing of a mechanical component with internal gears and housing (no text or symbols)natural_image
Technical line drawings of electrical components including a motor, three terminal blocks, and a plug (no text or symbols)natural_image
Pure electrical circuit lines without any symbolsnatural_image
Technical line drawing of a mechanical assembly with screwdriver and tool, no text or symbols presentnatural_image
Technical line drawing of a mechanical device with labeled components (b and c), no readable text or symbols present.natural_image
Pure mechanical assembly diagram without any text, numbers, or symbols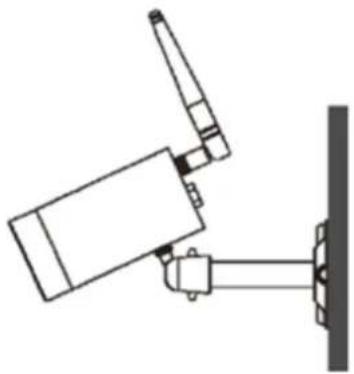
natural_image
Simple line drawing of a mechanical linkage or support structure (no text or symbols)natural_image
Two white circular icons on a dark blue background: one with a sensor and signal waves, the other with a magnifying glass (no text or symbols)
natural_image
Forest scene with trees and a blue icon overlay (no readable text or symbols)
Ajouter une caméra
natural_image
Exterior view of a silver ASIS security camera with visible sensor and antenna (no text or symbols)natural_image
Technical line drawing of a mechanical component with no visible text or symbolsWLAN buitencamera & app
natural_image
Pure electrical circuit lines without any symbolsLAN-adapterkabel

Antenne

natural_image
Technical line drawings of electronic components including a battery pack, two terminal blocks, and three cylindrical terminals (no text or symbols)Voeding incl. EU-, AU- en UK-adapter 5 V DC/1,5 A
| 1 | Antenne |
| 2 | Power-led |
| 3 | Vast objectief |
| 4 | IR-led |
| 5 | Camerahouder |
| 6 | PIR-sensor |
| 7 | Status-led |
Beschrijving LED(s)
natural_image
Technical line drawing of a mechanical assembly with screwdriver and bracket (no text or symbols)natural_image
Technical line drawing of a mechanical device with labeled parts (b and c), no readable text or symbols present.natural_image
Pure mechanical assembly diagram showing a lever and shaft assembly without any text or symbolsWandmontage

natural_image
Simple line drawing of a mechanical linkage or support structure (no text or symbols)6. Bediening en configuratie via app
natural_image
Two white circular icons on a dark blue background: one with a sensor and signal waves, the other with a magnifying glass (no text or symbols)
natural_image
Two white circular icons on a dark blue background: one with a speaker and signal waves, the other with a magnifying glass (no text or symbols)
natural_image
Forest scene with trees and a blue icon overlay (no readable text or symbols)
Camera toevoegen
natural_image
Exterior view of a silver ASUS security camera with visible sensor and antenna (no text or symbols)natural_image
Pure electrical circuit lines without any symbolsnatural_image
Technical line drawings of electrical components including a fuse, two terminal blocks, and three terminal blocks (no text or symbols)natural_image
Technical line drawing of a mechanical assembly with screwdriver and tool, no text or symbols presentnatural_image
Technical line drawing of a mechanical device with labeled components (b and c), no readable text or symbols present.natural_image
Pure mechanical assembly diagram without any text, numbers, or symbolsMontaggio a parete

natural_image
Simple line drawing of a mechanical linkage or support structure (no text or symbols)natural_image
Diagram of a washing machine with attached cable and connector (no text or symbols)natural_image
Two white circular icons on a dark blue gradient background: a sensor icon with signal waves and a magnifying glass (no text or symbols)
natural_image
Two white circular icons on a dark blue background: one with a sensor and signal waves, the other with a magnifying glass (no text or symbols)
natural_image
Forest scene with dense green trees and dark foreground (no visible text or symbols)
These operating instructions are published by ABUS Security-Center GmbH & Co.KG, Linker Kreuthweg 5, 86444 Affing, Germany. No reproduction (including translation) is permitted in whole or part e.g. photocopy, microfilming or storage in electronic data processing equipment, without the express written consent of the publisher. The operating instructions reflect the current technical specifications at the time of print. We reserve the right to change the technical or physical specifications.
- Bedienungsanleitung
- Kamera hinzufügen
- Ereignisliste filtern
- User manual
- Introduction
- Disclaimer
- Safety information
- Power supply
- Overloading
- Cleaning
- Ventilation
- Accessories
- Installation location
- Warnings
- Unpacking the device
- Contents
- Intended use
- Scope of delivery
- Features and functions
- Device description
- Overview
- Camera description
- Front:
- Rear:
- Installation
- Installation options:
- Operation and configuration via app
- ② Set-up – iOS app
- Option 1: (Wireless set-up)
- WLAN
- AP mode
- Option 2: (Wired set-up)
- ③ Set-up – Android app
- Adding a camera
- Camera configuration
- Updating connection
- PIN code/Push settings/
- Instructions/Firmware information
- ⑤ Store PIN code
- Snapshot
- Audio
- Start recording
- Back
- Email notification
- Admin password
- Time zone
- Daylight saving time
- Device security code
- Video settings
- Video quality:
- Image orientation
- Ambient conditions
- Adjustment to poor light conditions
- ⑩
- WiFi settings
- ⑪
- Motion detection
- Detection mode
- Off:
- PIR:
- Software:
- Email settings
- Using SSL:
- SMTP server:
- SMTP port:
- User name:
- Password:
- Recipient:
- SD card settings
- Format SD card
- Activate ring storage
- Profile settings
- Access to recordings
- Deleting recordings
- Filtering the event list
- Maintenance and cleaning
- Maintenance
- Cleaning
- Disposal
- Tips for troubleshooting
- Technical data
- Storage capacity
- TVAC19100A
- Ajouter une caméra
- Bediening en configuratie via app
- Camera toevoegen
Brand : ABUS
Model : TVAC19100A
Category : Surveillance Camera