
Urbalys AKF5 - Deep fryer MOULINEX - Free user manual and instructions
Find the device manual for free Urbalys AKF5 MOULINEX in PDF.


| Product Type | Deep Fryer |
| Brand | Moulinex |
| Model | Urbalys AKF5 |
| Dimensions (L x W x H) | 40 x 25 x 30 cm |
| Weight | 3.2 kg |
| Power | 1800 W |
| Voltage | 220-240 V |
| Frequency | 50/60 Hz |
| Oil Capacity | 2.5 L |
| Food Capacity | 1.2 kg |
| Temperature Range | 150°C - 190°C |
| Adjustable Thermostat | Yes |
| Indicator Lights | Power and Ready |
| Viewing Window | Yes |
| Oil Drain System | Yes, with tap |
| Filtration System | No |
| Non-Stick Coating | Yes, on inner bowl |
| Cool Touch Handles | Yes |
| Automatic Shut-Off | Yes |
| Overheat Protection | Yes |
| Dishwasher Safe Parts | Removable bowl and basket |
| Spare Parts Available | Yes (basket, bowl, filter) |
| Warranty | 2 years |
Frequently Asked Questions - Urbalys AKF5 MOULINEX
User questions about Urbalys AKF5 MOULINEX
0 question about this device. Answer the ones you know or ask your own.
Ask a new question about this device
Download the instructions for your Deep fryer in PDF format for free! Find your manual Urbalys AKF5 - MOULINEX and take your electronic device back in hand. On this page are published all the documents necessary for the use of your device. Urbalys AKF5 by MOULINEX.
USER MANUAL Urbalys AKF5 MOULINEX
| Français | p. | 3 |
| English | p. | 8 |
| Deutsch | p. | 13 |
| Nederlands | p. | 18 |
| Español | p. | 23 |
| Português | p. | 28 |
| Italiano | p. | 33 |
| Dansk | p. | 38 |
| Norsk | p. | 43 |
| Svenska | p. | 48 |
| Suomi | p. | 53 |
| Türkçe | p. | 58 |
| عربية | p. 66 |






FRANÇAIS
A1 Tiroir "Clean Express"
⑫ Retirez le couvercle.
Thank you for choosing an appliance from the Moulinex range.
Description
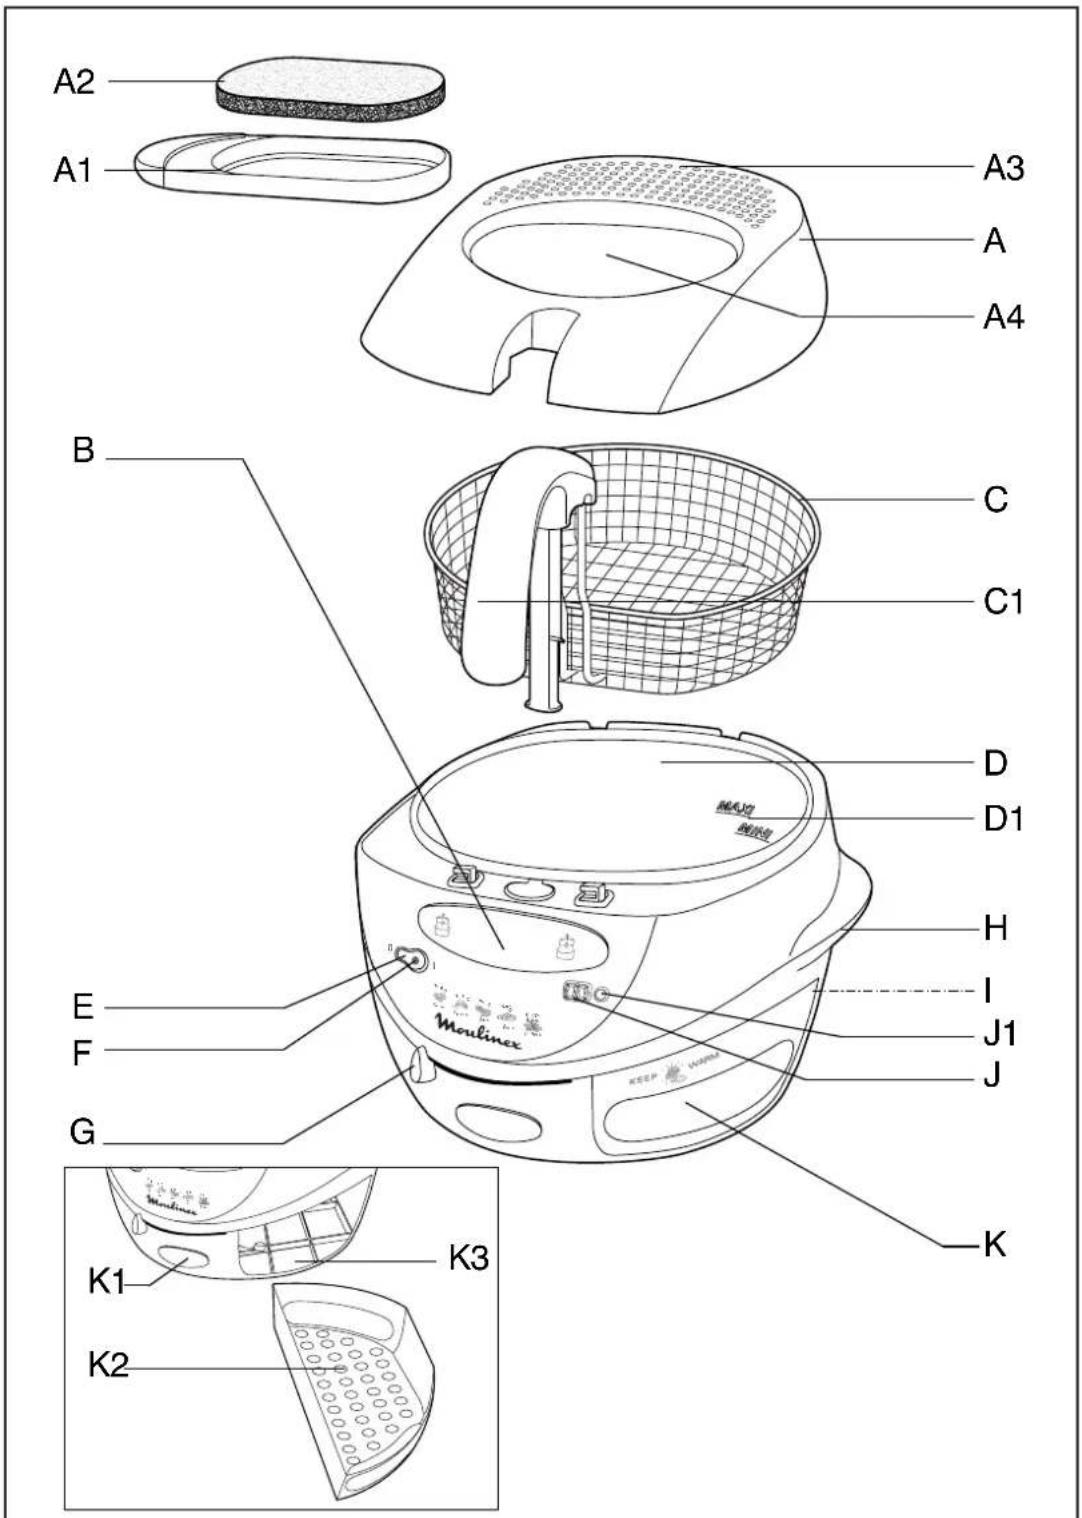
Firstly, you should familiarise yourself with the various parts of your fryer. Unfold the cover of the leaflet. The circled figures correspond to the numbers of the drawings and the letters to the various parts.
A Lid with automatic opening
A1 "Clean Express" drawer
A2 Anti-odour filter with saturation indicator
A3 Odour filtration zone
A4 Glass window
B Lid opening button
C Basket
C1 Basket handle
D Bowl
D1 Min. and Max. oil level markers
E On/Off switch with light indicator
Safety recommendations
- Please read the instructions for use carefully before using your appliance for the first time: any use which does not conform to these instructions will absolve Moulinex from all liability.
- Never leave the appliance (whether or not it is in use) within reach of children without supervision. Never allow children to use the fryer on their own. Severely disabled persons must only use this appliance under surveillance of a responsible adult.
- Check that the voltage rating of your appliance corresponds to that of your household electrical supply.
This appliance is manufactured to conform with current safety regulations and requirements as well as directives:
- 72/23/CEE modified by 93/68/CC,
- 89/336/CEE modified by 93/68/CEE. Any connection error will render the guarantee null and void.
- It is essential that your appliance is connected by means of an earthed plug. Non-compliance with this obligation can cause an electric shock and may lead to serious injury. It is vital for your own safety that the earth socket corresponds to the electrical installation standards in force in your country. If your system does not include an earthed socket, it is vital that you call in an approved body before plugging in the appliance, in order to bring your
F T emperature regulation indicator
G T emperature selector
H Carrying handles
I Cord storage
J T imer (depending on model)
J1 Setting button
K Keep warm function (depending on model)
K1 Opening button
K2 Keep warm and serving dish
K3 Dish housing
electrical system up to standard.
- This product has been designed for domestic use only. Any commercial use, inappropriate use or failure to comply with the instructions, the manufacturer accepts no responsibility and the guarantee will not apply.
- Never use your appliance if it is not working correctly, or if it has been damaged. If this happens, contact an approved Moulinex service centre (see list in service booklet).
- Any intervention other than cleaning and normal maintenance must be carried out by an approved Moulinex service centre.
- Unplug your appliance as soon as you have stopped using it and when you are cleaning it.
- Never put the appliance, the power cord or the plug into water or any other liquid.
- Never allow the power cord to hang down within reach of children. Always keep it well away from children.
- The power cord must never be in close proximity to or in contact with the hot parts of your appliance, close to a source of heat or rest on sharp edges.
- If the power cord or the plug are damaged, do not use your appliance. To avoid any risk, they must be replaced by an approved Moulinex service centre (see list in service booklet).
- F or your own safety, use only accessories and spare parts which are suitable for your appliance.
- Place your fryer on a worktop which is well away from any source of heat and from any risk of water splashes and which is heat-resistant.
- Never operate your fryer without filling the bowl (D) with the necessary amount of oil or fat.
- The fryer is protected by a thermostatic safety device which automatically cuts off the electrical power in the event of accidental over-heating.
- Never move your fryer while it is in use or the oil is still hot. Hot oil can cause very serious burns.
- Use the carrying handles (H) to move the fryer.
- It is essential that you wait until the oil has cooled down before emptying the oil from the fryer.
- Never obstruct the odour filtration zone (A3) located on the lid with your hand or any other object whatsoever (cloth, dish, plate, etc.), as you run the risk of being burnt.
① Check that the level of the oil is above the "min" level indicated in the bowl (D1) but does not exceed the "max" level..
- Oil and fat are flammable products. If the oil or fat catches fire, unplug the appliance, cover it with its own lid or a damp cloth to stifle the flame, but never use water.
Before first use
Unpack your fryer and keep your proof of purchase, then read the instructions for use carefully.
② Place the filter (A2) in the drawer (A1) with the black side facing downwards. Insert the whole unit into the lid of the fryer.
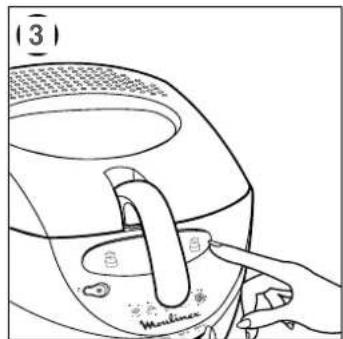
③ Open the lid (A) by pressing on the release button (B).
④ Remove the basket (C) by lifting the handle (C1).
Wash the basket (C) and the bowl (D) with hot water and washing up liquid, rinse and dry carefully.
Using the appliance
ADDING OIL OR FAT
③ Open the lid (A) by pushing on the lid release button (B).
④ Remove the basket (C) by raising the
handle (C1).
If you are using oil, pour the oil into the bowl (D) up to the Maxi level, which is about 2.1 litres.
① Never exceed the "maxi" level indicated in the bowl (D). If you use solid vegetable fat, take 1575 g - 1750 g of fat, cut into pieces and melt it in a separate pan then pour it ins the bowl (D). Never melt the blocks of fat in the basket (C), nor in the bowl (D).
⑥ Close the lid (A) until you hear a "click". Plug in the fryer.
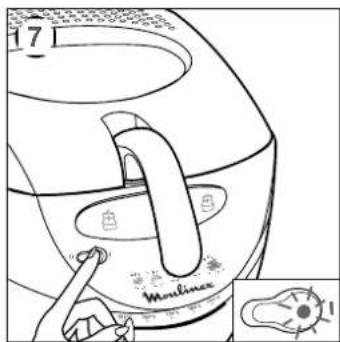
⑦ Press the On/Off switch (E). The temperature regulator light (F) comes on.
FRYING FOOD
Set the temperature selector (G) to the required setting (see cooking charts). The temperature regulator light (F) comes on.
When the temperature regulator light (F)
③ goes off, open the lid (A) by pushing on the opening button (B).
③ Raise the basket (C) using the handle (C1) and place it in the draining position.
④ Remove the basket from the appliance. Place the food in the basket (C). Put the basket back in the draining position.
Close the lid (A).
Slowly lower the basket (C) into the oil from the draining position
④ When the cooking is finished, raise the basket (C) and place it in the draining position.
Don't forget to switch off your fryer by pressing the On/Off switch(E).
Open the lid (A) and serve the food. Note:
If you need to fry several batches of food in succession, wait until the temperature regulator light (F) has gone out before putting the next batch of food into the oil. To avoid any risk of burns, never put your hands above the odour filtration zone (A3).
If your fryer is fitted with a timer(J): Press the button (J1) and the display "00" will light up.
Continue to press the button until the required time appears (see cooking
charts).
Once you let go of the button the count down will commence (the display will flash).
If you make an error, reset the timer (J) to "00" by holding down the button (J1) for a few seconds, and start again.
When the cooking time is up, the timer will beep. To stop it, press the button (J1).
Note: The timer signals the end of the cooking time but does not turn off the fryer.
The timer (J) display switches off automatically.
DEALING WITH ODOURS
The anti-odour filter (A2) remains effective for 10 to 15 uses.
When the saturation indicator (white side) turns red, change the filter.
Changing the filter (A2)
② Wait until the fryer has cooled down. Take out the "Clean Express" drawer (A1), and turn it upside down while holding it over the bin: the filter will fall out. Place the new filter (A2) into the drawer (A1) with the black side facing downwards.
Changing the oil
Unplug the fryer. Wait until the oil is lukewarm. Remove the lid (A). Empty the oil or fat into a large container and put it in the waste disposal.
Filtering the oil:- Remove small pieces of food with a non-metallic skimmer. You may store the oil or fat in the fryer, or in a separate airtight container.
Filter the oil after each use with a filter paper (available from approved service centres). Crumbs that break away from food tend to burn and alter the quality of the oil more quickly. Over time this increases the risk of the fryer catching fire. For this reason, filter the oil regularly.
Keep warm function (according to model)
The dish (K2) is designed so that food which has just been fried can be kept warm prior to serving (for example: chicken nuggets and chips) or two helpings of chips.
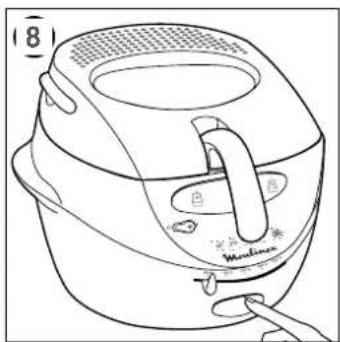
⑧ When the first fry is done, press on the dish opening button (K1).
Remove the dish from its housing (K3). Empty the contents of the basket (C) into the dish (K2) and distribute it evenly.
Important : Never use paper kitchen towel to line the bottom of the dish.
⑩ Put back the dish into place (K3) until you hear a "click".
Fry the second portion of food.
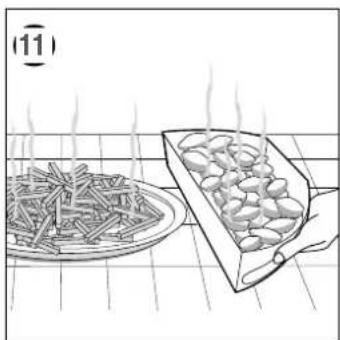
⑪ When the food is ready, serve everything at the same time. We advise you to prepare fresh chips last.
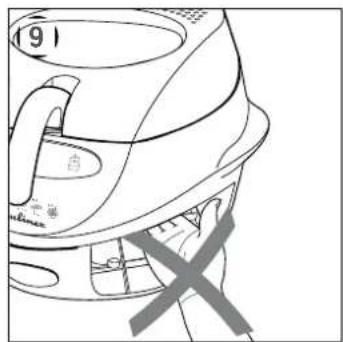
⑨ Caution : Never put your hand into the dish housing (K3), specially when moving the fryer, you might get burnt.
Practical tips
1. Oil or fat
Never operate your fryer without oil. Always use an oil which can withstand high temperatures.
Do not mix different types of oils. Change the oil when it becomes brown (every 10 to 20 uses, depending on the cooking done). If using sunflower oil ensure the oil is changed after every 5 uses.
Important: Before each use, make holes in the solid fat with a non-metallic spatula in the bottom of the bowl, in order to allow any water trapped under the fat to escape in the form of steam. Set the temperature selector (G) to position 150°C to melt the fat.
2. Preparing foods for frying
No matter what the recipe, food must be perfectly dry: this will prevent overflowing and extend the life of the oil. When dishes include raw potatoes (chips, crisps and potato straws), wash them in cold water to get rid of the starch. This will stop them from sticking together. Dry them carefully and thoroughly with paper kitchen towel. When preparing frozen foods, before cooking, remove any ice crystals on the food by placing the frozen food in the basket and gently shaking the basket over the sink.
3. Cooking
Do not overfill the basket, or you will cause the temperature of the hot oil to drop too much, and this will make the food greasy and soggy.
The capacity of your fryer is limited to:
- 1 kg of fresh chips
- 750 g of frozen chips
For best results, we advise that you use:
- 550 g of fresh chips
- 400 g of frozen chips
Do not leave your fryer heating unnecessarily: your oil will last longer this way.
Do not leave your cooked foods in the basket in the draining position for too long, as the steam may soften them and make them soggy.
Cleaning
Unplug your appliance and allow it to cool down before handling it.
Clean the exterior of the fryer with a damp cloth. Do not use an abrasive pad or any abrasive or alcohol based cleaning products.
Never immerse the appliance in water and never wash it under running water.
⑫ Remove the lid. Wash the basket and the lid (without the anti-odour filter) in the dishwasher or in hot water with washing up liquid, rinse and dry. When you change the oil, take the opportunity to clean your bowl with hot water and washing up liquid. Rinse and dry.
Accessories
The Anti-odour filter ref.: DA8. is available from your retailer or from an approved Moulinex service centre:
HELPLINE
If you have any problems or queries, please call our Customer Relations team first for expert help and advice on: 0845 602 1454 (UK - calls charged at local rate)
(01) 4751947 (Ireland)
Any repairs must be carried out only by an approved Service Centre using original spare parts.
Protection of the environment
Your appliance has been designed to work for many years. However, when finally you decide to replace your deep fryer, do not forget to think of what you can do to help to protect the environment by disposing of it at your local waste disposal centre.
Cooking charts
Cooking times are given by way of indication. You can adjust them according to your own taste.
Temperatures and cooking times: Fresh products
| Fresh foods Quantity Max Time | temperature | ||
| Chips maximum quantity 1000g 190°C 11 - 14 min.Chips quantity recommended for best results 550g 190°C 7 - 9 min.Battered cod fillet 180°C 8 - 10 min.Breaded camembert wedges 190°C 2 - 3 min.Breaded chicken strips 180°C 5 - 6 min.Breaded plaice filletChicken KievFried chicken (leg portion)Fried whole mushroomsFried onion ringsPotato or chicken croquettesRing doughnutsApple fritters | 450g 160°C 6 - 8 min.180°C 12 - 14 min.800g 180°C 12 - 15 min.150°C 6 - 8 min.180g 160°C 3 - 4 min.250g 190°C 8 - 9 min.180g 170°C 6 - 9 min.250g 170°C 4 - 6 min. |
For frozen foods, set the temperature selector (G) to 190° C. You will also need to adjust the cooking time as a function of the quantities and of your own tastes.
Weight and cooking time : Frozen products
| Max. weight Time | ||
| Chips maximum quantity 750 g 11 - 12 min.Chips quantity recommended for best results 400 g 4 - 7 min.American style thin cut chips 500 g 5 - 6 min.Alphabites 16 pieces 3 - 4 min.Chicken nuggets 12 pieces 4 - 5 min.Fish fingers 8 pieces 4 - 5 min.Potato croquettes 8 - 10 pieces 5 - 6 min.Battered cod fillets 2 pieces 11 - 13 min.Breaded MushroomsBreaded Fish nuggetsFried onion rings 6 - 8 pieces 1 - 2 min.Breaded Scampi | 16 pieces 2 - 3 min.8 pieces 5 - 6 min.12 pieces 4 - 5 min. |
What to do if your appliance does not work?
First, check the connection.
Then check whether one of the causes listed in the following table might be the reason.
Practical advice
| Problems | Causes | Solutions |
| Excessive odour. | Anti-odour filter is saturated. | Replace filter (see dealing with odours). |
| The oil has deteriorated. | Change the oil or fat. | |
| The fat is not appropriate for this type of cooking. | Use good quality oil or fat. Do not mix oils or fats of different qualities. | |
| Steam is escaping from under the lid. | The lid is not closed properly. | Ensure the lid is correctly locked. |
| The anti-odour filter is saturated. | Replace the filter (see dealing with odours). | |
| The gasket is faulty. | Wipe it, or replace if if it is damaged. | |
| Oil overflows. | The fryer has been filled beyond the max level. | Check oil level inside the bowl. |
| Food overloaded with ice/water plunged into hot oil. | Dry the food completely. | |
| Recommended quantities have been exceeded. | Do not exceed the maximum recommended quantities. | |
| Basket misshapen | Change the basket | |
| Mixture of different oils/fats | Empty and clean the bowl. Fill with one type of oil. | |
| Not changing the oil often enough. Using the wrong oil. | Change the oil regularly (at least every 10-20 uses, more if using sunflower oil). Use a good quality blended vegetable oil/fat. | |
| The oil is too hot. | Consult an approved Moulinex service centre. | |
| Food does not become golden and remains soft. | Cooking temperature too low. | Set the selector to the correct cooking temperature. |
| Basket overloaded with too much food. | Do not fry quantities greater than the weights indicated. | |
| The oil is not hot enough. | Consult an approved Moulinex service centre. | |
| The food is too thick and contains a lot of water. | As a test, try a longer cooking time. Cut food into smaller pieces. | |
| Chips, potato straws, crisps stick together. | Unwashed food immersed in the oil. | Wash the potatoes well and dry them carefully. |
| The oil does not heat up. | First heating made without oil in bowl. | Consult an approved Moulinex service centre. |
| Vision through the window is not clear. | Cleaning the window not often enough or using an inappropriate cloth. | To ensure good visibility, clean the window by wiping it with a sponge and a little lemon juice. |
| The timer no longer works (depending on model). | Battery is spent. | Consult an approved Moulinex service centre. |
If the problem persist, consult an approved Moulinex service centre.
DEUTSCH
A1 Schubfach "Clean Express"
A1 "Clean Express" filtercassette
Protection of the environment
A1 Bandeja "Clean Express"
A1 Gaveta "Clean Express"
A1 Cassetto "Clean Express"
Empty the fryer into a large container and put it in the waste disposal.

- FRANÇAIS
- DESCRIPTION
- A LID WITH AUTOMATIC OPENING
- B LID OPENING BUTTON
- C BASKET
- SAFETY RECOMMENDATIONS
- F T EMPERATURE REGULATION INDICATOR
- G T EMPERATURE SELECTOR
- H CARRYING HANDLES
- I CORD STORAGE
- BEFORE FIRST USE
- USING THE APPLIANCE
- ADDING OIL OR FAT
- FRYING FOOD
- DEALING WITH ODOURS
- CHANGING THE FILTER (A2)
- CHANGING THE OIL
- KEEP WARM FUNCTION (ACCORDING TO MODEL)
- PRACTICAL TIPS
- OIL OR FAT
- PREPARING FOODS FOR FRYING
- COOKING
- CLEANING
- ACCESSORIES
- HELPLINE
- PROTECTION OF THE ENVIRONMENT
- COOKING CHARTS
- WHAT TO DO IF YOUR APPLIANCE DOES NOT WORK
- DEUTSCH
Brand : MOULINEX
Model : Urbalys AKF5
Category : Deep fryer