
447 - Electric grater ARIETE - Free user manual and instructions
Find the device manual for free 447 ARIETE in PDF.


| Product type | Electric grater |
| Brand | Ariete |
| Model | 447 |
| Power supply | 220-240 V, 50/60 Hz |
| Power | 200 W |
| Dimensions (L x D x H) | 20 x 15 x 25 cm |
| Weight | 1.2 kg |
| Body material | ABS plastic |
| Drum material | Stainless steel |
| Functions | Grating, slicing, cutting |
| Included accessories | Fine grating drum, coarse grating drum, slicing blade, pusher |
| Safety | Safety switch, automatic shutdown in case of overheating |
| Maintenance and cleaning | Unplug before cleaning; drum and blade washable with soapy water; wipe the body with a damp cloth |
| Non-slip feet | Yes |
| Repairability | Repairability index not provided |
| Spare parts available | Drums, blades, pusher (contact customer service) |
| Certification | CE |
| Color | White with gray accents |
Frequently Asked Questions - 447 ARIETE
User questions about 447 ARIETE
0 question about this device. Answer the ones you know or ask your own.
Ask a new question about this device
Download the instructions for your Electric grater in PDF format for free! Find your manual 447 - ARIETE and take your electronic device back in hand. On this page are published all the documents necessary for the use of your device. 447 by ARIETE.
USER MANUAL 447 ARIETE
natural_image
Line drawing of a mechanical device with a coiled cable and a handle (no text or symbols)grati
-Ariete
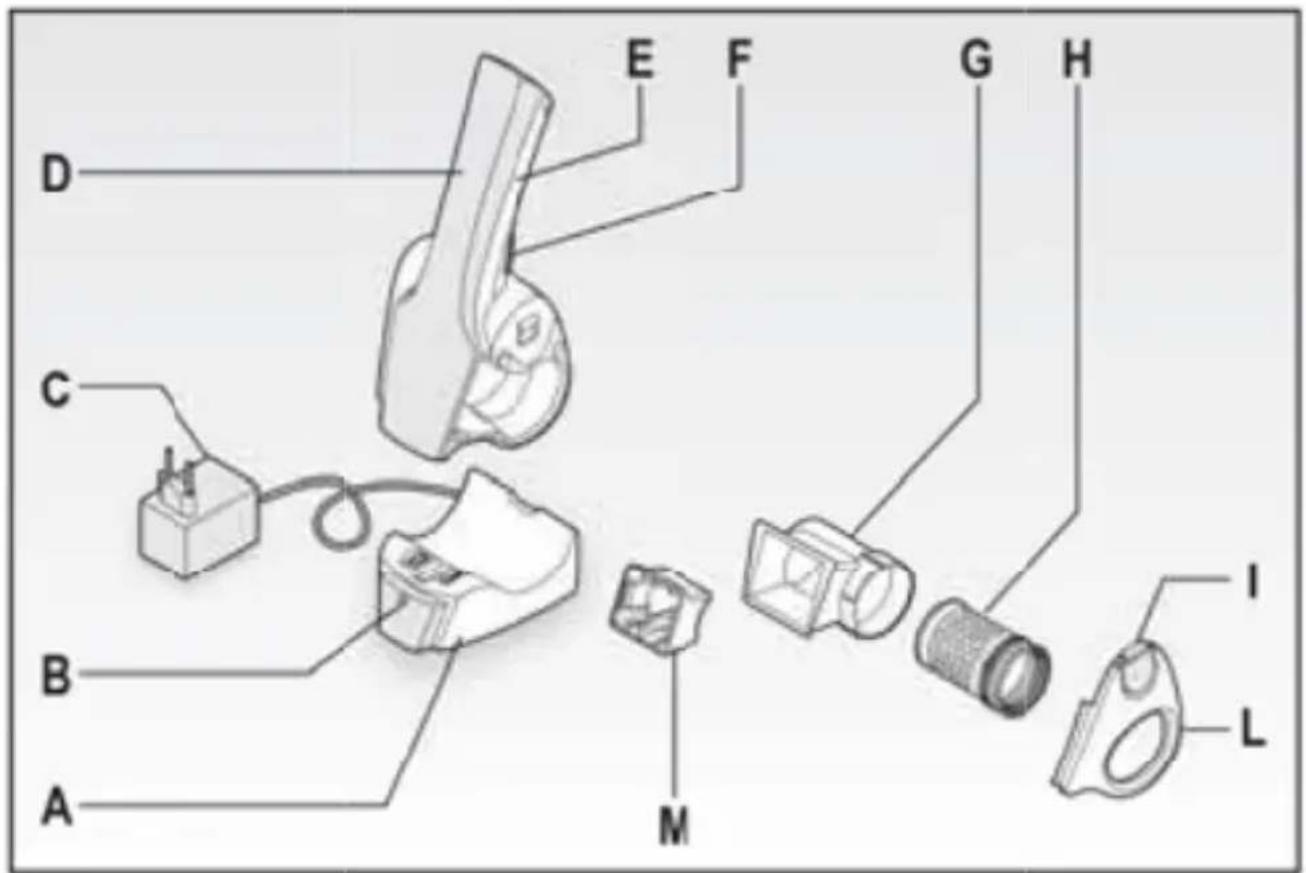
Fig. 1

natural_image
Illustration of a microscope with a downward arrow indicating compression or dislocation (no text or symbols present)Fig. 2
natural_image
Illustration of a hand cleaning a small object with a brush and tool nearby (no text or symbols)Fig. 3
natural_image
Illustration of a hand pouring liquid into a bowl with an arrow pointing to it (no text or symbols)Fig. 4
natural_image
Technical line drawing of a mechanical clamp or bracket with a wire, no text or symbols presentFig. 5
natural_image
Illustration of a hand holding a small object with a downward arrow indicating compression or damage (no text or symbols)Fig. 6

natural_image
Illustration of a hand holding a small object with a curved arrow indicating rotation or movement (no text or symbols)Fig. 7

natural_image
Illustration of kitchen appliances with a thought bubble showing three kitchen items (no text or symbols present)Fig. 8

natural_image
Diagram showing a 3D block being processed into a device (no text or symbols present)Fig. 9
natural_image
Diagram showing a device with internal components and an arrow indicating direction (no text or symbols)Fig. 10
natural_image
Technical line drawing of a mechanical component with cutaway view (no text or symbols)Fig. 11
natural_image
Illustration of a hand holding a rolled-up cable with a circular arrow indicating rotation (no text or symbols)Fig. 12
AVVERTENZE IMPORTANTI
LEGGERE QUESTE ISTRUZIONI PRIMA DELL'USO
The necessary precautions must be taken when using electrical appliances, and these include the following:
Before connecting the charging unit to the mains power, make sure that the volt-1. age on the appliance rating plate is compatible with that of the mains power.
Never leave the appliance unattended when connected to the power sup-2. ply; unplug it after every use.
Never place the appliance on or close to sources of heat.3.
Never leave the appliance exposed to the elements (rain, sun, etc....).4.
Make sure that the power cord does not come into contact with hot sur-5. faces.
This appliance is not intended for use by persons (including children) with 6. reduced physical, sensory or mental capabilities, or lack of experience and knowledge, unless they have been given supervision or instruction concerning use of the appliance by a person responsible for their safety.
Children should be supervised to ensure that they do not play with the 7. appliance.
NEVER STAND THE APPLIANCE BODY, CHARGING UNIT, PLUG OR 8. POWER CORD IN WATER OR OTHER LIQUIDS. WIPE CLEAN WITH A DAMP CLOTH.
REMOVE THE APPLICANCE FROM THE CHARGING UNIT DURING USE.9.
Always make sure that your hands are thoroughly dry before using or 10. adjusting the switches on the appliance, or before touching the power plug or power connections.
Never operate the appliance if it is empty.12.
Never use the appliance to chop excessively hard foods (for example, ice 13. cubes or meat on the bone).
In case of replacement and/or maintenance of the charging unit or power 14. cord, contact an Ariete Authorised Assistance Centre or similarly qualified person in order to avoid any risks.
In the event that fluid should leak from the batteries, do not use the appli-15. ance; take it to your nearest Ariete Authorised Assistance Centre to replace the batteries.
This appliance operates using rechargeable NiMH batteries and there-16. fore, at the end of its useful life, it must not be disposed of with standard household waste. It can be taken to one of the relevant recycling centres operated by your local authority or to retailers offering this service. The separate disposal of an electrical or electronic appliance makes it possible to avoid the possible negative consequences to health and the environment of unsuitable disposal methods and it also means it is possible to recover the material used to make it, meaning a significant saving in terms of energy and resources. To point out the obligation for separate disposal of electrical appliances the product has the crossed-out wheeled bin symbol.
Never throw batteries into fire.
To unplug the appliance, grip the plug and remove it directly from the power 17. socket. Never pull the power cord to unplug the appliance.
Never use the appliance if the power cord or plug are damaged or if the 18. appliance itself is faulty; in this case, take it to your nearest Authorised Assistance Centre.
To prevent any risks, if the power cord is damaged, it must be replaced by 19. the manufacturer, its Technical Assistance Service or a similarly qualified person.
This appliance is designed for HOME USE ONLY and may not be used for 20 commercial or industrial purposes.
This appliance conforms to the 2006/95/EC and EMC 2004/108/EC direc-21. tives.
Any changes to this product that have not been expressly authorised by 22. the manufacturer may lead to the user's guarantee being rendered null and void.
In the event that you decide to dispose of the appliance, we advise you to 23. make it inoperative by cutting off the power cord. We also recommend that any parts that could be dangerous be rendered harmless, especially for children, who may play with the appliance or its parts.
Packaging must never be left within the reach of children since it is poten-24. tially dangerous.
DO NOT THROW AWAY THESE INSTRUCTIONS
EN
Dear Customer,
Your Ariete GRATI rechargeable electric grater will soon become an indispensable aid in your kitchen, making it so much easier to prepare cheese so that you can always enjoy it freshly grated. This appliance has been designed to grate any type of hard or medium-hard cheese but it can also grate chocolate, dry bread, almonds, nuts, etc.
Grati is now even easier to clean because it can be taken to pieces.
The GRATI rechargeable grater works after being charged on a charging unit powered from the mains.
DESCRIPTION OF THE APPLIANCE (Fig. 1)
A Charging unit
B Operating light
C Feeder for charging unit
D Press
E Appliance body
F Start button
G Hopper
H Grater rollers
I Hopper lid release button
L Hopper lid
M Removable section of the presser
Please read these instructions with care before using the appliance; they will allow you to get the best possible performance from your “Grati” and to keep it working longer.
CHARGING THE BATTERIES
WARNING: Always charge the battery completely before using the appliance.
IMPORTANT: Always charge the battery for 24 hours to activate it before using it for the first time, after which time, the time needed to charge it fully will be approximately 16 hours.
IMPORTANT: Make sure not to start the appliance while it is charging.
- Connect the plug from the charging unit (A); the operating light (B) switches on to show that the mains power is connected. This light will switch off once the power cord is removed from the mains socket;
- insert the appliance body (E) into the charging unit (A) (Fig. 2). After approximately 16 hours, the appliance will be charged and the ready for use.
WARNING: We recommend using up the full battery charge before charging it again.
Charging unit
The charging unit serves to charge the batteries inside the appliance handle and it has the additional bonus of serving to put away the appliance when it is not being used; therefore, it needs to be placed near to a mains power socket.
Notes about charging
The charge will last longer and the appliance will work better if it is used on a regular basis.
IMPORTANT: The top part of the appliance body (E) can become warm while it is charging; this is normal.
IMPORTANT: Do not charge the appliance at temperatures below 5^ C ( 40^ F) or above 40^ C ( 105^ F) as this could damage the batteries.
IMPORTANT: If the appliance does not work, make sure that it is housed correctly in the charging unit (A), that the plug is inserted correctly.
Important: If, after repeated use, the power seems not to last so long, this does not mean that the unit is faulty. This problem can be solved by leaving the appliance switched on until it stops working and then charge it for approximately 16 hours. This will improve the charge capacity of the batteries. Repeat this operation several times, if necessary. If the power still does not last for very long, contact your assistance centre.
INSTRUCTIONS FOR USE
IMPORTANT: REMOVE THE APPLIANCE FROM THE CHARGING UNIT DURING USE.
IMPORTANT: NEVER USE THE APPLIANCE WHEN EMPTY.
- When the appliance has charged, take it out of its base (A).
- Cut the food into “cubes” (if cheese, remove the rind) and place the cubes inside the hopper (G) (Fig. 3). Then lower the presser (D).
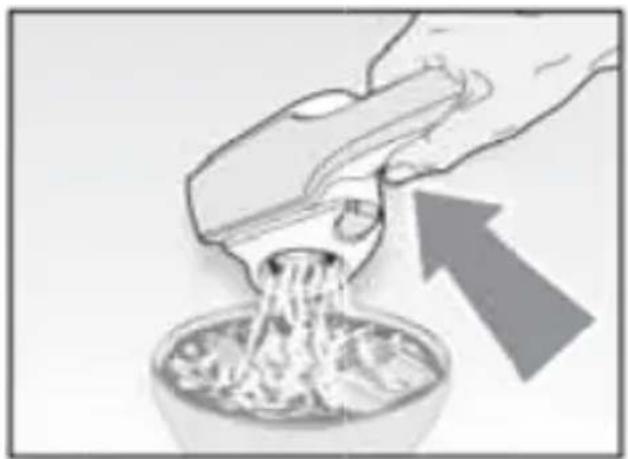
- Use the grater over a container or grate directly onto the food, pressing the start button (F) (Fig. 4).
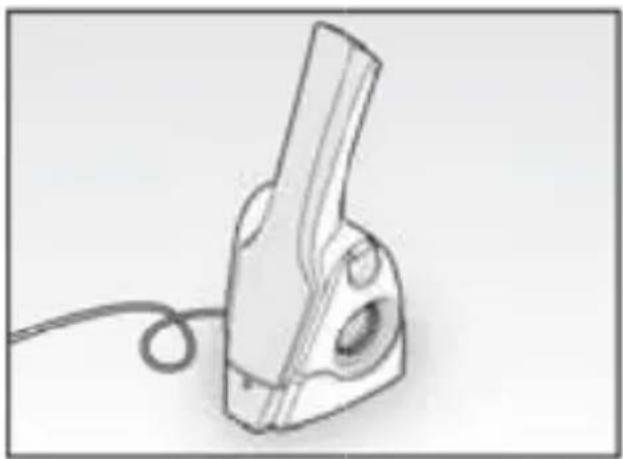
- Therefore, after use, put away the appliance, using the charging unit (A) as a handy support for upright storage (Fig. 5).
EN
IMPORTANT: Do not place the appliance in the refrigerator, as this could damage the batteries.
IMPORTANT: It is not hygienic to leave cheese (or chocolate) inside the hopper for days and it could lead to the formation of mould or unpleasant smells.
Therefore, after each use, we recommend removing any food that has not been used (unless it is going to be grated within a very short space of time) and to store them appropriately in line with normal hygiene standards.
CLEANING AND MAINTENANCE
IMPORTANT: NEVER STAND THE APPLIANCE BODY, CHARGING UNIT, PLUG OR POWER CORD IN WATER OR OTHER LIQUIDS. WIPE CLEAN WITH A DAMP CLOTH.
IMPORTANT: We recommend cleaning the appliance regularly since during use, residues of food can become trapped inside the hopper. Constant cleaning will guarantee greater hygiene for your food. We recommend that you ALWAYS clean the appliance if it is used with different foods (for example, if grating chocolate after first grating cheese), since any residues of one food could affect the taste of the others.
IMPORTANT: Keep the appliance clean and tidy; this way you will be guaranteed excellent prepared foods and a longer appliance lifetime.
Before cleaning the appliance, it needs to be disassembled completely, proceeding as follows:
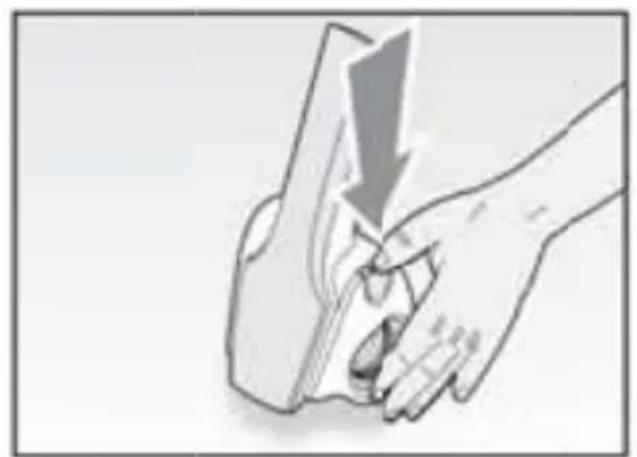
- remove the lid (L) by pressing the release button (I) and at the same time, pulling it outwards (Fig. 6);
- turn the roller (H) about a 14 turn anticlockwise and remove it (Fig. 7);
- slide out the hopper (G) from the appliance body (E) and take out the removable section of the presser (M) from the lever (D) by pulling it out.
Only the removable parts (roller, hopper and lid, presser), as shown in Fig. 8, can be washed in hot soapy water or in the top rack of the dishwasher.
To clean the other parts (appliance body, non-removable presser and charging unit) wipe clean with a damp cloth and NEVER stand in water or other liquids.
Also take care not to use abrasive cloths which could scratch and damage the plastic parts. Only use soft cloths.
Reassembling the appliance
Before using the appliance again, it needs to be reassembled as follows:
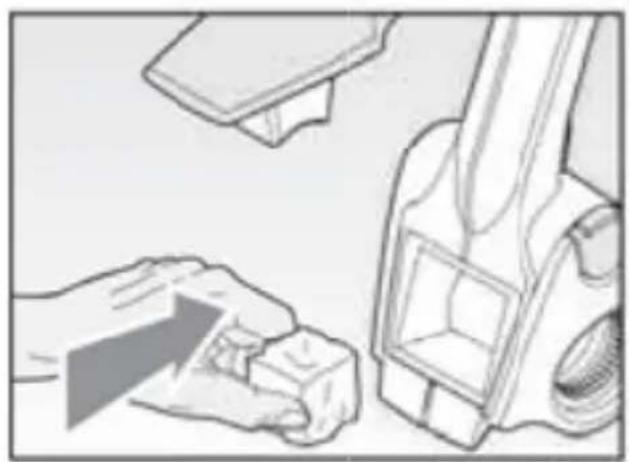
- lift the presser (D) and fit the removable section (M) into the seat, pressing it until it clicks into place (Fig. 9). Make sure that the tap enters the slot in the presser (D);
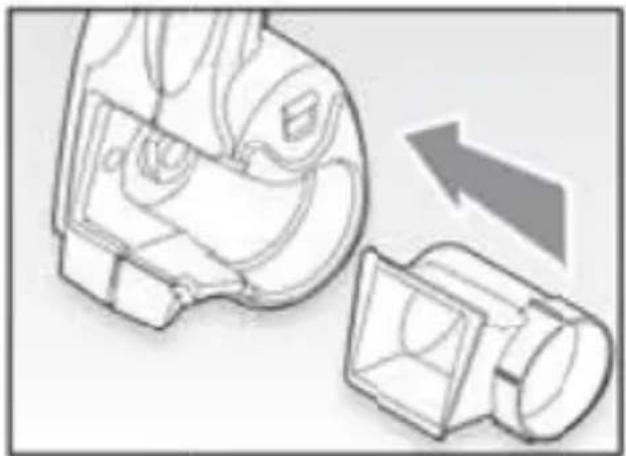
- insert the hopper (G) as far as it will go inside the appliance body (E) (Fig. 10);
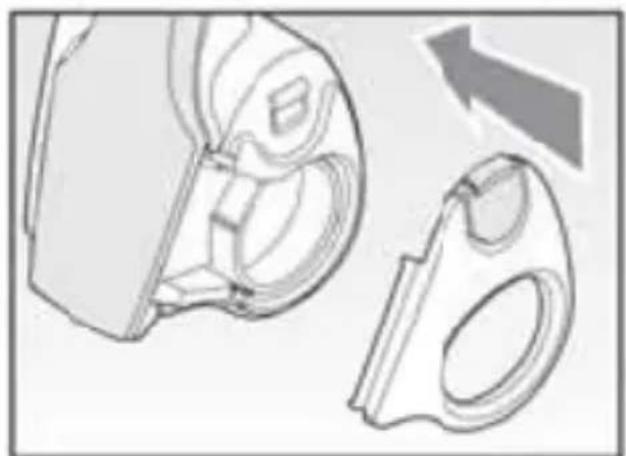
- fit the lid (L) onto the appliance body (E) making sure it is perfectly lined up inside its housing and pressing it gently until it clicks into place (Fig. 11);
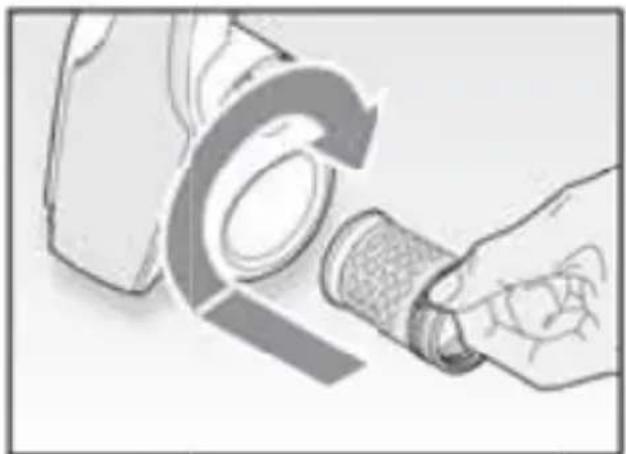
- insert the roller (H) into its seat inside the appliance body (E) and holding it down, turn it by a 1/4 turn clockwise (Fig. 12).
IMPORTANT: Before using the appliance, make sure that all parts have been correctly fitted inside it.
INSTRUCTIONS IMPORTANTES
LIRE CES INSTRUCTIONS AVANT L'EMPLOI
BESCHRIJVING VAN HET APPARAAT (Fig. 1)

- -Ariete
- AVVERTENZE IMPORTANTI
- LEGGERE QUESTE ISTRUZIONI PRIMA DELL'USO
- DO NOT THROW AWAY THESE INSTRUCTIONS
- EN
- Dear Customer,
- DESCRIPTION OF THE APPLIANCE (Fig. 1)
- CHARGING THE BATTERIES
- Charging unit
- Notes about charging
- INSTRUCTIONS FOR USE
- CLEANING AND MAINTENANCE
- Reassembling the appliance
- INSTRUCTIONS IMPORTANTES
- LIRE CES INSTRUCTIONS AVANT L'EMPLOI
Brand : ARIETE
Model : 447
Category : Electric grater