
MM 060 DSL0 - Microwaves HOTPOINT - Free user manual and instructions
Find the device manual for free MM 060 DSL0 HOTPOINT in PDF.
| Brand | HOTPOINT |
| Model | MM 060 DSL0 |
| Product type | Meat grinder |
| Power | 1600 W |
| Voltage | 220-240 V ~ 50/60 Hz |
| Capacity | Not specified |
| Functions | Meat grinding, sausage making |
| Perforated plates | 3 sizes: small, medium, large hole |
| Sausage stuffing tubes | 2 sizes: fine and thick |
| Locking system | Locking button to secure the head |
| Reverse function | Reverse rotation button |
| Safety device | Automatic shut-off after 15 minutes of continuous operation |
| Motor block material | Plastic (estimated) |
| Blade and plate material | Stainless steel (estimated) |
| Included accessories | Funnel, pusher, blade cover, key, cleaning disc, tube holder, funnel cover |
| Maintenance | Removable parts washable with water; motor block wiped with a damp cloth |
| Dimensions | Not specified |
| Weight | Not specified |
| Color | Not specified |
| Usage | Household use only |
| Repairability | Original spare parts available from authorized after-sales service |
Frequently Asked Questions - MM 060 DSL0 HOTPOINT
User questions about MM 060 DSL0 HOTPOINT
0 question about this device. Answer the ones you know or ask your own.
Ask a new question about this device
Download the instructions for your Microwaves in PDF format for free! Find your manual MM 060 DSL0 - HOTPOINT and take your electronic device back in hand. On this page are published all the documents necessary for the use of your device. MM 060 DSL0 by HOTPOINT.
USER MANUAL MM 060 DSL0 HOTPOINT
natural_image
Technical line drawing of a food robotic arm (no text or symbols visible)EN Operating instructions
FR Mode d'emploi
natural_image
Illustration of a kitchen tool with a rotating knob and handle, labeled Fig. 3 (no text or symbols on the diagram itself)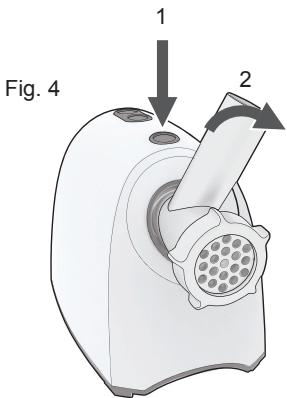
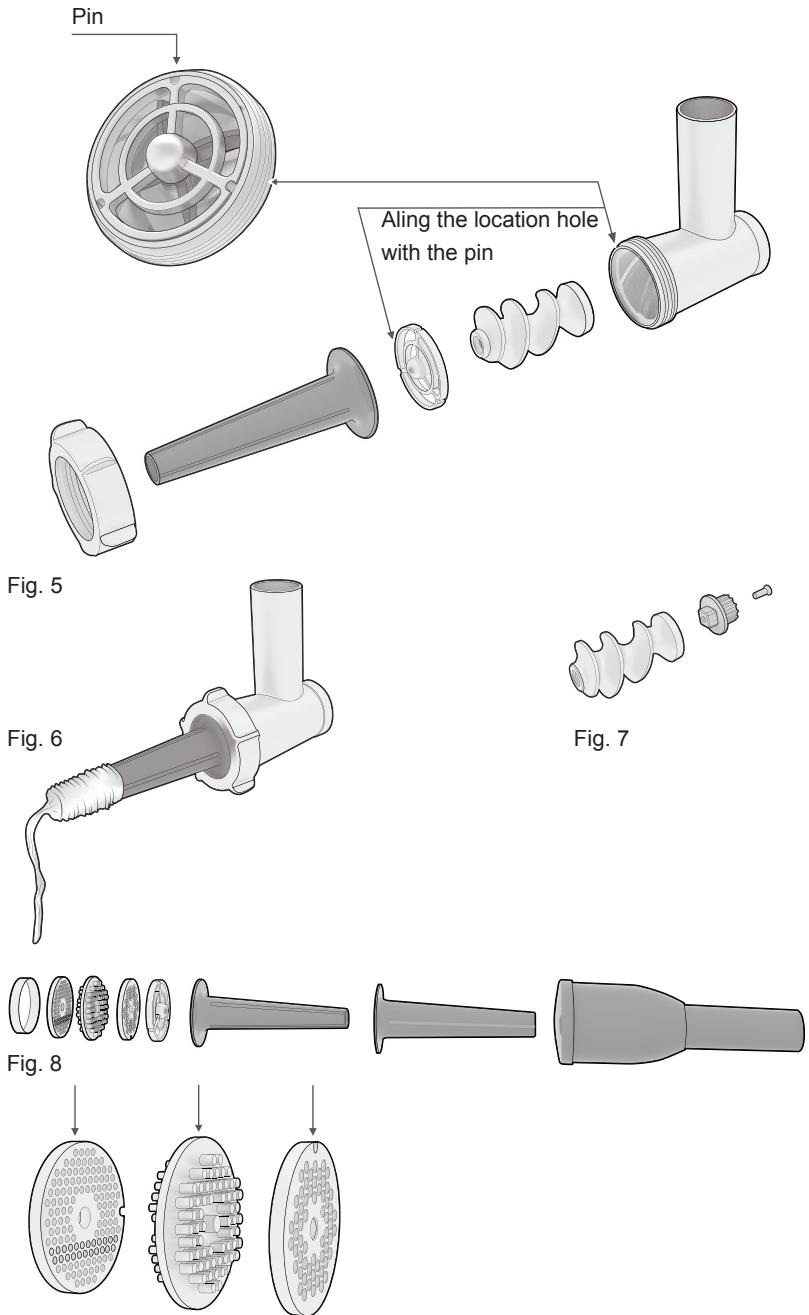
Fig. 9
PARTI E FUNZIONI
- Funnel
- Mincer head
- Lock button
- ON/OFF button
- REVERSE button
- Motor unit
- Grinding screw
- Blade
- Die plate (large hole)
- Blade cover
- Spanner
- Blades-cleaning disk
- Die plate (small hole)
- Die plate (medium hole)
- Sausage filler's nozzle support
- Funnel cover
- Sausage filler's nozzle (fine)
- Sausage filler's nozzle (coarse)
- Food pusher
INTRODUCTION
Thank you for purchasing our product.
In doing so, you have opted for an effective high-performance appliance.
If the instructions on the correct use of this appliance are not observed, the manufacturer shall assume no responsibility for any resulting damage.
The operating instructions may refer to different models: any difference is clearly identified.
IMPORTANT SAFEGUARDS
- When using the electrical appliance, the below basic safety precautions should be followed:
- Read all instructions.
- Do not immerse the motor unit of the blender in water, as this would give rise to electric shocks.
- Before using it, check that the voltage of the wall outlet corresponds to the voltage
shown on the rating plate.
-
Do not operate any appliance with a damaged cord / plug. If the appliance malfunctions or is dropped or damaged in any manner return the appliance to the nearest authorised service facility for examination, repairs or electrical / mechanical adjustment.
-
Unplug it from the outlet when not in use, before installing / removing any parts and before cleaning it.
-
Never introduce food by hand. Always use the food pusher.
-
The metal blades and disc are extremely sharp: handle with care. Always hold the blade attachments away from the cutting edges, both when handling and cleaning the unit.
-
The use of attachments not recommended by the appliance manufacturer may cause injuries or damage.
-
The appliance cannot be used to grind hard and/or dry substances, otherwise the blade could be blunted.
-
Do not let the cord hang over the edge of a table / counter or touch any hot surfaces.
-
Do not use fingers to scrape food away from discharge outlet while appliance is operating. Cut type injury may result.
-
During operating, never unplug the power outlet to stop working directly. You must make sure the ON/OFF button is on the off position firstly, then unplug the power outlet.
-
Never run the appliance empty after assembling the blade and blade tray. Otherwise the blade and blade tray will be abraded seriously, and accelerate the unit aging.
-
This appliance is not intended for use by persons (including children) with reduced physical, sensory or mental capabilities, or lack of experience and knowledge, unless they have been provided supervision or instructions on the use of the appliance by a person responsible for
their safety.
- Children should be supervised to ensure that they do not play with the appliance.
- Do not use outdoor.
- This appliance is intended for domestic use only.
- Save these instructions
OPERATING INSTRUCTIONS

Note: Before the first use, please clean all the detachable parts such as food pusher, funnel, mincer head, die plate (large hole, medium hole, small hole), blade cover, blade, kibble cone, kibble shaper and so on completely.

The blade is sharp, handle with care.
INSTRUCTION
Grinding
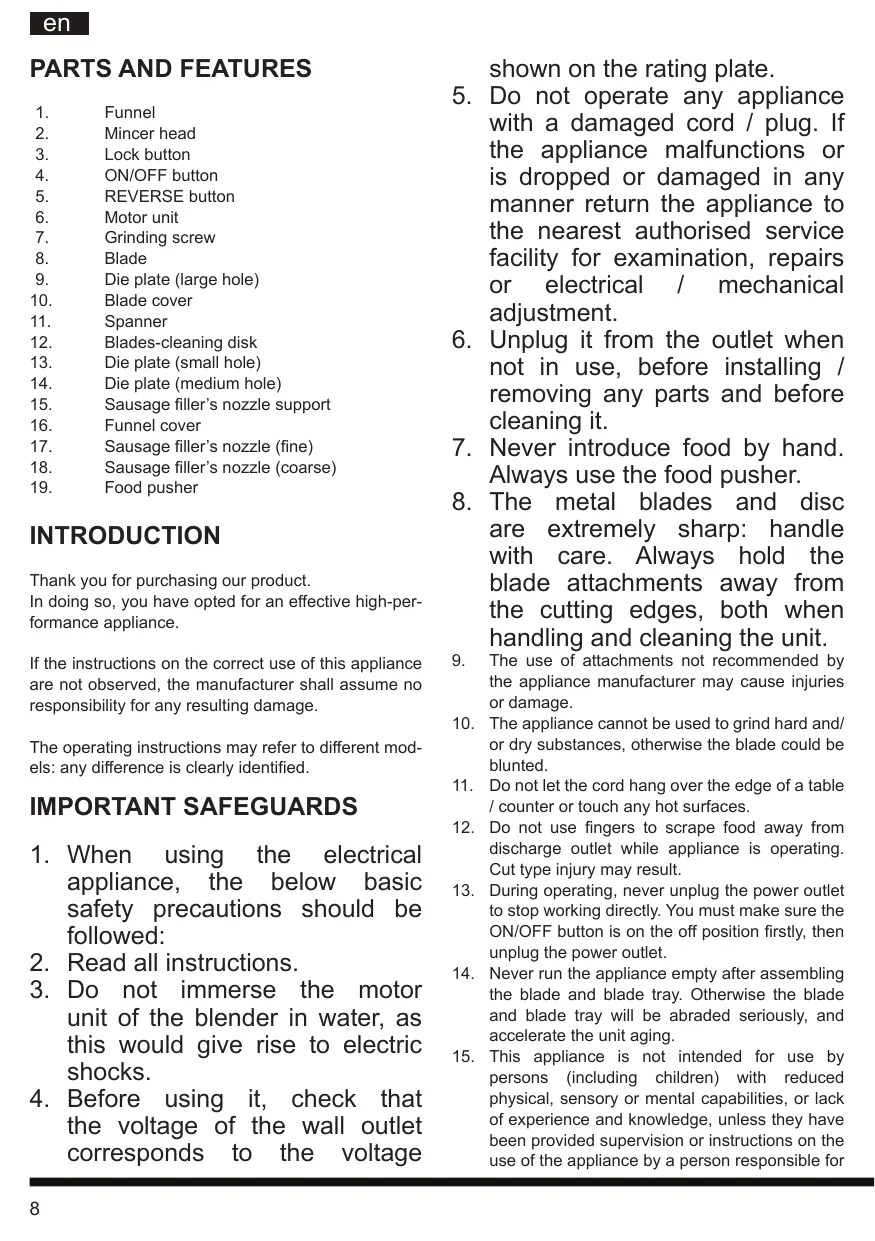
- Assemble grinding screw, blade, blade tray and blade cover as illustrated in picture (see picture 1) before grinding. Select proper mincer dieplate (fine, medium or coarse holes) according to your preference. Smaller holes will make the minced meat thinner and more uniform.

Note: Align the location hole on the selected die-plate to the pin; the rear surface of the blade has a letter "B", ensure that the side of "B" is toward the grinding screw when assembling (picture 1).
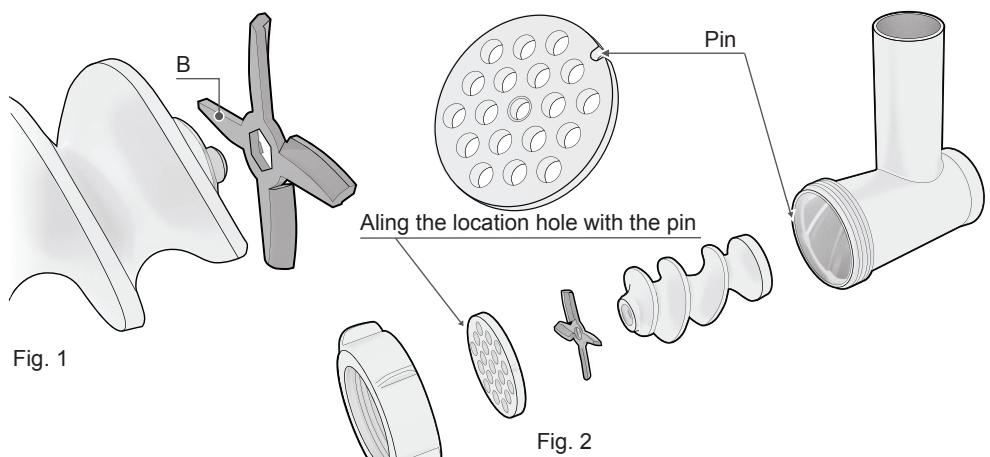
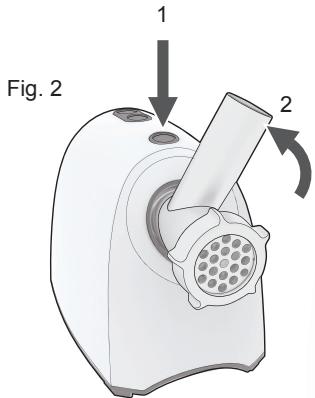
- Fix the mincer head into the motor unit. Press the lock button with one hand (see arrow 1 of picture 2), and hold the mincer head with the other hand, insert it into the hole of the unit and turn it counterclockwise until it cannot move anymore (see arrow 2 of picture 2). Release the lock button and the mincer head is fixed on the motor unit: tighten the blade cover using the spanner to ensure all elements are securely in place (see picture 3).

Caution: Make sure the appliance is unplugged when assembling.
- Put the funnel on the mincer head.
- Ensure that the ON/OFF button is in release state, then plug in power supply.
- Press ON/OFF button: the grinding blade turns counter-clockwise when the appliance
operates normally; put the meat piece into funnel, then press with the food pusher.

Attention: Always ensure bones and rind are removed from the meat before mincing.

Note: The appliance is equipped with a delayed start system: after hing the ON/OFF button, the iance will start operating with a y of about 2-3 seconds.

Note: The max operation time per time shall not exceed 14 minutes when processing beef.
- Place the funnel cover under the blade cover to receive minced meat coming from the appliance's outlet.
- Press the ON/OFF button
☐ release it immediately when blocking exists during grinding, then press the REVERSE button, let the unit turn clockwise, then release immediately, then press down the ON/OFF button again; if the blocking still exists, repeat the operations until the blocking disappears.
- When finish grinding, press ON/OFF and unplug to the power source.
- Disassemble the mincer head assembly: press lock button properly with one hand (see arrow 1 of Picture 4), turn the mincer head assembly clockwise with the other hand and remove it (see arrow 2 of picture 4).

Caution: Ensure that the motor unit is unplugged when disassembling.
Making sausages

- Assemble the mincer head, grinding screw, sausage filler's nozzle support, sausage filler's nozzle (select thick or thin according to your preference) and blade cover as shown in the picture 5.
Note: Never assemble blade and mincer dieplates when making sausages, and do not assemble sausages filler's nozzle and related support when grinding meat. - Fix the mincer head into the motor unit. Press the lock button with one hand (see arrow 1 of picture 2), and hold the mincer head with the
other hand, insert it into the hole of the unit and turn it counter-clockwise until it cannot move anymore (see arrow 2 of picture 2). Release the lock button and the mincer head is fixed on the motor unit: tighten the blade cover using the spanner to ensure all elements are securely in place.
- Set clean small intestine to sausage pole as in picture 6, then place minced meat into funnel.
- Press the ON/OFF button, the appliance turns anti-clockwise and the minced meat goes inside the intestine; you can tie the intestine anywhere you like with thread to make the sausage have proper length.
CLEANING AND MAINTENANCE
- Unplug the power cord before cleaning.
- Disassemble all the parts from mincer head, and immerse all of them in water for cleaning, including the mincer head itself.

Caution: The blade is sharp, so handle carefully when cleaning.

Note: The grinding screw can be disassembled for cleaning if necessary, as shown in picture 7.
- Wipe the outside surface of the motor unit with a damp cloth, then drying thoroughly.

Note: Never immerse the motor unit in the water for cleaning.
- After cleaning all the accessories, dry them completely, then assemble them in the food pusher as shown in picture 8 (picture 8)
CLEANING TIP:
To remove the meat that is stuck in fine and medium mincer die-plates, align the holes of the die-plates with the blades-cleaning disc and push the blades-cleaning disc into die-plate, as shown in picture 9.
Any meat stuck in the die-plate will be pushed out. Any remaining meat that is still in the blade tray should be washed off using a soft sponge and hot soapy water.
To remove foods from the die-plate (large hole), rinse it under cold, running water to force meat from holes, any remaining meat stuck on the blade tray should be washed off using a soft sponge and hot soapy water.
Ensure that all attachments and discs are dried thoroughly before storing. If trays are not dried, rust may occur on the trays.
DISPOSAL OF OLD ELECTRICAL APPLIANCES
The European Directive 2012/19/EU on Waste Elec-

trical and Electronic Equipment (WEEE), requires that old household electrical appliances must not be disposed of in the normal unsorted municipal waste stream.
Old appliances must be collected separately in order to optimise the recovery and recycling of the materials they contain and reduce the impact on hu-
CE man health and the environment. The crossed out "wheeled bin" symbol on the product reminds you of your obligation, that when you dispose of the appliance it must be separately collected. Consumers should contact their local authority or retailer for information concerning the correct disposal of their old appliance.