
HNC 6.8 AB X/HA - Range hood HOTPOINT - Free user manual and instructions
Find the device manual for free HNC 6.8 AB X/HA HOTPOINT in PDF.
| Product type | Range hood |
| Brand | Hotpoint |
| Model | HNC 6.8 AB X/HA |
| Height (cm) | 61 - 82 |
| Width (cm) | 59.8 |
| Depth (cm) | 50 |
| Exhaust tube diameter (cm) | 15 / 12 |
| Power supply | 230 V ~ 50 Hz |
| Lighting | 2 x 25 W Halogen (G9 base) or LED (depending on model) |
| Fan speeds | 4 speeds + intensive (Booster) function |
| Grease filter | Metallic, dishwasher safe (short cycle, low temperature) |
| Charcoal filter (odors) | Replace every 20 months, not washable |
| Installation type | External exhaust (recirculation possible with optional kit) |
| Minimum safety distance (cooking hob) | 65 cm (gas) / 55 cm (electric); follow hob's instructions |
| Noise level | Variable by speed (data not specified) |
| Material | Stainless steel (satin finish) |
| Weight | Not specified (estimated ~10-15 kg) |
| Control | Touch keyboard (T1-T5) |
| Filter reset function | Yes (long press on T5) |
| Child safety | Not specified |
| Maintenance | Monthly cleaning of filters and surface; use a soft cloth and mild detergent |
| Warranty | Not specified (refer to after-sales service) |
| Included accessories | Fixing plugs, user manual |
| Repairability | Technical assistance recommended; halogen bulbs replaceable, LED by after-sales service |
Frequently Asked Questions - HNC 6.8 AB X/HA HOTPOINT
User questions about HNC 6.8 AB X/HA HOTPOINT
0 question about this device. Answer the ones you know or ask your own.
Ask a new question about this device
Download the instructions for your Range hood in PDF format for free! Find your manual HNC 6.8 AB X/HA - HOTPOINT and take your electronic device back in hand. On this page are published all the documents necessary for the use of your device. HNC 6.8 AB X/HA by HOTPOINT.
USER MANUAL HNC 6.8 AB X/HA HOTPOINT
Operating Instructions COOKER HOOD
Contents
Operating Instructions,1
Montage,4
Warnings,10
Assistance,28
Installation,35
CHIMNEY controls,36
Maintenance and care,36
Troubleshooting,38

Espanol
HeicnpaBHOCTn MeToDbI INx yCTpaHEnH,66
PL
Polski
Instrukcja obstugi
OKAP
Spis tresci
! Keep this manual for reference. If you sell, transfer or move the unit to another location, make sure to keep the manual with the product.
! Read the instructions carefully - they contain important installation, user and safety information.
! Do not tamper with the electrical ormechanical equipment of the product or
its exhaust ducts.
General safety information
- The distance between the cookware support surface on top of the cooking appliance and the lowest part of the cooker hood must be at least:
65 cm if the hood is installed over a gas cooktop
55 cm if the hood is installed over an electric cooktop.
If the installation instruction manual for the gas cooking appliance specifies a greater distance, this measurement should be taken into account.
- The cooker hood comes with anchor plugs which are suitable for use with most walls/ceilings.
However, you must contact a qualified technician to check the suitability of the materials in relation to the type of wall/ceiling, which must be strong enough to support the weight of the unit. - Caution! Do not hook the unit up to its electrical power supply until the installation has been completed.
- Before cleaning or servicing the unit, disconnect it from the mains by pulling the power plug or disconnecting the main circuit breaker.
- Always wear work gloves when installing and servicing the unit.
- It is not intended for use by children or persons with sensory or mental disability and lack of experience or familiarity, except under the supervision or instruction of a person responsible for their safety.
- Make sure children do not play with the unit.
- Never operate the unit without its grease filter installed!
- NEVER use the hood as a support, unless expressly instructed to do so.
-
The room must be adequately ventilated if the hood is used at the same time with other equipment burning gas or other fuels
-
Extracted air must not be conveyed into a duct used for exhausting combustion fumes from gas or other fuel-fired equipment.
- Observe all regulations in relation to air extraction.
- NEVER cook food with an open flame under the hood; open flames will damage the filters and may cause fires. Never do this.
- Always supervise frying to make sure the heated oil does not catch fire.
- Strictly observe all local regulations in relation to the technical and safety measures to be employed in fumes extraction.
- Clean the product frequently, inside and out (AT LEAST ONCE A MONTH, and in observance of the maintenance instruction given in this manual).
- Failure to observe the hood cleaning and filter cleaning/replacement instructions can result in fires.
- Never use the hood without its bulbs properly installed - electrocution hazard.
- The manufacturer is not liable for any inconvenience, damage or fire caused by the unit as a result of failure to observe the instructions given in this manual.
- Caution! The unit's accessible parts can get very hot when used with cooking equipment.
- This appliance can be used by children aged from 8 years and above and persons with reduced physical, sensory or mental capabilities or lack of experience and knowledge if they have been given supervision or instruction concerning use of the appliance in a safe way and understand the hazards involved. Children shall not play with the appliance. Cleaning and user maintenance shall not be made by children without supervision
FR
Avertissements
ASSISTENZA -RICAMBI, ACCESSORI
199.199.199
NUMERO UNICO
! Never use the services of an unauthorised technician.
Please have the following information to hand:
The type of problem encountered.
The appliance model (Mod.).
The serial number (S/N).
The latter two pieces of information can be found on the data plate located on the appliance.
FR
Assistance
! HnKOrIa He o6paIaTecb K HeyNoJHOMOeHHbIM TEXHnKam.
Pn o6paueHm B LcHtp TexHnueckoro ObcIyKnBaHn Hno6xOaMo COo6uNTb:
TnHEnCnpaBHOCTn;
MoIeIb nI3IeIIa (MoI.)
Homep tex. nacnpota (cepuiHbI Ng)
3Tn DaHbIe Bbl HaJeTe Ha nacnpTHoN Ta6nUKe, paCNOJIOXeHHoN Ha 13denn.
UA
Доромora
!3BepTaITeC8 BnKIIIOUHO Do yIIOBHOBAxHeHX φaxiBüIB.
CπiD nobiOmHTn:
Tin HecnpaBHOCTi;
- MoD'enb npuanay (Mod.)
CepiHnH Homep (S/N)
"Low voltage" Directive 2006/95/EC (12-12-2006)
EMC"Directive 2004/108/EC (15-12-2004)
The installation procedure is illustrated in the first pages of this manual.
The installation must be done by a qualified technician.
Electrical hook up
The mains voltage must match that given on the ratings label inside the hood itself. If the hood has a power plug, connect the hood to an easily accessible regulatory power socket. If it does not (direct connection to the mains), or the socket is not easily accessible, install a two-pole regulatory switch to enable total disconnection from the mains in case of category III overvoltage, as required by the installation regulations.
Caution! Always check that the mains cable is hooked up properly and check that it operates correctly before reconnecting the hood to the mains.
Air exhaust (for ducted units)
Connect the hood to a duct and wall exhaust hole of a diameter equal to that of the air outlet flange. Using a smaller diameter tube and exhaust hole reduces the extraction capacity of the hood and also increases its running noise. The manufacturer is not liable for any consequences of doing so.
! Use the shortest duct required to achieve the purpose.
! Use a duct with as few bends as possible
! Avoid suddenly changing the diameter of the duct.
! The duct must have as smooth an inner surface as possible.
! The duct must be made of regulatory material.
! Do not connect the hood to flues carrying combustion fumes from other equipment (boilers, chimneys, stoves, etc.).
! Observe the instructions of the competent authorities in relation to the air exhaust. The air being exhausted may not be exhausted into a wall cavity unless the cavity in question is specifically intended for this purpose.
! Equip the room with air intakes to prevent the hood creating suction pressure in the interior (this must not exceed 0.04 mbar).
! The manufacturer is not liable for any consequences of failure to observe these instructions.
Filter or ducted?
! Your hood is supplied as a ducted unit.
If you wish to use it as a filter unit, you must install the proper ACCESSORY KIT.
Note: If supplied with the hood, the accessory active charcoal filter unit may already be installed.
Instructions for transforming the hood from the ducted to the filter version are given in this manual (see "Filter version").

Ducted version
GB
The hood purifies the air and expels it outdoors via an exhaust duct (dia. 150mm ) connected to its outlet flange. The diameter of the exhaust tube must be equal to that of the outlet flange.
Caution! The exhaust duct is not supplied and must be purchased separately.
When routed horizontally, the tube must be angled slightly upwards (around 10^ ) to enable the air to be conveyed outdoors more easily. If the hood is fitted with charcoal filters, they must first be removed.

Filter version
The hood purifies the air and returns it to the room. This version of the hood requires installation of an accessory active charcoal filter unit.
This version requires an air deflector, a reduction adapter and the charcoal filter/s. The top tube must have its air outlet slots uppermost.
Technical data
| Model | Height (cm) | Width (cm) | Depth (cm) | dia. of exhaust tube (cm) |
| CHIMNEY 60cm | 61-82 | 59.8 | 50 | 15/12 |
| CHIMNEY 90cm | 61-82 | 89.9 | 50 | 15/12 |
| Please check the plate in order to verify the total absorption and the light absorption |
| Power | Voltage | Cap | Dimensions | |
| Halogen 25 W | 2 x 25 W | 230 V | G9 | L40xØ14 |
| Halogen 20 W | 2 x 20 W | 12 V | G4 | L30xØ10 |
| LED* | Risk Group 1 according to Standard EN 62471 |
The model is in accordance with the following EU directives:
Low voltage" Directive 2006/95/EC (12-12-2006)
EMC" Directive 2004/108/EC (15-12-2004)
- UR Reference no. 66/2014 integrating Directive no. 2009/125/EC.
Reference standard:
EN 60704-2-13:2011; EN 60704-3:2006
EN61591:1997;EN61591:1997/A1:2006;EN61591:1997/A2:2011 EN61591:1997/A11:2014
EN 50564:2011
- Only available in certain models
Models with soft button keypad
HNC9.8LBX/HA
HNC6.8ABX/HA
HNC9.8ABX/HA
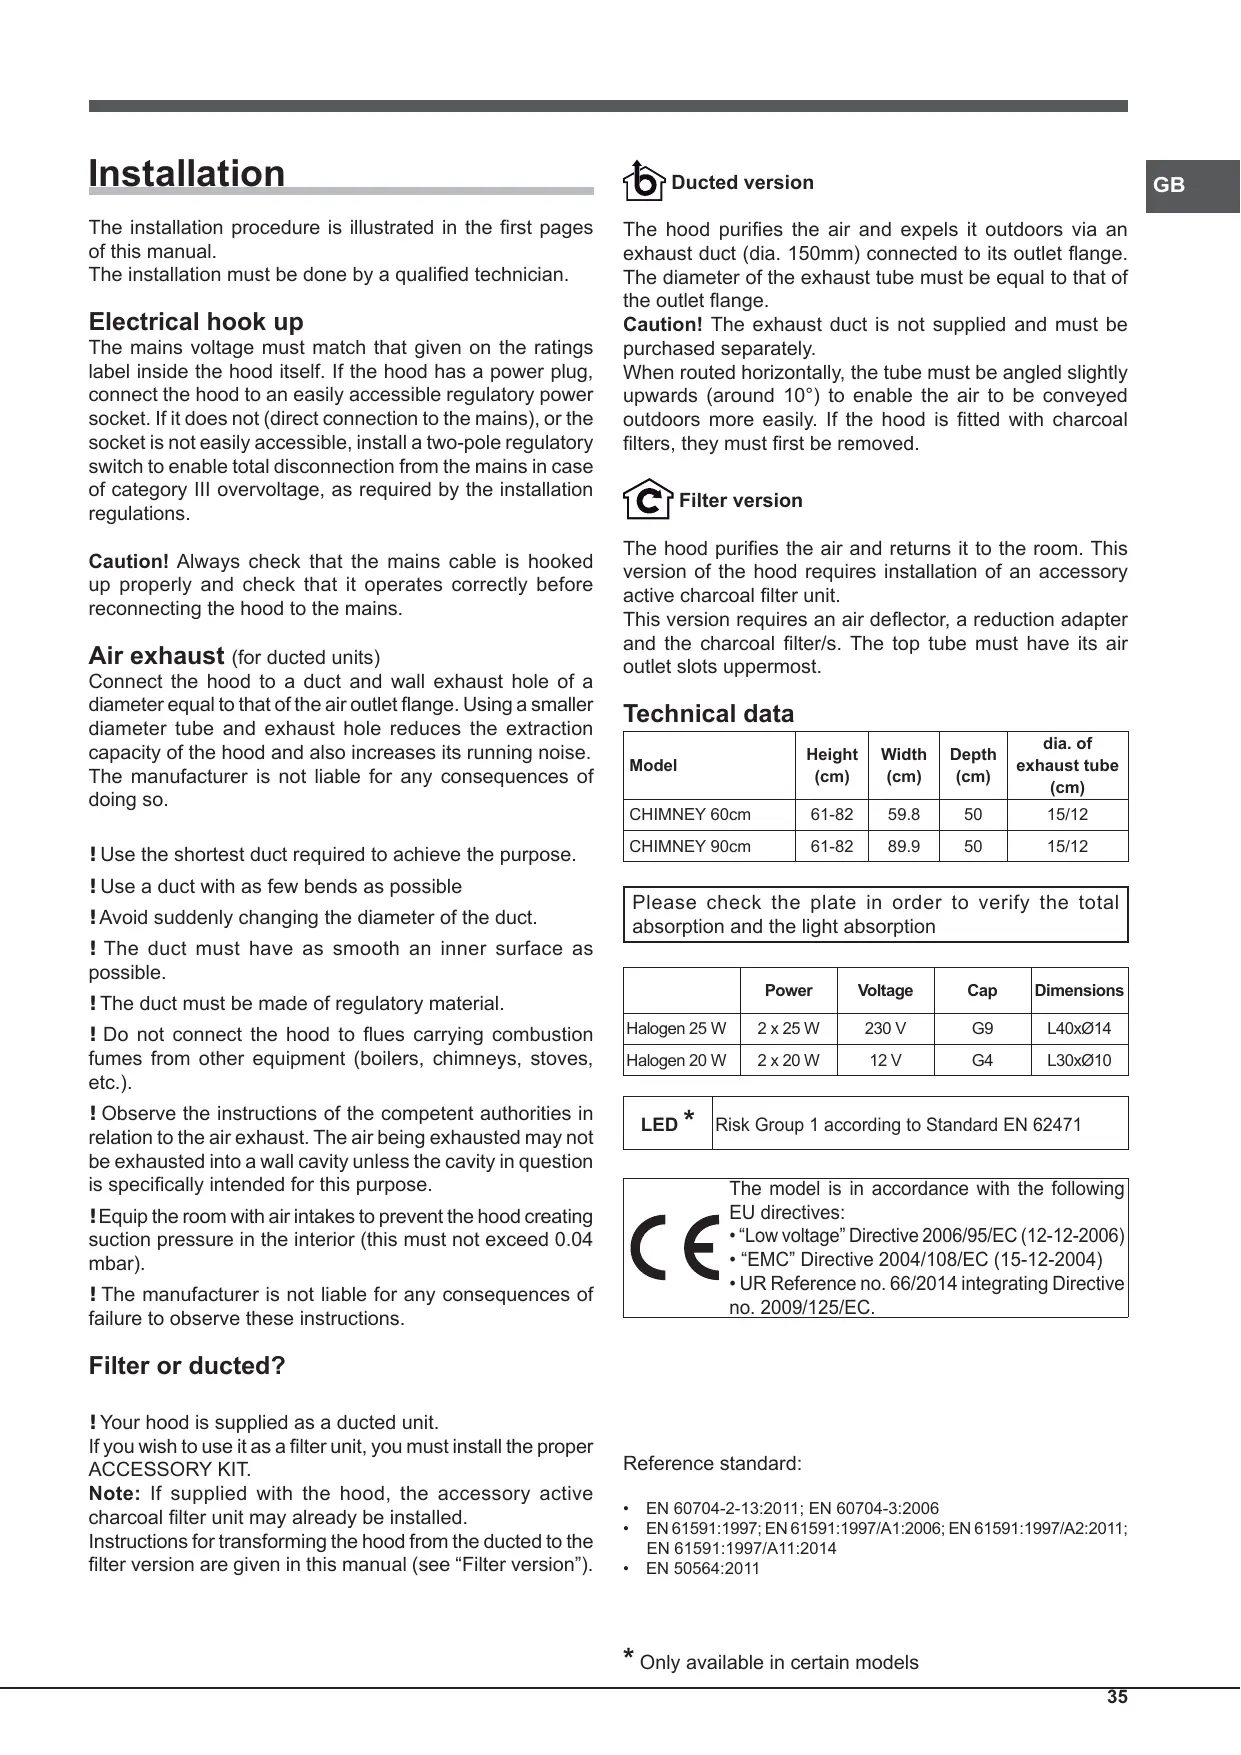
T1 Motor reset
Press the button with the hood off to set speed 1. Pressing the button while the hood is in operation turns it OFF.
T2 Speed 1
Pressing the button sets the hood to speed 1.
T3 Speed 2
Pressing the button sets the hood to speed 2.
T4 Speed 3
Pressing the button sets the hood to speed 3.
T5 Booster
Pressing the button sets the hood to high speed. After 5 minutes, the hood returns to the previous speed; pressing a speed button (T2, T3 or T4) quits booster mode and sets the selected speed.
T6 Lights ON/OFF
Grease/odour filter warnings
The T2 icon flashes to indicate that the grease filter is saturated, while T3 flashes to indicate that the odour filter is saturated, and if both are flashing then both filters are saturated. You must then clean/replace the grease filter (A) or odour filter (B) or both, accordingly (see "Maintenance and care").
To reset the filter counter:
Hold down T5 for three seconds while the hood is on.
The warning led flashes three times, then returns to its normal mode. If both filter warnings are active at the same time, you must reset each separately.
The first sequence resets the grease filter, while the second sequence resets the odour filter.
Hood configuration:
To set the operating mode of the hood, hold down T5 for 6 seconds while the product is off. Icons T2 or T3 will light up to show the type of installation: T2 ventilation, T3 filtering. You can change the type of installation by pressing T4 cyclically.
To save the new configuration press T1 individually.
Maintenance and care
Caution! Before cleaning or servicing the unit, disconnect it from the mains by pulling the power plug or disconnecting the main circuit breaker.
First cleaning
- Remove the protective film
- Clean with a damp sponge and a little neutral soap
- Rinse off with a damp cloth
- Dry with a soft cloth; if the hood is stainless steel, dry along the metal's grain
Periodic cleaning
The hood must be cleaned frequently (at least as often as you service the grease filter), inside and out. Use a damp cloth and a neutral liquid detergent with lukewarm water. Do not use abrasive or corrosive products.
Warning: Failure to observe the hood cleaning and filter cleaning/replacement instructions can result in fires. Follow the instructions carefully. The manufacturer is not liable for any damage to the motor or fires caused by incorrect care or failure to follow the above instructions.
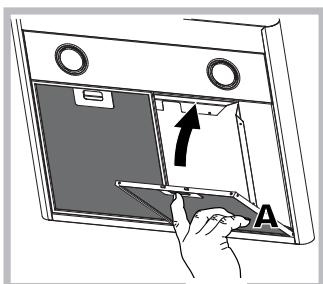
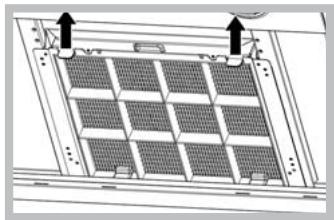
Servicing the grease filter (A)

The grease filter retains the particles of grease produced during cooking; it must be cleaned at least once a month with a non-aggressive detergent, either by hand or with a low temperature, short dishwasher cycle.
To extract the grease filter, pull the spring loaded handle.
If washed in a dishwasher, the metal filter may change colour, but this does not affect its performance.
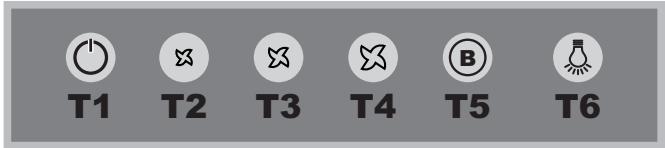
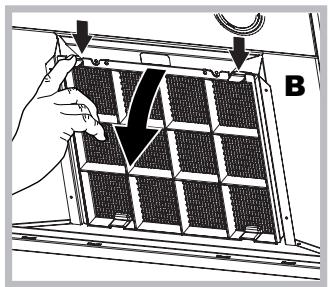
Servicing the charcoal filter (B)
The charcoal filter retains unpleasant cooking odours. The filter saturates after a variable time, depending on the type of cooking and how often the grease filter is cleaned. The cartridge must be replaced at least once every twenty months. This filter can NOT be washed or regenerated
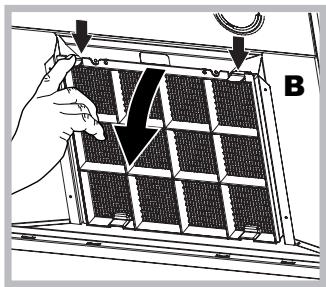
Disassembly: Remove the activated-carbon filter by pressing the two front levers which secure it to the hood.
Assembly: Secure the activated-carbon filter first in the back using the hood's metal tabs and then in the front by pressing the two levers.
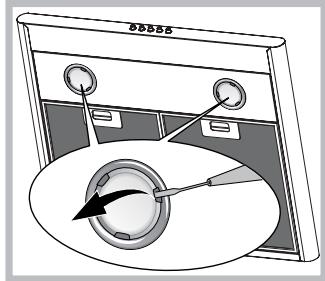
Replacing the bulbs
Disconnect the unit from the mains and remove the grease filter.
Caution! Make sure the bulbs are cool before touching them.
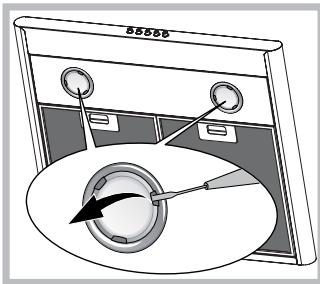
- Extract the guard by prising it out with a small flat head screwdriver or something similar.
-
Replace the faulty bulb. Use only bulbs of the same type (for details, see the technical data in the following manual).
-
Refit the guard (push it in).
Replacing the lights LED *
The hood is fitted with a lighting system based on LED technology. The LEDs ensure optimal lighting, longer life and lower consumption compared with traditional lights. To replace them please contact the assistance service.
Electrical cable
If the power cable is damaged, it can be replaced by the manufacturer or his technical service, to prevent any attendant risks.
SCRAPPING
The unit is marked for conformity with European Directive 2012/19/EC, Waste Electrical and Electronic Equipment (WEEE). By ensuring that the unit is scrapped properly, the user contributes to safeguarding the environment and public health.

The symbol on the product or on its accompanying documents indicates that the product may not be treated as domestic waste but must be handed over to a sorting centre for electrical and electronic waste. Dispose of it in accordance with local waste disposal regulations. For further information on the handling, recovery and recycling of this product, contact the local authority, domestic waste disposal service or the reseller from whom you purchased it
Troubleshooting
If something does not work, make the following simple checks before contacting Technical Service:
If the hood does not operate:
Check that:
the unit is powered up.
- a speed has been set.
If the hood is not working effectively:
Check that:
- the selected motor speed is sufficient to handle the amount of smoke and steam being produced.
- the kitchen is adequately ventilated for the unit to take air in.
- the charcoal filter is not exhausted (filter version).
If the hood turns off during normal operation:
Check that:
the unit is powered up.
- the circuit breaker has not tripped.
In case of faulty operation, before contacting Technical service, first disconnect the machine from the mains for at least 5 seconds by pulling its plug, then reconnect it. If the fault persist, contact Technical Service
Save energy and respect the environment
- Please use the hood by setting the speed in line with the real extraction need; please limit the use of the "intensive speed" feature, if present. Using the hood in a rational way allows you to limit energy consumption and to avoid an useless waste of clean and air-conditioned air.
- Please don't turn on the hood light unless this is needed to light the cooking area.
Installation
Save energy and respect the environment
- Please use the hood by setting the speed in line with the real extraction need; please limit the use of the "intensive speed" feature, if present. Using the hood in a rational way allows you to limit energy consumption and to avoid an useless waste of clean and air-conditioned air.
-
Please don't turn on the hood light unless this is needed to light the cooking area.
-
N'existe que sur certains modèles
Instalación
"Low voltage" Directive 2006/95/EC (12-12-2006)
"EMC" Directive 2004/108/EC (15-12-2004)
EcnBbITaKaHepa6oTaeT:
PpOBepuTb:
HaJIINUe 3JNEKTPoPNTaHnIa
- 6bila li 3aanda h a ckopoocTB.
PnHn3KoN 3ΦΦeKTHBHOCTN BbITJAKK:
PpOBepuTb:
- UTo6bI 3aJaHHa cKOpOCTb DnBraTeJIa 6bIla DoCTaTOHoi IJRA O6bema NcnapeHNI Ndbima.
-Чтобиnomешенькухниименидостаювентляцно ДэвозухOSTABAopa.
He n3HOweHn yroJIbHbIy fUNbTp (fUNbTpuyOuaB BepCnRA BbITaKKn).
Ecnn BbITaKKa BbIKnOuaeTcB npocece pa6oTbI:
IpoBepuTb:
HaJIuHne 3JIeKTpOpiNTaHnIa
He cpa6oTaJI MHOrONoJIIOCHbIX pa3beINHITeJIb.
B clyuae BO3MOXhIx HEnCnpaBnHcTe Npeed Tem, KaK o6patntbca B CepBnC, OTOeDInHnte BbITJxKU npImepHo Ha 5 cek. OT cTeBOrO pHTaHnR, BblHyB lTeNceJIbHyU BnIKy m3 cTeBoi Po3eTKn, 3aTEM BHObI NOdCoEduHnTE. EcnH HeNCpAusbocTh He yCTpaHreTcra, o6patntecb B CepBnc.
BcMoKtYuOua MoNΦikaia
BntaKka Ounzae NOBITpI BnWTOBxye Ioro Ha3OBHiepe3 BiINOBiHN TpybOpOBiD (diametpom 150 MM), kIn 3akpinIeHn Do 3'edHyBaIbHO rO fpaHrO NOIrpMa eBytn EKBBaJIeHTHM diametpy 3'EDHyBaIbHO rKlbz.
YBara! Tpy6a DnB BiDBeHnB BiDnpaCboBaHO NOBITpRe He BXoNTb Do KOMPJIeKTy NocTayAHN I MaE KynyBaTnCS Okpem. Ha rOpN3OHTaBHi NdiHaNci Tpy6a NOBHHa MaTN HeBEniKn HaxNJ Bropy (PnIbN3HO 10^ ),IcnpraE BiDBeEHNO NobITpRa NaOBHI. Jkso BuTjKka ObnadHaHa ByrIbHMnΦIbTpamN,ObOB'3KOBO 3hIMiTb IX.

Φilbtpyua Mondpikaia
Bntjka ouucae nobitpr i nobeptae noro do kimhaTn.
Uo6 BnKopncTOByBatn BnTJk Ky B ciM moNcikaui,
Heo6xIDHO BCTaHOBtN DOaTKOBy CnCTEmy fInbTpauii Ha
OCHOBi AKTNBOBaHOrO ByrInn. Lz MoNcikauiz noTppe6ye
DeΦJIeKTop nobITpr, peDyKtop i ByrInbHni/ ifinbTp/n. Y
BepXHi Tpybi Ma e 6ytN npeE6auehi npopi3n dJa BnPyCKy
NoBITpr, po3TaWOBahi y BepXHi qacTHNI.
TexhiHi daHi
| Мо德尔 | Висota (см) | ШирINA (см) | ГлибиHA (см) | Ø trуби дя Вдеведни Вдпрацьов-Bаногововитray (см) |
| CHIMNEY 60 CM | 61-82 | 59.8 | 50 | 15/12 |
| CHIMNEY 90 CM | 61-82 | 89.9 | 50 | 15/12 |
3araJIbHe CNOxINBaHHe HepriT Ta CNOxINBaHHe Heprii Ha OCbitIeHHHaBeDeHHe Ha TabnUciHa npctpoi.
| notuχnICTb | hanpyra prn | uzokolb | Pozmірі | |
| Галorenна 25 W | 2 x 25 W | 230 V | G9 | L40xØ14 |
| Галorenна 20 W | 2 x 20 W | 12 V | G4 | L30xØ10 |
LED*
TуIMe 6acbIIFAHda copfbl1-ЖblIaMdIbIka opHaTbIaIbI.
T3 KbldAmdbk2
Tумебасылфада copfblu 2-жblamdambkka opHaTBlaIaIbI.
T4 KblJaamdbik 3
TуIMe 6acblfHaHda copfblu3-ksblamdblka opHaTbIaIbI.
T5 KyseuTkiu
Tуиmeбасылганда copfblш когарыЖылдамдikka opHaТылады.5MHHTTah KeiH,copfblsh anDbHfbl Kылдамдikka opaIaIb;Жылдамдik ТуМeci bacIlnca (T2,T3 hemece T4),copfblш KUшЕТКИш ржIMiHeH ShbIFbl, taHdaIraH XылдамдIKtbl OpHaTaNbl.
T6 ⅢamapdbI KOCY/0UHPY
Ma/niic cy3rilepiin h eckepTuJIepi
T2 6eIiueci KblbIbIKTaca, DeMek Ma cy3ric KaHbIKKaH, an T3 6eIiueci KblbIbIKTaca, on nic cy3ricin H KaHbIKKaHbIH biDipei, an ekeyi de KblbIbIKTaca, DeMek eki cy3ri de KaHbIKKaH. Ohdai JkaFdaJa, MaJ cy3ricin (A) a nic cy3ricin (B) Hemece ekeyi De ta3aay/aybictby KaKet («TexHnKaIbIK Kbl3MeT KepCETy XaHe KYTim KepCETy» 6eImiH kapaHbI3).
Cy3ri caHaftbIbH KaIbHa KeItripy:
CopfblkocbltnyprhanKe3ne,T5Tymecin6acbln,yUckyHd yCTan typbHbI3.
EckepTy dnoDbI yw pet XbInbIbIKTaIdbI da, KaIbINTbl peKIMre opalaDbI.
Bip yaKbTTa cy3ri eckepTynepiH ekeyi De KocblIca, onapdbH apKaaicbIcbH 6eNEk KaIIbHa KeNTipy KepeK.
Anbimem Man cy3rici, OaH KeiH ic cy3rici KaIbHa KeItipinei.
Copfbii KOHcHpyauncaB:
Copfbltih kymbic peximin opnaty yuiin eHIM euiin TyprAh Ke3de T4 tymecin 6acbin, 6 cekyn yctan typbHbI3. Opaty TypiH Kepcety yuiH T2 He T3 6enriwepej xHaadbl: T2 -KeJdety, T3-cy3y.
T4 Tymecin Kaia-Ta-Kaia Ta 6acbIn, opHaTy TypiH e3reptyRe 6oanaBl.
KaHa KOHpUpaunHbI caTay ywiH T1 TYMeciH XeKe 6acblb3.
TexHnKaJIbIk KbI3MeT KOpCeTy JxHe KyTim KOpCeTy
A6aB 60nbHb3! KypblfbiHbTa3aJamaC Hemece orah Kbl3MeT Kepcetnec 6ypbIH, KyaT aibipbH aftTy a Heri3ri aibpbl KockblwTbI aXkbipaTy apKblb OHbl TOKTaH aftTy KepeK.
Anfawkbi Ta3anay
Koprafbiu ynpdi wein anbHb3
A3fHa 6eHapan ca6bIH KocBIn,dbIMKbln rY6KaMeH Ta3aJNaHbI3
-ДыIMьлшуберекпеншаиньИьз
KymcaKy6epeKeHcypTin, KypTaBih3; copfbltOT 6acnauTBH 60JatTAH XacaJFaH 6oNca, TeKctypa60nbIMeH KypTaBih3
Kyueni Ta3anay
Copfblthin iMi MeH cbiptbH Kni Ta3aIan Tpy KaKet (KeM DereHne, MaCy3rici H aybICTbIPFaH Ke3depe).DbIMKbl Ny6epeK neH 6eIapan cyBik Kxyfbl 3aT KocblJFaH Kblbl Cy KOJaHaBhl3.
KbipfblH Hemece TOTbIKTbIPfbl 3aTTapbl naIdaIaN6aHbI3.
Eckepty: Copfbltbl Ta3anay Xhe cy3rinepdi Ta3anay/ aybICTbpy Hcckaynapbl opbIHdIaMaca, ePT bIBybl MymKiH. Hcckaynapbl 6yJXbITnai opbIHdaHbI3. ΘHdipywi MOTopfa KeIreH 3aKbIMdApra Hemece dypbc Kytim Jxacamay J xofapbl Daftbl Hcckaynapbl opbIHdAmay caIapblHaH sbIKKaH eptKe kayantbl 6OImaIbl.
MaCy3ricHe KbI3MeT KepCety (A)
MaCy3rici TaFamniciprenKe3de 乌fTaBn Ma6bIeUeKTepeiN yCTaNbl; OHbl KEM DeReHDe aBHa bip pet, AICI3 Kyfbll 3aTneh KOImEH HeMeCE TEmEH TemNepaTypaBlbKbICKa bIDbc Kyfbll ZIKNbIMeH Ta3aJaly Kepek.
MaCy3ricin WbIrapbn any ywH cepinneni TTKaHbI
TapbIbI3. bIbIC KxyfblTa JxbyIICA, MetaII Cy3rIH Tyci e3repyIMykIH, biPak OHbIH KymbICbHa HkycaH KeImeNi.
Kemip cy3rire Kbi3MeT Kepcety (B)
Kemip cy3rici Kafbimcb3 TaFam nicipy niCTepiH yctaIdbI. Cy3ri nicipinetih TaFam TypHe KAne Mei Cy3rici H ta3aJAY kInirire He 6aIIaNaHbIcTbI ap TpyJI KNIINIKNEH KaHbIFbIN OTbIPAdbI. KapTpndx
Kem DeereHde XnBipMa aIa6ip pet aybICTbIpyblTnic. Bycn cy3riHi JyyFa Hemece kaJIbHa KeJItpyre 60MaJdbI
BeniwekeTey: CopbIuka 6ekirin TypaTBn aIdbHfbl Eki nIHipeKti bacIn, 6encehdipilreh Kemip cy3ricn Wewin aIbHb3.
KypacTbipy: BeceHdpinreH KEmip cy3rici H aIdbImeH copfbltblapTkblXaftbHaFbl MeTann TiIndepH, Oan H KeiH aIdbHfbl XaftbHaFbl eKi iINTipeKtiH Kemerim H bekitiH3.
Uamdaapdbaybictbipy
KypblfblHb TOKTah afbltbn, MaCy3ricH weWIn aNbHb3.
A6aB60JIbHbI3!YCTamac6ypbH, WAMdapCaIKbIHdaFaHbHa
Ke3 KeTki3iH3.
1.CaKaTahDbipfbIbIbIbIbIapBIn anbHbI3: KiUkeHe teric 6actbI bypaftiuneh HeMece OfAH yKcac KypaIme HbIFapbIHbI3.
2. AkaynbI wamdbI aybICTbIPbIH3. Typi bipneI waMapdbI fana KOndaHbIH3 (mJImET any ywiH, TeMeHderi HcyckaylbkTa bepiireh TexnkaJIbIK depeKti kapaHbI3).
3. CaKaThHbIbIbIbI bIbI opHbHa opHaTbIHbI3 (ntepin, opHaTbIHbI3).
ShamapdbaybictbypLED\*
Copfblta dnoT texHONORncaHa heri3JeIreH KapbIKTaHbpy Knyeci bap. NIOdTap aTeTTeri waMdpra KaparaHda OHtai JbI JapbIKTaHdbIpYdbI, y3aFbipak Kymblc icTeydi XHe a3bipak Kyat naJaIaNHydbI KaMTamacbl3 etedi. Onapbl aybICTbpy yuiH KEmek KepceTy KbImetiHe xaabpIacbl3.
3nektkabéji
Kyat ka6eni 3aKbIMdaIca, TayeKeIepeDiH anDbH any yuH OHbl eHdipyWIRE Hemece OHbH TexHkAJIbIK KbI3MeTiHe aybICTbIPTyfa 60JaBl.
KOKBICKA TACTAY
BvI Kpyblfbl KoKbIc 3JneKtp JxHe 3JneKtpoHdbIk JxAbIbIKKa (WEEE) KaTbIcTbI EC/2012/19 EyponaJIbIK DnpeKTNbAcbHa
caKeC KeIeI den 6enrIJIeHreH. Kypblfbl KOkbicka dYpbic TaCTaIybl KaMTaMaCbI3 eTy apKbIbn NaJdaJaHyuBk KopShaHaH opta MeH KofaMHbIH DeHCayNbIFbH KopFayfa at CaIbICAbl.

ΘHIMDiI HEMeCE OHbIH KγKaTTaMaCbIHDaIbI TaHbAcbl ΘHIMDi TYPbMICTbIK KObIC TactaImaybl, OHbIH OPhbHa 3JIeKTP JxHe 3JIeKTPoHDbIK KObICTbl CypblTAY OptaJIbIFbHa Ta6bCTaIybl Tnic eKeHIN biDipei. JKeprilKiTkoKbIC Tactay 3aHdapbHa cAnkec apeket etiH3. ΘHIMDi KONdaHy, KaIIbHa KeNTipy XeHe KaTa ΚHDeY TypaBl KoCbIMwa MAnimet any ywiH JxepriKiTI Kγ3bIPnbl OpraHdapra, KOkBiC XInHay KbI3MeTI He HEMeCE ΘHIMDi CaTbIN aIfAH OpblHFa xaBapNaCbIHbI3.
AkaayIbIKTapdbI JxOIO
KyMbic icTeMei KaJca, TexHnKaIbIK KbI3Met Kepcety optaHbHa xa6apnaacnac 6ypbIH TeMeHderi KaapanaBIM KaFdaanapdbI TekcepH3:
Copfbiiu xmbic icTeMece:
KeNeci KaFdaIaIapDbI TeKcepHiz3:
Kypblfbl KocblbnTyp.
- XbIJaMdBk OPhaTbINFaH.
Copfbiu TImdi xMyblic icTeMece:
KeNeci KaFdaIaIapDbI TeKcepHiz3:
TaHdaIHaH MOTOp KbIJaMdbIbI IbIKKaH TYTih MeH 6y KeJIemIH eHdeYre xeTKJIikTi.
KpybIyIaayaanyiYuH ac ynde Tnicti BeHTnlaqna 6ap.
Kemip cy3ri KaHBiKnFaHaC (Cy3y Hcckacbl).
Kymbc icten Typran Ke3ne, copbuiw ewin KaiaTbIH 6oIca:
KeNeci KaFdaIaIapDbI TeKcepH3:
KypblfblKocblbnTyp.
aBipbIKCKblIJKCobImaFaH.
AkaYbI JyMbIC icTeReH XaFdaaJa, TexHnKaIbIK KbI3MET KepcTeTy opTaIbIFbIHa xaabapnacnac 6ypbIH, aIbIPbIH aftTy apKblbl KpyblfbiTOKtaH KEM dereHde 5 ceKyHdka aftbIbIN, KaTaN KocbIHbI3. AkaybIK WseWJmMece, TexHnKaIbIK KbI3MET KepcTeTy opTaIbIFbIHa xaabapnacbIHbI3.
3KOHOMbTe 3HeprnIO n 6bepernte okpykaioyu cpeNy
- IcnojIb3yIte BbITJxKky, yCTaHaBnIBaR cKOpocTb B COOTBeTCTBnC peaJIbHbIMN NOTpe6HOCTaM; ORpaHnuBaIte NCNoJIb3OBAHne 0yHKUIN «NOBbIWeHHaR cKOpocTb》(“intensive speed”)prn HaIuyn TaKOBo. IcnoJIb3OBAHne BbITJxKKn paUHOHaNbHbIM Cnocobom No3BOJnEe TOrpaHnuBaTb NOTpe6JeHne 3Heprn N n36eRaTb BeCNoJe3HOJ TpaTbI YnCTOrO IN KOHNIOHINPOBaHHO BO3dyxa.
- He BkIIOuAte OcBeUeHne BbITaKn, KpOme ClyuaeB, KOrda 3To Heo6XoDnMo dJIa OCBeUeHnBaPouHoi NobepxHOCTn.
KZ
KZ
Indesit Company S.P.A.
Viale Aristide Merloni,47
60044 Fabriano (AN)
www.hotpoint.eu