
BS 1600E - Multi-cooker GORENJE - Free user manual and instructions
Find the device manual for free BS 1600E GORENJE in PDF.


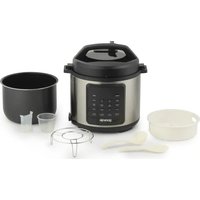
| Product Type | Multi-cooker |
| Brand | Gorenje |
| Model | BS 1600E |
| Capacity | 5 liters |
| Power Consumption | 900 W |
| Voltage | 220-240 V, 50/60 Hz |
| Dimensions (W x D x H) | 30 x 30 x 30 cm |
| Weight | 4.5 kg |
| Functions | Pressure cooking, slow cooking, rice cooking, steaming, sautéing, warming |
| Control Type | Electronic with LED display and buttons |
| Inner Pot Material | Non-stick coated aluminum |
| Safety Features | Overheat protection, pressure release valve, lid lock safety, automatic shut-off |
| Cleaning and Maintenance | Remove inner pot and wash with mild detergent; wipe exterior with damp cloth; clean lid and valve after each use |
| Spare Parts Availability | Inner pot, gasket, steam basket, measuring cup, rice paddle available from Gorenje service |
| Repairability | Modular design; some parts user-replaceable; professional repair advised for electrical faults |
| Warranty | 2 years |
| Certifications | CE, RoHS |
Frequently Asked Questions - BS 1600E GORENJE
User questions about BS 1600E GORENJE
0 question about this device. Answer the ones you know or ask your own.
Ask a new question about this device
Download the instructions for your Multi-cooker in PDF format for free! Find your manual BS 1600E - GORENJE and take your electronic device back in hand. On this page are published all the documents necessary for the use of your device. BS 1600E by GORENJE.
USER MANUAL BS 1600E GORENJE
SL Instructions for Use ....2
- Measuring cup
- Lid
- Glass jug
- Mixing unit
- On/Off switch
- Mixing control switch
- Display
- Cooking time setting switches
- Rapid heating switch
- Mixing control knob
- Simmer switch
- Slow heating switch
- Indicator light
Important
Before using the device, read and study the user manual with instructions for use in detail, and keep it for possible later use.

Never touch surfaces marked with the symbol. During operation, surfaces marked with this symbol become hotter, there is a risk of burns. Do not allow anyone to linger near the device.
Danger
Insert the measuring cup into the opening on the cover, so that the handle of the cup is aligned with the handle of the glass jug.
Cover
Assemble the jug cover as shown in the figures.
Mixing unit

Figure 1 Figure 2

Figure 3
- Measuring cup
- Lid
- Glass jug
- Mixing unit
- On/off switch
- Mixing control switch
- Screen
- Cooking time control switches
- Rapid heating switch
- Mixing control button
- Simmering switch
- Slow heating switch
- Indicator light
Important
Before using the appliance, read and study the user manual with instructions for use in detail, and keep it for future reference.
Never touch surfaces marked with this symbol. During operation, surfaces of the appliance marked with this symbol become very hot, so there is a risk of burns. Do not allow children to stay near the appliance.
Danger
Insert the measuring cup into the opening on the lid, so that the handle of the cup is aligned with the handle of the glass jug.
Lid
Figure 1 Figure 2
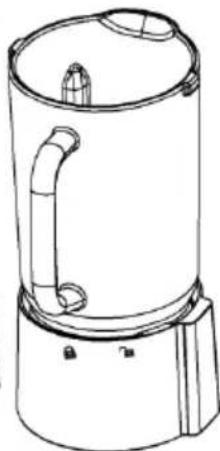
Figure 3
Place the glass jug onto the blending unit as shown in Figure 1. Align the handle of the jug with the open lock symbol on the blending unit. Once the jug is in place, turn it as shown in Figure 2. When the handle of the glass jug is aligned with the closed lock symbol on the blending unit, the glass jug is correctly positioned.
Motor unit

Place the blending unit as shown in Figure 1. The open lock symbol on the blending unit must be aligned with the arrow on the motor unit. Once the blending unit is in place, turn it as shown in Figure 2. When the closed lock symbol on the blending unit is aligned with the arrow on the motor unit, the appliance is ready for use. To disassemble the appliance, follow the steps in reverse order.
Using the appliance
Figure 1

Figure 2

Figure 3
Figure 1

Figure 2

Figure 3
- Measuring cup
- Lid
- Glass jug
- Blender unit
- On/off switch
- Blender switch
- Display
- Cooking timer switch
- Rapid heating switch
- Blender control knob
- Simmering switch
- Slow cooking switch
- Control light
Important
Before using the appliance for the first time, carefully read this instruction manual and save it for future reference.

Never touch the surfaces labelled with this symbol. These surfaces become very hot during operation. Risk of burning. Keep children away.
Danger
Do not immerse the unit with the motor in water and do not wash it under running water.
Warning
Before connecting the appliance to the power mains, make sure the voltage specified on the bottom of the appliance matches the voltage of the power mains in your home. If the power cord is damaged, it may only be replaced by Gorenje, Gorenje's authorized service and repair center, or an adequately trained professional. Do not use the appliance if the plug, power cord, or any other component is damaged. The appliance should not be used by children or persons with impaired physical or psychological skills, or persons with lacking experience and knowledge, unless such persons are supervised or advised by a person responsible for their safety. Do not let children play with the appliance. If the motor stops rotating during operation, switch off the appliance and disconnect it from the power mains for at least 30 seconds. After this time, switch on the appliance and try blending again. Do not connect the appliance to an external timer or a remote control system.
This equipment is labelled in compliance with the European Directive 2002/96/EC on waste electric and electronic equipment – WEEE. The Directive specifies the requirements for collection and management of waste electric and electronic equipment effective in the entire European Union.
Caution
Place the appliance on a level and stable surface. The appliance is intended solely for household use. Only use the appliance indoors. Do not use accessories or parts by other manufacturers, which are not expressly recommended by Gorenje. In case of use of such
attachments or accessories, the warranty shall be void.
Preparation for use
Before using the appliance for the first time, wash the jug and its lid in warm water with some detergent. Rinse the jug and dry thoroughly. The blender operates very quickly. The motor drives the blender/blade at a very high speed so that the food is thoroughly chopped or ground. Make sure the blender is always placed on a straight, clean and dry surface during operation. Before switching on the appliance, make sure the jug is installed firmly on the motor housing.
Assembling and disassembling the appliance
Measuring cup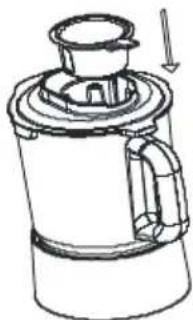
Place the measuring cup into the opening in the lid, so that the cup's handle is aligned with the glass jug handle.
Lid
Insert the lid as shown in the figures.

Figure 1 Figure 2 Figure 3
Insert the blade as shown in figure 1 and figure 2. First, insert the square part. Then, gently lower the blade into the bed.
Insert the seal/gasket as shown in Figure 3. Before installing the seal, inspect it and replace it if you observe any damage.
For a better seal, the gasket should be slightly moist.
Glass jug
Place the glass jug into the blender unit as shown in Figure 1. The jug handle should be flush with the open lock sign on the blender unit. When the jug is inserted, rotate it as shown in Figure 2. When the glass jug handle is flush with the closed lock sign on the blender unit, the glass jug is in place.
Motor unit

Figure 1

Figure 2

Figure 3
Insert the motor unit as shown in Figure 1. The open lock symbol on the blender unit should be aligned with the arrow on the motor unit. When the blender unit is installed, rotate it as shown in Figure 2. When the closed lock symbol on the blender unit is aligned with the arrow on the motor unit, the appliance is ready for operation.
Observe the reverse order to disassemble.
Using the appliance
Using the appliance as a blender
Switch on the appliance by pressing the on/off switch (5). When the appliance is switched on, the control light (15) will light up.
Place the food to be blended into the glass jug. Use the volume markings on the jug for guidance. Never exceed the 1,750 ml marking to prevent the liquid splashing or flowing over the brim during the blending process. Close the jug with the lid and the measuring cup.
ATTENTION: The appliance should not operate continuously for more than 60 seconds. Never switch on the appliance when it is empty.
Turn the blender control knob (10) to any level for a few seconds. Switch off the appliance and check the food. Blending is a rapid process. Make sure not to over-process the food.
Use the "P" setting (pulse operation) for better control when blending for a very short time. The blender control knob (10) has to be held in the "P" position. As soon as you release the blender control knob (10), the appliance operation will stop. Use the "P" position to avoid over-processing the food.
If you wish to add ingredients during the blending process, remove the measuring cup (1) and add them through the opening in the lid.
DO NOT USE THE APPLIANCE if the lid is not properly placed.
Using the appliance as a cooker
Switch on the appliance by pressing the on/off switch (5). When the appliance is switched on, the control light (15) will light up.
Place the food to be cooked into the glass jug.
Use the volume markings on the jug for guidance. Never exceed the 1,400 ml marking to prevent the liquid splashing or flowing over the brim during the cooking process. Close the jug with the lid and the measuring cup.
Press the "+" or "-" button to set the desired cooking time.
Press the "SIMMER/SAUTÉ", "LOW" or "HIGH" to set the cooking temperature, and start the program.
The "SIMMER/SAUTÉ" program is intended for reheating or sautéing. It heats up the food to a temperature of 80–85 °C.
The "LOW" program is intended for slow cooking. The ingredients are heated up more slowly and the food cooks by simmering.
The "HIGH" program is intended for rapid cooking. The ingredients are heated up faster. The boil is more intensive. After 20 minutes of intensive boil, the temperature automatically drops and cooking continues at a lower temperature.
During cooking, the temperature can be adjusted by pressing the "SIMMER/SAUTÉ", "LOW", or "HIGH" buttons. Moreover, cooking time can be extended or shortened by pressing the "+" or "-" key, respectively.
To blend the ingredients during cooking, use the "STIR" button.
The appliance will signal the end of the cooking process with six short beeps and automatically switch to "keep warm" mode. In the "keep warm" mode, the control light (15) is lit in white. In the "keep warm" mode, ingredients can be stirred or blended using the "STIR" button.
The appliance can stay in the "keep warm" mode for a maximum time of 40 minutes. After this time, the appliance is switched off.
ATTENTION: For your safety, the blender control knob (10) cannot be operated while the appliance is used as a cooker.
To end the cooking process, press the on/off switch (5).
Example: cooking zucchini soup:
Place butter into the appliance.
Press the on/off switch (5) to switch on the appliance.
Press the "+" or "-" button to set the desired cooking time.
Set the cooking temperature to "LOW".
When the butter melts, add onions. Press the "STIR" button to chop it.
When the onions turn translucent, add sliced or cubed zucchini and stock. Make sure the total amount of food in the jug does not exceed 1,400 ml.
Set the cooking temperature to "HIGH" and use "+" or "-" to set the desired cooking time.
Season the soup to taste.
Two minutes before the end of the cooking process, add cooking cream (heavy cream) and press the "STIR" button to blend the soup.
Cleaning
Disassemble the appliance as described in the section "Assembling and Disassembling the Appliance".
After use, wash the measuring cup, the lid, the glass jug, and the blender unit in warm water with some detergent.
Thoroughly dry all parts before storing them. Do not wash these parts in a dishwasher.
Powder cleaners and abrasive sponges may damage the surface or some parts. To remove stubborn stains, soak the part in water and then clean it with a soft cloth and a mild detergent.
NOTE: Never immerse the motor unit into any liquid (fluid).
To clean the motor housing, use a damp cloth. Wait for it to dry thoroughly before using again or storing.
Observe the following tips to extend the useful life of the appliance:
Always use the appliance on a level and dry surface.
Make sure the lid is always in place during blending.
Always switch off the blender before scraping the food from the walls of the jug. Use a spatula or a scraper with a long handle.
Before switching on the appliance, make sure it is not empty. If the appliance is operating when there is nothing in it, the blender bearings or blades may be damaged.
Do not process raw meat with the blender.
Make sure the contents of the jug are not too thick or too heavy for the motor. If you suspect the load on the motor is too heavy, add some liquid thorough the opening in the lid or stop the appliance and use a soft spatula to scrape the food from the jug walls towards the blade.
Please DO NOT use the jug to store food or beverages.
Storage
Store the appliance in a safe and dry place.
Environment
After the expiry of its useful life, do not discard the appliance with common household waste. Take it to an authorized recycling center. This will help preserve the environment.
Warranty and repair
For more information or in case of problems, please contact the Gorenje Call Center in your country (phone number listed in the International Warranty Sheet). If there is no such center in your country, please contact the local Gorenje dealer or Gorenje's small domestic appliance department.
For personal use only!
GORENJE WISHES YOU A LOT OF PLEASURE IN USING YOUR APPLIANCE.
We reserve the right to modifications.
General description
- Figure
- Figure

Figure 3
- Figure

- Figure

- Figure
- Figure

- Figure

Figure 1 Figure 2

Figure 3
Figure 1

Figure 2
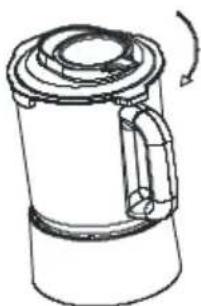
Figure 3
Figure 2

Figure 3
Figure 1

Figure 2

Figure 3
Fig. 1 Fig. 2

Fig. 3

- IMPORTANT
- DANGER
- MOTOR UNIT
- USING THE APPLIANCE
- WARNING
- CAUTION
- PREPARATION FOR USE
- ASSEMBLING AND DISASSEMBLING THE APPLIANCE
- USING THE APPLIANCE AS A BLENDER
- USING THE APPLIANCE AS A COOKER
- CLEANING
- STORAGE
- ENVIRONMENT
- WARRANTY AND REPAIR
- GORENJE WISHES YOU A LOT OF PLEASURE IN USING YOUR APPLIANCE
Brand : GORENJE
Model : BS 1600E
Category : Multi-cooker