
SEC-ALARM200 - Alarm bell KONIG - Free user manual and instructions
Find the device manual for free SEC-ALARM200 KONIG in PDF.


| Product type | Alarm sounder for security system |
| Brand | Konig |
| Model | SEC-ALARM200 |
| Dimensions | 120 x 80 x 30 mm |
| Weight | 150 g |
| Power supply | 12V DC (AC adapter included) or 9V batteries |
| Main functions | Loud alarm sound (90 dB), indicator light, silent mode, function test |
| Usage | Indoor only |
| Maintenance and cleaning | Clean with a soft, dry cloth. Do not use harsh products. |
| Safety | Respect polarity when connecting. Do not open the housing. |
| Spare parts and repairability | Not user-serviceable. Contact Konig after-sales service. |
| General information | Compatible with most alarm control panels. Wall mounting possible. |
Frequently Asked Questions - SEC-ALARM200 KONIG
User questions about SEC-ALARM200 KONIG
0 question about this device. Answer the ones you know or ask your own.
Ask a new question about this device
Download the instructions for your Alarm bell in PDF format for free! Find your manual SEC-ALARM200 - KONIG and take your electronic device back in hand. On this page are published all the documents necessary for the use of your device. SEC-ALARM200 by KONIG.
USER MANUAL SEC-ALARM200 KONIG
SEC-ALARM200

MANUAL (p. 2) WIRELESS ALARM SYSTEM
MODE D'EMPLOI (p. 10) SYSTÈME D'ALARME SANS FIL
MANUALE (p. 18) SISTEMA D'ALLARME SENZA FILI
MANUAL (p. 27) SISTEMA DE ALARME SEM FIOS
Alert – Advises you to what is happening around the house.
Alarm – Protects your home / assets while you are away.
Communication – Calls you during an emergency, you can also call in to perform a variety of operations.
This Quick Guide will show you how to setup the system and use basic functions. It is strongly recommended that you refer to the User's Instructions for full illustrations on how the system should be installed and operated.
Installation of the Control Panel
-
Plug in the adapter to a wall socket and the other end should be connected to the socket on the Control Panel marked "DC 12 V". You should hear 3 beeps.
-
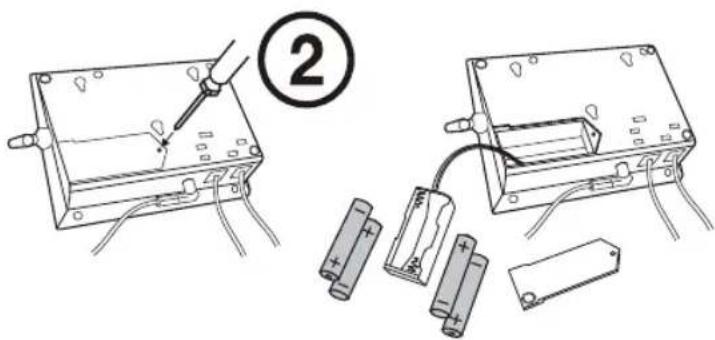
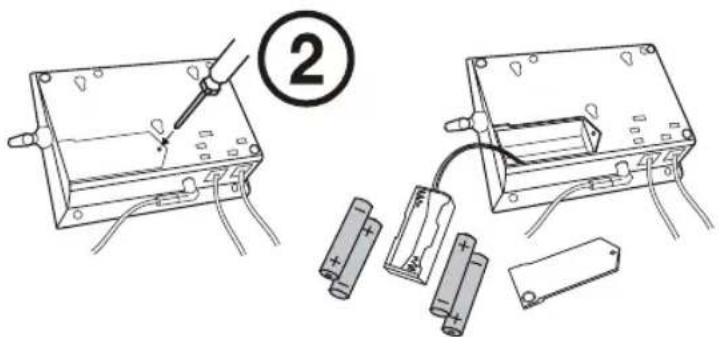
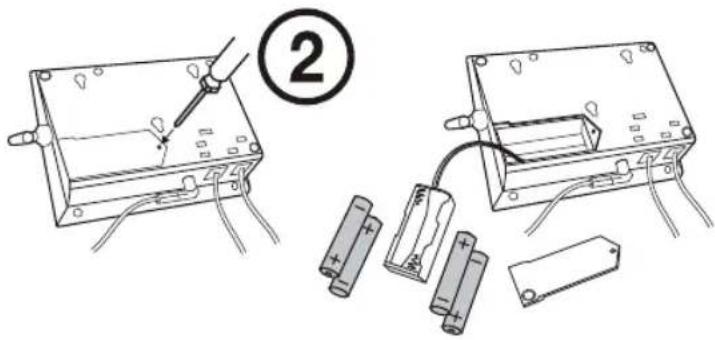
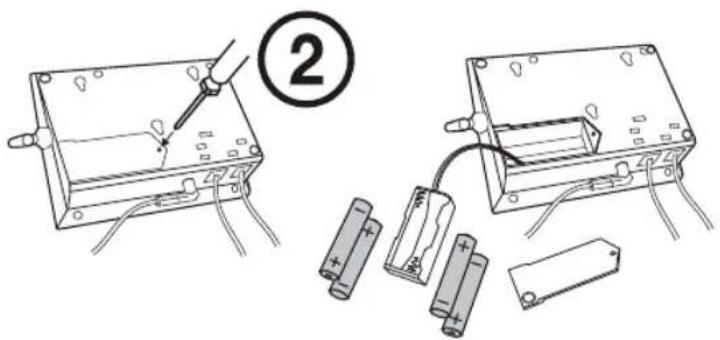
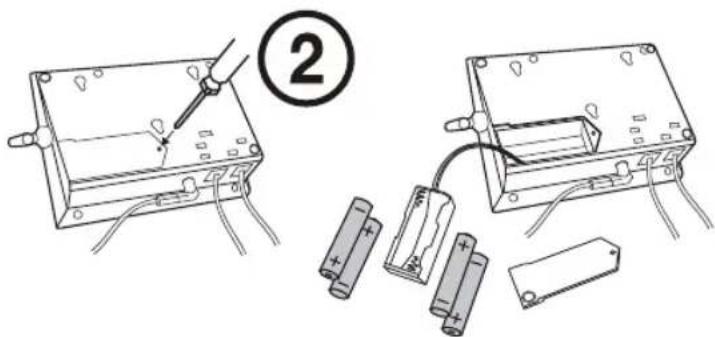
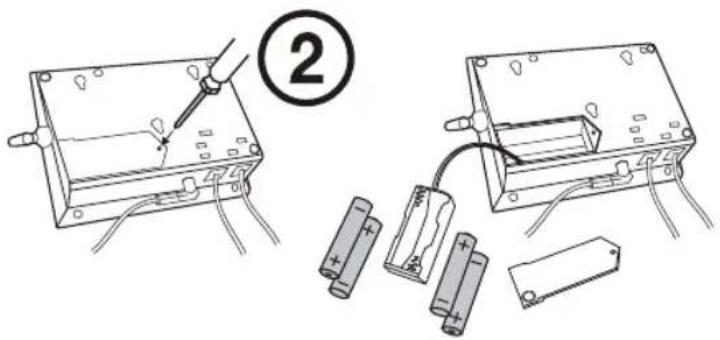
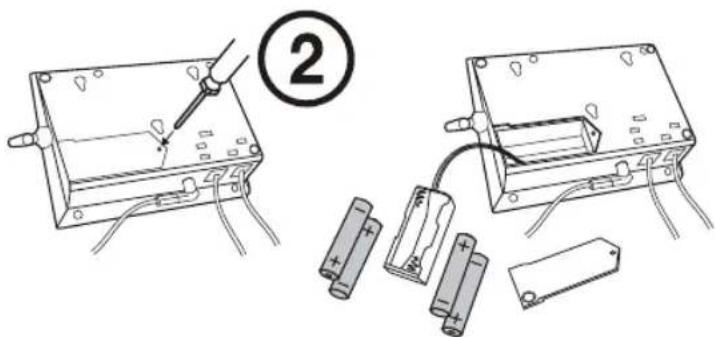
Remove the screw on the battery cover and insert 4 pcs of AAA batteries into the battery holder. Tighten the screw afterwards.
-
Plug in a phone line from the "LINE" socket to the phone outlet on the wall.
-
If you want to connect a telephone to the Control Panel, the phone can be plugged into the socket marked "PHONE" on the Control Panel.

Installation of Sensors - Batteries
Insert batteries in all the sensors and mount them accordingly. Please refer to the User's Instructions for details on how to install the Motion Sensor and Door / Window Sensor.

Remove the yellow protective tag from the sensors.

Insert 9V alkaline battery in the sensor
Operation - Alert Mode
All the sensors are preprogrammed at the factory, so the Control Panel can communicate with these sensors after the batteries are installed properly.
Door/Window Sensor
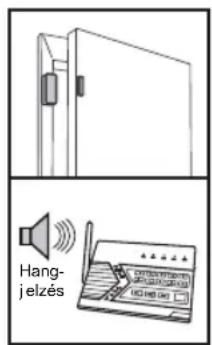
Activate the Door / Window Sensor, you will hear continuous beeping, one beep at a time, indicating zone 1 sensor is activated. Activate the other Door / Window Sensor, you will hear continuous beeping, two beeps at a time, indicating zone 2 sensor is activated.
Notes: The door/Window Sensor is factory default in zone 1 and zone 2.
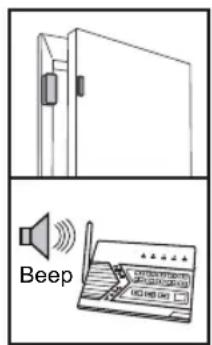

Activate the sensor by opening the door, you will hear voice announcement and continuous beeping.
Close the door, and beeping stop.
Motion Sensor
To perform the walk test, its necessary to enable the Alert Zone (Bypass Zone) feature in the Control Panel. After the walk test, it needs to disable this alert zone feature otherwise it will bypass the signal in the alarm mode.
To enable the alert zone feature:
- Press [PROG] + MPIN [factory default 1 2 3 4].
- Press [8] to select Alert Zone.
- Press [8] to enable for zone 3. The zone 3 LED will stay ON after selected.
- Press [PROG] when finished.

Walk in front of the Motion Sensor, you will hear the continuous beeping from the Control Panel. Beeping will continue for approx. 20 seconds for every motion detected.
To disable the alert zone feature:
- Press [PROG] + MPIN [factory default 1 2 3 4].
- Press [8] to select Alert Zone.
- Press [3] to disable for zone 3. The zone 3 LED will flash after selected.
- Press [PROG] when finished.
Notes:
1) The Motion Sensor is factory default in zone 3.
2) If the Motion Sensor doesn't respond to your movement, try not to move in front of the sensor for 20 seconds (i.e. no motion is detected in 20 seconds), then walk again. The Motion Sensor is designed to be triggered only if no motion is detected for 20 seconds.
Program Emergency Phone Number
During an emergency, the Control Panel can call up to 5 phone numbers to inform you about an emergency situation. There are 5 phone memories, it will first call phone memory 1, then phone memory 2, etc. It will call phone memory 5 last. Each phone number can have a redial count up to
9 times, and the emergency voice message can be repeated up to 9 times. To program phone numbers, follow the procedures below.
| Function | Key | Description |
| Enter program mode by MPIN [PROG] [MPIN] | ||
| Select program phone numbers [1] | ||
| Select phone memory [1] to [5] | ||
| Enter the phone number, then [Arm] [Phone] | Number] [Arm] Phone number | |
| Enter redial count, then [Arm] [1] to [9] [Arm] | ||
| Enter message repeat count, then [Arm] [1] to [9] [Arm] |
Note: Do not program police, or fire station phone numbers into any of the phone memories.
Operation - Alarm
Arm
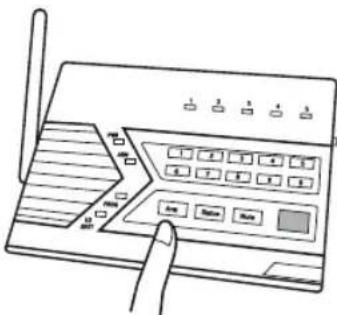
You should arm the Control Panel if you are the last person to leave the house. To arm, press [Arm], Control Panel will beep for 45 seconds, this is called the exit delay. You must leave the house within 45 seconds.
Note: Control Panel can only be armed when no sensor is triggered. Triggered sensors must be deactivated in order to successfully arm the system.
Disarm
If you are the first one to enter the house with the Control Panel armed, you must disarm it within the entry delay period of 30 seconds, otherwise the alarm will sound. To disarm, enter the 4-digit password, either the master password or secondary password.
Default Master Password: 1234
Default Secondary Password: 0000
Note: It is strongly recommended that you change both master and secondary passwords from the default value. Please refer to the User's Instructions for details.
Panic
During an emergency, any user can activate the alarm immediately by pressing the red panic button. When the panic button is pressed, 2 things will happen:
- Alarm will sound;
- Control Panel will call the pre-programmed phone numbers for assistance.

When you test this feature, beware of the intensity of the alarm. You should also advise those who will be called (recipients of the 5 phone numbers) so they know you are testing the system.
In order to terminate the alarm, or stop the Control Panel from calling to the 5 phone numbers, users can enter either the master or secondary password. This will stop the alarm from sounding and dialer will stop calling out for help.

Operation - Communication
Users can call in from any touch tone phone to check the system status, arm or disarm the system. Please refer to the User's Instructions for details.
You have now installed the system to perform the most basic functions. To customize the Control Panel or program other advanced features, please refer to the User's Instructions.
Safety precautions:

To reduce risk of electric shock, this product should ONLY be opened by an authorised technician when service is required. Disconnect the product from mains and other equipment if a problem should occur. Do not expose the product to water or moisture.
Maintenance:
Clean only with a dry cloth. Do not use cleaning solvents or abrasives.
Warranty:
No guarantee or liability can be accepted for any changes and modifications of the product or damage caused due to incorrect use of this product.
General:
- Designs and specifications are subject to change without notice.
- All logos, brands or brand logos and product names are trademarks or registered trademarks of their respective holders and are hereby recognised as such.
- This manual was produced with care. However, no rights can be derived. König Electronic can not accept liability for any errors in this manual or their consequences.
- Keep this manual and packaging for future reference.
Attention:

This product is marked with this symbol. It means that used electrical and electronic products should not be mixed with general household waste. There is a separate collections system for these products.
This product has been manufactured and supplied in compliance with all relevant regulations and directives, valid for all member states of the European Union. It also complies with all applicable specifications and regulations in the country of sales.
Formal documentation is available upon request. This includes, but is not limited to: Declaration of Conformity (and product identity), Material Safety Data Sheet and product test report.
Please contact our customer service desk for support:
via website: http://www.nedis.com/en-us/contact/contact-form.htm
via e-mail: service@nedis.com
via telephone: +31 (0)73-5993965 (during office hours)
NEDIS B.V., De Tweeling 28, 5215 MC 's-Hertogenbosch, THE NETHERLANDS
DEUTSCH
Alarm abschalten

Désarmer

Uitschakelen

Desactivar
Inserir bateria alcalina de 9 V no sensor
Funcionamento – Modo de Alerta
Desactivar
Notes: The door/Window Sensor is factory default in zone 1 and zone 2.
Hatástalanítás
Asenna tunnistimeen 9 V: n alkaliparisto
Varoitustoiminto
SNABBINSTALLATIONSGUIDE
Stänga av

Vložte do čidla alkalinovou baterii 9 V.
„Disarm (deaktivace pohotovosti alarmu)“
Dezarmare
Απενεργοποίηση
Sæt et 9V alkaline batteri i sensoren
Betjening - Advarselsmodus
Deaktivering

Sett in et 9 V alkalisk batteri i sensoren
Desarmering

Снятие с охраны

Devreden Çıkarma


- SEC-ALARM200
- INSTALLATION OF THE CONTROL PANEL
- INSTALLATION OF SENSORS - BATTERIES
- OPERATION - ALERT MODE
- DOOR/WINDOW SENSOR
- MOTION SENSOR
- PROGRAM EMERGENCY PHONE NUMBER
- OPERATION - ALARM
- ARM
- DISARM
- PANIC
- OPERATION - COMMUNICATION
- SAFETY PRECAUTIONS
- MAINTENANCE
- WARRANTY
- GENERAL
- ATTENTION
- DEUTSCH
- ALARM ABSCHALTEN
- DÉSARMER
- UITSCHAKELEN
- DESACTIVAR
- FUNCIONAMENTO – MODO DE ALERTA
- HATÁSTALANÍTÁS
- VAROITUSTOIMINTO
- SNABBINSTALLATIONSGUIDE
- STÄNGA AV
- „DISARM (DEAKTIVACE POHOTOVOSTI ALARMU)
- DEZARMARE
- ΑΠΕΝΕΡΓΟΠΟΊΗΣΗ
- BETJENING - ADVARSELSMODUS
- DEAKTIVERING
- DESARMERING
- СНЯТИЕ С ОХРАНЫ
- DEVREDEN ÇIKARMA
Brand : KONIG
Model : SEC-ALARM200
Category : Alarm bell