
EKI 3157 - Hob CLATRONIC - Free user manual and instructions
Find the device manual for free EKI 3157 CLATRONIC in PDF.
| Product type | Induction cooktop |
| Brand | CLATRONIC |
| Model | EKI 3157 |
| Color | Not specified |
| Power supply | 230 V ~ 50 Hz |
| Maximum power | 1800 W |
| Number of zones | 1 |
| Surface type | Glass ceramic |
| Dimensions (approx.) | 30 x 40 x 6 cm (estimate) |
| Weight (approx.) | 2.5 kg (estimate) |
| Protection class | I |
| Cooking functions | Heating (power controlled), Keep warm (temperature controlled), Timer |
| Display | Digital LED |
| Pan detection | Yes, with alarm if incompatible |
| Safety | Automatic shutdown, overheating protection, pan detection |
| Maximum continuous use | 4 hours, then 30 minutes rest |
| Maintenance | Clean with soft sponge and water, do not immerse |
| Warranty | 24 months |
Frequently Asked Questions - EKI 3157 CLATRONIC
User questions about EKI 3157 CLATRONIC
0 question about this device. Answer the ones you know or ask your own.
Ask a new question about this device
Download the instructions for your Hob in PDF format for free! Find your manual EKI 3157 - CLATRONIC and take your electronic device back in hand. On this page are published all the documents necessary for the use of your device. EKI 3157 by CLATRONIC.
USER MANUAL EKI 3157 CLATRONIC
Attention, surcharge!
General Safety Instructions
Read the operating instructions carefully before putting the appliance into operation and keep the instructions including the warranty, the receipt and, if possible, the box with the internal packing. If you give this device to other people, please also pass on the operating instructions.
- The appliance is designed exclusively for private use and for the envisaged purpose. This appliance is not fit for commercial use. Do not use it outdoors (except if it is designed to be used outdoors). Keep it away from sources of heat, direct sunlight, humidity (never dip it into any liquid) and sharp edges. Do not use the appliance with wet hands. If the appliance is humid or wet, unplug it immediately.
- When cleaning or putting it away, switch off the appliance and always pull out the plug from the socket (pull on the plug, not the cable) if the appliance is not being used and remove the attached accessories.
- Do not operate the machine without supervision. If you should leave the workplace, always switch the machine off or remove the plug from the socket (pull the plug itself, not the lead).
- Check the appliance and the cable for damage on a regular basis. Do not use the appliance if it is damaged.
- Do not try to repair the appliance on your own. Always contact an authorized technician. To avoid the exposure to danger, always have a faulty cable be replaced only by the manufacturer, by our customer service or by a qualified person and with a cable of the same type.
- Use only original spare parts.
- Pay careful attention to the following "Special Safety Instructions".
Children and Frail Individuals
- In order to ensure your children's safety, please keep all packaging (plastic bags, boxes, polystyrene etc.) out of their reach. Caution! Do not allow small children to play with the foil as there is a danger of suffocation!
- In order to protect children or frail individuals from the hazards of electrical equipment, please ensure that this device is only used under supervision. This device is not a toy. Do not allow small children to play with it.
Symbols in these Instructions for Use
Important information for your safety is specially marked. It is essential to comply with these instructions in order to avoid accidents and prevent damage to the machine:

WARNING:
This warns you of dangers to your health and indicates possible injury risks.

CAUTION:
This refers to possible hazards to the machine or other objects.

NOTE: This highlights tips and information.
Special safety instructions
GB
- Place the appliance on an even, moisture and heat-resistant surface. Use a heatresistant plate when placing on sensitive surfaces.
- Do not move the device when it is in operation.
- Only touch the machine by using the handles and buttons provided.
- Due to the rising heat and vapours the device should not be operated under wall cupboards.
- Keep the unit at a safe distance from easily inflammable objects such as furniture, curtains, etc. (30cm). Under no circumstances should the device be installed in cupboards.
- Do not heat empty pots on the cooking zone as this may lead to dangerous overheating.
- Ventilation: Always keep the ventilation slots free from any obstructions and dirt.

Attention
- Ceramic surface! If the surface is damaged or has cracks the device must be switched off to avoid the hazard of electrical shocks.
- Induction heat! Metal objects as, e.g., knives, forks, spoons and pot lids should not be placed on the cooking zone as they may get hot.
- Hot surface! The induction cooker initially heats only the base of the cooking utensils used, not the cooking zone itself. However, because of the heat radiated during cooking, dangerously high temperatures may also occur at the cooking zone after the cooking cycle. Hazard of burns!
- Warning: potential damage to your health! People wearing pacemakers must not use this cooker.
Control panel
1 Operation indicator
2 POWER (ON/OFF button)
3 FUNCTION key (cooking function)
4▲Button(higher)
5 Pilot lights of the display: POWER power level will be indicated TEMPERATURE temperature will be indicated
6 Display
7 HEATING cooking function "power control"
8 Button (lower)
9 TIMER illuminated clock timer
10 WARMING cooking function "temperature control"
General information
Cooking with induction technology
When cooking with induction technology, heat is only generated by means of magnetic power, if a pot or pan with a magnetisable base is placed on a switched-on cooking zone. The induction cooker heats only the base of the cooking utensils used, not the cooking zone itself. Under the glass-ceramics surface, the induction coil is located. If the coil is supplied with electrical power a magnetic field develops generating whirls in the pot's base. This results in the heating of the base material. The induction process saves energy as heat is solely produced where it is needed.
GB
What cooking utensils may I use?
Induction cookers require pots, i.e., pot bases made of magnetisable material. Today, cooking utensils appropriate for induction cooking usually bear a note saying 'Suitable for induction hob' or similar.
But principally you may use any iron-based cooking utensils; to find out whether a pot or pan is suitable, i.e., magnetisable just try the following:
Put the respective pot on the hob. Should appear "E0" in the display after having switched on the device and repeatedly ring out an acoustic signal the pot is not suitable for this use.
i
NOTE: For reasons of safety, the device automatically switches to the standby mode after a few seconds.
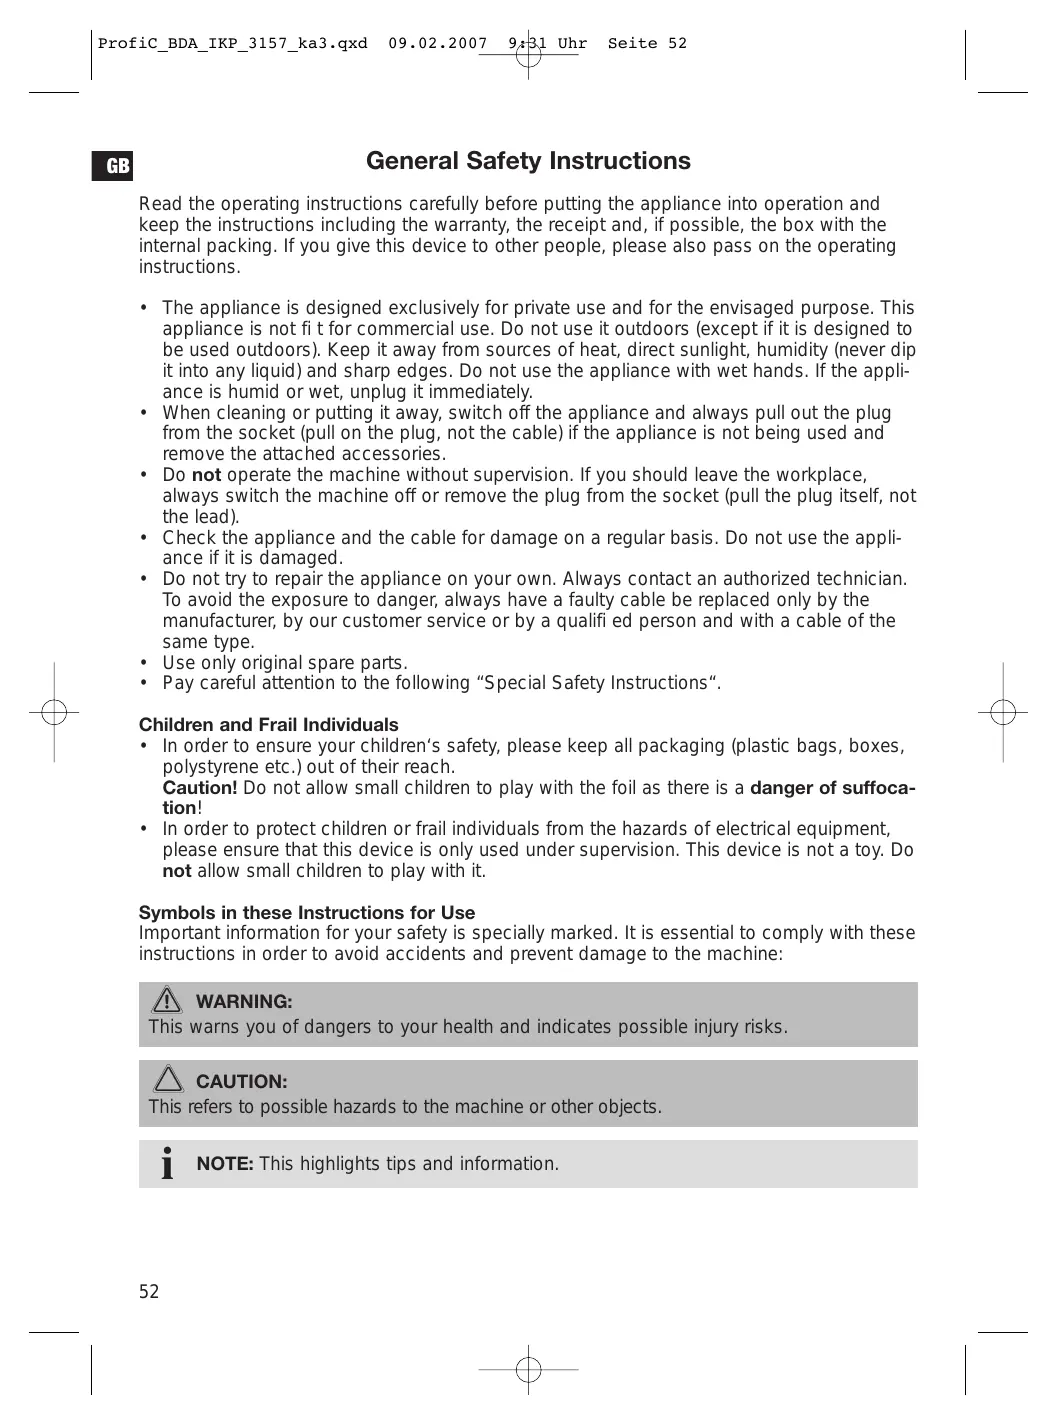
Cooking utensils made of the following materials are not suitable for induction hobs:
Clay, glass or aluminium.
Do not use the following types of pots:
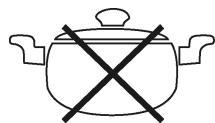
Pots with bended (convex/parabolic) bases.
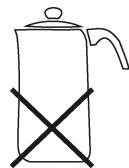
Pots with a base diameter of less than 12cm .
Pots standing on feet.
Operating time
Do operate the device only for a maximum of 4 hours continuously. Then interrupt the operation for at least 30 minutes, otherwise you risk some damages by overload.
Weight
Charge the cooker ring only with a maximum weight of 4kg , otherwise you risk damages to the cooking surface.
Mains supply
Connected load/wattage
The hob can take up an overall load of 1,800W. Because of this high connected load it is recommended to use a separate connection protected over a 16A safety switch.

Caution overload!:
Do not use extension cables or multiple sockets as the power consumption of this device is too high for these.
Connection
GB
- Before inserting the mains plug into the socket check whether the voltage which you intend to use corresponds to that of the machine. Please see the label on the machine for details.
- Only connect the machine to a correctly installed safety socket, 230V / 50Hz .
Operating instructions
Initial operation
- Standby mode: After you have connected the device's plug to the mains supply, the hub is in standby mode. "— — ——" appears on the display.
- Put a suitable pot on the cooking zone.
- Push the ON/OFF button (2) to start the cooking process. The operating mode indication (1) lights up and continuously remains lit-up.
i NOTE:
- The lamp POWER (5) goes on and "1800" for the power in watts appears on the display. At the same time the ventilator begins to work for the cooling air.
-
If "E0" appears on the display and repeatedly an acoustic signal rings out the pot is inappropriate.
-
Use the FUNCTION button (3) to select the desired cooking function.
Cooking function
Push the FUNCTION button (3) repeatedly to select one of the cooking functions available. The lamp for the corresponding function lights up.
Heating power control system for cooking
- The food to be cooked is continuously simmering on the power setting which has been selected by you.
NOTE:
- On the display the power measured in watts will be indicated and the lamp POWER (5) goes on.
- After the cooking zone has been switched on the selected power setting can be changed at any time with the keys (4/8).
Warming temperature control system for cooking
- The food to be cooked will be heated up to the temperature selected by you and kept warm on this temperature by automatic regulation.
NOTE:
- The temperature will be indicated on the display and the lamp TEMPERATURE (5) goes on.
- After the cooking zone has been switched on the pre-selected temperature can be changed at any time with the keys (4/8).
- In case of temperatures up to 200^ this function is suitable also for frying. Please do use only highly heat-resistant fat!
GB
TIMER enter disconnecting time
The cooking functions can be limited in time.
- Press the button FUNCTION (3) and select the setting Timer. The hour digit appears and begins to flash in the display.
- With the buttons (4/8) you can set now the desired disconnecting time in hours.
- Wait 3 seconds and then the minute digit appears flashing on the display.
- With the buttons (4/8) you can set now the desired disconnecting time in minutes.
- Wait again 3 seconds and then the residual running time and the selected power level measured in watts appear alternating.
i NOTE:
- After the timer has been switched on you can change the levels with the buttons (4/8) at any time.
- Press the button FUNKTION in order to adjust from the cooking function HEATING to the function WARMING.
- Interrupt: You can interrupt this process at any time by pressing the ON/OFF button (2).
- The end of the cooking time will be announced in the last minute by an acoustic signal.
Switching off
- Push the ON/OFF button (2).
- The hob changes back to the standby mode from whatever operating mode. The operation indicator (1) light goes out.
NOTE: The ventilator for the cooling air still continues to run for about 30 seconds.
Pull the plug.
- Let the device cool down, before you put it away.
Identification of the pot
The device has a pot recognition function. After the pot has been taken from the hob, it switches back to the standby mode.
In this context, please pay attention to the following:
WARNING:
After use, the hob must be switched off using the provided controls – not over its automatic pot recognition function only!
Hazard of burns! Because of the heat radiated during cooking, dangerously high temperatures may occur at the cooking zone after the cooking cycle.
Cleaning
GB
Always pull out the plug from the mains socket before cleaning and wait until the unit has cooled down.
Do not use any wire brush or other abrasive objects.
Do not use any acidic or abrasive detergents.
Under no circumstances should the device be immersed in water for cleaning.
Ceramic Hob
- Clean the surface from food remains when it's still warm using a moist cloth or tissue.
- Wash the hob using a soft sponge and some water, then wipe dry with a soft cloth.
- Cleaning agent for glass-ceramics surfaces: In case of stubborn, baked-in remains, use suitable cleaning products available at special departments of department stores.
Housing
- Clean the housing after use using a slightly moist cloth.
- Make sure that no fluid matter gets into any of the openings of the housing. This might damage the device or result in an electric shock.
Troubleshooting
Device does not function, no indication on the display.
Remedy: Check the mains connection.
- There is a sound after I have selected a cooking function and switched the device on.
Possible cause: You put no or an unsuitable pot on the hob.
NOTE: For reasons of safety, the device automatically switches to the standby mode after a few seconds.
Remedy: Put a pot on the hob that is suitable for induction hobs.
- The hob suddenly switches off during operation.
Possible cause: The overheating protection (cutout switch) has been activated.
Remedy: Pull the plug and let the device cool down for about 20 min.
Then start operating the device again.
Further cause: The ventilation slots are obstructed.
Remedy: Free the ventilation slots from any obstructions.
- When keeping food warm the pot is not maintaining the temperature.
Possible cause: The pot's base is not level or bended (convex/concave).
Remedy: Put a suitable pot on the hob.

- Error messages
During the operation the following message appears on the display:
| Security instruction | |
| E0 | There has been put no or an unsuitable pot on the stove. |
| E1 o. E2 | In this case, there is a problem with the electronic control. Send the device including a description of the error to our service centre. |
| E3 | Overheating. See below remedy of the fault. |
| E4 | Undervoltage. Check the power supply system! |
| E5 | Overvoltage. Check the power supply system! |
| E6 | Overheating of the electronic circuit. Let the device cool down for 20 minutes. |

Note: In any case of an error message the device will also turn off automatically.
Technical data
| Model: | EKI 3157 |
| Power supply: | 230V, 50Hz |
| Power consumption: | 1800W |
| Protection class: | I |
This device has been tested according to all relevant current CE guidelines, such as electromagnetic compatibility and low voltage directives, and has been constructed in accordance with the latest safety regulations. Subject to technical changes without prior notice!
Guarantee
The device supplied by our Company is covered by a 24 month guarantee starting on the date of purchase (receipt).
During the life of the guarantee any fault of the device or its accessories ascribable to material or manufacturing defects will be eliminated free of charge by repairing or, at our discretion, by replacing it. The guarantee services do not entail an extension of the life of the guarantee nor do they give rise to any right to a new guarantee!
Proof of the guarantee is provided by the proof of purchase. Without proof of purchase no free replacement or repair will be carried out.
If you wish to make a claim under the guarantee please return the entire machine in the original packaging to your dealer together with the receipt.
GB
Defects to consumables or parts subject to wearing as well as cleaning, maintenance or the replacement of said parts are not covered by the guarantee and hence are to be paid!
The guarantee lapses in case of unauthorized tampering.
After the expiry of the guarantee
After the expiry of the guarantee repairs can be carried by the competent dealer or repair service against the payment of the ensuing costs.
Meaning of the "Dustbin" Symbol

Protect our environment: do not dispose of electrical equipment in the domestic waste. Please return any electrical equipment that you will no longer use to the collection points provided for their disposal.
This helps avoid the potential effects of incorrect disposal on the environment and human health.
This will contribute to the recycling and other forms of reutilisation of electrical and electronic equipment.
Information concerning where the equipment can be disposed of can be obtained from your local authority.

Generelle sikkerhetsanvisninger
Les nœye gjennom bra克斯anvisingen før du tar apparatet i bruk. Ta godt vare på bra克斯anvis- ningen, garantibeviset, kassalappen og helst ögså esken med innvendig emballasje. Gis apparatet videre til en tredjeperson, mä bra克斯anvisingen ögså følge med.
- Apparatet mä bare brukes til private formål og de formål det der er beregnet på. Dette apparatet er ikke ment for industriell bruk. Det mä ikke benyttes utendørs (bortsett fra hvis det bare er beregnet på utendørs bruk). Hold det unna varme, direkte solskinn, faktigitet (senk det aldri ned i væsker) og skarpe kanter. Ikke bruk apparatet hijs du er faktig på hendende. Hvis apparatet har blitt faktig eller vätt, mä du trekke ut stopselet med en gang.
- Slá av apparatet og trekk alltid stöpselet ut av stikkontakten (trekk i stöpselet,/DDi leddening) nár du ikke bruker apparatet, fest tilbehördsdeler for rengjöring ell er ved feil.
- Ikke bruk apparatet uten oppsikt. Hvis du forlater arbeitsplassen, mä du alltid slå apparatet av eller trekke stöpselet ut av stikkontakten (trekk i stopselet, ikke i ledningen).
- Kontroller jevnlig om det er skader på apparat og ledning. Skadede apparater på ikke brukes.
- Ikke reparer apparatet selv. Oppsök en autorisert fagmann. Hvis en nettledning er defekt, på du sorge for at den kun skiftes ut med en lik ledning, for sik à unngå farer. Dette må gjores av produsenten, vår kundetjeneste eller en lignende kvalifi sert person.
- Bruk bare originaltilbehør.
- Legg merke til "Spesielle sikkerhetsanvisninger" nedenfor.
- UTo6bI 3aunTntb DeTei n Dpyrnx NIIu, HynDaIOUxNxCB YXOe I npncMOTpe, OT npaKeHnE 3JIeKTPoTOkOM, CLEInTe 3a TeM, UTo6bI np6Op He BKnIOUaJcNc 6e3 npncMOTpa. TOT np6Op - He nRpyuKa. He dOnyckaiTe K Hemy DeTe.
CIMBOJbI npHMeHReMbI B DaHHOM pyKOBoDCTBe NOJIb3OBaTeJIa
BaKhIbe peKoMeHdauin Ia oBeCneueHn BaWei 6e3OnaChOCTn 6o3NaHeHbI IO OcOeHHOMy.
O6raTeIbHO cIeDyIte 3TmM peKOMeHdaaIaM, YTO6bI ppeoTBpaITb HeCuaCTbI cIyauN IIN NOLOMKy n3dJIY:

IPEDYUNPEXDEHNE:
Ipeynpejdaet o6 onaCHOCTn IJRA 3DOPOBBn BO3MOXHOM pncke NOLyueHn TpaBMbl.

BHIMAHNE:
Yka3bIbaeT Ha BO3MOxHny ONaChOCTb ДяИЗдELЯ И дугnx OkpyжauOxINпpeДmetOB.

KaHyo KxyOHHyo Nocydy MoKHO HcNoIb3OBaTb?
ДлИнДукционнг ППNTы HeOxOДмma Nocya,НИЖнЯ NOBepxHOCt b KOTopoI COCTOnI n3 MaTePnIa, PОДLEжацero HamaRnHyBaHnIO. Ha HOBoI KUxOHNoNocyde qacto yKa3bIbAeTcra, PpIroDHa IIN OHa DlIry INDyKzHOnHOr PIINTbl.
B npHnCnne Bb moKeTe nCnoJIb3OBAt b BCIO nocuLy, cOepeKaUyO JeIe3O, c NOMoUbIO npocToI npOBepKn Bb cmOKeTe y3HaTb, pONLeKHT IOn OHa HamaHnHyBaHHIO:
IocTaBbTe nocuyu Ha nIHTy. B cnyaee, ecn Iocne BkIIOUeHnHa dncIpee NOBJIeTcRA «EO» n CHOBA 3ByuHT akcytueckn cnHaJ, To KAcTpOJa He npriOJaHa K nCNoJIb3OBAHnIO.
I I PnIMeUAHNE: IIO npuHnHaM 6e3oNaChOCTn pInIta aBtOMaTHueCKN OTKJIooYaeTcBpeKHM rTOOBHOCTn uepe3 HeckoJIbKO CeKyHd.
Cneyuoue MaTePnaIbI He npHroDhbI B KaueCTBe nocydbI dI npHroTOBJeHHaN:
TInHa,CTeKIO nn anHOMnHn.
Cneyuounhe kactpOJIN HcNoJb3oBaTb Henb3r:

Kactpnoi C kpyrblm OCHOBAHnEM.

KactpOJIcДnAmetpOM OCHOBAHMa MeHbSe Yem 12 cm.
KactpOIMn Ha HOKKax.
IpoJOnJIHHTeJIbHOCTb pa6Otbl
IcnoIb3yIte nIHTye He dOJIbSe 4 hAcOB nOpIpy.Iocne 3TOrO BbIKIOHHTe IINHTy KaK MInHMym Ha 30 MNHyT, B npOTnBHom cIyuea OHa MOKeT 6bITb NOBpeJkDeHa BCNeDCTBne Npeerpy3Kn.
Bec
He harpykaite KOHOFOPky BEcOM 6oJee 4 K, B nPOTnBHom Clyuae OHa MOKeT 6bITb NOBpeKdHa.
3JIeKtpnueeCKoe IOJKNIOUeHne
BennuHa nooknueHna
Yka3aHnI IO npIMeHeHIO
BBeJeHHe B3KcIpyaTuHIO
- PexHIM roTOBHOCTn: Iocne BkIIOUeHnB pO3ETky IIITa HaxoDHTCBy B peKHM e rTOBHOCTn. Ha DInCPTIIe NORBIAETCRA -· -· -· · ·
- NocTaBbTe Ha nIITy NOxOJaUyIO nocuYd.
- Yto6bHaayatbpnocecc npriroTOBHeHnPiu, HaKmTe Ha KhoNky ON/OFF (BKn./BbIKI) (2). HndkaTop pa6oerypeKIma (1) CBeHTcH enpepebIBHO.

ПИМЕЧАNHЕ:
- 3aropaetcЯ lamnoquka POWER (5) И на дисплee поьгетс «1800» Дя обзачени моцноctи вbat Tax. OndobpeMeHHo НачиhaeТ pa6OtaTb BeHTnIЯTop Дя oxlaЖдIoшero BO3dUxa.
-
Ecni Na dncnnee noBnIeTcN «E0» n CHOBa 3ByuHt aKyCTnueckn cInHaJ, To KacTpIOJI He npriOHa K nCNoIb3OBAHnIO.
-
C nOmoosbI KhoNkN FUNCTION (3) yCTaHOBnTe JKeJaEMyIO fYHKnIO.
Функци npriroTOBLeHnI nIu
Warming npnroTOBneHne nns np yctaHOBNEHHo TEMpepaType
- PnroTOBIIReMaH Niua HArpeBaETc DO yCTaHOBHeHHoT EmpeAtypb, 3aTeM 3Ta TEMepaTpaPOndEprKINBaETc C NOMOuBIO ABTOMaTHueCKoI peryInpOBKn.

ПИМЕЧАNHЕ:
- Ha dincnnee yka3bBaetc TEmnepaTpa n 3aropaetc lamnocha TEMPERATURE (5).
- YctahOBJIeHnyo 3apaHee TemnepaTyPOKHO I3MeHHTb BJIIO6OIMOMeT NocLe BKJIouChENrC NOMOUsbKOHOpOK (4/8).
-При TemпераType 200°C сэтабунця tak щоюнг и дя karкь ВО риюpe. Cneует Испальзовати Ночителбно Macno, похогшддЯ Всokих TemпераТу!
RUS
TIMER BBeCTn BpEMy BbIKNoueHn
CyueCTByET Bo3MOxHcOtB OrpaHnHTb BpeMa fynKcN pnproTOBJIeHnI nIu.
- Haxmnte Ha KhoNky FUNCTION (3) i BbIepeHte HacTpoNky Timer. Ha dinCnlee HauHnaet MIRaTb NOKa3aTeJIb YAcOB.
C nOmoIbH KHOJOK (4/8) Bbl MoKTe 3aDaTb HuyKHe BpeM BbIKIOueHnB Yacax. - IpoJxDInTe 3 ceKyHdbi Ha dncJIee HauHET MraTb nokaatelb MMHT.
C NOMOJIIO KHOJOK (4/8) Bbl MoKeTe 3aJaTb HxHcE BpeMa BblKIIoueHnB MmHyTaX. - Пдождente eе 3 cekyнblи на дсплг no oupeepin NOBRTcN oka3aTeIN OCTabWeroCn BpemeHn pa6Oblи 3aDaHHa MOnHocTb B BaTTax.
i
BHHMaHHe:
-После установлий таимера в лобов мочent можно мочны мочно Temпарату hyжатем конор (4/8).
- HαχΜιTe Na ΚΚΟΝΚy FUNKTION, ζτόβλ περεκλίουητβεγς Σ φυκήμιν HEATING Na φυκήμιν WARMING.
- PnnoctaHOBtB: B IIO6oM MoMeT Bb MoKTe npNoCTaHOBtB pOuecc nprirotobHeHn HauKaTHe KHOPIKn BkL./BbIKL. (2).
-BnocleHIO MmHyTu KOHeu BpeMeHH npiroTOBHeHH PnUc COO6aETCn NOMoBHO aKCTnueckoro CnHaHa.
BbIKIOHTb
- HaKMnTe Ha KhoNkU ON/OFF (BkI./BbIKI) (2).
- I3 IIO6Oro peKIMa pa6Otbl pIHTa nepeKJIIOUaETcB peKIM rOTOBHocTn. INdIKatop pa6Oyero peKIMa (1) rachet.
i
BHHMaHHe:BeHTnJIaTOpIyoxlaXeHnpa6OtaeEeOkoNo30ceKHyd.
3aTeMBbIKHouHTeJIHTyH3cETn.
- Pered tem kak y6paTb nIHTy, cIeJeY dAToB eN OCTbITb.
OnpeIeIeHne HauHnHaKacTpOJIa
ПлNTаобладаETФУнкиЕпасноЗнИЯ habИчЯ Кухонн Дуbl. Пocne toro,Кak nocya ChraTa CПЛТы,ПлNTa NepeKJIIOUaETcB PeЖIM rOTOBHOCtN.
YcTpaHHe HeNCpPaBHOCTe
-Пинта He pa6oTaeT,HaДиСплес Het noka3aHn.
Cnooc6 yctpaHnHa: PpOBepbTe NOdkIIOUeHne K cETn.
- Pocne toro, kak yhncn npnoTobHeHn nui BbIpaHa nPiHTa BkIoueHa, 3ByuNT aKyctueckn cnHaJ.
Bo3MOxHna npuHnHa: He nocTaNHe naocya, nIIN noCyda He noXoDnT nIaPiNtbl.
I I PIMMEUAHNE: N3 coo6paJxehn 6e3onacHocTn pInTa nepeKJIouaETcB peKIM I TOTOBHOCTN uepe3 HeCKOJIbKO cekyHd.
Cnoc6 yctpaHn: TocTaBbTe nocuTy, npiroDHyU dIa IHHyKUnHOHoi pNTbl.
BoBpempa60tI pnta pe3Ko OTKluocaeTc.
Bo3MOxHnA npuHnA: Cpa6oTaJa 3aunTa ot nepeRpeBa.
Cnoc06 yctpaHHeH: BbIKIOHTe IITy I3 cETN I daIte eI octbIb B TeueHne 20 MNHT. 3aTEM CHOBA BkIOHTe IITy.
Дугая пчда: BeHTINЯцIHьIE OTBepCTHЯ 3aKpbITbI.
Cnoc6 yctpaHn: Ocbo6oJte BENTINJIauHHbIe OTBepCTnOT NOCTOPOHHX IpEIMTOB.
JIeKtpoIHTaHHe: 230B,50T
Iotpe6nemMOHocTb: 1800B
Klacc 3aunTbI:
3To n3dJIeHHe npoJIo BCE Heo6xOaIMbIe n aKtYaJIbHbIe IpoBepKn, ppeIINcaHHbIe dIpeKTHBOI CE, K npm. Ha 3JeKTPomarHHTHyIO COBMecTmOCMb I COOTBeTCTBHe Tpe6OBaHNM K Hn3KOBoIbTHOH TEXHKe, OHO 6bIJO TAKKe CKOHCTpyIpObaHO I NOCTPOEHO C yUeTOM NocIeHNX Tpe6OBaHN IO TEXHKe 6e3OnaCHOcTn.
Mbl octabJIeRm 3a co6oI npaBO Ha texHnueckne n3MeHeHnI!
TapaHTnHoe 683aTeNbCTBO
RUS
TapaHTnHbI cpoK Ha TeppntOpu N PoCCncko Fedepaun yCTaHaBnBaetc nONHomOHyIMN npedctaBnteJIIMN.
Kaccobby uek aBJIaTcra rapaHTnHbIM TaHOHom. Be3 Hero HeBO3MOKeH 6ecPiAtHbI peMOHT nII 3aMeHa n3dEINIA.
B clyae BO3HKnHOXBKNHn npHTe3n no rapaHTn, npebIbNTe 3dEJIne B NOHONKOMNKeTAcHH, C opHnHaBHO YnakOBKO H KaccOBbIM YeKOM TOpROBOI TOUKe, PpOdaBSeI 3TO 3dEJIne.