
240Q - Server AXIS - Free user manual and instructions
Find the device manual for free 240Q AXIS in PDF.


| Product type | Network video server (4 channels) |
| Brand | Axis |
| Model | 240Q |
| Dimensions (W x H x D) | 440 x 44 x 220 mm (1U rack format) |
| Weight | 2.5 kg |
| Power supply | 12 V DC, 15 W (power adapter included) |
| Power consumption | 15 W maximum |
| Operating temperature | 0 to 45 °C |
| Relative humidity | 10 to 85 % (non-condensing) |
| Main functions | MPEG-4 and MJPEG video encoding, motion detection, alarm inputs/outputs, real-time streaming |
| Video inputs | 4 BNC inputs for analog cameras |
| Encoding resolution | Up to 704 x 576 (4CIF) at 30 fps |
| Network interface | Ethernet 10/100 Base-T, RJ45 |
| Supported protocols | HTTP, TCP/IP, UDP, RTSP, FTP, SMTP, Bonjour |
| Security | Password protection, HTTPS authentication, IP address filtering |
| Maintenance and cleaning | Regular dusting with a soft dry cloth; do not use solvents |
| Spare parts and repairability | Power supply and fan replaceable; other components not user-serviceable |
| Included accessories | Power adapter, Ethernet cable, rack mount kit, quick installation guide |
| Certifications | CE, FCC, RoHS |
Frequently Asked Questions - 240Q AXIS
User questions about 240Q AXIS
0 question about this device. Answer the ones you know or ask your own.
Ask a new question about this device
Download the instructions for your Server in PDF format for free! Find your manual 240Q - AXIS and take your electronic device back in hand. On this page are published all the documents necessary for the use of your device. 240Q by AXIS.
USER MANUAL 240Q AXIS
Axis Video Server Installation Guide
Axis Video Server Installation Guide
This installation guide provides instructions for installing an Axis Video Server on your network. These instructions apply to the models listed below. For all other aspects of using the product, please see the product User's Manual, available on the CD included in this package, or from www.axis.com
Installation steps
Follow these steps to install the Axis Video Server on your local network (LAN):
- Check the package contents against the list below.
- Connect the Axis Video Server. See page 6.
- Set an IP address. See page 7 for information on the available methods.
- Set the password. See page 11.
Package contents
| Item Description | |
| Axis Video Server models AXIS 240Q | AXIS 241SAXIS 241QAXIS 241QAAXIS 242S IVAXIS 243SA |
| Power adapter models Type PS-K, country-specificType PS-E (AXIS 242S IV), country-specific | |
| Mounting kit For wall or rack mounting | |
| Terminal block connector | 12-pin connector block for connecting external devices to the I/O terminal connector |
| CD | Axis Network Video Product CD, including installation tools and other software, product documentation |
| Printed Materials Axis Video Server Installation Guide (this document)Axis Warranty Document | |
Mounting
The Axis Video Server is supplied with a mounting kit for wall or rack mounting. The mounting brackets can be positioned for mounting the video server on a vertical surface or in a rack (4U). Follow the instructions below to attach the brackets to the video server:

Overview
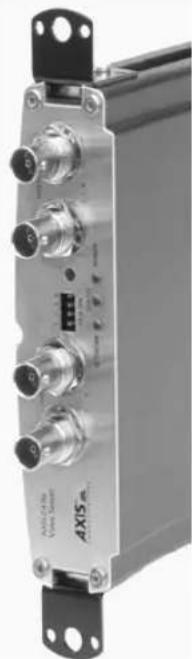
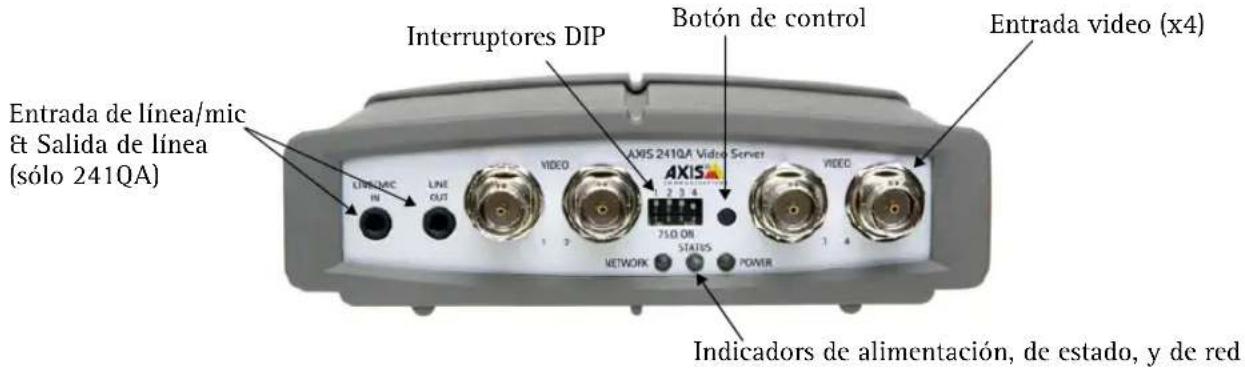
Front panel - AXIS 240Q/AXIS 241Q/AXIS 241QA

Front panel - AXIS 242S IV

Front panel - AXIS 241S/AXIS 243SA

Rear panel - all models

Connections
- Connect the Axis Video Server to your network using a standard network cable.
- Connect the video output of your camera(s) to the Axis Video Server, using a standard 75 Ohm coaxial video cable with BNC connectors.
- Connect power, using the supplied power adapter, or via the terminal connector on the rear panel (see the User's Manual for more information).
- An active speaker and a microphone can be connected to the AXIS 241QA/AXIS 243SA to provide two-way audio.
Notes: • Use an RCA-to-BNC adapter if your camera has a standard phono-type (RCA) connector.
- Y/C video can be connected directly to the AXIS 242S IV, via the S-Video connector.
- To connect Y/C video to the AXIS 241S/AXIS 243SA, use a Y/C to BNC adapter cable (not supplied). See the AXIS Video Server User's Manual for more information.
• The Line In & Mic In connectors on the AXIS 242S IV are used for audio analysis only.
Setting the IP address
The Axis Video Server is designed for use on an Ethernet network and must be assigned an IP address to make it accessible.
AXIS IP Utility
AXIS IP Utility is the recommended method for setting an IP address in Windows. This free application can be used on networks with or without a DHCP server. See page 8 for more information.
All installation methods
This table shows all of the available methods for setting or discovering the IP address. Select a method from the left-hand column and check the requirements for it to the right.
| Installation methods\Requirements | DHCP Server in network | Install on same network segment | Internet connection with no HTTP proxy | Operating system |
| AXIS IP Utility (recommended method)See page 8 | Optional Required | Windows | ||
| UPnPTMSee page 9 | Optional Required | Windows | (ME or XP) | |
| ARP/PingSee page 9 | Required All | operatingsystems | ||
| AXIS Internet Dynamic DNS ServiceSee page 10 | Recommended Required | All | operatingsystems | |
| View DHCP server admin pages for IP address(See note below) | Required All | operatingsystems |
Notes: • UPnP™ and DHCP are both enabled by default.
- The Axis Video Server has the default IP address 192.168.0.90
- To view the admin pages for the DHCP server, please see the server's own documentation. You may need to contact your network administrator.
- If setting the IP address fails, check that there is no firewall blocking the operation.
- If you would like to use a language other than English for the web interface of your Axis camera, it can be downloaded from www.axis.com/techsup/. See "The AXIS Internet Dynamic DNS Service" on page 10.
Notes: • UPnP™ and DHCP are both enabled by default.
- The Axis Video Server has the default IP address 192.168.0.90
- To view the admin pages for the DHCP server, please see the server's own documentation. You may need to contact your network administrator.
- If setting the IP address fails, check that there is no firewall blocking the operation.
- If you would like to use a language other than English for the web interface of your Axis camera, it can be downloaded from www.axis.com/techsup/. See "The AXIS Internet Dynamic DNS Service" on page 10.
AXIS IP Utility
AXIS IP Utility is a free Windows application that discovers and displays Axis devices on your network.
The application can also be used to manually set a static IP address.
Note that you must install the Axis Video Server on the same network segment (physical subnet) as the computer running AXIS IP Utility.
AXIS IP Utility is available on the CD supplied with this product, or it can be downloaded from www.axis.com/techsup

Automatic discovery
- Check that the Axis Video Server is connected to the network and that power has been applied.
- Start AXIS IP Utility. When the Axis Video Server appears in the window, double-click it to open the unit's home page.
- See page 11 for instructions on how to set the password.
Set the IP address manually
-
Acquire an unused IP address on the same network segment your computer is connected to.
-
Click the button (Set IP address using serial number) and enter the serial number and IP address for the Axis Video Server.
-
Click the Set IP button and then restart the Axis Video Server.
-
Click View Home Page to access the Axis Video Server's web pages.
-
See page 11 for instructions on how to set the password.
Note:
AXIS IP Utility can be used to change a dynamically set IP address to a static one.
UPnP ^TM
UPnP™ functionality is enabled by default in the Axis Video Server. If also enabled on your computer (Windows ME or XP), the video server will automatically be detected and a new icon will be added to “My Network Places.” Click this icon to access the Axis Video Server.
See also page 11 for instructions on how to set the password.
Note:
To install the UPnP™ service on your computer, open the Control Panel from the Start Menu and select Add/Remove Programs. Select Add/Remove Windows Components and open the Networking Services section. Click Details and then select UPnP as the service to add.
UPnP ^™ is a certification mark of the UPnP ^™ Implementers Corporation.
Manual Installation with ARP/Ping
- Acquire an unused IP address on the same network segment your computer is connected to.
- Locate the serial number (S/N) on the underside label (see page 5).
- Open a Command Prompt on your computer. As appropriate for your operating system, enter the following commands:
| Windows syntax: Windows example: | |
| arp -s <IP Address> <Serial Number> ping -l 408 -t <IP Address> | arp -s 192.168.0.125 00-40-8c-18-10-00 ping -l 408 -t 192.168.0.125 |
| UNIX/Linux/Mac syntax: | UNIX/Linux/Mac example: |
| arp -s <IP Address> <Serial Number> temp ping -s 408 <IP Address> | arp -s 192.168.0.125 00:40:8c:18:10:00 temp ping -s 408 192.168.0.125 |
- Check that the network cable is connected. Start/restart the Axis Video Server by disconnecting and reconnecting power, which must be done within 2 minutes of entering the ARP command.
- Close the Command prompt when you see 'Reply from 192.168.0.125: ...' or similar.
- Start your browser, type in http://
in the Location/Address field and press Enter on your keyboard. - See page 11 for instructions on how to set the password.
Notes: • To open a command prompt in Windows: from the Start menu, select Run... and type cmd (or command in Windows 98/ME). Click OK.
- To use the ARP command on a Mac OS X, use the Terminal utility, which is found under Application > Utilities.
The AXIS Internet Dynamic DNS Service
The AXIS Internet Dynamic DNS Service is a free service provided by Axis, which allows you to quickly and simply install your Axis Video Server, which then receives a static name (DNS name) and a dynamic IP address. More information about the AXIS Internet Dynamic DNS Service is available at www.axiscam.net
To perform this procedure, your network should have an Internet connection with no HTTP proxy, and IP addresses should preferably be assigned via DHCP.
Follow these instructions:
- After making the connections for network and power, wait for the Status indicator to show a steady green.
- Press the Control button once. The Status indicator flashes green while it connects to the AXIS Internet Dynamic DNS Service.
- Wait for the Status indicator to go back to showing a steady green.
- To complete the installation, now visit www.axiscam.net from an Internet connected computer. This must be done within 60 minutes of pressing the Control button.
- Follow the on-screen instructions provided by the AXIS Internet Dynamic DNS Service. You will need the product's serial number to complete the installation. See page 5. See also page 11 for instructions on how to set the password.
Important!
Please note that this procedure will send the Axis Video Server's IP address, firmware version, product type, HTTP port and serial number to the AXIS Internet Dynamic DNS Service. No personal information is transferred.
To remove the DNS name and unregister from this service, open the Setup pages in the Axis Video Server, click System Options > Network > TCP/IP > Basic, click the Settings button for the AXIS Internet Dynamic DNS Service and finally, click the Remove button.
Setting the Password
- When accessing the Axis Video Server for the first time, the 'Configure Root Password' dialog will be displayed on the screen.
- Enter a password and then re-enter it, to confirm the spelling. Click OK.
- The 'Enter Network Password' dialog will appear. Enter the User name: root
Note: The default administrator user name root is permanent and cannot be deleted.
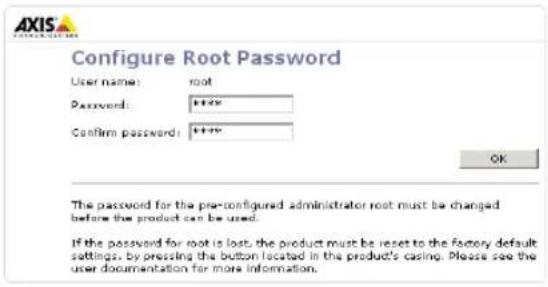
- Enter the password as set in step 2 above, and click OK. If the password is lost, the Axis Video Server must be reset to the factory default settings. See page 12.
- If required, click Yes to install AMC (AXIS Media Control), to allow viewing of the video stream in your browser. You will need administrator rights on the computer to do this.
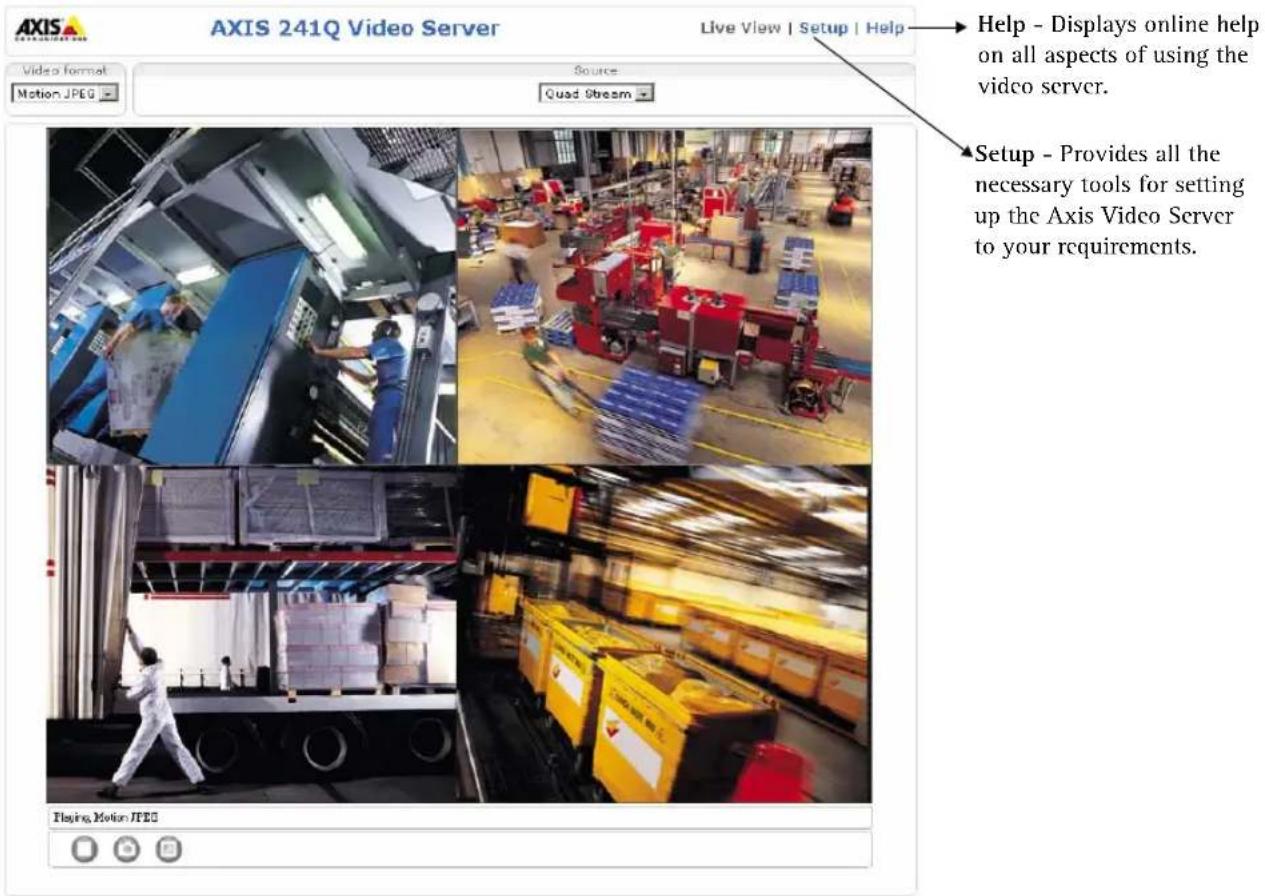
- The Live View page of the Axis Video Server is displayed, complete with links to the Setup tools, which allow you to customize the camera to your specific needs.
Accessing the Axis Video Server from the Internet
Once installed, your Axis Video Server is accessible on your local network (LAN). To access the video server from the Internet, network routers must be configured to allow incoming traffic, which is usually done on a specific port. Please refer to the documentation for your router for further instructions.
For more information on this and other topics, please visit the Axis Support Web at www.axis.com/techsup
Resetting to the Factory Default Settings
This will reset all parameters, including the IP address, to the Factory Default settings:
- Disconnect power from the Axis Video Server.
- Press and hold the Control button and reconnect power.
- Keep the button pressed until the Status Indicator displays yellow (this may take up to 15 seconds), then release the button.
- When the Status indicator displays green (which can take up to 1 minute) the Axis Video Server is reset to the factory default settings.
- Re-install the Axis Video Server using one of the methods described in this document.
More information
For more information, please see the Axis Video Server User's Manual, which is available on the CD included in this package. Updated versions can be obtained from www.axis.com
Application AXIS IP Utility
Application AXIS IP Utility
AXIS Internet Dynamic DNS Service
natural_image
Close-up of a mechanical component with metallic cylindrical ports and mounting brackets (no visible text or symbols)natural_image
Close-up of a mechanical device with a black bracket and an arrow pointing to it, no visible text or symbols.Alternativa A
natural_image
Exterior view of a metallic industrial device with multiple connectors and mounting brackets (no visible text or symbols)Cenni generali
Pannello anteriore - AXIS 240Q/AXIS 241Q/AXIS 241QA

natural_image
Close-up of a mechanical component with metallic fittings and mounting holes (no visible text or symbols)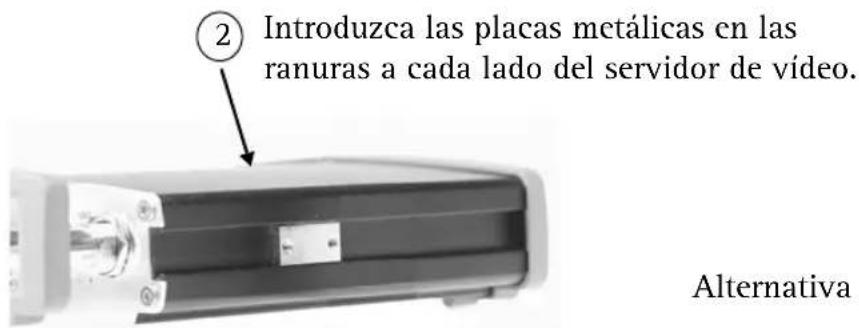
natural_image
Exterior view of a metallic industrial device with multiple connectors and mounting brackets (no visible text or symbols)Generalidades
Panel frontal - AXIS 240Q/AXIS 241Q/AXIS 241QA
AXIS Video Server Installation Guide v1.3 February 2007
Copyright © Axis Communications AB, 2005-2007 Part No. 28586


- Axis Video Server Installation Guide
- Installation steps
- Mounting
- Overview
- Connections
- Setting the IP address
- AXIS IP Utility
- All installation methods
- Automatic discovery
- Set the IP address manually
- Note:
- UPnP TM
- Manual Installation with ARP/Ping
- The AXIS Internet Dynamic DNS Service
- Follow these instructions:
- Important!
- Setting the Password
- Accessing the Axis Video Server from the Internet
- Resetting to the Factory Default Settings
- More information
- Application AXIS IP Utility
- AXIS Internet Dynamic DNS Service
- Cenni generali
- Generalidades
Brand : AXIS
Model : 240Q
Category : Server