
GH 650 B - Plane GUDE - Free user manual and instructions
Find the device manual for free GH 650 B GUDE in PDF.


| Product type | Planer (jointer / thicknesser) |
| Brand | Güde |
| Model | GH 650 B |
| Power supply | Electric (mains) |
| Rated voltage | 230 V / 50 Hz |
| Motor power | 1500 W |
| Maximum planing width | 150 mm |
| Maximum planing depth | 3 mm |
| Shaft rotation speed | 8000 rpm |
| Blade shaft diameter | 65 mm |
| Number of blades | 2 |
| Net weight | 20 kg |
| Dimensions (L × W × H) | 600 × 400 × 400 mm |
| Main functions | Planing, surfacing, chamfering |
| Work table | Cast aluminum, height adjustable |
| Parallel guide | Included, adjustable |
| Safety devices | Transparent blade guard, emergency stop, toggle switch |
| Maintenance and cleaning | Regular dust removal, sharpening or replacing blades, lubrication of moving parts |
| Spare parts and repairability | Replacement blades available, belt, bearings |
| General information | Domestic and semi-professional use, 2-year warranty |
Frequently Asked Questions - GH 650 B GUDE
User questions about GH 650 B GUDE
0 question about this device. Answer the ones you know or ask your own.
Ask a new question about this device
Download the instructions for your Plane in PDF format for free! Find your manual GH 650 B - GUDE and take your electronic device back in hand. On this page are published all the documents necessary for the use of your device. GH 650 B by GUDE.
USER MANUAL GH 650 B GUDE
Translation of original operating instructions
PETROL BRANCH CRUSHER
Français FR
2
EC-DECLARATION OF CONFORMITY
DECLARATION CE DE CONFORMITE |
PROHLASENI O SHODE EU | VYHLASENIE O
ZHODE EU | EG-CONFORMITEIT-VERKLARING |
natural_image
Industrial machine with visible propeller and wheels, no text or symbols on the device itself1


natural_image
Close-up of a hand using a tool to press or install a perforated metal panel, no text or symbols visible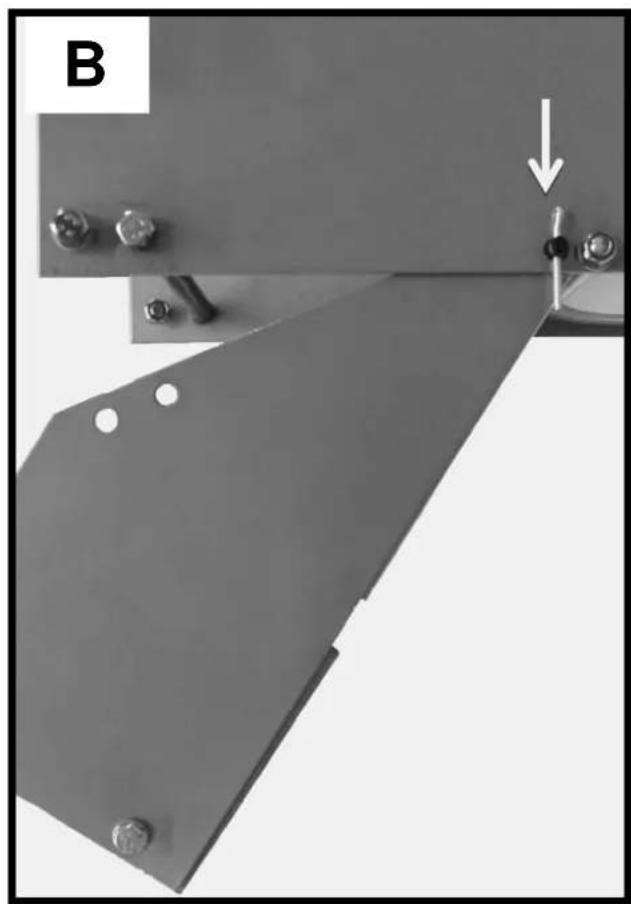
natural_image
Close-up of a metallic mechanical component with bolts and a downward arrow indicator (no text or symbols)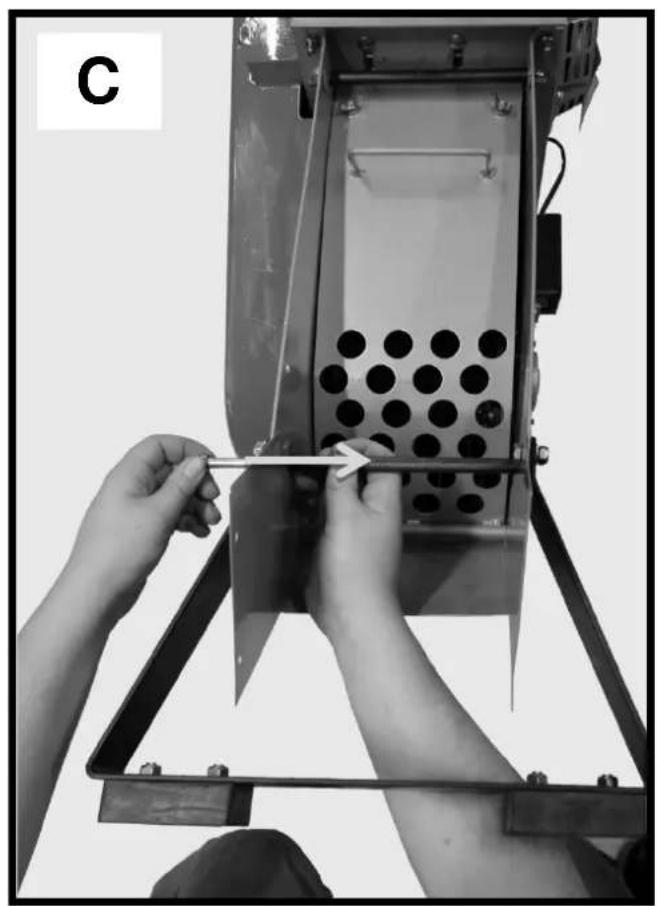
natural_image
Person using a tool to adjust or install a metal panel with circular holes, mounted on a metal frame (no text or symbols visible)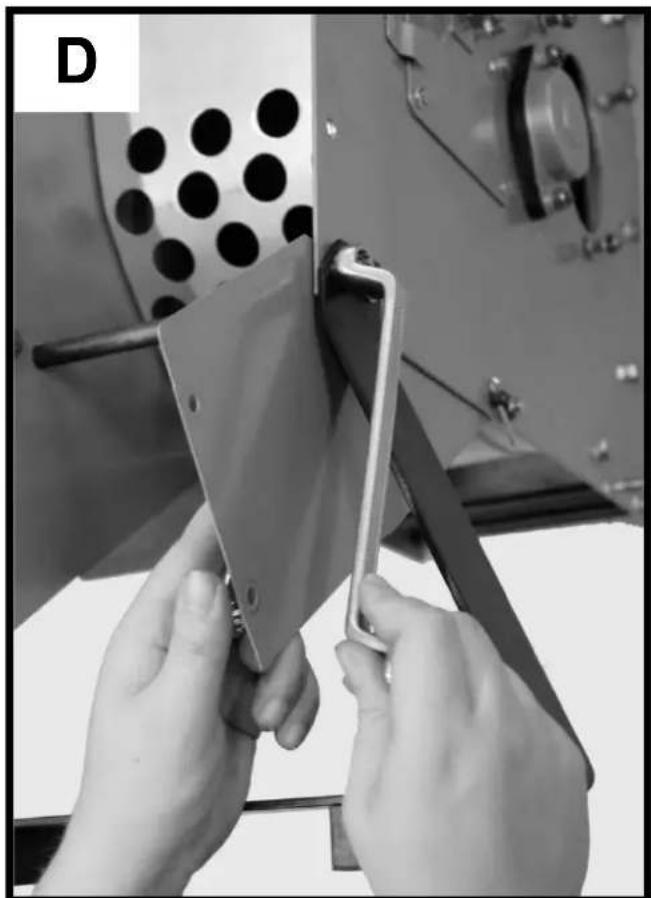
natural_image
Close-up of hands holding a metal clip attached to a mechanical device (no visible text or symbols)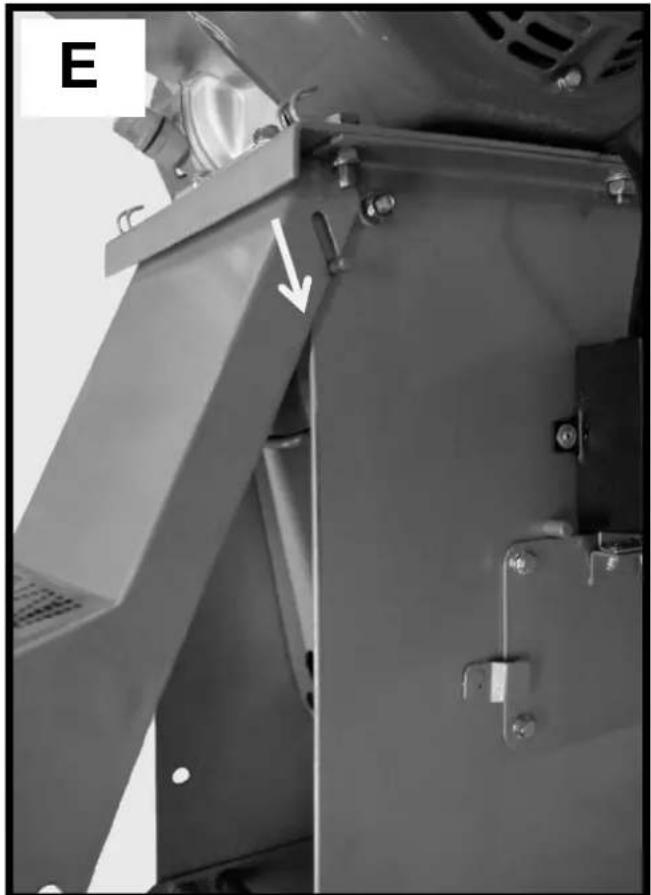
natural_image
Close-up of a mechanical assembly with metal components and bolts, no visible text or symbols
natural_image
Close-up of a hand adjusting a metal switch component on a metal panel (no visible text or symbols)






natural_image
Close-up of a hand using a screwdriver to adjust or install a motor fan (no visible text or symbols)



natural_image
Black-and-white photo of a man in outdoor gear handling a tool near a small box, with no visible text or symbols.
natural_image
Person operating a field-based optical equipment with a mounted weapon, set in a grassy outdoor setting (no visible text or symbols)

natural_image
Industrial equipment component with two curved arrows indicating motion or movement, labeled '25' at bottom left (no readable text or symbols)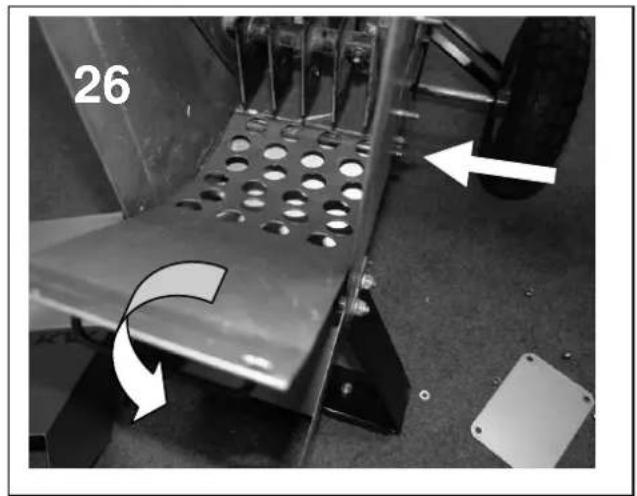
natural_image
Mechanical component with perforated plate and directional arrows indicating motion (no text or symbols)
natural_image
Black-and-white photo of a mechanical component with a white arrow pointing to a part, surrounded by small parts and a numbered label '27' (no readable text or symbols on the main subject)
natural_image
Close-up of a mechanical assembly with a hand operating a tool, showing internal components and a curved arrow indicating motion (no text or symbols)
natural_image
Blue circular icon with a white hand symbol (no text or numbers)
| GB | Please read carefully these Operating Instructions before putting the appliance into operation. |
A.V. 2 Any reprints, even in abbreviated version, are subject to approval. Technical changes reserved.
| GB | Do you have any questions? Any claim? Do you need spare parts or operating instructions?We will quickly help you and without bureaucracy at our homepage www.guede.com in the Servicing part. Please help us be able to help you. In order to identify your device in case of claim we need the serial No., order No. and year of production. All this data can be found on the type label. Please enter it here for future reference.Serial No._Order No._Year of production:_ | ||
| Tel.: +49 (0) 79 04 / 700-360 | Fax: +49 (0) 79 04 / 700-51999 | E-Mail: support@ts.guede.com | |
Marking:
Product safety, prohibitions:
| CE | |
| Product corresponds to appropriate norms of the EU. | Prohibition, general (in connection with any other icon) |
Prohibitions, Warning:
| Keep in safe distance from inflammable sources | Warning/Attention |
Warning, Instructions:
| Warning against dangerous electric voltage | Danger of items thrown by running engine |
Instructions:
| Use hearing protection | Read the Operating Instructions before use |
Environment Protection:
| Do not throw waste to environment but dispose it properly. | Packing cardboard material may be delivered to collecting centres designed thereto. |
| Faulty and/or for-disposal-designed electric or electronic devices must be delivered to appropriate collecting centres. |
Package:
| Protect against humidity This side up | |
Technical Data:
 |  |
| Connector Weight |
Appliance
GH 650 B Petrol Branch Crusher
High-quality, professional petrol branch crusher with high-efficiency 6.5 PS four-stroke OHV petrol engine. With a big, skew hopper and side shifting part for smaller branches. Optimum results even at crushing of big and robust waste are reached due to 3 hammer mechanisms and 2 double rotary knives (on the side shifting part). Including bantam wheels and wide chassis for convenient transport and safe standing. Ideal for crushing of garden waste of all types.
Scope of application:
Ideal for crushing of garden waste of all types.
Supply including (pic. 1)
- Feeding hopper
- Side shifting part
- Reverse starter
- Tank cover
- Lid for outlet maintenance
- Noise suppressor
- Air filter
- Socket plug
- Hole for crushing knife maintenance
- Limit switch
Warranty
Warranty period of 12 months applies to commercial use and 24 months applies to private use and commences on the day of purchase of the device.
Warranty applies exclusively to failures due to defective material or workmanship. An original sale slip with indication of date of sale must be presented in case of claiming for the warranty rights.
Warranty does not cover unprofessional use such as device overload, violent use, damage caused by third party or foreign materials, failure to comply with operations and assembly manual, and normal wear and tear.
The Operating Instructions need to be thoroughly read before first use of the appliance. Should there be any doubts concerning appliance connection and handling please contact the producer (servicing department).
FOLLOW CAREFULLY THE FOLLOWING INSTRUCTIONS TO ENSURE A HIGH SAFETY LEVEL:
ATTENTION!
- Pay attention to conditions of environment you are working in. The motor machine produces poisonous burnt gases after engine starting. These gases can be invisible and odourless. Therefore you can never work in closed or poorly ventilated spaces with the machine. Ensure good lighting at your work. Ensure corresponding stability at work in wet, snow or ice, on slopes or uneven surfaces.
- Do not let foreign persons get to the machine. Keep visitors and persons standing by, especially children and ill or weak people, in safe distance from your workplace. Make sure no persons can touch the machine.
- Ensure safe storage of tools. Store machines that are not used at a dry, preferably elevated, place or lock them so that they were not accessible to other persons.
- Always use correct machine for each work. Do not use e.g. small appliances or equipment for works that actually need to be executed with big appliances. Use the appliances solely for purposes to which they have been designed.
- Be particular about reasonable clothing. Your clothes must be purposeful and must not limit you in your work.
- Use personal protective equipment. Wear safety boots with steel toe boxes and a non-slip sole.
- Wear protective glasses. Items may be thrown away.
- Wear hearing protection aids. Wear personal equipment for hearing protection, e.g. ear protectors.
- Hand protection. Wear firm gloves – chromium tanned leather gloves provide good protection.
- Transport. Always transport the crusher with the feeding hopper assembled. Make sure no-one can be threatened at machine shutdown. Ensure the appliance against turnover, damage and fuel escape.
- Remove the tool wrenches, etc. All wrenches, etc. need to be removed before machine starting.
- Be always careful. Pay attention to what you are doing. Use common sense at your work. Do not use the motor machines if you are tired. Do not work with the machine when impaired or intoxicated or when consumed drugs reducing concentration ability.
- Refuelling. The engine must always be switched off before refuelling. Always open the tank cover carefully so that overpressure could slowly escape and fuel did not squirt. High temperatures are generated on the machine body at work with the machine. Let the machine cool down before refuelling. Otherwise there could be fuel ignition and person burning. Make sure you did not overfill the tank at refuelling. If the fuel runs out, it needs to be immediately removed and the appliance cleaned. After refuelling, check whether the screw closure is fixed firmly to avoid loosening due to vibrations at work.
- Pay attention to damaged parts. Inspect the appliance before use. Are any parts damaged? In case of slight damage seriously consider whether the appliance will continue to work safely and faultlessly. Ensure correct adjustment and setting of movable parts. Do any elements not fit into each other correctly? Are any of them damaged? Is everything installed properly? Are all other assumptions of perfect machine working fulfilled? Any damaged protective equipment, etc. need to be repaired or replaced at authorised servicemen unless explicitly provided otherwise in the Operating Instructions. Have any faulty switches replaced in an authorised service. If your machine needs to be repaired, please contact your nearest servicing centre.
- Ensure that the protection cover (feeding hopper) of the crusher always works and was fitted in a manner that the knives were always totally covered. Always switch the engine off before any adjustment and maintenance. That especially applies for crushing knife replacement.
- Use approved parts only. Use only identical spare parts at any maintenance and repair. Contact your authorised servicing centre for this purpose.
Emergency Action
Apply the first aid adequate to the injury and get qualified medical assistance as quickly as possible. Protect the injured person from more accidents and calm him/her down.
For the sake of eventual accident, in accordance with DIN 13164, a workplace has to be fitted with a first-aid kit. It is essential to replace any used material in the first-aid kit immediately after it has been used. If you seek help, state the following pieces of information:
- Accident site
- Accident type
- Number of injured persons
- Injury type(s)
Disposal
Disposal instructions are illustrated in the form of pictograms on the device or packaging. Description of the pictograms is given in "Identification" chapter.
Disposal of transport packaging
Packaging protects the device against damage during transport. Packaging materials are usually selected according to their effect on environment and disposal methods and can therefore be recycled. Returning of the packaging back to circulation saves resources and costs for packaging disposal.
Parts of the packaging (e.g. foil, styropor) may be dangerous for children. Risk of suffocation!
Keep these parts of the packaging out of reach of children and dispose as soon as possible.
Operating staff requirements
The operating staff must thoroughly read the Operating Instructions before appliance use.
Qualification
No special qualification is needed for appliance use apart from detailed instructions by a specialist.
Minimum age
Persons above 16 years of age are only allowed to work with the appliance.
An exception includes youngsters working within their professional education to reach skills under the supervision of a trainer.
Use as designed
The motor branch crusher is designed for crushing of waste of branches, bushes, hedges and trees up to the maximum-specified diameter (waste of coniferous trees and similar species may lead to blockage).
ATTENTION!
The crusher is not suitable for e.g. earth processing and must never be used for crushing of metal parts, stones, soil, glass, textile, paper, cardboard or plastic materials. These materials lead to serious damage of the cutting tool. There is also a risk of stone blow hit.
The producer cannot be held responsible for any damage should any provision of the generally valid regulations or Operating Instructions be breached.

Always work with gloves.

Always keep the knives sharp and make sure the ng mechanism is thoroughly cleaned after work finish!
Technical data
| Engine design: | 4-stroke OHV |
| Max. output | 4.8 kW at 3,600 a min ^-1 |
| Capacity: | 196 cm ^3 |
| Revolutions (knife): | 2,400 a min ^-1 |
| Branch diameter: | max. 76 mm |
| Crushing system: | 3 hammer mechanisms2 double rotary knives |
| Tank capacity: | 3.6 l |
| Oil tank: | 0.6 l |
| Dimensions L x W x H in mm: | 1,060 x 780 x 1,350 mm |
| Noisiness: | LWA 110 dB |
| Weight app.: | 73,4 kg |
| Order No.: | 94360 |
Assembly and first putting into operation
ATTENTION: There must be NO fuel in the appliance during assembly!
Take the screws supplied (pic. 2a) and assemble the legs (pic. 2b).
Take the screws supplied (pic. 2c) and assemble the chassis. If not already assembled, assemble the feeding hopper to the appliance (pic. 3).
For this purpose, you must insert the gasket supplied between the hopper and body and tightly screw together with the screws and check nuts supplied (pic. 3a).
Assemble the handle for travelling on the feeding hopper (pic. 4). Use the screws supplied (pic. 4a) for this.
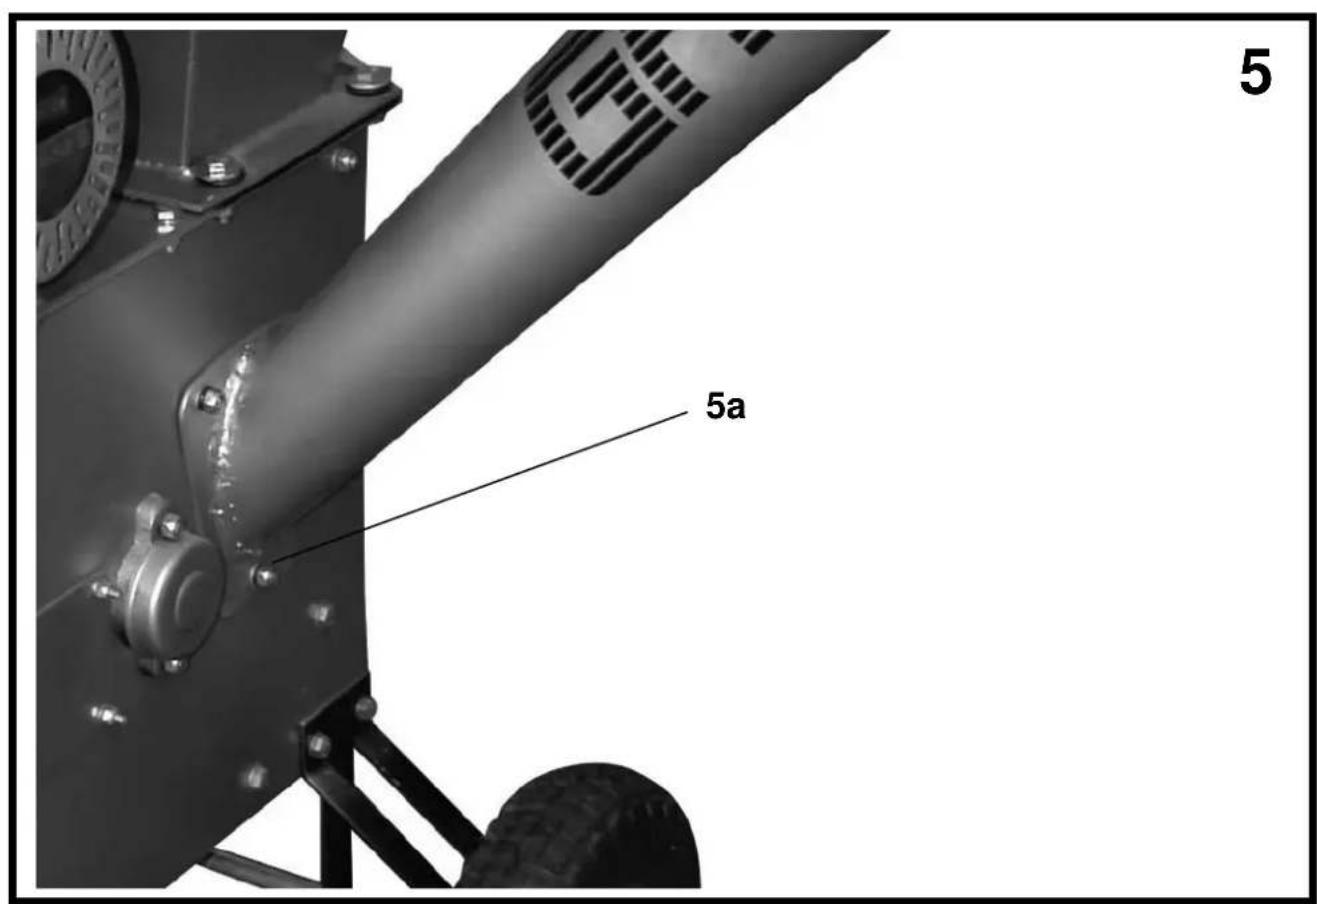
Assemble the side shifting part (pic. 5) on the appliance. Insert the shifting part on the screws and firmly screw on (pic. 5a) with the check nuts supplied.
First putting into operation
Place the crusher on an even, clean and dry basis
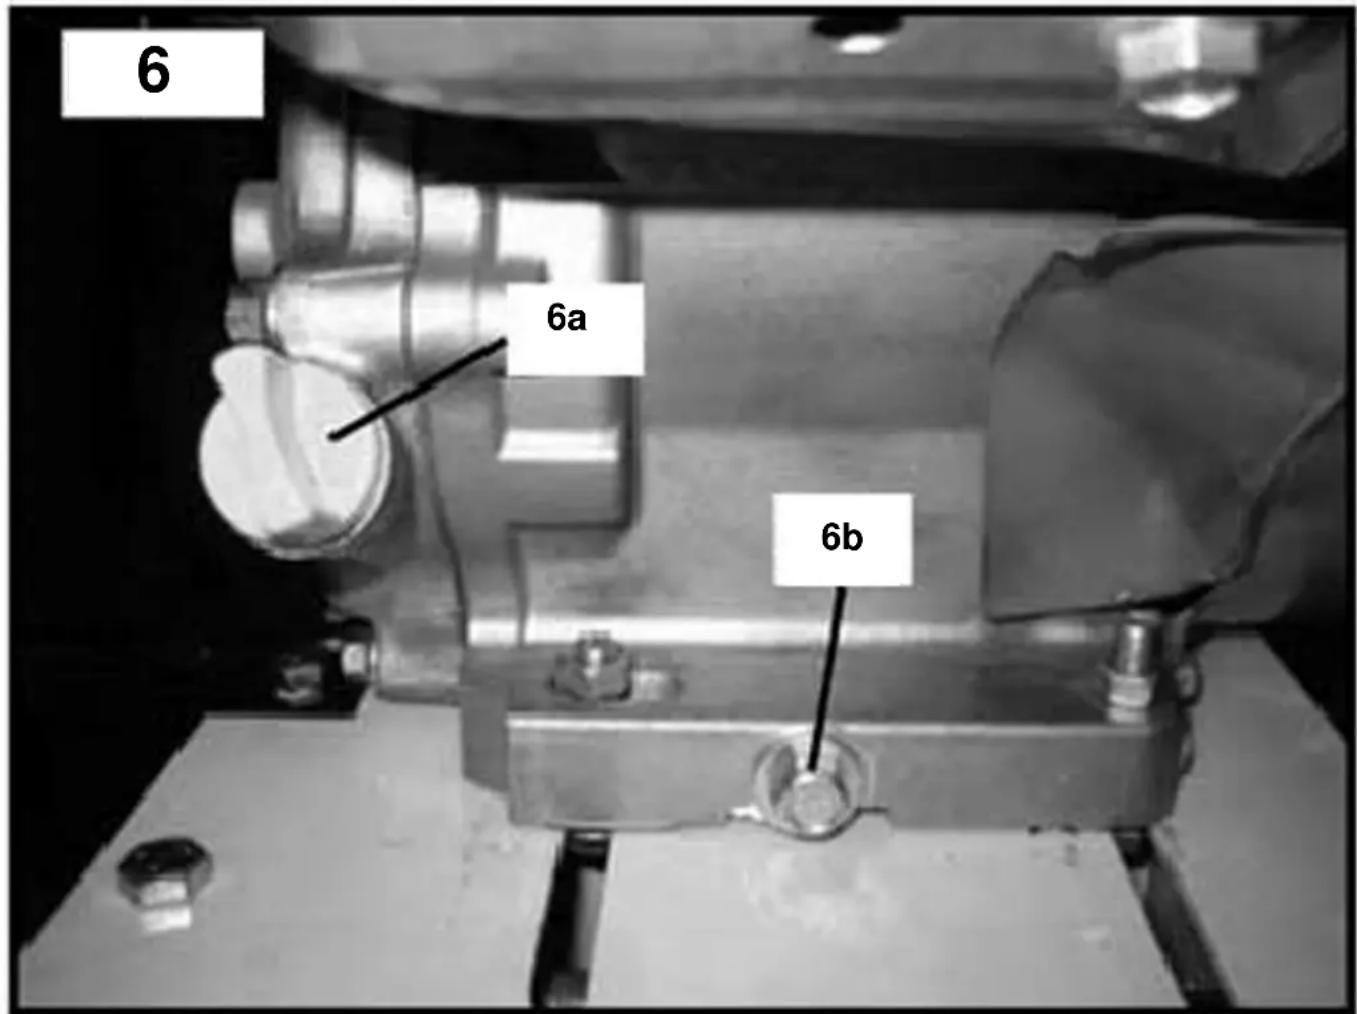
Motor oil filling (15W40), for this, screw the filling screw (pic. 6a) out and fill the oil up to the final engine oil filter screw thread. Now insert the dipstick and pull out again, by this you can find out the oil level according to the marking (pic. 7a).
Fuel up the tank (unleaded petrol), pic. 8 schematically shows the neck for tank fuelling, pic. 8a shows the maximum fuel level.
Engine starting
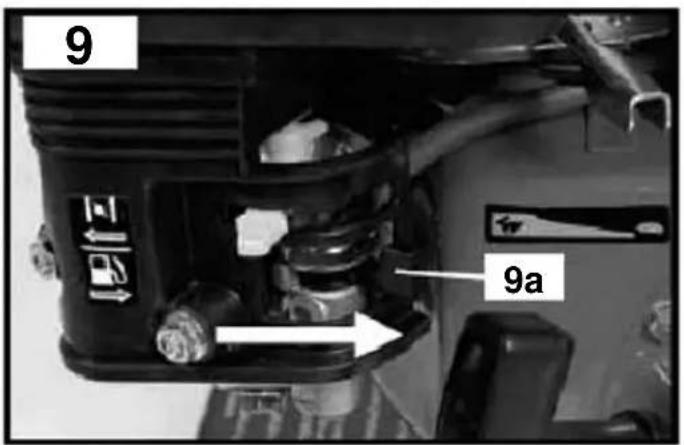
- Open the fuel cock (pic. 9a) – in the arrow direction
- Press the choke lever down (pic. 10a) – in the arrow direction
- Start the engine: main switch position in pic. 11a
- Ensure safe crusher standing and slowly pull the starter cable with perceivable resistance pic. 12) (the reverse starter shaft carrier is now fitted in and prevents motor damage due to slipping through)
- Now pull strongly the starter cable, the engine should start after 3-5 attempts (if no, repeat the procedure)
- When the engine starts and runs slightly warm shift the choke lever back to the operating position (pic. 13a)
- The engine revolutions can be set through regulation on the gas lever (pic. 14a).
Engine stopping
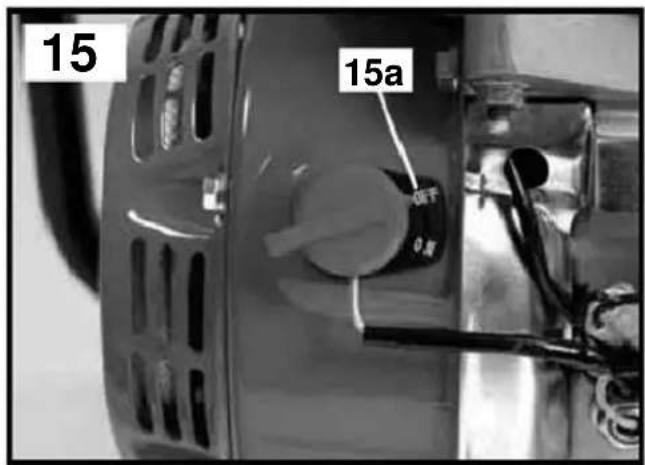
- Turn the main switch off to stop the engine: main switch position (pic. 15a)
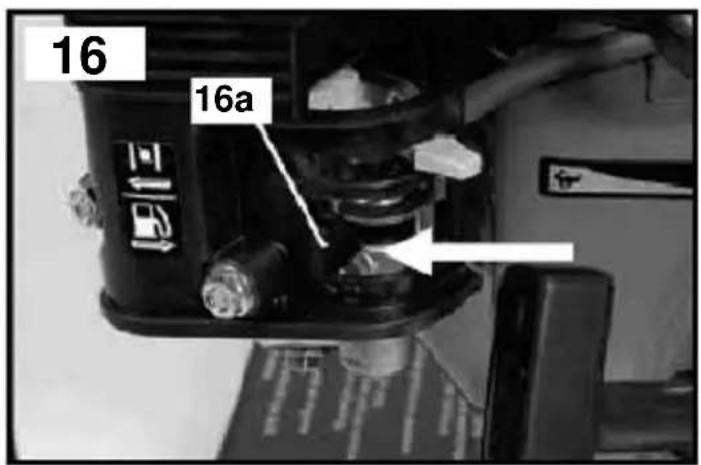
- Now close the fuel cock (pic. 16.a) – in the arrow direction
Crushing
ATTENTION: Ensure, if possible, DRY crushed material! Too wet crushed material necessarily leads to blockage and subsequent cleaning or maintenance!
Always keep your hands out of reach of the engine oil filters!
The petrol branch crusher offers the following two basic functions:
-
EITHER: crushing of leaves, branches, underbrushes and tiny loppings through the feeding hopper:
-
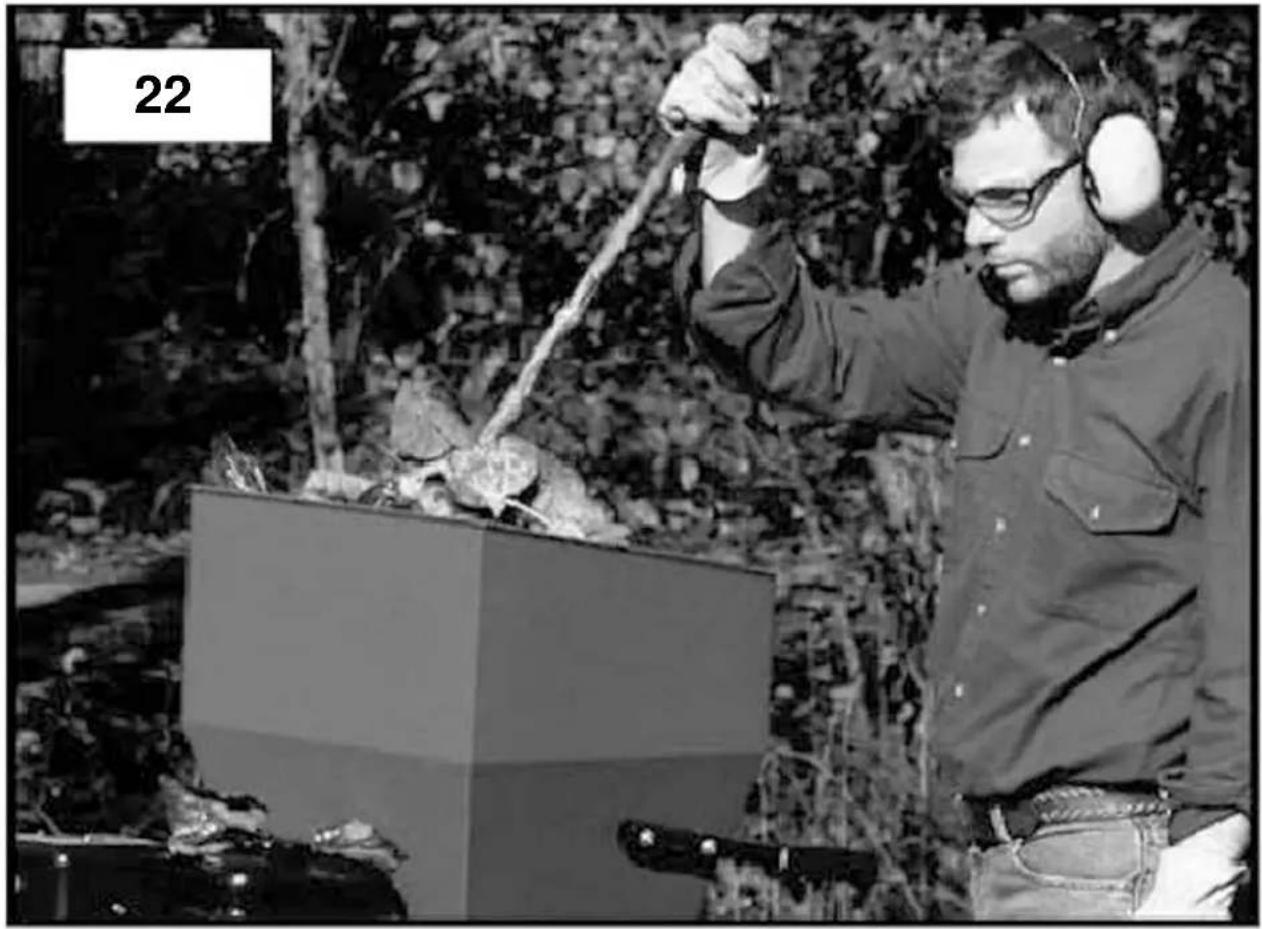
Slowly and carefully insert the crushed material to the top feeding hopper and use a rod (pic. 22) for this
-
Do not add too much material to the feeding hopper and do not push the material to the feeding hopper too strongly!
-
OR: crushing of branches up to maximum diameter of 76 mm
-
Ensure safe poise and stand sideways to the crusher (pic. 23)
- Remove tillers and leaves from branches you want to crush
- Always first insert the branches to the side shifting part with a stronger end (young branches can be crushed easier than the old ones)
- Push the branches to the side shifting part slightly, the crushing mechanism will automatically pull in the crushed material—please apply only reasonable pressure if necessary!
ATTENTION:
Never use both crushing functions at the same time!
For protection of the environment and persons around you, always reduce the engine revolutions when the machine is not used to full output or when you go for other material.
You must do the following before machine moving, transport, cleaning or maintenance:
- switch off the engine
• wait until all movable parts safely stop - let the engine cool down
- pull out the socket plug
Inspections and maintenance
Any repair must in all cases be only executed by trained authorised staffs.
The socket plug needs to be pulled out before any changeover, setting or maintenance of the appliance.
The hammer mechanisms can only be serviced by authorised or servicing staffs!
Safety instructions for inspections and maintenance
- Make sure petrol or oil did not run out – wear protective gloves at work near the knives!
Treatment, maintenance, repair, storage
General instructions, follow especially the safety instructions!
Regular maintenance is necessary to ensure faultless work of your crusher.
The feeding hopper, ejection hole and knives must especially be carefully maintained to prevent damage or injuries whatsoever.
Do the following before maintenance beginning:
- pull out the socket plug,
- stand up the machine safely,
- wait until the engine cools down.
Safety instructions for inspections and maintenance
Only a regularly maintained and treated appliance can be a satisfactory aid. Insufficient maintenance and care can lead to unforeseen accidents and injuries.
Work only when the appliance is cooled down and serviceable!
Feeding hopper cleaning
Clean the crusher and especially the feeding hopper after each use! For this, disassemble the side shifting part and feeding hopper (see pic. 3 and 5). Now you can clean the hopper and holes.
Discharge outlet and crushing screen cleaning
Remove the lid for discharge outlet maintenance: screw out the through-bolt and remove it along with the case (pic. 24). Loosen the top and external wing nuts and unhook the lid. Tip the crushing screen down by screwing out the wing nuts (pic. 25) and clean the discharge outlet.
Always use safety gloves! The hammer mechanism knives are very sharp! Use eventually a rod or other tool that cannot damage the knives.
Maintenance of knives
To turn the cutting knives, you must first remove the socket plug (engine is cooled down).
Disassemble the lid for discharge outlet maintenance as described in the above article (pic. 24/25/26).
Then, after screwing out the check nuts, remove the lid of outlet for crushing knives maintenance (pic. 1 note 9). Now you can see into the knife disc. Now you must place the crushing knives in front of the maintenance outlet. To do so, remove the crushing screen so that the knife disc could turn on the outer side of the hammer mechanism.
Remove the cotter key on the crushing screen axis (pic. 26) – arrow.
Pull out the axis with the case (pic. 27 - arrow) and remove the crushing screen.
Now CAREFULLY turn the hammer mechanism (use safety gloves)
Pic. 21a shows the position at which knives can be disassembled.
ATTENTION: The knives are extremely sharp!
Loosen the holding screws and turn the knives by 180°.
Make sure the knives are fitted well again.
If the knives are blunt, you can have them sharpened at a specialist or replaced with new ones.
Cleaning in general
Lubricate all movable parts with oil and safely re-fix all removed parts after each cleaning.
Clean the engine with a rag. Avoid sprinkling with heavy water current as water can get to ignition, fuel system and lubricant system and cause failures.
Air filter and fuel screen cleaning
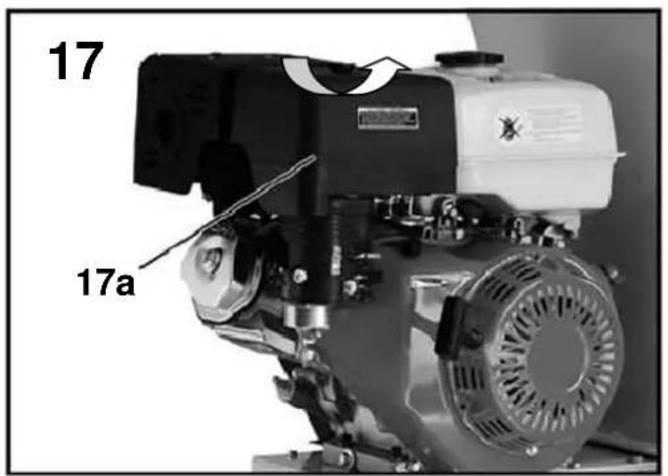
The air filter must be cleaned every 20-30 running hours. Remove the air filter cover by screwing out the wing nuts (pic. 17a - arrow) and pull out the air filter insertion.
Clean the filter with benzoline. Drop a few drops of motor petrol on the filter after cleaning. Assembly in the opposite order.
Clean the fuel screen by removing the tank cover and pulling out the screen (pic. 18a). The screen can carefully be blown-dry.
Transport and storing
The appliance can only be transported when the engine is off.
Clean the appliance thoroughly before storing.
Store the appliance at a clean and dry place with no fuel in the tank.
Storing
If the crusher is not used for a longer period of time, the following works need to be executed:
Thorough cleaning and repair of the damaged varnish.
Sprinkle the movable and stressed parts with anti-corrosive oil.
Crusher shutdown and storing
Do not store the crusher in wet rooms, in rooms with fertilisers, in stables and adjacent spaces.
At tipping, the motor oil can get to the combustion space and thus cause problems at starting or oil carbonisation.
Risk of strong corrosion creation.
Failure - Causes - Removal
| Failure | Cause | Removal |
| Jammed crushed material | 1. Blunt knife | 1. Sharpen or turn the knife |
| Output drops | 1. Jammed crushing mechanism | 1. Switch off the appliance and clean it |
| Engine does not start | 1. Empty tank2. No ignition spark3. Engine with excessive consumption4. Blocked knife | 1. Fill up full tank; check whether the carburettor contains fuel;Check tank vent pipe and perforate the hole in the tank cover with a needle2. Clean the ignition spark and keep the distance of electrodes at 0.6 – 0.8 mm (pic. 19 a) or use a new one;Check the ignition cable;Have the ignition checked at a servicing centre3. Screw out the sparking-plug, clean and dry it;Pull the starter cable several times while the sparking-plug is screwed out4. Make sure that the crushing mechanism was not blocked. |

EC-DECLARATION OF CONFORMITY
We, hereby declare the conception and construction of the below mentioned appliances correspond - at the type of construction being launched - to appropriate basic safety and hygienic requirements of EC Directives. In case of any change to the appliance not discussed with us the Declaration expires.
DECLARATION CE DE CONFORMITE
PROHLASENI O SHODE EU


- Marking:
- Appliance
- GH 650 B Petrol Branch Crusher
- Scope of application:
- Supply including (pic. 1)
- Warranty
- ATTENTION!
- Disposal
- Disposal of transport packaging
- Operating staff requirements
- Qualification
- Minimum age
- Use as designed
- Assembly and first putting into operation
- ATTENTION: There must be NO fuel in the appliance during assembly!
- First putting into operation
- Place the crusher on an even, clean and dry basis
- Engine starting
- Engine stopping
- Crushing
- ATTENTION:
- Never use both crushing functions at the same time!
- Inspections and maintenance
- Safety instructions for inspections and maintenance
- Feeding hopper cleaning
- Discharge outlet and crushing screen cleaning
- Always use safety gloves! The hammer mechanism knives are very sharp! Use eventually a rod or other tool that cannot damage the knives.
- Maintenance of knives
- ATTENTION: The knives are extremely sharp!
- Cleaning in general
- Air filter and fuel screen cleaning
- Transport and storing
- Storing
- Crusher shutdown and storing
- EC-DECLARATION OF CONFORMITY
- DECLARATION CE DE CONFORMITE
- PROHLASENI O SHODE EU
Brand : GUDE
Model : GH 650 B
Category : Plane