PERFECT STEAM DG8960F0 - Steam iron ROWENTA - Free user manual and instructions
Find the device manual for free PERFECT STEAM DG8960F0 ROWENTA in PDF.
| Brand | Rowenta |
| Model | Perfect Steam DG8960F0 |
| Product type | Vertical steam garment steamer |
| Water tank capacity | 3.785 liters |
| Power | 1500 W |
| Power supply | 220-240 V, 50/60 Hz |
| Flexible hose length | 1.5 m |
| Telescopic pole height | Adjustable up to 1.5 m |
| Weight | 4.5 kg |
| Dimensions (L x W x H) | 30 x 25 x 160 cm |
| Heating time | Approximately 60 seconds |
| Steam flow adjustment | Variable |
| Included accessories | Fabric brush, upholstery brush, lint brush, clip accessory, integrated hanger, curtain extension (depending on model) |
| Control type | Foot pedal on/off button |
| Cord winder | Yes, foot pedal |
| Maintenance and descaling | Recommended once a year or every 50 hours of use, use a citric acid-based descaling agent |
| Recommended water type | Tap water (mix with half distilled water if hard water) |
| Safety | Auto shut-off not mentioned, do not use without water, do not direct steam at people |
| Repairability | Rowenta authorized service centers |
| Warranty | 2 years (depending on legislation) |
Frequently Asked Questions - PERFECT STEAM DG8960F0 ROWENTA
User questions about PERFECT STEAM DG8960F0 ROWENTA
0 question about this device. Answer the ones you know or ask your own.
Ask a new question about this device
Download the instructions for your Steam iron in PDF format for free! Find your manual PERFECT STEAM DG8960F0 - ROWENTA and take your electronic device back in hand. On this page are published all the documents necessary for the use of your device. PERFECT STEAM DG8960F0 by ROWENTA.
USER MANUAL PERFECT STEAM DG8960F0 ROWENTA
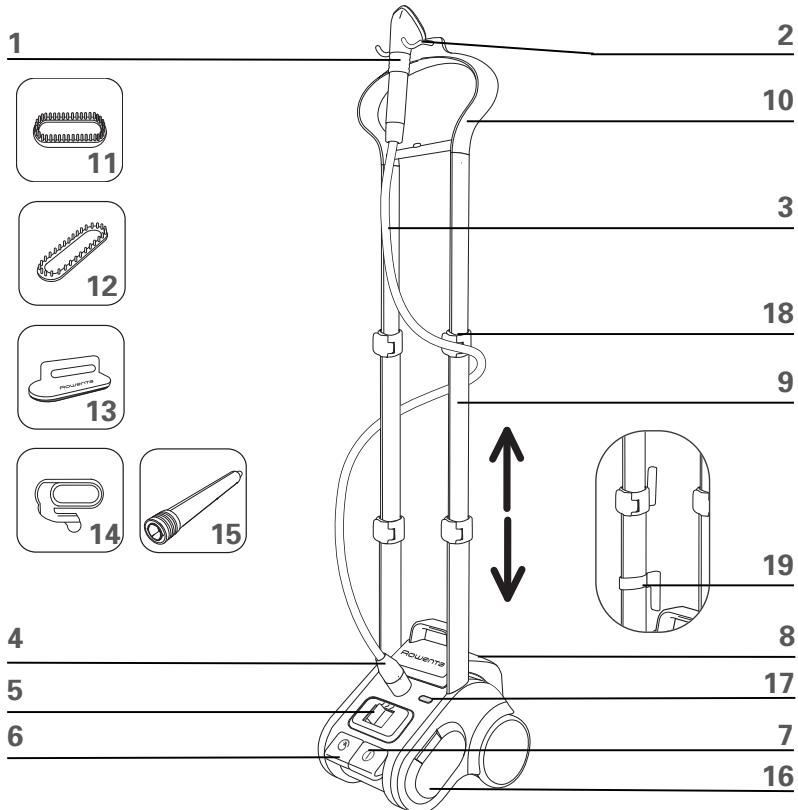
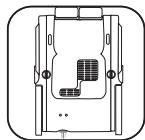
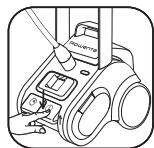
- Handle
- Steam head
- Flexible fabric hose
- Hose connector
- Variable steam control*
- Foot operated cord reel*
- Foot operated On/Off switch
- Removable water tank
- Double telescopic pole
-
Integrated hanger*
-
Fabric brush *
- Upholstery brush*
- Lint pad*
- Crease attachment*
- Curtain rod extension*
- On board accessories storage
- Power indicator light
- Clips for pole fastening
- Power cord clips*
*Depending on the model: these accessories are specific to certain models or available as an option.
IMPORTANT SAFETY INSTRUCTIONS
When using your appliance, basic precautions should always be followed, including the following: READ ALL INSTRUCTIONS BEFORE USING
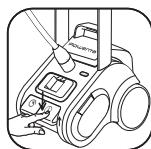
-To reduce the risk of contact with hot water emitting from steam vents, check appliance before each use by holding it away from body and operating steam button.
- Use appliance for its intended use only.
- To reduce the risk of electric shock, do not immerse the appliance in water or other liquids.
- Appliance should always be turned "OFF" before plugging or unplugging from outlet. Never yank the cord to disconnect from the outlet, instead grasp plug and pull to disconnect.
- Do not allow cord to touch hot surfaces. Let appliance cool completely before storing away. Loop cord loosely around appliance when storing.
- Do not direct steam at people or animals, or use steamer on garments while they are being worn.
- Always disconnect appliance from electrical outlet when filling with water, emptying or when not in use.
- Do not operate appliance with a damaged cord or if the appliance has been dropped or damaged. To avoid the risk of electrical shock, do not disassemble or attempt to repair the appliance. Ship it to the nearest authorized Rowenta approved service center for examination and repair. Incorrect reassembly can cause risk of fire, injury and electrical shock to persons when the appliance is in use.
- This appliance is not intended for use by or near children and other persons whose EN physical, sensory or mental capabilities or lack of experience and knowledge prevents them from using the appliance safely without supervision or instruction by a responsible person to ensure that they can use the appliance safely.
- Children should be supervised by the responsible person to ensure that they do not play with the appliance.
- Burns could occur from touching hot metal parts, hot water or steam. Use care when you empty a steam appliance, there may be hot water in the tank.
- Pour water in water tank only.
- Never drop or insert any object into any opening or hose.
- Always keep the hose and nozzle elevated above the water tank.
- Steam only in an up and down vertical motion. Never use steamer in a horizontal position or tilt into a backward position, this may result in hot water discharge.
- Do not place the steam nozzle directly on any surface or the appliance power cord while it is hot or plugged in. Use the stand provided.
- When changing attachments, please be sure the unit is off and no steam is being released to avoid contact with hot water.
- Use caution when changing attachments, as they may contain hot water from condensation. Ensure the attachments are cooled off to avoid contact with hot water.
- The use of accessory attachments other than those provided by Rowenta is not recommended and may result in fire, electric shock or personal injury.
- This unit is for indoor use only.
SPECIAL INSTRUCTIONS
- To avoid a circuit overload, do not operate another high wattage appliance on the same circuit.
If an extension cord is absolutely necessary, a 15-amp rated cord should be used. Cords rated for less amperage may overheat. Care should be taken to arrange the cord so that it cannot be pulled or tripped over.
SAVE THESE INSTRUCTIONS
ENVIRONMENTAL PROTECTION FIRST!
① Your appliance contains valuable materials which can be recovered or recycled.
- When disposing of it, take it to a collection point or an approved service center.tt

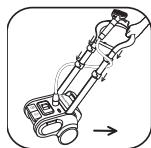
Assembly :
Preparation:
- Place the base on the floor and remove the water tank.
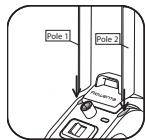
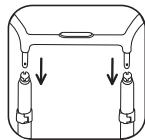
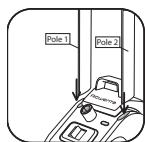
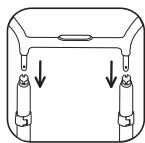
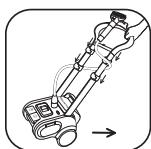
Install pole in main unit:
- Insert pole 1 and 2 according to the diagram to the right, ensuring the marks on the unit and the poles line up.
- Press pole firmly into place.
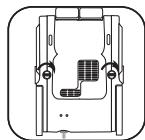
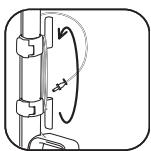
Locking the pole :
- With the poles inserted lay the base on its side.
- Turn the 2 lockbars on the base of the steamer 90^ to secure the poles.
Use a coin or similar object to turn the lockbar.
- After the poles are locked, pick up the unit and return to its use position.
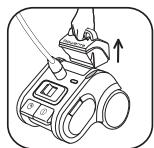
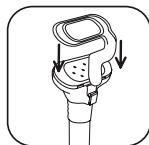
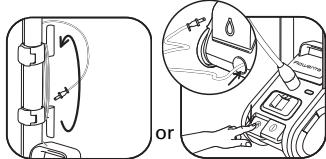
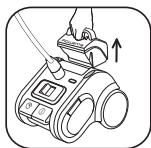
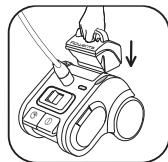
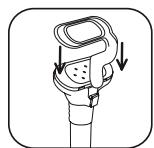
Installing Integrated Hanger :
- Take the hanger with the brush hooks facing to the front.
- Check for correct orientation with the index marks matching.
- Insert both ends of the hanger into the pole connection and press both ends simultaneously into the pole until the hanger properly engages.
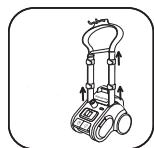
- If it is required to dismantle the pole from the main unit, tilt the appliance and unlock the pole first.
- Then place the appliance back into it's upright position. Expand both poles to the desired height by unlocking them, pulling them gently and locking them. Warning: Unlock the four clips while keeping integrated hanger in your hand.
- Dismantling of the hanger from the poles by the customer is not foreseen.

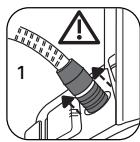
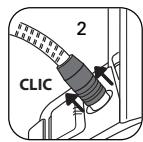
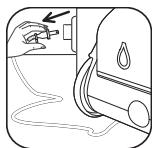
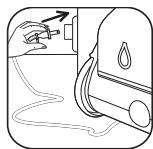
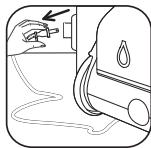
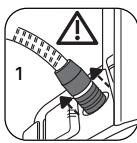
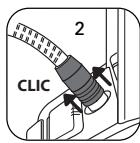
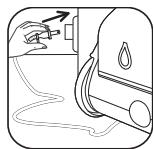
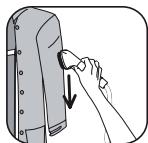
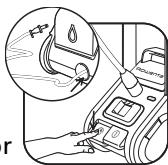
Attaching Steam hose to the main unit :
1) Insert hose plug into hose connector on main unit.
2) Secure hose connector by pulling clamping ring upwards.
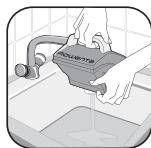
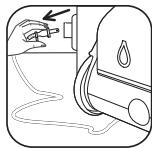
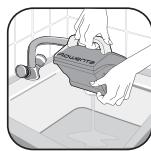
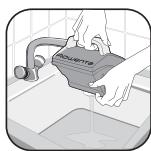
Filling the water tank
- Ensure that the steamer is unplugged. Remove the water tank from the base of the appliance by pulling it upwards. Unscrew the lid and fill the tank. The tank holds 128 ounces.
IMPORTANT
Never use water that contains additives (starch, perfume, aromatic substances, softener, etc) in the steamer. Additives such as these can affect the properties of the steam and lead to the formation of deposits.
- The steamer is designed to be used with TAP WATER. If the water in your area is hard, Rowenta recommends that you mix half tap water and half distilled water, which reduces the hardness; or just use inexpensive bottled spring water.
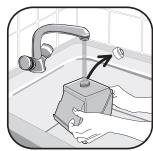

After closing the lid, place the water tank on the base of the appliance.
Tips
- We recommend checking the garment care label for manufacturer recommendations. We also recommend testing the garment on an unobtrusive area such as an inner seam.
- Read the recommendations for the maintenance of the fabrics on the labels of the clothing to be steamed.
- Test the strength of the colour of the fabric on an area of the garment that is not visible (inside of a hem).
- Avoid contact between the steam head and silk or velvet.
- Certain garments are smoothed more easily on the reverse side.
- If you are using the steam head at a position close to the ground, raise the hose frequently in order to avoid the formation of condensation.
You may hear a gurgling noise if the hose is obstructed in any way. - Heavy fabrics may need to be steamed longer.
- Be careful at all times.
Use
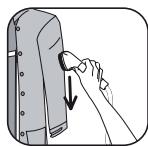
Warning: Never steam a garment while it is being worn. The hose and steam head may become hot during use. This is perfectly normal. Be careful and avoid any prolonged contact.
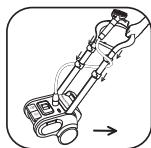
- Only operate the steamer on the floor clear of any materials which may obstruct the base of the steamer (flat and horizontal surface). Do not obstruct the openings on the lower part of the appliance.
- If necessary, expand the poles to the desired height by unlocking them, pulling them gently and locking them again. Unlock the four clips while keeping integrated hanger in your hand.
- Plug in the power cord and turn on the power using the foot operated pedal. The power light will illuminate. The steamer is operating.
*Depending on the model: these accessories are specific to certain models or available as an option.
- Depending on the model the steam amount can be set to the desired level with the variable steam control.*
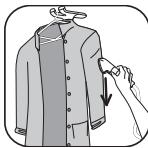
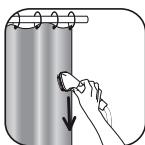
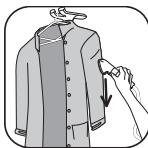
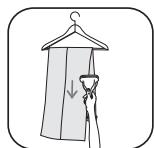
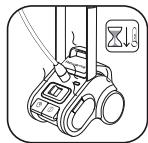
The unit will produce steam in 60 seconds, when in max position of variable steam control. - Put garment onto the hanger head. Grasp the steam head with the steam vents pointing away from you. Start steaming by touching material lightly with steaming head and moving in an up/down vertical motion. Beginning at the top of the garment move in a downward direction. Always steam in a vertical position.
- During use, the hose may make a gurgling noise. This is a normal occurrence due to condensation. If you hear the gurgling noise, hold the hose up to direct the condensation back into the appliance.
Warning: Do not allow the steamer to run dry.
Warning: Never use the steamer more than 3 hours.
Warning: Do not bend the steam hose during use or storage.
Accessories (depending on model)
Before using an accessory, check the manufacturer recommendations.
It is also recommend that you carry out a test on part of the fabric which cannot be seen.
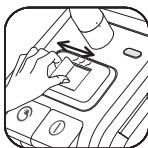
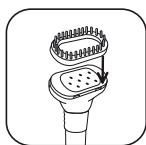
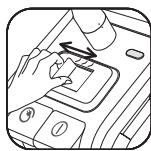
Upholstery brush*
The upholstery brush is used to aid steam penetration into difficult, heavy fabrics, for faster results.
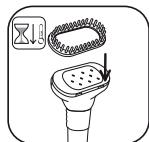
Be sure unit is unplugged and completely cool before attaching accessories.
- Attach the upholstery brush to the steam head by lining up the bottom of the brush with the bottom of the steam head. Gently push the top of the brush onto the steam head until it clicks.
- Gently brush the area to be steamed with the grain or nap of the fabric.
- Remove the upholstery brush once the unit is unplugged and completely cooled down. Remove it by pressing on the tab on top of the brush while pulling it forward.
Fabric brush*
The fabric brush opens the weave of the fabrics for better steam penetration.
Be sure unit is unplugged and completely cool before attaching accessories.
- Attach the fabric brush to the steam head by lining up the bottom of the brush with the bottom of the steam head. Gently push the top of the brush onto the steam head until it clicks into place.
- Gently brush the area to be steamed with the grain or nap of the fabric.
- Remove the fabric brush once unit is unplugged and completely cool. Remove it by pressing on the release tab on top of brush while pulling it forward.
Crease attachment*
- Gently push the crease attachment into place on the steam head.
- Push on the handle to open the crease attachment.
- Place the garment between the crease attachment and steam head.
- Release the handle.
- Starting at the top of the garment, move the crease attachment in a downwards motion.
- Once unit is unplugged and completely cooled down, remove the crease attachment by sliding it off of the steam head.


*Depending on the model: these accessories are specific to certain models or available as an option.
Lint pad*
The lint pad is a separate accessory and cannot be attached to the steam head. You can use the lint pad independently from the steamer.
The lint pad removes hair, lint and animal fur for a professional finish.
- To use the lint pad, slowly brush the clothing with the grain or nap of the fabric.
- The pad can be cleaned by brushing it in the opposite direction. We recommend cleaning the pad on an old cloth that can be discarded.
After use
After using the steamer, switch the power off (power indicator light will go out) and unplug the appliance.
- Hang steam head in an upright position on top of hanger when not in use.
- Push the cord reel pedal to store the power cord, or wrap the cord around the power cord storage clips.*
- Empty water tank each time_before storage.
- Do not carry the steamer by the water tank handle. If you grab water tank handle you will remove the tank. The unit includes luggage style wheels for added convenience when transporting.
Warning: Never touch the steam head until it has cooled down completely.

Cleaning
- Clean the main unit with a damp cloth. To maintain maximum performance, your steamer must be descaled occasionally. The time between descending operations depends on the quality of the water and the frequency with which you use the appliance. The appliance must be descaled at least once a year or after 50 hours of use.
- To carry out a descending operation, follow the following steps:
- Ensure that the appliance has cooled down completely. Unplug the unit and remove the steam hose from main unit. Collapse the telescopic poles.
- Fill the water tank with fresh water and attach it to the main unit again, allowing water to fill the boiler.
- Remove the tank from main unit and empty the water from the boiler through the open hose connector into a sink. Scale and other residues will be rinsed out.
- Repeat Step 2 and 3 several times until the scale has been removed.
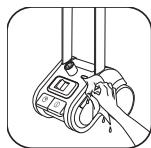
TIP: For more effective descending, after every 50 hours of use, use descalers available at your store recommended for garment steamers or electric kettles. To avoid irritant vapors, use products based on citric acid only.
Follow the products instruction for use with garment steamers or electric kettles.
*Depending on the model: these accessories are specific to certain models or available as an option.
Troubleshooting
| Problems | Possible causes | Solutions |
| There is no steam. | The appliance has not been turned on. | Check that your appliance is properly plugged in and press the On / Off button (on the front of the appliance). The power light should turn on. |
| The hose has been obstructed. | Check that the hose is not bent or twisted. | |
| There is no water left. | Turn off the appliance and refill the water tank. | |
| The steam flow is low. | Your steamer has a build-up of scale because it has not been rinsed out regularly. | Descale the steamer at least once a year or every 50 hours of use. If your water is hard, increase the frequency. |
| There is no water left. | Turn the appliance off and refill it. | |
| Water runs through the holes of the steambrush. | There is condensation in the hose. | Never use steamer in a horizontal position. Hold the hose vertically outstretched and wait for water to flow back into the steamer. |
| The steamer takes a long time to heat. | Your steamer has a build-up of scale because it has not been descaled regularly. | Rinse out the steamer at least once a year or every 50 hours of use. If your water is hard, increase the frequency. |
If it is not possible to establish the cause of the problem, seek the assistance of an Approved ROWENTA Service Center www.rowenta.com

BESCHREIBUNG
DZ5130 - DW4010 - DW4020 - DW5010 - DW5020 -
DW5030 - DW5035 - DW8010 - DW8011- DW8020 –
DW8110 - DW8111 - DW8120 - DW9010 - DW9020 –
DW9025 – DW9030 – DW9035 – DW9040 – DW9110 –
DW9120 - DW9125 - DW9130 - DW9135 - DW9140 -
DA1510 - DA1550 - IS9100 - DR5050
Belge Izin Tarihi
:14.05.2009
Garanti Belge No
:69129
Azami Tamir Suresi
:30gun
Garanti Suresi
:2y1l
URUN KULLANIM ÖMRÜ 7 YİL
Uretici Firma:
GROUPE SEB International
He 6blcnyaHNO OTKIOUeH OT CTeN 3NEKTOPITANH NIN YTO Ha Hero HIKTO cIyauHNO He HAcTyPnII.
XPAHNTE 3TV INHCTPYKUIO
3aunTm OkpykaioyUcpeNy!
① Baue yctpoiCTBO COCTOHT 36 60JIbIoro KOJIyIeCTBA MaTePnAIIOB, KOTOpbIe MOrT 6bITb BOCCTaHOBJIeHbI INI NOJIIeXaTb NOBTOPHOMY IcNIOJIb3OBAHIO.
EcnBb60bIe HnyJaTeCb BycTpoiCtBE,OTHeCnTe EBOyHK npHema 6bTObIX OTXoOB INAkkpeDITOBaHHbI CEHTP TEXHnueCKOrO OcCnyKbAHm.

C6opka:
IoproToBkaKpa6oTe:
- YctahOBInTE KOpNc yCtPoINCTBa Ha NOn I ChIMnTe pe3epByap IaR BOIb.
YCTaHOBka CToiKn Ha yCTpoIcTBO:
BCTabBe Tc0Ikn 1 n 2 KaK NOKa3Ano Ha CXeMe Cnpaba, npOBepeTe, YTO6bI cTOnKn 6bln yCtAHOBJIeHb B COOTBETCBN C OTMETKaMn Ha yCtPOINCTBE.
- HanaBNTe Ha CToiKn Do Ix POnHoi ycTaHOBKn Ha npnbope.
ΦHKCaUNA CTOEK
- Pocne TOrO, KaK CToiKN BCTaBHeHbI, NIOJKeTc KOpNc yCtpoiCTBa Ha 60K.
-ПовернITE Двасторжн Крелен,在 PaCnoIIOKeHHbIe Ha KOpNcEOTnapBaTeJI,Ha 90o n3aФИКСИРУТЕ TAKIM O6pa3OM CToIKN.
-ДяЗTOBOBCNOLb3yTEcBMOHEToI INI INpeDMeTOM NOO6HOH φOpMbI.
- 3aФИКСИРОВАВ CTоикн, NOCTaБТЕ KОПпс уСтpoIСТВа B pa6Oчe noLOXeHne.

YCTaHOBka BCTpoEHbIX OJExHbIX IJIeUNKOB:
- Bo3bMITE pIeUHK TAK, YTO6bl CTOPHa C KpIouKOM DnIa 5eTKN 6blna nobepHyta Ka Bam.
-ПовьзусьOTМТКами,поверьтepаВиьность yctановки Oдж-ных плейников.
BCTabbTe oba KOHua Odekhbx PIIeYHKOB BΦNKcPHyUOJIne HakoHeYNKINI pERyIINPOBKN IINIbI CTOEK N OJHOBPMeHNO HaIaBnTE Ha Oba KOHua Do TEX nop, NOKA Odekhbx PIIeYHKIN He 3aΦNKcPHyOTcB HakoHeHNKAX.
B Cnyaee ecn Heo6xOIMO cHbT cToKn c Kopnyca yctpoiCTBa, nepeBepnHTe Kopync n npCtynaiTe KpackpennHeIO CToE.
- Pocne 3TOrO nobepHnite npIb6p BeptnkajbHo. OtperynnpyTe JenaemyIO BbCOTy CTcEoK pnp IN packpeIeHN, 3aTeM octOpOKHO notHnRIN IN KEBxN CHOBA 3aQHKcPHyTe.
PpeDynpexJeHne: Ppi packpeIeHnIeTbIeX KpeEeXhIx CkO6 npo- DOnJaTe pniDepeXnBaTb BCTpoEHNble OeXHbIe PJIeHNKpyKo.
BnaIbIy yCtpoIcTb 3aIpeIaETCs CHMaTb IJIeUKN CO CToeK.

KpeJIenHe naponipoBoJa K yCTpoIcTBy:
1) Bctabte KOHeu napopnpoBaB rHe3do, paCnoJoxHHOe ha yCTpoIcTBe.
2) UctaHOBITE 3axmHoe KOJIbI O N 3aФИKcIpyTe rHe3do.
HanoJIHeHne pe3epByapa BoJoi.
CneIHTe 3a TEm, YTObIy yCTpoIcTBo 6blIO OTKIOUHO EN OTeN 3NeKToPONITAHIN. POnTHIne pe3epByap IJnA BOJI KBEpy N ChIMITE erO c Kopnyca yCTpoIcTBA. OTBNIHTe KpbIuKy n 3aJIeIte BOy B pe3epByap. O6bEmpe3epByapa, 3,785 n.
BHIMAHNE
3aPpeaaTcra NcOJIb3oBaTb BDOy C PnIMecMn (TaKIMN KAK KpXMaI, 3ΦHnIe MaCJa, apOMATn3ATOpSi, BOIOCMYnAOUIue cpeCTBa T.I.D.) Dnla 3aONJIHeHmpe3epByapa OTnpaIBaTeJIA. 3TN pIMcEi MOrT INMeHnB CBOIcTBa npa I npINBoITb K o6pa3OBaHnIO ocAka.

- Bby moxete nCnObl3OBAbT dIy OTnapnbATEB OBO yN3-nOD KpaHa. Ecln BOda, KOtopyo BBy nCnObl3yeTe, cOdepXNT N3BeCTb, Rowenta peKomeHuyET CMeWbAIB TBOy HN3-nOD KpHa N DCNTJINIpOBaHHyO BOY B paBHOM COOTHOWeHN, 6JIaOapra Yemy CHNXaetc JXeCTKoCTb BOI; TAKXE MOxH0 nCnObl3OBAbT pOndNKOByIO BOY B 6ytBJkax IJN TOJbKO DnCTNIINPObaHHy BOY.

- 3akpoIte KpbIuKy, yctaHObITpe3epByap dIra BOdIha KOpTyc yCTPOIcTBA.
Pekomehdaquim
- Pekomehyem CbeptbCn namrTkno yxOy 3a oJedko, Ha KOTOPOMHMeOTc INCTpyKmN O TPOINBODITJI. TaKke, pekomehyem IINI pOBePkn paobtby UcTpoCTBa ObpaotTaB ChaJa HeBUNIMyU cAteb OJExdb, HApIMep, BHyTPEHNI IOB.
• Ptochintaite pekomenlaunu no Xydu 3a TkaHbNo ha BnKpXh, NmeiouxhaN ha npOrnaHbaMeoM oJdeXe.
YIOCTOBeBTEcB Y CTOCTOHYBOCTN LBJETA TKAHIN, NCSNOL3yI DnI 3T0G HEBNDMYO OACTb ODEXDb (BHTyHNB CTOPONA KAMb).
Cneinte 3a TEM, TTO6bI napOBaR pyUka He BXOUNla B KOHTaKT C ueKOM nnBapxATOM. - HekOTOpBie n3dEInn 3ΦΦeKTHBHe e OTRJaxnBaIOCTc c N3HaHN.
- Eejn BBy IaIaIe NHHIOO Yacb 13dJIeNia, paIOnIOXeHHy BOINiO T ONIa, Heo6OxIMo KAc MOXn Ouae npINoIDmAtb NapopPOBDo, UTOb IIu36ExKaTb KOHeDcaUmpa. BybnKAnBe xapakTePo H Tex CnyuAox, KOrDa 3atpyDHeNA pIOxOIMocbTaPbNPOBoDA.
-Дяпогглaxивань 60лee ПLOTHых TkaHeN MOxET NOHaIObHTcBс 60ЛьшЕ BpeMeHn. - NocToaHNO co6IIOdaTe MepbI npEdoCTopoxHocTN.
PpimmeHne
IpeynpexdHeMe:3aepaaetcraTgnaTbOeXdy HnocpcedtBeHNO HaJeNoBKeB. B npocce CrraxkNn napopboDn I npaoBa PyKc MaYr HapReBaTcBdo DIO BbcOKIX TEmTpAtpy. 3TO HoPmaJIbHO.CobNiade MebpIpeoCTOpoxHcOtn N n36eaiTe NInTeJbHOro KONTAKTa C 3TIMM DeTajMI.
- Ppi pa6ote c yctpoiCTbOM Heo6xOIMO y6pa7b C n0la IIO6be npedMeTb, npenrTCTBtuOUInepeDnIXeHNO pONLY OCHOBt OTnpaIBaTeL (OTnapNBateIb DOnJcH pa6oTaB Ha POBHO rOpN3OHTaBH NOBepxHOCTn). CneIte 3a TEM, YTO6b OTBepCTnA HNXHe JactnycyTOPTCbHe 3akynopnbALncb.
B Cnyaee Heo6xOdmocTOn Otperynpyte XeJemaMyIO BcOTy CTOEK npmIX packpeJIeHIM, 3aTeM OCTOPOXHO NtOHTHE IN KBEpx I CHOBA 3aФИКСРИYte. PnI pACKPEIIHIM YeTbIPex KpEneKbIx CKoB nPoJONKaIte DePkXbT BCTPOEHHBe OeJHbIe PIneHKn pyKoR.
BCTabBe NtJky NITAHN B PO3ETKY IN KBNIOHTYE YCTPOICTBO HAXAHTEM HOXHO KHONK. 3aROpaETcN INHINKATOP NITAHN. OTnapNBATEbIb NaHInHaet pa6OTatb. - KeJaemoe KOJInueCTBO npa MoKET 3aDaBaTbC C NOMOuBIO KHOINIpeRyIINPOBKN IOnaHnnpa, B 3aBNCIMoCTN OT MOeJIIN*.
-手册地甲尼尼尼尼尼尼尼尼尼尼尼尼尼尼尼尼尼尼尼尼尼尼尼尼尼尼尼尼尼尼尼尼尼尼尼尼尼尼尼尼尼尼尼尼尼尼尼尼尼尼尼尼尼尼尼尼尼尼尼尼尼尼尼尼尼尼尼尼尼尼尼尼尼尼尼尼尼尼尼尼尼尼尼尼尼 - Haedehe OeJy Ha IJIeYKn. Bo3bMITE B pykn napoyu pky; cIeIne npn 3OTM, YTObI OTBepCTNpaCnpedEHeHnna papa6bln HapapBeHb NpOTHOBONOJXHy OT Bac CTOpOHy. HauNHTe rAnkxy, AKKpyaTHo npiTpaNRBaRcB KTKaHN npAOBOPyKoB, BInOnHra BEptKaJIbIbe DIBXeHnca CBepxBy BN3. HauHaTe rAnDHTb OeJdy CBepxY, NoctenEHNO onycsckB HNI. BcERda OTnapBAIte TAKIM Obpa3OM, YTObI npO npOBoND haxOINLCB B BEPTKaNBJHOM NOLOXeHN.
B naponpobode BO Bpemr pa60bI MOxET Cbluata6blykBaHbe.3OT 3ByK yBIAETC ECTeBHeHbM pe3yNbTaOM KOHDeHCaHn napa.EcJN BBy ycBIsITE 6blykBaHbe B naponpobode, npnoDHNmnte ero taK, TTObI HnapaBtB KoHDeHCnPOBaHHn nap bYctPOINCTBO.

PepnypexHHe: 3anpeaetcncnOeBabot OTnpnBAtb6be3B0d. PepnypexHHe: He nCnOeBcyte OTnpnBAtb6oJe3 Cacob noDpa.
Ipeynpexdene: He cnae TaepoipobOIO BO Bpem paobtI npi npu y6opKe Ha xpaHHe.
Pnncnoc6JeHnB (B3aBcNMOCTOnOTMOdeJI)
Ipeed nCIOJIb3OBAHnEM npNCIOcO6JIeHn O3HaKOMbTeCb c peKOMeHdaIaIyMn IPOUN3BOIDITeIa.
Kpome TOrO, COBetyem Onpo6obatb npncno6beHne Ha HeBnIMoH yactn OeJxbl.
HacaKa-TeTka IJMa Me6eBHOo6nBKn\*
ElaorapadaHacaJa-ueTKeIaMBe6nHoO6bIKnapnpOHkaertIyIb6OKoBCTpykTyPi0LbHxIpybIXTKaehiNpO3BOJraeBTbCTPOD6uBaBtcbpeBOcXODhBXpe3YJbTATOB.
PepTeM, KaK 3aKpeINb npncocO6JeHne Ha yctpoIcTB, y6eInTcBt, YcTO pCCTBO OTKIOUeHO O TcETn 3JIeKTPoII TaHH IN NIOHOCTbO OXJAAKeDeHO.
3aKpeHnTe HacaIky-TeTky Ira MebeIbHO NOBKN Ha npaBOBpyKe, BbOBoHr HIXHIO YacTb 5eTKn PO HIXHHe Tactn npaBOypyKn. 3aΦHKcnpyTe HacaKy Ha npaBOB pyKte JERkMm HaxaTMem HaBepXHO OAcTb 5eTKn DO NOIPOBJIeHnIeJka, yKa3bIAIoEro HaΦKCAuHIO HacaKD.
- AkkypaTHO npoIITeCb 5eTkoI IIO HAMEHHomy yAcTky TkaHN, yHIN-TbIBaA faktypu nn HaprabHeNBELOKOH TkaHN.
- Pénép TEM, KAK CHaTb HacaIky -Ie TkY IaI MbeIbHoi ObIbKIn, OTKJIIOHTy UcTOPTBIO I3 CETIN 3NKeKTPOINTAHIN I DOxJITcBc, NOKA OHO NIOHOTBOOCTBIIOCTIEH. IocIe 3TOrO HaxMNTe KHOKNy HA BepXHeJ Yactn 0ETKn I NOrAHTNe HacaIKY BnepeD.
RU
^* B 3aBcImOCTn OT MoJIeN DaHHIe PnucNtOcOBeHInn IMeIOTc TOnbKO B HeKOTopbIX MoJenX yCTpOINCTBa NIO ppeIOCTABJIOTc DOnONHITeJIbHO Ha YCLOBmX DoIINaTbI.
HacaKa-TeTka IJy ChSTK TKAHei\*
HacaKa-üeTka dIy NcCTKn TKAHe pAcKpbBaet yTOHyIO HHTb TKAHN, CnocO6CBYr ONTMaJIbHOMy pOnHKnHOBeHHIO npa.
PeneTcKak3aKpEnHbIpiNcNo6bHeHHeHa yCTpoiCTBe, y6eHTteC, YTOy cTPOCTBO kTIOHOeO TO cTeH 3JIeKTPoIN-TaHHu INIOHOCTbO OXJAAxDeHo.
3aKpENITE HacaIky-TeKy IJN qHCTKn TkaHei Ha napOBo pyUke, bIbPOBHB NHXHOIO qACTb TeKn IIO HIXHei qactn NapOBO pyUkn. 3aFHKcnpyIte HacaIKy Ha napOBo pyKe IerKm HaxaTne HA bepxHIOUqCTb IeKtNoIPOBHeHnIeJIYka, yKa3bIbAIOeH O h FkcaIIO HacaIKN.
- AkkypaTHO npoIIMTeCbIeTkoI NO HAmEeuHHomy yuactky TkaHn, yuHTbBa KaKtpyu nn HaprabJeHne BOLOKOH TkaHn.
- NpeD TEM, KAK CHRb HacaIky-IlteKy IINCTKn TKAHe, OTKLIIOHITe YcTPOINCTBO IV3 CETN 3NEkTPOINHAMn IN DOJNTIEcB, NOKA OHO NONHOCbTbOCTbH. Pocne 3TOr HaKMITE pa3beINHIOUy KOHNKY HaBEXHey qactn UeTKn n NotraHITe HacaIky BnpeD.
Hacaikanda ydaJIeHnCklaDOK
- AkkypaTHO NaIaBJIbIbAte Ha HacaIky Do Tex nop, noka OHa He 3aΦNKcPnyTc Ra MeCTe.
- PackpoTe HacaIky IyuaJIeHnIcKlaIOK nyTEM HaxaTnaI Ha pykoTky.
-Оджда должна pacnoлагаьсma Мжdu hyacakoДлг ydaJIeHnAcklaIokи napobOуpyko.
OTnyCTnte pykOarTy. - HauHnaiTe rIaIbTc BepxHeuactn OeJdbI, NocTepeHNO nepeme-uaHaCaIky dIry ydaJIeHncklaIok KHN3y.
- Pocne TOrO, KAK YCTPOOBTO KTKIOUeHO OT CETN 3NEKTPONITAHNA IN OJINHOCTBO OCTbILO, CHMNITE HacaIky IydaJIeHnCKlaDOK, nepeBdRgAee no napoboi pyuke.
HacaIka-1eTka IyUdaJIeHnB BOPCuHOK\*
Hacaikka-ueTka IJy ydaJIeHn BOPCnHOK - He3aBNCmOe npncnocobIeHne, n Ha npoByo pyuKy He Kpennr. BbI MoKTe PONbObaTcB 3TNM pNcNocObeHnEM OTdJIbHo, 6e3 otnapnBaTeJIa.
HacaKa-ueTka Iy ydaIeHnB BOPCHOK IO3BOJRAET 6e3yKOp3HeHHO ONUHTb PpeDMtbl OT BOLOCHOK, BOPCHOK N IePCTN XJBOTbIX.
IcnoIb3yHacaKny-üeTkyIgnaYdaJIenHnBOPCINHK,OCUeCTBJIaTe YIcTky He CneSha, yIITbIBa HapnbIeHne IIn ΦkTypy BOJOKOH TkaHI.
YtObIy IpoUHCTNTB cHTK, npOuIMTeB eIO NO TKAHN B pOITNBOONOHOH HapRabENH. JIaT NcEJIe peKOMeHdEm NCpOJIb3OBaTb KycOK CTAPoIK HNA, pReHdHA3HauehHOH Na BIbOpC.
PekomeHdaunnoocneIcnoJIb3OBAHnA
- Посlete OkOHuaHЯ paObTo b cOTnapBaTeIeM, BbKIIIOUHTe ERO (PnI 3TOM INHdkaTOp NITaHЯ rachET) I OTKIIIOHTe O T cETn 3JIeKTPONTAHЯ.
- Pocne OOKHAnnra pa60bI C yCTPOINCTBOM NOBecTe napOByIO pyKU Ha PIIeNKu B VeRtIKaJIbHOM NIOLOXEHNI.
- YTo6bI y6paTb 7Hyp, HxMmTe KHNkY HAmTaBlaOuIero yCTpoiCTBa DnIy hHpya nn O6MOTaTE 7Hyp BOKpyr DepXaTeJei*
-ПеледкождоуборковOTnapивateлЯнхраанене Heo6xodmo CINBaTb BODY n3 pe3epByapa.
3a nppeecho nepenocnb otnpnabateb 3a pyky pe3epbyapa. UcpoiCTBO Oshaeeo polikamn dIra IerKoCTn nepemesehna.
PpeDynpexJdHHe: 3aIpEeAeTc npKacatbca KnapoBOn pyKe do ee noNHO ro oxnaJdHHe.
^*B 3aBcIMOCHTN OT MOeJI NdHHbIe PnCnOcOBeHnI NMeIOTc TOnbKO B HeKOTopbIX MoeJIax yCTPOINCTBa IIO6 IpEoCTABJIOTc DOIoHNTeJbHO Ha YcIOBIAx DoIINaTbI.
yxoD
- UcTpoiCTBO CJIeDyET YIcHTb BLaJxHoi TpIaNKO. PeryJrAHO ydaJnIte HAKINb n3 UcTPOiCTBA DnI NODepXAHnE ERO B HauNlyuWe FyHKUoHANbHOB FOpME. Yactota npOceDpy NO ydaJeHIO HAKINs 3abVCIT OT KOJIueCTBa BOdIи NaCTOTb IcNOLZOBAHnE UcTPOiCTBa. PeKOMeHNyEM OChUaTcYcTPOiCTBO NT HAKIN He MeHee ODoHO pa3a B rO nIu Nepe3 kaxDbie 50 cAcob 3ckPnyataunn.
YctpaHHe HeNCpPaBHOCTe
Ecn npuHny HeucnpaBHOCTn yCTaHOBntb He ydAnocb, o6paTneTecb B aKKpeiITOBaHHbI cepBcHbI ueHTp ROWENTA www.rowenta.com
C cJIbIy yOcBepueHCTBOBaHnI npOn3BOIMMbIX n3dEiI, kOMTaNHry Rowenta coXpaHReT 3a cO6oI npABO n3MeHrT bI xTexnHueCKne napAeTpbl 6e3 ppeBapuTeJbHorO yBeOM- IENHn.

ONNC
- Napoba nppacka
2.Пдснграok - NapopnoBvI
- Гииздо napoppoBODY
-
KhoPka dIpa peryIIOBaHnI IOdaHnI npu
-
HAMOTyBaJIbHn pIncTpiI dIa IuHpy
- Hoxhni BMnKaay/BmMnKaay
- 3HIMn pe3epByap dny BOn
- DiBiyuata TeleckoniuHa cToiKa
- B6ydoBaHoi oJexKhi niiKn*
-
HacdaKa-uitka IJy NUneHn TKAHHN
-
Hacaika-uzitka Дя Me6JIeBOi 6bKn*
- Hacajka-uitka dny BuaJIeHnBOPcHOK*
- Hacaika Дя Видально 3борok*
- 3dovbxyBaIbHn HacaIka dIy IuIeHHN WTOP*
- Bičík děr 36epirānhy npnctocybaNb
- INDINKAToP XNBJEHHRA
- KpiinbHi cKo6n cToiKN
- HAMOTyBaIbHn IpnCTpiI dIa IuHpy*
*3anexHo bID MoJeI zi npncToCyBaHH e TInbKn y DeaKnx MoeJnx npncToPO a60 HadaioTbcra DoatKOBO Ha YMBoa DonnilaTu.
ПРавида.TEXHIКБE3NEКИ
Iiiceknnyataui npictpoHne6xidnoDtoPmByatncnpeBnix npabIn texhikn 6e3nekn:
Iepu Hix noaTn 3actocobvatn npicptiynbaxho 03naHOMTeCb 3 daHOIO IHCTpyKJieO 3 EKcIIyataui
- Lio6 3ano6fTn KOHTaTy 3 rapiyIO BOIOU, 5IO BNTIkae 3 OTbpy dIra BmYcKaHHa npa OrJaTe npiCTpipeep BIKOPINCTAHM Ta pnp BKJIOHNI pNCTPOIO TpIMai Te Ioro deani BiD cSebe.
-3a6b0pOHaTeBcBAVKnOpIcTObYBaTn pIcnCTpii He 3a npI3HaueHHaM.
- Ⅲo6 3aio6iTn He6e3neu y dapary eNeKtpnHm CTrpymOM He 3aHypOHTe pnicTpriy BODY uHny iHny piDHy.
- 3aBzKdMnKkAe npCtpi nepu HIX niiKnIOHtu no MepeXeIeKTOXMBENHra ta BIKIOHATu BID He. TeTnHb 3a 5Hyp eKToPCKBENHn DnI BIKIOHau npCTPOIO BID po3ETN; dIra toro, 606 BiKIOHNTnnpCTPI, nIPTNPMUYte To oBeOHO TgTRHTb UTencelBu BYNKy.
- CTeXte 3a TIm, 5IO6 UHyp He CTNkABcB 3 rApYHMn NOBepxHMM. NepU HIX npIbpaTn pnpCTpi, daJIeNoMY NOBHCTO OXJOLHTy. NepU HIX npIbpaTn pnpCTpi Ha 36EPIrAHH, UHpy ENEKTOPOKWBENHr Heo6xIDHO, He 3aTAYIOuH, OMBOTATn HABKOLO PnCtpoio a60 HAmotAtu HoTo 3a DOnOMOIO HAOTyBaJIbHO pNtCTPOIO.
- He cniihnapabnTn cTpym napu Ha liOe Ta TBaPHN, HIKOJIH He npacyTe OJgE3nocepEdNo Ha liOdiHi.
- Nepi x HANOHOBNATI pI npCTRI BDOIO, 3JINBATI 3 BOO aO npIHNHTIPOoTy 3 pnICTPOeM, O6OB'AKBOB DIKJIIOHITy Ioro 3 MEPEKj eEJTKPOBNIHJEHO.
-3a6bopnoHaeTbc npaIOBAtn 3 npCTpoEm, kIIOo IHHpy JxHbIeHHa 3iICOBaHn a60 kIIO pIcTpi TIOUKOJHeO u 3iICOBaHO. UIOb yHnKHyTN ydpary eJeKTPuHIM cTpymom, He po36puiTe Ta He Hamaarai TeCb BjD
peMOHTyBaTH pnpCTPII camOCTHIO. IaIgOrIaIy a60 peMOHTy pnpCTPOU 3BepHIbTcO daHbIMxHOrO akpeDITOBAHORO CEENTpy TeXHnHO O6CnYBOvBAHNr Rowenta. HeKopeKTHe cKnAadHnDEtanei MoKe pIn3BECTNdoNojeki, ydApE neEkeTpUHM CTpyMOM a60 TIIeCHM UkOKeHHmPiJacPoBToN 3IraDAHM pNCTCPOEo.
- Pnmtpr He p03paxoBamn Hn BaNkOpNCTAHnH DITbMa T aOC6aMn 3 NOHNXeHMn F3HNNMn, YHTtEbi a60 pO3yMOBmM 3Ii6HOCTAmn a6o chepe3 bpak y HNX DOCBiDy a60 hABNHOK 3 Be3neHNOE kcknnyatau, jAkyo BOHn HE hAXoYdTcBn iN KOHTpJemE a60 He oTPMaJI M BIDNoBIDHN IHCTpyKU nOdo BnKOpNCTAHn pNcTPOH O6OBO, BiNIOBIAIbHO 3a ix 63neKy.
-ДITIN NOBHHI KOHTPOLIOBAtnc BIIIOBIaJIbHIMN OOCaMn IJNe He DOnyUeHNr Tprn 3 npNCtpoem.
- TopKANH RAJYAX MEtAneBIX QaTcH IN PnCtPOO, KOHTAKT 3 rApJHO BOJDIO a6o NpAOIO, MOKytb PnI3BCTN do oniKIB. BydTe oBepeXHi npi 3iMbV BoDIO bIDnapIOBana, ocklkb IN pe3epByap I MoKe 3aJIuSATINCA RAPJRA BODA.
- HaninBaIte BOy TIIbKn Bpe3epByap Ira BOiN.
-3a6bOpOHReTbCRA BCTaBnT a60 KnDaTn 6yDb-9ki PpeMTeN B OTBip YN napOpOBiD npICrpoIO.
- CTeXe 3a TtM, 106 npopnpoBID Ta npobn PaujBOK 3haxOuINscra Po BInHOseHHIO Do pe3epByapy B iIiHrTOMy IonoJeHHI.
- Cπiπ πacybAtn tiBky BeptnKaIbHOMy IIOJoxeHHI 3Bepxu BHN3. Lio6 3an6iTrn 6pI30k HIOJN He BiJaPioIte B Trop3OHTaJIbHOMy IIOJoxeHHI Ta He BiIXINJIte BiNJapIOBAB Ha3ad.
- RaIO BIDNAPIOBAB NARITNI HN PIIKJIOUHENI DO MEPEXJE ENEKTPOXJMBEHNH, YHMKNHTI CTKNAHNR naIbKA 3 dyb-koIO NOBEPXHEO aBO uHypOM eNEKTPOXMBEHNH pIncTPOJO. BIKOPINCTOByTE cneJIaJIbHO nepeD6aEHNY onopy.
- IJIOyHnKATNI KOHTaTy 3 rapraHO BOIOI pID uac 3MIHN HacaOKepeKoHaITeCb, IIO npICTpiB iDKnIOeHO Ta IIO 3 HbOro He Ine Inpa.
-Пизмінінасадok 6удteОБepeхнi,ОсьінБнВсалійОК KOнДсcaціп napінHa NIXMOse 3aɪniшатиэ
гарачв好象。山бзблггтNiKоТakтУЗгарчIO BOYOU,daiTe Hacánkam OxOJOHHTN.
- PekomeHIOBaHO BVOKOpNCOByBatN TiNbK DiTali fipMn Rowenta, ockiNbK BVOKOpNCaTHn HInuX 3aNaCHNX TaCTMH MOKe Ipi3BecTn Do NooJeki, ydape eJeKtPmHIM CTpyMm OIN OTPMaHH TJIeCNx UYkoDxeHb.
-Po60Ta 3 npnCTpoem NOBHHa 3diCHIOBaTNC TlBky 3akpnx npmiueHHX.
OKPEMI PEKOMEHDAUJI
- Lio6 yHnKHyTn npeBaHTaxKeHHeJeKtpomepexi, He NiKJIIOHaIte Do IcEi MepeXi IHsII NToxHm npNCTpi.
Y BnnaKy JAKSO IOTPI6EN NIOOByBaC, CINa TOKy B HbOMy NOBnHa CKlaadTn 15 amnep. NIOOBKyBaHi, p03- paxoBAHn Ha bIbS cIaNbCy CINy CTpyM, CxNbHI Do pni3NKy nepeRpiBv.
IpekoHaTeCb, 10 NOOBxvBaH BnAaKOBo He BiKIOueHb BiMpeXeIeKToKMBHeHnA bO 106 XTOB HbOHO He HaCTyINB.
3BEPIAGNTE LIO IHCTPYKLIIO
3AXIJIAMO OTOUYIOUE CEPEIOBILIE!
① Y cIbOMy npIaIi 6arato MaTePiaJIIB, kI MoKyTb 6ytN ZIHHMn a60 MoKyTb BHKOPNCTOBYBaTICb NOBTOHO.
KaBAM6IbHHeNoTpi6eH npicTpi, BiDheCtIyoro Do NykTu npiOMy nobyTOBnBixBixOxOBa afo akpeNDToBaHO rENTpy TeXHiHOro OcbNyROByBaHH.

CklaanHn:
Пдг罗вka:
BCTaHOBITb KOpNc npictpoHa NiIIOrg Ta 3HIMITb pe3epByap DJI BODNI.
BctaHOBJIeHHa CToiKaHa npicTpi:
BCTABTE CTOKN 1 ta 2 JK NOKAZAHNO hA CxEMI npabOpuy, nepebiTe, uo6 CTOKN 6yIIN BCTAHOBJIeH IBIIOBINO do BIIMTOK h AnpctOIO.
- Hatachitb Ha ctoiKn Do ix nobHO BCTaHOBJIeHHa npucTpii.
ΦikCyBaHHa CTOiK:
Okpim toro,paammo BnnpobybaTn npictocybaHHa H enomitni yactnhi Ondry.
PekomeHdauii nicBnKOpncTaHHa
- Piciar 3aikHHHnroBOOTBbIDnapOBaBA BMMKHtB Ioro (npn cIbOMy iHdKnATOP XINBLeHNr RaCHE) i BMKHiTb Ioro 3 Mepexi eNEKTOXINBHeHn.
Пслд ЗakhiHNeHNO pOToN 3 pIcTPOeM NOBCTe napoby pyuKHa nIIpIku B ePrtNKaIbHOMO NPOJOEHI. - Ⅲo6 3a6paTn 5Hyp, HATNCiTB KHOIky HAOMTyBaJIbHOrO pIu-CTPOIO DIA 5Hhpy a60 o6MoTaIe 5Hyp HABKOLO TpIMaça.
or
-Пелед Кожимприбиразнгь Мьдnapювалу Heo6xio 3JNTN BOу 3pe3epByapa.
- 3a6bopoHeno nepeHocnTb BiDnapoiBab 3a pyuK pe3epByapa.
PnictpiO cOnaIeHHo poliKaMn dIe IeKTOpeNecyBaHnY.
PonepeJxehnHa: 3a6oPoHaeTbc TOpKaTnc npoBoi pyKn IIO NobHOrO OxonoJxehnHa.
Dorla
- Pnncptri cnid nctntn BONIOO raHvipko. PeryyraHb BnaIaJIre haknn 3 npCTPOO dny nIDTPMkn IHO B HauKpauiy fHyKIOHaJIbHiΦoMI. Yactota npOeDyp BnAaIeHNH HAKINy 3aJeXnTb iB IA KOCtI BO TaNCTO BNKOpNCtAHN pnpCTPOIO. PekomeHdymO nCTNTn npCTPNI bID HAKNY He MeHs OndHOr pa3y ha pik a60 chepe3 KOxhi 50 roHH ekCnpyatauii.
UcyHeHH HeCnpaBHOCTeI
| HECπPABHICTb | Можліві prічіні | Способі усуніні | |
| Відсүгі па rapa | Пристрий не вімкненій | Пerepeонайтесь, до ріnstрій рравільно підкіюechenій до мерекіе лі ektrpoхівін\'ьні та натуncіпі кhorікі Вімік\'ніЗ/Вімік\'ніні (на nepeş'dи чast\'иі кор'tуca ріnstropo). 3агор\'ься indіdkatop жів\'ніні. | |
| Уtrudнера пroxідність паропрові Bodу | Пerepeонайтесь, до рі的对象\'ьніні з\'эгн'tь та не з\'ламаній. | ||
| Рezервуар дія вodі пuct\'и. | Віміній\"ь ріnstрій та з\'алійт\'ь Bodу в pesterreich\"ь. | ||
| Славе пов健康的 пapi ri | Чepeз Неретул\'яни\'ь v віріст\'рі утворі\'ь\'ь с\'ь\'ь\ накіп. | Вінішій\"te Bідіп\'я\'ь\'ь віd`н\'ak\'и\"ь\ � мени\" о\'н\'ого р\'azу\"ha pіk\"\'б\'о\ чered\'ь\'\'\'\'50\'rog\'и\"ek\'с\'л\'у\'а\'ц\'ь\ Я\'ь\"Бі Ві\'ь\'\'\'\'\'\'\'\'\'\'\'\'\'\'\'\ dom\'\'ь\'ь\'\'\'\'50\'rog\'и\"ek\'с\'л\'у\'а\'ц\'ь\ \'\'\'\'\'\'\'\'\'\'\'\'\'\ \'\'\'\'\'\'\'\'\'\'\'\ \'\'\'\'\'\'\'\'\'\'\ \'\'\'\'\'\'\'\'\'\ \'\'\'\'\'\'\'\ \'\'\'\'\'\'\'\ \'\'\'\'\'\'\ \'\'\'\'\'\ \'\'\'\'\'\ \'\'\'\'\ \'\'\'\'\ \'\'\'\ \'\'\'\ \'\'\ \'\'\ \'\'\ \'\ \'\ \'\ \'\ \'\ \'\ \'\ \'\ \'\ \'\ \'\ \'\ \'\ \'\ \'\ \'\ \'\ \'\ \'\ \'\ \'\ \'\ \'\ \'\ \'\ \'\ \'\ \'\ \'\ \'\ \'\ \'\ \'\ \'\ \'\ \'\ \'\ \'\ \'\ \'\ \'\ \'\ \'\ \'\ \'\ \'\ \'\ \'\ \'\ \'' ... | Bінішій\"te Bідіп\'я\'ь\'ь\ � мени\" о\'н\'ого р\'azу\"ha pіk\"\'б\'о\ чered\'ь\'ь\'\'\'20\'rog\'и\"ek\'с\'л\'у\'а\'ц\'ь\ Я\'ь\"Бі Ві\'ь\'\'\'\'20\'rog\'и\"ek\'с\'л\'у\'а\'ц\'ь\ \'\'\'\'\ \'\ \'\ \'\ \'\ \'\ \'\ \'\ \'\ \'\ \'\ \'\ \'\ \'\ \'\ \'\ \'\ \'\ \'\ \'\ \'\ \'\ \'\ \'\ \'\ \'\ \'\ \'\ \'\ \'\ \'\ \'\ \'\ \'\ \'\ \'\ \'\ \'\ \'\ \'\ \'\ \'\ \'\ \'\ \'\ \'\ \'\ \'\ \'\ ... ... ... ... ... ... ... ... ... ... ... ... ... ... ... ... ... ... ... ... ... ... ... ... ... ... ... ... ... ... ... ... ... ... ... ... ... ... ... ... ... ... ... ... ... ... ... ... ... ... ... ... ... ... ... ... ... ... ... ... ... ... ... ... ... ... ... ... ... ... ... ... ... ... ... ... ... ... ... ... ... ... ... ... ... ... ... ... ... ... ... ... ... ... ... ... ... ... ... ... . ... ... ... ... ... ... ... ... ... ... ... ... ... ... ... ... ... ... ... ... ... ... ... ... ... ... ... ... ... ... ... ... ... ... ... ... ... ... ... ... ... ... ... ... ... ... ... ... ... ... ... ... ... ... ... ... ... ... ... ... ... ... ... ... ... ... ... ... ... ... ... ... ... ... ... ... ... ... ... ... ... ... ... ... ... ... ... ... ... ... ... ... ... ... ... ... ... ... ... ... ... ... ... ... ... ... ... ... ... ... ... ... ... ... ... ... ... ... ... ... ... ... ... ... ... ... ... ... ... ... ... ... ... ... ... ... ... ... ... ... ... ... ... ... ... ... ... ... ... ... ... ... ... ... ... ... ... ... ... ... ... ... ... ... ... ... ... ... ... ... ... ... ... ... ... ... ... ... ... ... ... ... ... ... ... ... ... ... ... ... ... ... ... ... ... ... ... ... ... ? ... ... ... ... ... ... ... ... ... ... ... ... ... ... ... ... ... ... ... ... ... ... ... ... ... ... ... ... ... ... ... ... ... ... ... ... ... ... ... ... ... ... ... ... ... ... ... ... ... ... ... ... ... ... ... ... ... ... ... ... ... ... ... ... ... ... ... ... ... ... ... ... ... ... ... ... ... ... ... ... ... ... ... ... ... ... ... ... ... ... ... ... ... ... ... ... ... ... ... .... ... ... ... ... ... ... ... ... ... ... ... ... ... ... ... ... ... ... ... ... ... ... ... ... ... ... ... ... ... ... ... ... ... ... ... ... ... ... ... ... ... ... ... ... ... ... ... ... ... ... ... ... ... ... ... ... ... ... ... ... ... ... ... ... ... ... ... ... ... ... ... ... ... ... ... ... ... ... ... ... ... ... ... ... ... ... ... ... ... ... ... ... ... ... ... ... ... ... ... .. ... ... ... ... ... ... ... ... ... ... ... ... ... ... ... ... ... ... ... ... ... ... ... ... ... ... ... ... ... ... ... ... ... ... ... ... ... ... ... ... ... ... ... ... ... ... ... ... ... ... ... ... ... ... ... ... ... ... ... ... ... ... ... ... ... ... ... ... ... ... ... ... ... ... ... ... ... ... ... ... ... ... ... ... ... ... ... ... ... ... ... ... ... ... ... ... ... ... ... > ... . ... . . . . . . . . . . . . . . . . . . . . . . . . . . . . . . . . . . . . . . . . . . . . . . . . . . . . . . . . . . . . . . . . . . . . . . . . . . . . . . . . . . . . . . . . . . . . . . . . . . . . - . . . . . . . . . . . . . . . . . . . . . . . . . . . . . . . . . . . . . . . . . . . . . . . . . . . . . . . . . . . . . . . . . . . . . . . . . . . . . . . . . . . . . . . . . . . . . . . . . . . ... . . . . . . . . . . . . . . . . . . . . . . . . . . . . . . . . . . . . . . . . . . . . . . . . . . . . . . . . . . . . . . . . . . . . . . . . . . . . . . . . . . . . . . . . . . . . . . . . . ... . ... . . . . . . . . . . . . . . . . . . . . . . . . . . . . . . . . . . . . . . . . . . . . . . . . . . . . . . . . . . . . . . . . . . . . . . . . . . . . . . . . . . . . . . . . . . . . . . . . ... . . ... . . . . . . . . . . . . . . . . . . . . . . . . . . . . . . . . . . . . . . . . . . . . . . . . . . . . . . . . . . . . . . . . . . . . . . . . . . . . . . . . . . . . . . . . . . . . . . . . ? . . . . . . . . . . . . . . . . . . . . . . . . . . . . . . . . . . . . . . . . . . . . . . . . . . . . . . . . . . . . . . . . . . . . . . . . . . . . . . . . . . . . . . . . . . . . . . . . . . . ? . . ? . . . . . . . . . . . . . . . . . . . . . . . . . . . . . . . . . . . . . . . . . . . . . . . . . . . . . . . . . . . . . . . . . . . . . . . . . . . . . . . . . . . . . . . . . . . . . . . . ? . . \... . \... . \... . \... . \... . \... . \... . \... . \... . ... ... ... ... ... ... ... ... ... ... ... ... ... ... ... ... ... ... ... ... ... ... ... ... ... ... ... ... ... ... ... ... ... ... ... ... ... ... ... ... ... ... ... ... ... ... ... ... ... ... ... ... ... ... ... ... ... ... ... ... ... ... ... ... ... ... ... ... ... ... ... ... ... ... ... ... ... ... ... ... ... ... ... ... ... ... ... ... ... ... ... ... ... ... ... ... ... ? ... ? ? ? ? ? ? ? ? ? ? ? ? ? ? ? ? ? ? ? ? ? ? ? ? ? ? ? ? ? ? ? ? ? ? ? ? ? ? ? ? ? ? ? ? ? ? ? ? ? ? ? ? ? ? ? ? ? ? ? ? ? ? ? ? ? ? ? ? ? ? ? ? ? ? ? ? ? ? ? ? ? ? ? ? ? ? ? ? ? ? ? ? ? ? ? ? ? ? ? ? ; ? ? ? ? ? ? ? ? ? ? ? ? ? ? ? ? ? ? ? ? ? ? ? ? ? ? ? ? ? ? ? ? ? ? ? ? ? ? ? ? ? ? ? ? ? ? ? ? ? ? ? ? ? ? ? ? ? ? ? ? ? ? ? ? ? ? ? ? ? ? ? ? ? ? ? ? ? ? ? ? ? ? ? ? ? ? ? ? ? ? ? ? ? ? ? ? ? ? ? . ? ? ? ? ? ? ? ? ? ? ? ? ? ? ? ? ? ? ? ? ? ? ? ? ? ? ? ? ? ? ? ? ? ? ? ? ? ? ? ? ? ? ? ? ? ? ? ? ? ? ? ? ? ? ? ? ? ? ? ? ? ? ? ? ? ? ? ? ? ? ? ? ? ? ? ? ? ? ? ? ? ? ? ? ? ? ? ? ? ? ? ? ? ? ? ? ? ? ? - ? ? ? ? ? ? ? ? ? ? ? ? ? ? ? ? ? ? ? ? ? ? ? ? ? ? ? ? ? ? ? ? ? ? ? ? ? ? ? ? ? ? ? ? ? ? ? ? ? ? ? ? ? ? ? ? ? ? ? ? ? ? ? ? ? ? ? ? ? ? ? ? ? ? ? ? ? ? ? ? ? ? ? ? ? ? ? ? ? ? ? ? ? ? . . . . . . . . . . . . . . . . . . . . . . . . . . . . . . . . . . . . . . . . . . . . . . . . . . . . . . . . . . . . . . . . . . . . . . . . . . . . . . . . . . . . . . . . . . . . . . . . . . - ; . . . . . . . . . . . . . . . . . . . . . . . . . . . . . . . . . . . . . . . . . . . . . . . . . . . . . . . . . . . . . . . . . . . . . . . . . . . . . . . . . . . . . . . . . . . . . . . . . . . ; . . . . . . . . . . . . . . . . . . . . . . . . . . . . . . . . . . . . . . . . . . . . . . . . . . . . . . . . . . . . . . . . . . . . . . . . . . . . . . . . . . . . . . . . . . . . . . . . . . - - - - - - - - - - - - - - - - - - - - - - - - - - - - - - - - - - - - - - - - - - - - - - - - - - - - - - - - - - - - - - - - - - - - - - - - - - - - - - - - - - - - - - - - - - - - - - - - - - - - - - - - - - - - - - - - - - - - - - - - - - - - - - - - - - - - - - - - - - - - - - - - - - - - - - - - - - - - - - - - - - - - - - - - - - - - - - - - - - - - - - - - - - - - - - - - - - - - - - - - - - - - - - - - - - - - - - - - - - - - - - - - - - - - - - - - - - - - - - - - - - - - - - - - - - - - - - - - - - - - - - - - - - - - - - - - - - - - - - - - - - - - - - - - - - - - - - - - - - - - - - - - - - - - - - - - - - - - - - - - - - - - - - - - - - - - - - - - - - - - - - - - - - - - - - - - - - - - - - - - - - - - - - - - - - - - - - - - - - - - - - - - - - - - - - - - - - - - - - - - - - - - - - - - - - - - - - - - - - - - - - - - - - - - - - - - - - - - - - - - - - - - - - - - - - - - - - - - - - - - - - - - - - - - - - - - - - - - - - - - - - - - - - - - - - - - - - - - - - - - # - - - - - - - - - - - - - - - - - - - - - - - - - - - - - - - - - - - - - - - - - - - - - - - - - - - - - - - - - - - - - - - - - - - - - - - - - - - - - - - - - - - - - - - - - - - - - - - - - - - = - = - = - = - = - = - = - = - = - = - = - = - = - = - = - = - = - = - = - = - = - = - = - = - = - = - = - = - = - = - = - = - = - = - = - = - = - = - = - = - = - = - = - = - = - = - = - = - = - = - = = - = - = - = - = - = - = - = - = - = - = - = - = - = - = - = - = - = - = - = - = - = - = - = - = - = - = - = - = - = - = - = - = - = - = - = - = - = - = - = - = - = - = - = - = - = - = - = - = - = - - = - = - = - = - = - = - = - = - = - = - = - = - = - = - = - = - = - = - = - = - = - = - = - = - = - = - = - = - = - = - = - = - = - = - = - = - = - = - = - = - = - = - = - = - = - = - = - = - = - - - = - = - = - = - = - = - = - = - = - = - = - = - = - = - = - = - = - = - = - = - = - = - = - = - = - = - = - = - = - = - = - = - = - = - = - = - = - = - = - = - = - = - = - = - = - = - = - = - = = = - = - = - = - = - = - = - = - = - = - = - = - = - = - = - = - = - = - = - = - = - = - = - = - = - = - = - = - = - = - = - = - = - = - = - = - = - = - = - = - = - = - = - = - = - = - = - = - = - = + = - = - = - = - = - = - = - = - = - = - = - = - = - = - = - = - = - = - = - = - = - = - = - = - = - = - = - = - = - = - = - = - = - = - = - = - = - = - = - = - = - = - = - = - = - = - = - = - = - = / = - = - = - = - = - = - = - = - = - = - = - = - = - = - = - = - = - = - = - = - = - = - = - = - = - = - = - = - = - = - = - = - = - = - = - = - = - = - = - = - = - = - = - = - = - = - = - = - = - =- = - = - = - = - = - = - = - = - = - = - = - = - = - = - = - = - = - = - = - = - = - = - = - = - = - = - = - = - = - = - = - = - = - = - = - = - = - = - = - = - = - = - = - = - = - = - = - = - = - = = = = - = - = - = - = - = - = - = - = - = - = - = - = - = - = - = - = - = - = - = - = - = - = - = - = - = - = - = - = - = - = - = - = - = - = - = - = - = - = - = - = - = - = - = - = - = - = - = - = - = = = = = = = = = = = = = = = = = = = = = = = = = = = = = = = = = = = = = = = = = = = = = = = = = = = = = = = = = = = = = = = = = = = = = = = = = = = = = = = = = = = = = = = = = = = = = = = = = = = = =/ =- =- =- =- =- =- =- =- =- =- =- =- =- =- =- =- =- =- =- =- =- =- =- =- =- =- =- =- =- =- =- =- =- =- =- =- =- =- =- =- =- =- =- =- =- =- =- =- =- =- = - =- =- =- =- =- =- =- =- =- =- =- =- =- =- =- =- =- =- =- =- =- =- =- =- =- =- =- =- =- =- =- =- =- =- =- =- =- =- =- =- =- =- =- =- =- =- =- =- =- = - - - = - - - = - - - = - - - = - - - = - - - = - - - = - - - = - - - = - - - = - - - = - - - = - - - = - - - = - - - = - - - = - - - = - - - = - - - = - - - = - - - = - - - = - - - = - - - = - - - = - - - - = - - - - = - - - - = - - - - = - - - - = - - - - = - - - - = - - - - = - - - - = - - - - = - - - - = - - - - = - - - - = - - - - = - - - - = - - - - = - - - - = - - - - = - - - - = - - - - = - = - - - - = - - - - = - - - - = - - - - = - - - - = - - - - = - - - - = - - - - = - - - - = - - - - = - - - - = - - - - = - - - - = - - - - = - - - - = - - - - = - - - - = - - - - = - - - - = - - - = - - - - = - - - - = - - - - = - - - - = - - - - = - - - - = - - - - = - - - - = - - - - = - - - - = - - - - = - - - - = - - - - = - - - - = - - - - = - - - - = - - - - = - - - - = - = - - - = - - - - = - - - - = - - - - = - - - - = - - - - = - - - - = - - - - = - - - - = - - - - = - - - - = - - - - = - - - - = - - - - = - - - - = - - - - = - - - - = - - - - = - - - - = - - - - = = - - - = - - - - = - - - - = - - - - = - - - - = - - - - = - - - - = - - - - = - - - - = - - - - = - - - - = - - - - = - - - - = - - - - = - - - - = - - - - = - - - - = - - - - = - - - - = - - - - = - - - - = - - - - = - - - - = - - - - = - - - - = - - - - = - - - - = - - - - = - - - - = - - - - = - - - - = - - - - = - - - - = - - - - = - - - - = - - - - = - - - - = - - - - = - - - - = - - - - =- =- =- =- =- =- =- =- =- =- =- =- =- =- =- =- =- =- =- =- =- =- =- =- =- =- =- =- =- =- =- =- =- =- =- =- =- =- =- =- =- =- =- =- =- =- =- =- =- = = = = = = = = = = = = = = = = = = = = = = = = = = = = = = = = = = = = = = = = = = = = = = = = = = = = = = = = = = = = = = = = = = = = = = = = = = = = = = = = = = = = = = = = = = = = = = = = = = = + = = = = = = = = = = = = = = = = = = = = = = = = = = = = = = = = = = = = = = = = = = = = = = = = = = = = = = = = = = = = = = = = = = = = = = = = = = = = = = = = = = = = = = = = = = = = = = = = = = = = = = = = = = = = = = = = = = = = = = = = = = = = = = = = = = = = = = = = = = = = = = = = = = = = = = = = = = = = = = = = = = = = = = = = = = = = = = = = = = = = = = = = = = = = = = = = = = = = = = = > = = = = = = = = = = = = = = = = = = = = = = = = = = = = = = = = = = = = = = = = = = = = = = = = = = = = = = = = = = = = = = = = = = = = = = = = = = = = = = = = = = = = = = = = = = = = = = = = = = = - = = = = = = = = = = = = = = = = = = = = = = = = = = = = = = = = = = = = = = = = = = = = = = = = = = = = = = = = = = = = = = = = = = = = = = = = = = = = = = = = = = = = = = = = = = = = = = = = = = > = = = = = = = = = = = = = = = = = = = = = = = = = = = = = = = = = = > = = = = = = = = = 。 = = = = = = assistant = assistant = -: - . - . - . - . - . - . - . - . - . - . - . ? - . assistant (SS (CC (C) (1)、 (2)、 (3)、 (4)、 (5)、 (6)、 (7)、 (8)、 (9)、 (10)、 (11)、 (12)、 (13)、 (14)、 (15)、 (16)、 (17)、 (18)、 (19)、 (20)、 (21)、 (22)、 (23)、 (24)、 (25)、 (26)、 (27)、 (28)、 (29)、 (30)、 (31)、 (32)、 (33)、 (34)、 (35)、 (36)、 (37)、 (38)、 (39)、 (40)、 (41)、 (42)、 (43)、 (44)、 (45)、 (46)、 (47)、 (48)、 (49)、 (50)、 (51)、 (52)、 (53)、 (54)、 (55)、 (56)、 (57)、 (58)、 (59)、 (60)、 (61)、 (62)、 (63)、 (64)、 (65)、 (66)、 (67)、 (68)、 (69)、 (70)、 (71)、 (72)、 (73)、 (74)、 (75)、 (76)、 (77)、 (78)、 (79)、 (80)、 (81)、 (82)、 (83)、 (84)、 (85)、 (86)、 (87)、 (88)、 (89)、 (90)、 (91)、 (92)、 (93)、 (94)、 (95)、 (96)、 (97)、 (98)、 (99)、 (100)、 (101)、 (102)、 (103)、 (104)、 (105)、 (106)、 (107)、 (108)、 (109)、 (110)、 (111)、 (112)、 (113)、 (114)、 (115)、 (116)、 (117)、 (118)、 (119)、 (120)、 (121)、 (122)、 (123)、 (124)、 (125)、 (126)、 (127)、 (128)、 (129)、 (130)、 (131)、 (132)、 (133)、 (134)、 (135)、 (136)、 (137)、 (138)、 (139)、 (140)、 (141)、 (142)、 (143)、 (144)、 (145)、 (146)、 (147)、 (148)、 (149)、 (150)、 (151)、 (152)、 (153)、 (154)、 (155)、 (156)、 (157)、 (158)、 (159)、 (160)、 (161)、 (162)、 (163)、 (164)、 (165)、 (166)、 (167)、 (168)、 (169)、 (170)、 (171)、 (172)、 (173)、 (174)、 (175)、 (176)、 (177)、 (178)、 (179)、 (180)、 (181)、 (182)、 (183)、 (184)、 (185)、 (186)、 (187)、 (188)、 (189)、 (190)、 (191)、 (192)、 (193)、 (194)、 (195)、 (196)、 (197)、 (198)、 (199)、 (200)、 (201)、 (202)、 (203)、 (204)、 (205)、 (206)、 (207)、 (208)、 (209)、 (210)、 (211)、 (212)、 (213)、 (214)、 (215)、 (216)、 (217)、 (218)、 (219)、 (220)、 (221)、 (222)、 (223)、 (224)、 (225)、 (226)、 (227)、 (228)、 (229)、 (230)、 (231)、 (232)、 (233)、 (234)、 (235)、 (236)、 (237)、 (238)、 (239)、 (240)、 (241)、 (242)、 (243)、 (244)、 (245)、 (246)、 (247)、 (248)、 (249)、 (250)、 (251)、 (252)、 (253)、 (254)、 (255)、 (256)、 (257)、 (258)、 (259)、 (260)、 (261)、 (262)、 (263)、 (264)、 (265)、 (266)、 (267)、 (268)、 (269)、 (270)、 (271)、 (272)、 (273)、 (274)、 (275)、 (276)、 (277)、 (278)、 (279)、 (280)、 (281)、 (282)、 (283)、 (284)、 (285)、 (286)、 (287)、 (288)、 (289)、 (290)、 (291)、 (292)、 (293)、 (294)、 (295)、 (296)、 (297)、 (298)、 (299)、 (300)、 (301)、 (302)、 (303)、 (304)、 (305)、 (306)、 (307)、 (308)、 (309)、 (310)、 (311)、 (312)、 (313)、 (314)、 (315)、 (316)、 (317)、 (318)、 (319)、 (320)、 (321)、 (322)、 (323)、 (324)、 (325)、 (326)、 (327)、 (328)、 (329)、 (330)、 (331)、 (332)、 (333)、 (334)、 (335)、 (336)、 (337)、 (338)、 (339)、 (340)、 (341)、 (342)、 (343)、 (344)、 (345)、 (346)、 (347)、 (348)、 (349)、 (350)、 (351)、 (352)、 (353)、 (354)、 (355)、 (356)、 (357)、 (358)、 (359)、 (360)、 (361)、 (362)、 (363)、 (364)、 (365)、 (366)、 (367)、 (368)、 (369)、 (370)、 (371)、 (372)、 (373)、 (374)、 (375)、 (376)、 (377)、 (378)、 (379)、 (380)、 (381)、 (382)、 (383)、 (384)、 (385)、 (386)、 (387)、 (388)、 (389)、 (390)、 (391)、 (392)、 (393)、 (394)、 (395)、 (396)、 (397)、 (398)、 (399)、 (400)、 (401)、 (402)、 (403)、 (404)、 (405)、 (406)、 (407)、 (408)、 (409)、 (410)、 (411)、 (412)、 (413)、 (414)、 (415)、 (416)、 (417)、 (418)、 (419)、 (420)、 (421)、 (422)、 (423)、 (424)、 (425)、 (426)、 (427)、 (428)、 (429)、 (430)、 (431)、 (432)、 (433)、 (434)、 (435)、 (436)、 (437)、 (438)、 (439)、 (440)、 (441)、 (442)、 (443)、 (444)、 (445)、 (446)、 (447)、 (448)、 (449)、 (450)、 (451)、 (452)、 (453)、 (454)、 (455)、 (456)、 (457)、 (458)、 (459)、 (460)、 (461)、 (462)、 (463)、 (464)、 (465)、 (466)、 (467)、 (468)、 (469)、 (470)、 (471)、 (472)、 (473)、 (474)、 (475)、 (476)、 (477)、 (478)、 (479)、 (480)、 (481)、 (482)、 (483)、 (484)、 (485)、 (486)、 (487)、 (488)、 (489)、 (490)、 (491)、 (492)、 (493)、 (494)、 (495)、 (496)、 (497)、 (498)、 (499)、 (500) ; (501) ; (502) ; (503) ; (504) ; (505) ; (506) ; (507) ; (508) ; (509) ; (510) ; (511) ; (512) ; (513) ; (514) ; (515) ; (516) ; (517) ; (518) ; (519) ; (520) ; (521) ; (522) ; (523) ; (524) ; (525) ; (526) ; (527) ; (528) ; (529) ; (530) ; (531) ; (532) ; (533) ; (534) ; (535) ; (536) ; (537) ; (538) ; (539) ; (540) ; (541) ; (542) ; (543) ; (544) ; (545) ; (546) ; (547) ; (548) ; (549) ; (550) ; (551) ; (552) ; (553) ; (554) ; (555) ; (556) ; (557) ; (558) ; (559) ; (560) ; (561) ; (562) ; (563) ; (564) ; (565) ; (566) ; (567) ; (568) ; (569) ; (570) ; (571) ; (572) ; (573) ; (574) ; (575) ; (576) ; (577) ; (578) ; (579) ; (580) ; (581) ; (582) ; (583) ; (584) ; (585) ; (586) ; (587) ; (588) ; (589) ; (590) ; (591) ; (592) ; (593) ; (594) ; (595) ; (596) ; (597) ; (598) ; (599) ; (600) ; (601) ; (602) ; (603) ; (604) ; (605) ; (606) ; (607) ; (608) ; (609) ; (610) ; (611) ; (612) ; (613) ; (614) ; (615) ; (616) ; (617) ; (618) ; (619) ; (620) ; (621) ; (622) ; (623) ; (624) ; (625) ; (626) ; (627) ; (628) ; (629) ; (630) ; (631) ; (632) ; (633) ; (634) ; (635) ; (636) ; (637) ; (638) ; (639) ; (640) ; (641) ; (642) ; (643) ; (644) ; (645) ; (646) ; (647) ; (648) ; (649) ; (650) ; (651) ; (652) ; (653) ; (654) ; (655) ; (656) ; (657) ; (658) ; (659) ; (660) ; (661) ; (662) ; (663) ; (664) ; (665) ; (666) ; (667) ; (668) ; (669) ; (670) ; (671) ; (672) ; (673) ; (674) ; (675) ; (676) ; (677) ; (678) ; (679) ; (680) ; (681) ; (682) ; (683) ; (684) ; (685) ; (686) ; (687) ; (688) ; (689) ; (690) ; (691) ; (692) ; (693) ; (694) ; (695) ; (696) ; (697) ; (698) ; (699) ; (700) ; (701) ; (702) ; (703) ; (704) ; (705) ; (706) ; (707) ; (708) ; (709) ; (710) ; (711) ; (712) ; (713) ; (714) ; (715) ; (716) ; (717) ; (718) ; (719) ; (720) ; (721) ; (722) ; (723) ; (724) ; (725) ; (726) ; (727) ; (728) ; (729) ; (730) ; (731) ; (732) ; (733) ; (734) ; (735) ; (736) ; (737) ; (738) ; (739) ; (740) ; (741) ; (742) ; (743) ; (744) ; (745) ; (746) ; (747) ; (748) ; (749) ; (750) ; (751) ; (752) ; (753) ; (754) ; (755) ; (756) ; (757) ; (758) ; (759) ; (760) ; (761) ; (762) ; (763) ; (764) ; (765) ; (766) ; (767) ; (768) ; (769) ; (770) ; (771) ; (772) ; (773) ; (774) ; (775) ; (776) ; (777) ; (778) ; (779) ; (780) ; (781) ; (782) ; (783) ; (784) ; (785) ; (786) ; (787) ; (788) ; (789) ; (790) ; (789) ; (790) ; (791) ; (792) ; (793) ; (794) ; (795) ; (796) ; (797) ; (798) ; (799) ; (800) ; (801) ; (802) ; (803) ; (804) ; (805) ; (806) ; (807) ; (808) ; (809) ; (810) ; (811) ; (812) ; (813) ; (814) ; (815) ; (816) ; (817) ; (818) ; (819) ; (820) ; (821) ; (822) ; (823) ; (824) ; (825) ; (826) ; (827) ; (828) ; (829) ; (830) ; (831) ; (832) ; (833) ; (834) ; (835) ; (836) ; (837) ; (838) ; (839) ; (840) ; (841) ; (842) ; (843) ; (844) ; (845) ; (846) ; (847) ; (848) ; (849) ; (850) ; (851) ; (852) ; (853) ; (854) ; (855) ; (856) ; (857) ; (858) ; (859) ; (860) ; (861) ; (862) ; (863) ; (864) ; (865) ; (866) ; (867) ; (868) ; (869) ; (870) ; (871) ; (872) ; (873) ; (874) ; (875) ; (876) ; (877) ; (878) ; (879) ; (880) ; (881) ; (882) ; (883) ; (884) ; (885) ; (886) ; (887) ; (888) ; (889) ; (890) ; (891) ; (892) ; (893) ; (894) ; (895) ; (896) ; (897) ; (898) ; (900) ; (901) ; (902) ; (903) ; (904) ; (905) ; (906) ; (907) ; (908) ; (909) ; (910) ; (911) ; (912) ; (913) ; (914) ; (915) ; (916) ; (917) ; (918) ; (919) ; (920) ; (921) ; (922) ; (923) ; (924) ; (925) ; (926) ; (927) ; (928) ; (929) ; (930) ; (931) ; (932) ; (933) ; (934) ; (935) ; (936) ; (937) ; (938) ; (939) ; (940) ; (941) ; (942) ; (943) ; (944) ; (945) ; (946) ; (947) ; (948) ; (949) ; (950) ; (951) ; (952) ; (953) ; (954) ; (955) ; (956) ; (957) ; (958) ; (959) ; (960) ; (961) ; (962) ; (963) ; (964) ; (965) ; (966) ; (967) ; (968) ; (969) ; (970) ; (971) ; (972) ; (973) ; (974) ; (975) ; (976) ; (977) ; (978) ; (979) ; (980) ; (981) ; (982) ; (983) ; (984) ; (985) ; (986) ; (987) ; (988) ; (989) ; (990) ; (991) ; (992) ; (993) ; (994) ; (995) ; (996) ; (997) ; (998) ; (999) ; (1000) : (1001) (1002) (1003) (1004) (1005) (1006) (1007) (1008) (1009) (1010) (1011) (1012) (1013) (1014) (1015) (1016) (1017) (1018) (1019) (1020) (1021) (1022) (1023) (1024) (1025) (1026) (1027) (1028) (1029) (1030) (1031) (1032) (1033) (1034) (1035) (1036) (1037) (1038) (1039) (1040) (1041) (1042) (1043) (1044) (1045) (1046) (1047) (1048) (1049) (1050) (1051) (1052) (1053) (1054) (1055) (1056) (1057) (1058) (1059) (1060) (1061) (1062) (1063) (1064) (1065) (1066) (1067) (1068) (1069) (1070) (1071) (1072) (1073) (1074) (1075) (1076) (1077) (1078) (1079) (1080) (1081) (1082) (1083) (1084) (1085) (1086) (1087) (1088) (1089) (1090) (1091) (1092) (1093) (1094) (1095) (1096) (1097) (1098) (1099) (1100) (1101) (1102) (1103) (1104) (1105) (1106) (1107) (1108) (1109) (1110) (1111) |
Ksqo npuHa HecnpabHocTei He BdaOcBCTaHObNTn, 3BepHiTbcr ao akpeIHTOBaHOro cepbichoro zentpy Rowenta www(rowenta.com
3 MeToO yDcCKoHaJIeHnB BInpo6iB, 100 BrTOBnIOIbTcBcK, KOMpaHir Rowenta 36epirae 3a co6oIO npabo 3mHOBaTI IX TexHiN HI napaMeTpNI 6e3 NOpEpeHbOrO NOViDomJIeHn.
UK