
3D i2 - Camcorder AIPTEK - Free user manual and instructions
Find the device manual for free 3D i2 AIPTEK in PDF.


| Product Type | 3D Camcorder |
| Brand | Aiptek |
| Model | 3D i2 |
| Dimensions (approx.) | 120 x 70 x 30 mm |
| Weight (approx.) | 200 g |
| Power Supply | Built-in rechargeable lithium-ion battery |
| Recording Type | 3D video (dual lens) and 2D |
| Display | Glasses-free 3D LCD screen (autostereoscopic) |
| Photo Resolution | Up to 5 megapixels (interpolated) |
| Video Resolution | Full HD 1080p (2D), 720p (3D) |
| Storage | SD/SDHC card (up to 32 GB, not included) |
| Zoom | 4x digital zoom |
| Video Output | HDMI (3D compatible) and USB 2.0 |
| Main Features | 3D recording, 3D photo, 3D playback on built-in screen, face detection |
| Care and Cleaning | Clean the lens with a soft, dry microfiber cloth |
| Safety | Do not expose to moisture, shocks, or extreme temperatures |
| Spare Parts and Repairability | Replacement battery, mains charger, USB cable |
| Supplied Accessories | Charger, USB cable, wrist strap, carrying case |
Frequently Asked Questions - 3D i2 AIPTEK
User questions about 3D i2 AIPTEK
0 question about this device. Answer the ones you know or ask your own.
Ask a new question about this device
Download the instructions for your Camcorder in PDF format for free! Find your manual 3D i2 - AIPTEK and take your electronic device back in hand. On this page are published all the documents necessary for the use of your device. 3D i2 by AIPTEK.
USER MANUAL 3D i2 AIPTEK
natural_image
Line drawing of a mobile phone with control buttons and display screen (no text or symbols)3D HD CAMCORDER
User's Manual
Welcome:
Dear user, thank you for purchasing this product.
Much investment in time and effort has gone into its development, and it is our hope that it will give you many years of trouble-free service.
FCC Compliance Statement:
This device complies with Part 15 of the FCC Rules. Operation is subjected to the following two conditions: (1) this device may not cause harmful interference, and (2) this device must accept any interference received, including interference that may cause undesired operation.

This equipment has been tested and found to comply with limits for a Class B digital device, pursuant to Part 15 of the FCC rules. These limits
are designed to provide reasonable protection against harmful interference in residential installations. This equipment generates, uses, and can radiate radio frequency energy, and if not installed and used in accordance with the instructions, may cause harmful interference to radio communications.
However, there is no guarantee that interference will not occur in a particular installation. If this equipment does cause interference to radio or television equipment reception, which can be determined by turning the equipment off and on, the user is encouraged to try to correct the interference by one or more of the following measures:
-Reorient or relocate the receiving antenna.
-Move the equipment away from the receiver.
-Plug the equipment into an outlet on a circuit different from that to which the receiver is connected.
-Consult the dealer or an experienced radio/television technician for additional suggestions.
You are cautioned that any change or modifications to the equipment not expressly approved by the party responsible for compliance could void Your authority to operate such equipment.
CE


If the time arises to throw away your product, please recycle all the components possible.
Batteries and rechargeable batteries are not to be disposed in your domestic waste! Please recycle them at your local recycling point.
Together we can help to protect the environment.
Safety Notice:
- Do not drop, puncture or disassemble the camcorder; otherwise the warranty will be voided.
- Avoid all contact with water, and dry hands before using.
- Do not expose the camcorder to high temperature or leave it in direct sunlight. Doing so may damage the camcorder.
- Use the camcorder with care. Avoid pressing hard on the camcorder body.
- For your own safety, avoid using the camcorder when there is a storm or lightning.
- Do not use batteries of different specifications. Doing so may lead to the potential for serious damage.
- Remove the battery during long periods between usage, as a deteriorated battery may affect the functionality of the camcorder.
- Remove the battery if it shows signs of leaking or distortion.
- Use only the accessories supplied by the manufacturer.
- Keep the camcorder out of the reach of infants.
- Risk of explosion if battery is replaced by an incorrect type.
- Dispose of used batteries according to the instructions.
Extra notice regarding 3D viewing:
- To view 3D display and receive 3D effects well, the viewer should be positioned to face the center of the screen at around 30 cm distance and not having a steep viewing angle.
- Viewing in 3D mode may cause dizziness or even perceptive after effects, disorientation, and eye strain. It is recommended that viewers take frequent breaks to alleviate the likelihood of these effects. If you have any of the above symptoms, immediately cease usage of the 3D display of this device and do not resume until the symptoms have receded.
- Do not use the Red/Cyan Glasses for any purpose other than viewing red/cyan 3D files. Wearing the Red/Cyan Glasses for any other purpose (such as general spectacles, sunglasses, protective goggles, etc.) may cause harm to you or weaken your eyesight.
- Young children viewing 3D files should always be accompanied by adults. It is not recommended to give this device into the hands of young children.
The 3D display technology used in this product:
This product utilizes the “Parallax Barrier” 3D technology. A parallax barrier is a device that allows a liquid crystal display (LCD) to show a stereoscopic image without the need for the viewer to wear a pair of 3D glasses. Placed in front of the normal LCD, a parallax barrier consists of a layer of material with a series of precision slits, allowing each eye to see a different set of pixels, thus creating a sense of depth and 3D effect through parallax.

flowchart
graph TD
    A["Parallax Barrier"] --> B["Pixels"]
    B --> C["Right eye"]
    B --> D["Left eye"]
    style A fill:#f9f,stroke:#333
    style B fill:#bbf,stroke:#333
    style C fill:#fff,stroke:#333
    style D fill:#fff,stroke:#333
Table of Contents
Getting Started.... 1
Product overview .... 1
Loading the battery.... 2
Charging the battery 2
Powering on or off / Using a memory card 3
Setting language.... 3
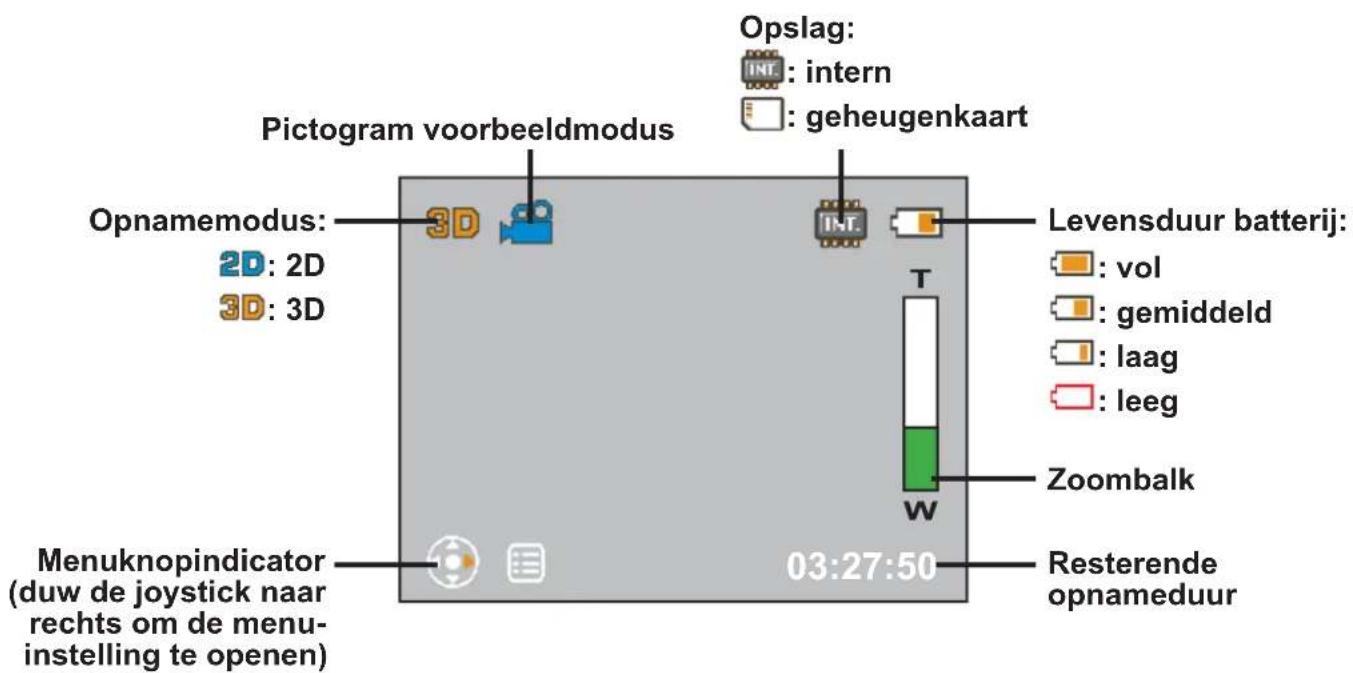
Reading screen icons 3
Basic Operations.... 4
Recording a video clip 4
Taking a photo 4
Playback 5
Deleting files 6
Menu operations....6
Menu items 6
File management on PC....7
Connecting to HDTV....8
Appendix 9
Battery life / Capacity table.... 9
Troubleshooting....9
Specifications....10
Getting Started
Product overview


natural_image
Technical line drawing of a vertical panel or enclosure with internal components, no text or symbols present

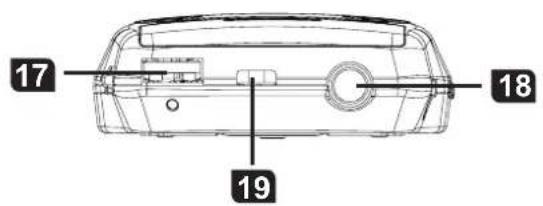
1 Power button - Press to turn on; long-press to turn off
2 HDMI port
3 SD/SDHC card slot
4 2D/3D display
5 Record button
6 Shutter button
7 Speaker
8 2D/3D button - Switch between 2D/3D mode
9 5-way joystick -
5-way: up/down/left/right/
enter
Enter: OK or Playback
10 Delete button
11 Battery charge LED indicator
12 USB switch - Slide downward to use the USB connector
13 Right lens - For 2D and 3D capture
14 Left lens - For 3D capture
15 Microphones
16 Battery cover
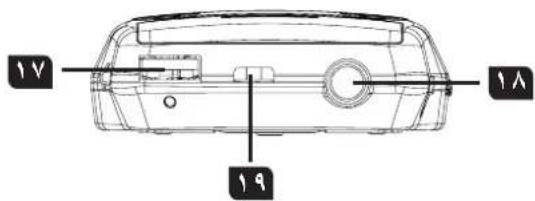
17 USB connector
18 Tripod socket
19 Hang strap holder
Loading the battery

1 Press the "3D" mark and then, while pressing, pull the battery cover to remove it.
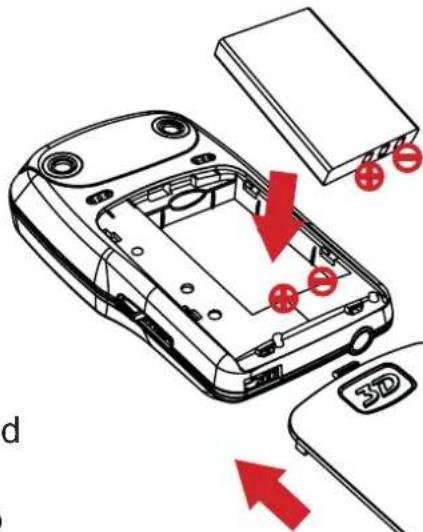
3 Replace the battery cover.
2 Place the battery into the compartment. Align the + and - metallic ends carefully.
① Note that the + and - metallic contacts must be aligned with the corresponding contacts in the compartment.
Charging the battery
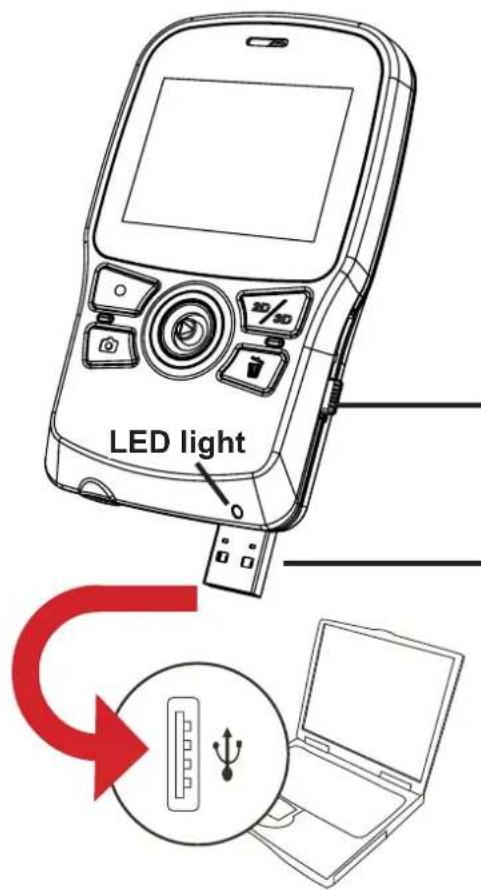
Before charge:
Power off the unit first and make sure the Li-ion battery is installed.
Make sure your PC is powered on during the charge.
It is recommended to charge the battery for at least 8 hours before the first time usage.
1 Slide the USB switch downward to reveal the USB connector.
2 Connect the USB connector to a USB port of a powered PC and the charge will begin. Use an extension cable if necessary.
The LED light turns amber when the charge is in progress. After the charge is complete, the LED light will turn green.
Powering on or off / Using a memory card
Press the power button to power on the unit. Press and hold down for 2 seconds to turn off the unit.
Insert a SD/SDHC card (sold separately) into the slot until it clicks into place. To remove the card, push the card to release it and then pull it out gently.
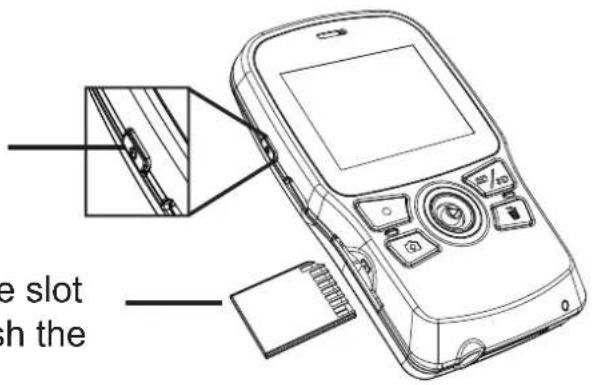
i If the unit cannot be powered on, please check the followings:
1) The battery is correctly loaded;
2) The loaded battery has enough power.
Setting language
1 Push the Joystick to the right (→) to bring up menu.
2 Select the "Language" item and Press OK ( ▶)
3 Move the Joystick up/down ( Ⓤ to select your local language. Press the OK button ( ▶ ) to confirm.

Reading screen icons

Basic Operations
i
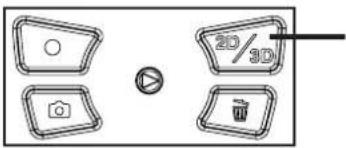
Press this button to shift between 2D/3D mode. Pressing this button in preview will determine whether the recorded file is 2D or 3D. Pressing this button in playback will let you see the 2D or 3D files stored in your camcorder or memory card. Note that 3D files cannot be recorded/viewed/deleted in 2D mode, and vice versa.
When recording or shooting in 2D mode, only the right lens is used for capturing image.
This product utilizes the “Parallax Barrier” 3D technology. The parallax barrier is a special layer placed in front of the LCD screen. In 3D mode, it allows each of your eye to see a different set of pixels on the screen (hence the 3D effect), and as a result the brightness of the screen will also seem to be halved in 3D mode.
Recording a video clip
1 Press the Record button ( ) to start the recording.
2 During recording, you can move the Joystick up/down ( ) to zoom in/out the image. You can also press the OK button ( ▶ ) to pause or resume the recording.
3 Press the Record button ( ) again to stop the recording.
When recording in a dim environment, please use extra light source to illuminate the subject.
Taking a photo
1 Move the Joystick up/down ( Ⓜ to zoom in/out the image until a proper scene is set.
2 Press the Shutter button ( ) to take a photo.
Blurred photos may occur due to hand shake. To avoid blurred photos, please hold the camcorder steady when taking photos or use a tripod to eliminate shaking.

Playback
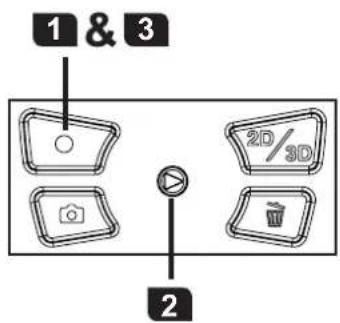
1 Press the OK button ( Ⓤ to enter Playback preview mode.
i Press the 2D/3D button (9 to switch between 2D or 3D files.
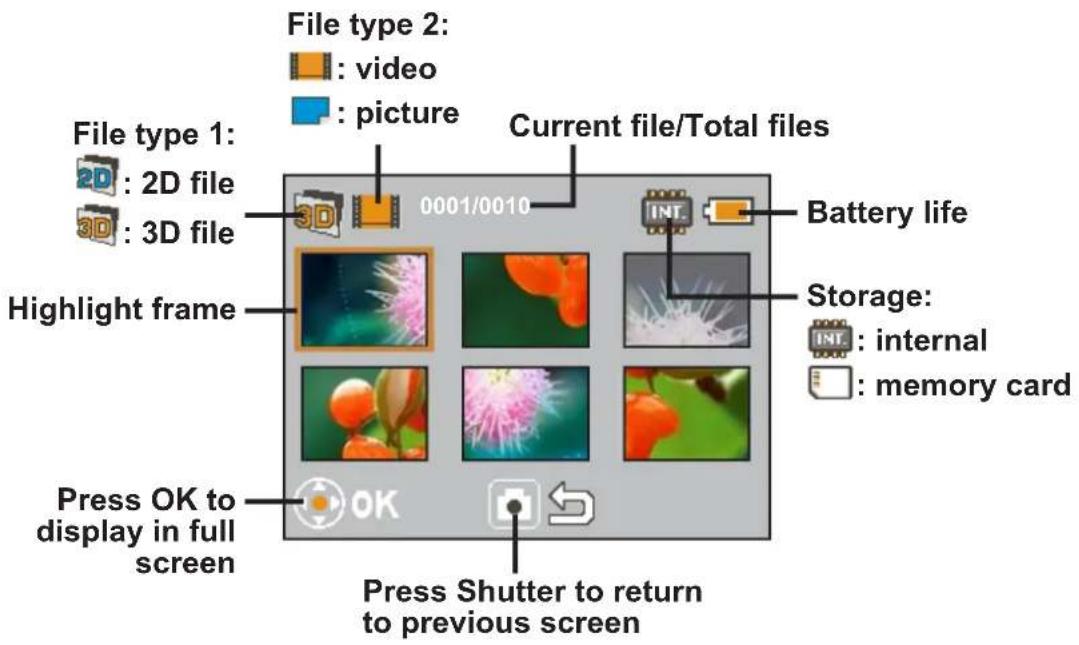
2 Use the Joystick ( ✉) to navigate through your recordings and select a file. Press OK ( ⭕ ) to view the file in full screen. When a file is viewed in full screen and is not playing or being zoomed and locked, you can move the Joystick left/right ( ⇔→ ) to shift between the previous or next file.
3-1 When playing a video, you can move the Joystick left/right ( ⇧ ) to fast rewind or fast forward, or press the OK button ( Ⓥ ) to pause or resume the playback. You can also move the Joystick up/down ( ⏻ ) to bring up volume control and then left/right ( ⇧ ) to adjust volume.
3-2 When viewing a photo, you can move the Joystick up/down ( 🔊) to zoom in/out. Press the OK button ( Ⓥ ) to lock ratio and use the Joystick ( 🔒) to browse the photo. To exit the zoomed condition, press OK ( Ⓡ ) and use the Joystick ( ↓ ) to zoom out the image until back to normal ratio, or simply press the Shutter ( 📄 ) button.
4 To exit Playback mode, press the Shutter (button.

Full screen playback
Deleting files
1 Press the OK button ( ▶ ) to enter Playback mode and use the Joystick ( ◆ ) to select a file.
2 Press the Delete button ( 📄 ) and 3 options will be available:
| Option Description | |
| Yes Delete the | selected file |
| No Exit menu | without deleting the file |
| All | Delete all video and image files in the same folder (3D or 2D) |

Menu operations
1 Push the Joystick to the right ( ) to bring up menu.
2 Move the Joystick up/down ( ⏻ ) to select a menu item and Press OK ( Ⓥ ) to enter.
3 Move the Joystick up/down ( Ⓤ ) to select your desired option and press OK ( ⏰ ) to confirm.
4 To exit menu, push the Joystick to the left().

Menu items
| Menu items Description | |
| Language | Select the language for the Camcorder. |
| Date & Time | To setup the date and time, move the Joystick up/down ( ⏻ ) to adjust value; left/right ( ⇌) to shift between fields. Press OK ( ⭕) to save the changes. |
| Date Stamp | Print a date and time mark on each photo (photo only). |
| Icon | Enable or disable the icons shown on the display. |
| Flicker | Set flicker frequency to 50Hz or 60Hz. See the “Flicker table” for more details. |
* Flicker table:
| Region | England Germany | many France | Italy Spain | Netherlands | Russia | ||
| Setting | 50Hz 50Hz | 50Hz 50Hz | 50Hz 50Hz | 50Hz 50Hz | |||
| Region | Portugal America | Taiwan | China Japan | Korea Thailand | |||
| Setting | 50Hz | 60Hz | 60Hz | 50Hz | 50/60Hz | 60Hz | 50Hz |
Note: The flicker setting is based on the frequency standard of your local power supply.
File management on PC

Connect the USB connector of the camcorder to your PC. Power on the camcorder and the LED will turn green. The camcorder is then treated as a removable disk on the PC, allowing you to have access to all files stored in the camcorder.
When you connect the camcorder to your PC for the first time, the installation of the bundled software will automatically start. Please follow the on-screen instructions to complete the software installation.
Copy your normal 2D files into the 2D (DCIM\101DIR2D) folder in your memory card. Do not store 2D files in the 3D (DCIM\100DIR3D) folder, otherwise they will not be detected and displayed.
Connecting to HDTV

1 Turn on your HDTV.
2 Connect the HDMI-in connector (the larger end) of the HDMI cable to the HDTV.
3 Connect the other end of the HDMI cable to your camcorder.
4 Turn on the camcorder.
5 On your HDTV, select the HDMI input port where the HDMI cable is connected.
6 Switch your camcorder to Playback mode and start to play a file. For operation details please refer to the "Playback" section.
If your HDTV is 2D type, the 3D files output on your HDTV will be 2D “side-by-side” only.
If you want to experience 3D effect on your 2D HDTV, you need to convert the 3D files into red/cyan format files by installing and using the bundled software (TotalMedia HD Cam) and copy the converted files into the “DCIM\101DIR2D” folder in the memory card. Then output the playback to your HDTV and wear the red/cyan glasses to watch it. For more information please refer to the “Software Addendum” included in the package.
Battery life / Capacity table
| Battery Life Table | Still picture Video clip | |
| Number of shots Recording time (minute) | ||
| 1000 60 | ||
| * The unit is set to 3D mode. | ||
Note: This table is for your reference only. The actual battery life depends on your battery quality and recharge level.
| Capacity Table | Memory (SD/SDHC) | Video clip (min.) Still picture | |
| 2GB 50 1400 | |||
| 4GB 100 2800 | |||
| 8GB 200 5600 | |||
| 16GB 400 11200 | |||
Note: The actual value of capacity may vary (up to ± 30%) depending on the color saturation and complexity of your subject and surroundings.
Troubleshooting
| Problem Possible cause Solution | ||
| I output 3D video/photo playback to my home HDTV. But the 3D effect does not work. | Your TV/display is 2D and therefore does not support the format of the 3D files. | Covert the 3D video/photo into red/cyan format. Then play and output the converted file on your 2D HDTV/display. You also need to wear the accessory red/cyan glasses. |
| I output 3D video/photo playback to my home 3D HDTV. But the 3D effect does not work. | The system of your 3D TV/display is not correctly set up to support the format of the 3D files. | Select “side-by-side” setting in your 3D HDTV/display to correctly display the 3D effect. |
| I play my 3D videos/photos on my 3D-featured PC/notebook. But the 3D effect does not work. | The PC/notebook does not support “side-by-side” 3D format or the system is not correctly set up. | 1) If your 3D PC/notebook is “Nvidia 3D” compatible, you can set the TotalMedia HDCam program to support “Nvidia 3D” directly.2) If your PC/notebook is not “Nvidia 3D” compatible, you may consider installing “Nvidia 3D kit” to support the effect.3) You can download and install the 3D freeware “Stereoscopic Player”, and set up the software to support “side-by-side” 3D effect. |
| Flash occurs when I wear my Shutter Glasses (that comes with 3D HDTV/display) to watch 3D files. | You are watching 3D files under 50Hz or 60Hz fluorescent light. | Turn off the fluorescent light to avoid interference and then watch the 3D files. |
Specifications
| Item Specification | |
| Image Sensor 5 Mega-pixels CMOS (2592 x 1944) x 2 | |
| Resolution | Camcorder: HD 720p 30f (1280 x 720)Camera: 5M |
| File Format MP4 (H.264), JPEG | |
| Video Frame Rate 30 frames per second | |
| Internal Memory Yes | |
| External Memory SD card slot (supports 256MB up to 32GB SDHC) | |
| LCD Display 2.4" 3D TFT supports 3D and 2D mode display | |
| 3D/2D capture Yes, switchable | |
| Lens Fixed focus lens x 2 | |
| Focus Range 1 m ~∞ | |
| Aperture Range F3.0 | |
| Shutter Speed 1 ~ 1/2000 sec. | |
| Digital Zoom 4X | |
| Night Shot Mode Auto | |
| White Balance Auto | |
| Exposure Control | Auto |
| Date Stamp | Yes |
| Microphone | Yes (Two) |
| Speaker | Yes |
| TV out | HDTV (HDMI output) |
| Auto Power-off | 3 minutes |
| Interface | USB 2.0 mass storage |
| Battery | NP60 Li-lon Rechargeable BatteryOperating condition:Temperature : 0~45 °CHumidity : 65+- 20% RH |
| Dimensions (LxWxH) | 118 x 72 x 23 mm |
Note: Specifications are subject to change without notice.
natural_image
Technical line drawing of a vertical panel or enclosure with internal components, no text or symbols present

Einlegen des Akkus

Lecture plein écran
Éléments de menu
natural_image
Technical line drawing of a vertical panel or enclosure with internal components, no text or symbols present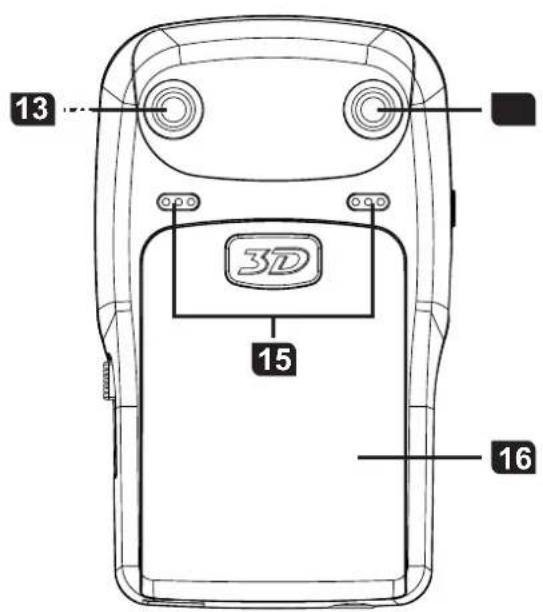

Voci del menu
natural_image
Technical line drawing of a vertical panel or cabinet with a labeled component (12), no text or symbols present.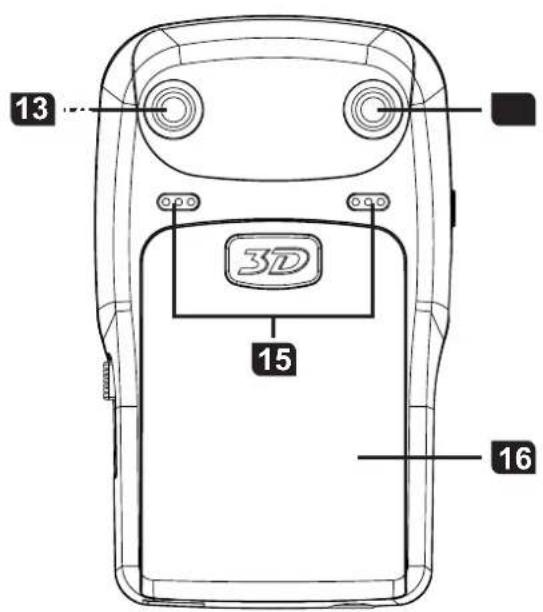

Schermpictogrammen lezen
Menu-items
natural_image
Technical line drawing of a vertical panel or enclosure with internal components, no visible text or symbols
natural_image
Technical line drawing of a vertical panel or enclosure with internal components, no visible text or symbols

3 蓋上電池蓋。
即
全螢幕播放
删除檔案
natural_image
Technical line drawing of a vertical panel or enclosure with internal components, no visible text or symbols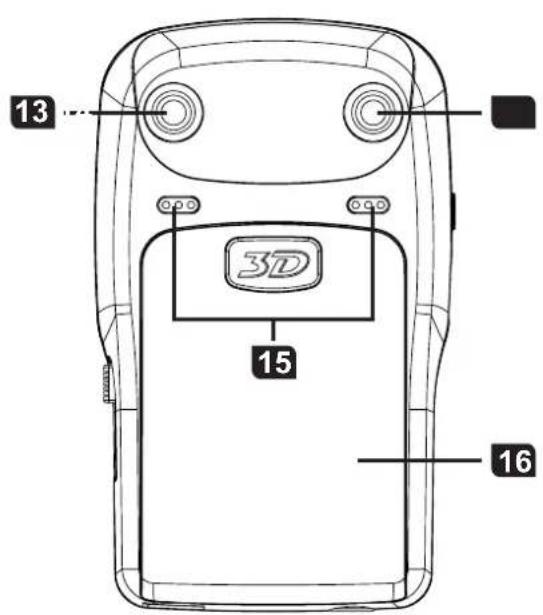

全屏幕播放
删除文件
natural_image
Technical line drawing of a vertical panel or enclosure with internal components, no visible text or symbols

3 カバーを元に戻します。
全画面再生
natural_image
Technical line drawing of a vertical panel or enclosure with internal components, no text or symbols present

전체 화면 재생
파일 삭제하기
메뉴사용법
natural_image
Technical line drawing of a vertical panel or enclosure with internal components, no visible text or symbols

3 Reinstale a tampa da bateria.
Operação do menu


natural_image
Line drawing of a vertical panel or cabinet with a control knob and a small labeled component (no text or symbols present)


natural_image
Line drawing of a mobile phone with visible screen, keypad, and cable (no text or symbols)


- 3D HD CAMCORDER
- Welcome:
- FCC Compliance Statement:
- Safety Notice:
- Extra notice regarding 3D viewing:
- The 3D display technology used in this product:
- Table of Contents
- Getting Started.... 1
- Basic Operations.... 4
- Appendix 9
- Getting Started
- Product overview
- Loading the battery
- Charging the battery
- Before charge:
- Powering on or off / Using a memory card
- Setting language
- Reading screen icons
- Basic Operations
- Recording a video clip
- Taking a photo
- Playback
- Deleting files
- Menu operations
- Menu items
- File management on PC
- Connecting to HDTV
- Einlegen des Akkus
- Éléments de menu
- Voci del menu
- Schermpictogrammen lezen
- Menu-items
- 删除檔案
- 删除文件
- 파일 삭제하기
- 메뉴사용법
- Operação do menu
Brand : AIPTEK
Model : 3D i2
Category : Camcorder