
FL-600R - Photo accessory OLYMPUS - Free user manual and instructions
Find the device manual for free FL-600R OLYMPUS in PDF.
| Product type | External electronic flash for digital camera |
| Brand | OLYMPUS |
| Model | FL-600R |
| Guide number | 36 (ISO100), 12 with wide-angle diffuser (ISO100) |
| Lighting angle | 12 to 42 mm (equivalent to 24 to 85 mm in 135 format); with diffuser: 8 mm (16 mm in 135 format) |
| Flash modes | TTL-AUTO, AUTO, MANUAL, FP TTL AUTO, FP MANUAL, SL AUTO, SL MANUAL, RC |
| Flash duration | Approx. 1/20,000 to 1/500 s (except Super FP flash) |
| Power supply | 4 AA batteries (alkaline or NiMH); manganese batteries prohibited |
| Recycle time | Approx. 2.5 s with alkaline batteries; 2 s with NiMH batteries |
| Number of flashes (full power) | Approx. 250 with alkaline batteries; 370 with NiMH batteries |
| Dimensions (W × H × D) | 62 × 104 × 98 mm (excluding protrusions) |
| Weight | 255 g (without batteries) |
| Operating temperature | -10 to 42 °C |
| Operating humidity | 20 to 90% |
| AF illuminator | Effective range: approx. 1 to 5 m (depending on camera and subject) |
| Special functions | Wireless flash (RC mode), LED light, wide-angle diffuser, tilting reflector, light capture plate |
| Mounting | Hot shoe with locking latch; stand provided for wireless use |
| Maintenance and cleaning | Clean with a soft, dry cloth. Do not use chemicals. Avoid water and moisture. |
| Safety | Do not use in the presence of flammable gases. Do not touch the emission area after continuous use. Keep out of reach of children. Do not disassemble. |
| Replacement parts and repairability | AA batteries (sold separately). Wide-angle diffuser and stand included. Repairs by an authorized Olympus service center. |
Frequently Asked Questions - FL-600R OLYMPUS
User questions about FL-600R OLYMPUS
0 question about this device. Answer the ones you know or ask your own.
Ask a new question about this device
Download the instructions for your Photo accessory in PDF format for free! Find your manual FL-600R - OLYMPUS and take your electronic device back in hand. On this page are published all the documents necessary for the use of your device. FL-600R by OLYMPUS.
USER MANUAL FL-600R OLYMPUS
IMPORTANT SAFETY INSTRUCTIONS
When using your photographic equipment, basic safety precautions should always be followed, including the following:
- Read and understand all instructions before using.
- Close supervision is necessary when any flash is used by or near children. Do not leave flash unattended while in use.
-
Care must be taken as burns can occur from touching hot parts.
-
Do not operate if the flash has been dropped or damaged - until it has been examined by qualified service personnel.
- Let flash cool completely before putting away.
- To reduce the risk of electric shock, do not immerse this flash in water or other liquids.
- To reduce the risk of electric shock, do not disassemble this flash, but take it to qualified service personnel when service or repair work is required. Incorrect reassembly can cause electric shock when the flash is used subsequently.
- The use of an accessory attachment not recommended by the manufacturer may cause a risk of fire, electric shock, or injury to persons.
SAVE THESE INSTRUCTIONS
Thank you for purchasing this Olympus product. To ensure your safety, please read this instruction manual before use, and keep it handy for future reference.
Names of Parts (Fig. 1 p. 3)
①Wide panel ②Light-emitting area
③ Remote sensor ④ AF illuminator/LED
window ⑤Auto light receptor ⑥Catch light
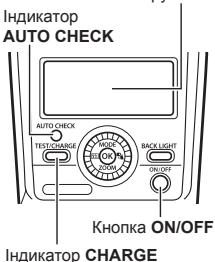
plate ⑦ Control panel ⑧ AUTO CHECK lamp
9 TEST button/CHARGE lamp OK button
11 Bounce lock release button 2 BACK LIGHT
button 13 ON/OFF button 14 Latch
⑤ Dial (a: flash compensation button; b: MODE
button; c: LED light button; d: ZOOM button)
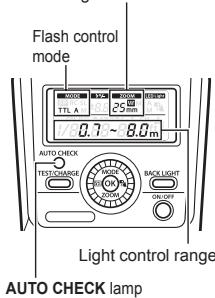
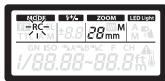
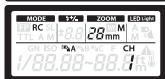
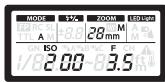
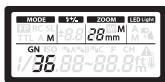
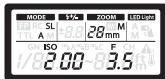
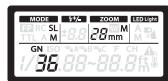
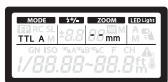
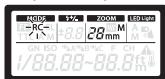
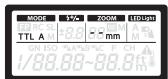
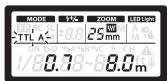
Control Panel (Fig. 2 p. 4)
Details (p. 11, 18)
① Super FP flash ② Flash control mode ③ Guide
number (GN) ④ Flash intensity control ⑤ Zoom
position (angle of illumination) ⑥FOUR THIRDS
⑦Zoom mode ⑧LED light ⑨ISO sensitivity
10 RC mode group 11 Aperture (F) 12 RC mode
channel ③ Temperature warning ④ Distance units
Continuous Firing
The flash may become hot when fired many times in succession, resulting in damage or malfunction. The flash should be fired no more than 10 times in succession at intervals of 2.5 seconds, after which it should be left unused for at least 10 minutes.
Preparing a Battery (Sold Separately)
Choose from the below batteries:
AA (R6) alkaline batteries (× 4)
AA (R6) NiMH batteries (× 4)
Note
AA (R6) manganese batteries cannot be used.
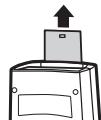
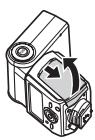
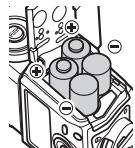
Loading Batteries
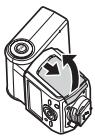
1 Open the battery compartment cover.
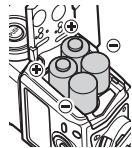
2 Insert the batteries with correct + / - polarity.
3 Close the battery compartment cover.
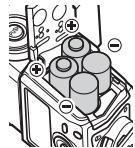
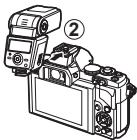
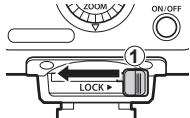
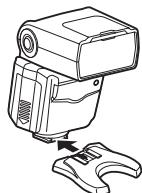
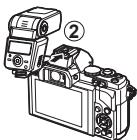
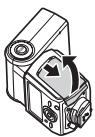
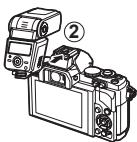
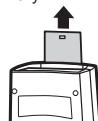
Attaching to the Camera
Confirm that both the camera and electronic flash are off. Attaching or removing the electronic flash while either the flash or the camera is on may result in malfunction.
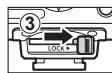
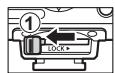
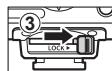
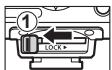
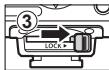
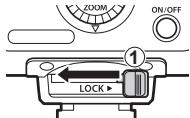
1 Slide the latch in the direction opposite to that indicated by the [LOCK] icon (①).
2 Slide the flash into the hot shoe until it clicks securely into place (②).
3 Slide the latch to the [LOCK] position (③).
- To remove the flash, slide the latch in the direction opposite to the [LOCK] arrow and slide it from the shoe.
Turning on the Electronic Flash
Attach an electronic flash to the camera, and then turn the camera on.
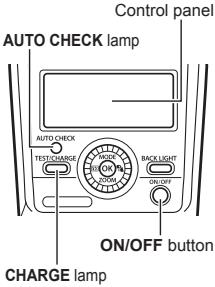
1 Press the ON/OFF button.
-
The control panel display will turn on.
To turn the flash off, press the ON/OFF button again. -
Replace the batteries if the CHARGE lamp does not light after:
30 seconds (Alkaline batteries)
10 seconds (NiMH batteries)
- If the CHARGE lamp and AUTO CHECK lamp blink simultaneously, batteries are running low. Replace the batteries.
- The flash will enter sleep mode whenever the camera enters sleep mode.
- If no operations are performed for approximately 60 minutes, the flash will turn off automatically. Press the ON/OFF button to turn it on.
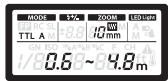
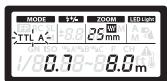
Firing angle Displayed according to the focal length of the lens.
1 Use camera controls to choose the flash mode. See the camera manual for details.
2 Choose a flash control mode. Flash control mode (p. 11)
3 Press the shutter button halfway.
- The camera and flash will exchange shooting information and the flash range will be displayed in the control panel.
- Flash range varies with camera settings (ISO sensitivity, aperture, and lens focal length).
4 Press the shutter button the rest of the way down to take the picture.
The AUTO CHECK lamp blinks for about 5 s after shooting to indicate that the flash has fired successfully.
- When using a flash, flash light may be blocked by the lens body, lens hood, etc.
- Use the wide panel to prevent overexposure at ranges of less than 1m (3 ft.).
Flash Control Mode
Choose a flash control mode according to your subject and shooting conditions. To select a mode, press the MODE (△) button and rotate the dial.

| Control panel display | Control operation |
| TTL-AUTO | The flash light intensity is controlled automatically according to the camera's setup. The flash will be adjusted based on the brightness taken through the camera's lens. Usually use this mode with a camera with communication capability. |
| AUTO A B L O R O F 3.5 Blinks: Out of flash control range | The flash will be adjusted based on the brightness captured by auto light receptor on the electronic flash. If the camera has communication capability, this mode can be used only when the camera is an AUTO-compatible model. |
| MANUAL M 3.9 7.1m | In this mode, the flash is emitted according to the guide number setting. Rotate the dial to choose the guide number. The flash displays the optimal range, which is calculated based on the guide number and camera settings. |
| FP TTLAUTO F2 TTL A 4.4 ~ 5.5m | Super FP flash. This mode allows you to use flash photography even at shutter speeds faster than the flash synchronization speed of the camera. Flash level is set automatically. Maximum output is reduced, resulting in a smaller flash range. Flash range also diminishes with shutter speed. |
| FP MANUAL F2 TTL M 28 mm Gn 3.9 7.1m | The flash fires at the selected guide number. Rotate the dial to choose the guide number. The flash displays the optimal range, which is calculated based on the guide number and camera settings. |
Button Functions
| Button | Function | Use |
| +2 | Adjust flash level by up to ±5 EV. This value is combined with adjustments to flash compensation made using the camera. | 1 Press (↓) or ZOOM (▽). 2 Rotate the dial. |
| ZOOM | Adjust the angle of illumination manually. “M” appears in the display. | |
| 3 | Manually turn the LED light on or off. | 1 Before shooting, set the LED light to manual. 2 “Other settings” (p. 17) 3 Press (◇) to turn the LED light on. Press (◇) again to turn the LED light off. To view the LED brightness setting, press and hold (◇) for 2 s while the LED light is on. |
| TEST | To fire a test flash, press the TEST button while the CHARGE lamp is lit. The AUTO CHECK lamp blinks for about 5 s to indicate that the flash has fired successfully. If the lamp does not blink, adjust settings or change the distance to the subject. | |
| BACK LIGHT | The control panel backlight lights for about 15 s. The backlight turns off when camera controls are used. | |
Restoring Default Settings
1 Keeping the OK button pressed, press the BACK LIGHT button for 2 s.
The control panel will blink once when settings are reset.
Wireless Flash Settings
Wireless control is available with Olympus digital cameras that support RC mode. The unit is controlled by means of a flash mounted on the camera. It can also be mounted on a camera for wireless control of multiple remote flash units. For information on cameras that support
this system, see the camera manual.
1 Set the camera and flash to RC mode.
Press MODE () and rotate the dial to select a flash control mode.
2 Use the flash to select the channel and group.
Press MODE (△) and use to highlight items and rotate the dial to change.
| CH Channel | Set the camera and flash to the same channel. |
| 3D A 3D B 3D C Group | The camera can adjust flash settings’ separately for up to 3 groups; choose the group to which the flash belongs. |
- Including flash control mode, flash level, and flash compensation.
Placing Wireless Flash Units
Since the communication is performed with the flash emission of the camera, the flash positioning range varies with camera. See the camera manual for details.
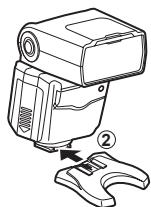
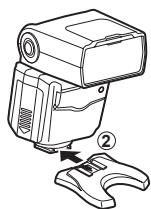
1 Attach the stand provided.
- Slide the latch in the direction opposite to that indicated by the [LOCK] icon (①) and slide the flash onto the stand until it clicks securely into place (②).
- Slide the latch to the [LOCK] position to latch the flash in place.
- To remove the flash, slide the latch in the direction opposite to the [LOCK] arrow and slide it from the stand.
2 Position the flash with the remote sensor facing the camera.
Take a test shot after positioning.
- We recommend using a single group of up to three remote flash units.
- Flash may not fire due to the angle or distance between the camera and the object.
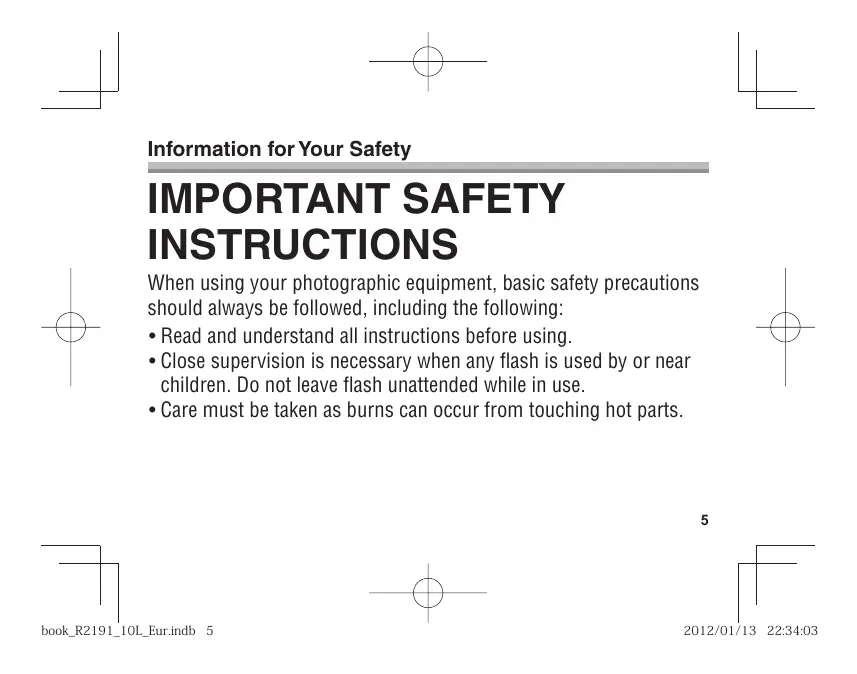
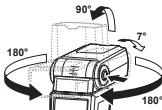
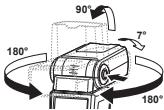
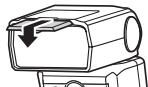
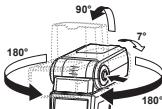
Fixing the Irradiation Angle
Point the flash head at a wall or ceiling for bounce flash photography. The area illuminated at ranges of 0.5 - 1.0m (1.6-3.3 ft.) will not be correct; point the flash down.
1 Pressing the bounce lock release button, turn the light-emitting section up/down and left/right.

Using the Wide Panel
Use for angles of illumination wider than 12mm (24 mm in 135 format). The ZOOM display will blink if the lens focal length is under 12mm .
1 Slide out the wide panel and place it on the light-emitting area (Fig. 1 p. 3).

- The estimated range display changes when the wide panel is used.
- The angle of illumination can be set to 10 mm and 8 mm only.
- Do not tilt the wide panel up.
- The ZOOM display will blink if the lens has a focal length of 12mm or more.
Using the Catch Light Plate
The catch light plate reflects light from the flash to create a catch light effect.
1 Slide out the catch light plate (Fig. 1 p. 3).
Point the flash directly upward with the plate toward the subject.
Other Settings
The following options can be selected in the control panel.

1 Press the OK button.
An item will blink in the control panel.
2 Press to highlight items.
3 Rotate the dial to change the highlighted item.
| Option | Description |
| MODE (flash control mode) | p. 11 |
| (flash compensation) | p. 13 |
| ZOOM (angle of illumination) | p. 13 |
| (LED light) | Choose whether the LED lights automatically or manually. A: Lights automatically as required. M: Lights when the LED light button is pressed. |
| GN (guide number) | Adjust flash level. |
| ISO sensitivity | Adjust ISO sensitivity. |
| Group | Choose a group for RC mode (p. 14). |
| Aperture | Adjust aperture. |
| Channel | Choose a channel for RC mode (p. 14). |
Custom Settings
Customize settings for improved ease of use.
1 Press the OK button for more than 2 s.
The flash will enter custom settings mode.
2 Press to highlight items.
3 Rotate the dial to change the highlighted item.
4 Press the OK button for more than 2 s to save changes.
| Control panel | Option | Description | |
| ICL | A | AF illuminator | A: Controlled by camera. OFF: Does not light. |
| LED LOM | 1/8 | LED brightness | 1/1-1/16: Adjust LED brightness. |
| MODE SL | on | Slave flash | ON: Flash control display shows slave mode. OFF: Flash control display does not show slave mode. |
| CLP | on | Flash cable | ON: Flash cable not used. OFF: Flash cable used. |
| ZOOM W mm | 4-3 | Zoom display | W: Display values for FOUR THIRDS lenses. OFF: Display 135 format equivalent values. |
| BP on | Wide panel detection | ON: Flash detects position of wide panel. Angle of illumination adjusted automatically. OFF: Flash does not detect wide panel position. | |
| m | Distance units | m: Distances displayed in meters. ft: Distances displayed in feet. | |
| GN | on | Guide number display | ON: Flash output is shown as a guide number. OFF: Flash output is shown as a relative value. |
| MODE | ISO F | Auto light sensing | ON: Show the flash range calculated by the camera in AUTO flash control mode. OFF: Show the current aperture and ISO sensitivity. |
| A | on | ||
| ISO | 100 | Auto ISO display | 25-3200: Display the ISO sensitivity when AUTO is selected as the flash control mode for cameras that can not communicate with the flash unit. |
Cameras That Do Not Communicate with the Flash
AUTO
Set aperture and ISO sensitivity to the values selected with the camera.
1 Set the flash control mode to AUTO. "Flash control mode" (p. 11)
2 Match the zoom position to the focal length of the lens. "ZOOM" (p. 13)
3 Adjust aperture and ISO sensitivity. "Other settings" (p. 17)
If the selected values are out of the flash control range, [ISO] and [F] will blink in the display. The AUTO CHECK lamp blinks for about 5 s after the shutter is released to show that the flash has fired successfully.
MANUAL
Choose the guide number.
1 Set the flash control mode to MANUAL. "Flash control mode" (p. 11)
2 Adjust flash level. "Other settings" (p. 17)
The flash can be fired remotely in sync with any flash fired by other units.
1 Set the flash control mode to SL AUTO or SL MANUAL.
“Flash control mode” (p. 11)
Adjust other flash settings as for AUTO or MANUAL mode.
"Cameras That Do Not Communicate with the Flash" (p. 20)
2 Position the flash.
See the camera manual for more information.
- The flash can not be used with cameras that require a pre-flash.
- The flash may fire in response to flash units used by other photographers.
Safety precautions
Read WARNINGS and CAUTIONS thoroughly to ensure safe usage. These safety precautions protect the users and others and prevent property damage.

WARNING
Failure to observe the precautions indicated by this symbol may result in injury or death.
- Do not use flash in places where it may be exposed to flammable or explosive gas. Otherwise, fire ignition or explosion may result.
- Do not directly solder the product or modify, remodel, or disassemble.
- Do not cover the light emitting area of the flash with your hand, and do not touch the light emitting area after continuous firing. It may burn your skin.
- Water and foreign matter inside of the device may cause fire or electric shock. If the device is immersed in or exposed to water or foreign matter is found inside of the device, turn off the power immediately and remove batteries with care. Contact your dealer or consult an Olympus Authorized Service Station.
- To prevent a traffic accident, do not direct the flash at a person operating a motor vehicle.
- Do not use the flash or AF illuminator in close proximity to others (especially infants). Keep the flash out of reach of children. Light from the flash can cause visual impairment.
- Do not use batteries that are not specified for use.
- Do not mix old and new batteries, or batteries made by different manufacturers.
- Do not connect substances such as metal to the (+) or (-) of batteries.
Specifications
| MODEL NO. | : FL-600R |
| Product type | : External electronic flash for digital still camera |
| Guide number | : 36 (ISO100), 12 (ISO100, using the wide panel) |
| Firing angle | : Covers the angle of view of 12–42 mm lenses (equivalent to 24–85 mm in 135 format) (With wide panel: 8 mm lens, equivalent to 16 mm in 135 format) |
| Flash modes | : TTL-AUTO, AUTO, MANUAL, FP TTL AUTO, FP MANUAL, SL AUTO, SL MANUAL, RC |
| Flash emission period | : Approx. 1/20000 to 1/500 seconds (except in Super FP flash) |
| Flash emission count (at full activation)* | : Approx. 250 times (using AA (R6) alkaline batteries) Approx. 370 times (using AA (R6) NiMH batteries) |
| Recharge time | : Approx. 2.5 seconds (using AA (R6) alkaline batteries) Approx. 2 seconds (using AA (R6) NiMH batteries) (from full activation to CHARGE lamp lighting)* |
| AF illuminator | : Effective range: Approximately 1–5 m (varies with camera and lens used) |
| Operating environment | : Temperature: -10 to 42°C (14 to 108°F) Humidity: 20 to 90% |
| Dimensions | : 62 (W) × 104 (H) × 98 (D) mm/2.4 × 4.1 × 3.9 in. (excluding protrusions) |
| Weight | : 255 g (9 oz.) (excluding batteries) |
- Measurements obtained from in-house tests at Olympus. Actual figures may vary depending on shooting conditions.
Specifications are subject to change without any notice or obligation on the part of the manufacturer.

CAUTION
Failure to observe the precautions indicated by this symbol may result in injury or property damage.
- If you notice any abnormalities such as odor, noise, or smoke, stop using this device. Otherwise a fire or burn may result. Remove the batteries carefully to avoid burning yourself, and contact your dealer or consult an Olympus Authorized Service Station.
- Do not operate with wet hands. This may cause malfunction or electric shock.
European technical Customer Support
Please visit our homepage http://www.olympus-europa.com or call: Tel. 00800 - 67 10 83 00 (Toll-free) +49 180 5 - 67 10 83 or +49 40 - 237 73 4899 (Charged)
For customers in Europe

The "CE" mark indicates that this product complies with the European requirements for safety, health, environment and customer protection. CE-mark products are for sale in Europe.

This symbol [crossed-out wheeled bin WEEE Annex IV] indicates separate collection of waste electrical and electronic equipment in the EU countries. Please do not throw the equipment into the domestic refuse. Please use the return and collection systems available in your country for the disposal of this product.
of bel: Tel. 00800 - 67 10 83 00 (gratis)
+49 180 5 - 67 10 83 of +49 40 - 237 73 48 99 (volgens tarief)
HaMeHOBaHnO CoCTaBbIX YacteI (Pnc.1,ctp.3)
1]UHkooyTnHnaNahebE 2]Nauyauuou nIeMEnET
3]DaTtukDnCTaHnONHOY npaBnENe 4)ONo hocCBTeKN bAtrofOKyCa/cBteNDoHa 5)AotAmTuKcN oPtopeLentOp
6]EKnIOBaNa naHeb7 7)PnBeH ypnaBnHn 8)Lamna- nHnIKatopnproBepKeu AUTO CHECK 9)KhOnKa TectOBoi AKTHBaCm TEST/INZnKATop 3apdKn CHARGE 10)KhOnKa OK 11)KhOnKa cOb0BcDhen 12)KhOnKa nOcCBetBn BACK LIGHT 13)KhOnKa bblKIOueHn ON/OFF 14)3aueKnA 15)DInck (a: KhOnKa KoppeKm CbStbnKn; b: KhOnKa MODE ; c: KhOnKa cBteTDNO HnIDkATopRa; d: KhOnKa ZOOM )
PanaheIynpaBLeHnra (Pnc. 2 ctp.4) ▶IpoDpo6HoCTn (cTp.155,162)
① PekHM BCblHs Super FP ② PekHM npBaBHeHHB BCblHsO ③ Beduyue cncn (GN) ④ PerynpKoMa MOOHCTN BCblHs ⑤ IOnoxHeHy 3yma (YrO CTObEeuHJ) ⑥ PekHM FOUR THRDS ⑦ PekHM 3yma ⑧ CetodmoHgnd Nocbcte ⑨ UcbTBeNTbeHbOCT ISO ⑩ PynnA peKIMACR 已 DnaepmaF (F) 已 KaHAn peKIMACR 已 PtendynpeTentbHMy HIndkatop TEmenapTyb 已 EddinHMy INmepEHpaPacTcON
HenpepbBHa aKTHBaunBcNbIiKn
BcNbIkaMQeT HarpeTbCnPm MHOrOxPaTHoH
NoCNEIOBATEbHOI AKTbBaUNi, YTO MQeT
pNBeCTK NOBpeZdEHNO BcNbIKu INI
hApUeHHIO peKIMa ee poBOtI. BcNbIKy
cNeJyET AKTNBPoBAT he 60nee 10 pa3
noPdrd C nIEpBanAMn2,5 cekyHND, noCne Yero
Heo6XoIMMo pNocTaHOBVte ee hCNpIb3OBAHN
kak MNHIMM y HnMHTy.
IpoIroTOBka 3JIeMeHTOB NITaHIN (IPOdaHOrTa OTdEInbHo)
PekomeHyetyerTcIcnOpN3o8aTb 3nEMeHtbl NtiharunToTbnKo cIeDyUOIN TINOH:
- Μειηουnhie δαταρειν Μημα AA (R6) (× 4)
- Hinkel-N-MetallnogndipdHbte 6aTaepen TINA AA (R6) (× 4)
Приимechаиме
MapraheBbte 6atapen Tnla AA (R6) He nCnOB3oBaTb.
YcTaHOBka 3IeMeHToB NITaHnA
1 OtkpoTe KpbIshky akkymyIaTOpHOrO OTeKa.
2 BCTaBtte 3IeMeHbI NITAHn, co6NIOda npabNbHyo nOJIpaHOCTb +/-.
3 3aKpOTe KpbIuKy aKcyMnyTOpHOro otCeKa.
YctaHOBKa BCnblIkw Na fOtoannnapaT
Y6edntcB, YTO FOATOAnnapat I NkETPOHNA B CnblIa K BbIKNOeHb. UCTAHOBKA BCblIaKHa NFOtoAnnapat INI ee CHrTcC Hero Pn BIKIOeHHOM NITAHIN BCblIaKu INI FOToAnnapata MOKet pnpBeNTN K HApUeHHo RpeKHeMa paOboIb.
1 CdInHbTe 3aueKny B HanpaBneHn, npOTnbONOxHOM TOMy, yTO yKa3aHO MeTKoN [LOCK] (①).
2 BCTaBtBe BCbIuKy B «TopaHb 6aUmak» Do ueJIHa Ka (②).
3Переметпгдзаценив поожене,уkaэанhoeMeTKOIBLCK]③).
1 HaxMMITE KONIKY OCB6OXJDEHNA3NJYUATETN, NOBEPHTE 3NJYUATEN BBEX / BHN3 N BNEBO / BNPABO.
IcnoIb3ObaHne IwpoKoyroIbHO nahen
Uncnbl3yIte npu yrrnax ocBseHn6o0nee 12 MM (24 MM B cOpMaTe 135).NudnkaTOp ZOOM 6ydet MmraTb,ecIn fokychoe paCtOHaNe ObeKbTaMeHee 12 MM.
1 BvDmbHbTe ⅢnKoOyOrbnHyNo NaHenB n pa3MeCTIe ee HaN3nyaTeNe BCnbluKN (Pnc.1cpt.3).

Дипснел рпбинзгentьногу диапаэнона Мениетя,Когд Иколььетя сИнковуглъная поны.
- YOJ OBUCEUHNA MOXHO YCTAHOBNTB TOJIbKO HA 10 MM N 8 MM
- Haiknohaine shiPKoYrOHy haoHeB bBeP.
- INHANKATOP ZOOM 6byet MMrTb,ecnI φokychoe paccctoHne 06bektna coCTABNIE T 12 MM nINn 60nee.
IcnoJb3OBAHne 6nKOBo naneJIn
1 Haxmte KhoNky OK 6oone 2 c.
Bcblka BOJET B pexm nolb3OBaTeIbcknx HAcTpoek.
2 HaxMMTe ,yTO6bblBIDeINITb3neMeHTbl.
3 NObepHnTe Dnck, TTO6bl N3MeHnTB BbIeJIeHHbI 3JemeHT.
4 Haxmnte KhONky OK 60Jee 2c, yTO6bI coXpaHnTb N3MeHeHnA.
MepbI npedoctopoXHOCTN
BHNMATEbHO NPOUTITE PEPJLYPPEKDEHNI PEPJIOCTEPEKHEINY, YTO6bI 06eCNHTb 630aHcHoe nOCHOBAHNE. MpeJepeoctopHOCTN ppeHaNaHeBd I daaNTbI bONbOBAteEN I dpynIXu, a TAKGE I nepeDTBaueHHI NOPEkDEHNI IMUyCECTBA.

IPEyIPEXDEHME
HecobioeHneYkaaHnO603HaueHHbIX 3TNM 3NaKOM,MOXET npuBcTNI K Cepbe3HbIM TpaBMm ININ CmePTN.
He nIoh-3yIeBcTbCblIKoB Me Tae, Ibe OMOxHaYteKa BOCnPaHemEroMOrIO INI B3pIbUaTOrO rAa. B pTOIbTHOB CInyue BoMoxHO B0r3OpAHne IIN3BpIb.
He pemOHHTyIte h3dene cAmOCToRTe bHO, He 3MehaIe erO KOHCTpyKUIO, He nepeDeJIbAitne I He pa36paIte erO.
- He zakblyahe iNauyuaouzhi aneMeHTBcblnyu kpyu N eHOTparrBaTteCbdo Hoerocne npOdoJIKTHbHOI AKNTAUBaR BcblNUk. 3TOX MOKET Bb3aBtB oKON KOnK.
Погамане Вовь си NOCTOPHINИ ПЕMDETOB BHYtpиДENIMI MOKET pRINBECTN K BOSTRAPAHIO Ипnpokян� NGKTPKHEKUM TOKOM.ЕС YCSTPOCTBO B5NIO NORGYKEO B NOYIM NOJDBePRTOCB BO3dEChTBNO Bovc, cBNH BYTPc yTPOCTBA NOANO HIOPODHO BeUeCTBO, HEMEDENHO BbIKHOnHTI nHTAHNE I OCTOPOXH N3BLeKNITE bATapeN.CBRAKITCEb CINPENOM I INPpIeCTABNTENEM CEPBCHOH CTsAnHONYomus.
BoI36BeaHneDPOHO-THAPCNOPHTORIOPOHNCSECTBNAHEnHapBNIITEBCbIIKHYKaHEnOBeKA,ynpaBNIIOOERTOPAHCNOPTBNIMCSPDECTCBN.
He IcNOpIb3yIte BcbluIKU JIIN NOCDCBTKY ABOTDOKYCBA HENOCPdCTBEHNIOB 6HIM3OCTN OT IJIDEIN (B OBCOBHNOCTM MAnDEAEUBE). DepeKTI BCbluIKU B MeCTax He DCOPRAEBx DnI DETeR. CBET OBCbluIKMOKET Bb3BATy UxyDUHEME 3PENHIA.
He nCnoB3yIe 6aTapeN, He npedHa3NaueHHbIe IJn NCNoJIb3OBAHnC daHHbIM N3dennm.
He IONIO3y3yTOBMECTHO CTAPbIe HOBBeI 3NEMEHTbI NITAHINI INI 3NEMEHTbI NITAHINa PA3bHIX nIOTOBITENIE.
He coeHnIte MeTaNluecknMn npEmdTAMn nnn dpyHMn npOBdNkAmn nonIOca (+) n (-) 6aTaapei.
Texnueckne xapaKtepuctuKn
YcraHOBka akymyIaTOpIB
1 BiDkpiTe KpnuKy aKymyTOpHOro BiDiCiKy.
2 BctaBte akymyIaTOpn 3 ypaxyBaHnM nonApHoCTi + / -
3 3akpnTe KpnsKy aKymyIaTOpHOro BiDciKy.
PnncdHaHHNo KaMepn
IpekoHaeTec, 10o foToKoAmepa Ta eneKtPOHH cnIax BMMKHyTI. IpneDHaHnA b6o BiEcdHnHn EeKtPOHHOrO cnAnaxy, KOIn eneKtPOHH cnAnax a6o foToKaMepa BBIMKHyTi, MoKe Jpn3BcTeN do HonoanAd y p60ti.
1 3cyhble fikcaTop y HanpmaKMy, npoTnneXHomy, HIX nokaaycctpiikaHa [LOCK] (①).
2 Uctahobitbnapnayp03cMnIpnkpiinneHHaKceCyapir TaK,IOB BIn HaNJIHOPO3MiCTNBCYPONCaOaHOMyMICU (npn bOmy6bYe CYTHO KlaaDHAR) (2).
3 cyhble Te pikcatop B noJIOKeHHra [LOCK] (③).
- Uo6 3nana, 3cynthe fikcatop y nparnMky, npotniexhOMy, hix nokaae ctpinka ha [LOCK], notim BID endahte cnanaek bID poaemy for kpinneHHA akcecyapir.
PnEaHae eNkToHHm cnaax do foToKamepn, notim yBIMkhItb II.
PahEnb KepyBaHHa
1 HaTnCHiTh KhoNkY ON/OFF.
Зановittа посторICAL and technical research of the Russian
1 06 obpaTn pexm cnaaxy, ckopncty Tece enemeHTAMN kepyBaHHa FOtOKaMePN.
Даггимань догатков IOHOFOMaIIIДИВТСК КерBERHATBO 3 ekcnPATAUJIФOTOKAMPEK.
2Bb6epitbpexkMkepyBaHnCpnaJaxOM.
HanaaTuBaHn8 6e3dpOTobOro cnaIaxy
Bédpotobe KepybaHH MOKHA BIKOPCOTBOBVATNI DIAI ZPFOBPXIS FOKOTOPE Olympus, 100 NiPTPMYTOB PEXHKMRC. PoBOTa 63EPOTOBORO CnAnayxq KepyETc3A ZdoONOMOOr CnAnayx, 100 BCTAHOBHENH Ma FOKTOPEPi. IpiCTPI TAKOX MOKH BCTAHOBITN H a FOKTOPEMI DIAI 63DPOTOBORO KEPYBAHH KINbKOMA DnCTAHJIHHN CnAnaxAMXII. DTI pRTHMAHNO DOATAKBOI IHOPMAJI IIPO FOKTOPEMI, SKI NIPTPMYTOB DAHY CNTCEMY, DNIBTcER KEPBIHNUBTO 3 EKCIPNYATAU FOKTOPEPI.
1 YctahOBiB dIra foToKamepn Ta cnaIaxy peXIM RC.
Hattichb MODE (△) Ta noberpHb Dnckobn yepyIaTOp, 06b Bn6patn pexkM kepyBaHH nchanAoxm.
2 KopncTyIeTcnaIaxom, 06Bn6paTn KaHaI I rpyny.
HattichtB MODE () i 3a DOnOMOIO BNDiPiB eENEMeNTIa nopeBHIOKOBIOE peryTJPOL, UO 6MmIHNTIx.

| СН Канan | Установпд ду phотokамери та салалу той сами канan. |
| БАБВБСГуna | Зд ду photokамери можнда ретуновати налайштуваня` Okремо мaksимудддддддддддддддддддддддддддддддддддддддддддддддддддддддддддддддддддддддддддддддддддддддддддддддддддд徳с. Туся Дуся Дуся Дуся Дуся Дуся Дуся Дуся Дуся Дуся Дуся Дуся Дуся Дуся Дуся Дуся Дуся Дуся Дуся Дуся Дуся Дуся Дуся Дуся Дуся Дуся DA DA DA DA DA DA DA DA DA DA DA DA DA DA DA DA DA DA DA DA DA DA DA DA DA DA DA DA DA DA DA DA DA DA DA DA DA DA DA DA DA DA DA DA DA DA DA DA DA DA D DA DA DA DA DA DA DA DA DA DA DA DA DA DA DA DA DA DA DA DA DA DA DA DA DA DA DA DA DA DA DA DA DA DA DA DA DA DA DA DA DA DA DA DA DA DA DA DA DA DMA DMA DMA DMA DMA DMA DMA DMA DMA DMA DMA DMA DMA DMA DMA DMA DMA DMA DMA DMA DMA DMA DMA DMA DMA DMA DMA DMA DMA DMA DMA DMA DMA DMA DMA DMA DMA DMA DMA DMA DMA DMA DMA DMA DMA DMA DMA DMA DMA DMA DMA DMA DMA DMA DMA DMA DMA DMA DMA DMA DMA DMA DMA DMA DMA DMA DMA DMA DMA DMA DMA DMA DMA DMA DMA DMA DMA DMA DMA DMA DMA DMA DMA DMA DMA DMA DMA DMA DMA DMA DMA DMA DMA DMA DMA DMA DMA DMA DMA DMA DA DA DA DA DA DA DA DA DA DA DA DA DA DA DA DA DA DA DA DA DA DA DA DA DA DA DA DA DA DA DA DA DA DA DA DA DA DA DA DA DA DA DA DA DA DA DA DA DA MA DA DA DA DA DA DA DA DA DA DA DA DA DA DA DA DA DA DA DA DA DA DA DA DA DA DA DA DA DA DA DA DA DA DA DA DA DA DA DA DA DA DA DA DA DA DA DA DA DA DM DA DA DA DA DA DA DA DA DA DA DA DA DA DA DA DA DA DA DA DA DA DA DA DA DA DA DA DA DA DA DA DA DA DA DA DA DA DA DA DA DA DA DA DA DA DA DA DA DA NA DA DA DA DA DA DA DA DA DA DA DA DA DA DA DA DA DA DA DA DA DA DA DA DA DA DA DA DA DA DA DA DA DA DA DA DA DA DA DA DA DA DA DA DA DA DA DA DA DA DNA DMA DMA DMA DMA DMA DMA DMA DMA DMA DMA DMA DMA DMA DMA DMA DMA DMA DMA DMA DMA DMA DMA DMA DMA DMA DMA DMA DMA DMA DMA DMA DMA DMA DMA DMA DMA DMA DMA DMA DMA DMA DMA DMA DMA DMA DMA DMA DMA DMA MA DMA DMA DMA DMA DMA DMA DMA DMA DMA DMA DMA DMA DMA DMA DMA DMA DMA DMA DMA DMA DMA DMA DMA DMA DMA DMA DMA DMA DMA DMA DMA DMA DMA DMA DMA DMA DMA DMA DMA DMA DMA DMA DMA DMA DMA DMA DMA DMA DMA DM DMA DMA DMA DMA DMA DMA DMA DMA DMA DMA DMA DMA DMA DMA DMA DMA DMA DMA DMA DMA DMA DMA DMA DMA DMA DMA DMA DMA DMA DMA DMA DMA DMA DMA DMA DMA DMA DMA DMA DMA DMA DMA DMA DMA DMA DMA DMA DMA DMA DNA DMA DMA DMA DMA DMA DMA DMA DMA DMA DMA DMA DMA DMA DMA DMA DMA DMA DMA DMA DMA DMA DMA DMA DMA DMA DMA DMA DMA DMA DMA DMA DMA DMA DMA DMA DMA DMA DMA DMA DMA DMA DMA DMA DMA DMA DMA DMA DMA DMA DMA DMA DMA DMA DMA DMA DMA DMA DMA DMA DMA DMA DMA DMA DMA DMA DMA DMA DMA DMA DMA DMA DMA DMA DMA DMA DMA DMA DMA DMA DMA DMA DMA DMA DMA DMA DMA DMA DMA DMA DMA DMA DMA DMA DMA DMA DMA DMA DMA DMA MA DMA DMA DMA DMA DMA DMA DMA DMA DMA DMA DMA DMA DMA DMA DMA DMA DMA DMA DMA DMA DMA DMA DMA DMA DMA DMA DMA DMA DMA DMA DMA DMA DMA DMA DMA DMA DMA DMA DMA DMA DMA DMA DMA DMA DMA DMA DMA DMA DMA DM DMA DMA DMA DMA DMA DMA DMA DMA DMA DMA DMA DMA DMA DMA DMA DMA DMA DMA DMA DMA DMA DMA DMA DMA DMA DMA DMA DMA DMA DMA DMA DMA DMA DMA DMA DMA DMA DMA DMA DMA DMA DMA DMA DMA DMA DMA DMA DMA DMA DA DMA DMA DMA DMA DMA DMA DMA DMA DMA DMA DMA DMA DMA DMA DMA DMA DMA DMA DMA DMA DMA DMA DMA DMA DMA DMA DMA DMA DMA DMA DMA DMA DMA DMA DMA DMA DMA DMA DMA DMA DMA DMA DMA DMA DMA DMA DMA DMA DMA DNA DMA DMA DMA DMA DMA DMA DMA DMA DMA DMA DMA DMA DMA DMA DMA DMA DMA DMA DMA DMA DMA DMA DMA DMA DMA DMA DMA DMA DMA DMA DMA DMA DMA DMA DMA DMA DMA DMA DMA DMA DMA DMA DMA DMA DMA DMA DMA DMA MA MA MA MA MA MA MA MA MA MA MA MA MA MA MA MA MA MA MA MA MA MA MA MA MA MA MA MA MA MA MA MA MA MA MA MA MA MA MA MA MA MA MA MA MA MA MA MA MA MA DMA DMA DMA DMA DMA DMA DMA DMA DMA DMA DMA DMA DMA DMA DMA DMA DMA DMA DMA DMA DMA DMA DMA DMA DMA DMA DMA DMA DMA DMA DMA DMA DMA DMA DMA DMA DMA DMA DMA DMA DMA DMA DMA DMA DMA DMA DMA DMA MA M M M M M M M M M M M M M M M M M M M M M M M M M M M M M M M M M M M M M M M M M M M M M M M M M M MA M M M M M M M M M M M M M M M M M M M M M M M M M M M M M M M M M M M M M M M M M M M M M M M M MA MA MA MA MA MA MA MA MA MA MA MA MA MA MA MA MA MA MA MA MA MA MA MA MA MA MA MA MA MA MA MA MA MA MA MA MA MA MA MA MA MA MA MA MA MA MA MA MA M M M M M M M M M M M M M M M M M M M M M M M M M M M M M M M M M M M M M M M M M M M M M M M M MDA M M M M M M M M M M M M M M M M M M M M M M M M M M M M M M M M M M M M M M M M M M M M M M M M M MDA |
- Pexm KepyBaHH cnaJaxom, pibeHb notyXhoCTi cnaJaxy Ta KOMneHcaJir cnaJaxy BkIouHO.
PozmieneHg 6e3dpOTOBx cnaJaxiB
OckbIky 38aOKy tcaOBaNOeBc BJDNOBIDNo DO cnpaIOABHn Cnaansy FOtOKaMEpN, Dianao3OH no3NIoHyBaHn CnAnaxy pIHbTcBc B aIaeKHOCTc BID MOKINBOCTe FOtOKaMEpN. Ipy OTPMaHHDdoATKOBI IHDPOMaui DIBITCBc KEIPBHNTOB3 eECKNJYATAUoi FOtOKaMEpN.
1 PnpEHaIe Tne iDctabky 3 KOMPJIeKTy nOCTaHnH.
- 3cyhthe pfcatop y hapmy, npotnyekxHOMy, hix no3haueHO CTpIKHO HA [LOCK] (1), TA BCTAOHBiT b cnaanx Ha niDcTBAK TY, uO6 BIN HADIHO PO3MTCIBY c nocadoHOMy Mici (npbIohy Bdeye UTHO klaaAHN) (2).
3Cyhbt6 fikcatop y noponoxheny [LOCK], uo6 3aqrpinntn cnanax h cboemy miuci.
山 063n7nac7, xh7be fckcatop y hnpMky, npotnHexHomy, HIX no3haheo cptiKIOHO HA [LOCK], NOT BIMdEchAte cnanax BID nDCTABKn.
2 Po3mictb cnaJax, cnPryBaBun DaTnK DnCTaHuiHoro KepyBaHnHa foToKaMepy.
Pnicra no3niohybaHHc npaaxy 3po6iB npo6Hm 3HIMOK.
- PekomHeNyIb3B BnIOKpOCTOByBatn OduHpyN MaKcIMyM JIAN TpbO XINCTAHUIHIN CxanIaXb.
CnanaX MoKe He cnpaUOBATN B 3aJeXHOCTi BiD Kyta nO3nioHyBaHHa a60 BiCTahi MIX KamepoTO T oB'cKOMI.
3aKpinJenny Kyta ocbitneHH
CnpymyTe cnanax Ha CTIny a6o CTEnIO dI
BKNHOAH3NOMKn 3BNOKPcTaNHRM BiDfONTO
CBITra.3OHa,OCBITNeHa Bdiana3oHi 0,5-1,O M,
BNIIaDa HKeOPeTKHO, CNpymyTe cnanax BHN3.
1HaTMCYBUN KHOJIKy PO36NOKyBAHNJ DnI BIDHOTORO CBIITNA, NOBETaTe CekUIO BINPOMIHOBAHNB CBIITNA BROPY/BN3 Ta BNIBO/BNPABO.
BnKOpNCTAHHnWpOKoI naHeJI
3aCTOCOByTbCnI DnI OTPMAnHH KytB OcBtIeHH6blBeH 12 MM (24 MM nI 135 TnY).IHndkaicz ZOOM 6bnMaTImHe, kUoO fokCyBaViDCTaHb O6kTbMa MeHs 12 MM.
1 BucyhTe 1nPKOy NaHEn Ta po3MCTITb II Hau 30HO BnPOMIHOBaHH CBITra (MaI. 1 cT op. 3).


- Kojni BHKOPICTOBYcBcI WINPOKA naHEnb, 3MHIIOHTbCn KOKa3AHHH npInyCTUMORIO diaJAN3OHy.
- KYT OCBITNEHOR MOKHANAHAJIYBATN TINBHKI B NONOKEKHER 10 MM Ta 8 MM.
- He BiidxnlaTe Iupoky naHelen Bropy.
- Izhinkai ZOOM 6nIMATmme, kkuO FOkycna BiCTaHb 6E'KtNbA 12 MM a6o 6bnIe.
Bukopnstahn nnactnn 3axbaTy cbitna
Пл actHna 3axbayCtBnA BIDbSnBa CBTNLO cnaAnxy, CTO bOpOBc eEeKt BIDsnCKy.
1 BucyhTe pnaCTMHy 3axbAty CBITNa (Man. 1 CTOP. 3). CnpamyTe cnaTan ix pnaCTHIOHO, HABedeHOHO Ha 06'Kt 3IOMK, BROPy.
Ha naheni kepybaHHa moXHa BnbpapTu nepeliiHei dai napametpn.

Olympus Imaging & Audio Ltd
KeyMed House, Stock Road, Southend-on-Sea
Essex, SS2 5QH, Service - 0800 111 4888
www.olympus.co.uk
TN Olympus
Cofn 1680, 6yn. Bblrapn 88, bx.2, an.3
info@olympus.bg
www.olympus.bg