
EXABOX - Room Thermostat SAUNIER DUVAL - Free user manual and instructions
Find the device manual for free EXABOX SAUNIER DUVAL in PDF.
| Product type | Programmable room thermostat |
| Brand | Saunier Duval |
| Model | EXABOX (Exabox 7J) |
| Power supply | Via Saunier Duval boiler connection + backup battery (8 years reserve) |
| Comfort temperature setting range | +5 °C to +30 °C |
| Economy temperature setting range | +5 °C to +30 °C |
| Holiday temperature setting range (frost protection) | +5 °C to +30 °C |
| Ambient temperature display range | 0 °C to +40 °C |
| Static differential | < 0.3 °C |
| Operating temperature | -10 °C to +50 °C |
| Storage temperature | -20 °C to +65 °C |
| Maximum humidity | 90 % at 25 °C |
| Protection rating | IP30 |
| Insulation class | II |
| Pre-recorded programs | P1, P2, P3 (North and South variants) + P4 free |
| Number of periods per day (P4) | Up to 3 comfort periods + 3 economy periods |
| Holiday mode | Programmable from 1 to 99 days with adjustable temperature |
| Hour counter | Display and reset of boiler operating hours |
| Dimensions (estimated) | Approximately 120 x 80 x 30 mm |
| Weight (estimated) | Approximately 150 g |
| Maintenance | Clean with a soft, dry cloth; do not use chemical products |
| Installation | On an interior wall, 1.50 m from the floor, away from heat sources |
| Safety functions | Integrated frost protection, minimum temperature ensured |
Frequently Asked Questions - EXABOX SAUNIER DUVAL
User questions about EXABOX SAUNIER DUVAL
0 question about this device. Answer the ones you know or ask your own.
Ask a new question about this device
Download the instructions for your Room Thermostat in PDF format for free! Find your manual EXABOX - SAUNIER DUVAL and take your electronic device back in hand. On this page are published all the documents necessary for the use of your device. EXABOX by SAUNIER DUVAL.
USER MANUAL EXABOX SAUNIER DUVAL
natural_image
Line drawing of a hand inserting a card into a device (no text or symbols)natural_image
Hand inserting a component into a device case (no text or symbols visible)natural_image
Simple line drawing of a refrigerator with two circular indicators and a base, no text or symbols present....
natural_image
Line drawing of a hand holding a folded garment with arrows indicating movement (no text or symbols)natural_image
Hand inserting a card into a device (no text or symbols visible)3. Liaison chaudière - Exabox 7J
Liaison chaudière - Exabox 7J
natural_image
Line drawing of a hand inserting a card into a device (no text or symbols visible)natural_image
Line drawing of a hand inserting a card into a device (no text or symbols visible)natural_image
Hand inserting a device into a case, showing internal components and a pointer (no text or symbols)...
Gerät einstellen.
natural_image
Line drawing of a hand holding a folded garment with arrows indicating movement (no text or symbols)natural_image
Hand inserting a card into a device (no text or symbols visible)natural_image
Line drawing of a hand inserting a card into an electronic device (no text or symbols visible)I. Presentation of the clock thermostat
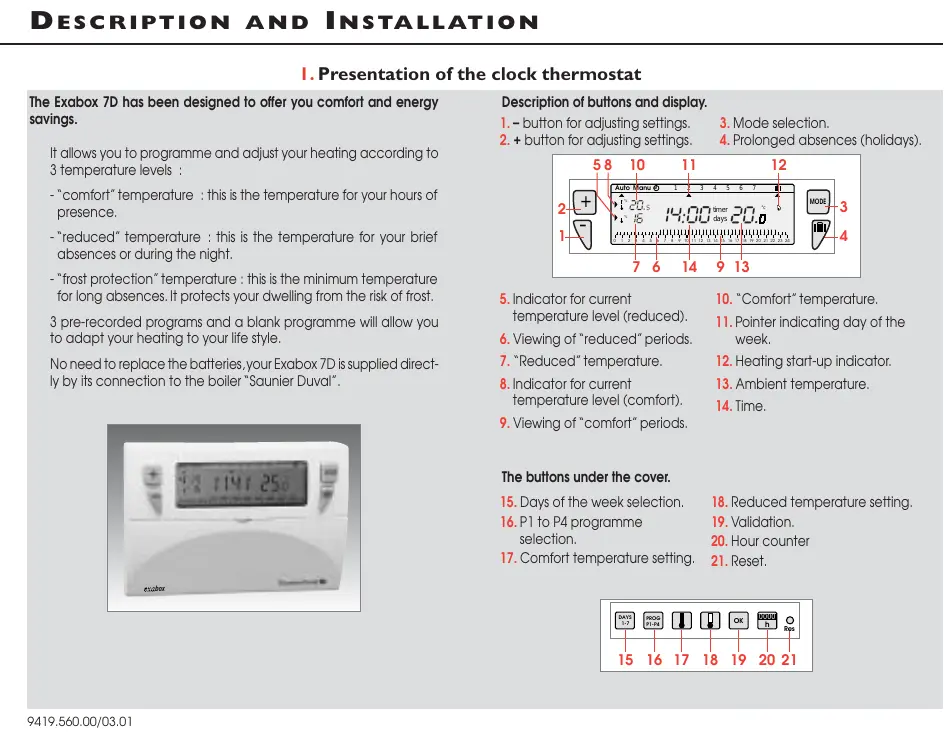
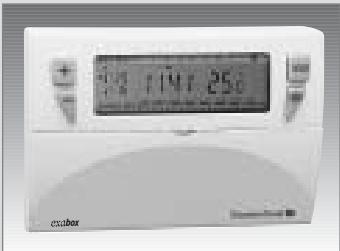
The Exabox 7D has been designed to offer you comfort and energy savings.
It allows you to programme and adjust your heating according to 3 temperature levels :
- "comfort" temperature : this is the temperature for your hours of presence.
- "reduced" temperature : this is the temperature for your brief absences or during the night.
- "frost protection" temperature: this is the minimum temperature for long absences. It protects your dwelling from the risk of frost.
3 pre-recorded programs and a blank programme will allow you to adapt your heating to your life style.
No need to replace the batteries, your Exabox 7D is supplied directly by its connection to the boiler "Saunier Duval".
Description of buttons and display.
-
- button for adjusting settings.
-
- button for adjusting settings.
-
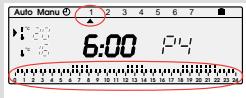
Mode selection.
- Prolonged absences (holidays).
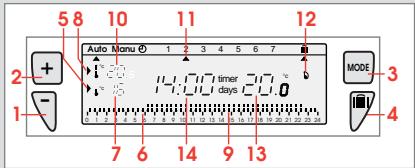
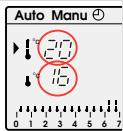
- Indicator for current temperature level (reduced).
- Viewing of "reduced" periods.
- "Reduced" temperature.
- Indicator for current temperature level (comfort).
-
Viewing of "comfort" periods.
-
"Comfort" temperature.
- Pointer indicating day of the week.
- Heating start-up indicator.
- Ambient temperature.
- Time.
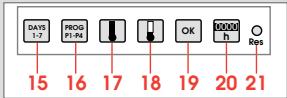
The buttons under the cover.
- Days of the week selection.
- P1 to P4 programme selection.
-
Comfort temperature setting.
-
Reduced temperature setting.
- Validation.
- Hour counter
- Reset.
2. Installation of your clock thermostat.
Your Exabox 7D should be installed at least 1,50 m above the ground, on an inside wall protected from direct sun ray and from any heat source such as television, lamp, draughts, etc...
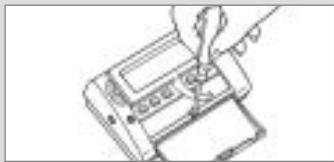
Slide the cover down and unscrew screw.
natural_image
Hand inserting a card into a device (no text or symbols visible)Fix the base to the wall.

natural_image
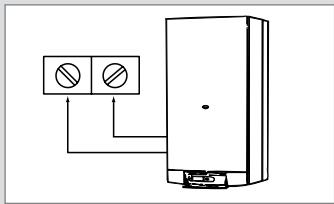
Hand inserting a component into a device casing (no text or symbols visible)Connect the device according to the diagram below.
natural_image
Simple line drawing of a refrigerator with two circular indicators and a base, no text or symbols present....
Important settings.

Put the first micro-switch on BATTERY ON to activate the saving battery (to keep your programs on memory when the clock thermostat is OFF).
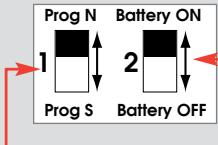
According to your geographical position, select the pre-recorded programmes version North or version South (cf. chapter 6 – programmation).
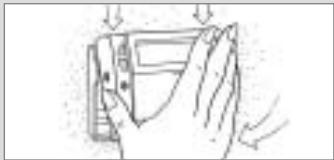
Replace the product on its base.
natural_image
Line drawing of a hand holding a folded garment with arrows indicating movement (no text or symbols)Screw it on and close the cover.
natural_image
Line drawing of a hand inserting a device into a rack (no text or symbols)3. Link between your boiler and Exabox.
Link between your boiler and Exabox.
Your Exabox 7D operates in direct connection with your boiler.
When your boiler is turned off or in summer mode, your Exabox 7D is OFF and only displays the ambient temperature.
All your programmation is saved on memory.
Your Exabox 7D will automatically switch itself ON when you will turn ON your boiler.
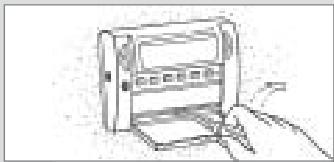
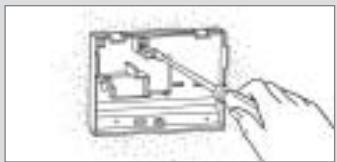
You are putting the device into operation for the first time, before starting your programmation, slide cover down and press RESET ⚙ with the tip of a pen.
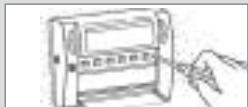
natural_image
Simple line drawing of a hand inserting a card into a device (no text or symbols)Technical specifications.
- adjustment range for comfort temperature : +5 to +30°C.
- adjustment range for reduced temperature : +5 to +30°C.
- adjustment range for holiday temperature : +5 to +30°C.
- display of ambient temperature : 0°C to +40°C.
- static differential <0.3°C
- supply : by the connection to the boiler.
- Saving battery life span : 8 years.
- Operating temperature : -10 to +50°C.
- Storage temperature : -20°C to +65°C.
- Hygrometry : 90% max at 25°C
- degree of protection : IP30.
- insulation class II.
4. Time setting
Time setting.
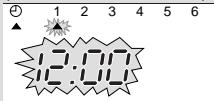
Setting current day and time.
You are putting the device into operation for the first time, you have just pressed the "reset" button.
12:00 appears and the pointer flashes under day 1.
-
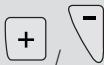
Set the time using the ☐ / ∪ buttons (the numbers run off more quickly when the button is pressed continuously).
-
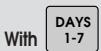
Set the current day by pressing several times on 1-7, a pointer appears under the corresponding day (1=Monday, 2=Tuesday, etc...)
-
Validate with OK
-
If you wish to change the time or the day, press until the pointer appears under the clock sign and continue as above for points 1, 2 and 3.
DAYS 1-7
MODE

and continue
5. Temperature settings.
To set the "comfort" temperature.
Slide cover down.
Press

Adjust the temperature with

or

Until you display the required temperature.
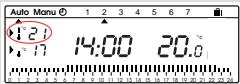
Confirm with
OK
To set the "reduced" temperature.
Press

Adjust the temperature with

or

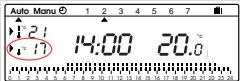
Until you display the required temperature.
Confirm with
OK
N.B. These temperatures are adjustable from 5 to 30°C by steps of 0.5°C.
6. Programming.
Open the cover.
To programme your device, you have 4 programs at your disposal.
- 3 of these programs are pre-recorded and cannot be modified.
- The 4th programme is blank and allows you to create a personalised programme.
The 3 pre-recorded programs exist on version North and on version South :
NORTH
P1 : Comfort temperature from 6h to 23h.
Reduced temperature from 23h to 6h.

P2 : Comfort temperature from 6h to 8h30 and from 16h30 to 23h. Reduced temperature from 8h30 to 16h and from 23h to 6h.

P3 : comfort temperature from 6h to 8h30, from 11h30 to 13h30 and from 16h30 to 23h00.
Reduced temperature from 8h30 to 11h30, from 13h30 to 16h30 and from 23h to 6h.

P4 : Blank programme allowing you to create 3 comfort temperature periods and 3 reduced temperature periods.
SOUTH
P1 : Comfort temperature from 7h to 23h. Reduced temperature from 23h to 7h.

P2 : Comfort temperature from 7h to 9h and from 18h to 23h. Reduced temperature from 9h to 18h and from 23h to 7h.

P3 : comfort temperature from 7h to 9h, from 13h to 15h and from 18h to 23h. Reduced temperature from 9h to 13h, from 15h to 18h and from 23h to 7h.

P4 : blank programme.

Important : To switch between pre-recorded programs version North and version South, take the product out of its base and use the microswitch PROG N / PROG S.
To program your week according to the 3 pre-recorded programs P1, P2 and P3.
- Press

to go into programming mode.
- Press
DAYS 1-7
until the pointer appears under the day you wish to programme.
- Press
PROG P1-P4
until the programme you wish to select is displayed.
Check your programming on the 24 hour profile.
- Press
OK
to confirm.
The following day is automatically proposed.
7. Creating a P4 programme.
Create your programme according to your needs
This programme can be different for each day of the week.
1. Press
PROG P1-P4
to go into the programming mode.
2. Press
DAYS 1-7
until a pointer appears under the day you wish to programme.
3. Press
PROG P1-P4
until the P4 programme flashes in the right side of the screen.
Your display panel indicates 0h00 and the first thermometer flashes on the 24 hour profile.
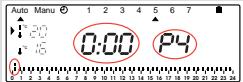
The pointer flashes between 0h00 and 0h30.
Press

to require comfort temperature.
or
Press

to require reduced temperature.
...
For example, you want to programme comfort temperature between 7h30 and 9h30 and then from 19h00 to 23h00.
Press

several times to obtain 7h30.
Press

several times to obtain 9h30.
Press

several times to obtain 19h00.
Press

several times to obtain 23h00
To validate this programme P4
press


You have programmed comfort temperature between 7h30 and 9h30 and from 19h to 23h.
8. Programme reading.
From "auto" mode

select the day from 1 to 7 and check your programming on the 24 hour profile at the bottom of the display panel (see example above).

to return to automatic mode.
Automatic mode "auto".
You pass into automatic mode by pressing the "mode"
button until the pointer appears under Auto!
In automatic mode, your Exabox 7D adapts your heating to your life style by running the programs you have selected.
9. Temporary temperature modification.
In automatic mode, this very useful function allows you to modify ambient temperature temporarily.
- to increase the temperature,
press + (several times if necessary).
- to decrease the temperature,
press (several times if necessary).
The current temperature level indicator (comfort or reduced) will begin flashing.
This modification ends with the next change in programmed temperature.
To return to the initial programme,

an re-position the pointer under "auto".
The current temperature level indicator (comfort or reduced) will stop flashing.
- Permanent temperature modification.
II. Counting running hours.
To maintain a constant temperature in your dwelling (adjustable between 5^ C and 30^ C) without taking into account any programmation. This mode transforms your device into a simple thermostat.
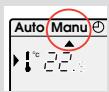
- Press

to position the pointer under "Manu".
- Press
to adjust the required temperature.
To quit the MANU mode,
Press

and re-position the pointer under auto.
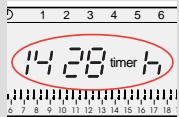
Counting running hours.
This very useful function will allow you to know the number of hours your boiler has been running since the last reset.
Press

The display panel will indicate the number of hours your boiler has been running.
Press

during 5 sec, to return the counter to zero.
12. Prolonged absence mode – holidays.
Prolonged absence mode – holidays.
This mode protects your dwelling from the risk of frost by maintaining a minimum adjustable temperature in your dwelling during your absences (from 1 to 99 days).
You can programme the length of your absence so that the temperature rises for your return.
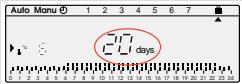
- Press

- Press
to set the length of your absence in days (from 1 to 99 days) The current day count as one.
- Validate with

- Press
to set the temperature level required during your absence
- Validate with

Remain in this mode !
To cancel and return to automatic mode, press
MODE
Tasti esterni e spie del display.
natural_image
Line drawing of a hand inserting a card into a device (no text or symbols)natural_image
Hand inserting a component into a device case (no text or symbols visible)natural_image
Simple line drawing of a refrigerator with two circular indicators and a base, no text or symbols present....
natural_image
Simple line drawing of a folded garment with arrows indicating fabric or movement (no text or symbols)natural_image
Hand holding a device with a scroll, no visible text or symbols3. Collegamento caldaia – Exabox
natural_image
Line drawing of a hand inserting a card into an electronic device (no text or symbols visible)CARATTERISTICHE TECNICHE
natural_image
Line drawing of a hand inserting a card into a device (no text or symbols)Fije la base a la pared.
natural_image
Hand inserting a device into a case (no text or symbols visible)natural_image
Simple line drawing of a refrigerator with two circular indicators and a base, no text or symbols present....
Configure el aparato

natural_image
Line drawing of a hand holding a folded garment with arrows indicating movement (no text or symbols)natural_image
Hand inserting a card into a device (no text or symbols visible)natural_image
Line drawing of a hand inserting a card into an electronic device (no text or symbols visible)natural_image
Line drawing of a hand inserting a card into a device (no text or symbols)natural_image
Hand inserting a component into a device case (no text or symbols visible)natural_image
Simple line drawing of a refrigerator with two circular indicators and a battery outlet (no text or symbols)...
natural_image
Line drawing of a hand holding a folded garment with arrows indicating movement (no text or symbols)natural_image
Hand inserting a card into a device (no text or symbols visible)3. Verbinding tussen ketel en Exabox
Verbinding tussen ketel en Exabox
natural_image
Line drawing of a hand inserting a card into an electronic device (no text or symbols visible)natural_image
Line drawing of a hand inserting a card into a device (no text or symbols)natural_image
Hand inserting a device into a device case (no text or symbols visible)natural_image
Simple line drawing of a refrigerator with two circular indicators and a base, no text or symbols present....
Złożyć urządzenie.
