HT 600 Flexible Cut - Hedge trimmers AL-KO - Free user manual and instructions
Find the device manual for free HT 600 Flexible Cut AL-KO in PDF.

User questions about HT 600 Flexible Cut AL-KO
0 question about this device. Answer the ones you know or ask your own.
Ask a new question about this device
Download the instructions for your Hedge trimmers in PDF format for free! Find your manual HT 600 Flexible Cut - AL-KO and take your electronic device back in hand. On this page are published all the documents necessary for the use of your device. HT 600 Flexible Cut by AL-KO.
USER MANUAL HT 600 Flexible Cut AL-KO
natural_image
Product photo of a black and white ALEK-O hooded saw tool with red hose and blade (no text or symbols visible)D DK
GB S
NL N
F FIN
E EST
P LV
I LT
SLO RUS
HR UA
SRB BG
PL RO
CZ GR
SK MK
H TR
INFORMATION | MANUALS | SERVICE
HT 600 FLEXIBLE CUT HT 700 FLEXIBLE CUT
Gebrauchsanleitung


D: Gebrauchsanleitung ....4 DK: Brugsanvisning....108
GB: Instruction manual 12 S: Bruksanvisning 116
NL: Gebruikshandleiding ....20 N: Bruksanvisning ....124
F : Mode d'emploi .....28 FIN: Käyttöohje .....132
E: Instrucciones de uso ....36 EST: Kasutusjuhend....140
P: Manual de instruções .....44 LV: Lietošanas instrukcija .....148
I: Istruzioni d'uso .....LT52 Naudojimo instrukcija .....156
SLO: Navodilo za uporabo ....60 RUS: Руководство по эксплуатации.....164
HR: Upute za uporabu ....68 UA: Інструкція з експлуатації....172
PL: Instrukcja obsługi....76 BG: Ръководство за експлоатация .....180
CZ: Návod k obsluze ....84 RO: Instructiuni de utilizare ....188
SK: Návod na použitie .....92 GR: Ođnyíes хрňσης.....196
H: Használati útmutató....100 TR: Kullanım kılavuzu....204
SRB: Упутства за употребу .....212
MK: Упатство за работа....220
©
text_image
1
text_image
a b c 2
text_image
3
text_image
4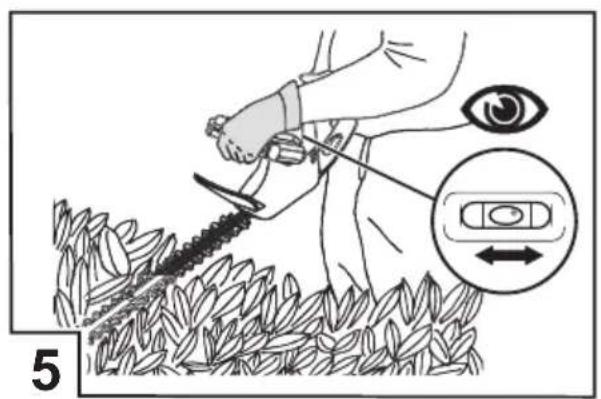
text_image
5
natural_image
Line drawing of a car interior showing a padlock securing the seatbelt (no text or symbols)
natural_image
Technical line drawing of a mechanical component with no visible text or symbols
text_image
10cm 1 m 8Zu diesem Handbuch
Antonio De Filippo, Managing Director
Garantie
Read these operating instructions before starting operation. This is a precondition for safe working and flawless operation.
- Observe the safety warnings in this documentation and on the machine.
The operating instructions must be kept in a safe place for future reference and passed on to any subsequent operators.
Explanation of symbols

Caution!
Following these safety warnings carefully can prevent personal injury and/or material damage.

Special instructions for greater ease of understanding and improved handling.

The camera symbol refers to illustrations.
Contents
About this handbook ....12
Product description ......12
Safety and protective equipment ....12
Technical data 14
Safety instructions ....14
General Power Tool Safety Warnings ....14
Assembly....17
Operation....17
Repairs 17
Maintenance and care ....18
Troubleshooting....18
Storage....18
Disposal....18
Warranty....19
Product description
Designated use
This hedge trimmer is intended exclusively for non-commercial trimming of hedges, shrubs and bushes.
Using this machine for any other or additional purpose is considered contrary to its designated use.
The manufacturer cannot be held liable for any damage resulting from such use.
Incorrect use
Safety equipment must not be removed or bypassed, e.g. by tying down the switches on the hand grips.
Do not use the machine in the rain or on wet hedges and bushes.
■The machine must not be used commercially.
Safety and protective equipment

Danger – risk of injury!
Safety and protective equipment must not be disabled!
Child-proof lock
A hole (5 mm) is provided on the rear actuating lever for fitting a padlock* (☐ 5). The padlock prevents the machine from being switched on unintentionally.
* Not supplied
Handguard

Caution!
Risk of injury if the handguard is not installed! Never start up the machine without the handguard.
Two-hand operation
The hedge trimmer can only be operated using both hands at the same time.
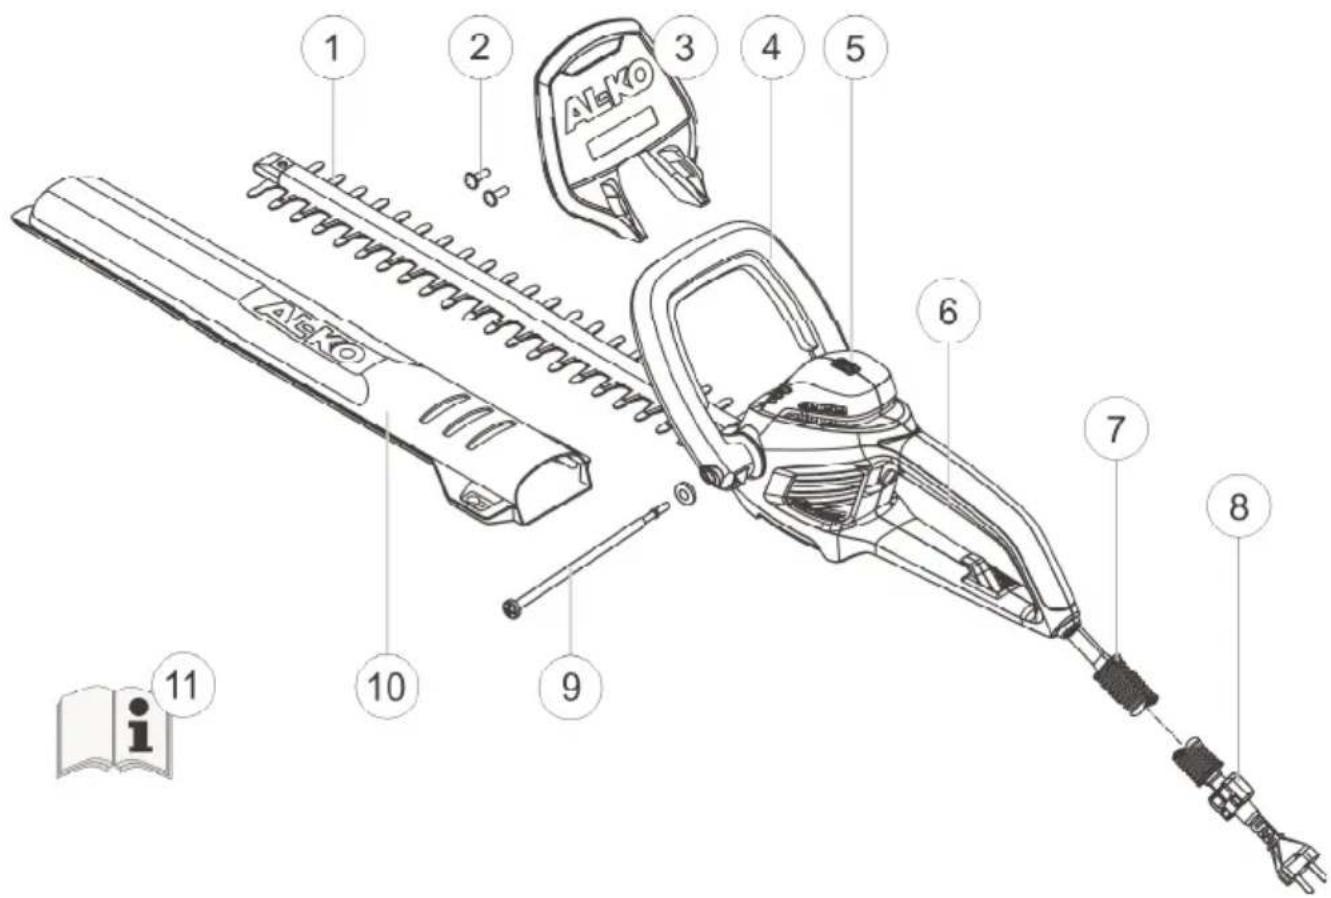
Product overview
text_image
1 2 3 4 5 6 7 8 9 10 11 i| 1 Blade 7 Safety cable | ||
| 2 Screws for fastening the handguard 8 Cable strain relief | ||
| 3 Handguard 9 Clamping bolt & washer for adjustable hand grip | ||
| 4 Front hand grip with switch 10 Blade cover | ||
| 5 Spirit level 11 Operating instructions | ||
| 6 Rear hand grip with switch |
Meaning of symbols on the machine

Wear safety goggles.

Caution! Handle carefully.

Read the operating instructions and operate the machine accordingly

Immediately disconnect the plug from the mains if the cable is damaged or severed!

Do not expose the machine to rain.
Technical data
| Technical data HT 600 Flexible Cut HT 700 Flexible Cut | ||
| Power consumption 600 W 700 W | ||
| Blade length 600 mm 650 mm | ||
| Cutting thickness 24 mm 24 mm | ||
| Total weight 4.1 kg 4.5 kg | ||
| Vibrations measured at hand grip* 4.8 m/s2 4.1 m/s2 | ||
| Mains voltage 230 V ~ 240 V / | 50 Hz | 230 V ~ 240 V /50 Hz |
| Insulation class | ☐ / II / II | ☐ |
| Stroke rate at no load 1,700 min | -1 | 1,700 min-1 |
| Noise level LPA | 90 dB (A) | 94 dB (A) |
* The declared vibration total value has been measured in accordance with a standard test method and may be used for comparing one tool with another.
Safety instructions
General Power Tool Safety Warnings
Warning!
The vibration emission during actual use of the power tool can differ from the declared total value depending on the ways in which the tool is used..
Caution!
Read all safety warnings and all instructions.
Failure to follow the warnings and instructions may result in electric shock, fire and/or serious injury.
Save all warnings and instructions for future reference.
Caution - Risk of injury!
Safety/protection devices should not be disabled!
Caution - Danger of electrocution!
If the cable has been cut or is damaged, disconnect the plug from the mains supply immediately.
Caution!
Use the equipment only if it is in correct operating condition! Before using, check the machine, cable and plug for damage; any damaged parts must be repaired or replaced at a specialised repair centre.
Work area safety
Keep work area clean and well lit.
Cluttered or dark areas invite accidents.
■Do not operate power tools in explosive atmospheres, such as in the presence of fl ammable liquids, gases or dust.
Power tools create sparks which may ignite the dust or fumes.
- Keep children and bystanders away while operating a power tool.
Distractions can cause you to loose control.
Electrical safety
Power tool plugs must match the outlet. Never modify the plug in any way. Do not use any adapter plugs with earthed (grounded) power tools.
Unmodifi ed plugs and matching outlets will reduce risk of electric shock.
■ Avoid body contact with earthed or grounded surfaces, such as pipes, radiators, ranges and refrigerators.
There is an increased risk of electric shock if your body is earthed or grounded.
Do not expose power tools to rain or wet conditions.
Water entering a power tool will increase the risk of electric shock.
- Do not abuse the cord. Never use the cord for carrying, pulling or unplugging the power tool. Keep cord away from heat, oil, sharp edges and moving parts.
Damaged or entangled cords increase the risk of electric shock.
When operating a power tool outdoors, use an extension cord suitable for outdoor use.
Use of a cord suitable for outdoor use reduces the risk of electric shock.
If operating a power tool in a damp location is unavoidable, use a residual current device (RCD) protected supply.
Use of an RCD reduces the risk of electric shock
Personal safety
■ Stay alert, watch what you are doing and use common sense when operating a power tool. Do not use a power tool while you are tired or under the influence of drugs, alcohol or medication.
A moment of inattention while operating power tools may result in serious personal injury.
■Use personal protective equipment. Always wear eye protection.
Protective equipment such as dust mask, non-skid safety shoes, hard hat, or hearing protection used for appropriate conditions will reduce personal injuries.
■Prevent unintentional starting. Ensure the switch is in the off-position before connecting to power source, picking up or carrying the tool.
Carrying power tools with your fi nger on the switch or energising power tools that have the switch on invites accidents.
Remove any adjusting key or wrench before turning the power tool on.
A wrench or a key left attached to a rotating part of the power tool may result in personal injury.
- Do not overreach. Keep proper footing and balance at all times.
This enables better control of the power tool in unexpected situations.
■Dress properly. Do not wear loose clothing or jewellery. Keep your hair, clothing and gloves away from moving parts.
Loose clothes, jewellery or long hair can be caught in moving parts.
If devices are provided for the connection of dust extraction and collection facilities, ensure these are connected and properly used.
Use of dust collection can reduce dust-related hazards.
Power tool use and care
- Do not force the power tool. Use the correct power tool for your application.
The correct power tool will do the job better and safer at the rate for which it was designed.
- Do not use the power tool if the switch does not turn it on and off.
Any power tool that cannot be controlled with the switch is dangerous and must be repaired.
■Disconnect the tool from the power source before making any adjustments, changing accessories, or storing power tools.
Such preventive safety measures reduce the risk of starting the power tool accidentally.
■Store idle power tools out of the reach of children and do not allow persons unfamiliar with the power tool or these instructions to operate the power tool.
Power tools are dangerous in the hands of untrained users.
- Maintain power tools. Check for misalignment or binding of moving parts, breakage of parts and any other condition that may affect the power tool's operation. If damaged, have the power tool repaired before use.
Many accidents are caused by poorly maintained power tools.
- Keep cutting tools sharp and clean.
Properly maintained cutting tools with sharp cutting edges are less likely to bind and are easier to control.
■Use the power tool, accessories and tool bits etc. in accordance with these instructions, taking into account the working conditions and the work to be performed.
Use of the power tool for operations different from those intended could result in a hazardous situation.
Service
Have your power tool serviced by a qualifi ed repair person using only identical replacement parts.
This will ensure that the safety of the power tool is maintained.
Safety instructions for operation
Always operate the machine with both hands.
- Keep body and clothing away from cutting parts.
Do not remove cut material while the motor is running.
When leaving unattended / transporting the machine:
■ Switch the machine off.
Pull out the mains plug.
Push on the safety cover.
Never hold the machine by the blade.
Only carry the machine by the hand grip.
The domestic mains voltage must match the mains voltage specifications in the technical data.
■Always use the special cable strain relief for the extension lead.
■Always keep the cable out of the cutting area and routed away from the machine.
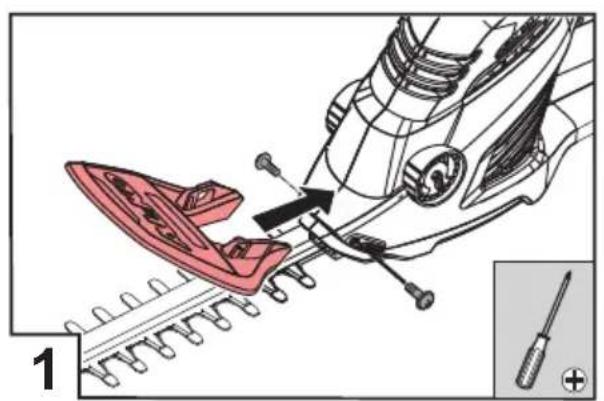
Assembly
The camera symbol refers to illustrations on page 3.
- Fasten the handguard to the housing using the screws provided (☐ 1).
- Pull the hand grip apart slightly and push it onto the housing (☐ 2a). The toothing must click into place.
- Pull out the quick-release lever on the hand grip and hold it in place.(☐ 2b)
- Push the clamping bolt through the hand grip and housing and screw it into the quick-release lever by hand. (2c)
- Screw the clamping bolt in so far that the quick-release lever can be pushed against the hand grip with little force.
- Route the extension lead through the strain relief ( 3).
Operation
Danger – risk of injury!
The machine must not be operated before assembly work has been completed!
Observe the safety instructions for operation!
Adjust the front hand grip.1.
Pull out the quick-release levera.
Move the hand grip to the desired positionb.
Push the quick-release lever back inc.
- Plug the power cable into the mains power supply.
- Grip the front hand grip with one hand, then grip the rear hand grip with the other hand.
- Press the switches on both hand grips (☐ 4) – the machine will start.
- Keep both switches pressed while working.
- The hedge trimmer will stop immediately if one of the switches is released.
Work instructions
■ Always cut both sides of the hedge first, before cutting the top. This will prevent cut material from falling into areas that have not yet been cut.
The built-in spirit level facilitates cutting along a straight line (C).
Hedges should always be cut in a trapezoid shape. This prevents the lower branches from becoming bare (☐).
Repairs
Repair work may only be carried out by competent specialist workshops or our AL-KO Service Centres.
Maintenance and care

Danger of electrocution!
Always unplug from the mains before commencing any maintenance or preventive maintenance work!

Danger – risk of injury!
Always wear protective gloves when carrying out maintenance or preventive maintenance work on the blade!
- Always clean the blade and housing with a brush or cloth after use. Do not use water and/or aggressive cleaning agents – risk of corrosion!
- Lightly oil the cutter bar with a suitable preservative oil.
- Check that all screws are tightened securely.
- Check blade regularly.
Contact AL-KO Service Centre in the case of:
defective blade
blunt blade
excessive wear
Storage

The blade cover can be used as a wall-mounted holder for the hedge trimmer.
Make sure that the screws are tightened securely! (7)
■Always unplug the machine from the mains for storage.
Always attach the blade cover before storing the machine.
■ Store the machine in a dry condition and out of reach of children and unauthorised persons.
- Secure the machine with a padlock* (6).
* Not supplied
Disposal

Machines, batteries and rechargeable batteries that are no longer required must not be disposed of with household waste!
Packaging, machine and accessories are manufactured using recyclable materials and must be disposed of accordingly.
Troubleshooting
| Fault Possible cause Solution | ||
| Machine does not work No | power supply Check fuse / extension lead | |
| Machine cable defective Contact AL-KO Service Centre | ||
| Machine cuts out intermittently | Extension lead damaged Check extension lead | |
| ON/OFF switch defective Contact AL-KO Service Centre | ||
| Internal fault Contact AL-KO Service Centre | ||
| Motor runs but blades do not move | Internal fault Contact AL-KO Service Centre | |
| Blades get hot Insuffi cient | ubrication Lightly oil blades | |
| Blades blunt Contact AL-KO Service Centre | ||
| Notching on blades Contact AL-KO Service Centre | ||

In the case of faults that are not listed in this table, or faults that you cannot rectify without assistance, please contact our customer service department.
EC Declaration of Conformity
We hereby declare that this product, in the form marketed by us, meets the requirements of the harmonised EU directives, the EU safety standards and the product-specific standards.
Product
Electric hedge trimmer
Serial number
G 2402405
Manufacturer
AL-KO Geräte GmbH
Ichenhauser Str. 14
D-89359 Kötz
Authorised representative
Anton Eberle
Ichenhauser Str. 14
D-89359 Kötz
Type
HT 600 Flexible Cut
HT 700 Flexible Cut
EU directives
98/37/EC (until 28.12.09) EN 60745-2-15
2006/42/EC (from 29.12.09)
2006/95/EC
2004/108/EC
2000/14/EC
Sound power level
measured / guaranteed
HT 600 Flexible Cut 107 / 107 dB(A)
HT 700 Flexible Cut 103 / 103 dB(A)
Conformity assessment
2000/14/EC, Annex V
Kötz, 20.10.2009

Antonio De Filippo, Managing Director
Warranty
We will eliminate any material defects or manufacturing defects in the machine during the statutory period of limitation for warranty claims; at our discretion, this will be effected either by repair or replacement. The period of limitation is determined in accordance with the laws of the country in which the machine was purchased.
Fulfi lment of our warranty obligations is conditional on:
The warranty is nullified in the following cases:
Correct use of the machine
Observation of the operating instructions ■
Use of original spare parts ■
Attempted repairs to the machine ■ Technical modifications to the machine Incorrect use ■ (e.g. commercial or municipal use)
The following are not covered by the warranty:
Damage to paintwork attributable to normal wear ■
Wearing parts indicated by ■ XXX (XX) on the spare parts card
■internal combustion engines – These are covered by the separate warranty provisions of the relevant engine manufacturer
In the event of a warranty claim, please contact your dealer or local authorised customer service centre with this warranty declaration and proof of purchase. The statutory rights of the purchaser with respect to claims against the vendor in the case of defects are not affected by this warranty declaration.
Over dit handboek
Antonio De Filippo, Managing Director
Garantie
Antonio De Filippo, Managing Director
Garantía
Antonio De Filippo, Director Geral
Garantia
Antonio De Filippo, Managing Director
Garanzia
2000/14/ES, Dodatek V
Kötz, 20.10.2009

Antonio De Filippo, direktor