Quick Play Flash - Turntable ION - Free user manual and instructions
Find the device manual for free Quick Play Flash ION in PDF.

User questions about Quick Play Flash ION
0 question about this device. Answer the ones you know or ask your own.
Ask a new question about this device
Download the instructions for your Turntable in PDF format for free! Find your manual Quick Play Flash - ION and take your electronic device back in hand. On this page are published all the documents necessary for the use of your device. Quick Play Flash by ION.
USER MANUAL Quick Play Flash ION
○ Make sure that the items listed below are included in the box:
- QUICK PLAY FLASH
- Slipmat
- Power adapter
- USB Flash Drive
- Software CD
- USB Cable
- Quickstart Guide
• Safety Instructions & Warranty Information
- READ SAFETY INSTRUCTION BOOKLET BEFORE USING THE PRODUCT
INTRODUCTION
You should install EZ Vinyl/Tape Converter to take advantage of computer recording. EZ Vinyl/Tape Converter is the quickest and easiest way to turn your recordings into digital media. EZ Vinyl/Tape Converter conveniently saves your recordings in your iTunes* library. We have included a handy software Quickstart Guide with step-by-step instructions on software installation and operation.
Visit www.ionaudio.com/ezvc to download the latest version of EZ Vinyl/Tape Converter software or for helpful troubleshooting guide and additional support.
To install the software: simply insert the included CD into your computer and follow the on-screen instructions. After you finish converting your vinyl, you can then burn to CD or load onto portable media devices.
Visit www.ionaudio.com/computer-optimization for more information on optimizing your computer for audio.
* iTunes is a trademark of Apple, Inc., registered in the U.S.A. and other countries.
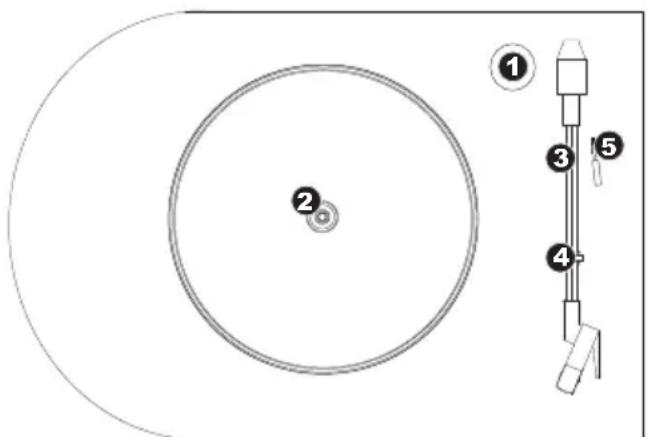
TOP PANEL
- 45 RPM Adapter- Use this adapter to play your 45 RPM records.
- Platter – Place your slipmat and record here.
- Tonearm- QUICK PLAY FLASH comes with a ready to use pre-balanced tonearm and cartridge. The tonearm can be raised and lowered by hand, or by pressing the raise / lower lever. Please note that the tonearm needs to be moved away from resting position (on the arm clip) for the turntable motor to activate. When the tonearm is placed back in its resting position, the turntable motor will deactivate.
- Arm Clip – This specially designed arm clip secures the tonearm while at rest or when not in use. The arm clip has been designed to remain in the up position while unlocked.
- Raise / Lower Lever – Raises and lowers the tonearm.
text_image
Technical diagram showing a circular component with numbered parts and a separate schematic of a mechanical assembly.IMPORTANT: Remove the plastic cartridge cover (needle cover) before operating the turntable.
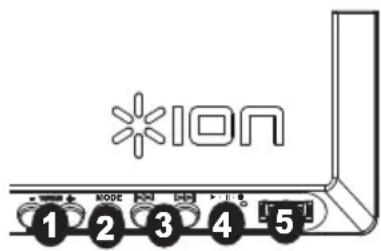
FRONT PANEL
- VOLUME - hold down "-" or "+" button to increase/decrease volume;
- MODE - enters Playback or Record Mode. Press this button firmly for about half a second -- don't just tap it.
- FORWARD/BACK - moves to the previous/next track on the flash drive
- ▶ / || / ● - Play, Pause, and Record functions.
See PLAYBACK/RECORDING section for more information.
• Solid red light: Ready to record (Record Mode). - Flashing red light: Recording a song.
• Solid green light: Ready to play (Playback Mode). -
Flashing green light: Playing a song.
-
USB PORT - connect a USB flash drive here
text_image
ION 1 2 3 4 5REAR PANEL
- RCA OUTPUT – Line-level coaxial output; do not connect to phono-level inputs (on a receiver).
Note: You must be in Record Mode to hear audio through these outputs when playing a record. - USB - Connect to a computer to record audio with EZ Vinyl/Tape Converter; (QUICK PLAY FLASH can not be USB-powered; this must use a power adapter). Use the included USB Cable to connect your turntable to your computer. For transferring your vinyl records to your computer, we have provided software on the included CD.

text_image
1 2 3 4 5 6-
PHONES – Connect 1/8" stereo headphones here (not included). The RCA outputs stop playing audio once headphones are connected.
-
33/45/78 RPM SWITCH – Sets speed of the platter
-
Autostop Switch - This switch turns autostop on or off. When autostop is on, the platter will start spinning when the tonearm is placed over the record and stop spinning when the record has reached the end. (When autostop is off, the platter will always spin regardless of the position of the tonearm.)
* If needed, you may adjust the speed of the turntable platter by tightening/loosening the appropriate screw (there are separate screws for 33/45/78 RPM operation on the underside of QUICK PLAY FLASH) with a standard Phillips-head screwdriver.
Note: If your record stops before a song is done playing, set the Autostop Switch to "off."
- POWER - Use included adapter to connect to wall power (9V DC, 800mA, pin +, tip -).
PLAYBACK/RECORDING
- Place the record on platter.
- Select speed (33/45/78 RPM); use the included 45 RPM adapter if needed.
- Undo the armclip.
- Use the Raise/Lower Lever to raise the tonearm, then move it over to the record.
- Lower the tonearm onto record; the record will begin playing.
- Adjust volume with VOL buttons or your speaker system.
- When finished, raise the tonearm and return it to rest on the armclip.
HOW TO RECORD TO A FLASH DRIVE
- Connect a USB flash drive to the turntable's front USB port.
- Follow Steps #1-3 in HOW TO PLAY YOUR RECORDS (above).
- If the light next to the ▶ / ∥ / ● button is lit solid red, proceed to Step 4. If it is lit green, press the Mode button once.
- To start recording, press and hold the ▶ / II / ● for about 2 seconds; the light will flash red, indicating it's recording.
- Lower tonearm onto the record; the record will play and the song will record.
- When finished, press ▶ / ∥ / ● for about 2 seconds to stop recording.
- To record more songs, repeat Steps #2-6 above. When you are finished, raise the tonearm and return it to the armclip.
HOW TO PLAYBACK FROM A FLASH DRIVE
- Connect a USB flash drive with MP3 to the turntable's front USB port.
- If the light next to the ▶ / ∥ / ● button is lit solid green, proceed to Step 3. If it is lit red, press the Mode button once.
- Press ▶ / Ⅱ / ●; the first song will play.
Note: Songs will play in alphabetical order by file name within each folder on the drive. QUICK PLAY FLASH will scan through the drive's folders/subfolders for playable music files in the following order: (1) songs recorded by the turntable that are located in the MUSIC ▶_ION folder. (2) songs in the root directory (3) songs in other folders/subfolders (including any hidden or .Trash folders)
- Press |<< or >>| to skip to the previous/next song.
HOW TO ACCESS FLASH DRIVE RECORDED MUSIC ON YOUR COMPUTER
- Connect the USB flash drive to a free USB port on your computer (preferably one on the rear panel of your computer).
- On a PC, your flash drive can be accessed by opening the My Computer icon on your desktop (this is called 'Computer' in Windows Vista and Windows 7). On a Mac, the USB flash drive icon will appear on your desktop.
- Select your USB flash drive from the list of drives in My Computer (PC) or on your desktop (Mac) and double click to open the drive.
- The files that you recorded using the QUICK PLAY FLASH can be found in the MUSIC ▶_ION folder and will be titled "Rec001.MP3", "Rec002.MP3, etc. You can then select your songs and drag them to a folder on your computer. Then use your favorite MP3 music player software to play back the songs.
- After you have transferred your songs, to safely remove the USB drive, right-click on the drive icon in the System Tray and select the option to "safely remove" the drive (PC), or right-click (Ctrl+click) on the drive icon on the desktop and select 'Eject' (Mac). Once the drive has been ejected, you can remove the USB flash drive from the computer's USB port.
TROUBLESHOOTING
| PROBLEM CAUSE SOLUTION | ||
| I am not hearing any audio when I am recording. | Needle is not on the record. Place the needle on the record. | |
| I am experiencing poor sound quality. | Cartridge connection is not secure. | Cartridge must be securely connected to the tonearm whenever you are using the turntable. |
| Vinyl record is dirty or scratched. | Try dusting off and gently wiping the surface of the record before playing it. | |
| When recording into my computer on Windows Vista, my recordings are mono instead of stereo. | Recording input properties in Vista not set to "stereo". | In Vista, you may need to manually specify "stereo" for the recording input.Go to Start ▶ Control Panel ▶ Sound (in Classic View). Then, click on the Recording tab and highlight the Microphone input (USB Audio Codec). Click on Properties to bring up the input settings. Next, click on the Advanced tab and select "2 channel, 16 bit, 44100 Hz (CD quality)" in the Default Format pull-down menu. Lastly, click Apply to accept the settings. |
| My music is playing at a strange pitch. | Incorrect speed selected on the turntable. | Make sure that you are playing your records at the speed they were intended to be played. Select between the different speeds (33, 45, or 78 RPM). |
| When recording into my computer on Windows 7, my recordings are distorted. | The Windows 7 Sound Panel> Levels setting is turned up too high | Go to Start ▶ Control Panel ▶ Sound (in Classic View). Then click on the Recording tab and highlight the Microphone input (USB Audio Codec). Click on Properties to bring up the input settings. Next, click on the Advanced tab and select "2 channel, 16 bit, 44100 Hz (CD quality)"Uncheck the two boxes in Exclusive Mode and click Apply. Select the Levels tab and set the level slider to '4'. Then click Apply and Ok. |
| My record stopped playing before the end of the song. | If you are playing a 45RPM record, the Autostop feature may have detected that the tonearm is close enough to the center to stop the record. | Set the Autostop Switch to "off." |
text_image
Technical diagram showing a circular component with numbered parts and a separate schematic of a mechanical assembly.CÓMO REPRODUCIR Y GRABAR
CÓMO REPRODUCIR SUS DISCOS
text_image
Technical diagram showing a circular component with numbered parts and a separate mechanical assembly with labeled parts 1 through 5.text_image
Diagram showing a circular component with numbered parts and a labeled pin mechanism, likely illustrating a mechanical or electrical assembly.text_image
Technical diagram showing a circular component with numbered parts and a separate mechanical assembly with labeled parts 1 through 5.text_image
Technical diagram showing a circular component with numbered parts and a separate schematic of a mechanical assembly.BEFORE RETURNING THE PRODUCT, please contact the ION Audio technical support team. Contact information can be found in the Safety Instruction Booklet included with this product.
www.ionaudio.com/quickplayflash
www.ionaudio.com/supporthome