TTUSB10 - Turntable ION - Free user manual and instructions
Find the device manual for free TTUSB10 ION in PDF.

User questions about TTUSB10 ION
0 question about this device. Answer the ones you know or ask your own.
Ask a new question about this device
Download the instructions for your Turntable in PDF format for free! Find your manual TTUSB10 - ION and take your electronic device back in hand. On this page are published all the documents necessary for the use of your device. TTUSB10 by ION.
USER MANUAL TTUSB10 ION
Quick Start Owner's Manual
text_image
Slipmat 45 RPM Counterweight Platter USB CD Pre-Mounted Cartridge ION TTUSB10 Dust Cover Dust Cover Mount (2)(ENGLISH) QUICK START GUIDE
○ Make sure all items listed on the front of this guide are included in the box.
- READ SAFETY INSTRUCTION BOOKLET BEFORE USING THE PRODUCT
- Go to http://www.ion-audio.com for product registration.
INTRODUCTION
The USB turntable connects directly to your computer to turn your treasured vinyl recordings into digital music. We have included two software packages to aid you in converting your vinyl recordings:
EZ Vinyl / Tape Converter (PC only) or EZ Audio Converter (Mac only) is the quickest and easiest way to turn your recordings into digital media. EZ Vinyl / Tape Converter or EZ Audio Converter conveniently saves your recordings in your iTunes* library. Novice users may find this application preferable. On the CD, we have included a handy Quickstart Guide with step-by-step instructions on software installation and operation.
To install the software: simply insert the included CD into your computer and follow the on-screen instructions. After you finish converting your vinyl, you can then burn to CD or load onto portable media devices.
* iTunes and iPod are trademarks of Apple, Inc., registered in the U.S.A. and other countries.
GENERAL CONTROLS
- Power Cable: This power cable should be plugged into a wall receptacle AFTER all audio connections are made.
-
RCA Audio Output Cables: These cables should be plugged into the audio inputs of your home stereo system. (Please note: you can still copy records to your computer, even if the audio outputs of the turntable are not connected to a stereo system. It is also possible to hear your records through your computer, as long as you have configured your computer's sound input and output options correctly
-
There is a switch on the bottom panel, next to the RCA cables, that selects between PHONO/LINE. Use PHONO level for plugging into a turntable input on a home stereo. Use the LINE level for plugging into CD/AUX/TAPE inputs. WARNING: You may damage your receiver if you plug in a LINE level into a PHONO input.
-
Gain: This knob can be used to adjust the gain level of the audio signal from the turntable. If the audio from the turntable is too quiet or too loud, use this knob to adjust the volume setting.
-
USB Audio Output: Use the included USB Cable to connect your turntable to

flowchart
graph TD
    A["1: USB"] --> B["2: L/R"]
    B --> C["3: PHONO LINE"]
    C --> D["4: GAIN"]
    D --> E["5: Laptop"]
    E --> F["6: USB"]
    F --> G["7: Ring"]
    G --> H["8: Clock"]
    H --> I["9: USB"]
    I --> J["10: Phone Line"]
    J --> K["11: L/R"]
    K --> L["12: L/R"]
    L --> M["13: L/R"]
    M --> N["14: L/R"]
    N --> O["15: L/R"]
    O --> P["16: L/R"]
your computer. For transferring your vinyl records to your computer, we have provided two different software packages on the included CD.
-
Power Button: Use this button to power the turntable on and off.
-
Platter: This platter must be securely fastened to the turntable prior to operation. The Motor Drive Belt can be found on the drive ring underneath the platter. See SETUP INSTRUCTIONS for detailed information on installing the Motor Drive Belt.
-
Start/Stop Button: This button starts and stops the turntable motor. If the button seems not to be functioning, check to make sure that the Motor Drive Belt is properly installed in the SETUP INSTRUCTIONS.
-
1/8" Stereo Line Input: Connect Tape Players, Reel to Reel, or any other audio source here. This signal is sent to the computer through the USB connection. Make sure that your phono cartridge is installed while using this input for maximum sound quality. Also make sure that your RCA jacks are either plugged into an input device or not in contact with metal.
Note: The 1/8" audio input is not routed to the turntable's RCA output jacks, only to your computer via USB.
- 33 and 45 RPM Buttons: These buttons control the RPM of the turntable platter. A red LED indicates which RPM mode has been selected.
NOTE: If the turntable is powered down while in the 45 RPM setting, it will return to 33 RPM when it is powered up.
Note: You can record your 78RPM records by recording them at 33 or 45rpm, then changing them to 78 in the Audacity software.
- 45 RPM Adapter Holder: You may place the 45 adapter here when not in use.
TONE ARM: Items 12 – 16 are all parts of the tonearm. Refer to the TONEARM SETUP section for additional details on these controls.
-
Counter Weight and Scale Ring: The Counterweight is used to balance the head shell and cartridge assembly so that the proper amount of stylus pressure is applied to the record.
-
Anti-Skate Adjustment: This knob is used to compensate for inward tracking forces. See TONEARM SETUP for more details.
-
Arm Clip: This specially designed arm clip secures the tone arm while at rest or when not in use. The arm clip has been designed to remain in the up position while unlocked.
NOTE: When transporting the turntable, it is always recommended that the headshell be removed and the arm clip secured to prevent tonearm or turntable damage.
-
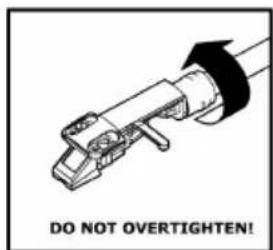
Tone Arm Lock Nut: This Aluminum nut is used to secure the head shell and cartridge assembly to the tone arm tube. See Cartridge Setup for more details.
-
Cartridge and Headshell: The cartridge is pre-mounted on a standard headshell. The cartridge is user replaceable and compatible with a variety of standard cartridges. Be sure to remove the clear plastic cover before operating the turntable and cartridge.
PLATTER SETUP
text_image
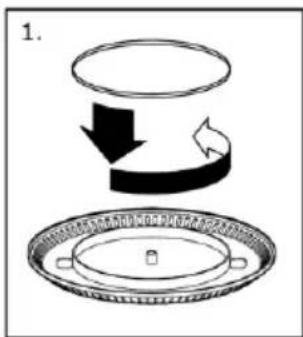
1.
natural_image
Diagram of a mechanical device with a rotating disc and a downward arrow, labeled '2.' (no text or symbols on the diagram itself)
text_image
3. 0.5 ALIGNED
natural_image
Diagram showing a circular object with arrows indicating rotation or movement, and a small inset view of a dot (no text or symbols)WARNING: Incorrect Platter setup can lead to poor turntable performance, platter instability or permanent motor damage.
-
The rubber belt has been preinstalled onto the turntable platter. However, please turn the platter over and make sure that the belt is attached and is not twisted. If the belt has come off during shipping, please place it around the inner bottom ring of the turntable platter, as shown in #1 above.
-
Install the Platter on the center spindle and press it down firmly. Check to make sure that it rotates uniformly and does not wobble excessively.
-
Rotate the platter so that the one of the holes is aligned with the Start/Stop button on the front corner of the turntable. The brass motor spindle should be visible through this hole.
-
Reach into the hole and pull the rubber drive belt off of the inner ring, and install it over the motor spindle. Be careful not to twist the rubber drive belt during this step. Check to make sure the platter rotates uniformly. If the drive belt is properly installed, there should be a slight amount of tension that brings the platter to a stop after spinning it freely.
TONEARM SETUP
-
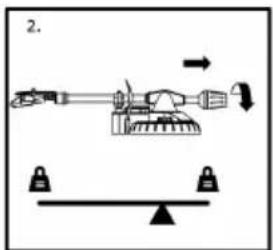
Begin by rotating the counterweight counterclockwise until it is in the complete forward position (NOTE: this is also the maximum amount of pressure that can be applied to the cartridge.)
-
Now there should be a feeling of weight and resistance when the head shell is raised and lowered. Begin rotating the counterweight clockwise (away from the pivot point) until the weight and resistance feeling is gone. If done
text_image
DO NOT OVERTIGHTEN!
text_image
1.
text_image
2.
text_image
3. Only Rotate Scale Ring!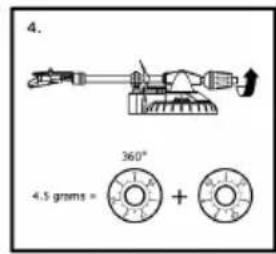
text_image
4. 360° 4.5 grams = +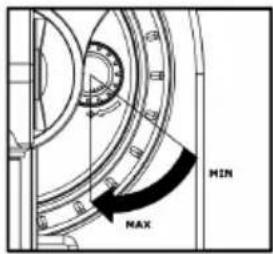
text_image
MIN MAXproperly, the tone arm will pivot with very little resistance back and forth indicating that there is exactly 0 grams of stylus pressure.
-
With the counterweight in its new position further away from tone arm pivot point, grasp the scale ring of the counter weight and rotate it until "0" is in the vertical position.
-
Finally, rotate the counterweight (and scale ring) counter-clockwise (towards the pivot point) until the desired amount of weight is reached. If the scale rotates 360 degrees beyond the zero point, the new scale ring reading should be added to 3.5.
*The included head shell and cartridge assembly requires a minimum of 3 grams and no more than 5 grams for optimum performance.
Setting the Anti-Skate Adjustment
In most cases, the Anti-Skate should be set to its minimum setting. Anti-Skate compensates for inward tracking forces that occur with certain cartridges when the stylus nears the center of the record. If the turntable is experiencing excessive skipping during back-cueing and scratching while nearing the center spindle, try increasing the Anti-Skate in the increments indicated on the dial. Start by adding an increment of 1, test its performance, then increase it more, and so on.
IMPORTANT
Make sure that the felt slipmat is always placed on top of the platter while using the turntable. Failure to use the slipmat may cause damage to your media as well as damage to the turntable.
Remove the plastic cartridge cover (needle cover) before operating the turntable.
MOUNTING THE DUST COVER

natural_image
Technical line drawing of a mechanical assembly with a black arrow indicating a component (no text or symbols present)- Attach the included dust cover mounts to the turntable.
- Attach the dust cover to the mounts as shown in illustration on the left.
natural_image
Diagram of a CD/DVD disc with a black arrow indicating force or movement, no text or symbols present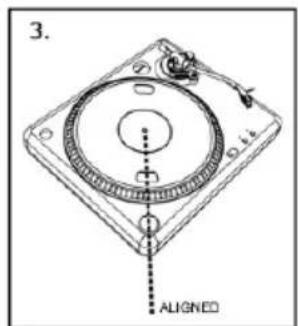
text_image
3. ±4 ALIGNED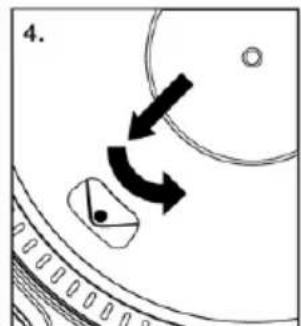
text_image
4.natural_image
Technical line drawing of a mechanical assembly with a black arrow indicating a component (no text or symbols present)natural_image
Diagram of a mechanical lever system with a balance scale and directional arrow (no text or labels)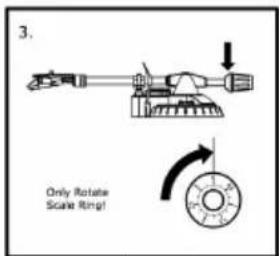
text_image
3. Only Rotate Scale Ring!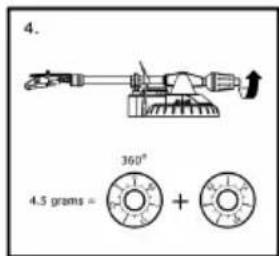
text_image
4. 360° + 4.5 grams =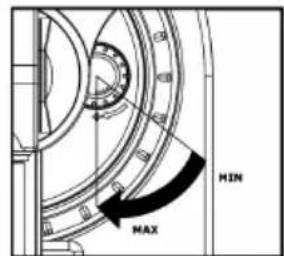
text_image
MIN MAXflowchart
graph TD
    A["1: USB"] --> B["2: L/R"]
    B --> C["3: PHONO LINE"]
    C --> D["4: GAIN"]
    D --> E["5: Laptop"]
    E --> F["6: Clock"]
    F --> G["7: Ring"]
    G --> H["8: Phone Icon"]
    G --> I["9: Link to Phone Icon"]
    G --> J["10: Connection to Phone Icon"]
    G --> K["11: Loop with Terminal 11"]
    G --> L["12: Terminal 12"]
    G --> M["13: Terminal 13"]
    G --> N["14: Terminal 14"]
    G --> O["15: Terminal 15"]
    G --> P["16: Terminal 16"]
natural_image
Diagram of a CD or DVD disc with a black arrow indicating a cutting tool (no text or symbols present)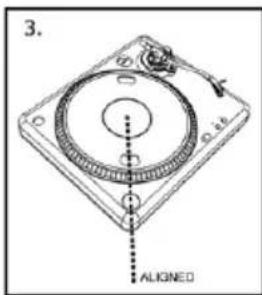
text_image
3. ALIGNED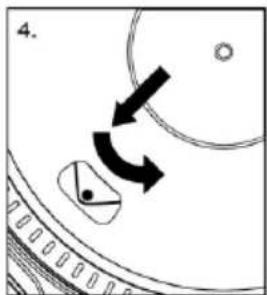
natural_image
Diagram showing a circular object with arrows indicating rotation or movement, no text or symbols presentnatural_image
Technical line drawing of a vehicle interior showing structural components and a directional arrow (no text or symbols)AUFBAU DES TONARMS
text_image
3. Only Rotate Scale Ring!
text_image
4. 360° 4.5 grams = +
text_image
MIN MAXflowchart
graph TD
    A["1: USB"] --> B["2: L"]
    B --> C["3: RN"]
    C --> D["4: GAIN"]
    D --> E["5: Laptop"]
    E --> F["6: Clock"]
    F --> G["7: Ring"]
    G --> H["8: Clock"]
    H --> I["9: Phone Line"]
    I --> J["10: Connection"]
    J --> K["11: Loop"]
    K --> L["12: Connection"]
    L --> M["13: Connection"]
    M --> N["14: Connection"]
    N --> O["15: Connection"]
    O --> P["16: Connection"]
natural_image
Diagram of a mechanical device with a downward arrow and labeled component (no readable text or symbols)
text_image
3. ALIGNED
natural_image
Diagram showing a circular object with arrows indicating rotation or movement, and a small inset view of a device (no text or symbols)natural_image
Technical line drawing of a vehicle interior showing structural components (no text or symbols)INSTALLATION DU BRAS DE LECTURE
text_image
3. Only Rotate Scale Ring!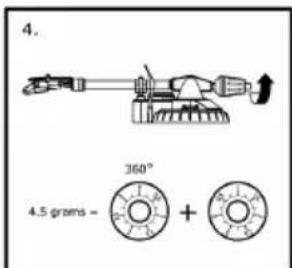
text_image
4. 360° + 4.5 grams =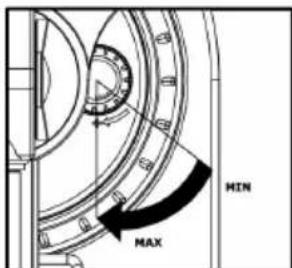
text_image
MIN MAXnatural_image
Technical line drawing of a vehicle interior showing structural components (no text or symbols)text_image
3. Only Rotate Scale Ring!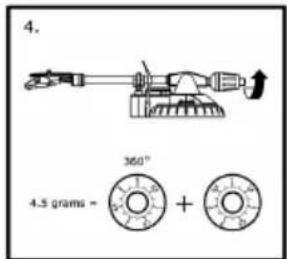
text_image
4. 360° 4.5 grams = +
text_image
MAX MINComputer Requirements:
PC
- Windows 98SE, 2000, ME, XP, Vista
- 500 MHz Pentium class processor or better
- QuickTime 7.1.6 or later
· 256MB RAM (minimum) - 250MB available Hard Drive space (minimum)
- One available USB1.1 port or higher
- CD-ROM drive or better
- Windows-compatible sound card
Mac
- OS X 10.3.9 or later or OS X 10.4.7 or later
- 500MHz G3 processor or better
- QuickTime 6.5.2 or later
· 256MB RAM (minimum) - 250MB available Hard Drive space (minimum)
- One available USB1.1 port or higher
- CD-ROM drive or better
- Mac-compatible sound card
Part List:
- ION TTUSB10 Turntable
o Counterweight for tonarm
- Platter w/belt
- Slipmat
o Cartridge pre-mounted on Headshell
o RCA Cable connected
o Dust cover
o Dust cover mounts
- USB Cable Included
- 45 RPM Adapter Included
- Software CD (MAC/PC)
- Quick Start Guide
Product Weight (with Packaging): 12 lbs
Turntable Weight: 7.7 lbs
Master CTN dimensions: 20.27" x 17.16" x 6.85"
Motor: Belt Drive
Speed: 33 1/3 RPM or 45 RPM operation
Inputs: 1/8" stereo line level
Outputs: RCA (LINE/PHONO), USB Audio.
ION Audio, LLC
Tel: (U.S.) 401.658.3743
Email: support@ion-audio.com