
LP 2 Flash - Turntable ION - Free user manual and instructions
Find the device manual for free LP 2 Flash ION in PDF.


| Brand | ION |
| Model | LP 2 Flash |
| Product type | Vinyl record player |
| Dimensions (approx.) | 37.5 x 30.5 x 12.5 cm |
| Weight (approx.) | 3.5 kg |
| Power supply | 5V DC power adapter (included) |
| Playback speeds | 33 ⅓ and 45 RPM |
| Digital conversion | USB 2.0 to PC/Mac (EZ Vinyl Converter software included) |
| Built-in speakers | Yes, 2 x 3 W |
| Audio outputs | 3.5mm headphone jack, RCA stereo |
| Main features | Vinyl playback, MP3/WAV conversion, built-in speakers, speed adjustment |
| Care and cleaning | Clean with a soft, dry cloth. Do not use chemicals. |
| Safety | Do not expose to moisture or excessive heat. Disconnect when cleaning. |
| Spare parts and repairability | Replacement stylus available (standard model). Repair by authorized center. |
| Package contents | LP 2 Flash turntable, power adapter, USB cable, RCA cable, EZ Vinyl Converter software, quick start guide |
Frequently Asked Questions - LP 2 Flash ION
User questions about LP 2 Flash ION
0 question about this device. Answer the ones you know or ask your own.
Ask a new question about this device
Download the instructions for your Turntable in PDF format for free! Find your manual LP 2 Flash - ION and take your electronic device back in hand. On this page are published all the documents necessary for the use of your device. LP 2 Flash by ION.
USER MANUAL LP 2 Flash ION
Thank you for purchasing this product. The LP2FLASH is the fastest and easiest way to convert music from vinyl recordings or line-level external audio sources to an SD card or USB storage device (such as a thumb drive).
You can also conveniently record vinyl directly to your computer using the software we have included. We have included several software applications to aid you in converting your records to digital music:
EZ Vinyl/Tape Converter* (PC only) or EZ Audio Converter (Mac only) is the quickest and easiest way to turn your recordings into digital media. The software conveniently saves your recordings in your iTunes** library. Novice users may find this application preferable. On the CD, we have included a handy Software Quickstart Guide with step-by-step instructions on software installation and operation.
Audacity (PC and Mac) is intended for the advanced user. This application allows for advanced audio editing and processing, such as normalization, noise removal and automatic track separation. The Audacity Software Guide can be found on the included CD – please refer to this guide as you are working with Audacity.
* A version of EZ Vinyl/Tape Converter with Gracenote MusicID is available for download at your product's page at www.ion-audio.com.
** iTunes and iPod are trademarks of Apple, Inc., registered in the U.S.A. and other countries.
TOP PANEL FEATURES
- PLATTER - Put the record you would like to play here.
- TONEARM – The LP2FLASH comes with a ready to use pre-balanced TONEARM and cartridge. The TONEARM can
be raised and lowered by hand, or by pressing the RAISE / LOWER LEVER. Please note that the TONEARM needs to be moved away from resting position (on the TONEARM CLIP) for the turntable motor to activate. When the TONEARM is placed back in its resting position, the turntable motor will deactivate.
-
RAISE / LOWER LEVER – Raises and lowers the TONEARM.
-
TONEARM CLIP – Use this clip to secure your TONEARM when storing and transporting the unit.
-
45 RPM ADAPTER HOLDER - Holds the included 45 RPM adapter. When not using the adapter, please place it in this holder.
-
RCA OUTPUT CABLE – Connect the attached cable to a line-level RCA input (on a mixer, for instance).
WARNING: Do not attempt to connect the LP2FLASH to a phono-level input.
-
USB AUDIO OUTPUT – Use the included USB Cable to connect your turntable to your computer. For transferring your vinyl records to your computer, we have provided two different software packages on the included CD. EZ Vinyl / Tape Converter or EZ Audio Converter is the easiest and quickest way to transfer your vinyl records and should be used if you are a beginner. Alternatively, if you are an advanced user you may wish to install and use the Audacity software, which allows you to take advantage of advanced audio editing features, such as audio normalization, noise removal and automatic track separation.
-
POWER CABLE – This power cable should be plugged into a wall receptacle after all audio connections are made.

FRONT PANEL FEATURES

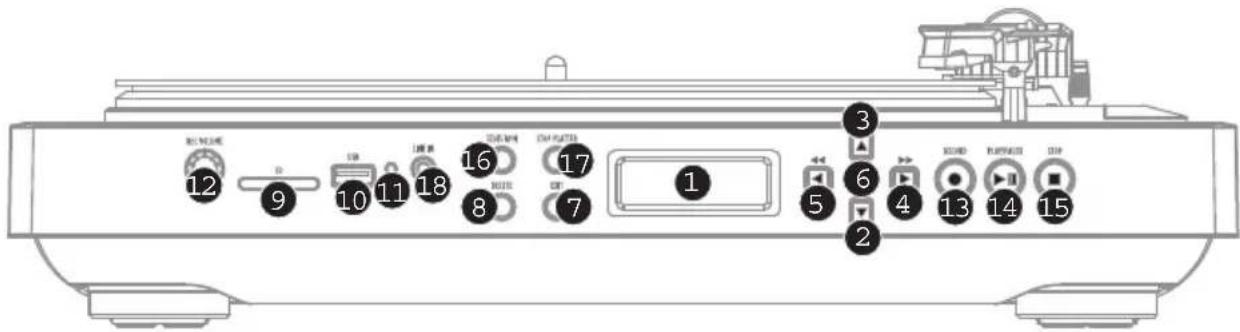
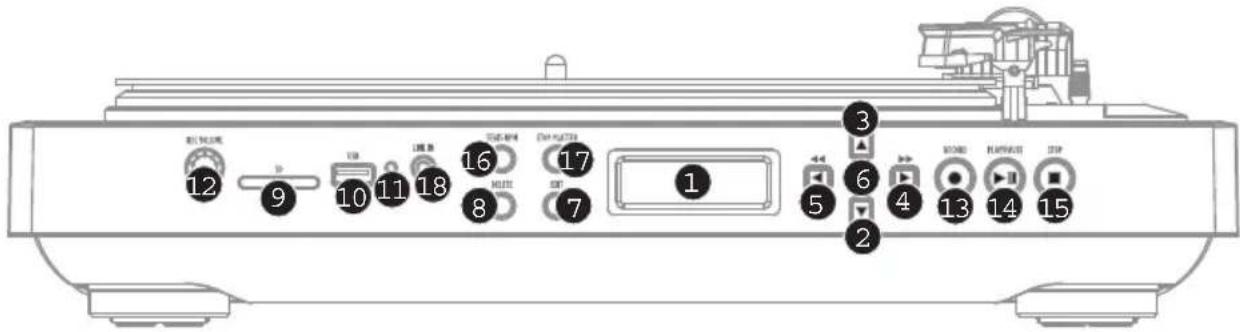
- DISPLAY – Shows information pertinent to unit operation.
- DOWN BUTTON – This button is used to move down through lists of available options on the DISPLAY.
- UP BUTTON – This button is used to move up through lists of available options on the DISPLAY.
- RIGHT BUTTON - When a selected option shows a “>” symbol in the DISPLAY, this button may be used to enter and display available sub-items. When playing music from an attached USB or SD media device, this button functions as a Skip Forward button, allowing you to skip to the next available track.
- LEFT BUTTON - When a selected option shows a "<" in the DISPLAY, this button may be used to go back to the previous set of options. When playing music from an attached USB or SD media device, this button functions as a Skip Back button, allowing you to skip to the beginning of the track, or to the previous track, if pressed again.
- SELECT BUTTON – This button selects the option highlighted on the DISPLAY.
- EXIT – This button returns you to the main set of options (main page).
- DELETE – Press this button to delete the selected recording.
- SD CARD SLOT – Insert SD card into this slot.
- USB SLOT – Insert USB thumb-drive or connect USB hard-drive (FAT16 or FAT32 only) to this input. Note: The LP2FLASH does not support USB hubs.
- USB STATUS INDICATOR – This LED will light when a USB drive is connected.
- RECORD VOLUME – This knob adjusts the recording level. As you adjust the recording level, keep an eye on the audio meters on the DISPLAY.
- RECORD – Press this button to enter Record Mode. Record Mode allows you to record music from the turntable platter, or from external audio devices connected to the LINE IN, directly to a connected USB or SD device.
- PLAY / PAUSE – Press this button to play. While playing, press again to pause. While paused, press again to resume playback.
- STOP – Press this button to stop playback (or recording).
- 35 / 45 RPM BUTTON – This button controls the RPM of the PLATTER. A number on the upper-right-hand corner of the DISPLAY indicates which RPM mode has been selected.
- STOP PLATTER – This button returns the TONEARM to its resting position and stops the turntable motor. If the button is not functioning, make sure the Motor Drive Belt is properly installed (see ATTACHING THE DRIVE BELT).
- LINE IN - Connect a tape player, reel-to-reel machine, or other audio source to this input using a 1/8" stereo cable. Any signal entering this input will be included in the playback or recording mix.
To play music directly from your USB device (FAT16 or FAT32 only) or secure digital (SD) card, follow these instructions.
- Insert your USB drive or SD card into the appropriate slot. The main page should appear. Note: The LP2FLASH does not support USB hubs.

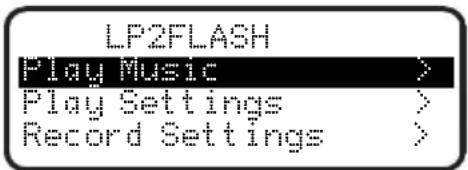
- Make sure Play Music is highlighted, then press the RIGHT or SELECT BUTTON.
- Use the UP and DOWN BUTTONS to highlight the USB drive or SD card containing the music you want to play, then press the RIGHT or SELECT BUTTON.
- The DISPLAY will list the files and folders stored on the attached device. You can enter any folders on your device by using the UP and DOWN BUTTONS to highlight it and pressing the RIGHT or SELECT BUTTON. Music files that you can play with the LP2FLASH will be marked with a musical note ("♪") and an ".MP3" extension.

- Use the UP and DOWN BUTTONS to highlight the track you want to play, then press the RIGHT, SELECT, or PLAY BUTTON.
- Underneath the file name, you will see the Time Elapsed (in Hours : Minutes : Seconds). Underneath the Time Elapsed, you will see two numbers. The first refers to where in the list of files in the selected folder or drive the song appears. The second is the number of playable song files in that folder or drive.

You can use the following controls while playing music:
■ PLAY / PAUSE: Starts, pauses, or resumes a track.
■ STOP: Stops a track.
■ RECORD: Stops a track and enters Record Mode.
■ LEFT BUTTON: Functions as a Skip Back button. Press and hold it to rewind the current track.
- RIGHT BUTTON: Functions as a Skip Forward button. Press and hold it to fast-forward through the current track.
■ UP BUTTON: Press this to skip to the previous track.
■ DOWN BUTTON: Press this to skip to the next track.
- EXIT: Stops a track and returns to the initial display screen.
ADJUSTING THE PLAY SETTINGS
To adjust the settings of how the LP2FLASH plays tracks from a USB drive (FAT16 or FAT32 only) or SD card, follow these instructions:
- On the main page in the DISPLAY, use the UP and DOWN BUTTONS to highlight Play Settings, then press the RIGHT or SELECT BUTTON.

- Use the UP and DOWN BUTTONS to scroll through the menu. Highlight the setting you want:

■ Normal: Tracks will play in alphabetical order by file name (the way they are listed on your USB drive or SD card).
■ Shuffle: Tracks will play in random order.
■ Repeat One Song: Whatever track you select will repeat until you stop it or skip to a different track.
- After you have highlighted the setting you want, press the LEFT or EXIT BUTTON to return to the main page.
To record music directly from LPs to your USB device (FAT16 or FAT32 only) or secure digital (SD) card, follow these instructions.
Note: The LP2FLASH does not support USB hubs.
Note: When recording to SD cards, the LP2FLASH only records to SD Cards with storage capacities less than 2GB.
- Insert your USB drive or SD card into the appropriate slot. The main page should appear.
- Press RECORD.
- Use the UP and DOWN BUTTONS to highlight the USB drive or SD card to which you want to record, then press the RIGHT or SELECT BUTTON. The DISPLAY will prompt you to check the recording volume.
- Play the track you want to record and adjust the RECORD VOLUME knob to set an appropriate recording level. You can use the level meters that appear on the DISPLAY to gauge this. Return to the beginning of the track when you are done checking the recording level.
Note: If the recording level is too high, the level meters will display the word "CLIP." Reduce the recording level by adjusting the RECORD VOLUME knob.

- Press the PLAY BUTTON. The DISPLAY will change to show the Time Elapsed (in Hours : Minutes : Seconds), which will remain at "zero" until recording begins.
- Play the track you want to record. Depending on the Auto Record settings (see ADJUSTING RECORD SETTINGS), the LP2FLASH may begin recording once it receives an audio signal from a source (e.g. the needle dropping onto the vinyl or signal entering the LINE IN input).
You can use the following controls while recording music:
■ Play / Pause: Pauses the recording while the Platter keeps rotating. Press it again to resume recording.
- Stop: Stops the recording while the Platter keeps rotating. From here, you can press Record to record on the next track, press Play to hear the recording you just made, or Exit to exit Record Mode and to return to the main page.
- The LP2FLASH will automatically name the file and append a 3-digit number.
ADJUSTING RECORD SETTINGS
To adjust the settings of how the LP2FLASH records tracks from a USB drive (FAT16 or FAT32 only) or SD card, follow these instructions:
- On the main page in the DISPLAY, use the UP and DOWN BUTTONS to highlight Record Settings, then press the RIGHT or SELECT BUTTON.

- Use the UP and DOWN BUTTONS to scroll through the menu. Highlight Record Quality or Auto Recording and press the RIGHT or SELECT BUTTON.
Record Quality:

Use the UP and DOWN BUTTONS to choose between three levels of recording quality: Good (128kbps), Better (160kbps), and Best (192kbps). Remember that a recording at a higher bitrate will take up more space on your storage device.
Auto Recording:

Use the UP and DOWN BUTTONS to set the Auto Record level. When the option you want is highlighted, press the SELECT BUTTON. An "X" should appear next to the option you have selected:
■ Off: Auto Record is disabled.
- Low: Recording starts automatically when the LP2FLASH detects a lower input signal.
- High: Recording starts automatically when the LP2FLASH detects a higher input signal.
Use the UP and DOWN BUTTONS to set the Split Time. An "X" should appear next to the option you have selected:
■ 0: Auto Record starts after 50 milliseconds
■ 1: Auto Record starts after 1 second
■ 2: Auto Record starts after 2 seconds
■ 3: Auto Record starts after 3 seconds
■ 4: Auto Record starts after 4 seconds
- After you have highlighted the settings you want, press the LEFT or EXIT BUTTON to return to the main page.
ATTACHING THE DRIVE BELT
The ION LP2FLASH platter is driven by a rubber drive belt attached to the turntable motor. In some rare cases, this belt may slip off, causing the turntable platter to stop spinning. If the turntable does not begin spinning when you lower the TONEARM, the most likely cause is the belt. Please follow the instructions below in order to properly re-attach the belt to the motor and the platter.


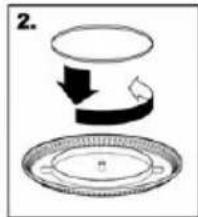
- Begin by removing the clip which secures the PLATTER to the center spindle. After you have removed the clip, remove the PLATTER.
- Turn the PLATTER upside down. Place the rubber drive belt around the inner bottom ring of the turntable PLATTER, making sure that the rubber belt is not twisted.
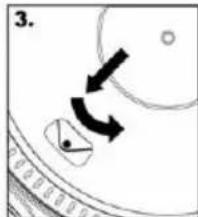
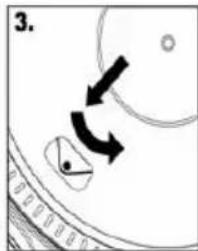
- Place the PLATTER back onto the center spindle and rotate it so that you can see the motor spindle through the hole on the platter. Now reach into the hole, pull the rubber drive belt off the inner ring and install it over the motor spindle, as shown in the illustration. Be careful not to twist the belt during this step.
- Lastly, replace the clip onto the center spindle to secure the PLATTER.
IMPORTANT!
Make sure that the slipmat is always placed on top of the platter while using the turntable. Failure to use the grip mat may damage your media as well as damage to the turntable.
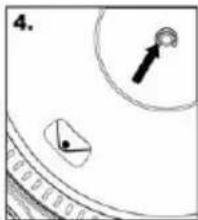
Remove the plastic cartridge cover (needle cover) before operating the turntable.
CONVERTING YOUR 78RPM VINYL
To convert your 78RPM records, you will need to install and use the Audacity application. This application can be found on the CD included in the box. Please install Audacity and follow the instructions below to record your 78RPMs. For Audacity troubleshooting, refer to the Audacity Software Guide included on the CD.
- Connect your turntable to your computer's USB port.
- Open Audacity.
- In Audacity, go to EDIT -> PREFERENCES and set the Recording Device to 'USB Audio Codec' – this is your USB turntable (select 2 channels to record in stereo).
- Select your computer's soundcard as the Playback Device. Note that the device name will vary from computer to computer but should never be set to 'Microsoft Sound Mapper'.
- Lastly, check 'Software Playthrough' so you can hear the music through your audio device while recording.
- You are now ready to record. Press the RECORD button in Audacity to begin recording.
- Play your 78RPM at 33 or 45RPM.
- Once you have recorded the desired material, press STOP in Audacity.
- Click on EDIT menu, then click on SELECT, then click on ALL (shortcut: "CTRL-A").
- Click on the EFFECT menu, click on CHANGE SPEED.
- When the CHANGE SPEED box opens, you will see Standard Vinyl RPM selections. The "from" should be set to 33 or 45 RPM (depending on the speed you selected on your turntable), and the "to" should be set to 78 RPM.
- Click on PREVIEW to hear your recording converted to the correct speed of 78 RPM. Click on OK to finalize the conversion to 78 RPM.
- Once you are finished, you can save your file by going to FILE -> EXPORT AS WAV. This will save the recording as a .WAV audio file.
- Pick a destination on your computer, a name for your recording, and click SAVE.
- The recording can now be found in the location where you saved it in the previous step.
CARACTÉRISTIQUES DU PANNEAU AVANT

FUNCTIES BOVENPANEEL


Requirements for Computer Recording:
PC
• Windows 98SE, 2000, ME, XP, Vista
- 500 MHz Pentium class processor or better
- QuickTime 7.1.6 or later
• 256MB RAM (minimum)
• 250MB available Hard Drive space (minimum)
• One available USB1.1 port or higher
• CD-ROM drive or better
- Windows-compatible sound card
Mac
- OS X 10.3.9 or later or OS X 10.4.7 or later
• 500MHz G3 processor or better - QuickTime 6.5.2 or later
• 256MB RAM (minimum)
• 250MB available Hard Drive space (minimum)
• One available USB1.1 port or higher
• CD-ROM drive or better
• Mac-compatible sound card
Part List:
• ION TTUSB Turntable
。Counterweight for tonearm
- Platter w/belt
。Slipmat
- Cartridge pre-mounted on Headshell
- RCA Cable connected
- USB Cable Included
• 45 RPM Adapter Included
• Software CD including EZ Vinyl/Tape Converter (PC) and Audacity (MAC/PC)
- Software User Manual
- Hardware Quick Start Guide
Turntable Weight: 8 lbs
Master CTN dimensions (W x D x H): 16.57" x 15.35" x 4.88"
Motor: Belt Drive
Speed: 33 1/3 RPM or 45 RPM operation
Inputs: 1/8" stereo line level
Outputs: RCA (LINE/PHONO), USB Audio.
Mp3 Recording Bitrate: 128 – 192 kbps
Device Compatibility: USB Thumb Drive* (FAT 16 and FAT32 format only); SD Card (< 2GB capacity)
* USB hard drives are not supported.
www.ion-audio.com

Brand : ION
Model : LP 2 Flash
Category : Turntable