Nassau Inox III - Barbecue BARBECOOK - Free user manual and instructions
Find the device manual for free Nassau Inox III BARBECOOK in PDF.

User questions about Nassau Inox III BARBECOOK
0 question about this device. Answer the ones you know or ask your own.
Ask a new question about this device
Download the instructions for your Barbecue in PDF format for free! Find your manual Nassau Inox III - BARBECOOK and take your electronic device back in hand. On this page are published all the documents necessary for the use of your device. Nassau Inox III by BARBECOOK.
USER MANUAL Nassau Inox III BARBECOOK
text_image
Exploded view diagram of a household air conditioner unit with numbered parts and exploded viewNASSAU INOX III
223.9022.000
| N° | Nassau Inox III223.9022.000 |
| 1 227.9022.100 | |
| 2 227.9022.110 | |
| 3 227.9022.130 | |
| 4 227.9022.135 | |
| 4 a 227.9022.140 | |
| 5 227.9022.200 | |
| 6 227.9022.210 | |
| 7 227.9022.220 | |
| 8 227.9022.230 | |
| 9 227.9022.235 | |
| 10 227.9022.250 | |
| 11 227.9022.280 | |
| 12 227.9022.270 | |
| 13 227.9022.240 | |
| 14 227.9022.300 | |
| 15 227.9022.310 | |
| 16 227.9022.560 | |
| 17 227.9022.565 | |
| 18 227.9022.530 | |
| 19 227.9020.540 | |
| 20 227.9020.550 | |
| 21 227.9022.500 | |
| 22 227.9022.330 | |
| 23 227.9022.580 | |
| 24 227.9020.530 | |
| 25 227.9022.520 | |
| 26 227.9020.510 | |
| 26 a 227.9022.525 | |
| 27 227.9022.340 | |
| 28 227.9022.590 | |
| 29 227.9022.510 | |
| 30 227.9022.610 | |
| 31 227.9022.650 | |
| 32 227.9022.750 | |
| 33 227.9022.700 |
GB
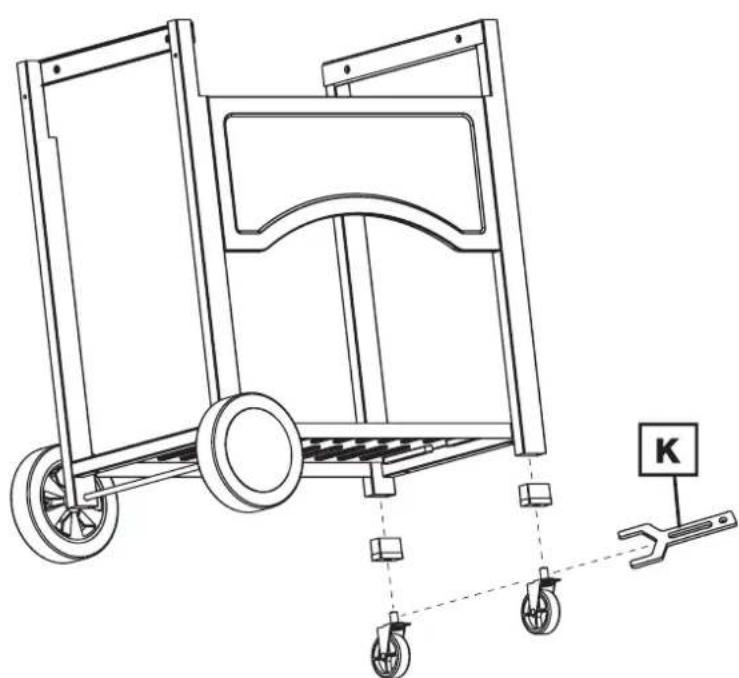
ASSEMBLY INSTRUCTIONS
Read these instructions carefully before assembling the barbecue. Assemble the barbecue on a flat, clean surface.
Caution: Take care when assembling the appliance, since the tools can damage the enamel. You may have extra hardware left over after completing the assembly.
F
INSTRUCTION D'ASSEMBLAGE
natural_image
Technical line drawing of a wheeled cart with wheels and a labeled component (no text or symbols present)3
natural_image
Technical line drawing of a mechanical cart with wheels and a tool, no text or symbols present4

text_image
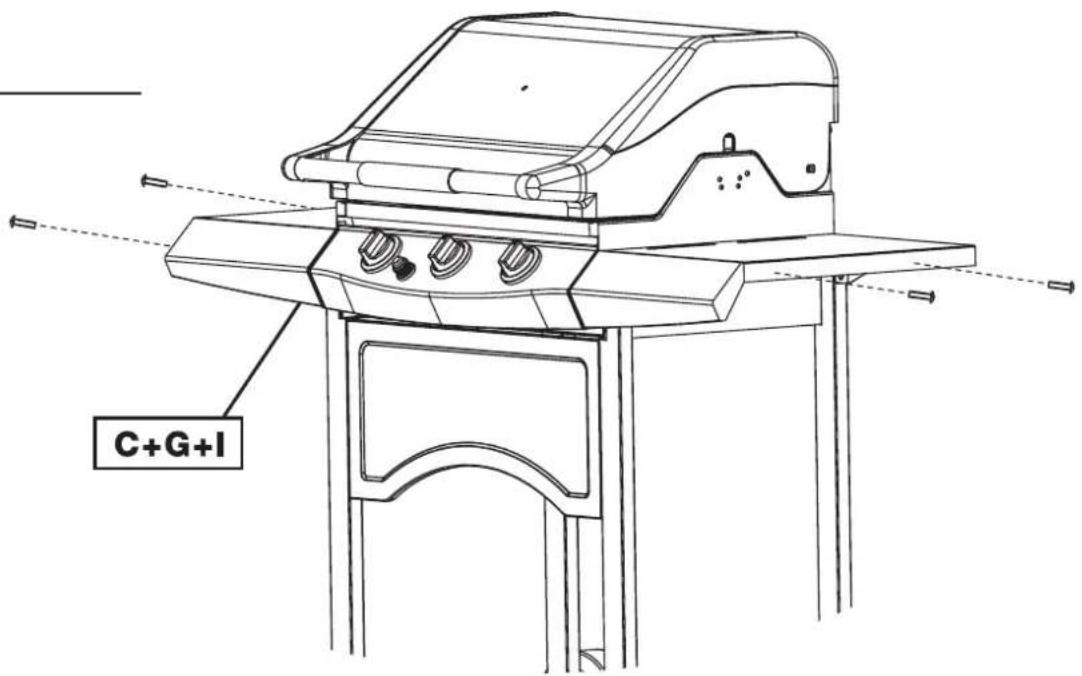
C+G+I+D5
text_image
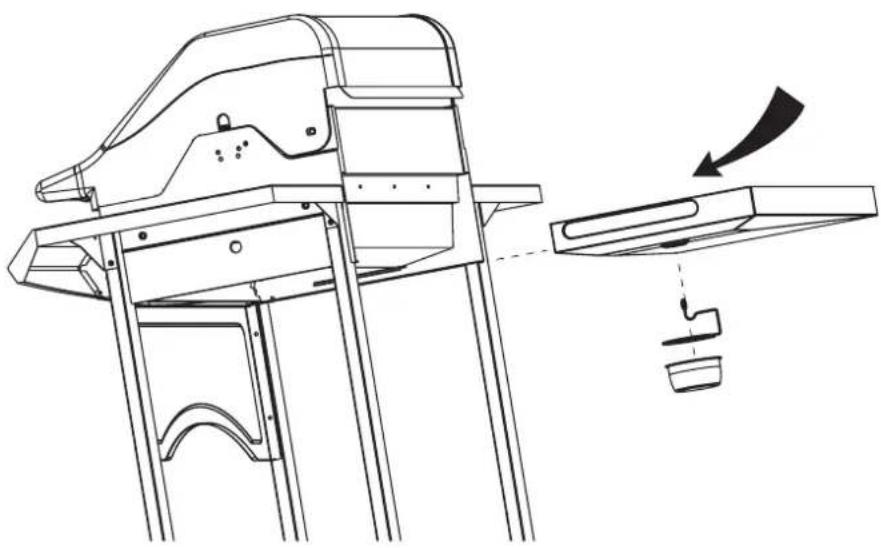
C+G+I6

natural_image
Line drawing of a mounted electric grill with grating and control panel (no text or symbols)7
natural_image
Technical line drawing of a mechanical device with an arrow indicating motion or assembly (no text or symbols present)8
30-37 MBAR

text_image
Technical diagram of a grill with labeled components and directional arrows indicating flow or movement.50 MBAR

text_image
AR 1 2 3GBIMPORTANT!
ONLY FOR COUNTRIES WITH 50 MBAR GERMANY – AUSTRIA – LUXEMBOURG SWITZERLAND – THE NETHERLANDS
- Remove the pigtail
- Connect the nipple (with built-in reductor) to the grill
- Connect the nut of the regulator to the installed nipple
FIMPORTANT!
UNIQUEMENT VALABLE POUR LES PAYS DE 50 MBAR ALLEMAGNE - AUTRICHE - LUXEMBOURG SUISSE - PAYS-BAS
SAFE USE, CARE AND ASSEMBLY MANUAL
Read this manual before using the barbecue!
THE USE OF LAVAROCKS IS UNNECESSARY WITH THIS BARBECUE.
FOR YOUR SAFETY
If you smell gas:
- Immediately turn off the gas flow to the unit.
- Extinguish any open flame.
- Open the lid of the unit.
- If the odour persists, immediately call your gas supplier or fire department for assistance.
- Do not store or use gasoline or other fl ammable vapours and liquids in the vicinity of this or any other appliance.
- A gas cylinder not connected for use must not be stored in the vicinity of this or any other appliance.
Failure to follow all of the Manufacturer's instructions could result in hazardous fi res, explosions or property damage. The user is responsible for the proper assembly, installation and use of his barbecue.
Failure to follow all of the manufacturer's instructions could result in serious personal injury, or even death. Any modification of the appliance may be dangerous. Do not store the gas cylinder underneath the barbecue.
THIS BARBECUE IS FOR OUTDOOR USE ONLY
WARRANTY
The barbecook® comes with a two-year limited warranty on manufacturing defects, from the date of purchase and to the extent to which use of the appliance corresponds with these instructions for use. The receipt stating the date of purchase is valid as a guarantee card.
This barbecook® is not suited for professional use.
This warranty shall be limited to the repair or replacement of parts that prove defective under normal conditions of use and service.
The foregoing warranty does not apply to defects resulting from faulty installation, incorrect operation, disassembly, alterations or remodelling; misuse, misapplication, neglect, abuse, an accident, tornado, hurricane, or earthquake, or lack of proper maintenance, cleaning and care.
INSTALLATION
This appliance must be installed in accordance with all local regulations.

natural_image
Line drawing of a portable grill with wheels and side-mounted top (no text or symbols)ADDITIONAL WARNINGS
Minimum clearance to adjacent combustible materials:
- 76 cm (30") from furthest protruding edge on side of barbecue.
- 76 cm (30") from furthest protruding edge on rear of barbecue.
- Always keep the area around the barbecue clean and clear of any combustible materials such as gasoline or other fl ammable liquids, paper or oily rags.
- Do not operate this barbecue under any overhanging or unprotected construction.
- Remember that this barbecue is for outdoor use only, in a well-ventilated area and at least 3m (10') away from any dwelling or other building. The barbecue is not intended for use on any boat or recreational vehicle.
- Do not use in garages or in any other enclosed area.
- Do not leave your barbecue unattended while in operation.
- Do not obstruct the flow of combustion and ventilation air to the barbecue.
- Do not use while under the influence of drugs or alcohol.
- Do not store any spare cylinders, full or empty, underneath or near your barbecue.
- Warning: accessible parts may be very hot. Do not allow children or pets to play anywhere near the barbecue.
- Do not move the barbecue while cooking.
GAS CYLINDER
When purchasing a cylinder for your barbecue, it must be constructed and marked as meeting the specifications of the local standards. Check whether the bottle can supply sufficient gas, as stipulated for your barbecue model.
• Always keep the cylinder that is in use, securely fastened in an upright position.
• Always handle the tank valve with the utmost care.
- Never connect a cylinder without a regulator to the barbecue.
- Never connect an unregulated gas cylinder to the barbecue.
• Always close the cylinder valve completely when the barbecue is not in use.
- If the barbecue is not equipped with a tank clip the gas cylinder must be placed on the ground, next to the barbecue.
- Never store a spare cylinder, empty or full, near or underneath the barbecue when in operation.
- Never expose the cylinders to direct sunlight or excessive heat.
TRANSPORTATION AND STORAGE OF CYLINDER
Although the cylinder is completely safe when handled properly, misuse could result in an explosion or fire, which could cause serious personal injury and / or property damage.
To avoid unnecessary risks:
- Do not store the cylinder in any enclosed area such as a garage, and make sure that the storage area is well ventilated.
- Do not store the cylinder near any appliances or in any areas that could become hot, such as a vehicle or a boat.
- Make sure that the cylinder is out of reach of children.
- When transporting or storing the cylinder, make sure that it is in an upright position and not lying on its side.
- Do not smoke in the vicinity of the cylinder, especially when transporting it in a vehicle.
HOSE AND REGULATOR
The hose and regulator are not provided by the manufacturer. You may only use a combination of hose and regulator that complies with all local standards, and that corresponds with the couplings of the gas cylinder and the gas type/nominal pressure indicated on the barbecue. Keep the hose as short as possible.
- Never connect this barbecue to an unregulated gas supply, or to another type of gas. Do not alter or change the hose or regulator in any way.
- Visually inspect the entire hose assembly before each use for evidence of wear or damage such as cracks, burns or cuts. If any damage is found, replace the assembly before using the barbecue. Only use a hose that complies with the national standards
- Do not allow any grease or other hot materials to fall on the hose, and make sure that the hose does not touch any hot surfaces of the barbecue.
- The connection fi tting must be protected when it is disconnected from the cylinder. Do not allow the fi tting to bump or drag on the ground, since nicks and scratches could help create a leak when it is reconnected to the cylinder.
- Do not twist the hose when connecting or disconnecting the gas cylinder.
- The maximum length of the hose is 1,5m.
LEAK TESTING
natural_image
Line drawing of a gas cylinder with a lid and side port, labeled 'B' (no text or symbols on the object itself)
natural_image
Technical line drawing of a mechanical device with no visible text or symbols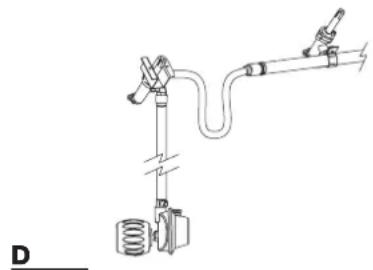
natural_image
Technical line drawing of a mechanical device with hoses and components (no text or symbols)Please note: model of the regulator can vary.
Perform a "Leak Test"
- Before lighting your barbecue for the first time.
- Every time the cylinder is refi lled, or any component is replaced.
- At least once every year, preferably at the start of the season.
The “Leak Test” must be done outdoors, away from heat, open fl ames and fl ammable liquids. Do not smoke while performing the test. Use only a mixture of 50 /50 liquid soap and water for leak testing. Never use a match or open fl ame.
The following must be checked:
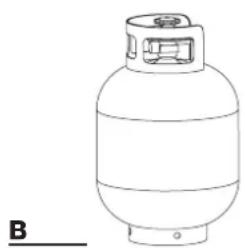
- The tank valve, including the threads into the tank (drawing C).
• Regulator fi ttings and tank connections (drawing C). - All tank welds (drawing B).
-
All hose connections (drawing D).
-
With a newly filled and tested propane tank attached to the barbecue and all the barbecue controls turned OFF, slowly open the cylinder valve one full turn.
- Using a brush and soap, soak all the connections and components listed above and shown in drawings B, C, D.
- Look carefully for bubbles forming, which is an indication of leaking gas.
- Tighten the connections in the areas where the bubbles were visible until re-testing shows no indication of any leaks (shut off the cylinder while correcting any leaks).
- Close the cylinder valve and ensure that all control valves are closed.
- Do not use the barbecue if there are any leaks that cannot be stopped. Close the gas cylinder valve, remove the gas cylinder and seek assistance from a qualified gas appliance service mechanic or gas dealer.
PRIOR TO USE
Do not use your barbecue until you have carefully read and fully understand all the information in this manual. Please ensure that:
- Your barbecue is properly assembled.
- There are no leaks in the system (see "Leak Test").
- The burner is properly assembled, with the Venturi tubes seated over the valve outlets (drawing E), and that there is nothing blocking the Venturi tubes (drawing F).
- All the power cords and / or gas supply hoses will not touch or be near the surfaces that will get hot.
- The barbecue is in a safe location (see installation).
Ensure that the valve outlets (orifices) are inserted approximately 6mm (1/4½') deep into the Venturi tubes, and that the valve outlets and Venturi tubes are more or less parallel to the bottom of the lower body.

natural_image
Illustration of a mosquito and a bottle with a magnified inset showing the infection (no text or symbols)F
WARNING
Natural Hazards – insects and spiders
During shipment or storage, small insects such as spiders could find their way into the Venturi tubes and nest or make webs. This could block the flow of gas through the Venturi tube, causing a smoky, yellowish flame, or prevent a burner from lighting. It could even cause the gas to burn outside the Venturi tube, which could seriously damage your barbecue. If these occur, turn off the gas flow and wait for the barbecue to cool down. When the barbecue has cooled down, remove the burner and clean out the Venturi
tubes with a brush or pipe cleaner. Replace the burner and ensure that the Venturi tubes are seated over the orifices located on the gas valves. The Venturi tubes should be cleaned periodically, especially at the start of the season.
Note: Damage resulting from blocked Venturi tubes is not covered by the warranty, and is regarded as inadequate maintenance.
LIGHTING THE GRILL
Make sure you have followed all the checks, procedures and instructions indicated in the preceding sections before attempting to light the grill.
• Always raise the barbecue lid before lighting the burner.
- Do not bend directly over the barbecue while lighting, in case of backfl ash.
- Making sure all the control knobs are 'OFF'. Slowly and carefully open the gas cylinder valve. Wait for about five seconds before opening the burner valve and lighting the barbecue. This procedure allows the pressure to stabilise, and prevents activation of the flow control feature.
LIGHTING THE MAIN BURNER
- Important: Light only one burner!
- Once one burner is lit, the burner next to it can be lit by turning the control knob to "HIGH".
- Never light all burners at once.
USING THE IGNITOR TO LIGHT THE BURNER
- Raise the lid of the barbecue.
- Turn on the tank.
- Push in the control knob and turn it to the "HIGH" position.
- Push the ignitor button until sparks are being generated.
- If the burner does not light after three attempts, turn the control knob to the "OFF" position and wait for the gas to clear (about 5 minutes). Repeat the aforementioned lighting procedure.
- If the burner still does not light, refer to the troubleshooting guide for help, or light with a long match as explained below.

natural_image
Technical line drawing of a mechanical device with internal components and a handle (no text or symbols)G
MANUAL LIGHTING PROCEDURE
The barbecue has a small hole on the lower left and right side of the housing. These holes are situated towards the front of the barbecue, and are used to manually light the barbecue (Drawing G).
- Raise the lid of the barbecue.
- Place a lighted match through the hole, to within 1,3 cm (0,51") of the burner.
- Turn on the tank.
- Push in the burner knob and turn it to the "HIGH" position. If the burner does not light within 5 seconds, turn the control knob back to the "OFF" position and wait for the gas to clear.
- Wait for 5 minutes, and then repeat steps 1 to 4. If the burner still does not light after three attempts, consult the troubleshooting guide for help.
VISUALLY CHECK BURNER FLAME
- Adjust the flame by turning the knobs from 'HIGH' to 'LOW'. The flames will be smaller when the knobs are in the 'LOW' position.
- If the flames come out of the burner box when the barbecue is in use, turn off the knobs immediately. Wait for 5 minutes for the gas to clear before lighting the burner again. Consult the troubleshooting guide if the problem persists.
- Always check the fl ame prior to each use. A good fl ame is almost entirely blue, with a little bit of yellow on top. If the fl ame is unusually small and mostly yellow, turn off the barbecue and check whether the Venturi tubes are blocked, or consult the troubleshooting guide for help.

text_image
HIGH LOWSHUTTING DOWN THE BARBECUE AFTER USE
- Turn off the gas cylinder valve.
- Turn the burner control valve to the "OFF" position.
This sequence is important, as it prevents residual gas from being left in the system under pressure and will make the next use easier.
TIPS ON USING YOUR BARBECUE
FIRST USE
Before cooking, turn on the grill and operate on “HIGH” for about 15 minutes with the lid closed. Do not open the lid during this procedure. Open the lid and continue to run the grill on “HIGH” for another 5 minutes. Your grill should now be burnt in and ready to use.
PREPARATION
The barbecue should be preheated before adding any food. This is done by lighting the grill and running it at "HIGH" for up to ten minutes, with the lid closed. If the food you are cooking needs a lower temperature, turn the control knob to the required setting before adding food.
COOKING TIME
This is affected by many things, and experience in grilling will help you. The type of food, the thickness of the food, and even the weather can have an effect on cooking time. You will learn that on a hot day, a lower setting will work better and on a cold day a higher setting may work better.
FLARE-UPS
Flare-ups can increase the temperature in the grill and add to the build-up of grease, resulting in a higher risk of a grease fi re. Some fi are-ups are normal and are required to create smoke, which enhances the fl avour of your food. To keep these fi are-ups at the desired level, you should:
• Always trim fat from steaks / red meats before grilling.
• Cook chicken and pork at a lower setting.
- Make sure the grease drain hole is clear, and that the grease catcher is not full.
• Always cook with the lid down, and cook at the lowest efficient heat setting.
Note: with the lid down, you will maintain a more consistent temperature inside the cooking area and use less energy / gas.
HOW TO PREVENT FOOD FROM STICKING TO THE COOKING GRATES
- Marinating or lightly oiling the food before placing it on the cooking grates will help prevent food from sticking to the grate.
- Food may stick if turned too soon after being placed on the cooking grates. Let food cook for a few minutes before turning it, so that it will have time to sear properly.
WARNING :
- Do not leave your barbecue unattended, and watch out for children around the barbecue. Make sure the barbecue is functioning safely at all times.
- Do not move the barbecue while cooking.
- Do not use charcoal, wood or briquettes.
- Do not use lava rocks or ceramic briquettes.
CLEANING AND MAINTENANCE
To get many years of service out of your barbecue, perform the following procedures at least once a year, especially at the start of a new season. Purchase a barbecook® cover to protect your investment.
GRILL
Apply a light coating of cooking oil to the grating to prevent food from sticking. After each use, and after the barbecue has cooled down, scrub the grating with a non-abrasive brush. Alternatively, you can wash the grating with a special barbecook® cleaner, mild detergent or baking soda, but do not use a commercial oven cleaner.
BURNER AND VENTURI TUBES
It is important to remove the burner and Venturi tube and clean them at least twice a year, making sure that all dirt and rust are removed. Use a piece of wire to clean out the hole in the Venturi tube. Make sure the bottom housing is clean, and that all holes are clear. If the burner has been damaged or has rusted, replace it as soon as possible. If the burner is in good shape, reinstall it in the correct position. Also ensure that the Venturi tube is centred over the valve outlet.
STORAGE
When the outdoor cooking season is over and you are going to store the unit for the winter, please do the following:
- After removing and cleaning the burner and grill (lightly oil the grill after cleaning), wrap them in paper and store indoors.
- Cover the barbecue with a barbecook® cover if it is to be stored outdoors.
- Do not store the gas cylinder in an enclosed area.
When the barbecue is not in use, the gas must be turned off at the cylinder valve. The barbecue and cylinder should be stored outdoors, in a well-ventilated area. Do not store the barbecue in a garage or near heat. If there is a need for the barbecue to be stored indoors, remove the cylinder. The barbecue can be stored indoors if the cylinder is disconnected from the appliance and stored outside.
| Problem Possible causes Corrective action | ||
| Burner will not light (match or ignitor) | • Blocked Venturi tubes • Clean out blockage | |
| Burners not hot enough | • Cylinder or gas supply valve turned off. | • Open cylinder or gas supply valve. |
| • Venturi tubes not properly sealed over orifi ces | • Ensure proper Venturi tube as-sembly | |
| • Burner ports blocked • Clean / replace burner | ||
| • Low on or out of propane • Refi II cylinder | ||
| • Regulator not fully tightened onto cylinder | • Tighten regulator fully onto cyl-inder (by hand).• Straighten fuel hose | |
| Flames smoky, yellow • Partially blocked Venturi tubes • Clean out blockage | ||
| • Excess cooking salts on burner • Clean burner | ||
| Burner lights with match, but not with igniter | • Loose wire connection | • Check that all connections are tight |
| • Broken electrode• Poor ground | • Ensure that collector box, burn-er and igniter are assembled properly. | |
| • Faulty igniter • Replace ignitor | ||
| Flame blows out / down through base | • High wind conditions | • Relocate barbecue with the rear towards the wind. |
| • Propane low • Refi II cylinder | ||
| Too much heat / excessive fl are-up | • Excessive fat in meat | • Trim meat, turn down burner controls and / or fuel supply |
| • Grease drain plugged • Clean casting base and burner. | ||
| • Cooking system not positioned correctly | • Position cooking system cor-rectly | |
| Flames under heat control con-sole | • Blocked Venturi tubes | • Immediately shut off gas at source, allow grill to cool down and clean out Venturi tubes |
| Regulator humming • This is not a defect or a hazard | • Temporary condition caused by high outside temperatures and a full propane cylinder. | |
| Incomplete fl ame | • Plugged, rusted or leaking burner | • Clean / replace burner |
| Warming rack does not fi t | • Legs are angled too narrowly, or too widely | • The warming rack legs are adjustable. Bend them to fi t into the warming rack holes. |
TROUBLESHOOTING GUIDE ELECTRONIC INGNITION
| Problem Possible causes Corrective action | ||
| No sparks appear at any electrodes when ignition button is pushed; no noise can be heard from spark module | Battery not installed properly | • Install battery (make sure that “+” and “-” connectors are oriented correctly, with “+” end up an “-” end down) |
| Dead battery | • Replace battery with new AA-size battery | |
| Button assembly not installed properly | • Unscrew button cap assembly and reinstall, making sure threads are aligned and engaged fully | |
| Faulty spark module | • Replace spark module assembly | |
| No sparks appear at any electrodes when ignition button is pushed; noise can be heard from spark module | Output lead connections not complete | • Remove and reconnect all output connections at module and electrodes |
| Sparks are present but not at all electrodes and/or not at full strength | Output lead connections not complete | • Remove and reconnect all output connections at module and electrodes |
| Arcing to grill away from burner(s) | • If sparks are observed other than from burner(s),wire installation may be damaged. Replace wires. | |
| Weak battery | • Replace battery with new AA-size battery | |
| Electrodes are wet | • Use paper towel to remove moisture | |
| Electrodes cracked or broken “sparks at crack” | • Replace cracked or broken electrodes | |
FR
GUIDE D'ASSEMBLAGE, D'UTILISATION ET D'ENTRETIEN
natural_image
Line drawing of a portable electric grill with wheels and control panel (no text or symbols)AVERTISSEMENTS ADDITIONNELS
natural_image
Simple line drawing of a gas cylinder with a lid and side port, labeled 'B' at the bottom (no text or symbols on the object itself)
natural_image
Technical line drawing of a mechanical device with no visible text or symbols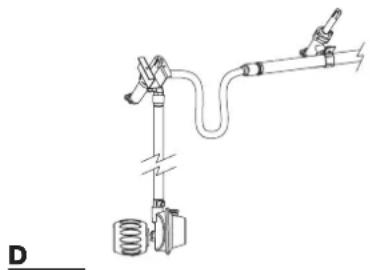
natural_image
Technical line drawing of a mechanical device with spring and connecting rod (no text or symbols)natural_image
Illustration of a mosquito spraying into a bottle, with an inset showing the mosquito inside (no text or symbols)F
natural_image
Technical line drawing of a mechanical device with internal components and a handle (no text or symbols)CONTROLE VISUEL DES FLAMMES DES BRULEURS
natural_image
Line drawing of a portable electric grill with wheels and heat exchangers (no text or symbols)natural_image
Line drawing of a gas cylinder with a lid and side port, labeled 'B' (no text or symbols on the object itself)
natural_image
Technical line drawing of a mechanical device with no visible text or symbols
natural_image
Technical line drawing of a mechanical device with hoses and components (no text or symbols)natural_image
Illustration of a mosquito impact experiment with magnified view of the infection (no text or symbols)F
WARNHINWEIS
natural_image
Technical line drawing of a mechanical device with internal components and a handle (no text or symbols)natural_image
Line drawing of a portable electric grill with wheels and control panel (no text or symbols)VEILIGHEIDSADVIES
natural_image
Line drawing of a gas cylinder with a lid and side port, labeled 'B' (no text or symbols on the object itself)
natural_image
Technical line drawing of a mechanical device with no visible text or symbols
natural_image
Technical line drawing of a mechanical device with hoses and components (no text or symbols)natural_image
Illustration of a mosquito impact experiment with magnified view of the infection (no text or symbols)F
VEILIGHEIDSADVIES
natural_image
Technical line drawing of a portable oven or rack unit with internal channels and mounting bracket (no text or symbols)ONTSTEKING VAN HOOFDBRANDER MET LUCIFER
natural_image
Line drawing of a portable electric grill with wheels and control panel (no text or symbols)ADVERTENCIAS ADICIONALES
natural_image
Line drawing of a gas cylinder with a lid and side port, labeled 'B' (no text or symbols on the object itself)
natural_image
Technical line drawing of a mechanical device with no visible text or symbols
natural_image
Technical line drawing of a mechanical device with hoses and components (no text or symbols)natural_image
Illustration of a mosquito impact experiment with magnified view of the insect and a device (no text or symbols)F
ADVERTENCIA
natural_image
Technical line drawing of a portable oven or refrigerator with internal compartments and a handle (no text or symbols)ENCENDIDO DEL QUEMADOR PRINCIPAL CON UNA CERILLA
natural_image
Line drawing of a portable electric grill with wheels and control panel (no text or symbols)AVVERTENZE SUPPLEMENTARI
natural_image
Line drawing of a gas cylinder with a lid and side port, labeled 'B' (no text or symbols on the object itself)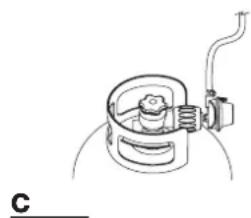
natural_image
Technical line drawing of a mechanical device with no visible text or symbols
natural_image
Technical line drawing of a mechanical device with hoses and components (no text or symbols)natural_image
Illustration of a mosquito impact experiment with magnified view of infection (no text or symbols)F
AVVERTENZA
natural_image
Technical line drawing of a portable electrical enclosure with internal channels and a cable (no text or symbols)ACCENSIONE DEL BRUCIATORE PRINCIPALE CON UN FIAMMIFERO
natural_image
Line drawing of a portable electric grill with wheels and control panel (no text or symbols)AVISOS ADICIONAIS
natural_image
Line drawing of a gas cylinder with a lid and side port, labeled 'B' (no text or symbols on the object itself)
natural_image
Technical line drawing of a mechanical device with no visible text or symbols
natural_image
Technical line drawing of a mechanical device with spring and connecting rod (no text or symbols)natural_image
Illustration of a mosquito spraying into a bottle, with an inset showing the same mosquito inside (no text or symbols)AVISO
natural_image
Technical line drawing of a portable oven or refrigerator with internal grating and a handle (no text or symbols)ACENDIMENTO DO QUEIMADOR PRINCIPAL COM UM FÓSFORO
natural_image
Line drawing of a portable electric grill with wheels and control panel (no text or symbols)SÄKERHETSRÅD
natural_image
Line drawing of a gas cylinder with a lid and side port, labeled 'B' at the bottom (no text or symbols on the object itself)
natural_image
Technical line drawing of a mechanical device with no visible text or symbols
natural_image
Technical line drawing of a mechanical device with hoses and components (no text or symbols)natural_image
Illustration of a mosquito impact experiment with magnified view of the insect and a bottle (no text or symbols)F
WARNING!
natural_image
Technical line drawing of a mechanical device with internal components and a handle (no text or symbols)TÄNDA HUVUDBRÄNNAREN MED TÄNDSTICKA
natural_image
Line drawing of a portable electric grill with wheels and control panel (no text or symbols)YDERLIGERE ADVARSLER
natural_image
Line drawing of a gas cylinder with a lid and side port, labeled 'B' (no text or symbols on the object itself)
natural_image
Technical line drawing of a mechanical device with no visible text or symbols
natural_image
Technical line drawing of a mechanical device with hoses and components (no text or symbols)natural_image
Illustration of a mosquito spraying into a bottle, with magnified inset showing the infection (no text or symbols)F
ADVARSEL!
natural_image
Technical line drawing of a mechanical device with internal components and a handle (no text or symbols)OPTÆNDING AF HOVEDBRÆNDEREN MED EN TÆNDSTIK
natural_image
Line drawing of a portable electric grill with wheels and control panel (no text or symbols)LISÄVAROITUKSET
natural_image
Line drawing of a gas cylinder with a lid and side port, labeled 'B' (no text or symbols on the object itself)
natural_image
Technical line drawing of a mechanical device with no visible text or symbols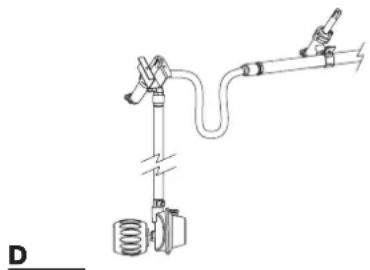
natural_image
Technical line drawing of a mechanical device with hoses and components (no text or symbols)natural_image
Illustration of a mosquito spraying into a bottle, with an inset showing the same mosquito (no text or symbols present)F
VAROITUS
natural_image
Technical line drawing of a portable stove or oven with internal grating and mounting bracket (no text or symbols)PÄÄPOLTTIMEN SYTYTYS TULITIKULLA
natural_image
Line drawing of a portable electric grill with wheels and heat exchangers (no text or symbols)UPOZORNĚNÍ
natural_image
Line drawing of a gas cylinder with a side port, labeled 'B' at the bottom (no text or symbols on the object itself)
natural_image
Technical line drawing of a mechanical device with no visible text or symbols
natural_image
Technical line drawing of a mechanical assembly with no visible text or symbolsnatural_image
Illustration of a mosquito infecting a bottle, showing magnified view of the infection (no text or symbols present)E