BLZH 5500 IN - Oven BAUKNECHT - Free user manual and instructions
Find the device manual for free BLZH 5500 IN BAUKNECHT in PDF.

User questions about BLZH 5500 IN BAUKNECHT
0 question about this device. Answer the ones you know or ask your own.
Ask a new question about this device
Download the instructions for your Oven in PDF format for free! Find your manual BLZH 5500 IN - BAUKNECHT and take your electronic device back in hand. On this page are published all the documents necessary for the use of your device. BLZH 5500 IN by BAUKNECHT.
USER MANUAL BLZH 5500 IN BAUKNECHT
BLZH 5500PRODUCTINFORMATIEBLAD
NL

Instructions for use
General recommendations
Installation
Electrical connection
Oven accessories
Cleaning the oven and accessories
Troubleshooting guide
After Sales-Service
General recommendations
Before using the appliances
- To make the most of your new appliances read the users instructions carefully and keep them on hand for consultation in the future.
- Remove the cardboard protections and the protective plastic film
- Remove the accessories from the oven and heat it at 200°C for about an hour to eliminate the smell of protective grease and insulating materials. Keep the window open during this procedure. The fan may continue to run for the time necessary to ensure sufficient cooling of the components and adjacent kitchen units after the appliances have been switched off
protecting the environment
1' packing
• The packaging material is 100% recyclable and it is marked with the recycle symbol
2' Appliances
- The appliances are built from recyclable materials: If you decide to scrap the appliances please observe local waste disposal regulations. When you scrap them, cut off the power cords so that the appliances cannot be connected to the mains:
Declaration of conformity CE:
- These appliances are designed to come into contact with foodstuffs and they are constructed in compliance with Directive 89/109/EEC
- They are designed solely for use as domestic cooking appliances. Any other use of the appliances (e.g. for room heating) is considered as improper use and potentially dangerous
- These appliances are designed' built and sold in compliance with:
- the safety requirements of "Low Voltage" Directive 73/23/EEC;
- the protection requirements of EMC Directive 89/336/EEC;
- the requirements of Directive 93/68/EEC
General recommendations
- Never stand or sit on the oven open door. Never hang any weight at the handle of the oven door when open:
- Use oven gloves to remove baking trays and accessories when the oven is hot
• Do not bottom of the oven with aluminium foil
- Do not place inflammable material in the oven - risk of fire if the oven is inadvertently switched on.
precautions and general recommendations
- Before any maintenance on the appliances disconnect them from the power supply:
- Keep children away from the oven when it is in use and when its has just been switched off
• The oven must be repaired or adjusted only by a qualified technician.
• Make sure that the electrical wires of other electrical appliances near the oven do not come into contact with hot parts and do not become entrapped in the oven door.
- During the cooking process' water evaporates from food
All ovens require this steam and other fumes to be vented from the oven cavity. For reasons of safety and aesthetics, we have determined that an opening at the bottom of the door is the optimum solution:
o v e r t h e Consequently vapour may be seen to be coming from this area on occasions (see picture):
- This is a normal occurrence and the bottom trim can be cleaned after removal of the door as described on "Cleaning the oven and its accessories".
- Heavy weights must not be placed on the open door as this may result in damage to the cavity and hinges. Max weight: 7 kg (15lbs)

text_image
fumes exhaustInstallation
Technical information for the installer Oven
• After removing the oven from its packaging' before making the connections place it on the polystyrene foam base to protect it from damage.
- Do not attempt to lift the oven by the handle
- Lift at the sides as shown in the figure (see arrow)
- Check that the appliance has not been damaged in transit
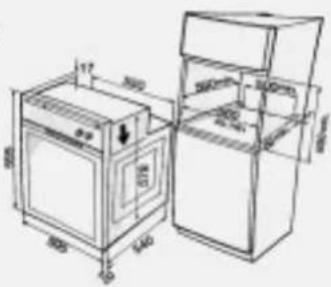
- Oven dimensions and kitchen unit dimensions are shown in the figure opposite:
- Kitchen units in contact with the oven must be heat resistant (80°C)
- If plastic laminates or cement are not sufficiently heat-resistant warping, bubbling or detachment of the finish may result
• Install the oven in the housing' lifting it at the sides' taking care not to trap the wires of the electrical supply cable.
• Install the oven in the housing' lifting it at the sides' taking care not to trap the wires of the electrical supply cable.
text_image
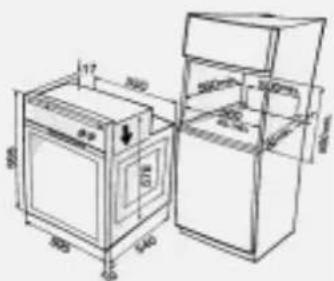
Technical line drawing of an oven and refrigerator with labeled dimensions in millimetersInstallation
- For correct ventilation, follow the ventilation opening directions shown in the figure (500 x 80 mm min).
- Secure the oven to the kitchen unit with screws (B) as shown
• The oven has also been designed for building in under a cooktop.
NOTE: To allow for proper ventilation, we recommend that you leave an opening of at least 500x80 mm or an equivalent area in the lower section of the housing.
An additional opening of 5 mm is required between the oven top rim and the cooktop lower rim: this opening must not be closed by strips or housing crosspieces.
During oven installation' care must be taken to ensure that the sides are not touching the front edges of the housing or adjacent drawers and doors (see picture):
text_image
Technical line drawing of an oven and refrigerator with dimension annotations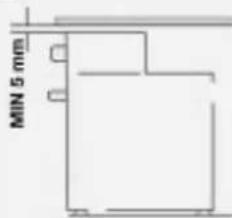
text_image
MIN 5 mm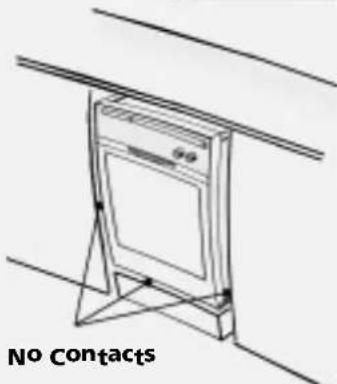
natural_image
Line drawing of a cabinet mounted on a stand, no text or symbols presentElectrical connection
- Warning: Do not connect to the power supply before you have finished connecting the oven.
• Make sure the oven is installed and connected to the electricity supply by a qualified technician in accordance with the manufacturer's instructions and in compliance with local regulations'
• The inst responsible for the correct electrical connection of the oven and the observance of the relative safety regulations. - The oven must be connected to the electricity supply by means of an all-pole disconnect switch with minimum contact gap of 3 mm.
• The oven must be earthed by law
- Do not use multiple plug adapters or extension leads
• After th been installed' the electrical components must be inaccessible.
• Make sure that the voltage shown on the rating plate is the same as the power supply voltage in your home
I The fating plate is on the front edge of the oven cavity (visible with oven door open).

natural_image
Line drawing of a kitchen appliance with an inset showing a close-up of the lid (no text or symbols)Oven accessories
Accessories supplied depend on the model (refer to the Product Description Sheet supplied separately)
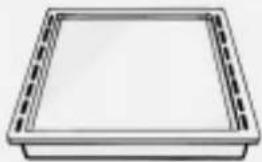
Drip tray
The drip tray is designed to collect fat and food partiges when it is positioned under the grid; it can also be used as a griddle to cook meat' chicken and fish' with or without vegetables
To avoid spatters of fat and smoke, pour a little water into the drip tray
natural_image
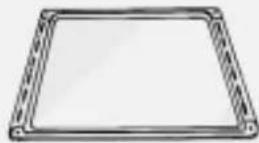
Simple 3D rendering of a rectangular tray with dashed border (no text or symbols)Baking tray
For cooking biscuits' meringues and pizzas'
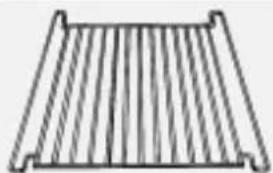
Grid
The grid can be used to grill food or as a support for baking trays' cake tins and other cooking receptacles
It can be placed in two different ways (or) and on any of the runners in the oven.
natural_image
Simple line drawing of a corrugated metal grate (no text or symbols)Catalytic panels
The catalytic panels have a microporous coating that absorbs fat spatters. We recommend an automatic cleaning cycle after cooking particularly fatty food.
- At the end of the cycle' when the oven is cool use a moist sponge to remove food residues Do not use detergent or cleaners - risk of damaging the catalytic enamel coating

- To clean the oven heat it to 200°C when empty and leave it switched on for about an hour.
Spit
Use the spit as indicated in the relevant chapter in the Product Description Sheet supplied separately

natural_image
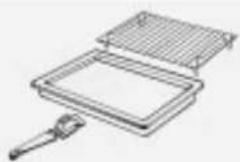
Simple line drawing of a mechanical device with a lever and handle (no text or symbols)Pan Set Kit
The set comprises a grid' a drip tray and one or two tongs. This accessory must be set on the grid and used with the Grill function:
natural_image
Technical line drawing of a rectangular device with a gridded top and a handle, no text or symbols presentOven functions
Accessories supplied depend on the model
(refer to the Product Description Sheet supplied separately)
STATIC FUNCTION
This function is used to cook food on the same runner level. The function allows temperature control; the temperature can be set in the range of 50°C to 250°C.
The default setting is 200°C
- preheat the oven until the required temperature is reached and place the food into the oven when all the indicators on the scale °C are on.
- When using this function, it is advisable to put the food in the middle of the oven.
GRILL FUNCTION
- This function is ideal to grill small pieces of meat (steaks' sausages) and for making toast
- The function allows five settings' 1' 2' 3' 4' 5' each corresponding to an increased heating level of the heating element at the top.
• The default setting is 3 - During cooking' the oven door must be kept closed
- preheat the oven for 3/5 minutes
- When cooking meat' to avoid spatters of fat and smoke' pour a little water into the drip tray
- Turn the food half-way through grilling time
- When this function is selected the spit (if supplied) is also activated
"MLTF" FUNCTION (Heat maintenance)
This function keeps one of two temperature levels of temperature (either 35^ C or 60^ C) inside the oven.
- Setting the temperature at 35^ is particularly useful to raise dough for bread and pizza.
• The default setting is 35^ C
- For this function it is advisable to use the first shelf level.
- Use the 60°C temperature setting to keep the food warm once it is cooked
FAN FUNCTION
This function is especially useful for simultaneously cooking different foods at more than one shelf level (for example: fish' vegetables' pasta)
This function allows temperature control; the temperature can be set in the range 50^ C to 250^ C.
The default setting is 160°C
• If possible choose dishes that require the same cooking temperature:
- It is not necessary to preheat the oven.
- If the dishes in the oven have different cooking times' remove completed dishes and leave remaining foods until cooked.
PASTRY FUNCTION (Static + Fan)
This function is useful when cooking at two levels and when baking cakes. The function allows temperature control; the temperature can be set in the range of 50^ C to 250^ C.
The default setting is 175°C
- It is not necessary to preheat the oven.
- Switch the position of the dishes inside the oven during cooking time.
- If the dishes in the oven have different cooking times' remove completed dishes and leave remaining foods until cooked.
TURBOGRILL FUNCTION (Grill + Fan)
This function is ideal to cook large chunks of meat (i'e roast beef' roasts).
The function allows five settings' 1' 2' 3' 4' 5' each corresponding to an increasing heating level of the heating element at the top. The default setting is 3'
- Keep the oven door closed while cooking
- Lay the meat onto the grid and position the drip tray on the first shelf level. To avoid spatters of fat and smoke, pour a little water into the drip tray
- Turn over the meat half way through cooking time
Oven functions
TURBOFAN FUNCTION
This function is useful when cooking at two runner levels; the temperature can be set in the range of 50^ C to 250^ C. The default setting is 160^ C. This function is ideal for:
• Large fruitcakes
- Timbales
- Stuffed vegetables
• poultry (weighing more than 3 kg)
It is not necessary to preheat the oven.
PROGRAMME FUNCTION
This function is useful to bake pizzas' bread and focaccia. The function provides 3 cooking programs
(P1' P2' P3) with preset initial temperatures that can be adjusted by the user. The maximum temperature values that can be adjusted by the user are: 240°C for P1'
200°C for P2 and 190°C for P3 in order to obtain uniform cooking results:
Each program corresponds to a recipe for the preparation of the dish you want
programme P1 allows rapid preheating with an initial temperature of 300°C and a cooking temperature of
240°C
To improve energy saving and avoid wasting electricity there is no preheating if the oven is already warm and the cooking temperature is set automatically (240°C) For programmes P2 and P3 the initial temperature is always 220°C
BOOSTER FUNCTION
This function allows fast preheating of the oven. The function allows temperature control; the temperature can be set in the range of 50^ C to 250^ C.
The default setting is 200°C. As the temperature in the oven increases, the indicators ----°C light up in sequence.
When the selected temperature is reached, an acoustic signal is emitted and the oven switches automatically to Static Function.
This function is ideal when cooking meat' fish and poultry
Cleaning the oven and accessories
- When you finish cooking wait for the oven to cool and then clean it to prevent the build-up of baked-on residues
- If the food residues are baked on' use a specific oven cleaner and follow the manufacturer's instructions
- Clean the exterior of the oven with a sponge and warm water.
• Do not u cleaners or pan scourers:
- Use a liquid detergent to clean the oven door window.
- Wash the accessories in a dish washer or in the sink' using an oven cleaner
• After the oven has been in prolonged use and when cooking on different levels (especially food with high water contents such as pizzas' stuffed vegetables' etc.) condensation may form on the inside of the door and of the door seal. When the oven is cool, dry any condensation with a cloth or a sponge.
Additional information for appliances which have an aluminium front:
The material has a sensitive surface. In order to avoid scratches' only use a soft sponge and liquid cleaner to clean the front of the appliance.
Removing the oven door (for cleaning)
1' Open the oven door
2' press hinge catches (A) forwards
3' Lift the catches until they engage and then remove the door.
4' Warning: While you are cleaning the oven, ensure you do not disengage the hinge retainer catches.
5* Refit the oven door by following the above steps in reverse order
Dropping the grill element to clean the oven roof (depending on model)
- Do not attempt to clean the oven until it is cool
s1. e a b r a s i v to clean the oven roof pull out the grill element and lower it as far as it will go
2' Clean the oven roof and then return the grill element to its original position:
Changing the oven lamp
1* Disconnect the oven from the electrical supply
2* Unscrew the lamp cover
3' Change the lamp (see N'B')
4' Refit the lamp cover
5* Reconnect the electrical supply
Changing the lateral lamp (depending on model)
1* Disconnect the oven from the electrical supply
2. Remove the left hand side grid
3' Use a screwdriver to prize off the lamp cover.
4° Change the lamp (see N'B)
5* Reposition the lamp cover and press it against the oven wall until it clicks into place.
6* Refit the side grid
7* Reconnect the power supply
N·B: Use exclusively 25 W 230 V lamps' type E-14' T300°C' available from After Sales Service.

natural_image
Line drawing of an open oven with a hand inserting a pencil (no text or symbols)
text_image
e ① ② ③
text_image
Diagram of a refrigerator with labeled parts and directional arrow indicating open status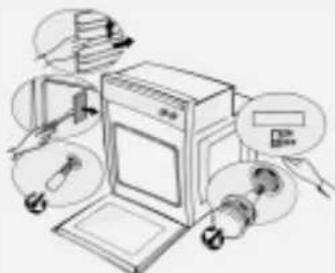
natural_image
Illustration of a kitchen appliance with labeled parts (no text or symbols present)Troubleshooting guide
Oven not working
- Switch the oven off and then on again to see if the problem persists:
- Check for the presence of mains electrical power
-
Check that the oven selector is not on position "0".
-
If the electronic display presents the message "STOP" press the button 2 to reset the oven and then set the clock (see the PROGRAMMER DESCRIPTION SHEET supplied separately)
- If the electronic display shows the message "Fxx" contact the AfterSales Service' quoting the error code displayed
After Sales-Service
Before contacting After Sales Service:
- Try to solve the problem (see "Troubleshooting guide")
2* Turn off the appliance and restart it to see if the fault is repeated
If after the above checks the fault still occurs' get in touch with the nearest After-Sales Service' please give:
• the nature of the problem
- the exact type and model
• the service number
- (number after the word service on the rating plate)' located under the cook top or on the product Description Sheet or' finally' on the right hand edge of the oven cavity (visible when the oven door is open).
The service number is also indicated on the guarantee booklet'
- your complete address (including postal code) and phone number
If any repairs are required, please contact an authorised AFTER SALES SERVICE as indicated in the warranty
In the unlikely event that an operation or repair is carried out by an unauthorised technician always request a certification of the job carried out and insist on the use of original spare parts Failure to comply with these instructions may compromise the safety and quality of the product
SERVICE
0000 000 00000

BLZH 5500PRODUCT DESCRIPTION SHEET
DE ENI
text_image
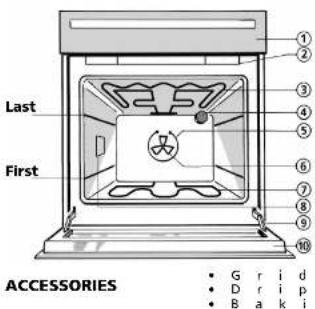
Last First ACCESSORIES 1 2 3 4 5 6 7 8 9 10 • G r i d • D r i p • B a k iFirst-Last... shelf positions
- Control panel
2.Cooling fan* (not visible)
3.Top heating element (can be lowered)
4.Oven light
- Round heating element (not visible)
6.Fan
-
Bottom heating element (not visible)
-
Lateral standard lamps
9.Oven door hinges
10.Oven cool door
*N.B.: The cooling fan switches on only when the oven has reached a certain temperature. After the oven switches off, the cooling fan may, however, continue to run for a certain time to ensure proper cooling.
OVEN FUNCTIONS TABLE
| Function | Function | Preset temperature/level | Function description (see details in the user's manual) | ||||||
| SymbolNr. | |||||||||
| - | - | O | V | E | N | - | O | F | F |
| - | - | O V | E | -N | T | L | I | G H | |
| 2 | MLTF (Heat Maintenance) | 35C | To keep a constant temperature, either 35°C or 60°C. | ||||||
| 3 | S T | 200C | T To cook food at one shelf level. Preheating. | ||||||
| 4 | PASTRY (Static + Fan) | 175C | To cook on two shelf levels, at the same temperature. | ||||||
| 5 | FAN | 160C | To cook on more than one shelf level, at the same temperature. | ||||||
| 6 | TURBOFAN | 160C | To cook: large fruitcakes, stuffed vegetables, timbales, poultry. | ||||||
| 7 | G R | 3 | To grill small pieces of meat, toast, etc. | ||||||
| 8 | TURBOGRILL (Grill + Fan) | 3 | To grill large pieces of meat. | ||||||
| 9 | PROGRAMME | P1 | To bake pizza, bread, focaccia. | ||||||
| 10 | BOOSTER | 200C | For fast preheating of the oven. | ||||||
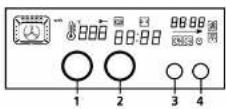
- Selector knob: to choose the oven functions.
- Knob to set time of day, cooking time, the time at which cooking should terminate, the temperatures and the power levels (Function P).
- Button to select and confirm the different operations (operate by single presses only).
- Button to select special functions: "Browning" and "Heat Maintenance"
Push-push knobs
• To use this type of knob, press
• Turn the knob to the desired pos
Once cooking is over, turn the knob back to the position marked by "0" and press it again to restore it to its initial setting.
T w i t c h o n t
STARTING THE OVEN
When the oven is connected to the power supply for the first time, or re-connected after a power failure, the display shows "STOP".
To start the oven:
• t uknob 1with index at the top as in fig. 1 of programmer sheet.
• p r button 3 The display shows "--":
FOR A DESCRIPTION ON HOW TO USE THE OVEN, PLEASE REFER TO THE PROGRAMMER DESCRIPTION SHEET.
COOKING TABLE FOR GRILL FUNCTION
| FOODFunction | Preheating (5 minutes) | Level (from the bottom) | Browning level | Cooking time (minutes) | |
| Sinloin steaks7X4535 - 45 | |||||
| Cutlets7X4530 - 40 | |||||
| Sausages7X4530 - 40 | |||||
| Pork chops7X4525 - 15 | |||||
| Fish7X4530 - 40 | |||||
| Chicken legs7X4535 - 40 | |||||
| Kebabs7X4530 - 35 | |||||
| Spare ribs7X4520 - 35 | |||||
| Chicken halves7X3545 - 50 | |||||
| Chicken halves8-3545 - 55 | |||||
| Whole chicken8-3560 - 70 | |||||
| Roast (pork, beef) | 8-3575 - 90 | ||||
| Duck | 8-2580 - 90 | ||||
| Leg of lamb8 | -3590 - 120 | ||||
| Roast beef | 8 | - | 3 | 5 | 90 - 120 |
| Baked potatoes | 8 | - | 3 | 5 | 40 - 50 |
| Swordfish cutlets8-3535 - 45 |
FOOD COOKING TABLES
| FOOD | Function | Preheating (10 minutes) | Level (from the bottom) | Temperature (°C) | Cooking time (minutes) |
| MEAT Lamb, Kid, Mutton | 3 | X | 2 | 200 | 60 - 80 |
| 5 | X | 2 | 190 | 70 - 90 | |
| 4 | X | 2 | 190 | 60 - 80 | |
| Roast (Veal, Pork, Beer) (kg. 1) | 3 | X | 2 | 200 | 70 - 90 |
| 5 | - | 2 | 190 | 60 - 80 | |
| 4 | - | 2 | 190 | 60 - 80 | |
| Chicken, Rabbit, Duck | 3 | X | 2 | 200 | 70 - 80 |
| 5 | - | 2 | 190 | 60 - 70 | |
| 4 | - | 2 | 190 | 70 - 80 | |
| Turkey (kg. 6) + level. 3 browning | 3 | X | 1 | 200 | 160 - 180 |
| 5 | X | 1 | 190 | 150 - 180 | |
| 4 | X | 1 | 190 | 150 - 180 | |
| Goose (2 Kg) | 3 | X | 2 | 200 | 120 - 130 |
| 5 | X | 2 | 190 | 100 - 120 | |
| 4 | X | 2 | 190 | 110 - 120 | |
| FISH (WHOLE) (1-2 kg) | 3 | X | 2 | 200 | 60 - 70 |
| Gill-head, Bass, Tuna, Salmon, Trout | 5 | - | 2 - 3 | 190 | 65 - 75 |
| 4 | - | 2 - 3 | 190 | 60 - 70 | |
| FISH (CUTLETS) (1 kg.) | 3 | X | 2 | 200 | 45 - 55 |
| Sword Fish, Tuna, Salmon, Cod | 5 | - | 3 | 190 | 50 - 55 |
| 4 | X | 2 | 190 | 45 - 55 |
NOTE: When cooking meat using fan-assisted and static functions, it is also advisable to use the Browning function (level 1 to 3).
| FOOD | Function | Preheating (10 minutes) | Level (from the bottom) | Temperature (°C) | Cooking time (minutes) |
| VEGETABLES Stuffed peppers | 6 | X | 2 | 200 | 50 - 60 |
| 3 | X | 2 | 190 | 35 - 45 | |
| 5 | - | 2 | 180 | 55 - 60 | |
| 4 | - | 2 | 190 | 50 - 60 | |
| Stuffed tomatoes | 3 | X | 2 | 200 | 50 - 55 |
| 5 | - | 2 | 180 | 50 - 60 | |
| 4 | - | 2 | 190 | 35 - 45 | |
| Baked potatoes | 3 | X | 2 | 200 | 40 - 50 |
| 5 | - | 2 | 190 | 45 - 50 | |
| 4 | - | 2 | 190 | 45 - 50 | |
| Raw vegetables au gratin (e.g. Fennel, Cabbage, Asparagus, Celery) | 3 | X | 2 | 200 | 35 - 45 |
| 5 | - | 3 | 180 | 40 - 50 | |
| 4 | - | 2 | 190 | 40 - 50 |
| FOOD | Function | Preheating (10 minutes) | Level (from the bottom) | Temperature (°C) | Cooking time (minutes) |
| SWEETS, FASTRIES, ETC. Raising cakes (sponges) | 3 | X | 2 | 160 | 30 - 40 |
| 5 | - | 3 | 150 | 35 - 45 | |
| 4 | - | 3 | 160 | 30 - 40 | |
| Filled pies (with cheese) | 3 | - | 2 | 180 | 90 - 95 |
| 5 | - | 2 | 160 | 70 - 80 | |
| 4 | - | 2 | 170 | 90 - 95 | |
| Tarts | 3 | X | 2 | 180 | 25 - 35 |
| 5 | - | 3 | 180 | 45 - 50 | |
| 4 | - | 2 | 180 | 30 - 40 | |
| Apple strudel | 3 | X | 2 | 200 | 40 - 45 |
| 5 | X | 3 | 200 | 45 - 50 | |
| 4 | - | 2 | 180 | 45 - 50 | |
| Biscuits | 3 | X | 2 | 180 | 20 - 30 |
| 5 | - | 1 - 3 | 160 | 30 - 40 | |
| 4 | - | 2 - 4 | 180 | 25 - 35 | |
| Cream pulls | 3 | X | 2 - 4 | 190 | 25 - 35 |
| 5 | X | 1 - 3 | 180 | 40 - 50 | |
| 4 | X | 2 - 4 | 190 | 30 - 40 | |
| Savoury Pies | 3X2 | 200 | 50 - 55 | ||
| 5 | X | 3 | 180 | 55 - 60 | |
| 4 | X | 2 | 200 | 40 - 50 | |
| Lasagne | 3 | X | 2 | 200 | 45 - 55 |
| 5 | - | 2 | 190 | 45 - 55 | |
| 6 | - | 2 | 190 | 45 - 55 | |
| Filled fruit pies e.g. Pineapple, Peach | 3 | X | 2 | 200 | 35 - 45 |
| 5 | - | 2 | 180 | 45 - 50 | |
| 4 | - | 2 | 180 | 40 - 50 | |
| Moringues | 3X2 | 90120 - 150 | |||
| 5 | - | 1 - 3 | 80 | 150 - 180 | |
| 4 | - | 2 - 4 | 100 | 120 - 150 | |
| Vol-au-vents | 3 | X | 2 | 200 | 15 - 25 |
| 5 | X | 1 - 3 | 190 | 25 - 30 | |
| 4 | X | 2 - 4 | 200 | 20 - 30 | |
| Souffles | 3 | X | 2 | 190 | 30 - 40 |
| 5 | - | 2 | 180 | 55 - 65 | |
| 4 | X | 2 | 190 | 40 - 50 | |

natural_image
Interior scene of a kitchen with three people preparing food; no visible text or symbols
natural_image
Two men working at a table with tools and equipment, no visible text or symbols
natural_image
Close-up of a smiling couple in conversation, no visible text or symbolsGebrauchsanweisung
natural_image
Simple 3D illustration of a rectangular tray or container with dashed border (no text or symbols)Backblech
natural_image
Simple line drawing of a rectangular frame with dashed border and corner holes (no text or symbols)Rost
natural_image
Simple line drawing of a rectangular metal grate or rack structure (no text or symbols)Selbstreinigende
natural_image
Simple line drawing of a mechanical device with a lever and handle (no text or symbols)Grill-Set
text_image
Diagram showing three labeled components of a filtration or drying device, with parts A and B marked.Backofenfunktionen
text_image
Diagram of a kitchen appliance with labeled parts and an inset showing a tool interacting with the interior panel.text_image
Technical line drawing of an oven and refrigerator with labeled dimensions in millimetersAsennus
text_image
Technical line drawing of an oven and refrigerator with labeled dimensions in millimeters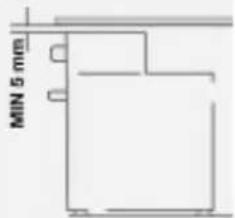
text_image
MIN 5 mm
natural_image
Line drawing of a kitchen oven with an open lid and a magnified inset showing internal components (no text or symbols)Uunin varusteet
natural_image
Simple 3D rendering of a rectangular tray with dashed border (no text or symbols)Leivinpelti
natural_image
Simple line drawing of a corrugated metal grate (no text or symbols)Katalyyttipaneelit
natural_image
Simple line drawing of a tool interacting with a flat surface (no text or symbols)Uunipannusarja
natural_image
Line drawing of an open oven with a hand inserting a pencil into the tray (no text or symbols)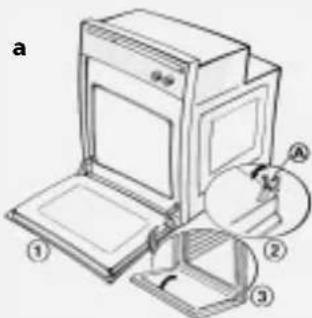
text_image
a ① ② ③
text_image
Diagram of a refrigerator with labeled parts, showing front and side views with numbered annotations
natural_image
Illustration of a kitchen appliance with multiple kitchen utensils and a door, no text or symbols presentVianetsintä
Uuni ei tojmi
natural_image
Interior scene of a kitchen with three people preparing food; no visible text or symbols
natural_image
Two men working at a table with tools and equipment, no visible text or symbols
natural_image
Close-up of a smiling couple in conversation, no visible text or symbolsNotice d'emploi
natural_image
Simple line drawing of a rectangular tray or container with dashed border (no text or symbols)Plaque à pâtisserie
natural_image
Simple line drawing of a rectangular frame with dashed border (no text or symbols)Grille
natural_image
Simple line drawing of a rectangular metal grate or rack structure (no text or symbols)natural_image
Simple line drawing of a mechanical device with a lever and handle (no text or symbols)text_image
Diagram showing a filtration or cleaning process with labeled components A and B, including a tool and component assembly.Fonctions du four
natural_image
Line drawing of an oven with a hand holding a tool, showing food being placed on the tray (no text or symbols)text_image
Diagram of a kitchen appliance with labeled parts and a magnified view showing internal components and directional arrows.text_image
Diagram illustrating the process of installing or adjusting a door oven, with labeled buttons for ON/OFF and directional arrows indicating steps.Diagnostic rapide
text_image
Technical line drawing of an oven and refrigerator with labeled dimensions in millimetersInstallation
text_image
Technical line drawing of an oven and refrigerator with dimension annotations
text_image
MIN 5 mm
natural_image
Line drawing of a door mounted on a stand, labeled 'Ingen kontakt' at the bottom (no other text or symbols)Eltislutning
natural_image
Simple 3D rendering of a rectangular tray with dashed border (no text or symbols)Bageplade
natural_image
Simple line drawing of a tool interacting with a rectangular object (no text or symbols)Grydesæt
natural_image
Line drawing of an open oven with a hand inserting a pencil into the tray (no text or symbols)
text_image
Technical diagram of an oven with labeled parts and a magnified view showing internal components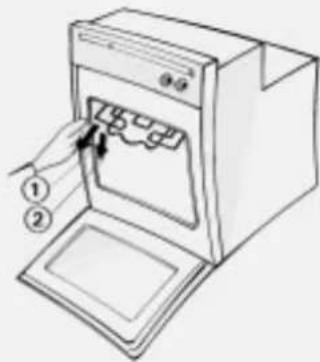
text_image
Diagram of a refrigerator with labeled parts, showing hand placement and control buttons
natural_image
Illustration of a kitchen appliance with labeled parts (no text or symbols present)text_image
Technical line drawing of an oven and refrigerator with labeled dimensions in millimetersInstallation
text_image
Technical line drawing of an oven and refrigerator with dimension annotations
text_image
MIN 5 mm
natural_image
Line drawing of a cabinet mounted on a stand, labeled 'Inga kontakter' at the bottom (no other text or symbols)Elektrisk anslutning
natural_image
Simple line drawing of a rectangular tray or container with dashed border (no text or symbols)Bakplåt
natural_image
Line drawing of an open oven with a hand inserting a pencil into the tray (no text or symbols)e

text_image
d e ① ② ③ A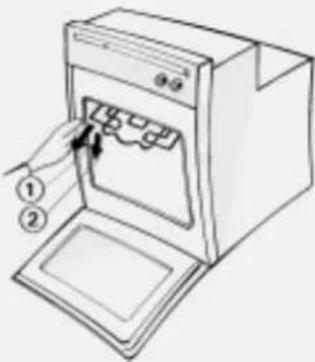
text_image
Diagram of a refrigerator with labeled parts, showing a door and tray with arrows indicating insertion or movement.