
SWV3105S - Computer Cable PHILIPS - Free user manual and instructions
Find the device manual for free SWV3105S PHILIPS in PDF.


| Product type | Filter coffee maker |
| Brand | Philips |
| Model | SWV3105S |
| Power supply | 220-240 V, 50-60 Hz |
| Water tank capacity | Up to 1.5 L (10 cups) |
| Coffee type | Ground coffee for filter |
| Filter | Paper type 1x4 or No. 4, or permanent filter (depending on model) |
| Functions | Keep warm, drip-stop system, manual shut-off |
| Removable parts | Carafe, filter holder, water tank lid, carafe lid |
| Cleaning | Removable parts in dishwasher or hot soapy water; exterior with damp cloth |
| Descaling | Recommended 2 to 5 times per year depending on water hardness; use white vinegar 4% or liquid descaler |
| Safety | Do not immerse, check voltage, keep cord away from hot surfaces |
| Spare parts | Replacement carafe: HD7989/20 (black) or HD7989/00 (grey) |
| Warranty | International warranty (details on the leaflet) |
| Weight | Approx. 1.2 kg |
| Dimensions (L x W x H) | Approx. 25 x 20 x 32 cm |
Frequently Asked Questions - SWV3105S PHILIPS
User questions about SWV3105S PHILIPS
0 question about this device. Answer the ones you know or ask your own.
Ask a new question about this device
Download the instructions for your Computer Cable in PDF format for free! Find your manual SWV3105S - PHILIPS and take your electronic device back in hand. On this page are published all the documents necessary for the use of your device. SWV3105S by PHILIPS.
USER MANUAL SWV3105S PHILIPS
natural_image
White Philips 400ml coffee maker with clear glass lid and control panel (no visible text or symbols on device body)
ENGLISH 6
DANSK 11
DEUTSCH 16
ΕΛΛΗΝΙΚΑ 22
ESPAÑOL 28
SUOMI 34
FRANÇAIS 39
ITALIANO 45
NEDERLANDS 51
NORSK 57
PORTUGUÊS 62
SVENSKA 68
TÜRKÇE 73
Introduction
Congratulations on your purchase and welcome to Philips! To fully benefit from the support that Philips offers, register your product at www.philips.com/welcome.
General description (Fig. 1)
A Lid of coffeemaker
B Removable filter holder
C Removable water tank cover
D Water tank
E Water level indicator
F Lid of jug
G Jug
H On/off switch
I Hotplate
J Mains cord with plug
K Coffeemaker
Important
Read this user manual carefully before you use the appliance and save it for future reference.
Danger
- Never immerse the appliance in water or any other liquid, nor rinse it under the tap.
Warning
- Check if the voltage indicated on the appliance corresponds to the local mains voltage before you connect the appliance.
- Do not use the appliance if the plug, the mains cord or the appliance itself is damaged.
- If the mains cord is damaged, you must have it replaced by Philips, a service centre authorised by Philips or similarly qualified persons in order to avoid a hazard.
- This appliance is not intended for use by persons (including children) with reduced physical, sensory or mental capabilities, or lack of experience and knowledge, unless they have been given supervision or instruction concerning use of the appliance by a person responsible for their safety.
- Children should be supervised to ensure that they do not play with the appliance.
- Keep the mains cord out of the reach of children. Do not let the mains cord hang over the edge of the table or worktop on which the appliance stands.
Caution
- Do not place the appliance on a hot surface and prevent the mains cord from coming into contact with hot surfaces.
- Unplug the appliance if problems occur during brewing and before you clean it.
- This appliance is intended to be used in household and similar applications such as:
- staff kitchen areas in shops, offices and other working environments;
- farm houses;
- by clients in hotels, motels and other residential type environments;
- bed and breakfast type environments.
Electromagnetic fields (EMF)
This Philips appliance complies with all standards regarding electromagnetic fields (EMF). If handled properly and according to the instructions in this user manual, the appliance is safe to use based on scientific evidence available today.
Before first use
1 Place the appliance on a flat and stable surface.
2 Push excess cord into the opening in the back of the appliance. To fix the cord, push it into the narrow part of the opening (Fig. 2).
Note: Make sure that the cord does not come into contact with hot surfaces.
3 Put the mains plug in an earthed wall socket.
4 Clean the detachable parts (see chapter 'Cleaning').
5 Reassemble all parts.
- Make sure the water tank cover is placed correctly (Fig. 3).
- Make sure the filter holder is placed correctly. First place the back of the filter holder under the rim of the hinge (1) and then push down the handgrip (2) until the filter holder locks into place (Fig. 4).
6 Flush the appliance (see section ‘Flushing the appliance’ below).
Flushing the appliance
Note: Do not put a filter and ground coffee in the filter holder.
1 Open the lid of the coffeemaker (Fig. 5).
2 Fill the water tank with fresh cold water up to the MAX indication (Fig. 6).
Note: Do not switch on the appliance when the lid is still open.
3 Close the lid (Fig. 7).
4 Put the jug on the hotplate (Fig. 8).
Note: Make sure you put the jug on the hotplate with the spout facing into the appliance.
5 Press the on/off switch to switch on the appliance (Fig. 9).
The power-on light goes on.
6 Let the appliance operate until all the water has run into the jug.
7 Switch off the appliance. Let it cool down for at least 3 minutes before you start brewing coffee.
Using the appliance
1 Open the lid of the coffeemaker (Fig. 5).
2 Fill the water tank with fresh cold water up to the required level (Fig. 10).
- The indications on the left side of the water level window correspond to large cups (120ml).
- The indications on the right side of the water level window correspond to small cups (80ml).
3 Make sure the filter holder is placed correctly. First place the back of the filter holder under the rim of the hinge (1) and then push down the handgrip (2) until the filter holder locks into place (Fig. 4).
Note: If the filter holder is not placed correctly, the drip stop cannot function properly. The drip stop prevents coffee from dripping through the filter onto the hotplate when the jug is removed.
4 Take a paper filter (type 1x4 or no. 4) and fold the sealed edges to prevent tearing and folding (Fig. 11).
5 Put the paper filter in the filter holder (Fig. 12).
ENGLISH8
Note: Some versions come with a permanent filter. In this case you do not need to use paper filters.
6 Put ground coffee (filter-fine grind) in the filter (Fig. 13).
- For large cups: use one heaped measuring spoon of ground coffee for each cup.
- For small cups: use one level measuring spoon of ground coffee for each cup.
7 Close the lid of the coffeemaker. (Fig. 7)
8 Place the jug with the lid closed on the hotplate (Fig. 8).
Note: Make sure you put the jug on the hotplate with the spout facing into the appliance. If the spout of the jug sticks out from under the filter holder, the coffee may cool down.
Note: If you do not place the jug properly on the hotplate, the drip stop prevents the coffee from flowing into the jug. This may cause the filter to overflow.
9 Press the on/off switch to switch on the appliance (Fig. 9).
The power-on light goes on.
10 Let the water pass through the filter into the jug.
Note: If you want to remove the jug during brewing, the drip stop prevents coffee from dripping through the filter onto the hotplate. Place back the jug as soon as possible to prevent the filter from overflowing (Fig. 14).
11 You can leave the jug on the hotplate to keep the coffee warm and to preserve its flavour.
Note: Make sure you put the jug on the hotplate with the spout facing into the appliance. If the spout of the jug sticks out from under the filter holder, the coffee may cool down.
12 After use, press the on/off switch to switch off the appliance.
Note: The appliance does not switch off automatically.
Note: If you want to brew another jug of coffee right away, let the appliance cool down for 3 minutes first.
13 Remove the filter holder and throw away the paper filter and its contents. If you have used the permanent filter, empty and rinse it.
Tip: After the brewing cycle is completed, you can pour the hot coffee into a thermos jug to keep it hot and fresh.
Cleaning
Never immerse the appliance in water or any other liquid, nor rinse it under the tap.
1 Unplug the appliance and let it cool down.
2 Clean the outside of the appliance with a moist cloth.
3 Remove the filter holder.
4 Remove the water tank cover (Fig. 15).
5 Remove the lid from the jug.
6 Clean the filter holder, the water tank cover, the jug and the lid of the jug in hot water with some washing-up liquid or in the dishwasher.
7 After cleaning, rinse the jug with fresh hot water and reattach all parts.
- For instructions on how to reattach the water tank cover and filter holder, see chapter 'Before first use'.
Descaling
Regular descaling prolongs the life of the appliance and guarantees optimal brewing results and a constant brewing time for a long time.
In case of normal use (two full jugs of coffee every day), descale the appliance:
- 2 or 3 times a year if you use soft water (up to 18dH);
- 4 or 5 times a year if you use hard water (over 18dH).
Contact your local water board for information about the water hardness in your area.
You can use white vinegar with 4% acetic acid or a liquid descaler to descale the coffeemaker.
Note: If the appliance starts to produce more steam, this can be an indication that scale is building up.
Never use vinegar with an acetic acid content of 8% or more, natural vinegar, powder descalers or tablet descalers to descale the appliance, as this may cause damage.
Descaling takes approx. 30 to 60 minutes.
1 Fill the water tank with one litre of white vinegar (4% acetic acid) (Fig. 16).
Note: Do not put a filter and ground coffee in the filter holder.
Note: You can also use an appropriate liquid descaler. In this case, follow the instructions on the package of the descaler.
2 Press the on/off switch to switch on the appliance and let it complete the brewing cycle (see chapter ‘Using the appliance’) (Fig. 9).
3 Empty the jug over a sink (Fig. 17).
Note: For extra through descaling and to make sure that there is no scale left in the appliance, repeat steps 1 to 3.
4 Let the appliance complete two more brewing cycles with fresh cold water to remove any vinegar/descaler and scale residues (Fig. 18).
5 Clean the jug and the filter holder (see chapter 'Cleaning').
Replacement
You can order a new jug from your local Philips dealer or a Philips service centre under type number HD7989/20 (black) and HD7989/00 (grey).
Environment
- Do not throw away the appliance with the normal household waste at the end of its life, but hand it in at an official collection point for recycling. By doing this, you help to preserve the environment (Fig. 19).
Guarantee and service
If you need service or information or if you have a problem, please visit the Philips website at www.philips.com or contact the Philips Consumer Care Centre in your country (you find its phone number in the worldwide guarantee leaflet). If there is no Consumer Care Centre in your country, go to your local Philips dealer.
Troubleshooting
This chapter summarises the most common problems you could encounter with the appliance. If you are unable to solve the problem with the information below, contact the Consumer Care Centre in your country.
Problem Possible solution
| The appliance does not work. Plug in and switch on the appliance. | |
| Make sure that the voltage indicated on the appliance corresponds to the local mains voltage. | |
| Fill the water tank with water. | |
| In all other cases, contact the Philips Consumer Care Centre. | |
| Water leaks out of the appliance. Do not fill the water tank beyond the MAX level. | |
| In all other cases, contact the Philips Consumer Care Centre. | |
| The appliance takes a long time to brew coffee. | Descale the appliance (see chapter ‘Descaling’). |
| The appliance produces a lot of noise and steam during the brewing process. | Make sure that the appliance is not blocked by scale. If necessary, descale the appliance (see chapter ‘Descaling’). |
| The filter overflows when I remove the jug from the appliance while it is brewing coffee. | If you remove the jug from the hotplate while the appliance is brewing coffee, place the jug back onto the hotplate as soon as possible to prevent the filter from overflowing. Also note that the coffee does not reach its full taste before the end of the brewing cycle. Therefore we advise you not to remove the jug and pour out the coffee before the end of the brewing cycle. |
| Coffee grounds end up in the jug. | Make sure that the water tank cover is in place before you put the ground coffee in the filter. |
| Do not put too much ground coffee in the filter. | |
| Place the jug correctly under the filter holder. | |
| Unclog the opening in the bottom of the filter holder. | |
| Use the right size of paper filter (1x4 or no. 4). | |
| Make sure the paper filter is not torn. | |
| The coffee is too weak Use the right proportion of coffee to water. | |
| Make sure the paper filter does not collapse. | |
| Use the right size of paper filter (1x4 or no. 4). | |
| Make sure there is no water in the jug before you start to brew coffee. | |
| The coffee does not taste good. Do not leave the jug with coffee on the hotplate too long, especially not if it only contains a small amount of coffee. | |
The coffee is not hot enough. Place the jug properly on the hotplate.
Introduktion
Avkalking tar ca. 30–60 minutter.
natural_image
Hand holding a curved object with a black arrow, no visible text or symbols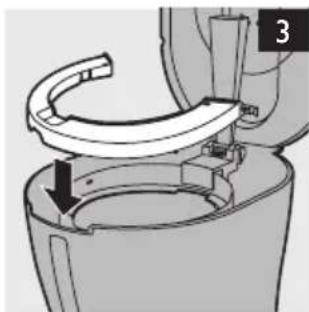
natural_image
Mechanical assembly diagram showing a valve or clamp mechanism inside a container (no text or symbols visible)

natural_image
Diagram of a mechanical device with a curved arrow indicating motion or force, no text or symbols present
natural_image
Diagram of a mechanical device with a curved arm and central shaft, no visible text or symbols
natural_image
Line drawing of a coffee maker with lid and side bowl (no text or symbols)
natural_image
Diagram of a pump bottle with a circular component and arrow indicating rotation (no text or symbols)
natural_image
Illustration of a hand pouring liquid into a container with an inset showing a magnified view of the same container (no text or symbols present)
natural_image
Close-up of hands holding a pen or ruler with arrows indicating motion (no text or symbols)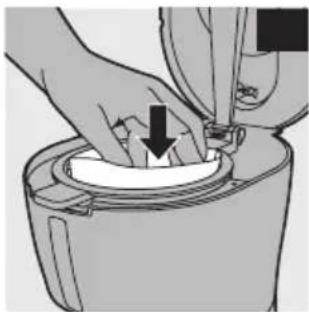
natural_image
Illustration of a hand pouring liquid into a container with a downward arrow indicating flow (no text or symbols)

natural_image
Illustration of a coffee maker with lid, lid, and side panel (no text or symbols)
natural_image
Diagram of a mechanical device with a rotating component and a labeled part (15), showing no text or symbols beyond the number.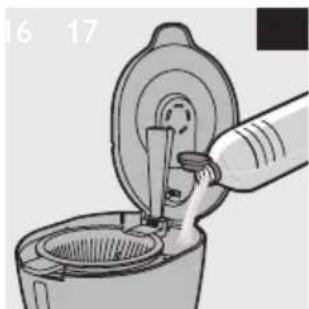
natural_image
Illustration of a hand pouring liquid into a container (no text or symbols)
natural_image
Illustration of a hand cleaning a kitchen sink with a magnified inset showing a cup (no text or symbols)
natural_image
Illustration of a hand pouring liquid into a container using a filter (no text or symbols visible)


Brand : PHILIPS
Model : SWV3105S
Category : Computer Cable