USER MANUAL MCS-FS131 PIONEER
Discover the benefits of registering your product online at http://www.pioneer.eu
Thank you for buying this Pioneer product.
Please read through these operating instructions so you will know how to operate your model properly.
After you have finished reading the instructions, put them away in a safe place for future reference.
CAUTION
TO PREVENT THE RISK OF ELECTRIC SHOCK, DO NOT REMOVE COVER (OR BACK). NO USER-SERVICEABLE PARTS INSIDE. REFER SERVICING TO QUALIFIED SERVICE PERSONNEL.
D3-4-2-1-1_B1_En
CAUTION
This product is a class 1 laser product classified under the Safety of laser products, IEC 60825-1:2007, but this product contains a laser diode higher than Class 1. To ensure continued safety, do not remove any covers or attempt to gain access to the inside of the product.
Refer all servicing to qualified personnel.
CLASS 1 LASER PRODUCT
The following caution label appears on your unit. Location: inside of the unit
CAUTION - CLASS 2 LASER RADIATION WHEN OPEN DO NOT STARE INTO THE BEAM
D58-5-2-2b*_B1_En
WARNING
This equipment is not waterproof. To prevent a fire or shock hazard, do not place any container filled with liquid near this equipment (such as a vase or flower pot) or expose it to dripping, splashing, rain or moisture.
D3-4-2-1-3_A1_En
VENTILATION CAUTION
When installing this unit, make sure to leave space around the unit for ventilation to improve heat radiation (at least 10 cm at top, 10 cm at rear, and 10 cm at each side).
WARNING
Slots and openings in the cabinet are provided for ventilation to ensure reliable operation of the product, and to protect it from overheating. To prevent fire hazard, the openings should never be blocked or covered with items (such as newspapers, table-cloths, curtains) or by operating the equipment on thick carpet or a bed.
Operating Environment
Operating environment temperature and humidity: +5 °C to +35 °C (+41 °F to +95 °F); less than 85 %RH (cooling vents not blocked)
Do not install this unit in a poorly ventilated area, or in locations exposed to high humidity or direct sunlight (or strong artificial light)
D3-4-2-1-7c*_A1_En
CAUTION
The Ⓧ STANDBY/ON switch on this unit will not completely shut off all power from the AC outlet. Since the power cord serves as the main disconnect device for the unit, you will need to unplug it from the AC outlet to shut down all power. Therefore, make sure the unit has been installed so that the power cord can be easily unplugged from the AC outlet in case of an accident. To avoid fire hazard, the power cord should also be unplugged from the AC outlet when left unused for a long period of time (for example, when on vacation).
D3-4-2-2-2a*_A1_En
This product is for general household purposes. Any failure due to use for other than household purposes (such as long-term use for business purposes in a restaurant or use in a car or ship) and which requires repair will be charged for even during the warranty period.
K041_A1_En
POWER-CORD CAUTION
Handle the power cord by the plug. Do not pull out the plug by tugging the cord and never touch the power cord when your hands are wet as this could cause a short circuit or electric shock. Do not place the unit, a piece of furniture, etc., on the power cord, or pinch the cord. Never make a knot in the cord or tie it with other cords. The power cords should be routed such that they are not likely to be stepped on. A damaged power cord can cause a fire or give you an electrical shock. Check the power cord once in a while. When you find it damaged, ask your nearest PIONEER authorized service center or your dealer for a replacement.
S002*_A1_En
WARNING
To prevent a fire hazard, do not place any naked flame sources (such as a lighted candle) on the equipment.
D3-4-2-1-7a_A1_En
(Symbol for equipment)

(Symbol examples) for batteries
Pb
These symbols on the products, packaging, and/or accompanying documents mean that used electrical and electronic products and batteries should not be mixed with general household waste.
For proper treatment, recovery and recycling of old products and used batteries, please take them to applicable collection points in accordance with your national legislation.
By disposing of these products and batteries correctly, you will help to save valuable resources and prevent any potential negative effects on human health and the environment which could otherwise arise from inappropriate waste handling.
For more information about collection and recycling of old products and batteries, please contact your local municipality, your waste disposal service or the point of sale where you purchased the items.
These symbols are only valid in the European Union.
For countries outside the European Union:
If you wish to discard these items, please contact your local authorities or dealer and ask for the correct method of disposal.
K058a_A1_En
Cautions on 3D Viewing
- If you should experience any fatigue or discomfort while viewing 3D images, stop viewing them.
- Children, particularly those under 6, may be more prone to sensitivity, so guardians should watch for any signs of fatigue or discomfort.
- When viewing 3D images, rest periodically.
Extended viewing of 3D images without rest periods could cause fatigue or discomfort.
For Wireless product European Union Notice
CE PIONEER hereby declares that this/these product(s) is/are in compliance with the essential requirements and other relevant provisions of Directive 1999/5/EC, 2004/108/EC, 2006/95/EC and 2009/125/EC.
RF Radiation Exposure Statement
This equipment should be installed and operated with minimum distance 20 cm between the radiator and your body.
WARNING
Changes or modifications not expressly approved by the party responsible for compliance could void the user's authority to operate the equipment.
NOTE: THE MANUFACTURER IS NOT RESPONSIBLE FOR ANY RADIO OR TV INTERFERENCE CAUSED BY UNAUTHORIZED MODIFICATIONS TO THIS EQUIPMENT. SUCH MODIFICATIONS COULD VOID THE USER'S AUTHORITY TO OPERATE THE EQUIPMENT.
Notes on Copyrights
- Because AACS (Advanced Access Content System) is approved as content protection system for Blu-ray Disc format, similar to use of CSS (Content Scramble System) for DVD format, certain restrictions are imposed on playback, analog signal output, etc., of AACS protected contents. The operation of this product and restrictions on this product may vary depending on your time of purchase as those restrictions may be adopted and/or changed by AACS after the production of this product.
- Furthermore, BD-ROM Mark and BD+ are additionally used as content protection systems for Blu-ray Disc format, which imposes certain restrictions including playback restrictions for BD-ROM Mark and/or BD+ protected contents. To obtain additional information on AACS, BD-ROM Mark, BD+, or this product, please contact an authorized Customer Service Center.
- Many BD-ROM/DVD discs are encoded with copy protection. Because of this, you should only connect your player directly to your TV, not to a VCR. Connecting to a VCR results in a distorted picture from copy-protected discs.
- Under the U.S. Copyright laws and Copyright laws of other countries, unauthorized recording, use, display, distribution, or revision of television programs, videotapes, BD-ROM discs, DVDs, CDs and other materials may subject you to civil and/or criminal liability.
Important Notice for TV colour system
The colour system of this player differs according to currently playing discs.
For example, when the player plays the disc recorded in the NTSC colour system, the image is output as an NTSC signal.
Only the multi system colour TV can receive all signals output from the player.
- If you have a PAL colour system TV, you will see just distorted images when using discs or video contents recorded in NTSC.
- The multi system colour TV changes the colour system automatically according to input signals. In case that the colour system is not changed automatically, turn it off and then on to see normal images on screen.
- Even if the disc recorded in NTSC colour system are well displayed on your TV, these may not be recorded correctly on your recorder.
Table of Contents
1 Before you start
8 Introduction
8 – Supplied accessories
8 – Accessories of speaker box (MCS-838, MCS-737)
8 – Accessories of speaker box (MCS-434, MCS-333)
9 – Accessories of speaker box (MCS-FS232)
9 – Accessories of speaker box (MCS-FS131)
10 – Putting the batteries in the remote control
10 – Software update
10 – About operation of this player from a mobile device (iPod, iPhone, iPad etc.)
11 – Types of discs/files that can be played
18 – Trademarks and licenses
20 Remote control
22 Front panel
23 Rear panel
23 - MCS-838/MCS-434/MCS-737/MCS-333
23 - MCS-FS232/MCS-FS131
2 Connecting
24 Assemble the speakers
24 – Speaker setup for MCS-838, MCS-737
25 – Wall mounting the speaker for MCS-838, MCS-737
26 – Additional notes on speaker for MCS-838, MCS-737
26 – Positioning the system for MCS-838, MCS-737
27 – Speaker setup for MCS-434, MCS-333
27 – Wall mounting the speaker for MCS-434, MCS-333
28 – Additional notes on speaker for MCS-434, MCS-333
28 – Positioning the system for MCS-434, MCS-333
29 – Speaker setup for MCS-FS232
31 – Wall mounting the speakers for MCS-FS232
32 – Additional notes on speaker placement for MCS-FS232
32 – Positioning the system for MCS-FS232
33 – Speaker setup for MCS-FS131
33 – Wall mounting the speaker for MCS-FS131
34 – Additional notes on speaker for MCS-FS131
34 – Positioning the system for MCS-FS131
35 Connecting to Your TV
35 - HDMI connection
35 - ARC (Audio Return Channel) function
36 Antenna connection
36 Connections with external device
36 - AUX connection
37 - PORTABLE IN connection
37 – OPTICAL IN connection
38 - HDMI IN 1/2/3/4 connection
39 Connecting to your Home Network
39 – Wired network connection
40 – Wireless network connection (MCS-838/MCS-434/MCS-FS232 only)
40 – Wireless network setup (MCS-838/MCS-434/MCS-FS232 only)
42 – WPS setup (Wi-Fi Protected Setup) (MCS-838/MCS-434/MCS-FS232 only)
44 USB device connection
44 – About USB devices
44 – Connecting the USB device
3 Getting Started
45 Making settings using the Setup Navigator menu
46 Operating the TV with the player's remote control
47 - TV preset code list
4 Playback
48 Playing discs or files
49 – Forward and reverse scanning
49 – Playing specific chapters, tracks or files
49 – Skipping content
49 – Playing in slow motion
49 – Step forward and step reverse
49 – Playing a specific section within a title or track repeatedly (A-B Repeat)
50 – Playing repeatedly (Repeat Play)
50 – Playing in the desired order (Programmed Play)
51 – Making bookmarks
51 - Zoom
51 – Playing photos as slideshows
51 – Switching the camera angles
52 – Switching the subtitles
52 – Switching the audio
52 – Convert 2D image into 3D
52 – Switching the CD/SACD playback area
52 – Displaying the disc information
53 – Enjoying BONUSVIEW or BD-LIVE
54 – Playback functions
55 Using the TOOLS menu
55 – Playing from a specific time (Time Search)
56 – Playing a specific title, chapter, track or file (Search)
56 – Playing specified range of discs, titles or chapter (track/file) in random order
56 Continuing playback from a specified position (Continued Viewing Playback)
57 About Home Media Gallery
57 – About network playback
59 Playback file on the network
59 Disc/USB playback
59 – Playing back image files
59 – Switch Play Mode
60 Playing in the desired order (Playlist)
60 – Adding tracks/files
60 – Playing the playlist
60 – Deleting tracks/files from the playlist
61 Copy files to a USB
61 – Select and copy a single file/folder
61 - Copy all files
62 Use the unit's Wi-Fi Direct™ function (MCS-838/MCS-434/MCS-FS232 only)
62 – Display the Wi-Fi Direct mode screen
62 – Connect to mobile device
63 – Connect using WPS (Wi-Fi Protected Setup)
63 – Connect using mobile device's Wi-Fi Direct function
63 – Playback photos, music and video files from a mobile device
64 – Ending Wi-Fi Direct connection
64 – Change SSID and password
6 Playing the web contents
65 Available web contents
65 Playing the items
65 Enjoying YouTube
7 Other Operating
66 Recording Audio CD to a USB device
67 iPod/iPhone/iPad playback (MCS-838/MCS-434/MCS-FS232 only)
67 – Connect an iPod/iPhone/iPad
68 – Playing your iPod/iPhone/iPad
69 Radio Operations
69 – Listening to the radio
69 – Presetting the radio stations
69 – Deleting all the saved stations
69 – Improving poor FM reception
69 – Seeing information about a radio station
69 – FM Recording
70 Karaoke
70 – Enjoying Karaoke
72 Sound
8 Advanced settings
73 Changing the settings
73 – Operating the initial setup screen
80 – Software updating
81 – Restoring all the settings to the factory default settings
82 – Language code table and country/area code table
9 Troubleshooting
83 – Picture
84 - Sound
84 – Playback
85 - Control function
85 - Network
87 – Wireless LAN (MCS-838/MCS-434/MCS-FS232 only)
87 – iPod/iPhone/iPad (MCS-838/MCS-434/MCS-FS232 only)
88 - Others
10 Appendix
89 Specifications
93 Maintenance
93 – Handling the unit
93 – Notes on discs
94 Important Information Relating to Network Services
Chapter 1
Before you start
Introduction
Supplied accessories

natural_image
Front view of a gray remote control with keyboard and mouse (no text or symbols visible)
Remote control (1)

natural_image
Simple line drawing of a cylindrical battery with a cross mark on its side (no text or symbols)
Battery (2)

natural_image
Simple line drawing of a cable with two connectors (no text or symbols)
FM antenna (1)

natural_image
Line drawing of a coiled cable with two connectors (no text or symbols)
Power cord
- Software license notice
- Warranty card (1)
- Operating instructions (This document)
Accessories of speaker box (MCS-838, MCS-737)
natural_image
Simple diagram of four circles arranged in a diamond shape within a rounded rectangle (no text or symbols)
Non-skid pads (1)
[2 cm x 2 cm]

natural_image
Simple line drawing of a screw with a star-shaped head (no text or symbols)
Screws M4 x 16 (16)
(They are used to fix to the base and lower cabinet.)

natural_image
Simple line drawing of a screw with a star-shaped head (no text or symbols)
Screws M4 x 12 (8)
(They are used to fix the upper and lower cabinet.)
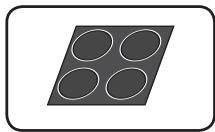
Accessories of speaker box (MCS-434, MCS-333)
natural_image
Simple diagram of four overlapping ovals inside a tilted rectangular frame (no text or symbols)
Non-skid pads (5)
[2 cm x 2 cm]

natural_image
Simple line drawing of a screw with a star detail (no text or symbols)
Screws M3.5x12
[Taping type] (4)
(These screws are used to fix the speakers to the stands.)
Accessories of speaker box (MCS-FS232)
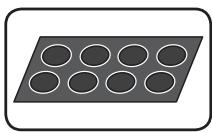
natural_image
Simple diagram of a rectangular plate with eight circular holes, no text or symbols present.
Non-skid pads (1)
[5 cm × 2.5 cm]

natural_image
Simple black-and-white icon of a curved object inside an oval frame (no text or symbols)
Speaker stand bases (2)
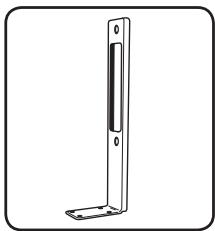
natural_image
Simple line drawing of a vertical metal bracket with a flat base (no text or symbols)
Large poles (2)

natural_image
Simple line drawing of a metal bracket with mounting holes (no text or symbols)
Small poles (2)

natural_image
Simple line drawing of a screw with a star-shaped head (no text or symbols)
Large screws (4)

natural_image
Simple line drawing of a screw with a star rating, enclosed in a rounded rectangle (no text or symbols)
Small screws (8)
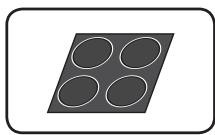
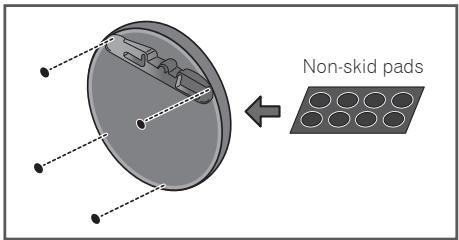
Accessories of speaker box (MCS-FS131)
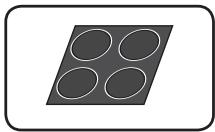
natural_image
Simple geometric diagram of four overlapping circles inside a tilted square (no text or symbols)
Non-skid pads (2)
[2 cm x 2 cm]

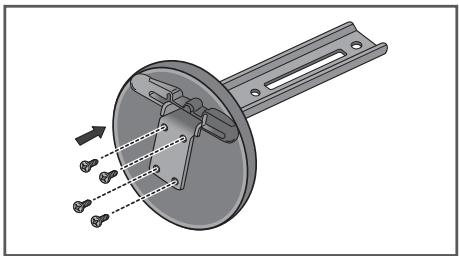
natural_image
Simple line drawing of a screw with a star on the head (no text or symbols)
Screws M3.5x12
[Taping type] (2)
(These screws are used to fix the speakers to the stands.)
WARNING
Store small parts out of the reach of children and infants. If accidentally swallowed, contact a doctor immediately.
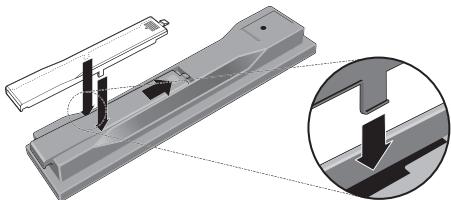
Putting the batteries in the remote control
1. Open the rear cover.
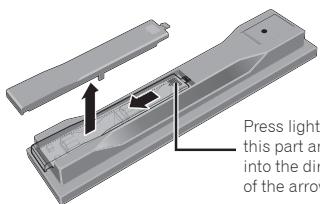
Press lightly on this part and slide into the direction of the arrow.
2. Insert the batteries (AAA/R03 x 2).
Insert as indicated by the ⊕/⊖ marks into the battery compartment.
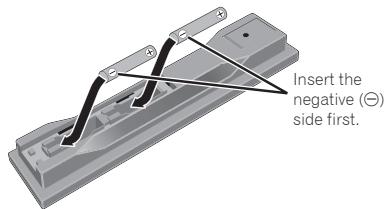
3. Close the rear cover.
Close securely (a click should be heard).
natural_image
3D mechanical assembly diagram showing a bracket with internal components and an inset close-up of a detail (no text or symbols)
The batteries included with the player have been provided to allow you to check product operation and may not last long. We recommend using alkaline batteries that have a longer life.

WARNING
- Do not use or store batteries in direct sunlight or other excessively hot place, such as inside a car or near a heater. This can cause batteries to leak, overheat, explode or catch fire. It can also reduce the life or performance of batteries.

Caution
- Do not use any batteries other than the ones specified. Also, do not use a new battery together with an old one.
-
When loading the batteries into the remote control, set them in the proper direction, as indicated by the polarity marks (⊕ and ⊖).
-
Do not heat batteries, disassemble them, or throw them into flames or water.
- Batteries may have different voltages, even if they look similar. Do not use different kinds of batteries together.
- To prevent leakage of battery fluid, remove the batteries if you do not plan to use the remote control for a long period of time (1 month or more). If the fluid should leak, wipe it carefully off the inside of the case, then insert new batteries. If a battery should leak and the fluid should get on your skin, flush it off with large quantities of water.
- When disposing of used batteries, please comply with governmental regulations or environmental public institution's rules that apply in your country/area.
- When inserting the batteries, make sure not to damage the springs on the battery's (−) terminals. This can cause batteries to leak or overheat.
Software update
Product information on this player is provided on the Pioneer website. Check this website for update and service information on your Blu-ray disc player.
IN Europe:
http://www.pioneer.eu/
IN U.K.:
http://www.pioneer.eu/
http://www.pioneer.co.uk/
IN Russia:
http://www.pioneer.eu/
http://www.pioneer-rus.ru/
IN Hong Kong:
http://www.pioneerhongkong.com.hk/
IN Singapore:
http://www.pioneer.com.sg/firmwaredownload
IN Australia:
http://www.pioneer.com.au/
About operation of this player from a mobile device (iPod, iPhone, iPad etc.)
The player can be controlled from a mobile device by installing the special application onto the mobile device.
For details, see the product information on the Pioneer website.
This special application may be changed or discontinued without notice.
Types of discs/files that can be played
playable discs
Discs with the logo marks below indicated on the disc label, package or jacket can be played.

Caution
- Only the discs that have been finalized can be played.
| Disc type | Logo | Application format |
| BDMV | BDAV | DVD-Video | DVD VR | CD-DA DTS-CD | DATA-DISC ^1 |
| BD ^2 | BD-ROM |  | ✓ | ✓ | ✘ | ✘ | ✘ | ✘ |
| BD-R | ✓ | ✓ | ✘ | ✘ | ✘ | ✓ |
| BD-RE | ✓ | ✓ | ✘ | ✘ | ✘ | ✓ |
| DVD | DVD-ROM |  | | | | | | |
 | ✓ | ✘ | ✓ | ✘ | ✘ | ✓ |
 | | | | | | |
| DVD-R ^2,3,4 |  | ✓^6 | ✓^7 | ✓ | ✓ | ✘ | ✓ |
| DVD-RW ^3,7 |  | ✓^6 | ✓^7 | ✓ | ✓ | ✘ | ✓ |
| DVD+R ^2,3 | | ✓ | ✘ | ✓ | ✘ | ✘ | ✓ |
| DVD+RW ^3 | | ✓ | ✘ | ✓ | ✘ | ✘ | ✓ |
| CD | CD-DA (Audio CD) ^8 |  | | | | | | |
 | ✘ | ✘ | ✘ | ✘ | ✓ | ✘ |
| CD-R ^3 | | ✘ | ✘ | ✘ | ✘ | ✓ | ✓ |
| CD-RW ^3 | | ✘ | ✘ | ✘ | ✘ | ✓ | ✓ |
| CD-ROM | | ✘ | ✘ | ✘ | ✘ | ✓ | ✓ |
- Discs on which video, image or audio files are recorded. This player does not support multisession discs or multiborder recording.
2 Including dual-layered discs.
- Finalize them before playing them on this player.
4 DVD-R for Authoring discs (3.95 and 4.7 GB) cannot be played.
-
Including the AVCHD format.
-
Including the AVCREC format.
-
Version 1.0 DVD-RW discs cannot be played.
-
Including Video CDs.
-
"Blu-ray Disc", "Blu-ray" and "Blu-ray Disc" logo are trademarks of Blu-ray Disc Association.
• DVD is a trademark of DVD Format/Logo Licensing Corporation.
◆ Discs that cannot be played
- HD DVDs
- DVD-RAM discs
It is possible that some discs other than the ones listed above may not be playable either.

Note
- Some discs cannot be played, even if one of the logo marks on the previous page is indicated.
- To play 8 cm discs, set the disc in the 8 cm disc depression in the center of the disc tray. No adapter is necessary. 8 cm BD-ROMs cannot be played.
✿ About playback of unauthorized copies Cinavia Notice
This product uses Cinavia technology to limit the use of unauthorized copies of some commercially-produced film and videos and their soundtracks. When a prohibited use of an unauthorized copy is detected, a message will be displayed and playback or copying will be interrupted.
More information about Cinavia technology is provided at the Cinavia Online Consumer Information Center at http://www.cinavia.com. To request additional information about Cinavia by mail, send a postcard with your mailing address to: Cinavia Consumer Information Center, P.O. Box 86851, San Diego, CA, 92138, USA.
Copyright 2004-2010 Verance Corporation. Cinavia™ is a Verance Corporation trademark. Protected by U.S. Patent 7,369,677 and worldwide patents issued and pending under license from Verance Corporation. All rights reserved.
◆ About copyright protection
Copyright protection technology is used for some Blu-ray Discs ^™ , DVDs and contents played over the Internet or other networks. Copyright protection technology restricts playback and analog output. Due to updates in copyright protection provisions, the restrictions may differ depending on the date this product was purchased. Furthermore, the restrictions may be updated when the software is updated after purchase.
The following audio formats are supported on this player:
- Dolby TrueHD
- Dolby Digital Plus
- Dolby Digital
• DTS-HD Master Audio
• DTS-HD High Resolution Audio
• DTS Digital Surround
- MPEG audio (AAC)
- Linear PCM
Manufactured under license from Dolby Laboratories. Dolby, Pro Logic, and the double-D symbol are trademarks of Dolby Laboratories.
Manufactured under license under U.S. Patent Nos: 5,956,674; 5,974,380; 6,226,616; 6,487,535; 7,392,195; 7,272,567; 7,333,929; 7,212,872 & other U.S. and worldwide patents issued & pending. DTS-HD, the Symbol, & DTS-HD and the Symbol together are registered trademarks & DTS-HD Master Audio | Essential is a trademark of DTS, Inc. Product includes software. © DTS, Inc. All Rights Reserved.
Playing BDs
- BDs (BDMV) compatible with the formats below can be played.
- Blu-ray Disc Read-Only (ROM) Format Version 2
- Blu-ray Disc Recordable (R) Format Version 2
- Blu-ray Disc Rewritable (RE) Format Version 3
This player supports BD-ROM Profile 5.

"Blu-ray 3D" and "Blu-ray 3D" logo are trademarks of Blu-ray Disc Association.
BONUSVIEW functions such as playback of secondary video (Picture-in-Picture) and secondary audio can be used. The data used with the BONUSVIEW functions (the secondary video (Picture-in-Picture) and secondary audio data) may be stored in the storage. For details on secondary video and secondary audio playback, refer to the disc's instructions.
BONUS VIEW™
"BONUSVIEW" is trademark of Blu-ray Disc Association.
BD-LIVE functions such as downloading movie trailers or additional audio and subtitle languages and playing on-line games can be enjoyed over the Internet. The data downloaded with the BD-LIVE function (trailers, etc.) is stored in the storage. Refer to the disc's instructions for details about BD-LIVE functions.

"BD-LIVE" logo is trademark of Blu-ray Disc Association.
With BD-ROMs, it is possible to use BD-J (Java) applications to create highly interactive titles, for example including games.

Oracle and Java are registered trademarks of Oracle and/or its affiliates. Other names may be trademarks of their respective owners.
- BDs (BDAV) compatible with the formats below can be played.
- Blu-ray Disc Recordable (R) Format Version 1
- Blu-ray Disc Rewritable (RE) Format Version 2
Playing DVDs
RW COMPATIBLE
This label indicates playback compatibility with DVD-RW discs recorded in VR format (Video Recording format). However, for discs recorded with a record-only-once encrypted program, playback can only be achieved using a CPRM compatible device.
The AVCHD is a high definition (HD) digital video camera recorder format recording high-definition onto certain media by using highly efficient codec technologies.
AVCHD™
"AVCHD" and the "AVCHD" logo are trademarks of Panasonic Corporation and Sony Corporation.
◆ About region numbers
Blu-ray Disc Player and BD-ROM or DVD-Video discs are assigned region numbers according to the region in which they are sold.
This player's region numbers are:
- BD-ROM:
– Europe, Australia and New Zealand models: B
- Russia models: C
- Others: A
- DVD-Video:
– Europe models: 2
– Australia and New Zealand models: 4
– Russia models: 5
- Others: 3
Discs not including these numbers cannot be played. Discs playable on this player are as shown below.
- BDs:
– Europe, Australia and New Zealand models: B (including B) and ALL
– Russia models: C (including C) and ALL
– Others: A (including A) and ALL
- DVDs:
– U.K. models: 2 (including 2) and ALL
– Australia and New Zealand models: 4 (including 4) and ALL
– Russia models: 5 (including 5) and ALL
– Others: 3 (including 3) and ALL
Playing CDs
Regarding copy protected CDs: This player is designed to conform to the specifications of the Audio CD format. This player does not support the playback or function of discs that do not conform to these specifications.
DualDisc playback
A DualDisc is a two-sided disc, one side of which contains DVD content - video, audio, etc. - while the other side contains non-DVD content such as digital audio material.
The DVD side of a DualDisc can be played on this player.
The non-DVD, audio side of the disc is not compatible with this player.
It is possible that when loading or ejecting a DualDisc, the opposite side to that being played will be scratched. Scratched discs may not be playable.
For more detailed information on the DualDisc specification, please refer to the disc manufacturer or disc retailer.
- Playing discs created on computers or BD/DVD recorders
- It may not be possible to play discs recorded using a computer due to the application settings or computer's environment settings. Record discs in a format playable on this player. For details, contact the dealer.
- It may not be possible to play discs recorded using a computer or a BD/DVD recorder, if burn quality is not good due to characteristics of the disc, scratches, dirt on the disc, dirt on the recorder's lens, etc.
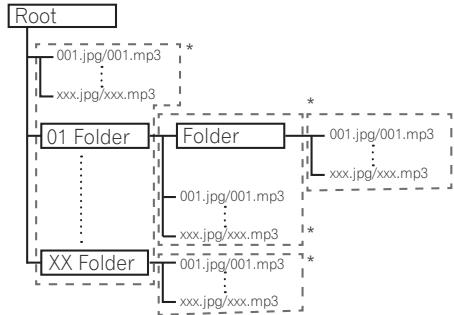
✿ About video, audio, and image files and folders
Audio and image files can be played on this player when the folders on the disc or USB device are created as described below.
Example of folder structure:
flowchart
graph TD
    A["Root"] --> B["001.jpg/001.mp3"]
    A --> C["xxx.jpg/xxx.mp3"]
    B --> D["01 Folder"]
    C --> D
    D --> E["Folder"]
    E --> F["001.jpg/001.mp3"]
    E --> G["xxx.jpg/xxx.mp3"]
    D --> H["XX Folder"]
    H --> I["001.jpg/001.mp3"]
    H --> J["xxx.jpg/xxx.mp3"]
* The number of folders and files within a single folder (including the root directory) is limited to a maximum of 256. Also, keep the number of folder layers to a maximum of 5.
Note
- The file and folder names displayed on this player may differ from those displayed on a computer.
playable files
Video, image and audio files recorded on DVDs, CDs or USB devices can be played.
- DivX Plus HD
DivX Certified ^® to play DivX ^® and DivX Plus ^™ HD (H.264/MKV) video up to 1080p HD including premium content.
ABOUT DIVX VIDEO: DivX ^® is a digital video format created by DivX, LLC, a subsidiary of Rovi Corporation. This is an official DivX Certified ^® device that plays DivX video. Visit divx.com for more information and software tools to convert your files into DivX videos.
ABOUT DIVX VIDEO-ON-DEMAND: This DivX Certified ^® device must be registered in order to play purchased DivX Video-on-Demand (VOD) movies. To obtain your registration code, locate the DivX VOD section in your device setup menu. Go to vod.divx.com for more information on how to complete your registration.

DivX ^® , DivX Certified ^® , DivX Plus ^TM HD and associated logos are trademarks of Rovi Corporation or its subsidiaries and are used under license.
Note
- This DivX® Certified device must be registered in order to play DivX Video-on-Demand (VOD) content. First generate the DivX VOD registration code for your device and submit it during the registration process. Important: DivX VOD content is protected by a DivX DRM (Digital Rights Management) system that restricts playback to registered DivX Certified devices. If you try to play DivX VOD content not authorized for your device, the message Authorization Error will be displayed and your content will not be played. Learn more at www.divx.com/vod.
- This player's DivX VOD registration code can be checked at HOME MENU → Initial Setup → Playback → DivX® VOD DRM → Registration Code (page 75).
- The number of views is restricted for some DivX VOD files. When such files are played on this player, the remaining number of views is displayed. Files for which the remaining number of views has reached 0 cannot be played (This DivX® rental has expired is displayed). Files for which the number of views is not restricted can be played as many times as you like (the remaining number of views is not displayed).
Table of Playable Files
| Playable files (Extensions) | Playable media | File specifications |
| BD-R/RE/-R DL/ RE DL/-R LTH, DVD-R/RW/-R DL/ +R/+RW/+R DL, CD-R/RW | USB devices1 | Network |
| MP3 (.mp3) | ✓ | ✓ | ✓ | Sampling frequencies: Up to 48 kHzBit rate: Up to 320 kbpsAudio type: MPEG-1 Audio Layer 3 |
| WMA*2 (.wma) | ✓ | ✓ | ✓ | Sampling frequencies: Up to 48 kHzBit rate: Up to 192 kbpsAudio type: WMA version 9 |
| AAC*3 (.m4a) | ✓ | ✓ | ✓ | Sampling frequencies: Up to 96 kHzBit rate: Up to 192 kbpsAudio type: MPEG4-AAC |
| WAV (.wav) | ✓ | ✓ | ✓ | Sampling frequencies: Up to 192 kHzQuantization bitrate: 16 bit, 24 bitChannel: 2ch |
| FLAC (.flac) | ✓ | ✓ | ✘ | Sampling frequencies: Up to 192 kHzQuantization bitrate: 16 bit, 24 bitChannel: Multi channel |
| Monkey's Audio (.ape) | ✓ | ✓ | ✓ | Sampling frequencies: Up to 192 kHzQuantization bitrate: 16 bitChannel: 2ch |
| JPEG (.jpg/.jpeg) | ✓ | ✓ | ✓ | Maximum resolution: 4 000 x 3 000 pixels |
| MPO (.mpo) | ✓ | ✓ | ✓ | 3D photo image |
| PNG (.png) | ✓ | ✓ | ✓ | Maximum resolution: 2 048 x 1 024 pixelAnimated PNG files are not supported. |
| GIF (.gif) | ✓ | ✓ | ✓ | Maximum resolution: 2 048 x 1 024 pixelAnimated GIF files are not supported.Rotate is not supported. |
| DivX (.avi/.divx/.mkv) | ✓ | ✓ | ✓ | Supported versions: Through DivX® PLUS HDMaximum resolution:Up to 1 920 x 1 080 (DivX® PLUS HD)Up to 1 280 x 720 (MKV) |
| MP4 (.mp4) | ✓ | ✓ | ✓ | Maximum resolution: Up to 1 920 x 1 080Video: MPEG4, MPEG-4 AVC (level 4.1)Audio: AAC, MP3 |
| WMV (.wmv) | ✓ | ✓ | ✓ | Maximum resolution: Up to 1 280 x 720Video: WMV9, WMV9AP (VC-1)Audio: WMA |
| AVI (.avi) | ✓ | ✓ | ✓ | Maximum resolution: Up to 1 920 x 1 080Video: MPEG4Audio: MP3, AAC |
| Playable files (Extensions) | media | specifications |
| -R/RE/-R DL/RE DL/-R LTH,DVD-R/RW/-R DL/+R/+RW/+R DL,CD-R/RW | devices^1 | |
| 3GP(.3gp) | √ | √ | √ | Video: H.263, MPEG4, H.264Audio: MPEG-4 AAC |
| FLV(.flv) | √ | √ | √ | Video: Sorenson H.263 (FLV1), VP6 (FLV4), H.264Audio: MP3, AAC |
- This unit supports FAT16, FAT32 and NTFS file systems.
- WMA Pro, Lossless and Voice are not supported.
- Apple lossless encoding is not supported.
Note
- Depending on the file structure, server capacity and network environment, it may not be possible to play certain files, even for files indicated on the table of playable files above.
- When using wireless LAN, depending on the environment (radiowave interference) during sending/receiving of a large volume of data such as HD quality image files and WAV/FLAC 192 kHz/24 bit high quality audio files, images and sound may be interrupted during playback.
- Files protected by DRM (Digital Rights Management) cannot be played (not including DivX VOD files).
• AVCHD contents cannot be played via LAN.
Trademarks and licenses
HDMI
The terms HDMI and HDMI High-Definition Multimedia Interface, and the HDMI Logo are trademarks or registered trademarks of HDMI Licensing, LLC in the United States and other countries.

DOLBY TRUEHD
Manufactured under license from Dolby Laboratories. Dolby, Pro Logic, and the double-D symbol are trademarks of Dolby Laboratories.

dts-HD ^TM
Master Audio | Essential
Manufactured under license under U.S. Patent Nos: 5,956,674; 5,974,380; 6,226,616; 6,487,535; 7,392,195; 7,272,567; 7,333,929; 7,212,872 & other U.S. and worldwide patents issued & pending. DTS-HD, the Symbol, & DTS-HD and the Symbol together are registered trademarks & DTS-HD Master Audio | Essential is a trademark of DTS, Inc. Product includes software. © DTS, Inc. All Rights Reserved.

dlna ^TM CERTIFIED
DLNA ^® , the DLNA Logo and DLNA CERTIFIED ^® are trademarks, service marks, or certification marks of the Digital Living Network Alliance.

CERTIFIED
The Wi-Fi CERTIFIED Logo is a certification mark of the Wi-Fi Alliance.
(MCS-838/MCS-434/MCS-FS232 only)
Wi-Fi, Wi-Fi Protected Setup, Wi-Fi Direct, WPA, WPA2 are marks of the Wi-Fi Alliance.
(MCS-838/MCS-434/MCS-FS232 only)

The Wi-Fi Protected Setup Identifier Mark is a mark of the Wi-Fi Alliance.
(MCS-838/MCS-434/MCS-FS232 only)
x.v.Colour x.v.Color
"x.v.Colour", x.v.Colour and x.v.Color are trademarks of Sony Corporation.

YouTube ^™ is a trademark of Google Inc.

Picasa™ Web Albums
Picasa™ Web Albums is a trademark of Google Inc.
This product includes technology owned by Microsoft Corporation and cannot be used or distributed without a license from Microsoft Licensing, Inc.
This item incorporates copyright protection technology that is protected by U.S. patents and other intellectual property rights of Rovi Corporation.
Reverse engineering and disassembly are prohibited.
Do not connect the unit through a VCR. Video signals fed through VCRs may be affected by copyright protection systems and the picture will be distorted on the television.
Made for

iPod

iPhone

iPad
USB works with iPhone 5, iPhone 4S, iPhone 4, iPhone 3GS, iPhone 3G, iPad (4th generation), iPad (3rd generation), iPad 2, iPad mini, iPad, iPod touch (1st through 5th generation) and iPod nano (2nd through 7th generation). "Made for iPod," "Made for iPhone," and "Made for iPad" mean that an electronic accessory has been designed to connect specifically to iPod, iPhone, or iPad, respectively, and has been certified by the developer to meet Apple performance standards. Apple is not responsible for the operation of this device or its compliance with safety and regulatory standards. Please note that the use of this accessory with iPod, iPhone, or iPad may affect wireless performance.
Apple, iPad, iPhone, iPod, iPod nano, and iPod touch are trademarks of Apple Inc., registered in the U.S. and other countries.
(MCS-838/MCS-434/MCS-FS232 only)
Remote control
1
(STANDBY/ON): Press to turn the power on and off.
FUNCTION: Changes the input source or function.
When switching while viewing the display window on the player
- The input source switches every time the FUNCTION is pressed.
- Select the desired input source and press ENTER.
When switching while viewing the TV monitor
- Press FUNCTION to display the [Source Menu].
- The input source switches every time the FUNCTION is pressed. You can also use the cursor / to switch the input source.
- Select the desired input source and press ENTER.
* The Source Menu screen can also be displayed by [HOME MENU] → [Source Menu] and pressing ENTER.
The FUNCTION button switches the input source for the [Source Menu]. Select Home Media Gallery to playback disc. (page 48)
▲ OPEN/CLOSE: Opens and closes the disc tray.
2
TV Control Buttons: See page 46.
KARAOKE: Press to display the Karaoke Settings screen.
KEY/ECHO: Switch between Key Control and Echo adjustment modes (See page 70).
RESOLUTION: Sets the output resolution for HDMI (See page 74).
NET CONTENTS: Enhances the picture quality of network video contents.
YouTube: Display the YouTube screen (See page 65).
MIC VOLUME: Adjust mic volume.
DIMMER: Dims the light on the unit.
SLEEP: Sets a certain period of time after which the unit will switch to off.
EXIT: See page 65.
3
HOME MEDIA GALLERY: See page 57.
VIRTUAL 3D SOUND: Switch VIRTUAL 3D
SOUND effects (See page 72).
VOL +/- : Adjusts speaker volume.
DISPLAY: Displays or exits On- Screen Display.
CD/SACD: See page 52.
● USB REC: Records an audio.
SOUND: Switches to Sound settings (See page 72).
MUTE: Mute the unit.
4
TOP MENU: Press to display the top menu of the BD-ROM or DVD-Video.
POPUP MENU/MENU: Press to display the BD-ROM or DVD-Video menus.
/// (up/ down/ left/ right): Used to navigate on-screen displays.
ENTER: Acknowledges menu selection.
HOME MENU: Displays or exits the [Home Menu].
RETURN: Press to return to the previous screen.
5
REPLAY: Press to jump back 10 seconds when
←. REPLAY is pressed during playback.
TOOLS: See page 55.
CONTINUED: Use to continue playback from a specified position.
SKIP SEARCH: Press to skip 30 seconds ahead when SKIP SEARCH is pressed during playback.
|◀◀/◀II/◀I, |▶/||▶/▶▶I: See page 49.
PLAY (▶): Starts playback.
REV/FWD (◀◀/▶▶): See page 49.
PAUSE (II): Pauses playback.
STOP (■): Stops playback or recording.
6
0-9 numerical buttons: Selects numbered options in a menu or inputs letters in the keypad menu.
AUDIO: See page 52.
SUBTITLE: See page 52.
ANGLE: See page 51.
7
CLEAR: Press to clear the numeric number, etc.
REPEAT: See page 50.
A-B: See page 49.
Color buttons: Use these to navigate BD-ROM menus.
PROGRAM: Registers FM radio stations.
BOOKMARK (RDS): Create a BOOKMARK (See page 51). When FM TUNER is selected, switches RDS information (See page 69).
ZOOM (PTY): Will zoom in or zoom out. When this button is pressed while the FM tuner is selected, the PTY value will switch.
INDEX: Slideshow playback (See page 51).
Front panel
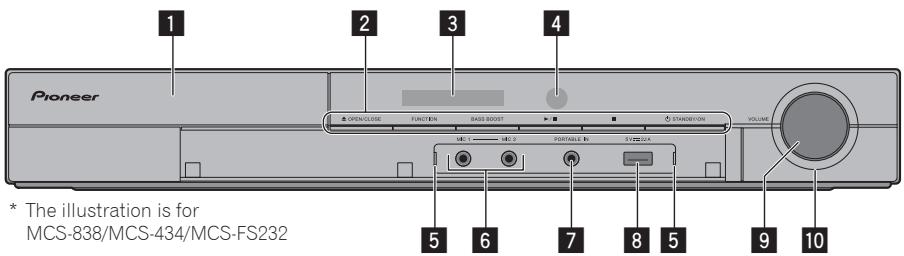
1 Disc tray
2 Operation buttons
▲ (OPEN/CLOSE)
FUNCTION
Changes the input source or function.
- The input source switches every time the FUNCTION is pressed.
- Select the desired input source and press
▶/Ⅱ (PLAY/PAUSE).
The FUNCTION button switches the input source for the [Source Menu]. Select Home Media Gallery to playback disc. (page 48)
BASS BOOST
Turn BASS BOOST ON or OFF.
▶/II (PLAY/PAUSE)
■ (STOP)
(STANDBY/ON)
Switches the unit ON or OFF.
Note
If the power does not turn OFF, pressing the ⏻ (STANDBY/ON) button for more than 5 seconds reboots the unit and the operation becomes possible.
3 Display Window
4 Remote control sensor
Point the remote control to this, then operate it within approximately 7 m. The player may have trouble capturing remote control signals if there is a fluorescent light nearby. If this happens, move the player away from the fluorescent light.
5 Front input indicator
Lit at the following times.
- When a front USB is connected and recognized by the unit.
- When Portable IN is selected.
- When the unit settings Karaoke Switch is ON.
6 MIC 1, MIC 2
7 PORTABLE IN
8 USB Port
- Connect a USB device, iPod/iPhone/iPad. (MCS-838/MCS-434/MCS-FS232)
- Connect a USB device. (MCS-737/MCS-333/MCS-FS131)
Caution
The USB port on the front of the unit cannot be used for recording. Please connect to the USB port on the rear of the unit.
9 Volume control
10 Ring indicator
- Lit when Bass Boost is turned ON.
- Flashes when switching Bass Boost.
Rear panel
MCS-838/MCS-434/MCS-737/MCS-333

MCS-FS232/MCS-FS131
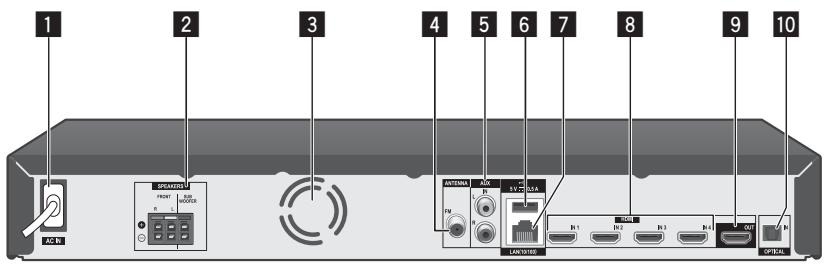
1 AC IN
Plug into the power source.
2 SPEAKERS connectors
3 Cooling Fan
4 Antenna Connector
5 AUX IN (L/R)
6 USB Port

Caution
The USB port on the rear of the unit does not support iPod/iPhone/iPad. Please connect these devices to the USB port on the front of the unit. (MCS-838/MCS-434/MCS-FS232)
7 LAN port
8 HDMI IN 1/2/3/4
9 HDMI OUT
10 OPTICAL IN
Chapter 2
Connecting
Assemble the speakers
Speaker setup for MCS-838, MCS-737
Preparing the speakers
- Connect the wires to the player.
Insert the cables connected to the player to the same colored connector on the speaker.
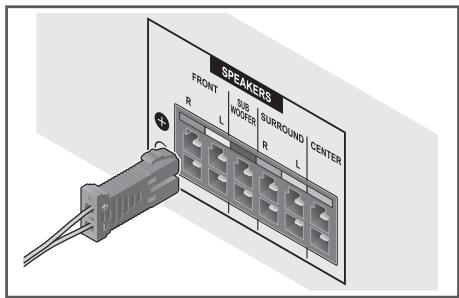
Caution
- These speaker terminals carry HAZARDOUS LIVE voltage. To prevent the risk of electric shock when connecting or disconnecting the speaker cables, disconnect the power cord before touching any uninsulated parts.
- Do not connect any speakers other than those supplied to this system.
-
Do not connect the supplied speakers to any amplifier other than the one supplied with this system. Connection to any other amplifier may result in malfunction or fire.
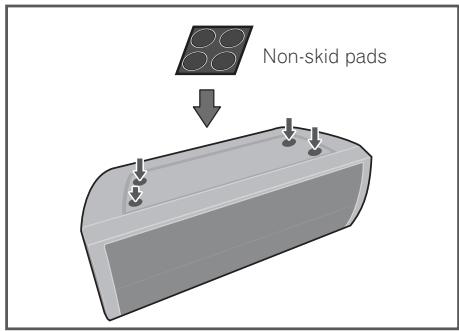
-
Attach the non-skid pads to the base of the center speaker.
- Mount the front/surround speaker.
① Insert the lower cabinet to the base so that the cable hole is positioned at the backside.
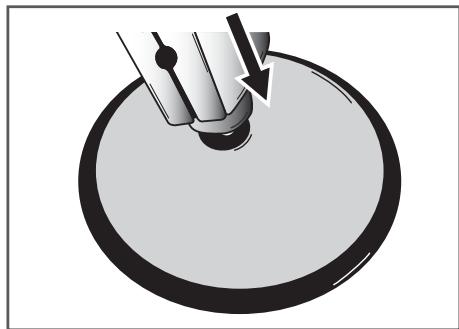
natural_image
Diagram of a mechanical component pressing into a circular component (no text or symbols)
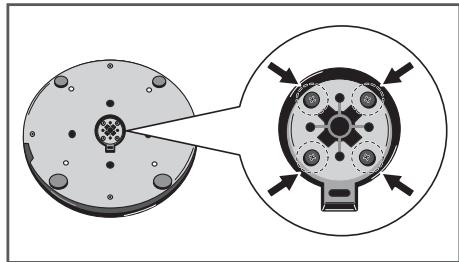
② Fix the base to the lower cabinet from the underside, using the four screws (M4 x 16).
natural_image
Diagram showing a circular component with internal components and an arrow indicating rotation or assembly (no text or symbols present)
③ Insert the upper cabinet to the lower cabinet.
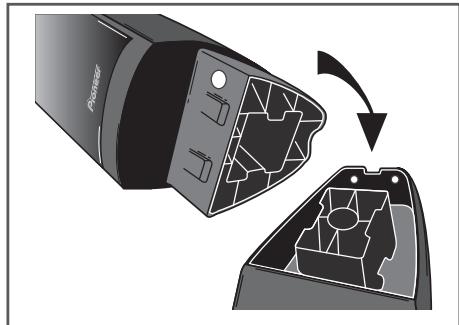
natural_image
Diagram of a device showing internal structure before and after disassembly (no text or symbols)
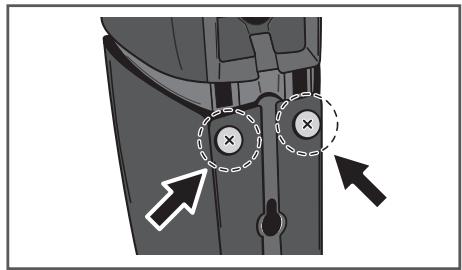
④ Fix the upper cabinet and the lower cabinet from the backside of the speaker using the two screws (M4 x 12).
Caution
- Be careful not to tighten screws excessively. If excessive force is used to tighten screws, the threads of screw and/or nut may be damaged. Use a middle-sized manual screwdriver during assembly. Do not use power screwdrivers or oversized screwdrivers that may exert excessive force on the screws and nuts. Confirm that no foreign matter is stuck to the base or the lower cabinet during assembly. If the unit is assembled with foreign matter stuck between the base and lower cabinet, the unit may not be assembled securely, resulting in tipping or falling.
- Do not stand on the speaker stand base of the tall speaker to push or swing the speaker. The speaker may fall and break, or someone may be injured. Pay special attention to children.
Wall mounting the speaker for MCS-838, MCS-737
The center speaker have a mounting hole which can be used to mount the speaker on the wall.
Before mounting
Remember that the speaker system is heavy and that its weight could cause the screws to work loose, or the wall material to fail to support it, resulting in the speaker falling. Make sure that the wall you intend to mount the speakers on is strong enough to support them. Do not mount on plywood or soft surface walls.
Mounting screws are not supplied. Use screws suitable for the wall material and support the weight of the speaker.
Caution
- If you are unsure of the qualities and strength of the wall, consult a professional for advice.
- Pioneer is not responsible for any accidents or damage that result from improper installation.
Additional notes on speaker for MCS-838, MCS-737
Install the main front left and right speakers at an equal distance from the TV.
Precautions:
These speakers are not magnetically shielded and so should not be placed near a TV or monitor. Magnetic storage media (such as floppy discs and tape or video cassettes) should also not be kept close to these speakers.
Do not attach the front/surround speakers and subwoofer to a wall or ceiling. They may fall off and cause injury.
Positioning the system for MCS-838, MCS-737
The following illustration shows an example of positioning the system. Note that the illustrations in these instructions differ from the actual unit for explanation purposes. For the best possible surround sound, all the speakers other than the subwoofer should be placed at the same distance from the listening position (A).
Ⓐ Front left speaker (L)/
⑧ Front right speaker (R):
Place the front speakers to the sides of the monitor or screen and as flush with the screen surface as possible.
© Center speaker:
Place the center speaker below or in front of the monitor or screen.
(D) Surround left speaker (L)/
⑤ Surround right speaker (R):
Place these speakers behind your listening position, facing slightly inwards.
⑤ Subwoofer:
The position of the subwoofer is not so critical, because low bass sounds are not highly directional. But it is better to place the subwoofer near the front speakers. Turn it slightly toward the center of the room to reduce the wall reflections.
© Unit

Caution
- Be careful to make sure children do not put their hands or any objects into the *subwoofer duct. *subwoofer duct: A hole for plentiful bass sound on subwoofer cabinet (enclosure).
- Place the center speaker well out of the reach of children.
Otherwise it may result in the speaker falling down and causing personal injury and/or property damage.
- The speakers contain magnet parts, so color irregularity may occur on the TV screen (CRT) or computer monitor screen. Please use the speakers away from the TV screen (CRT) or computer monitor screen.
Speaker setup for MCS-434, MCS-333
Preparing the speakers
1. Connect the wires to the player.
Insert the cables connected to the player to the same colored connector on the speaker.
Caution
- These speaker terminals carry HAZARDOUS LIVE voltage. To prevent the risk of electric shock when connecting or disconnecting the speaker cables, disconnect the power cord before touching any uninsulated parts.
- Do not connect any speakers other than those supplied to this system.
- Do not connect the supplied speakers to any amplifier other than the one supplied with this system. Connection to any other amplifier may result in malfunction or fire.
2. Attach the non-skid pads to the base of each speaker.

Wall mounting the speaker for MCS-434, MCS-333
All speakers have a mounting hole which can be used to mount the speaker on the wall.
Before mounting
Remember that the speaker system is heavy and that its weight could cause the screws to work loose, or the wall material to fail to support it, resulting in the speaker falling. Make sure that the wall you intend to mount the speakers on is strong enough to support them. Do not mount on plywood or soft surface walls.
Mounting screws are not supplied. Use screws suitable for the wall material and support the weight of the speaker.
Caution
- If you are unsure of the qualities and strength of the wall, consult a professional for advice.
- Pioneer is not responsible for any accidents or damage that result from improper installation.

Additional notes on speaker for MCS-434, MCS-333
Install the main front left and right speakers at an equal distance from the TV.
Precautions:
These speakers are not magnetically shielded and so should not be placed near a TV or monitor. Magnetic storage media (such as floppy discs and tape or video cassettes) should also not be kept close to these speakers. Do not attach the subwoofer to a wall or ceiling. They may fall off and cause injury. The unit's front speaker and surround speaker can be attached to speaker stand CP-31B. When using the CP-31B, the speaker must be attached to the stand's bracket using the screws supplied with this unit. (The screws (M5) supplied with the CP-31B cannot be used to attach the speakers from this unit).
You must also pass the speaker cable through the bottom of the base from the hole in the upper part of the speaker stand pipe.
Positioning the system for MCS-434, MCS-333
The following illustration shows an example of positioning the system. Note that the illustrations in these instructions differ from the actual unit for explanation purposes. For the best possible surround sound, all the speakers other than the subwoofer should be placed at the same distance from the listening position (A).
Ⓐ Front left speaker (L)/
⑧ Front right speaker (R):
Place the front speakers to the sides of the monitor or screen and as flush with the screen surface as possible.
© Center speaker:
Place the center speaker below or in front of the monitor or screen.
(D) Surround left speaker (L)/
⑤ Surround right speaker (R):
Place these speakers behind your listening position, facing slightly inwards.
⑤ Subwoofer:
The position of the subwoofer is not so critical, because low bass sounds are not highly directional. But it is better to place the subwoofer near the front speakers. Turn it slightly toward the center of the room to reduce the wall reflections.
© Unit

Caution
- Be careful to make sure children do not put their hands or any objects into the *subwoofer duct. *subwoofer duct: A hole for plentiful bass sound on subwoofer cabinet (enclosure).
- Place the front, surround and center speakers well out of the reach of children.
Otherwise it may result in the speaker falling down and causing personal injury and/or property damage.
- The speakers contain magnet parts, so color irregularity may occur on the TV screen (CRT) or computer monitor screen. Please use the speakers away from the TV screen (CRT) or computer monitor screen.
Speaker setup for MCS-FS232
Preparing the speakers
For front speakers:
Assembling the speaker stands and securing your front speakers.
For vertical installation
- Use the supplied adhesive to attach 4 small pads to the speaker stand base.
- Insert the large pole from the holes behind the base and secure with the 4 screws.
natural_image
Mechanical assembly diagram showing a circular component with mounting holes and a bracket, no text or symbols present
- Pass the speaker wire through the hole on the pole.
natural_image
Mechanical assembly diagram showing a rotating component with arrows indicating motion direction (no text or symbols)
- Secure the speaker and the pole with 2 screws. Ensure that the speaker wire does not get pinched between the speaker and the pole.

For horizontal installation
- Use the supplied adhesive to attach 4 small pads to the speaker stand base.

- Insert the small pole from the holes behind the base and secure with the 4 screws.
natural_image
Mechanical assembly diagram showing a circular component with internal components and mounting holes (no text or symbols)
- Secure the speaker and the pole with 2 screws. Ensure that the speaker wire does not get pinched between the speaker and the pole. The height of the speaker stands can be adjusted in two levels; select the height you prefer, and fix in position.
natural_image
3D diagram of a device with a base mount and cable, no text or symbols present
For direct installation
Use the supplied adhesive to attach 4 pads to the base of the front speakers.
natural_image
Diagram of a rectangular electronic component with circular holes and wires, showing a transformation process (no text or symbols)
Connect the wires to the player
Insert the cables connected to the player to the same colored connector on the speaker.

Caution
- Do not connect any speakers other than those supplied to this system.
- Do not connect the supplied speakers to any amplifier other than the one supplied with this system. Connection to any other amplifier may result in malfunction or fire.
- These speaker terminals carry HAZARDOUS LIVE voltage. To prevent the risk of electric shock when connecting or disconnecting the speaker cables, disconnect the power cord before touching any uninsulated parts.
Wall mounting the speakers for MCS-FS232
Before mounting
- Remember that the speaker system is heavy and that its weight could cause the screws to work loose, or the wall material to fail to support it, resulting in the speaker falling. Make sure that the wall you intend to mount the speakers on is strong enough to support them. Do not mount on plywood or soft surface walls.
- Mounting screws are not supplied. Use screws suitable for the wall material and support the weight of the speaker.

Caution
- If you are unsure of the qualities and strength of the wall, consult a professional for advice.
- Pioneer is not responsible for any accidents or damage that result from improper installation.
Attaching the speakers
The front speaker can be hung vertically or horizontally on the wall. Use one hole to hang it vertically and two holes to hang it horizontally. The illustration below shows the front right speaker.
When installing the speaker horizontally, set it up so that the speaker wire position on the back side of the speaker is on the outside on the end of the surface, farthest away from the other speaker.
Additional notes on speaker placement for MCS-FS232
Install the main front left and right speakers at an equal distance from the TV.
Precautions:
The front speakers and subwoofer is not magnetically shielded and so should not be placed near a TV or monitor. Magnetic storage media (such as floppy discs and tape or video cassettes) should also not be kept close to the front speakers and subwoofer.
Do not attach the subwoofer to a wall or ceiling. They may fall off and cause injury.
Positioning the system for MCS-FS232
The following illustration shows an example of positioning the system. Note that the illustrations in these instructions differ from the actual unit for explanation purposes. For the best possible surround sound, all the speakers other than the subwoofer should be placed at the same distance from the listening position (A).
Ⓐ Front left speaker (L)/
⑧ Front right speaker (R):
Place the front speakers to the sides of the monitor or screen and as flush with the screen surface as possible.
© Subwoofer:
The position of the subwoofer is not so critical, because low bass sounds are not highly directional. But it is better to place the subwoofer near the front speakers. Turn it slightly toward the center of the room to reduce the wall reflections.
(D) Unit

Caution
- Be careful to make sure children do not put their hands or any objects into the *subwoofer duct. *subwoofer duct: A hole for plentiful bass sound on subwoofer cabinet (enclosure).
- Place the front speaker at a safe distance from the child's reach.
Otherwise it may result in the speaker falling down and causing personal injury and/or property damage.
- The speakers contain magnetic parts, so colour irregularity may occur on the TV screen (CRT) or computer monitor screen. Please use the speakers away from the TV screen (CRT) or computer monitor screen.
Speaker setup for MCS-FS131
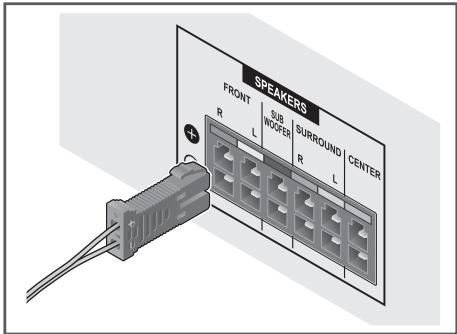
Preparing the speakers
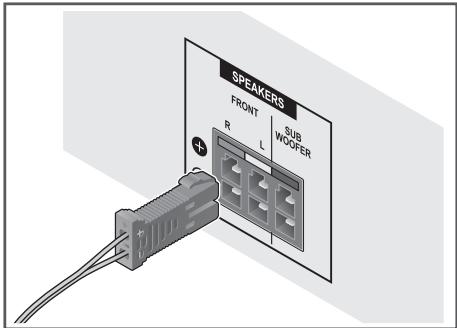
1. Connect the wires to the player.
Insert the cables connected to the player to the same colored connector on the speaker.
Caution
- These speaker terminals carry HAZARDOUS LIVE voltage. To prevent the risk of electric shock when connecting or disconnecting the speaker cables, disconnect the power cord before touching any uninsulated parts.
- Do not connect any speakers other than those supplied to this system.
- Do not connect the supplied speakers to any amplifier other than the one supplied with this system. Connection to any other amplifier may result in malfunction or fire.
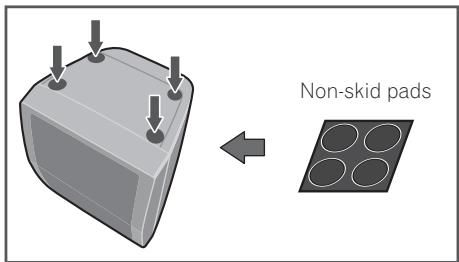
2. Attach the non-skid pads to the base of each speaker.
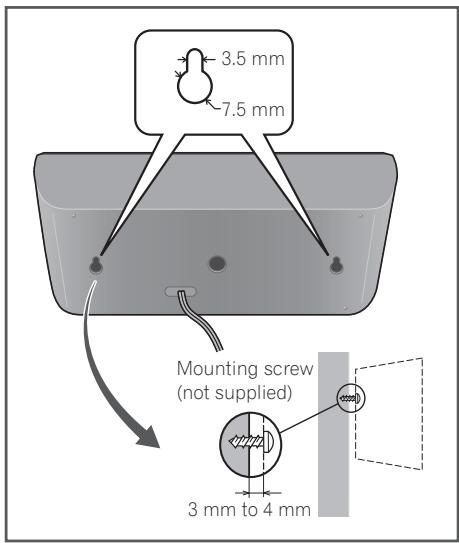
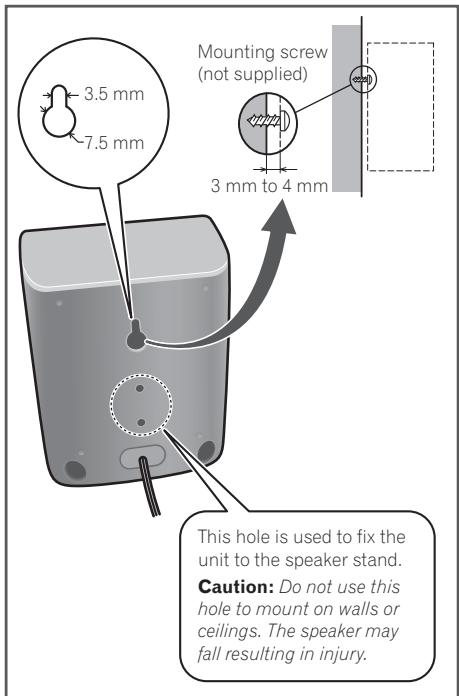
Wall mounting the speaker for MCS-FS131
All speakers have a mounting hole which can be used to mount the speaker on the wall.
Before mounting
Remember that the speaker system is heavy and that its weight could cause the screws to work loose, or the wall material to fail to support it, resulting in the speaker falling. Make sure that the wall you intend to mount the speakers on is strong enough to support them. Do not mount on plywood or soft surface walls.
Mounting screws are not supplied. Use screws suitable for the wall material and support the weight of the speaker.
Caution
- If you are unsure of the qualities and strength of the wall, consult a professional for advice.
- Pioneer is not responsible for any accidents or damage that result from improper installation.
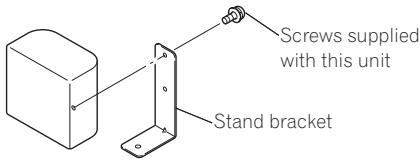
Additional notes on speaker for MCS-FS131
Install the main front left and right speakers at an equal distance from the TV.
Precautions:
These speakers are not magnetically shielded and so should not be placed near a TV or monitor. Magnetic storage media (such as floppy discs and tape or video cassettes) should also not be kept close to these speakers.
Do not attach the subwoofer to a wall or ceiling. They may fall off and cause injury.
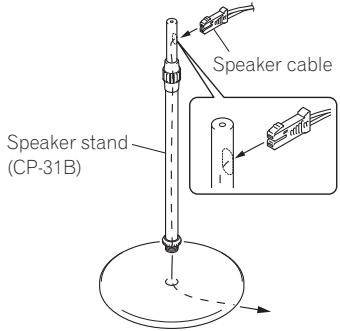
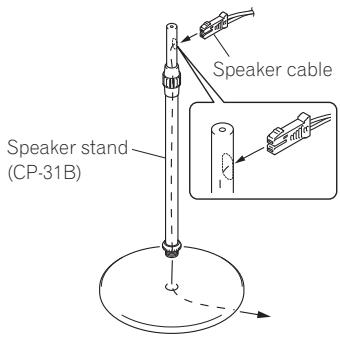
The unit's front speaker can be attached to speaker stand CP-31B.
When using the CP-31B, the speaker must be attached to the stand's bracket using the screws supplied with this unit. (The screws (M5) supplied with the CP-31B cannot be used to attach the speakers from this unit).
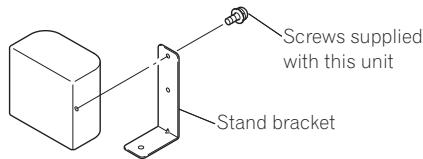
You must also pass the speaker cable through the bottom of the base from the hole in the upper part of the speaker stand pipe.
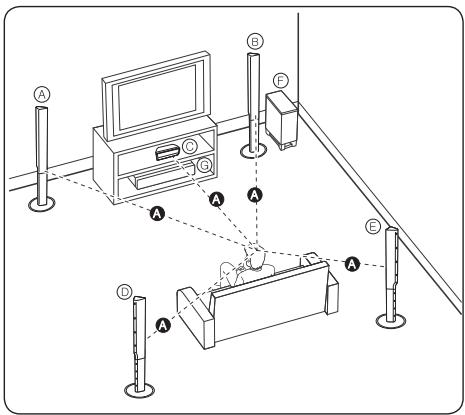
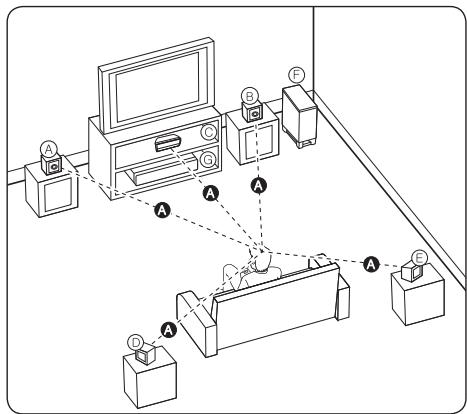
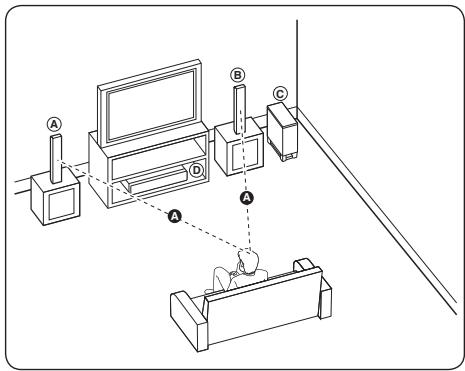
Positioning the system for MCS-FS131
The following illustration shows an example of positioning the system. Note that the illustrations in these instructions differ from the actual unit for explanation purposes. For the best possible surround sound, all the speakers other than the subwoofer should be placed at the same distance from the listening position (A).
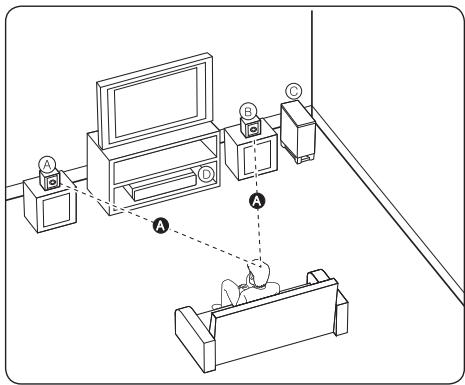
Ⓐ Front left speaker (L)/
⑧ Front right speaker (R):
Place the front speakers to the sides of the monitor or screen and as flush with the screen surface as possible.
© Subwoofer:
The position of the subwoofer is not so critical, because low bass sounds are not highly directional. But it is better to place the subwoofer near the front speakers. Turn it slightly toward the center of the room to reduce the wall reflections.
(D) Unit

Caution
- Be careful to make sure children do not put their hands or any objects into the *subwoofer duct. *subwoofer duct: A hole for plentiful bass sound on subwoofer cabinet (enclosure).
- Place the front speaker at a safe distance from the child's reach.
Otherwise it may result in the speaker falling down and causing personal injury and/or property damage.
- The speakers contain magnet parts, so color irregularity may occur on the TV screen (CRT) or computer monitor screen. Please use the speakers away from the TV screen (CRT) or computer monitor screen.
Connecting to Your TV
Note
- Please refer to the manuals of your TV, stereo system or other devices as necessary to make the best connections.
- Make sure the player is connected directly to the TV. Tune the TV to the correct video input channel.
HDMI connection
If you have a HDMI TV or monitor, you can connect it to this player using a HDMI cable (High Speed HDMI ^® /™ Cable). Connect the HDMI terminal on the player to the HDMI terminal on a HDMI compatible TV or monitor.
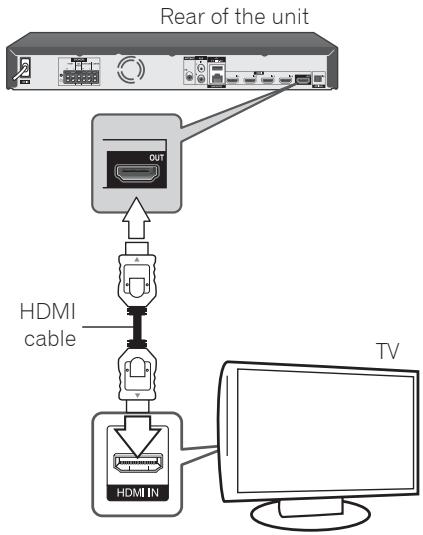
flowchart
graph TD
    A["Rear of the unit"] --> B["OUT"]
    B --> C["HDMI cable"]
    C --> D["HDMI IN"]
    D --> E["TV"]
Set the TV's source to HDMI (refer to TV's Operating Instructions).
Caution
Connecting the player and the TV using the HDMI cable alone does not enable you to hear the audio from the devise. Please also connect by either the optical cable (page 37) or the analog audio cable (page 36).
When connected to a DVI device
- It is not possible to connect DVI devices (computer displays, for example) that are not compatible with HDCP. HDCP is a specification to protect audiovisual content across the DVI/HDMI interface.
- No audio signals are output. Connect using an audio cable, etc.
- This player is designed for connection with HDMI compatible devices. When connected to a DVI device, it may not operate properly depending on the DVI device.
ARC (Audio Return Channel) function
The ARC function enables an HDMI capable TV to send the audio stream to HDMI OUT of this player.
To use this function:
- Your TV must support the ARC function.
- The setting method of ARC may differ depending on the TV. For details about ARC function, refer to your TV manual.
- You must use the HDMI cable (High Speed HDMI ^® /™ Cable).
- You must connect with the HDMI IN of TV that supports the ARC function using the HDMI OUT on this player.
- You can connect only one Home Theater to TV compatible with ARC.
- The ARC function does not warrant that the function works in all cases even if the above conditions are satisfied.
- When you use the ARC function, CEC (Consumer Electronics Control) may work. If you do not want to use CEC, you can stop it work by setting [Control: Off] on HDMI. In this case, it is needed to connect TV and this player by an optical cable to send the audio stream to this player.
- Power on the unit when using CEC function.
- CEC does not operate during Standby mode.
Antenna connection
Connect the supplied antenna for listening to the radio.
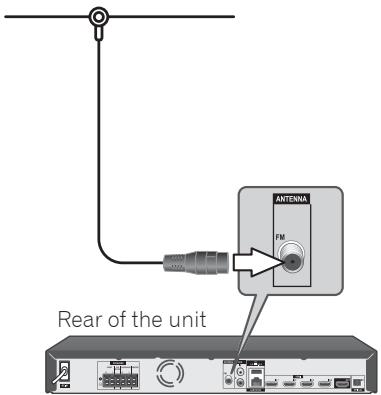

Note
- After connecting the FM wire antenna, keep it as horizontal as possible. Be sure to fully extend the FM wire antenna.
Connections with external device
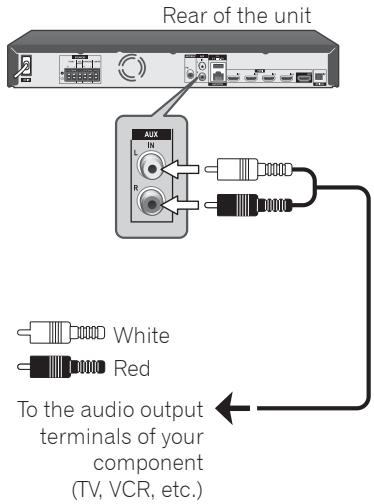
AUX connection
You can enjoy the sound from an external component through the speakers of this system.
Connect the analog audio output terminals of your component into the AUX L/R (INPUT) on this unit. And then select the [AUX] option by pressing FUNCTION and ENTER.
PORTABLE IN connection
You can enjoy the sound from your portable audio player through the speakers of this system.
Connect the headphones (or line out) terminal of the portable audio player into the PORTABLE IN socket of this unit. And then select the [Portable In] option by pressing FUNCTION and ENTER.
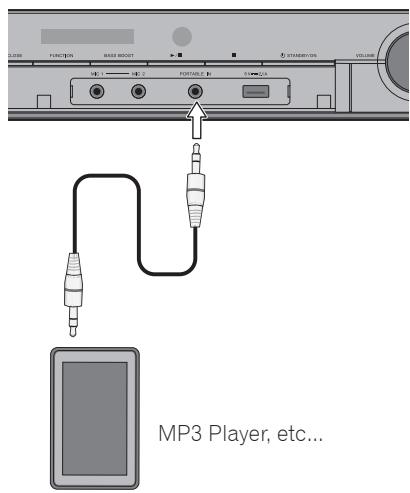

Caution
- When inserting the PORTABLE IN terminal, support the top of the unit with your hand to prevent it from moving.
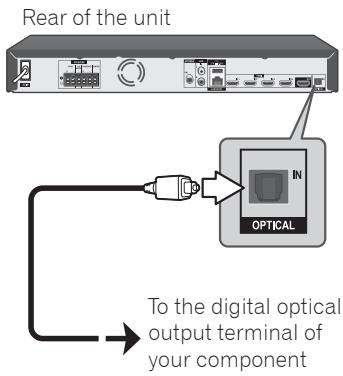
OPTICAL IN connection
You can enjoy the sound from your component with a digital optical connection through the speakers of this system.
Connect the optical output terminal of your component into the OPTICAL IN terminal on the unit. And then select the [Optical IN] option by pressing FUNCTION and ENTER.
HDMI IN 1/2/3/4 connection
You can enjoy the pictures and sound from your component through this connection.
Connect the HDMI OUT terminal of your component into the HDMI IN 1, 2, 3 or 4 terminal on this unit. And then select the [HDMI IN 1/2/3/4] option by pressing FUNCTION and ENTER.
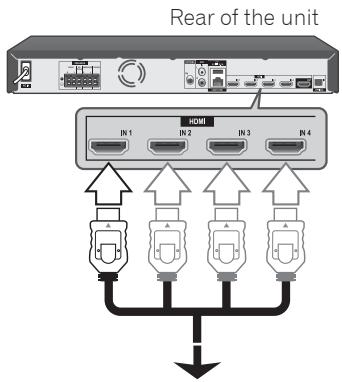
To the HDMI OUT terminal of your component (set-top box, digital satellite receiver, video game machine, etc.)

Note
- You cannot change the video resolution in the HDMI IN 1/2/3/4 mode. Change the video resolution of the connected component.
- If the video output signal is abnormal when your personal computer is connected to HDMI IN 1, 2, 3 or 4 terminal, change the resolution of your personal computer to 576p, 720p, 1080i or 1080p.
- You may not able to output 3D images depending on the type of the 3D output signal of the connected device.
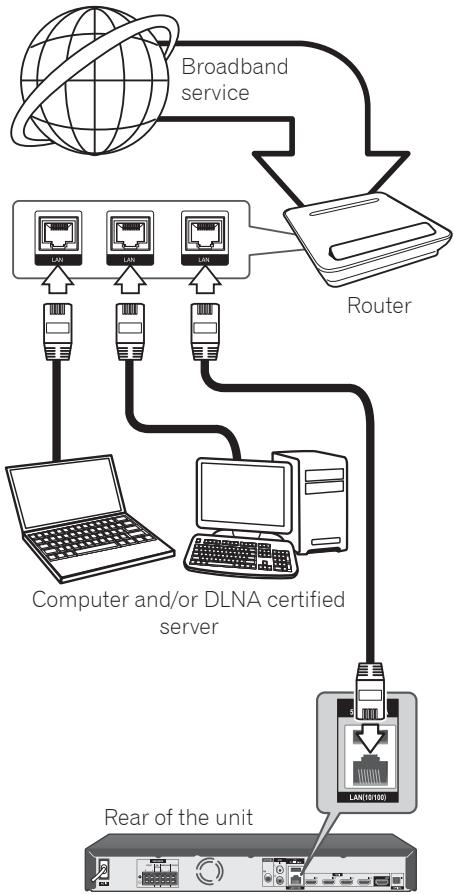
Connecting to your Home Network
This player can be connected to a local area network (LAN) via the LAN port on the rear panel or the internal wireless module. By connecting the unit to a broadband home network, you have access to services such as BD-LIVE interactivity and Online content services.
Wired network connection
Using a wired network provides the best performance, because the attached devices connect directly to the network and are not subject to radio frequency interference.
Please refer to the documentation for your network device for further instructions.
Connect the player's LAN port to the corresponding port on your Modem or Router using a commercially available LAN or Ethernet cable.
Note
- When plugging or unplugging the LAN cable, hold the plug portion of the cable. When unplugging, do not pull on the LAN cable but unplug while pressing down on the lock.
- Do not connect a modular phone cable to the LAN port.
- Since there are various connection configurations, please follow the specifications of your telecommunication carrier or internet service provider.
- If you want to access content from computers or DLNA servers, this player must be connected to the same local area network with them via a router.
flowchart
graph TD
    A["Broadband service"] --> B["Router"]
    B --> C["Computer and/or DLNA certified server"]
    C --> D["Rear of the unit"]
    D --> E["LAN(10/100)"]
    E --> F["LAN"]
    F --> G["LAN"]
    G --> H["LAN"]
    H --> I["LAN"]
    I --> J["LAN"]
    J --> K["LAN"]
    K --> L["LAN"]
    L --> M["LAN"]
    M --> N["LAN"]
    N --> O["LAN"]
    O --> P["LAN"]
    P --> Q["LAN"]
    Q --> R["LAN"]
    R --> S["LAN"]
    S --> T["LAN"]
    T --> U["LAN"]
    U --> V["LAN"]
    V --> W["LAN"]
    W --> X["LAN"]
    X --> Y["LAN"]
Wireless network connection (MCS-838/MCS-434/MCS-FS232 only)
Another connection option is to use an Access Point or a wireless router. The network configuration and connection method may vary depending on the equipment in use and the network environment.
This player is equipped with an IEEE 802.11n (Single band, 2.4 GHz band) wireless module, which also supports the 802.11b/g standards. For the best wireless performance, we recommend using a IEEE 802.11n certified Wi-Fi network (access point or wireless router).
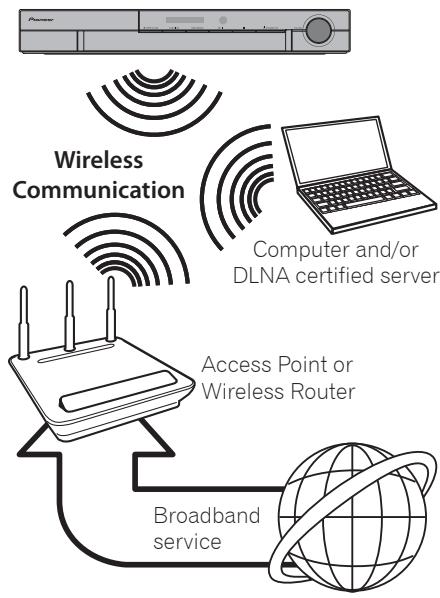
flowchart
graph TD
    A["Power"] --> B["Wireless Communication"]
    B --> C["Computer and/or DLNA certified server"]
    C --> D["Access Point or Wireless Router"]
    D --> E["Broadband service"]
    E --> D
Refer to the setup instructions supplied with your access point or wireless router for detailed connection steps and network settings.
For best performance, a direct wired connection from this player to your home network's router or cable/DSL modem is always the best option. If you do chose to use the wireless option, note that performance can sometimes be affected by other electronic devices in the home.
Wireless network setup (MCS-838/MCS-434/MCS-FS232 only)
For the wireless network connection, the player needs to be set up for network communication. This adjustment can be done from the [Setup] menu. Adjust the [NETWORK] setting as follow. Setting up the access point or the wireless router is required before connecting the player to the network.
Preparation
Before setting the wireless network, you need to:
- connect the broadband internet to the wireless home network.
- set the access point or wireless router.
-
note the SSID and security code of the network.
-
Select [Initial Setup] → [Network] → [Interface] → [Wireless] and press ENTER.
-
Select [Initial Setup] → [Network] → [Wireless Setting] → [Next Screen] and press ENTER.
-
Select [Yes] and press ENTER to continue. The new connection settings reset the current network settings.
-
[Wireless Setting] menu is displayed.
Use ↑/↓ to select [Scan]. Then select [Next] using the ←/→ and press ENTER.
-
The player scans the all available access points or wireless routers within range and display them as a list. Use ↑/↓ to select an access point or wireless router on the list, and then press ENTER.
If you have security on your access point or wireless router, verify that the WEP or WPA key that was entered into the player matches the router's information exactly. You need to input the security code as necessary.
- How to enter the security code.
① Select the security code section using ↑/↓/↔/→ and press ENTER to start the software keyboard.
② Use ↑/↓/↔/→ to select characters and items, and then press ENTER to input.
③ Select [abc], [ABC], or [@@#\$] using ↑/↓ /←/→ to switch to lower case characters, upper case characters, or symbols.
④ Finish entering the security code by selecting [Enter] using /// and pressing ENTER.
-
Select [Next] using /// and press ENTER. If it connects success, it will display connection success and IP is obtained.
-
Pressing ENTER ends [Wireless Setting].
Note
- WEP security mode generally have 4 keys available on an access point or wireless router's setting. If your access point or wireless router use WEP security, enter the security code of the key "No.1" to connect on your home network.
- An Access Point is a device that allows you to connect to your home network wirelessly.
[Scan] – The player scans the all available access points or wireless routers within range and display them as a list.
[Manual] – Your access point may not be broadcasting its access point name (SSID). Check your router settings through your computer and either set your router to broadcast SSID, or manually enter the access point name (SSID) in [Manual].
[Auto] – If your access point or wireless router that supports the Push Button Configuration method, select this option and press the Push Button on your access point or wireless router within 120 counts. You do not need to know the access point name (SSID) and security code of your access point or wireless router.
Note
- If there is no DHCP server on the network and you want to set the IP address manually, Please refer to "Setting the IP address". (Page 77)
WPS setup (Wi-Fi Protected Setup) (MCS-838/MCS-434/MCS-FS232 only)
WPS connection setting
WPS is abbreviation of Wi-Fi Protected Setup. A standard established by the Wi-Fi Alliance industry group for a function allowing settings related to interconnection of WPS compatible wireless LAN devices and encryption to be made with simple operations.
This unit supports push-button configuration and PIN code configuration.
Connection settings are made automatically simply by pressing the WPS buttons on the WPS compatible wireless LAN device. This is the simplest way of making the settings, and is possible when the WPS compatible wireless LAN device is equipped with WPS button.
Connection settings are made by inputting the 8-digit PIN code shown on the main display to the access point to which you selected. Follow the instructions shown in Connecting using PIN code configuration on the right.
When performing wireless settings set [Initial Setup] → [Network] → [Interface] to [Wireless].
- Press HOME MENU.
The HOME MENU screen is displayed.
- Use cursor buttons to select [Initial Setup] and press ENTER.
The Initial Setup screen is displayed.
- Select [Initial Setup] → [Network] → [Wireless Setting] → [Next Screen] and press ENTER.
A confirmation screen is displayed.
- Use ←/→ to select Yes, then press ENTER.
The Wireless Setting screen is displayed.
- Use ↑/↓ to select Auto, then press ENTER.
The WPS (Wi-Fi Protected Setup) screen is displayed.
- Use ↑/↓ to switch between [■PBC] or [■PIN] screens.
When connecting using PBC go to step 7. When connecting using PIN go to step 8.
- When connecting using PBC (Push Button), on the [■PBC] screen use ←/→ to select NEXT, then press ENTER.
Then press the WPS button on the access point within 120 seconds.
- When connecting using PIN confirm the PIN Code on the [■PIN] screen. Use cursor ←/→ to select NEXT, then press ENTER.
- Enter into the access point the PIN Code that you confirmed in step 8 above.
The PIN Code input method differs depending on the LAN device used. For details, consult the operating instructions accompanying your LAN device.
Notes on Network Connection:
- Many network connection problems during set up can often be fixed by re-setting the router or modem. After connecting the player to the home network, quickly power off and/or disconnect the power cord of the home network router or cable modem. Then power on and/or connect the power cord again.
- Depending on the internet service provider (ISP), the number of devices that can receive internet service may be limited by the applicable terms of service. For details, contact your ISP.
- Our company is not responsible for any malfunction of the player and/or the internet connection feature due to communication errors/malfunctions associated with your broadband internet connection, or other connected equipment.
- The features of BD-ROM discs made available through the Internet Connection feature are not created or provided by our company, and our company is not responsible for their functionality or continued availability. Some disc related material available by the Internet Connection may not be compatible with this player. If you have questions about such content, please contact the producer of the disc.
- Some internet contents may require a higher bandwidth connection.
- Even if the player is properly connected and configured, some internet contents may not operate properly because of internet congestion, the quality or bandwidth of your internet service, or problems at the provider of the content.
- Some internet connection operations may not be possible due to certain restrictions set by the Internet service provider (ISP) supplying your broadband Internet connection.
- Any fees charged by an ISP including, without limitation, connection charges are your responsibility.
- A 10 Base-T or 100 Base-TX LAN port is required for wired connection to this player. If your internet service does not allow for such a connection, you will not be able to connect the player.
-
You must use a Router to use xDSL service.
-
xDSL modem is required to use xDSL service and a cable modem is required to use cable modem service. Depending on the access method of and subscriber agreement with your ISP, you may not be able to use the internet connection feature contained in this player or you may be limited to the number of devices you can connect at the same time. (If your ISP limits subscription to one device, this player may not be allowed to connect when a computer is already connected.)
- The use of a “Router” may not be allowed or its usage may be limited depending on the policies and restrictions of your ISP. For details, contact your ISP directly.
- The wireless network operate at 2.4 GHz radio frequencies that are also used by other household devices such as cordless telephone, microwave oven, and can be affected by interference from them.
- Turn off all unused network equipment in your local home network. Some devices may generate network traffic.
- For the purpose of the better transmission, placing the player from the access point as close as possible.
- In some instances, placing the access point or wireless router at least 0.45 m above the floor may improve the reception.
- Move closer to the access point if possible or re-orient the player so there is nothing between it and the access point.
- The reception quality over wireless depends on many factors such as type of the access point, distance between the player and access point, and the location of the player.
- Set your access point or wireless router to Infrastructure mode. Ad-hoc mode is not supported.
USB device connection
A USB device connected to the unit can perform the following operations.
- File Playback
Playback files recorded on the front USB device or rear USB device, such as video, music or photos.
- Copy Files
Files can be copied from the front USB device to the rear USB device.
- Record CD or FM
The rear USB device can be used to record CD or FM.

Note
• See page 67 for details on connecting a iPod/iPhone/iPad (MCS-838/MCS-434/MCS-FS232 only).
About USB devices
The USB devices that can be connected to the player are as shown below.
• USB 2.0-compatible memory devices
- FAT16, FAT32 or NTFS file system, minimum 1 GB capacity (2 GB or more recommended)

Note
- Devices formatted with a file system other than the above cannot be used.
- USB devices may not be recognized if they contain multiple partitions.
- Some USB devices may not operate with this player.
• Operation of USB devices is not guaranteed.
Connecting the USB device

Caution
- Be sure to turn the player's power off before connecting or disconnecting USB devices.
- When using an external hard disk as the external storage device, be sure to turn on the hard disk's power before turning on the player's power.
- If the USB device is write-protected, be sure to disable the write-protection.
- When connecting the USB cable, hold onto the plug, set the plug in the proper direction for the port and insert it horizontally.
- Placing excessive loads on the plug may result in poor contact, making it impossible to write data on the USB device.
- When a USB device is connected and the player's power is turned on, do not unplug the power cord.
This player can play movie, music and photo files contained in the USB device.
- Insert a USB device to the USB port until it fits into place.
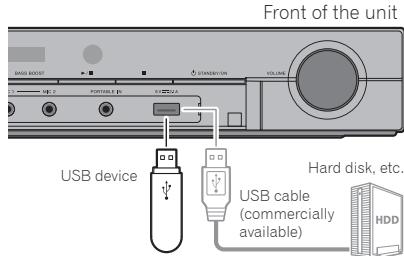
Rear of the unit


Caution
- When inserting the USB terminal, support the top of the unit with your hand to prevent it from moving.

Note
• This unit does not support a USB hub.
- Use a USB cable with a length of 2 meters or less.
Capter 3
Getting Started
Be sure to perform these settings when using the player in the following situations.
- When you use the player for the first time.
• After Initial Setup format.
- After updating the player's software.

Caution
- Before turning on the power, check that the connections between the player and other devices are correct. Also, turn on the power of the devices connected to the player before turning on the player's power.
- When using a Pioneer Flat Screen TV or front projector compatible with the Control function, set Control to On on the connected device before turning on the player's power.
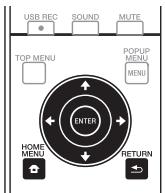
See the TV's operating instructions for the details of operating the TV.
2. Turn on the player's power.
Press ⏻ STANDBY/ON.
Check that the Setup Navigator menu is displayed.
3. Start Setup Navigator.
Press ENTER.
- Setup Navigator starts.
4. Select the OSD language.
Use / to select, then press ENTER. When a Pioneer Flat Screen TV that is compatible with Control function is connected to this player's HDMI OUT terminal, language settings are imported from the Pioneer Flat Screen TV's language settings before Setup Navigator begins.
5. Select the appropriate output resolution for the connected TV.
Use ↑/↓ to select, then press ENTER.
6. Select the appropriate aspect for the connected TV.
Use ↑/↓ to select, then press ENTER.
Press ENTER.
- Setup Navigator finishes and the setting is stored.
- Press ← RETURN to go back to the previous screen.
Operating the TV with the player's remote control
When the manufacturer code for your brand of TV is set on the player's remote control, the TV can be operated using the player's remote control.

Caution
- For some models it may not be possible to operate the TV with the player's remote control, even for TVs of brands listed on the manufacturer code list.
- The setting may be restored to the default after the batteries are replaced. If this happens, reset it.
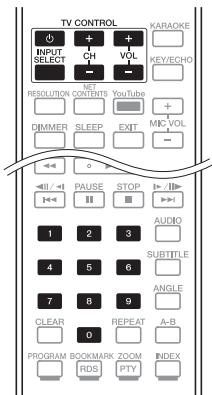
Press the number buttons (0 to 9) to input the code while pressing TV CONTROL ⏻.

Note
• The factory default setting is 00 (PIONEER).
- If you make a mistake when inputting the code, release TV CONTROL ⏻ then start over from the beginning.
- When there are multiple codes for a manufacturer, try inputting them in the indicated order until the TV can be operated.
2. Check that the TV can be operated.
Operate the TV using TV CONTROL.
- Press to turn the TV's power on and off.
INPUT SELECT – Press to switch the TV's input.
CH +/- - Press to select the TV channel.
VOL +/- - Press to adjust the volume.
TV preset code list
Manufacturer Code(s)
PIONEER 00, 31, 32, 07, 36, 42, 51, 22, 91, 92
ACURA 44
ADMIRAL 31
AIWA 60, 58
AKAI 32, 35, 42
AKURA 41
ALBA 07, 39, 41, 44
AMSTRAD 42, 44, 47
ANITECH 44
ASA 45
ASUKA 41
AUDIOGONIC 07, 36
BASIC LINE 41, 44
BAUR 31, 07, 42
BEKO 38, 83, 84, 89
BEON 07
BLAUPUNKT 31
BLUE SKY 41
BLUE STAR 18
BPL 18
BRANDT 36
BTC 41
BUSH 07, 41, 42, 44, 47, 56
CASCADE 44
CATHAY 07
CENTURION 07
CGB 42
CIMLINE 44
CLARIVOX 07
CLATRONIC 38
CONDOR 38
CONTEC 44
CROSLEY 32
CROWN 38, 44
CRYSTAL 42
CYBERTRON 41
DAEWOO 07, 44, 56
DAINICHI 41
DANSAI 07
DAYTON 44
DECCA 07, 48
DIXI 07, 44
DUMONT 53
ELIN 07
ELITE 41
ELTA 44
EMERSON 42
ERRES 07
FERGUSON 07, 36, 51
FINLANDIA 35, 43, 54
FINLUX 32, 07, 45, 48, 53, 54
FIRSTLINE 40, 44
FISHER 32, 35, 38, 45
FORMENTI 32, 07, 42
FRONTECH 31, 42, 46
FRONTECH/PROTECH 32
FUJITSU 48, 74, 77
FUNAI 40, 46, 58, 56
GBC 32, 42
GE 00, 01, 08, 07, 10, 11, 17, 02, 28, 18
GEC 07, 34, 48
GELOSO 32, 44
GENERAL 29
GENEXXA 31, 41
GOLDSTAR 10, 23, 21, 02, 07, 50
GOODMANS 07, 39, 47, 48, 56
GORENJE 38
GPM 41
GRAETZ 31, 42
GRANADA 07, 35, 42, 43, 48
GRADIENTE 30, 57
GRANDIN 18
GRUNDIG 31, 53
HANSEATIC 07, 42
HCM 18,44
HINARI 07, 41, 44
HISAWA 18
HITACHI 31, 33, 34, 36, 42, 43, 54, 06, 10, 24, 25, 18
HUANYU 56
HYPSON 07, 18, 46
ICE 46, 47
IMPERIAL 38, 42
INDIANA 07
INGELEN 31
INTERFUNK 31, 32, 07, 42
INTERVISION 46, 49
ISUKAI 41
ITC 42
ITT 31, 32, 42
JEC 05
JVC 13, 23
KAISUI 18, 41, 44
KAPSCH 31
KENDO 42
KENNEDY 32, 42
KORPEL 07
KOYODA 44
LEYCO 07, 40, 46, 48
LIESENK&TTER 07
LOEWE 07
LUXOR 32, 42, 43
M-ELECTRONIC 31, 44, 45, 54, 56, 07, 36, 51
MAGNADYNE 32, 49
MAGNAFON 49
MAGNAVOX 07, 10, 03, 12, 29, 81
MANESTH 39, 46
MARANTZ 07
MARK 07
MATSUI 07, 39, 40, 42, 44, 47, 48
MCMICHAEL 34
MEDIATOR 07
MEMOREX 44
METZ 31, 69
MINERVA 31, 53
MITSUBISHI 09, 10, 02, 21, 31, 73
MULTITECH 44, 49
NEC 59, 57
NECKERMANN 31, 07
NEI 07, 42
NIKKAI 05, 07, 41, 46, 48
NOBLIKO 49
NOKIA 32, 42, 52
NORDMENDE 32, 36, 51, 52
OCEANIC 31, 32, 42
ORION 32, 07, 39, 40
OSAKI 41, 46, 48
OSO 41
OSUME 48
OTTO VERSAND 31, 32, 07, 42
PALLADIUM 38
PANAMA 46
PANASONIC 31, 07, 08, 42, 22, 70
PATHO CINEMA 42
PAUSA 44
PHILCO 32, 42
PHILIPS 31, 07, 34, 56, 68, 55, 63, 82
PHOENIX 32
PHONOLA 07
PROFEX 42, 44
PROTECH 07, 42, 44, 46, 49
QUELLE 31, 32, 07, 42, 45, 53
R-LINE 07
RADIOLA 07
RADIOSHACK 10, 23, 21, 02
RBM 53
RCA 01, 10, 15, 16, 17, 18, 61, 62, 09, 59, 60
REDIFFUSION 32, 42
REX 31, 46
ROADSTAR 41, 44, 46
SABA 31, 36, 42, 51
SAISHO 39, 44, 46
SALORA 31, 32, 42, 43
SAMBERS 49
SAMSUNG 07, 38, 44, 46, 69, 70, 64, 65, 78, 79, 80
SANYO 35, 45, 48, 21, 14, 91, 67, 76
SBR 07, 34
SCHAUB LORENZ 42
SHARP 02, 19, 27, 67, 90, 62, 66
SIAREM 32, 49
SIEMENS 31
SINUDYNE 32, 39, 40, 49
SKANTIC 43
SOLAVOX 31
SONOKO 07, 44
SONOLOR 31, 35
SONTEC 07
SONY 04, 72
SOUNDWAVE 07
STANDARD 41, 44
STERN 31
SUSUMU 41
SYSLINE 07
TANDY 31, 41, 48
TASHIKO 34
TATUNG 07, 48
TEC 42
TELEAVIA 36
TELEFUNKEN 36, 37, 52
TELETECH 44
TENSAI 40, 41
THOMSON 36, 51, 52, 63, 61
THORN 31, 07, 42, 45, 48
TOMASHI 18
TOSHIBA 05, 02, 26, 21, 53
TOWADA 42
ULTRAVOX 32, 42, 49
UNIDEN 92, 68
UNIVERSUM 31, 07, 38, 42, 45, 46, 54
VESTEL 07
VICTOR 13
VOXSON 31
WALTHAM 43
WATSON 07
WATT RADIO 32, 42, 49
WHITE WESTINGHOUSE 07
YOKO 07, 42, 46
ZENITH 03, 20
Chapter 4
Playback
Playing discs or files
This section describes the player's main operations.
For the types of discs and files that can be played, see page 11. Video, image and audio files recorded on discs are played with the Home Media Gallery (page 57).
1. Press ⏻ STANDBY/ON to turn on the power.
Turn the TV's power on and switch its input beforehand.
2. Press ▲ OPEN/CLOSE to open the disc tray and load the disc.

Note
- Load the disc with the printed side facing up.
- Several dozen seconds are required to read the disc. Once reading is completed, the type of disc is displayed on the player's front panel display.
- When a BD with usage restrictions set by a BD recorder is loaded, the PIN code input screen appears. In this case, input your PIN code.
3. Press ▶ PLAY to play the disc.
• To pause, press II PAUSE during playback.
- To stop, press ■ STOP during playback.

Note
- Some discs start playing automatically when the disc tray is closed.
- BD-ROM/DVD-Video discs have parental lock features. Input the password registered in the player's settings to unlock the parental lock. For details, see page 79.
- BD-R/-RE may have restrictions placed on the disc or titles. Enter the password set to the disc in order to remove the restrictions.
For some discs, the disc menu is displayed automatically when playback starts. The contents of the disc menu and the way to operate depend on the disc.
◆ Resuming playback from where it was stopped (resume playback function)
- When ■ STOP is pressed during playback, the point at which the disc stopped is stored in the memory. When
▶ PLAY is pressed after that, playback resumes from that point.
- To cancel the resume playback function, press ■ STOP while playback is stopped.

Note
- The resume playback function is canceled automatically in the following cases:
- When the disc tray is opened.
- When the file list window is switched.
- When the power is turned off. (For BDs and DVDs this does not cancel the resume playback function.)
- When you want to continue playback from a position you specify to be played next time, see Continuing playback from a specified position (Continued Viewing Playback) on page 56.
- The resume playback function cannot be used for some discs.
❖ Playback disc/file when selecting other functions
- Press ▲ OPEN/CLOSE to open the disc tray and load the disc.
- Press HOME MEDIA GALLERY to display the Home Media Gallery.
- Select disc type (BDMV/BDAV/DVD etc.).
Forward and reverse scanning
▶ During playback, press ◀REV or ▶FWD.
- The scanning speed switches each time the button is pressed. The speed steps depend on the disc or file (the speed is displayed on the TV screen).
◆ To resume normal playback
▶ Press ▶ PLAY.
Playing specific chapters, tracks or files
During playback, input the number of the chapter/track/file you want to select.
- Use the number buttons (0 to 9) to input the number, then press ENTER.
- Press CLEAR to clear the values you have input.
Skipping content
▶ During playback, press ◀◀◀ or ▶▶◀.
- When ▶▶▶ is pressed, the playback skips ahead to the beginning of the next chapter/track/file.
- When I◀◀ is pressed while a video or audio file is playing, the playback skips back to the beginning of the currently playing chapter/track/file. Press twice to skip back to the beginning of the previous chapter/track/file.
- When ◀◀◀ is pressed while an image file is playing, playback returns to the previous file.
Playing in slow motion
▶ While playback is paused, press and hold ◀/◄ or ►/||►.
- The speed switches each time the button is pressed (the speed is displayed on the TV screen).
◆ To resume normal playback
▶ Press ▶ PLAY.
Step forward and step reverse
▶ While playback is paused, press ◀/◄ or |►/||►.
- The picture moves a step forward or reverse each time the button is pressed.
◆ To resume normal playback
▶ Press ▶ PLAY.
Playing a specific section within a title or track repeatedly (A-B Repeat)
Use this procedure to play a specific section within a title or track repeatedly.
- During playback, press A-B to select the starting point.
• A- is displayed on the TV screen.
- During playback, press A-B to select the ending point.
• A-B Repeat playback starts.
To cancel A-B Repeat play
- Press A-B during the A-B Repeat play.
Note
- A-B Repeat play is canceled in the following cases:
- When you search outside of the repeat range.
- When you start other Repeat Play or Random Play.
Playing repeatedly (Repeat Play)
Use this procedure to play the currently playing disc, title, chapter, track or file repeatedly.
▶ During playback, press REPEAT.
- Each time you press REPEAT the type of repeat modes changes as shown below.
BD
Current chapter → Current title
DVD
Current chapter → Current title → All titles
CD/Video file/Audio file/Image file
Current track/file → All tracks/All files in folder
To cancel Repeat Play
- Press REPEAT several times during Repeat Play.

Note
- Repeat Play is canceled in the following cases:
- When you search outside the repeat range.
- When you start other Repeat Play or Random Play.
Playing in the desired order (Programmed Play)
1 During playback, press PROGRAM.
- The program screen is displayed.
- Select the program number.
Use ↑/↓ to select, then press ENTER.
- Select the title you want to play.
Use ↑/↓ to select, then press →.
- Select the chapter you want to play.
Use ↑/↓ to select, then press ENTER.
- Press ▶ PLAY.
- Playback starts.
Editing the program
- Select the program number you want to edit, then press ENTER.
- Select title/chapter, then press ENTER.
◆ Deleting the program
▶ Select the program number you want to delete, then press CLEAR.
- To delete all the programs, press ➕ RETURN.

Note
- When you use audio CDs for Programmed Play, enter the track number in step 3.
• This function does not work with BDs.
Making bookmarks
You can make bookmarks on the video currently playing and play back the scene later.
▶ During playback, press BOOKMARK.
- The bookmark is made.
• Maximum number of bookmarks are 12.
◆ Playing the bookmarked scene
1. Press and hold BOOKMARK for a few seconds.
- The list of bookmarks is displayed.
2. Select the bookmark you want to play. Use ←/→ to select, then press ENTER.
◆ Deleting the bookmark
▶ Select the bookmark you want to delete, then press CLEAR.
- Bookmarks may not be allowed to make for some discs.
- Bookmarks are canceled in the following cases:
- When the player's power turned off.
- When the disc tray is opened.
Zoom
▶ During playback, press ZOOM.
- Each time you press ZOOM, the zoom level changes as shown below.
Zoom 2x → Zoom 3x → Zoom 4x → Zoom 1/2 → Zoom 1/3 → Zoom 1/4 → Normal (not displayed)
Note
• This function does not work with some discs.
Playing photos as slideshows
This function plays the photos, switching them automatically.
▶ During playback, press INDEX.
- Display the thumbnail of image files. The maximum number is 12 at once.
- If you select one of the image and press ENTER, slideshow will start from the image you selected.
◆ Rotating/inverting photos
When a slideshow is playing or paused, the display switches as shown below when the ↑/
↓/←/→ buttons are pressed.
→ button: Rotates 90° clockwise
← button: Rotates 90° counterclockwise
▲ button: Flips horizontally
↓ button: Flips vertically
Switching the camera angles
For BD-ROM and DVD-Video discs on which multiple angles are recorded, the angles can be switched during playback.
▶ During playback, press ANGLE.
- The current angle and total number of recorded angles are displayed on the TV screen.
To switch the angles, press ANGLE again.
- The angles can also be switched by selecting Angle from the TOOLS menu.
- If the angles are not switched when ANGLE is pressed, switch them from the disc menu screen.
Switching the subtitles
For discs or files on which multiple subtitles are recorded, the subtitles can be switched during playback.

Caution
- The subtitles cannot be switched for discs recorded by a DVD or BD recorder. Also refer to the operating instructions for the device used for recording.
▶ During playback, press SUBTITLE.
- The current subtitle and total number of recorded subtitles are displayed on the TV screen.
To switch the subtitle, press SUBTITLE again.
- The subtitles can also be switched by selecting Subtitle from the TOOLS menu.
- If the subtitles are not switched when SUBTITLE is pressed, switch them from the disc menu screen.
◆ Turning the subtitles off
In addition to the subtitles recorded in DivX media files, this player also supports the display of external subtitle files. If a file has the same name as that of a DivX media file aside from the file extension and the extension is one of the extensions listed below, the file is treated as an external subtitle file. Note that DivX media files and external subtitle files must be located in the same folder.
Only one external subtitle file can be displayed on this player. Use a computer, etc., to delete any external subtitle files you do not want to display from the disc.

Note
- Depending on the file, the external subtitles may not be displayed properly.
Switching the audio
For discs or files on which multiple audio streams/channels are recorded, audio streams/channels can be switched during playback.
▶ During playback, press AUDIO.
- The current audio and total number of recorded audio streams are displayed on the TV screen. To switch the audio, press AUDIO again.
- The audio can also be switched by selecting Audio from the TOOLS menu.
- If the audio is not switched when AUDIO is pressed, switch it from the disc menu screen.
Convert 2D image into 3D
Convert 2D image into a pseudo 3D image and output.
The TOOLS menu will be displayed.
2. Use ↑/ ↓ to select [2D To 3D], then press →.
3. Use ↑/ ↓ to select [On], then press ENTER.
![PIONEER MCS-FS131 - Use ↑/ ↓ to select [On], then press ENTER. - 1](/content/2024/12/119098/images/db28055173351acdaa780136a7113c5755cd032a59f83ac3280747022a77217d.jpg)
Note
• A TV that supports 3D must be connected.
- Depending on the disc and the image, the 3D effect may not work.
Switching the CD/SACD playback area
1. Select the area you want to play.
In the stop mode, press CD/SACD. The playback area switches on the front panel display window each time the button is pressed.
$$
[ \mathrm{CDAREA} ] \rightarrow [ \mathrm{SACD2CH} ] \rightarrow [ \mathrm{SACDMCH} ]
$$
→ (back to beginning)
- During playback, press ■ STOP twice to cancel continuous play before selecting the playback area.
▶ Press DISPLAY.
The disc information appears on the TV screen. To switch off the information display, press DISPLAY again.
The information display differs between during playback and when playback is stopped.
Enjoying BONUSVIEW or BD-LIVE
This player is compatible with BD-Video BONUSVIEW and BD-LIVE.
When using BD-Video discs compatible with BONUSVIEW, you can enjoy such functions as secondary video (picture in picture) (page 55) and secondary audio (page 55). With BD-Video discs supporting BD-LIVE, special video images and other data can be downloaded from the Internet.
Data recorded on BD video and downloaded from BD-LIVE is stored on the USB flash drive (external memory). To enjoy these functions, connect a USB flash drive (minimum 1 GB capacity, 2 GB or greater recommended) supporting USB 2.0 High Speed (480 Mbit/s) to the USB port.
- When you insert or remove a USB flash drive, be sure to turn the player's power off.
- To recall data stored in the USB flash drive, first insert the disc media that was being used at the time the data was downloaded (if a different disc is loaded, the data stored on the USB flash drive cannot be played).
- If a USB flash drive containing other data (previously recorded) is used, the video and audio may not play back properly.
- Do not disconnect the USB flash drive while playback is in progress.
- Some time may be required for the data to load (read/write).
Caution
- It may not be possible to use the BONUSVIEW and BD-LIVE functions if there is insufficient space on the USB flash drive. In this case, refer to Erasing data that has been added to BDs and application data on page 78 for erasing the Virtual Package data and the BD-LIVE data in the USB flash drive.
Note
• Operation of USB flash drives is not guaranteed.
- Playback of BD-LIVE function data differs depending on the disc used. For details, consult the user instructions supplied with the disc.
- To enjoy the BD-LIVE function, a network connection and settings are required (pages 39 and 77).
- BD-LIVE is a function that provides for connection to the Internet. Discs supporting the BD-LIVE function may send ID codes identifying this player and the disc to the contents provider via the Internet.
Playback functions
The functions that can be used differ according to the type of disc and file. In some cases, some of the functions cannot be used. Check the usable functions on the table below.
| Function ^1 | Disc/file type |
| BD-ROM | BD-R/-RE | DVD-Video | DVD-R/-RW(VR format) | AVCREC | AVCHD | Video file | Image file | Audio file | Audio CD |
| Forward and reverse scanning ^2 | ^3 | ^3 | ^3 | ^3 | ^3 | ^3 | ^3 | X | ^4 | ^4 |
| Playing specific titles, chapters or tracks | √ | √ | √ | √ | √ | √ | X | X | X | √ |
| Skipping content | √ | √ | √ | √ | √ | √ | √ | √ | √ | √ |
| Slow motion play ^2,5 | √ | √ | √ | √ | √ | √ | ^6 | √ | X | X |
| Step forward and step reverse ^2 | √ | √ | √ | √ | √ | √ | ^7 | √ | X | X |
| A-B Repeat play ^2 | √ | √ | √ | √ | √ | √ | √ | √ | √ | √ |
| Repeat Play | √ | √ | √ | √ | √ | √ | √ | √ | √ | √ |
| Zoom | √ | √ | √ | √ | √ | √ | √ | √ | X | X |
| Angle ^8 | √ | X | √ | X | X | X | X | X | X | X |
| Subtitle ^9 | √ | √ | √ | √ | √ | √ | √ | X | X | X |
| Audio ^10 | √ | √ | √ | √ | √ | √ | √ | X | X | X |
| Disc information | √ | √ | √ | √ | √ | √ | √ | √ | √ | √ |
-
Some functions may not work for some discs or files, even if indicated [✓] on the table.
-
For some discs, normal playback resumes automatically when the chapter switches.
-
No sound is produced during forward and reverse scanning.
-
Sound is produced during forward and reverse scanning.
-
No sound is output during slow motion playback.
-
Reverse slow motion playback is not possible.
-
Reverse step playback is not possible.
-
Angle mark is displayed for scenes at which multiple angles are recorded if Angle Mark is set to On (page 75).
-
• The types of recorded subtitles depend on the disc and file.
- In some cases, the subtitle may switch or the switching screen provided on the disc may be displayed immediately, without the current subtitle or the total number of subtitles recorded on the disc being displayed.
- The types of recorded audio streams depend on the disc and file.
Various functions can be called out according to the player's operating status.
Press TOOLS during playback.
2. Select and set the item.
Use ↑/↓ to select, then press ENTER.

Note
- Items that cannot be changed are displayed in gray. The items that can be selected depend on the player's status.
To change the setting of the selected item
Use / to change.
Press TOOLS.
| Item | Description |
| Title | Display the title information for the currently playing disc and total number of titles on the disc. Also select the title you want to play. (See the following description.) |
| Chapter (track/file)^1 | Display the information for the currently playing chapter (track/ file) and total number of chapters in the disc. Also select the chapter (track/file) you want to play. (See the following description.) |
| Time | Display the elapsed or remaining time.Also enter the time from which you want to start playback. (See the following description.) |
| Mode | Switch the play mode (page 56). |
| Audio | Switch the audio. |
| Angle | Switch the BD-ROM/DVD-Video disc's camera angle. |
| Subtitle | Switch the subtitle language. |
| Code Page | Switch the subtitle code page. |
| Secondary Video^2 | Switch the BD-ROM's secondary video (Picture-in-Picture). |
| Secondary Audio^3 | Switch the BD-ROM's secondary audio. |
| Bitrate | Display the bitrate of the audio/video/ secondary video/secondary audio. |
| Item | Description |
| Still off | Switch off the BD-ROM's still picture. |
| Ins Search | Skip forward 30 seconds. |
| Ins Replay | Skip backward 10 seconds. |
| 2D To 3D | Convert 2D image into a pseudo 3D image and output. |
| Slide Show | Switch the playback speed while playing the picture slide show. |
| Transition | Change the style of the slide show while playing the picture slide show. |
- One of these types of information is displayed, depending on the type of disc.
- Secondary video mark is displayed for scenes at which secondary video is recorded if PIP Mark is set to On (page 75).
- Secondary audio mark is displayed for scenes at which secondary audio is recorded if Secondary Audio Mark is set to On (page 75).
Note
- Selectable items depend on the type of disc.
- The types of recorded secondary audio streams depend on the disc and file.
- Some discs do not include secondary audio/secondary video.
- In some cases, the secondary audio/secondary video may switch or the switching screen provided on the disc may be displayed immediately, without the current secondary audio/secondary video or the total number of secondary audio/secondary video streams recorded on the disc being displayed.
Playing from a specific time (Time Search)
1. Select Time.
Use ↑/↓ to select, then press ENTER.
Use the number buttons (0 to 9) to input the time.
- To play from 45 minutes, input 0, 0, 4, 5, 0 and 0, then press ENTER.
- To play from 1 hour 20 minutes, input 0, 1, 2, 0, 0 and 0, then press ENTER.
- Press CLEAR to clear the values you have input.
3. Starting playback from the specified time.
Press ENTER.
Playing a specific title, chapter, track or file (Search)
- Select Title or Chapter (track/file).
Use ↑/↓ to select, then press ENTER.
- Input the Title or Chapter (track/file) number.
Use the number buttons (0 to 9) or ↑/↓ to input the number.
- To search for title 32, input 3 and 2, then press ENTER.
-
Press CLEAR to clear the values you have input.
-
Starting playback from the specified title, chapter or track.
Press ENTER.
Playing specified range of discs, titles or chapter (track/file) in random order
You can select from 2 types of random playback.
- Select Mode.
Use ↑/↓ to select, then press ENTER.
- Select the playing mode.
Use ↑/↓ to select, then press ENTER.
Random play
The specified range of discs, titles or chapter (track/file) is played in random order. The same item may be played consecutively.
◆ Shuffle play
The specified range of discs, titles or chapter (track/file) is played in random order. Each item is played once.
Continuing playback from a specified position (Continued Viewing Playback)
This function allows you to continue playback from a position you specify to be played next time, even after turning the power off.
Setting
▶ During playback, press CONTINUED at the position from which you want to start continued viewing playback.
The elapsed playing time at the specified position is displayed on the TV screen.
Playing
- Press ▶ PLAY to play the title for which you have set continued viewing playback.
The continued viewing playback confirmation screen appears.
- Use ◀/▶ to select Yes, then press ENTER.
Playback starts from the specified position.
Note
- The continued viewing playback setting is canceled when ▲ OPEN/CLOSE is pressed.
- Continued viewing playback may not work properly with some discs.
Chapter 5
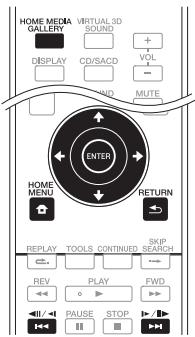

This player's Home Media Gallery function allows you to display a list of input sources and start playback. This chapter describes setup and playback procedures required to enjoy these features. When you play the files stored on your computer or the components on the network, it is advisory that you also refer to the operation manual supplied with your network component.
The input sources that can be played from Home Media Gallery are as shown below.
• BD-R/RE (BDAV format) discs
• DVD-R/RW (VR format) discs
• Audio CDs (CD-DA, SACD and DTS CDs)
- DVD/CDs on which only data files of video, image or audio files, etc. are recorded.
- USB device
- Files on the network servers (on the computers or components connected to the player via LAN interface.)
Note
- The Home Media Gallery allows you to play files on media servers connected to the same Local Area Network (LAN) as the unit.
- The following files are allowed to be played from Home Media Gallery:
- Computers running Microsoft Windows Vista or XP with Windows Media Player 11 installed
- Computers running Microsoft Windows 7 with Windows Media Player 12 installed
– DLNA-compatible digital media servers (on computers or other components)
Files stored in a computer or DMS (Digital Media Server) as described above can be played by Digital Media Player (DMP). The player supports the use of such DMP.
- Files stored in a computer or DMS (Digital Media Server) as described above can be played via command from an external Digital Media Controller (DMC). Devices controlled by this DMC to play files are called DMRs (Digital Media Renderers). This player supports this DMR function. When in the DMR mode, such operations as playing and stopping files can be performed from the external controller.
- To play back audio files stored on components on the network, you must turn on the DHCP server function of your router. In case your router does not have the built-in DHCP server function, it is necessary to set up the network manually. Otherwise, you cannot play back files stored on components on the network. See page 77.
About network playback
The network playback function of this unit uses the following technologies:
See Windows Media Player 11/Windows Media Player 12 above for more on this.
DLNA

dlna™
CERTIFIED
DLNA CERTIFIED ^® Audio Player
The Digital Living Network Alliance (DLNA) is a cross-industry organization of consumer electronics, computing industry and mobile device companies. Digital Living provides consumers with easy sharing of digital media through a wired or wireless network in the home.
The DLNA certification logo makes it easy to find products that comply with the DLNA Interoperability Guidelines. This unit complies with DLNA Interoperability Guidelines v1.5. When a computer running DLNA server software or a DLNA compatible device is connected to this player, some setting changes of software or other devices may be required. Please refer to the operating instructions for the software or device for more information.
DLNA ^® , the DLNA Logo and DLNA CERTIFIED ^® are trademarks, service marks, or certification marks of the Digital Living Network Alliance.
◆ Content playable over a network
- Even when encoded in a compatible format, some files may not play correctly.
- Some functions may not be supported depending on the server type or version used.
- Supported file formats vary by server. As such, files not supported by your server are not displayed on this unit. For more information check with the manufacturer of your server.
◆ Disclaimer for Third Party Content
Access to content provided by third parties requires a high speed Internet connection and may also require account registration and a paid subscription.
Third party content services may be changed, suspended, interrupted, or discontinued at any time without notice, and Pioneer disclaims any liability in connection with such occurrences.
Pioneer does not represent or warrant that content services will continue to be provided or available for a particular period of time, and any such warranty, express or implied, is disclaimed.
✿ About playback behavior over a network
- Playback may stall when the computer is switched off or any media files stored on it are deleted while playing content.
- If there are problems within the network environment (heavy network traffic, etc.) content may not be displayed or played properly (playback may be interrupted or stalled). For best performance, a 10BASE-T/100BASE-TX connection between the player and the computer is recommended.
- If several clients are playing simultaneously, as the case may be, playback is interrupted or stalled.
- Depending on the security software installed on a connected computer and the setting of such software, network connection may be blocked.
Pioneer is not responsible for any malfunction of the player and/or the Home Media Gallery features due to communication errors/malfunctions associated with your network connection and/or your computer, or other connected equipment. Please contact your computer manufacturer or Internet service provider.
Windows Media is either a registered trademark or trademark of Microsoft Corporation in the United States and/or other countries.
This product includes technology owned by Microsoft Corporation and cannot be used or distributed without a license from Microsoft Licensing, Inc.
Microsoft, Windows and Windows Vista are either registered trademarks or trademarks of Microsoft Corporation in the United States and/or other countries.
Playback file on the network
The Home Media Gallery can also be displayed by selecting [Home Media Gallery] from Home Menu, then pressing ENTER.
2. Select the server which contains the file you want to play.
3. Select the file you want to play.
Use ↑/↓ to select, then press ENTER.
Press HOME MEDIA GALLERY.

Note
- If you are unable to display the servers on the Home Media Gallery screen, select [DLNA Search] and press ENTER.
Disc/USB playback
The Home Media Gallery can also be displayed by selecting [Home Media Gallery] from Home Menu, then pressing ENTER.
2. Select Disc or USB.
Use ↑/↓ to select, then press ENTER.
3. Select Photo/Music/Video/AVCHD.
Use ↑/↓ to select, then press ENTER.
- This step is not for the discs that have been recorded with BDAV/VR/AVCREC format.
- To play files in AVCHD format on a USB device, create a folder named "AVCHD" on the USB device, then copy the "BDMV" folder containing which the files to be played into the "AVCHD" folder.
4. Select the title/track or file you want to play.
Use ↑/↓ to select, then press ENTER.
Playback starts from the selected title/track or file.
- If the file you want to play is in the folder, select the folder that contains the file first.
Playing back image files
About Slideshow
A display of the files on the disc or in the folder switches automatically.

Note
- When playing an audio CD (CD-DA/SACD/DTS-CD), the Now Playing screen is displayed.
- Some BD-R/-RE discs have playback protection. To cancel the protection, input the password set for the disc.
- It may take a few seconds before playback starts. This is normal.
- It may not be possible to play some files properly.
- The number of views may be restricted.
- Depending on the connected devices and conditions, some time may be required for playback to start and for the image to switch.
Switch Play Mode
Playback range can be selected from within a folder, or within the selected Disc/USB device.
- While stopped display the Home Menu.
Press HOME MENU.
- Select and confirm [Initial Setup].
Use ↑/↓ to select, then press ENTER.
- Select and confirm [Playback] → [Play Mode] → [All Play] or [Folder Play].
Use ↑/↓ to select, then press ENTER.
- Folder Play: Playback files from the selected folder.
- All Play: Playback all files on the selected USB device or disc.
Caution
- When using [All Play], a new file list will be displayed on the unit, regardless of original folder composition, and then played back in the order that they are displayed.
- The order the files are displayed in on the unit's file list may be different from the original order on your computer.
- Playback will stop once the final file on the file list is played.
- If you want to playback again from the top of the file list use the repeat function (page 50).
- The maximum number of files that can be displayed is 1000 files.
- The file list may take some time to be displayed when it includes a large number of files.
Playing in the desired order (Playlist)
The discs that can add tracks and files to the Playlist are as shown below.
- DVDs/CDs/USB devices on which audio files are recorded
Adding tracks/files
Use this procedure to add tracks and files, and create the Playlist.
- Press HOME MEDIA GALLERY to display the Home Media Gallery.
The Home Media Gallery can also be displayed by selecting [Home Media Gallery] from Home Menu, then pressing ENTER.
- Select Disc or USB.
Load the disc beforehand.
Use ↑/↓ to select, then press ENTER.
- Select the track/file to be added.
Use to select.
- Press POPUP MENU to display the POPUP MENU menu.
- Select Add to Playlist to add to Playlist.
Use ↑/↓ to select, then press ENTER.
The track or file selected in step 3 is added to the Playlist.
- To add more tracks or files, repeat steps 3 to 5.
Playing the playlist
-
Press HOME MEDIA GALLERY to display the Home Media Gallery.
The Home Media Gallery can also be displayed by selecting [Home Media Gallery] from Home Menu, then pressing ENTER.
-
Select Playlist.
Use ↑/↓ to select, then press ENTER.
- Select the track/file to be played.
Use ↑/↓ to select, then press ENTER. Playback starts from the selected track/file and continues until the end of the list is reached. Use I◀◀/▶▶I to play the previous or next track/file. The Now Playing screen is displayed.
Deleting tracks/files from the playlist
- Select the track/file to be deleted, then press POPUP MENU to display the POPUP MENU menu.
- Use ↑/↓ to select Remove from Playlist, then press ENTER.
Copy files to a USB
Files can be copied from the front USB device or from a data disc to the rear USB device.
Select and copy a single file/folder
You can only copy one file or one folder at a time.
The Home Media Gallery can also be displayed by selecting [Home Media Gallery] from Home Menu, then pressing ENTER.
2. Select [Disc] or [Front USB].
Use ↑/↓ to select, then press ENTER.
3. Select [Photo]/[Music]/[Video]/[AVCHD].
Use ↑/↓ to select, then press ENTER.
4. Select the file/folder you want to copy.
Use → to select.
[√] will be displayed to the left of the selected file/folder. You can only select one.
Press POPUP MENU.
6. Copy the file/folder to the rear USB device.
Use ↑/↓ to select [Copy 1 file/folder], then press ENTER.
- If you want to copy other files/folders, repeat steps 3 to 6.
Copy all files
The Home Media Gallery can also be displayed by selecting [Home Media Gallery] from Home Menu, then pressing ENTER.
2. Select [Disc] or [Front USB].
Use ↑/↓ to select, then press ENTER.
3. Select [Photo]/[Music]/[Video]/[AVCHD].
Use ↑/↓ to select, then press ENTER.
Press POPUP MENU.
5. Copy the file/folder to the rear USB device.
Use ↑/↓ to select [Copy All], then press ENTER.
- To copy other types of file, repeat steps 3 to 5.
Caution
- When using [Copy All], all files will be copied into a single folder regardless of the original folder composition.
- The order of the file list may differ from the order displayed on your computer.
- The maximum number of files that can be copied at once is 1000 files.
- You cannot overwrite when there is a file with the same name.
Note
- Different types of file, such as [Photo], [Music], [Video] and [AVCHD], cannot be copied at the same time.
- When copying starts, a [File] folder will be created in the [Pioneer] folder on the rear USB device.
• The maximum number of [File] folders is 99.
• This unit does not support a USB hub.
Image of [Copy All]
Example folder composition on a copy source (Front USB)
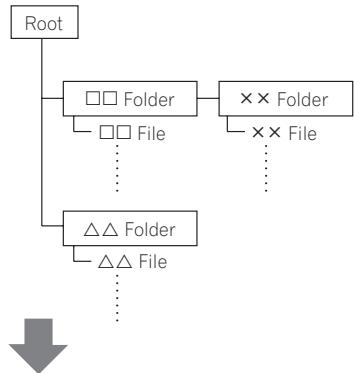
flowchart
graph TD
    A["Root"] --> B["Folder"]
    B --> C["×× Folder"]
    B --> D["File"]
    B --> E["..."]
    B --> F["△△ Folder"]
    F --> G["△△ File"]
    F --> H["..."]
Example folder composition on a copy source (Rear USB)
All files will be copied into a single folder regardless of the original folder composition.
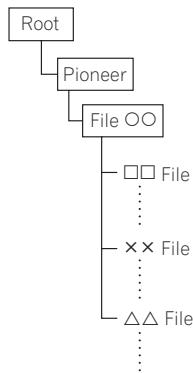
flowchart
graph TD
    A["Root"] --> B["Pioneer"]
    B --> C["File OO"]
    C --> D["□□ File"]
    C --> E["..."]
    C --> F["×× File"]
    C --> G["..."]
    C --> H["△△ File"]
Use the unit's Wi-Fi Direct™ function (MCS-838/MCS-434/MCS-FS232 only)
Wi-Fi Direct is a function that allows the unit and mobile device to be directly connected together without the need for a wireless LAN router. Installing a DLNA based application on your mobile device will allow you to playback on the unit photos, music and video files saved on your mobile device.

Note
- You can only connect one mobile device to the unit at a time with this function. If you want to connect a different mobile device, you will first need to disconnect the one that is currently connected.
- While connected via Wi-Fi Direct, you will be unable to use the unit's internet connection.
- While connected via Wi-Fi Direct, you will be unable to change sound settings.
- While connected via Wi-Fi Direct, you cannot use the Karaoke function.
- If the power to the unit is turned OFF (Standby) then this function will be terminated, and network settings will be returned to what they were before using this function.
- The unit does not support mobile device control using a specialist application.
- In order to use this function your mobile device must meet Wi-Fi specifications.
Display the Wi-Fi Direct mode screen
1. Press ⏻ STANDBY/ON and the power to the unit will come on.
The Pioneer logo will be displayed on the TV screen.
2. Press to display the Wi-Fi Direct mode screen.
- Settings to connect the unit and mobile devices will be started from this screen.
- This screen will also be displayed while the unit and your mobile device are connected using Wi-Fi Direct.
- Closing this screen will terminate the Wi-Fi Direct connection.

Caution
- If the Pioneer logo is not displayed, please check the following.
- If the unit is playing back, press the STOP and stop playback. After stopping playback, press the STOP again and cancel resume playback.
- If the Home Media Gallery or Home Menu are displayed, press HOME MENU and close the displayed screen.
- When an external input function such as FM or AUX input is selected, press HOME MENU twice.
Connect to mobile device
This is the normal method you should use to connect.
First display the Pioneer logo on the TV screen, then press ↑ to display the Wi-Fi Direct mode screen.
1. Under the "Wi-Fi Network Settings" on your mobile device, select the device name "DIRECT-xxBD" for this unit as displayed on the TV screen.
The “xx” shown here stands for the unit’s identification code.

Caution
- If the name of the unit "DIRECT-xxBD" does not appear on your mobile device, press RETURN on the remote control and then the ↑ button and perform the controls again from the Wi-Fi Direct Mode Screen.
2. Enter the password "xxxxxxxx" for the unit as shown on the TV screen into your mobile device.
The connection is then complete.

Note
- Please see the manual for your mobile device for details on how to operate it.
Connect using WPS (Wi-Fi Protected Setup)
You can connect using WPS if your mobile device supports it.
First display the Pioneer logo on the TV screen, then press ↑ to display the Wi-Fi Direct mode screen.
- Use / to select [WPS (PBC)], then press ENTER.
The WPS (Push Button Configuration) screen will be displayed.
- Use ←/→ to select [Next], then press ENTER.
- Turn on the WPS setting on your mobile device within 2 minutes.
If the connection is successful then [Connection Success] will be displayed on the TV screen.
- Press ENTER.
The connection is then complete.
The Wi-Fi Direct Mode screen will be displayed.
Note
- Please see the manual for your mobile device for details on how to operate it.
Connect using mobile device's Wi-Fi Direct function
You can connect using a Wi-Fi Direct function, if your mobile device has one.
First display the Pioneer logo on the TV screen, then press ↑ to display the Wi-Fi Direct mode screen.
- Turn on the Wi-Fi Direct setting on your mobile device.
- Use / to select [Search], then press ENTER.
A list of mobile devices that be connected to the unit will be displayed on the TV screen.
-
Use ↑/↓ to select a mobile device from the list, then press ENTER.
Depending on the mobile device you are using, a connection confirmation may be displayed on its screen.
If one is displayed, select [OK] or [Yes] on the mobile device to allow the connection. If the connection is successful then [Connection Success] will be displayed on the TV screen.
-
Press ENTER.
The connection is then complete. The Wi-Fi Direct Mode screen will be displayed.
Note
- Please see the manual for your mobile device for details on how to operate it.
Playback photos, music and video files from a mobile device
Send photos, music and video files from a mobile device to the unit.
Note
- Please see the manual for your mobile device for details on how to operate it.
- Depending on the mobile device you are using, you may need to first install software before you can send photos, music and video files.
Ending Wi-Fi Direct connection
Press RETURN while the Wi-Fi Direct mode screen is displayed.
The connection will be terminated. Network settings will be returned to what they were before using this function.

Note
- If you wish to playback a disc, USB device or web contents during Wi-Fi Direct connection, you must close the Wi-Fi Direct mode screen.
- When changing to external input functions such as FM and AUX input, you must close the Wi-Fi Direct Mode Screen.
Change SSID and password
Change the SSID and password used to connect the unit and a mobile device.
- Press ⏻ STANDBY/ON and the power to the unit will come on.
The Pioneer logo will be displayed on the TV screen.
- Press to display the Wi-Fi Direct mode screen.
- Use ←/→ to select [Refresh], then press ENTER.
SSID and password will be changed. The connection between the unit and mobile device will be terminated. After the connection is terminated, when using the unit's Wi-Fi Direct function again you will also need to set up the connection again.

Caution
- All connection settings that have been setup for mobile devices will be removed.
- The SSID and password will not change until an update (Refresh) is performed. You should periodically perform an update (Refresh) for security reasons.
Chapter 6
Playing the web contents
You can enjoy some streaming contents on the Internet with the player.
Available web contents
About YouTube
- This player supports the YouTube Leanback service. The YouTube Leanback service is only available in English for now.
- YouTube videos for mobile phones cannot be played.
• Some YouTube videos cannot be played.
About vTuner
• vTuner is an online content service for internet radio.
- The port number differs depending on the station broadcasting the internet radio, so be sure to check your firewall settings.
- The list of stations provided by vTuner is subject to change without prior notification.
- Broadcast may be cut short or cancelled by the radio station. Under these circumstances, playback will not occur even if the station appears on and can be selected from the station list.
- Depending on the station, data such as the name of tracks may not be displayed correctly.
- The guidance on the vTuner Access Screen is all conducted in English.
About Picasa
- Picasa is available only in English. Refer to instructions at http://picasa.google.com/support/for details.
- Register your user name and password on the computer before you use Picasa Web Albums.
- When you access Picasa from this player for the first time, select the New User icon and enter your registered user name and password.
Note
- Depending on the Internet connection environment, it may not be possible to play web contents properly.
- To access to web contents, this player requires a broadband Internet connection. A contract with an Internet provider is required for a broadband Internet connection.
- Access to content provided by third parties requires a high speed Internet connection and may also require account registration and a paid subscription. Third party content services may be changed, suspended, interrupted, or discontinued at any time without notice, and Pioneer disclaims any liability in
connection with such occurrences.
Pioneer does not represent or warrant that content services will continue to be provided or available for a particular period of time, and any such warranty, express or implied, is disclaimed.
- Disc playback and this function cannot be used at the same time.
Playing the items
Caution
You must connect the player to the Internet beforehand. See Connecting to your Home Network on page 39 for the details.

- Display the selection screen.
The selection screen can be selected by pressing ⚙ HOME MENU then selecting Web Contents → Desired web content.
- Select the type of web contents.
Use ↑/↓ to select, then press ENTER.
- Press ↑/↓ to select the item you want to play, then press ENTER.
To stop playback, press EXIT. Playback of the video stops.
Enjoying YouTube
- Display YouTube screen.
Press YouTube.
- Select file and playback.
Use /// to select, then press ENTER.
Press STOP to stop playback. Playback of image will stop.
Chapter 7
Other Operating
Recording Audio CD to a USB device
You can record audio CD to the rear USB device using this player.

Caution
- The USB port on the front of the unit cannot be used for recording.
- Insert an USB device into the USB port on the rear panel.
- Open the disc tray and place an Audio CD on the tray.
Press ▲ OPEN/CLOSE.
- Close disc tray.
When ▲ OPEN/CLOSE is pressed, playback will start automatically.
- If playback does not start automatically, press the ▶ PLAY on the remote or ▶/II (PLAY/PAUSE) on the device to start playback.
- Press USB REC during CD playback.
[CD RIP] will be displayed.
- Select the song or the Track No. you want to record.
If you are recording all the songs on the CD use /// to select [Select all] and press ENTER.
If you are selecting a Track to record use /// to select the Track No. and press ENTER.
Use ↑/↓/←/→ to select [Speed] and press ENTER.
- The recording speed will change each time ENTER is pressed. The recording speed will change as shown below.
Normal: when recording while listening to the music.
Fast: will record at approx 4x speed. You cannot listen to the music.
- Start recording.
Use ↑/↓/←/→ to select [Start] and press ENTER to start recording.
- Exit CD recording display.
Use /// to select [Cancel] then press ENTER after recording has finished.

Note
- Use cursor /// to select [Bitrate] then press ENTER to change the Bitrate setting.
The set speed will change each time [Bitrate] is pressed. The set value can be selected from those shown below.
$$
\begin{array}{l}\text {[ 64kbps ] \rightarrow [ 96kbps ] \rightarrow [ 128kbps ] \rightarrow [ 192kbps ]}\\rightarrow \text {[ 256kbps ] \rightarrow [ 320kbps ]}\end{array}
$$
- When you start recording, a [CD] folder will be created in the [Pioneer] folder on the unit's rear USB device.
- The maximum number of folders that can be created is 100.
• This unit does not support a USB hub.
iPod/iPhone/iPad playback (MCS-838/MCS-434/MCS-FS232 only)
Supported iPod/iPhone/iPad models:
Connect an iPod/iPhone/iPad
Use the USB cable supplied with your iPod/iPhone/iPad. Connect it to the unit's front USB.
Caution
- The USB port on the rear of the unit does not support iPod/iPhone/iPad. Please connect these devices to the USB port on the front of the unit.
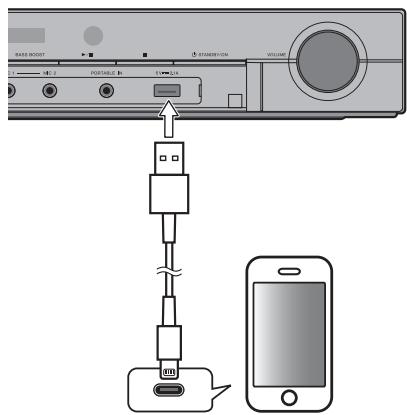
Note
- Some functions may be restricted depending on the model or software version.
- iPod/iPhone/iPad is licensed for reproduction of non-copyrighted materials or materials the user is legally permitted to reproduce.
- Features such as the equalizer cannot be controlled using this system, and we recommend switching the equalizer off before connecting.
- Pioneer cannot under any circumstances accept responsibility for any direct or indirect loss arising from any inconvenience or loss of recorded material resulting from iPod/iPhone/iPad failure.
- Your iPod/iPhone/iPad will not be charged when the unit power is turned off.
- For detailed instructions on using the iPod/iPhone/iPad, please refer to the manual supplied with the iPod/iPhone/iPad.
Playing your iPod/iPhone/iPad
1. Connect your iPod/iPhone/iPad.
To connect your iPod/iPhone/iPad, see Connect an iPod/iPhone/iPad on page 67.
| Button | What it does |
| ▶ PLAY | Starts normal playback. |
| ■ PAUSE | Pauses playback. |
| ■ STOP | Pauses playback. |
| ◀◀ PREV | Press to skip to the start of the current file, then previous files. |
| ▶▶ NEXT | Press to skip to the next file. |
| ◀◀ | Press to start fast reverse scanning. |
| ▶▶ | Press to start fast forward scanning. |
| MENU | Use to access the iPod/iPhone/iPad menu. |
| ↑/↓/ENTER | Use to control the iPod/iPhone/iPad menu. |

Caution
- If this unit cannot play your iPod/iPhone/iPad, perform the following troubleshooting checks:
- Check whether the iPod/iPhone/iPad is supported by this unit.
- Reconnect the iPod/iPhone/iPad to the unit. If this doesn't seem to work, try resetting your iPod/iPhone/iPad.
- Check the iPod/iPhone/iPad software is supported by this unit.
- If the iPod/iPhone/iPad cannot be operated, check the following items:
- Is the iPod/iPhone/iPad connected correctly? Reconnect the iPod/iPhone/iPad to the unit.
- Is the iPod/iPhone/iPad experiencing a hangup? Try resetting the iPod/iPhone/iPad, and reconnect it to the unit.

Note
- When input is switched from iPod to another function, iPod/iPhone/iPad playback is temporarily stopped.
Radio Operations
Be sure that FM aerial is connected. (Refer to the page 36)
Listening to the radio
- Press FUNCTION until FM appears in the display window and press ENTER. The last received station is tuned in.
- Scanning will start when either the ▶▶ or the ◀◀ button is pressed.
or
Press ↑/↓ repeatedly.
- Adjust the volume by rotating VOLUME on the front panel or by pressing VOL + or VOL - on the remote control repeatedly.
Presetting the radio stations
You can preset 50 stations for FM.
Before tuning, make sure that you have turned down the volume.
- Press FUNCTION until FM appears in the display window and press ENTER. The last received station is tuned in.
- Select the desired frequency by using / .
- Press PROGRAM a preset number will flash in the display window.
- Press ←/→ to select the preset number you want.
- Press PROGRAM.
The station is stored.
- Repeat the steps 2 to 5 to store other stations.
- You can select the stored station by pressing / .
Deleting all the saved stations
- Press and hold CLEAR for two seconds. [ERASE ALL] will flash up on the display window.
- Press CLEAR to erase all of the saved radio stations.
Improving poor FM reception
Press AUDIO on the remote control. This will change the tuner from stereo to mono and usually improve the reception.
The FM tuner is supplied with the RDS (Radio Data System) facility. This shows information about the radio station being listened to. Press BOOKMARK (RDS) repeatedly to cycle through the various data types:
| PS | (Programme Service Name)The name of the channel will appear in the display. |
| PTY | (Programme Type Recognition)The programme type (e.g. Jazz or News) will appear in the display. |
| RT | (Radio Text)A text message contains special information from the broadcast station. This text may scroll across the display. |
You can search the radio stations by programme type by pressing BOOKMARK (RDS). The display will show the last PTY in use. Press ZOOM (PTY) one or more times to select your preferred programme type. Press and hold ◀/►. The tuner will search automatically. When a station is found the search will stop.
FM Recording
The unit is capable of recording received FM broadcasts to the rear USB device.
Caution
- The USB port on the front of the unit cannot be used for recording.
- Connect the USB device to the USB port on the rear of the unit.
- Receive the broadcast station you wish to record.
- Press USB REC on the remote.
Recording will begin. The recording time will be displayed on the TV screen.
- Press STOP on the remote to stop recording.
Note
- If you switch from FM to another function while recording, the recording will be stopped.
- When you start recording, a [FM] folder will be created in the [Pioneer] folder on the unit's rear USB device.
- The maximum number of files that can be created is 100.
- The maximum single length of time that be recorded is 5 hours.
• This unit does not support a USB hub.
Karaoke
Enjoying Karaoke
1. Press KARAOKE on the remote control.
The Karaoke setting screen will be displayed on the TV screen.
Press KARAOKE to close the Karaoke settings screen.
2. Turn the Karaoke Switch on.
Select [Karaoke Switch] → [On] using cursor and press ENTER.
3. Adjust microphone volume.
Select [Microphone Setup] → [Mic Volume] using cursor and press ENTER.
Use / to adjust the microphone volume.
Press RETURN to finish.
◆ Adjust microphone echo
Select [Microphone Setup] → [Mic Echo] using cursor and press ENTER.
Use cursor / to adjust the microphone echo.
Press RETURN to finish.
Microphone echo can also be adjusted using
KEY/ECHO and ←/→ on the remote control.
Press KEY/ECHO to display [Mic Echo] and then adjust using / .
Adjust Key Control
Use ↑/↓/↔/→ to select [Key Control] → [Next], and then press ENTER.
Use ←/→ to adjust Key Control volume, and then press RETURN.
Key Control can also be adjusted using KEY/ ECHO and on the remote control.
Press KEY/ECHO to display [Key Control] and then adjust using ←/→.
❖ Switch Vocal Cancel on or off
Use cursor to select [Vocal Cancel] → [On] or [Off] and press ENTER.
◆ Turn the Karaoke score function on/off
Use /// to select [Karaoke Score] [On] or [Off], and then press ENTER.
When the Karaoke score function is turned on, a score will be displayed after each track ends.
Note
- Karaoke can only be used with disc playback or USB playback.
- Depending on the song, Vocal Cancel may not be effective.
- When inserting the MIC terminal, support the top of the unit with your hand to prevent it from moving.
- The microphone volume can also be adjusted using the MIC VOL +/- button on the remote control.
- If you turn on Vocal Cancel, Virtual 3D Sound settings and Surround settings are turned off. If you turn on Virtual 3D Sound settings or Surround settings when Vocal Cancel is on, Vocal Cancel is turned off.
- Turn the Karaoke Switch Off and Vocal Cancel and Karaoke Score will be turned off, and Key Control will be set to a value of 0.
- The sound may be distorted if the microphone volume is too high.
- If there is howling, move the microphone away from the speakers. Also try lowering the volume and echo level.
| Setting | Options | Explanation |
| Karaoke Switch | Off | Select when not using Karaoke. |
| On | Select when using Karaoke. |
| Microphone Setup | Mic Volume | Select to adjust the volume of your microphone.Use ←/→ to perform the adjustment on the mic volume adjustment screen. |
| Mic Echo | Select to adjust the level of microphone echo.Use ←/→ to perform the adjustment on the mic echo adjustment screen. |
| Key Control | Select to adjust the level of the key control.Use ←/→ to perform the adjustment on the key control adjustment screen. |
| Vocal Cancel | Off | Select when you want Vocal Cancel off. |
| On | Select when you want Vocal Cancel on. |
| Karaoke Score | Off | Turn Karaoke score function Off. |
| On | Turn Karaoke score function On. |
Sound
Press SOUND on the remote control to display the sound select menu on the TV screen.
Use cursor button to make a selection, then press ENTER.
Press SOUND to exit the Sound Menu.

Note
- When HDMI IN 1, 2, 3 or 4 is selected, the Sound Menu cannot be displayed. Switch to other input source and then switch the Sound.
- When disc/file is stopped, SOUND menu cannot be displayed. Please switch SOUND when disc/file is being played.
- When vTuner is selected, Virtual 3D Sound, Dolby PL II Movie, Dolby PL II Music, and Front Surround Mode are not effective.
| Setting | Options | Explanation |
| Sound Retriever | Off | A WMA, MP3 or AAC file is played with high sound quality. This is only valid for files with the extension “.wma”, “.mp3” or “.m4a”. The effect depends on the file. Try different settings, and choose the one providing the best effect. |
| Low |
| High |
| Equalizer | Add a variety of effects to the output sound. Select a mode that suits your personal tastes. |
| Off | |
| News | This mode is suited to the news. |
| Gaming | This mode is suited to video games. |
| Movie | This mode is suited to movies. |
| Music | This mode is suited to music. |
| Surround (MCS-838/MCS-434/MCS-737/MCS-333) | Off | |
| Virtual 3D Min | Effect is minimum | Virtual 3D Sound: Has the effect of creating a 3D sound space. |
| Virtual 3D Mid | Effect is moderate |
| Virtual 3D Max | Effect is maximum |
| Extra Power Mode | The sound from the front speakers will also be output by the rear speakers. This mode is valid in both 2 channel audio source and 5.1 channel audio source. |
| 5 Speaker Mode | The same sound will be output from the 5 speakers other than the sub woofer. This mode is valid in both 2 channel audio source and 5.1 channel audio source. |
| Dolby PL II Movie | Dolby Pro Logic II enables you to play stereo source on 5.1-channel. This mode is valid in 2 channel audio source. |
| Dolby PL II Music |
| Front Surround Mode | Suited to when restrictions on speaker placement mean you have to place surround speakers alongside your front speakers. |
| Virtual 3D Sound (MCS-FS232/MCS-FS131) | Off | |
| Min | Effect is minimum | Virtual 3D Sound: Has the effect of creating a 3D sound space. |
| Mid | Effect is moderate |
| Max | Effect is maximum |
| Bass Boost | Off | Switch to Bass Boost mode. This will emphasize deeper sounds and increase the impact of movies and music. |
| On |
| Audio Sync | Adjust the delay between image and sound. Use ←/→ to adjust. |
Chapter 8
Advanced settings
Changing the settings
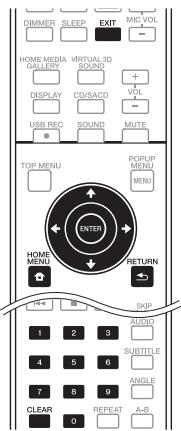
Operating the initial setup screen
- When playback is stopped, display the Home Menu screen.
Press HOME MENU.
- Select and set Initial Setup.
Use ↑/↓ to select, then press ENTER.
- Select the item and change the setting.
Use ↑/↓/←/→ to select, then press ENTER.
◆ Closing the Initial Setup screen
Press ↗ HOME MENU or ↙ RETURN.
Note
- The items that can be selected depend on the player's status.
- In Options, the factory default settings are indicated in bold.
| Setting | Options | Explanation |
| TV Screen | 16:9 Full | Select this when connecting to a wide (16:9) TV. |
| 16:9 Normal | Select this when connected to a wide (16:9) TV. 4:3 pictures are displayed with vertical black bars along the sides. |
| 4:3 Pan&Scan | Select this when connecting to a 4:3 screen TV and playing a 16:9 video. The video will be played with the left and right sides of the image cut off to display on the 4:3 screen. (This function works if the disc is labeled for 4:3PS.) |
| 4:3 Letterbox | Select this when connecting to a 4:3 screen TV and playing a 16:9 video. The video will be played with black bands at the top and bottom. |
| Video Adjust | Standard | Choose the video output mode. |
| Vivid |
| Cinema |
| Custom | The quality of the playback picture can be adjusted according to the TV you are using (page 77). |
| Noise Reduction | 0 | Choose the level of noise reduction. |
| 1 |
| 2 |
| 3 |
| Net Contents Mode | Off | Select this to automatically correct compressed video files on the network, a disc or a USB device and play them with a more natural picture quality. |
| On |
| Setting | Options | Explanation |
| Audio Output | DRC (Dynamic Range Control) | Off | Select this to output audio signals without using the DRC function. |
| On | Select this to adjust the range between the loudest and softest sounds (dynamic range) for playback at average volume. Use this when it is hard to hear dialog or when watching movies at midnight. |
| Auto | Select to switch the DRC setting On/Off automatically according to the input audio signal from the disc. This only affects Dolby TrueHD signals. |
| • This affects such audio signals as Dolby Digital, Dolby TrueHD, and Dolby Digital Plus.• Depending on the disc, the effect may be weak. |
| Speaker Setup | Adjust the Trim (output level) and Delay (distance from viewers) of the speakers.Please see “Adjust speaker settings” for more details (page 77). |
| Test Tone | Output a test tone from the speakers. |
| HDMI | Color Space | RGB | Select this to output the video signals as RGB signals. Choose this if the colors seem too faint and the black seems too bright. |
| YCbCr | Select this to output the video signals as YCbCr 4:4:4 signals. |
| YCbCr 422 | Select this to output the video signals as YCbCr 4:2:2 signals. |
| Full RGB | Select this to output the video signals as RGB signals. Choose this if the colors seem too dense and all the dark colors are displayed in a uniform black. |
| Resolution | Auto | Select this to choose the resolution of the video signals output from the HDMI OUT terminal automatically. |
| 480I/576I | Output the video signals from the HDMI OUT terminal with the selected resolution. |
| 480P/576P | The resolution can be changed by pressing RESOLUTION, but Auto cannot be selected. |
| 720P |
| 1080I |
| 1080P |
| HDMI Audio Out | Bitstream | Select this to output HDMI audio signals directly. |
| PCM | Select this to output HDMI audio signals converted to PCM audio signals. |
| Reencode | When a BD containing secondary audio and interactive audio is played, the two audio signals are mixed and converted to DTS audio for output. |
| Off | Select this when you do not want to output the audio signal from the HDMI output terminal. |
| HDMI Deep Color | 30bits | Select this when outputting the video signals with 30-bit color. |
| 36bits | Select this when outputting the video signals with 36-bit color. |
| Off | Select this when outputting the video signals with normal 24-bit color. |
| When [30bits] or [36bits] is selected, set the color space to a setting other than YCbCr 422. |
| HDMI 1080P 24Hz | On | Select this when Resolution is set to Auto or 1080P and outputting 1080p/24 video signals to a TV compatible with 1080p/24. |
| Off | Select this when Resolution is set to 1080P and outputting 1080p/60 video signals to a TV compatible with 1080p/60. |
| HDMI 3D | Auto | With 3D discs, the disc is played with 3D images. |
| Off | 3D images are not played. |
| 3D Notice | Yes | This sets whether or not to display the 3D notice when playing 3D images. |
| No |
| HDMI In Audio Through | On | Specifies the routing of the HDMI audio signal out of this system (amp) or through to a TV. When On is selected, no sound is output from this system. Off: Playback using speakers connected to the unit. On: Playback through TV connected to the unit via HDMI output |
| Off |
| Control | On | Select this to control the player with the remote control of the connected AV device using an HDMI cable. Also refer to page 35. |
| Off | Select this when you do not want to control the player with the remote control of the connected AV device using an HDMI cable. |
| Network | IP Address Setting | Select this to set the IP address of the player and DNS server (page 77). |
| Proxy Server | Only set the proxy server if so instructed by your Internet service provider (page 78). |
| Information | Displays the values of the MAC address, IP address, subnet mask, default gateway, DNS server (primary) and DNS server (secondary). |
| Connection Test | Select this to test the network connection (page 78). |
| Internet Connection | Enable | Select this when connecting to the Internet. |
| Disable | Select this when not connecting to the Internet. |
| BD-Live Connection | Permitted | All discs are allowed to connect to BD-LIVE. |
| Partial Permitted | Only discs whose safety has been confirmed are allowed to connect to BD-LIVE. |
| Prohibited | No disc is allowed to connect to BD-LIVE. |
| DLNA | Enable | Select this when connecting to DLNA server. |
| Disable | Select this when not connecting to DLNA server. |
| Interface | Ethernet | Select when using a LAN cable to connect to the network. |
| Wireless | Select when connecting wirelessly to the network. |
| Wireless Setting | Perform settings for a wireless network connection (page 40). |
| Language | OSD | available languages | Choose a language for the on-screen displays from the listed languages. |
| Audio* For some discs, it may not be possible to change to the selected language. | available languages | Choose a language from the listed languages to set the default audio language for BD-ROM and DVD-Video playback. |
| If a language not recorded on the BD/DVD is set, one of the recorded languages is automatically selected for playback. |
| Subtitle* For some discs, it may not be possible to change to the selected language. | available languages | Choose a language from the listed languages to set the default subtitle language for BD-ROM and DVD-Video playback. |
| If a language not recorded on the BD/DVD is set, one of the recorded languages is automatically selected for playback. |
| Menu* For some discs, it may not be possible to change to the selected language. | available languages | Choose a language from the listed languages to set the default language for BD-ROM and DVD-Video menus. |
| If a language not recorded on the BD/DVD is set, one of the recorded languages is automatically selected for playback. |
| Playback | Angle Mark | On | Select this to display the angle mark on the TV screen (page 51). |
| Off | Select this if you do not want to display the angle mark on the TV screen. |
| PIP Mark | On | Select this to display the PIP mark on the TV screen. |
| Off | Select this if you do not want to display the PIP mark on the TV screen. |
| Secondary Audio Mark | On | Select this to display the secondary audio mark on the TV screen (page 55). |
| Off | Select this if you do not want to display the secondary audio mark on the TV screen. |
| DivX® VOD DRM | Registration Code | Displays the player's registration code required to play DivX VOD files (page 15). |
| Internet Setting | Permitted | Web contents can be watched without entering the password. |
| Partial Permitted | The password must be entered to watch web contents. |
| Prohibited | No web contents can be watched. |
| Disc Auto Playback | On | Discs are played automatically after they are loaded. |
| Off | Loaded discs do not start playing automatically. |
| Last Memory | On | Select this to save the point at which you last stopped playback, even after the disc tray is opened or you switch to the standby mode. |
| Off | Select this when you want to use only Continue Viewing Play (page 56). |
| Playback | PBC (Play Back Control) | On | Select this to play Video-CDs (version 2.0) compatible with PBC using the disc menu. |
| Off | Select this to play Video-CDs (version 2.0) compatible with PBC without using the disc menu. |
| Play Mode | Folder Play | Playback files from the selected folder. |
| All Play | Playback all files on the selected USB device or disc. |
| Setup Navigator | Start making the settings using the Setup Navigator menu. For details, see page 45. |
| Security | Change Password | Register (change) the password for parental lock settings or for unlocking to play DVD-Videos with the parental lock feature (page 79). The default password is “0000”. |
| Parental Control | Change the player's parental lock level (page 79). |
| Country Code | Change the Country/Area code (page 79). |
| Options | Screen Saver | Off | The screen saver is not activated. |
| 1 min | The screen saver will be activated if no operation has been performed for more than one minute/two minutes/three minutes. Operating the remote control can deactivate the screen saver. |
| 2 min |
| 3 min |
| Auto Power Off | Off | Select this if you do not want the power to turn off automatically. |
| 10 min | The power will be automatically turned off if no operation has been performed for more than 10 minutes/20 minutes/30 minutes. |
| 20 min |
| 30 min |
| Quick Start | On | Select to shorten the required time to boot up. |
| Off | Select to perform normal bootup. |
| Update | USB Storage | Select the method of software updating. (page 80) |
| Network |
| Load Default | Restore the settings to the factory default. |
| System Information | Check the system version number. |
| BUDA | BUDA Information | Display and set up the BUDA data on the connected USB device (page 78). |
| BUDA Setup |
Adjusting the video
- Select and set Display Setting → Video Adjust → Custom.
Use ↑/↓ to select, then press ENTER.
- Select the item and change the setting.
Use / to select the item, then use / to change the setting. Once the setting is completed, press RETURN to close the settings screen.
| Item | Description |
| Brightness | Select this to adjust the TV screen's brightness. |
| Saturation | Select this to adjust the TV screen's saturation. |
| Hue | Select this to adjust the color (green and red) balance of the TV screen. |
| Contrast | Select this to adjust the TV screen's contrast. |
| Sharpness | Choose the level of sharpness. |
| CTI (Color Transient Improvement) | Provides images with clearer color contours. |
◆ Adjust speaker settings
- Select and set Audio Output → Speaker Setup → Next Screen.
Use /// to select, then press ENTER.
- A picture of speakers will be shown on the screen. Select the speaker using cursor and press ENTER.
- Use ↑/↓ to select Trim or Delay and then press ENTER.
- Use cursor ←/→ to adjust the setting, then press ENTER.
❖ Adjust speaker settings while listening to a sound
- Select and set Audio Output → Test Tone → Next Screen.
Use ↑/↓/←/→ to select, then press ENTER.
- A test tone will be output. The speakers will switch automatically.
- A picture of speakers will be shown on the screen. Press ENTER when the speaker you wish to adjust to is focused.
- Use ↑/↓ to select Trim or Delay and then press ENTER.
5 Use ←/→ to adjust the setting, then press ENTER.
$$
^ {*} 1 \mathrm{ms} = 3 0 \mathrm{cm}
$$
Setting the IP address
- Select and set Network → IP Address Setting → Next Screen.
Use ↑/↓ to select, then press ENTER.
- Set IP address.
Use /// to set the IP address of the player or DNS server, then press ENTER.
• Auto Set IP Address
On – The player's IP address is obtained automatically. Select this when using a broadband router or broadband modem that has a DHCP (Dynamic Host Configuration Protocol) server function. This player's IP address will automatically be allocated from the DHCP server.
Off – The player's IP address must be set manually. Use the number buttons (0 to 9) to input the IP address, subnet mask and default gateway.
Note
- For information on the DHCP server function, refer to the operating instructions for the network device.
- You may need to contact your Internet service provider or network administrator when inputting the IP address manually.
Setting the proxy server
Only set the proxy server if so instructed by your Internet service provider.
- Select and set Network → Proxy Server → Next Screen.
Use ↑/↓ to select, then press ENTER.
- Select and set Use or Not use at Proxy Server.
Use ←/→ to change, then press ↓.
- Use – Select this when using a proxy server.
- Not use – Select this when not using a proxy server.
If you have selected Use, proceed to step 3.
- Select and set Server Select Method.
Use ←/→ to change, then press ↓.
Use the number buttons (0 to 9) to input the number if you select IP address in step 3.
Use ←/→ to move the cursor.
When Server Name is selected in step 3, use the number buttons (0 to 9) to launch the software keyboard. Now use /// to select characters and items, then press ENTER to input.
- Input Port Number.
Press ↓, then use the number buttons (0 to 9) to input the number.
- Press ENTER to set.
◆ Displaying the network settings
▶ Select and set Network → Information → Next Screen.
Use ↑/↓ to select, then press ENTER.
The MAC address, IP address, subnet mask, default gateway and DNS server (primary and secondary) settings are displayed.
When Auto Set IP Address is set to On, the values obtained automatically are displayed.
Note
- [0.0.0.0] is displayed when each IP address has not been set.
◆ Testing the network connection
▶ Select and set Network → Connection Test → Start.
Use ↑/↓ to select, then press ENTER.
[Network is OK.] is displayed once the test is completed. If any other message is displayed, check the connections and/or settings (pages 39 and 77).
- Changing to other language at language setting
- Select and set Language.
Use ↑/↓ to select, then press ENTER.
- Select and set OSD, Audio, Subtitle or Menu
Use ↑/↓ to select, then press ENTER.
- Select and set the desired language.
Use ↑/↓ to select, then press ENTER.
Note
- If a language not recorded on the BD/DVD is set, one of the recorded languages is automatically selected and played.
❖ Erasing data that has been added to BDs and application data
Use this procedure to erase data that has been added to BDs (data downloaded with the BD-LIVE function and data used with the BONUSVIEW function) and application data.
Caution
Use ↑/↓ to select, then press ENTER.
- Select and set Fmt buda.
Press ENTER.
◆ Registering or Changing the password
Use this procedure to register or change the code number required for the Parental Lock settings.
About default password of this unit
The default password is [0000].
- This unit might ask you to enter a password when you change the password.
- If you reset this unit, your password is simultaneously changed to the default setting.
1. Select and set Security → Change Password → Next Screen.
Use ↑/↓ to select, then press ENTER.
Use the number buttons (0 to 9) to input the number, then press ENTER to set.
Use ←/→ to move the cursor.
Use the number buttons (0 to 9) to input the number, then press ENTER to set.
Use ←/→ to move the cursor.
- To change the password, input the previously registered password, then input the new password.
Note
• We recommend making a note of the password.
- If you have forgotten the password, reset the player to the factory default setting, then register the password again (page 81).
- Changing the Parental Lock level for viewing DVDs/BD-ROMs
Some DVD-Video discs containing scenes of violence, for example, have Parental Lock levels (check the indications on the disc's jacket or elsewhere). To restrict viewing these discs, set the player's level to the level lower than the discs.
1. Select and set Security → Parental Control → Next Screen.
Use ↑/↓ to select, then press ENTER.
Use the number buttons (0 to 9) to input the number, then press ENTER to set.
Use ←/→ to move the cursor.
3. Change the level.
Use to change, then press ENTER to set.
Note
- The level can be set to Off or between Level1 and Level8. When set to Off, viewing is not restricted.
◆ Changing the Country/Area code
1. Select and set Security → Country Code → Next Screen.
Use ↑/↓ to select, then press ENTER.
Use the number buttons (0 to 9) to input the number, then press ENTER to set.
Use ←/→ to move the cursor.
3. Change the country/area code.
Use / to change, then press ENTER to set. Refer to page 82.
Software updating
The player's software can be updated using one of the methods shown below.
- Connecting to the Internet.
• Using a USB flash drive.
Product information on this player is provided on the Pioneer website. Check the website shown on page 10 for update and service information on your Blu-ray disc player.

Caution
- Do not unplug the power cord or remove the USB flash drive during software updating. Also, do not reboot by pressing the Ⓧ STANDBY/ON button for 5 seconds or longer. Otherwise, the updating will be aborted and malfunction may occur with the player.
- There are two processes for software updating, downloading and updating. Both processes may take a certain period of time.
- Other operations are defeated during software updating. Furthermore, updating process cannot be canceled.
◆ Updating connecting to the Internet
- Connect to the Internet.
- When playback is stopped, display the Home Menu screen.
Press HOME MENU.
- Select and set Initial Setup.
Use ↑/↓ to select, then press ENTER.
- Select and set Options → Update → Network → Start.
Use ↑/↓/←/→ to select, then press ENTER.
- Updating starts.
Press ENTER.
- Software updating may take a certain period of time.
- When updating is completed, the unit restarts automatically.
◆ Updating using a USB flash drive

Note
- When an update file is provided on the Pioneer website, use your computer to download it onto a USB flash drive. Carefully read the instructions on downloading update files provided on the Pioneer website.
- Store the update file in the root directory of the USB flash drive. Do not store it within a folder.
- Do not put any files other than the update file on the USB flash drive.
- The player supports USB flash drive formatted in FAT32/FAT16/NTFS. When formatting a USB flash drive on your computer, do so with the settings below.
- File system: FAT32
- Allocation unit size: Default allocation size
- Only store the most recent update file on the USB flash drive.
-
Do not use a USB extension cable to connect a USB flash drive to the player. Using a USB extension cable may prevent the player from performing correctly.
-
Plug in the USB flash drive on which the update file is stored.
- When playback is stopped, display the Home Menu screen.
Press HOME MENU.
- Select and set Initial Setup.
Use ↑/↓ to select, then press ENTER.
- Select and set Options → Update → USB Storage → Start.
Use /// to select, then press ENTER.
- Updating starts.
Press ENTER.
- Software updating may take a certain period of time.
- When updating is completed, the unit restarts automatically.
Restoring all the settings to the factory default settings
- Check that the player's power is turned on.
-
When playback is stopped, display the Home Menu screen.
Press HOME MENU.
-
Select and set Initial Setup.
Use ↑/↓ to select, then press ENTER.
- Select and set Options → Load Default → Next Screen.
Use ↑/↓ to select, then press ENTER.
- Select and set OK.
Use ←/→ to select, then press ENTER.
-
Press ⏻ STANDBY/ON to turn off the power.
-
Press ⏻ STANDBY/ON to turn on the power.
Note
- After restoring all the settings to the factory default settings, use Setup Navigator to reset the player (page 45).
Language code table and country/area code table
◆ Language code table
Language name, language code, input code
Abkhazian, ab/abk, 0102
Afar, aa/aar, 0101
Albanian, sq/sqi, 1917
Amharic, am/amh, 0113
Arabic, ar/ara, 0118
Armenian, hy/hye, 0825
Assamese, as/asm, 0119
Aymara, ay/aym, 0125
Azerbaijani, az/aze, 0126
Bashkir, ba/bak, 0201
Basque, eu/eus, 0521
Belarusian, be/bel, 0205
Bengali, bn/ben, 0214
Bihari, bh/bih, 0208
Bislama, bi/bis, 0209
Breton, br/bre, 0218
Bulgarian, bg/bul, 0207
Burmese, my/mya, 1325
Catalan, ca/cat, 0301
Central Khmer, km/khm, 1113
Chinese, zh/zho, 2608
Corsican, co/cos, 0315
Croatian, hr/hrv, 0818
Czech, cs/ces, 0319
Danish, da/dan, 0401
Dutch, nl/nld, 1412
Dzongkha, dz/dzo, 0426
English, en/eng, 0514
Esperanto, eo/epo, 0515
Estonian, et/est, 0520
Finnish, fi/fin, 0609
Fijian, fj/fij, 0610
Faroese, fo/fao, 0615
Georgian, ka/kat, 1101
German, de/deu, 0405
Greek, el/ell, 0512
Guarani, gn/grn, 0714
Gujarati, gu/guj, 0721
Hausa, ha/hau, 0801
Hebrew, iw/heb, 0923
Hindi, hi/hin, 0809
Hungarian, hu/hun, 0821
Icelandic, is/isl, 0919
Indonesian, in/ind, 0914
Interlingua, ia/ina, 0901
Interlingue, ie/ile, 0905
Inupiaq, ik/ipk, 0911
Irish, ga/gle, 0701
Italian, it/ita, 0920
Japanese, ja/jpn, 1001
Javanese, jw/jav, 1023
Kalaallisut, kl/kal, 1112
Kannada, kn/kan, 1114
Kashmiri, ks/kas, 1119
Kazakh, kk/kaz, 1111
Kinyarwanda, rw/kin, 1823
Kirghiz, ky/kir, 1125
Korean, ko/kor, 1115
Kurdish, ku/kur, 1121
Lao, lo/lao, 1215
Latin, la/lat, 1201
Latvian, lv/lav, 1222
Lingala, In/lin, 1214
Lithuanian, It/lit, 1220
Macedonian, mk/mkd, 1311
Malagasy, mg/mlg, 1307
Malay, ms/msa, 1319
Malayalam, ml/mal, 1312
Maltese, mt/mlt, 1320
Maori, mi/mri, 1309
Marathi, mr/mar, 1318
Mongolian, mn/mon, 1314
Moldavian, mo/mol, 1315
Nauru, na/nau, 1401
Nepali, ne/nep, 1405
Norwegian, no/nor, 1415
Occitan, oc/oci, 1503
Oriya, or/ori, 1518
Oromo, om/orm, 1513
Panjabi, pa/pan, 1601
Persian, fa/fas, 0601
Polish, pl/pol, 1612
Portuguese, pt/por, 1620
Pushto, ps/pus, 1619
Quechua, qu/que, 1721
Romanian, ro/ron, 1815
Romansch, rm/roh, 1813
Rundi, rn/run, 1814
Sanskrit, sa/san, 1901
Scottish Gaelic, gd/gla, 0704
Serbian, sr/srp, 1918
Serbo-Croatian, sh/---, 1908
Shona, sn/sna, 1914
Sindhi, sd/snd, 1904
Sinhalese, si/sin, 1909
Slovak, sk/slk, 1911
Slovenian, sl/slv, 1912
Somali, so/som, 1915
Sotho, Southern, st/sot, 1920
Spanish, es/spa, 0519
Sundanese, su/sun, 1921
Swahili, sw/swa, 1923
Swati, ss/ssw, 1919
Swedish, sv/swe, 1922
Telugu, te/tel, 2005
Thai, th/tha, 2008
Tibetan, bo/bod, 0215
Tigrinya, ti/tir, 2009
Tonga (Tonga Islands), to/ton, 2015
Tsonga, ts/tso, 2019
Tswana, tn/tsn, 2014
Turkmen, tk/tuk, 2011
Turkish, tr/tur, 2018
Twi, tw/twi, 2023
Ukrainian, uk/ukr, 2111
Urdu, ur/urd, 2118
Uzbek, uz/uzb, 2126
Vietnamese, vi/vie, 2209
Volapük, vo/vol, 2215
Welsh, cy/cym, 0325
Western Frisian, fy/fry, 0625
Wolof, wo/wol, 2315
Xhosa, xh/xho, 2408
Yiddish, ji/yid, 1009
Cayman Islands, ky, 1125
Chile, cl, 0312
China, cn, 0314
Colombia, co, 0315
Croatia, hr, 0818
Cyprus, cy, 0325
Czech Republic, cz, 0326
Denmark, dk, 0411
Dominica, dm, 0413
Dominican Republic, do, 0415
Estonia, ee, 0505
Finland, fi, 0609
France, fr, 0618
Georgia, ge, 0705
Germany, de, 0405
Greece, gr, 0718
Greenland, gl, 0712
Grenada, gd, 0704
Guyana, gy, 0725
Haiti, ht, 0820
Hong Kong, hk, 0811
Hungary, hu, 0821
Iceland, is, 0919
India, in, 0914
Indonesia, id, 0904
Ireland, ie, 0905
Israel, il, 0912
Italy, it, 0920
Jamaica, jm, 1013
Japan, jp, 1016
Kazakhstan, kz, 1126
Korea, Republic of, kr, 1118
Kyrgyzstan, kg, 1107
Latvia, Iv, 1222
Liechtenstein, li, 1209
Lithuania, It, 1220
Luxembourg, lu, 1221
Macedonia, the Former
Yugoslav Republic of, mk, 1311
Malaysia, my, 1325
Malta, mt, 1320
Mexico, mx, 1324
Moldova, Republic of, md, 1304
Monaco, mc, 1303
Montserrat, ms, 1319
Netherlands, nl, 1412
New Zealand, nz, 1426
Norway, no, 1415
Pakistan, pk, 1611
Peru, pe, 1605
Philippines, ph, 1608
Poland, pl, 1612
Portugal, pt, 1620
Puerto Rico, pr, 1618
Romania, ro, 1815
Russian Federation, ru, 1821
Saint Kitts and Nevis, kn, 1114
Saint Lucia, lc, 1203
Saint Vincent and
Grenadines, vc, 2203
San Marino, sm, 1913
Singapore, sg, 1907
Slovakia, sk, 1911
Slovenia, si, 1909
Spain, es, 0519
Suriname, sr, 1918
Sweden, se, 1905
Switzerland, ch, 0308
Taiwan, Province of China, tw, 2023
Tajikistan, tj, 2010
Thailand, th, 2008
Trinidad and Tobago, tt, 2020
Tunisia, tn, 2014
Turkey, tr, 2018
Turkmenistan, tm, 2013
Turks and Caicos Islands, tc,
2003
Ukraine, ua, 2101
United Kingdom, gb, 0702
United States, us, 2119
Uruguay, uy, 2125
Uzbekistan, uz, 2126
Venezuela, ve, 2205
Virgin Islands, British, vg, 2207
Chapter 9
Troubleshooting
Incorrect operation is often mistaken for trouble or malfunction. If you think that there is something wrong with this component, check the points below. Sometimes the trouble may lie in another component. Inspect the other components and electrical appliances being used. If the trouble cannot be rectified even after checking the points below, ask your nearest Pioneer authorized service center or your dealer to carry out repair work.
Picture
| Problem | Check | Remedy |
| No picture is displayed or the picture is not displayed properly. | Is the HDMI cable properly connected? | Connect the cable properly according to the connected devices (page 35).Disconnect the HDMI cable, then reinsert it firmly and all the way in. |
| Is the HDMI cable damaged? | If the cable is damaged, replace it with a new one. |
| Is the input setting on the connected TV right? | Read the operating instructions for the connected components and switch to the proper input. |
| Is the output video resolution properly set? | Press RESOLUTION to switch the video resolution output from the HDMI OUT terminal (page 20). |
| Is the player connected with an HDMI cable other than a High Speed HDMI ^ / ^TM Cable (with a Standard HDMI ^ / ^TM cable)? | Connect to the TV using a High Speed HDMI ^ / ^TM Cable. |
| Is a DVI device connected? | The picture may not be displayed properly if a DVI device is connected. |
| Is Color Space properly set? | Change the Color Space setting (page 74). |
| Picture is stretched.Picture is cropped.Aspect ratio cannot be switched. | Is the TV's aspect ratio properly set? | Read the operating instructions for the TV and set the TV's aspect ratio properly. |
| Is TV Screen properly set? | Set TV Screen properly (page 73). |
| When video signals with a resolution of 1080/50i, 1080/50p, 720/50p, 1080/24p, 1080/60i, 1080/60p or 720/60p are being output from the HDMI OUT terminal, they may be output with an aspect ratio of 16:9 even if TV Screen is set to 4:3 Pan&Scan (page 73). |
| Picture is interrupted. | | The picture may be interrupted when the resolution of the recorded video signal switches. Press RESOLUTION to select a setting other than Auto (page 74). |
| Blu-ray 3D disc playback does not output 3D views. | | Connect the player to your TV with HDMI cable (High Speed HDMI ^ / ^TM Cable).Your TV may not support "HDMI 3D mandatory format". |
Sound
| Problem | Check | Remedy |
| No sound is output.Sound is not output properly. | Is the disc played back in slow motion?Is the disc played back in fast forward or fast reverse? | No sound is output during slow motion play and forward and reverse scanning. |
| Are the cables properly connected? | Connect the cable properly according to the connected devices (page 35).Insert the cable firmly and all the way in. |
| Is the audio cable damaged? | If the cable is damaged, replace it with a new one. |
| Is Audio Output properly set? | Set Audio Output properly, according to the connected device (page 74). |
| Are the connected components properly set? | Read the operating instructions for the connected components and check the volume, input, speaker settings, etc. |
| Multi-channel sound is not output. | Is multi-channel sound selected? | Use the menu screen or AUDIO to switch the disc's sound to multi-channel. |
| No sound from surround or center speaker. | | Check to confirm that the speakers are connected properly.Check the volume setting in the Speaker Setup for Audio Menu menu (page 74). |
| No sound from the sub-woofer. | | When the audio signal being played has no bass component, no sound will come from the sub-woofer.Check the volume setting in the Speaker Setup for Audio Menu (page 74). |
| Excessive noise during radio reception. | | Connect an antenna and set to the best reception position.Set an FM antenna outside the house.Turn power off the electric devices that may be causing the noise or move these devices away from this unit. |
| HDMI input audio sound cannot be output from the speaker or is output from the TV. | Is the HDMI In Audio Through for HDMI setup On? | Set the HDMI In Audio Through for HDMI setup to Off (page 74). |
Playback
| Problem | Check | Remedy |
| Disc does not play.Disc tray opens automatically. | Is the disc one that is playable on this player? | Check whether the disc is one that can be played on this player (page 11). |
| Is the file one that is playable on this player? | Check whether the file is one that can be played on this player (page 15).Check whether or not the file is damaged. |
| Is the disc scratched? | It may not be possible to play scratched discs. |
| Is the disc dirty? | Clean the disc (page 93). |
| Is there a piece of paper or sticker attached to the disc? | The disc may be warped and unplayable. |
| Is the disc properly set in the disc tray? | Set the disc with the printed side facing up.Set the disc properly in the depression in the disc tray. |
| Is the region number correct? | See page 13 for the region numbers of discs that can be played on this player. |
| Picture freezes and the front panel and remote control buttons stop working. | | Press (■) STOP to stop playback, then restart playback.If the playback cannot be stopped, press Ⓧ STANDBY/ON on the player's front panel to turn off the power, then turn the power back on.Press Ⓧ STANDBY/ON on the player for more than 5 seconds. The unit reboots, and the operation becomes possible. |
| The subtitles cannot be switched. | | The subtitles cannot be switched for discs recorded on a DVD or BD recorder. |
| After a disc is inserted,Loading stays displayed and playback does not start. | Are there too many files recorded on the disc? | When a disc on which files are recorded is inserted, depending on the number of files recorded on the disc, loading may take several dozen minutes. |
| (■) is displayed in file names, etc. | | The characters that cannot be displayed on this player are displayed in (■). |
| A message indicating low memory appears while playing a BD-ROM disc. | | Connect a USB device (page 44).Erase the data stored on the connected USB device from BUDA Setup (page 78). |
Control function
| Problem | Check | Remedy |
| Control function does not work. | Is the HDMI cable properly connected? | To use the Control function, connect the Flat Screen TV to theHDMI OUTterminal (page 35). |
| Is the HDMI cable you are using a High Speed HDMI^®/TM Cable ? | Use a High Speed HDMI^®/TM Cable . The Control function may not work properly if an HDMI cable other than a High Speed HDMI^®/TM Cable is used. |
| Is this player connected to the TV using an HDMI cable to watch the picture? | If video signals are being output from a terminal other than theHDMI OUTterminal, the Control function does not work. Connect to the TV using an HDMI cable (page 35). |
| Does the connected device support the Control function? | The Control function will not work with devices of other brands that do not support the Control function, even when connected using an HDMI cable.The Control function will not work if devices that do not support the Control function are connected between the Control-compatible device and the player.See page 16.Even when connected to a Pioneer product compatible with the Control function, some of the functions may not work.Also refer to the operating instructions for the connected device. |
| Is Control set to On on the connected device? | Set Control to On on the connected device. The Control function operates when Control is set to On for all devices connected to theHDMI OUTterminal.Once connections and settings of all the devices are finished, be sure to check that the player’s picture is output to the Flat Screen TV. (Also, check after changing the connected devices and connecting and/or disconnecting HDMI cables.) If the player’s picture is not being output to the Flat Screen TV, the Control function may not work properly.For details, refer to the operating instructions of the connected device. |
Network
| Problem | Check | Remedy |
| BD-LIVE function (connection to the Internet) cannot be used."No valid id file found!" is displayed when I try to update the software. | | PerformConnection Test(page 78). If “Networks is OK.” is displayed, check the proxy server settings (page 78). Also, there may be a problem with the Internet connection. Contact your Internet service provider. |
| Software updating is slow. | | Depending on the Internet connection and other conditions, some time may be required to update the software. |
| A message other than “Networks is OK.” is displayed whenConnection Testis performed. | Is “Network is FAILED.” displayed? | Check that this player and the Ethernet hub (or router with a hub functionality) are properly connected.If the IP address is obtained using the DHCP server function, check the setting is correct at theInformation(page 75). For details on the DHCP server function, see the operating instructions for the Ethernet hub (or router with a hub functionality).Set the IP address manually.Check the operation and settings of the DHCP server function of the Ethernet hub (or router with a hub functionality). For details on the DHCP server function, see the operating instructions for the Ethernet hub (or router with a hub functionality).If this player has been set manually, reset the IP address of this player or other components. |
| Is the Ethernet hub (or router with a hub functionality) operating properly? | Check the settings and operation the Ethernet hub (or router with a hub functionality). For details, see the operating instructions for the Ethernet hub.Reboot the Ethernet hub (or router with a hub functionality). |
| Cannot access to the component or computer connected via network. | Internet security software is currently installed in the connected component. | There are cases where a component with Internet security software installed cannot be accessed. |
| The audio component on the network which has been switched off is switched on. | Switch on the audio component on the network before switching on this unit. |
| The component connected to the network is not properly set. | If the client is automatically authorized, you need to enter the corresponding information again. Check whether the connection status is set to “Do not authorize”. |
| There are no playable audio files on the component connected to the network. | Check the audio files stored on the component connected to the network. |
| Playback does not start. | The component is currently disconnected from this unit or the power supply. | Check whether the component is properly connected to this unit or the power supply. |
| The computer is not properly operated. | The corresponding IP address is not properly set. | Switch on the built-in DHCP server function of your router, or set up the network manually according to your network environment. |
| The IP address is being automatically configured. | The automatic configuration process takes time. Please wait. |
| The audio files stored on components on the network, such as a computer, cannot be played back. | Windows Media Player 11 or Windows Media Player 12 is not currently installed on your computer. | Install Windows Media Player 11 or Windows Media Player 12 on your computer. |
| Audio files were recorded in formats other than MP3, WAV (LPCM only), MPEG-4 AAC, and WMA. | Play back audio files recorded in MP3, WAV (LPCM only), MPEG-4 AAC, or WMA. Note that some audio files recorded in these formats may not be played back on this unit. |
| Audio files recorded in MPEG-4 or AAC are being played back on Windows Media Player 11 or Windows Media Player 12. | Audio files recorded in MPEG-4 AAC cannot be played back on Windows Media Player 11 or Windows Media Player 12. Try using another server. Refer to the operation manual supplied with your server. |
| The component connected to the network is not properly operated. | Check whether the component is affected by special circumstances or is in the sleep mode. Try rebooting the component if necessary. |
| The component connected to the network does not permit file sharing. | Try changing the settings for the component connected to the network. |
| The folder stored on the component connected to the network has been deleted or damaged. | Check the folder stored on the component connected to the network. |
| Network connections could be restricted due to the computer's network settings, security settings, etc. | Check the computer's network settings, security settings, etc. |
| Cannot access Windows Media Player 11 or Windows Media Player 12. | In case of Windows Media Player 11: You are currently logged onto the domain through your computer with Windows XP or Windows Vista installed.In case of Windows Media Player 12: You are currently logged onto the domain through your computer with Windows 7 installed. | Instead of logging onto the domain, log onto the local machine. |
| Audio playback is undesirably stopped or disturbed. | The audio file currently being played back was not recorded in a format playable on this unit. | Check whether the audio file was recorded in a format supported by this unit.Check whether the folder has been damaged or corrupted.Even audio files listed as playable on this unit may sometimes not be played back or displayed. |
| The LAN cable is currently disconnected. | Connect the LAN cable properly. |
| There is heavy traffic on the network with the Internet being accessed on the same network. | Use 100BASE-TX to access the components on the network. |
| There is a connection routed through a wireless LAN on the same network. | There may be a shortage of bandwidth on the 2.4 GHz band used by the wireless LAN. Make wired LAN connections not routed through a wireless LAN.Install away from any devices emitting electromagnetic waves on the 2.4 GHz band (microwave ovens, game consoles, etc.). If this does not solve the problem, stop using other devices that emit electromagnetic waves. |
Wireless LAN (MCS-838/MCS-434/MCS-FS232 only)
| Problem | Check | Remedy |
| Network cannot be accessed via wireless LAN. | This unit and wireless LAN router etc. are too far apart, or there is an obstacle between them. | Improve the wireless LAN environment by taking steps such as moving the unit and wireless LAN router etc. closer together. |
| There is a microwave oven or other device generating electromagnetic waves near the wireless LAN environment. | Use the unit in a place away from microwave ovens or others device generating electromagnetic waves.Avoid using devices generating electromagnetic waves as much as possible when using the unit with a wireless LAN. |
| Multiple wireless devices are connected to the wireless LAN router. | When connecting multiple wireless devices, their IP addresses must be changed. |
| Connection settings between the unit and the wireless LAN router etc. are not set up correctly. | If the connection settings between the unit and the wireless LAN router etc. are not set up correctly, connection settings much be performed in order to connect the unit and the wireless LAN router etc. |
| The IP address settings for the unit and the wireless LAN router etc. (including DHCP settings) do not match. | Check the IP address settings of the unit and the wireless LAN router etc. (including the DHCP setting).If the unit's DHCP setting is on, turn the unit's power off, then turn the power back on. Check that the IP address of the unit matches the settings of the wireless LAN router etc.If the unit's DHCP setting is off, set an IP address matching the network of the wireless LAN router etc.For example, if the wireless LAN router's IP address is “192.168.1.1”, set the unit's IP address to “192.168.1.XXX” (*1), the subnet mask to “255.255.255.0”, and the gateway and DNS to “192.168.1.1”.(*1) Set the “XXX” in “192.168.1.XXX” to a number between 2 and 248 that is not assigned to other devices. |
| The access point is set to conceal the SSID. | In this case, the SSID may not be displayed on the access point list screen. If not, set the SSID etc. by setting the wireless LAN settings on the receiver manually. |
| The access point's security settings use WEP 152-bit length code key or shared key authentication. | The unit does not support WEP 152-bit length code key or shared key authentication. |
| Unable to connect normally using the Wi-Fi Direct function. | Press RETURN on the remote control to close the Wi-Fi Direct Mode Screen. Then press the ↑ button and perform the controls again from the Wi-Fi Direct Mode Screen. |
iPod/iPhone/iPad (MCS-838/MCS-434/MCS-FS232 only)
| Problem | Check | Remedy |
| Can't operate the iPod/iPhone/iPad. | Is the iPod/iPhone/iPad connected correctly? | Make sure the iPod/iPhone/iPad is connected correctly. Also, try disconnecting the iPod/iPhone/iPad then reconnecting it. |
| Does the unit support the iPod/iPhone/iPad? | Confirm that the connected iPod/iPhone/iPad is supported by this unit. |
| Is the iPod/iPhone/iPad experiencing a hangup? | Try resetting the iPod/iPhone/iPad and then reconnect it to the unit. |
Others
| Problem | Check | Remedy |
| Power does not turned on. | Is the power cord properly connected? | Plug the power cord securely into the power outlet.Unplug the power cord, wait several seconds, then plug the power cord back in. |
| The player's power turns off automatically. | Is Auto Power Off set to 10 min/20 min/30 min? | If Auto Power Off is set to 10 min/20 min/30 min, the player's power automatically turns off if no operation is performed for the set amount of time (page 76). |
| Is Control set to On? | The player's power may turn off together with the power of the TV connected to the HDMI OUT terminal. If you do not want the player's power to turn off when the TV's power is turned off, set Control to Off (page 74). |
| The player's power turns on automatically. | Is Control set to On? | The player's power may turn on together with the power of the TV connected to the HDMI OUT terminal. If you do not want the player's power to turn on when the TV's power is turned on, set Control to Off (page 74). |
| Cannot be operated with the remote control. | Are you operating the remote control from a point too far away from the player? | Operate from within 7 m of the remote control sensor. |
| Are the batteries dead? | Replace the batteries (page 10). |
| Settings I have made have been cleared. | Have you disconnected the power cord while the player's power was on?Has there been a power failure? | Always press STANDBY/ON on the player's front panel or STANDBY/ON on the remote control, check that POWER OFF has turned off from the player's front panel display and wait for more than 10 seconds before disconnecting the power cord. Be particularly careful when the power cord is connected to the AC outlet on another device because the player turns off in conjunction with the device. |
| USB (external storage) device does not work with this player properly. | Is the USB device properly connected? | Turn the player's power off, then turn the power back on.Turn the player's power off, then reconnect the external storage device (page 44). |
| Is the USB device connected via an extension cable? | Do not use an extension cable. The player may not work properly with it. |
| Is the external storage device connected to the USB port via a memory card reader or USB hub? | External storage device may not work if connected to the USB port via a memory card reader or USB hub. |
| Does the external storage device contain multiple partitions? | External storage devices may not be recognized if they contain multiple partitions. |
| Is the external storage device write-protected? | Turn the player's power off, then disable the write-protection. |
| Is the external storage device's file system FAT16, FAT32 or NTFS? | Only external storage devices with a FAT16, FAT32 or NTFS file system can be used. |
| Some external storage devices may not operate. |
| Cannot record to a USB device. | A USB device is not connected to the USB port on the rear of the unit. | You cannot use the USB port on the front of the unit to record. |
| There is not enough free memory in the USB device. | Please check to make sure that there is enough free memory in the USB device. |
| The USB device format is not set correctly. | Please set the USB device to the correct format. |
| Display window is dark. | | Press the DIMMER on the remote and select the desired display brightness. |
| "OC ERROR" is displayed on the unit's display window. | | Unplug the unit and contact the Pioneer Customer Support Center. |
Chapter 10
Appendix
Specifications
| General for MCS-838/MCS-737/MCS-434/MCS-333 |
| Power requirements | AC 220 V to 240 V, 50 Hz/60 Hz |
| Power consumption | 145 W (In Standby mode: Less than 0.5 W) |
| Dimensions (W x H x D) | Approx. 430 mm x 63 mm x 349 mm |
| Net Weight (Approx.) | 3.1 kg |
| Operating temperature | 5 °C to 35 °C |
| Operating humidity | 5 % to 85 % |
| General for MCS-FS232/MCS-FS131 |
| Power requirements | AC 220 V to 240 V, 50 Hz/60 Hz |
| Power consumption | 90 W (In Standby mode: Less than 0.5 W) |
| Dimensions (W x H x D) | Approx. 430 mm x 63 mm x 349 mm |
| Net Weight (Approx.) | 3.0 kg |
| Operating temperature | 5 °C to 35 °C |
| Operating humidity | 5 % to 85 % |
| Inputs/Outputs |
| HDMI IN/OUT (video/audio) | 19 pin (HDMI®/TM Connector) |
| ANALOG AUDIO IN | 2.0 Vrms (1 kHz, 0 dB), 600 Ω, RCA jack (L, R) x 1 |
| DIGITAL IN (OPTICAL) | 3 V (p-p), Optical jack x 1 (48 kHz, 96 kHz sampling) |
| PORTABLE IN | 0.5 Vrms (3.5 mm stereo jack) |
| MIC | Mic jack x 2 |
| USB | 4 pin A Type x 2 |
| Tuner |
| FM Tuning Range | 87.5 MHz to 108.0 MHz |
| Antenna input | 75 Ω unbalanced |
| Amplifier for MCS-838/MCS-737/MCS-434/MCS-333 |
| Power output (RMS) THD 30 % (AUX) |
| Total | 1000 W |
| Front | 170 W × 2 (4 Ω) |
| Center | 170 W (4 Ω) |
| Rear | 170 W × 2 (4 Ω) |
| Sub-Woofer | 170 W (4 Ω) |
| Amplifier for MCS-FS232/MCS-FS131 |
| Power output (RMS) THD 30 % (AUX) |
| Total | 510 W |
| Front | 170 W × 2 (4 Ω) |
| Sub-Woofer | 170 W (4 Ω) |
| System |
| Laser | Semiconductor laser |
| Signal system | Standard PAL/NTSC colour TV system |
| LAN port | Ethernet jack x 1, 10BASE-T / 100BASE-TX |
| Wireless LAN (internal antenna) (MCS-838/MCS-434/MCS-FS232 only) | Integrated IEEE 802.11n (2.4 GHz band) wireless networking access, compatible with 802.11b/g Wi-Fi networks. |
| Bus Power Supply (USB) | Front: DC 5 V 2.1 A (MCS-838/MCS-434/MCS-FS232)DC 5 V 500 mA (MCS-737/MCS-333/MCS-FS131)Rear: DC 5 V 500 mA |
| Speakers for MCS-838 |
| • Front speaker (Left/Right) |
| Type | 2 Way | Net Dimensions(W x H x D) | 250 mm x 1110 mm x 250 mm |
| Impedance Rated | 4 Ω | Net Weight | 3.7 kg |
| • Surround speaker (Left/Right) |
| Type | 1 Way | Net Dimensions(W x H x D) | 250 mm x 1110 mm x 250 mm |
| Impedance Rated | 4 Ω | Net Weight | 3.6 kg |
| • Center speaker |
| Type | 1 Way | Net Dimensions(W x H x D) | 230 mm x 80 mm x 90 mm |
| Impedance Rated | 4 Ω | Net Weight | 0.7 kg |
| • Subwoofer |
| Type | 1 Way | Net Dimensions(W x H x D) | 130.5 mm x 420 mm x 375 mm |
| Impedance Rated | 4 Ω | Net Weight | 4.4 kg |
| Speakers for MCS-737 |
| • Front speaker (Left/Right) |
| Type | 2 Way | Net Dimensions(W x H x D) | 250 mm x 1110 mm x 250 mm |
| Impedance Rated | 4 Ω | Net Weight | 3.7 kg |
| • Surround speaker (Left/Right) |
| Type | 1 Way | Net Dimensions(W x H x D) | 250 mm x 1110 mm x 250 mm |
| Impedance Rated | 4 Ω | Net Weight | 3.6 kg |
| • Center speaker |
| Type | 1 Way | Net Dimensions(W x H x D) | 230 mm x 80 mm x 90 mm |
| Impedance Rated | 4 Ω | Net Weight | 0.7 kg |
| • Subwoofer |
| Type | 1 Way | Net Dimensions(W x H x D) | 200 mm x 340 mm x 270 mm |
| Impedance Rated | 4 Ω | Net Weight | 3.7 kg |
| Speakers for MCS-434 |
| • Front/Surround speaker (Left/Right) |
| Type | 1 Way | Net Dimensions(W x H x D) | 95 mm x 80 mm x 90 mm |
| Impedance Rated | 4 Ω | Net Weight | 0.4 kg |
| • Center speaker |
| Type | 1 Way | Net Dimensions(W x H x D) | 230 mm x 80 mm x 90 mm |
| Impedance Rated | 4 Ω | Net Weight | 0.7 kg |
| • Subwoofer |
| Type | 1 Way | Net Dimensions(W x H x D) | 130.5 mm x 420 mm x 375 mm |
| Impedance Rated | 4 Ω | Net Weight | 4.4 kg |
| Speakers for MCS-333 |
| • Front/Surround speaker (Left/Right) |
| Type | 1 Way | Net Dimensions(W x H x D) | 95 mm x 80 mm x 90 mm |
| Impedance Rated | 4 Ω | Net Weight | 0.4 kg |
| • Center speaker |
| Type | 1 Way | Net Dimensions(W x H x D) | 230 mm x 80 mm x 90 mm |
| Impedance Rated | 4 Ω | Net Weight | 0.7 kg |
| • Subwoofer |
| Type | 1 Way | Net Dimensions(W x H x D) | 200 mm x 340 mm x 270 mm |
| Impedance Rated | 4 Ω | Net Weight | 3.7 kg |
| Speakers for MCS-FS232 |
| • Front speaker (Left/ Right) |
| Type | 1 Way | Net Dimensions(W x H x D) | 380 mm x 97 mm/87 mm x 110 mm(lengthwise putting)110 mm x 412 mm x 110 mm(side putting) |
| Impedance Rated | 4 Ω | Net Weight | 0.9 kg |
| • Subwoofer |
| Type | 1 Way | Net Dimensions(W x H x D) | 130.5 mm x 420 mm x 375 mm |
| Impedance Rated | 4 Ω | Net Weight | 4.4 kg |
| Speakers for MCS-FS131 |
| • Front speaker (Left/Right) |
| Type | 1 Way | Net Dimensions(W x H x D) | 95 mm x 80 mm x 90 mm |
| Impedance Rated | 4 Ω | Net Weight | 0.4 kg |
| • Subwoofer |
| Type | 1 Way | Net Dimensions(W x H x D) | 200 mm x 340 mm x 270 mm |
| Impedance Rated | 4 Ω | Net Weight | 3.7 kg |
- Design and specifications are subject to change without notice.
Maintenance
Handling the unit
When shipping the unit
Please save the original shipping carton and packing materials. If you need to ship the unit, for maximum protection, re-pack the unit as it was originally packed at the factory.
Keeping the exterior surfaces clean
- Do not use volatile liquids such as insecticide spray near the unit.
- Wiping with strong pressure may damage the surface.
- Do not leave rubber or plastic products in contact with the unit for a long period of time.
Cleaning the unit
To clean the player, use a soft, dry cloth. If the surfaces are extremely dirty, use a soft cloth lightly moistened with a mild detergent solution. Do not use strong solvents such as alcohol, benzine, or thinner, as these might damage the surface of the unit.
Maintaining the unit
The unit is a high-tech, precision device. If the optical pick-up lens and disc drive parts are dirty or worn, the picture quality could be diminished. For details, please contact your nearest authorized service center.
Notes on discs
Handling discs
Do not touch the playback side of the disc. Hold the disc by the edges so that fingerprints do not get on the surface. Never stick paper or tape on the disc.
Storing discs
After playing, store the disc in its case. Do not expose the disc to direct sunlight or sources of heat and never leave it in a parked car exposed to direct sunlight.
Cleaning discs
Fingerprints and dust on the disc can cause poor picture quality and sound distortion. Before playing, clean the disc with a clean cloth. Wipe the disc from the center to out.
Do not use strong solvents such as alcohol, benzine, thinner, commercially available cleaners, or anti-static spray intended for older vinyl records.
All information, data, documents, communications, downloads, files, text, images, photographs, graphics, videos, webcasts, publications, tools, resources, software, code, programs, applets, widgets, applications, products and other content (“Content”) and all services and offerings (“Services”) provided or made available by or through any third party (each a “Service Provider”) is the sole responsibility of the Service Provider from whom it originated.
The availability of and access to Content and Services furnished by the Service Provider through the PIONEER Device are subject to change at any time, without prior notice, including, but not limited to the suspension, removal or cessation of all or any part of the Content or Services.
Should you have any inquiry or problem related to the Content or Services, you may refer to the Service Provider's website for the most up-to-date information. PIONEER is neither responsible nor liable for customer service related to the Content and Services. Any question or request for service relating to the Content or Services should be made directly to the respective Content and Service Providers.
Please note that PIONEER is not responsible for any Content or Services provided by the Service Provider or any changes to, removal of, or cessation of such Content or Services and does not warrant or guaranty the availability of or access to such Content or Services.
natural_image
Front view of a gray remote control with keyboard and mouse (no text or symbols visible)
Télécommande (1)
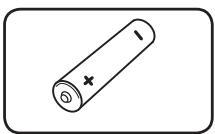
natural_image
Simple line drawing of a cylindrical battery with a cross mark on its side (no text or symbols)
Piles (2)
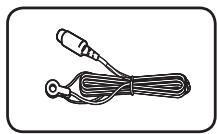
natural_image
Simple line drawing of a cord with two connectors (no text or symbols)
Antenne FM (1)

natural_image
Illustration of a coiled cable with three connectors (no text or symbols)
natural_image
Simple diagram of four circles arranged in a diamond shape within a rounded rectangle (no text or symbols)
Tampon antidérapant (1)
[2 cm x 2 cm]

natural_image
Simple line drawing of a screw with a star-shaped head (no text or symbols)
natural_image
Simple line drawing of a screw with a star-shaped head (no text or symbols)
natural_image
Simple geometric diagram of four overlapping circles inside a tilted square (no text or symbols)
Tampon antidérapant (5)
[2 cm x 2 cm]

natural_image
Simple line drawing of a screw with a star on the head (no text or symbols)
natural_image
Simple diagram of a rectangular plate with eight circular holes, no text or symbols present.
natural_image
Simple black-and-white icon of a curved object inside an oval frame (no text or symbols)
natural_image
Simple line drawing of a vertical metal bracket with a flat base (no text or symbols)
Grandes barres de fixation (2)

natural_image
Simple line drawing of a metal bracket with mounting holes (no text or symbols)
natural_image
Simple line drawing of a screw with a star-shaped head (no text or symbols)
Grandes vis (4)
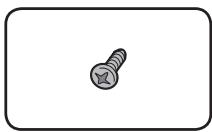
natural_image
Simple line drawing of a screw with a star-shaped head (no text or symbols)
Petites vis (8)
natural_image
Simple diagram of four overlapping ovals inside a tilted rectangular frame (no text or symbols)
Tampon antidérapant (2)
[2 cm x 2 cm]

natural_image
Simple line drawing of a screw with a star on the head (no text or symbols)
natural_image
Mechanical assembly diagram showing a bracket with tool pins and a magnified inset view (no text or symbols)
http://www.pioneer.co.uk/
EN Russie :
http://www.pioneer.eu/
http://www.pioneer-rus.ru/
À Hong Kong :
http://www.pioneerhongkong.com.hk/
À Singapour :
http://www.pioneer.com.sg/firmwaredownload
EN Australie :
http://www.pioneer.com.au/
Master Audio | Essential
Wi-Fi, Wi-Fi Protected Setup, Wi-Fi
natural_image
Illustration of a mechanical component inserted into a circular base, with no visible text or symbols.
natural_image
Diagram showing a circular mechanical component with internal components and an inset view of a multi-hole motor or fan assembly (no text or symbols present)
natural_image
Diagram of a device showing internal structure before and after disassembly (no text or symbols)
Attention
natural_image
Mechanical assembly diagram showing a circular component with mounting holes and a lever mechanism (no text or symbols)
natural_image
Mechanical assembly diagram showing a rotating wheel with mounting brackets and connecting wires (no text or symbols)
natural_image
Mechanical assembly diagram showing a circular component with mounting flanges and bolted joints, no text or symbols present.
natural_image
3D diagram of a device with a base mount and cable, no text or symbols present
Installation directe
natural_image
Diagram of a mechanical component with circular holes and a base, showing a transformation or assembly (no text or symbols present)

Attention
Attention
PIONEER 00, 31, 32, 07, 36, 42, 51, 22, 91, 92
ACURA 44
ADMIRAL 31
AIWA 60, 58
AKAI 32, 35, 42
AKURA 41
ALBA 07, 39, 41, 44
AMSTRAD 42, 44, 47
ANITECH 44
ASA 45
ASUKA 41
AUDIOGONIC 07, 36
BASIC LINE 41, 44
BAUR 31, 07, 42
BEKO 38, 83, 84, 89
BEON 07
BLAUPUNKT 31
BLUE SKY 41
BLUE STAR 18
BPL 18
BRANDT 36
BTC 41
BUSH 07, 41, 42, 44, 47, 56
CASCADE 44
CATHAY 07
CENTURION 07
CGB 42
CIMLINE 44
CLARIVOX 07
CLATRONIC 38
CONDOR 38
CONTEC 44
CROSLEY 32
CROWN 38, 44
CRYSTAL 42
CYBERTRON 41
DAEWOO 07, 44, 56
DAINICHI 41
DANSAI 07
DAYTON 44
DECCA 07, 48
DIXI 07, 44
DUMONT 53
ELIN 07
ELITE 41
ELTA 44
EMERSON 42
ERRES 07
FERGUSON 07, 36, 51
FINLANDIA 35, 43, 54
FINLUX 32, 07, 45, 48, 53, 54
FIRSTLINE 40, 44
FISHER 32, 35, 38, 45
FORMENTI 32, 07, 42
FRONTECH 31, 42, 46
FRONTECH/PROTECH 32
FUJITSU 48, 74, 77
FUNAI 40, 46, 58, 56
GBC 32, 42
GE 00, 01, 08, 07, 10, 11, 17, 02, 28, 18
GEC 07, 34, 48
GELOSO 32, 44
GENERAL 29
GENEXXA 31, 41
GOLDSTAR 10, 23, 21, 02, 07, 50
GOODMANS 07, 39, 47, 48, 56
GORENJE 38
GPM 41
GRAETZ 31, 42
GRANADA 07, 35, 42, 43, 48
GRADIENTE 30, 57
GRANDIN 18
GRUNDIG 31, 53
HANSEATIC 07, 42
HCM 18,44
HINARI 07, 41, 44
HISAWA 18
HITACHI 31, 33, 34, 36, 42, 43, 54, 06, 10, 24, 25, 18
HUANYU 56
HYPSON 07, 18, 46
ICE 46, 47
IMPERIAL 38, 42
INDIANA 07
INGELEN 31
INTERFUNK 31, 32, 07, 42
INTERVISION 46, 49
ISUKAI 41
ITC 42
ITT 31, 32, 42
JEC 05
JVC 13, 23
KAISUI 18, 41, 44
KAPSCH 31
KENDO 42
KENNEDY 32, 42
KORPEL 07
KOYODA 44
LEYCO 07, 40, 46, 48
LIESENK&TTER 07
LOEWE 07
LUXOR 32, 42, 43
M-ELECTRONIC 31, 44, 45, 54, 56, 07, 36, 51
MAGNADYNE 32, 49
MAGNAFON 49
MAGNAVOX 07, 10, 03, 12, 29, 81
MANESTH 39, 46
MARANTZ 07
MARK 07
MATSUI 07, 39, 40, 42, 44, 47, 48
MCMICHAEL 34
MEDIATOR 07
MEMOREX 44
METZ 31, 69
MINERVA 31, 53
MITSUBISHI 09, 10, 02, 21, 31, 73
MULTITECH 44, 49
NEC 59, 57
NECKERMANN 31, 07
NEI 07, 42
NIKKAI 05, 07, 41, 46, 48
NOBLIKO 49
NOKIA 32, 42, 52
NORDMENDE 32, 36, 51, 52
OCEANIC 31, 32, 42
ORION 32, 07, 39, 40
OSAKI 41, 46, 48
OSO 41
OSUME 48
OTTO VERSAND 31, 32, 07, 42
PALLADIUM 38
PANAMA 46
PANASONIC 31, 07, 08, 42, 22, 70
PATHO CINEMA 42
PAUSA 44
PHILCO 32, 42
PHILIPS 31, 07, 34, 56, 68, 55, 63, 82
PHOENIX 32
PHONOLA 07
PROFEX 42, 44
PROTECH 07, 42, 44, 46, 49
QUELLE 31, 32, 07, 42, 45, 53
R-LINE 07
RADIOLA 07
RADIOSHACK 10, 23, 21, 02
RBM 53
RCA 01, 10, 15, 16, 17, 18, 61, 62, 09, 59, 60
REDIFFUSION 32, 42
REX 31, 46
ROADSTAR 41, 44, 46
SABA 31, 36, 42, 51
SAISHO 39, 44, 46
SALORA 31, 32, 42, 43
SAMBERS 49
SAMSUNG 07, 38, 44, 46, 69, 70, 64, 65, 78, 79, 80
SANYO 35, 45, 48, 21, 14, 91
SBR 07, 34
SCHAUB LORENZ 42
SHARP 02, 19, 27, 67, 90, 62, 66
SIAREM 32, 49
SIEMENS 31
SINUDYNE 32, 39, 40, 49
SKANTIC 43
SOLAVOX 31
SONOKO 07, 44
SONOLOR 31, 35
SONTEC 07
SONY 04, 72
SOUNDWAVE 07
STANDARD 41, 44
STERN 31
SUSUMU 41
SYSLINE 07
TANDY 31, 41, 48
TASHIKO 34
TATUNG 07, 48
TEC 42
TELEAVIA 36
TELEFUNKEN 36, 37, 52
TELETECH 44
TENSAI 40, 41
THOMSON 36, 51, 52, 63, 61
THORN 31, 07, 42, 45, 48
TOMASHI 18
TOSHIBA 05, 02, 26, 21, 53
TOWADA 42
ULTRAVOX 32, 42, 49
UNIDEN 92, 68
UNIVERSUM 31, 07, 38, 42, 45, 46, 54
VESTEL 07
VICTOR 13
VOXSON 31
WALTHAM 43
WATSON 07
WATT RADIO 32, 42, 49
WHITE WESTINGHOUSE 07
YOKO 07, 42, 46
ZENITH 03, 20
Chapitre 4
Lecture
Connexion WPS (Wi-Fi Protected Setup)
- Auto Set IP Address
Albanian, sq/sqi, 1917
Amharic, am/amh, 0113
Arabic, ar/ara, 0118
Armenian, hy/hye, 0825
Assamese, as/asm, 0119
Aymara, ay/aym, 0125
Azerbaijani, az/aze, 0126
Bashkir, ba/bak, 0201
Basque, eu/eus, 0521
Belarusian, be/bel, 0205
Bengali, bn/ben, 0214
Bihari, bh/bih, 0208
Bislama, bi/bis, 0209
Breton, br/bre, 0218
Bulgarian, bg/bul, 0207
Burmese, my/mya, 1325
Catalan, ca/cat, 0301
Central Khmer, km/khm, 1113
Chinese, zh/zho, 2608
Corsican, co/cos, 0315
Croatian, hr/hrv, 0818
Czech, cs/ces, 0319
Danish, da/dan, 0401
Dutch, nl/nld, 1412
Dzongkha, dz/dzo, 0426
English, en/eng, 0514
Esperanto, eo/epo, 0515
Estonian, et/est, 0520
Finnish, fi/fin, 0609
Fijian, fj/fij, 0610
Faroese, fo/fao, 0615
Georgian, ka/kat, 1101
German, de/deu, 0405
Greek, el/ell, 0512
Guarani, gn/grn, 0714
Gujarati, gu/guj, 0721
Hausa, ha/hau, 0801
Hebrew, iw/heb, 0923
Hindi, hi/hin, 0809
Hungarian, hu/hun, 0821
Icelandic, is/isl, 0919
Indonesian, in/ind, 0914
Interlingua, ia/ina, 0901
Interlingue, ie/ile, 0905
Inupiaq, ik/ipk, 0911
Irish, ga/gle, 0701
Italian, it/ita, 0920
Japanese, ja/jpn, 1001
Javanese, jw/jav, 1023
Kalaallisut, kl/kal, 1112
Kannada, kn/kan, 1114
Kashmiri, ks/kas, 1119
Kazakh, kk/kaz, 1111
Kinyarwanda, rw/kin, 1823
Kirghiz, ky/kir, 1125
Korean, ko/kor, 1115
Kurdish, ku/kur, 1121
Lao, lo/lao, 1215
Latin, la/lat, 1201
Latvian, Iv/lav, 1222
Lingala, In/lin, 1214
Lithuanian, It/lit, 1220
Macedonian, mk/mkd, 1311
Malagasy, mg/mlg, 1307
Malay, ms/msa, 1319
Malayalam, ml/mal, 1312
Maltese, mt/mlt, 1320
Maori, mi/mri, 1309
Marathi, mr/mar, 1318
Mongolian, mn/mon, 1314
Moldavian, mo/mol, 1315
Nauru, na/nau, 1401
Nepali, ne/nep, 1405
Norwegian, no/nor, 1415
Occitan, oc/oci, 1503
Oriya, or/ori, 1518
Oromo, om/orm, 1513
Panjabi, pa/pan, 1601
Persian, fa/fas, 0601
Polish, pl/pol, 1612
Portuguese, pt/por, 1620
Pushto, ps/pus, 1619
Quechua, qu/que, 1721
Romanian, ro/ron, 1815
Romansch, rm/roh, 1813
Rundi, rn/run, 1814
Sanskrit, sa/san, 1901
Scottish Gaelic, gd/gla, 0704
Serbian, sr/srp, 1918
Serbo-Croatian, sh/---, 1908
Shona, sn/sna, 1914
Sindhi, sd/snd, 1904
Sinhalese, si/sin, 1909
Slovak, sk/slk, 1911
Slovenian, sl/slv, 1912
Somali, so/som, 1915
Sotho, Southern, st/sot, 1920
Spanish, es/spa, 0519
Sundanese, su/sun, 1921
Swahili, sw/swa, 1923
Swati, ss/ssw, 1919
Swedish, sv/swe, 1922
Telugu, te/tel, 2005
Thai, th/tha, 2008
Tibetan, bo/bod, 0215
Tigrinya, ti/tir, 2009
Tonga (Tonga Islands), to/ton, 2015
Tsonga, ts/tso, 2019
Tswana, tn/tsn, 2014
Turkmen, tk/tuk, 2011
Turkish, tr/tur, 2018
Twi, tw/twi, 2023
Ukrainian, uk/ukr, 2111
Urdu, ur/urd, 2118
Uzbek, uz/uzb, 2126
Vietnamese, vi/vie, 2209
Volapük, vo/vol, 2215
Welsh, cy/cym, 0325
Western Frisian, fy/fry, 0625
Wolof, wo/wol, 2315
Xhosa, xh/xho, 2408
Yiddish, ji/yid, 1009
Philippines, ph, 1608
Pologne, pl, 1612
Portugal, pt, 1620
Puerto Rico, pr, 1618
Roumanie, ro, 1815
Taiwan, Province de Chine, tw, 2023
Tajikistan, tj, 2010
Thaïlande, th, 2008
Copyright (C) 1991, 1999 Free Software Foundation, Inc.
51 Franklin Street, Fifth Floor, Boston, MA
02110-1301 USA
Foundation, Inc., 51 Franklin Street, Fifth Floor, Boston, MA 02110-1301 USA.
natural_image
Gray rectangular remote control device with keypad and scroll (no visible text or symbols)
Fernbedienung (1)
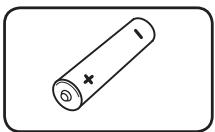
natural_image
Simple line drawing of a cylindrical battery with a cross mark on its side (no text or symbols)
Batterien (2)

natural_image
Simple line drawing of a cable with two connectors (no text or symbols)
UKW-Antenne (1)
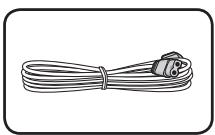
natural_image
Line drawing of a coiled cable with two connectors (no text or symbols)
Netzkabel
natural_image
Simple diagram of four circles arranged in a diamond shape within a rounded rectangle (no text or symbols)
Rutschfeste
Unterlagen (1)
[2 cm x 2 cm]

natural_image
Simple line drawing of a screw with a star-shaped head (no text or symbols)
natural_image
Simple line drawing of a screw with a star-shaped head (no text or symbols)
natural_image
Simple geometric diagram of four overlapping circles inside a tilted square (no text or symbols)
natural_image
Simple line drawing of a screw with a star-shaped head (no text or symbols)
natural_image
Simple diagram of a rectangular plate with eight circular holes, no text or symbols present.
Rutschfeste
Unterlagen (1)
[5 cm x 2,5 cm]

natural_image
Simple black-and-white icon of a curved object inside an oval frame (no text or symbols)
natural_image
Simple line drawing of a vertical metal bracket with a base, no text or symbols present
Große Ständer (2)
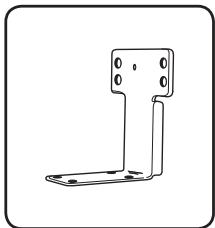
natural_image
Simple line drawing of a metal bracket with mounting holes (no text or symbols)
natural_image
Simple line drawing of a screw with a star-shaped head (no text or symbols)
Große Schrauben (4)
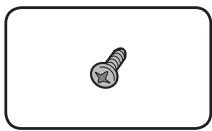
natural_image
Simple line drawing of a screw with a star-shaped head (no text or symbols)
natural_image
Simple geometric diagram of four overlapping ovals inside a tilted square (no text or symbols)
Rutschfeste
Unterlagen (2)
[2 cm x 2 cm]

natural_image
Simple line drawing of a screw with a star on the head (no text or symbols)
natural_image
Technical illustration of a mechanical assembly with an inset magnified view showing internal components (no text or symbols)
http://www.pioneer.co.uk/
IN Russland:
http://www.pioneer.eu/
http://www.pioneer-rus.ru/
IN Hongkong:
http://www.pioneerhongkong.com.hk/
IN Singapur:
http://www.pioneer.com.sg/firmwaredownload
IN Australien:
http://www.pioneer.com.au/
Master Audio | Essential
- Flashes when switching Bass Boost.
Rückseite
MCS-838/MCS-434/MCS-737/MCS-333
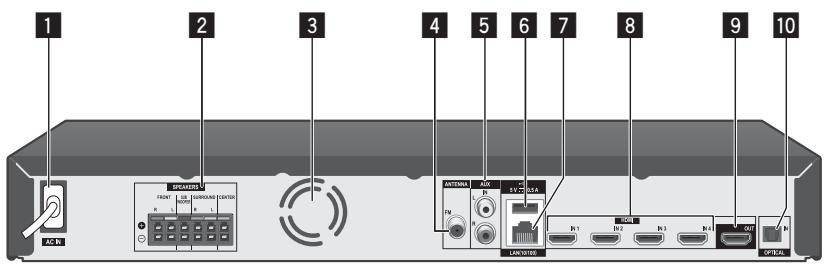
MCS-FS232/MCS-FS131

natural_image
Diagram of a mechanical component pressing into a circular component (no text or symbols)
natural_image
Diagram showing a circular mechanical component with internal components and an inset view of a multi-hole rotary mechanism (no text or symbols)
natural_image
Diagram of a device showing internal structure before and after assembly (no text or symbols)
Achtung
natural_image
Mechanical assembly diagram showing a circular component with internal components and directional arrows indicating motion (no text or symbols)
natural_image
Mechanical assembly diagram showing a rotating component with two directional arrows indicating motion (no text or symbols)
Für horizontale Montage
natural_image
Mechanical assembly diagram showing a circular component with mounting flanges and bolted joints, no text or symbols present
natural_image
3D diagram of a device with a base mount and cable, no text or symbols present
natural_image
Diagram of a mechanical component with circular holes and a base, showing a transformation or assembly (no text or symbols present)

Achtung
Achtung
PIONEER 00, 31, 32, 07, 36, 42, 51, 22, 91, 92
ACURA 44
ADMIRAL 31
AIWA 60, 58
AKAI 32, 35, 42
AKURA 41
ALBA 07, 39, 41, 44
AMSTRAD 42, 44, 47
ANITECH 44
ASA 45
ASUKA 41
AUDIOGONIC 07, 36
BASIC LINE 41, 44
BAUR 31, 07, 42
BEKO 38, 83, 84, 89
BEON 07
BLAUPUNKT 31
BLUE SKY 41
BLUE STAR 18
BPL 18
BRANDT 36
BTC 41
BUSH 07, 41, 42, 44, 47, 56
CASCADE 44
CATHAY 07
CENTURION 07
CGB 42
CIMLINE 44
CLARIVOX 07
CLATRONIC 38
CONDOR 38
CONTEC 44
CROSLEY 32
CROWN 38, 44
CRYSTAL 42
CYBERTRON 41
DAEWOO 07, 44, 56
DAINICHI 41
DANSAI 07
DAYTON 44
DECCA 07, 48
DIXI 07, 44
DUMONT 53
ELIN 07
ELITE 41
ELTA 44
EMERSON 42
ERRES 07
FERGUSON 07, 36, 51
FINLANDIA 35, 43, 54
FINLUX 32, 07, 45, 48, 53, 54
FIRSTLINE 40, 44
FISHER 32, 35, 38, 45
FORMENTI 32, 07, 42
FRONTECH 31, 42, 46
FRONTECH/PROTECH 32
FUJITSU 48, 74, 77
FUNAI 40, 46, 58, 56
GBC 32, 42
GE 00, 01, 08, 07, 10, 11, 17, 02, 28, 18
GEC 07, 34, 48
GELOSO 32, 44
GENERAL 29
GENEXXA 31, 41
GOLDSTAR 10, 23, 21, 02, 07, 50
GOODMANS 07, 39, 47, 48, 56
GORENJE 38
GPM 41
GRAETZ 31, 42
GRANADA 07, 35, 42, 43, 48
GRADIENTE 30, 57
GRANDIN 18
GRUNDIG 31, 53
HANSEATIC 07, 42
HCM 18,44
HINARI 07, 41, 44
HISAWA 18
HITACHI 31, 33, 34, 36, 42, 43, 54, 06, 10, 24, 25, 18
HUANYU 56
HYPSON 07, 18, 46
ICE 46, 47
IMPERIAL 38, 42
INDIANA 07
INGELEN 31
INTERFUNK 31, 32, 07, 42
INTERVISION 46, 49
ISUKAI 41
ITC 42
ITT 31, 32, 42
JEC 05
JVC 13, 23
KAISUI 18, 41, 44
KAPSCH 31
KENDO 42
KENNEDY 32, 42
KORPEL 07
KOYODA 44
LEYCO 07, 40, 46, 48
LIESENK&TTER 07
LOEWE 07
LUXOR 32, 42, 43
M-ELECTRONIC 31, 44, 45, 54, 56, 07, 36, 51
MAGNADYNE 32, 49
MAGNAFON 49
MAGNAVOX 07, 10, 03, 12, 29, 81
MANESTH 39, 46
MARANTZ 07
MARK 07
MATSUI 07, 39, 40, 42, 44, 47, 48
MCMICHAEL 34
MEDIATOR 07
MEMOREX 44
METZ 31, 69
MINERVA 31, 53
MITSUBISHI 09, 10, 02, 21, 31, 73
MULTITECH 44, 49
NEC 59, 57
NECKERMANN 31, 07
NEI 07, 42
NIKKAI 05, 07, 41, 46, 48
NOBLIKO 49
NOKIA 32, 42, 52
NORDMENDE 32, 36, 51, 52
OCEANIC 31, 32, 42
ORION 32, 07, 39, 40
OSAKI 41, 46, 48
OSO 41
OSUME 48
OTTO VERSAND 31, 32, 07, 42
PALLADIUM 38
PANAMA 46
PANASONIC 31, 07, 08, 42, 22, 70
PATHO CINEMA 42
PAUSA 44
PHILCO 32, 42
PHILIPS 31, 07, 34, 56, 68, 55, 63, 82
PHOENIX 32
PHONOLA 07
PROFEX 42, 44
PROTECH 07, 42, 44, 46, 49
QUELLE 31, 32, 07, 42, 45, 53
R-LINE 07
RADIOLA 07
RADIOSHACK 10, 23, 21, 02
RBM 53
RCA 01, 10, 15, 16, 17, 18, 61, 62, 09, 59, 60
REDIFFUSION 32, 42
REX 31, 46
ROADSTAR 41, 44, 46
SABA 31, 36, 42, 51
SAISHO 39, 44, 46
SALORA 31, 32, 42, 43
SAMBERS 49
SAMSUNG 07, 38, 44, 46, 69, 70, 64, 65, 78, 79, 80
SANYO 35, 45, 48, 21, 14, 91, 67, 76
SBR 07, 34
SCHAUB LORENZ 42
SHARP 02, 19, 27, 67, 90, 62, 66
SIAREM 32, 49
SIEMENS 31
SINUDYNE 32, 39, 40, 49
SKANTIC 43
SOLAVOX 31
SONOKO 07, 44
SONOLOR 31, 35
SONTEC 07
SONY 04, 72
SOUNDWAVE 07
STANDARD 41, 44
STERN 31
SUSUMU 41
SYSLINE 07
TANDY 31, 41, 48
TASHIKO 34
TATUNG 07, 48
TEC 42
TELEAVIA 36
TELEFUNKEN 36, 37, 52
TELETECH 44
TENSAI 40, 41
THOMSON 36, 51, 52, 63, 61
THORN 31, 07, 42, 45, 48
TOMASHI 18
TOSHIBA 05, 02, 26, 21, 53
TOWADA 42
ULTRAVOX 32, 42, 49
UNIDEN 92, 68
UNIVERSUM 31, 07, 38, 42, 45, 46, 54
VESTEL 07
VICTOR 13
VOXSON 31
WALTHAM 43
WATSON 07
WATT RADIO 32, 42, 49
WHITE WESTINGHOUSE 07
YOKO 07, 42, 46
ZENITH 03, 20
Kapitel 4
Wiedergabe
[CD AREA] → [SACD 2CH] → [SACD MCH]
- Auto Set IP Address
Albanian, sq/sqi, 1917
Amharic, am/amh, 0113
Arabic, ar/ara, 0118
Armenian, hy/hye, 0825
Assamese, as/asm, 0119
Aymara, ay/aym, 0125
Azerbaijani, az/aze, 0126
Bashkir, ba/bak, 0201
Basque, eu/eus, 0521
Belarusian, be/bel, 0205
Bengali, bn/ben, 0214
Bihari, bh/bih, 0208
Bislama, bi/bis, 0209
Breton, br/bre, 0218
Bulgarian, bg/bul, 0207
Burmese, my/mya, 1325
Catalan, ca/cat, 0301
Central Khmer, km/khm, 1113
Chinese, zh/zho, 2608
Corsican, co/cos, 0315
Croatian, hr/hrv, 0818
Czech, cs/ces, 0319
Danish, da/dan, 0401
Dutch, nl/nld, 1412
Dzongkha, dz/dzo, 0426
English, en/eng, 0514
Esperanto, eo/epo, 0515
Estonian, et/est, 0520
Finnish, fi/fin, 0609
Fijian, fj/fij, 0610
Faroese, fo/fao, 0615
Georgian, ka/kat, 1101
German, de/deu, 0405
Greek, el/ell, 0512
Guarani, gn/grn, 0714
Gujarati, gu/guj, 0721
Hausa, ha/hau, 0801
Hebrew, iw/heb, 0923
Hindi, hi/hin, 0809
Hungarian, hu/hun, 0821
Icelandic, is/isl, 0919
Indonesian, in/ind, 0914
Interlingua, ia/ina, 0901
Interlingue, ie/ile, 0905
Inupiaq, ik/ipk, 0911
Irish, ga/gle, 0701
Italian, it/ita, 0920
Japanese, ja/jpn, 1001
Javanese, jw/jav, 1023
Kalaallisut, kl/kal, 1112
Kannada, kn/kan, 1114
Kashmiri, ks/kas, 1119
Kazakh, kk/kaz, 1111
Kinyarwanda, rw/kin, 1823
Kirghiz, ky/kir, 1125
Korean, ko/kor, 1115
Kurdish, ku/kur, 1121
Lao, lo/lao, 1215
Latin, la/lat, 1201
Latvian, Iv/lav, 1222
Lingala, In/lin, 1214
Lithuanian, It/lit, 1220
Macedonian, mk/mkd, 1311
Malagasy, mg/mlg, 1307
Malay, ms/msa, 1319
Malayalam, ml/mal, 1312
Maltese, mt/mlt, 1320
Maori, mi/mri, 1309
Marathi, mr/mar, 1318
Mongolian, mn/mon, 1314
Moldavian, mo/mol, 1315
Nauru, na/nau, 1401
Nepali, ne/nep, 1405
Norwegian, no/nor, 1415
Occitan, oc/oci, 1503
Oriya, or/ori, 1518
Oromo, om/orm, 1513
Panjabi, pa/pan, 1601
Persian, fa/fas, 0601
Polish, pl/pol, 1612
Portuguese, pt/por, 1620
Pushto, ps/pus, 1619
Quechua, qu/que, 1721
Romanian, ro/ron, 1815
Romansch, rm/roh, 1813
Rundi, rn/run, 1814
Sanskrit, sa/san, 1901
Scottish Gaelic, gd/gla, 0704
Serbian, sr/srp, 1918
Serbo-Croatian, sh/---, 1908
Shona, sn/sna, 1914
Sindhi, sd/snd, 1904
Sinhalese, si/sin, 1909
Slovak, sk/slk, 1911
Slovenian, sl/slv, 1912
Somali, so/som, 1915
Sotho, Southern, st/sot, 1920
Spanish, es/spa, 0519
Sundanese, su/sun, 1921
Swahili, sw/swa, 1923
Swati, ss/ssw, 1919
Swedish, sv/swe, 1922
Telugu, te/tel, 2005
Thai, th/tha, 2008
Tibetan, bo/bod, 0215
Tigrinya, ti/tir, 2009
Tonga (Tonga Islands), to/ton, 2015
Tsonga, ts/tso, 2019
Tswana, tn/tsn, 2014
Turkmen, tk/tuk, 2011
Turkish, tr/tur, 2018
Twi, tw/twi, 2023
Ukrainian, uk/ukr, 2111
Urdu, ur/urd, 2118
Uzbek, uz/uzb, 2126
Vietnamese, vi/vie, 2209
Volapük, vo/vol, 2215
Welsh, cy/cym, 0325
Western Frisian, fy/fry, 0625
Wolof, wo/wol, 2315
Xhosa, xh/xho, 2408
Yiddish, ji/yid, 1009
natural_image
Gray rectangular remote control device with keypad and scroll (no visible text or symbols)
Telecomando (1)

natural_image
Simple line drawing of a cylindrical battery with a cross mark on its side (no text or symbols)
Batterie (2)
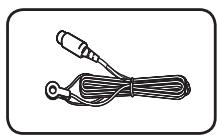
natural_image
Simple line drawing of a cable with two connectors (no text or symbols)
Antenna FM (1)

natural_image
Line drawing of a coiled cable with two connectors (no text or symbols)
Cavo corrente
natural_image
Simple diagram of four circles arranged in a diamond shape within a rounded rectangle (no text or symbols)
natural_image
Simple line drawing of a screw with a star-shaped head (no text or symbols)
natural_image
Simple line drawing of a screw with a star-shaped head (no text or symbols)
natural_image
Simple diagram of four overlapping circles inside a tilted rectangular frame (no text or symbols)
natural_image
Simple line drawing of a screw with a star on the head (no text or symbols)
natural_image
Simple diagram of a rectangular plate with eight circular holes, no text or symbols present.
natural_image
Simple black-and-white icon of a curved object inside an oval frame (no text or symbols)
natural_image
Simple line drawing of a vertical metal bracket with a flat base (no text or symbols)
Montanti grandi (2)

natural_image
Simple line drawing of a metal bracket with mounting holes (no text or symbols)
natural_image
Simple line drawing of a screw with a star-shaped head (no text or symbols)
Viti grandi (4)
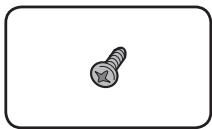
natural_image
Simple line drawing of a screw with a star rating, enclosed in a rounded rectangle (no text or symbols)
Viti piccole (8)
natural_image
Simple geometric diagram of four overlapping ovals inside a tilted square (no text or symbols)
natural_image
Simple line drawing of a screw with a star on the screw (no text or symbols)
natural_image
3D mechanical assembly diagram showing a bracket with internal components and an inset close-up of a detail (no text or symbols)
http://www.pioneer.co.uk/
In Russia:
http://www.pioneer.eu/
http://www.pioneer-rus.ru/
In Hong Kong:
http://www.pioneerhongkong.com.hk/
In Singapore:
http://www.pioneer.com.sg/firmwaredownload
In Australia:
http://www.pioneer.com.au/
Master Audio | Essential
natural_image
Illustration of a mechanical component pressing into a circular component (no text or symbols)
natural_image
Diagram showing a circular mechanical component with internal components and an inset view of a multi-hole rotary mechanism (no text or symbols)
natural_image
Diagram of a device showing internal structure before and after disassembly (no text or symbols)

Attenzione
natural_image
Mechanical assembly diagram showing a circular component with mounting holes and a lever mechanism (no text or symbols)
natural_image
Mechanical assembly diagram showing a rotating wheel with mounting brackets and connecting wires (no text or symbols)
natural_image
Mechanical assembly diagram showing a rotating component and a rectangular plate with holes, no text or symbols present.
natural_image
Mechanical assembly diagram showing a circular component with internal components and mounting holes, no text or symbols present.
natural_image
3D diagram of a device with a base mount and cable, no text or symbols present
natural_image
Diagram of a mechanical component with circular holes and a base, showing a transformation or assembly (no text or symbols present)

Attenzione

Attenzione
PIONEER 00, 31, 32, 07, 36, 42, 51, 22, 91, 92
ACURA 44
ADMIRAL 31
AIWA 60, 58
AKAI 32, 35, 42
AKURA 41
ALBA 07, 39, 41, 44
AMSTRAD 42, 44, 47
ANITECH 44
ASA 45
ASUKA 41
AUDIOGONIC 07, 36
BASIC LINE 41, 44
BAUR 31, 07, 42
BEKO 38, 83, 84, 89
BEON 07
BLAUPUNKT 31
BLUE SKY 41
BLUE STAR 18
BPL 18
BRANDT 36
BTC 41
BUSH 07, 41, 42, 44, 47, 56
CASCADE 44
CATHAY 07
CENTURION 07
CGB 42
CIMLINE 44
CLARIVOX 07
CLATRONIC 38
CONDOR 38
CONTEC 44
CROSLEY 32
CROWN 38, 44
CRYSTAL 42
CYBERTRON 41
DAEWOO 07, 44, 56
DAINICHI 41
DANSAI 07
DAYTON 44
DECCA 07, 48
DIXI 07, 44
DUMONT 53
ELIN 07
ELITE 41
ELTA 44
EMERSON 42
ERRES 07
FERGUSON 07, 36, 51
FINLANDIA 35, 43, 54
FINLUX 32, 07, 45, 48, 53, 54
FIRSTLINE 40, 44
FISHER 32, 35, 38, 45
FORMENTI 32, 07, 42
FRONTECH 31, 42, 46
FRONTECH/PROTECH 32
FUJITSU 48, 74, 77
FUNAI 40, 46, 58, 56
GBC 32, 42
GE 00, 01, 08, 07, 10, 11, 17, 02, 28, 18
GEC 07, 34, 48
GELOSO 32, 44
GENERAL 29
GENEXXA 31, 41
GOLDSTAR 10, 23, 21, 02, 07, 50
GOODMANS 07, 39, 47, 48, 56
GORENJE 38
GPM 41
GRAETZ 31, 42
GRANADA 07, 35, 42, 43, 48
GRADIENTE 30, 57
GRANDIN 18
GRUNDIG 31, 53
HANSEATIC 07, 42
HCM 18,44
HINARI 07, 41, 44
HISAWA 18
HITACHI 31, 33, 34, 36, 42, 43, 54, 06, 10, 24, 25, 18
HUANYU 56
HYPSON 07, 18, 46
ICE 46, 47
IMPERIAL 38, 42
INDIANA 07
INGELEN 31
INTERFUNK 31, 32, 07, 42
INTERVISION 46, 49
ISUKAI 41
ITC 42
ITT 31, 32, 42
JEC 05
JVC 13, 23
KAISUI 18, 41, 44
KAPSCH 31
KENDO 42
KENNEDY 32, 42
KORPEL 07
KOYODA 44
LEYCO 07, 40, 46, 48
LIESENK&TTER 07
LOEWE 07
LUXOR 32, 42, 43
M-ELECTRONIC 31, 44, 45, 54, 56, 07, 36, 51
MAGNADYNE 32, 49
MAGNAFON 49
MAGNAVOX 07, 10, 03, 12, 29, 81
MANESTH 39, 46
MARANTZ 07
MARK 07
MATSUI 07, 39, 40, 42, 44, 47, 48
MCMICHAEL 34
MEDIATOR 07
MEMOREX 44
METZ 31, 69
MINERVA 31, 53
MITSUBISHI 09, 10, 02, 21, 31, 73
MULTITECH 44, 49
NEC 59, 57
NECKERMANN 31, 07
NEI 07, 42
NIKKAI 05, 07, 41, 46, 48
NOBLIKO 49
NOKIA 32, 42, 52
NORDMENDE 32, 36, 51, 52
OCEANIC 31, 32, 42
ORION 32, 07, 39, 40
OSAKI 41, 46, 48
OSO 41
OSUME 48
OTTO VERSAND 31, 32, 07, 42
PALLADIUM 38
PANAMA 46
PANASONIC 31, 07, 08, 42, 22, 70
PATHO CINEMA 42
PAUSA 44
PHILCO 32, 42
PHILIPS 31, 07, 34, 56, 68, 55, 63, 82
PHOENIX 32
PHONOLA 07
PROFEX 42, 44
PROTECH 07, 42, 44, 46, 49
QUELLE 31, 32, 07, 42, 45, 53
R-LINE 07
RADIOLA 07
RADIOSHACK 10, 23, 21, 02
RBM 53
RCA 01, 10, 15, 16, 17, 18, 61, 62, 09, 59, 60
REDIFFUSION 32, 42
REX 31, 46
ROADSTAR 41, 44, 46
SABA 31, 36, 42, 51
SAISHO 39, 44, 46
SALORA 31, 32, 42, 43
SAMBERS 49
SAMSUNG 07, 38, 44, 46, 69, 70, 64, 65, 78, 79, 80
SANYO 35, 45, 48, 21, 14, 91, 67, 76
SBR 07, 34
SCHAUB LORENZ 42
SHARP 02, 19, 27, 67, 90, 62, 66
SIAREM 32, 49
SIEMENS 31
SINUDYNE 32, 39, 40, 49
SKANTIC 43
SOLAVOX 31
SONOKO 07, 44
SONOLOR 31, 35
SONTEC 07
SONY 04, 72
SOUNDWAVE 07
STANDARD 41, 44
STERN 31
SUSUMU 41
SYSLINE 07
TANDY 31, 41, 48
TASHIKO 34
TATUNG 07, 48
TEC 42
TELEAVIA 36
TELEFUNKEN 36, 37, 52
TELETECH 44
TENSAI 40, 41
THOMSON 36, 51, 52, 63, 61
THORN 31, 07, 42, 45, 48
TOMASHI 18
TOSHIBA 05, 02, 26, 21, 53
TOWADA 42
ULTRAVOX 32, 42, 49
UNIDEN 92, 68
UNIVERSUM 31, 07, 38, 42, 45, 46, 54
VESTEL 07
VICTOR 13
VOXSON 31
WALTHAM 43
WATSON 07
WATT RADIO 32, 42, 49
WHITE WESTINGHOUSE 07
YOKO 07, 42, 46
ZENITH 03, 20
Capitolo 4
Riproduzione
Premere TOOLS during playback.
Playback del file in rete
Connettere usando WPS (Wi-Fi Protected Setup)
Premere ▲ OPEN/CLOSE.
• Auto Set IP Address
Albanian, sq/sqi, 1917
Amharic, am/amh, 0113
Arabic, ar/ara, 0118
Armenian, hy/hye, 0825
Assamese, as/asm, 0119
Aymara, ay/aym, 0125
Azerbaijani, az/aze, 0126
Bashkir, ba/bak, 0201
Basque, eu/eus, 0521
Belarusian, be/bel, 0205
Bengali, bn/ben, 0214
Bihari, bh/bih, 0208
Bislama, bi/bis, 0209
Breton, br/bre, 0218
Bulgarian, bg/bul, 0207
Burmese, my/mya, 1325
Catalan, ca/cat, 0301
Central Khmer, km/khm, 1113
Chinese, zh/zho, 2608
Corsican, co/cos, 0315
Croatian, hr/hrv, 0818
Czech, cs/ces, 0319
Danish, da/dan, 0401
Dutch, nl/nld, 1412
Dzongkha, dz/dzo, 0426
English, en/eng, 0514
Esperanto, eo/epo, 0515
Estonian, et/est, 0520
Finnish, fi/fin, 0609
Fijian, fj/fij, 0610
Faroese, fo/fao, 0615
Georgian, ka/kat, 1101
German, de/deu, 0405
Greek, el/ell, 0512
Guarani, gn/grn, 0714
Gujarati, gu/guj, 0721
Hausa, ha/hau, 0801
Hebrew, iw/heb, 0923
Hindi, hi/hin, 0809
Hungarian, hu/hun, 0821
Icelandic, is/isl, 0919
Indonesian, in/ind, 0914
Interlingua, ia/ina, 0901
Interlingue, ie/ile, 0905
Inupiaq, ik/ipk, 0911
Irish, ga/gle, 0701
Italian, it/ita, 0920
Japanese, ja/jpn, 1001
Javanese, jw/jav, 1023
Kalaallisut, kl/kal, 1112
Kannada, kn/kan, 1114
Kashmiri, ks/kas, 1119
Kazakh, kk/kaz, 1111
Kinyarwanda, rw/kin, 1823
Kirghiz, ky/kir, 1125
Korean, ko/kor, 1115
Kurdish, ku/kur, 1121
Lao, lo/lao, 1215
Latin, la/lat, 1201
Latvian, Iv/lav, 1222
Lingala, In/lin, 1214
Lithuanian, It/lit, 1220
Macedonian, mk/mkd, 1311
Malagasy, mg/mlg, 1307
Malay, ms/msa, 1319
Malayalam, ml/mal, 1312
Maltese, mt/mlt, 1320
Maori, mi/mri, 1309
Marathi, mr/mar, 1318
Mongolian, mn/mon, 1314
Moldavian, mo/mol, 1315
Nauru, na/nau, 1401
Nepali, ne/nep, 1405
Norwegian, no/nor, 1415
Occitan, oc/oci, 1503
Oriya, or/ori, 1518
Oromo, om/orm, 1513
Panjabi, pa/pan, 1601
Persian, fa/fas, 0601
Polish, pl/pol, 1612
Portuguese, pt/por, 1620
Pushto, ps/pus, 1619
Quechua, qu/que, 1721
Romanian, ro/ron, 1815
Romansch, rm/roh, 1813
Rundi, rn/run, 1814
Sanskrit, sa/san, 1901
Scottish Gaelic, gd/gla, 0704
Serbian, sr/srp, 1918
Serbo-Croatian, sh/---, 1908
Shona, sn/sna, 1914
Sindhi, sd/snd, 1904
Sinhalese, si/sin, 1909
Slovak, sk/slk, 1911
Slovenian, sl/slv, 1912
Somali, so/som, 1915
Sotho, Southern, st/sot, 1920
Spanish, es/spa, 0519
Sundanese, su/sun, 1921
Swahili, sw/swa, 1923
Swati, ss/ssw, 1919
Swedish, sv/swe, 1922
Telugu, te/tel, 2005
Thai, th/tha, 2008
Tibetan, bo/bod, 0215
Tigrinya, ti/tir, 2009
Tonga (Tonga Islands), to/ton, 2015
Tsonga, ts/tso, 2019
Tswana, tn/tsn, 2014
Turkmen, tk/tuk, 2011
Turkish, tr/tur, 2018
Twi, tw/twi, 2023
Ukrainian, uk/ukr, 2111
Urdu, ur/urd, 2118
Uzbek, uz/uzb, 2126
Vietnamese, vi/vie, 2209
Volapük, vo/vol, 2215
Welsh, cy/cym, 0325
Western Frisian, fy/fry, 0625
Wolof, wo/wol, 2315
Xhosa, xh/xho, 2408
Yiddish, ji/yid, 1009
iPod/iPhone/iPad (solo MCS-838/MCS-434/MCS-FS232)
KLASSE 1 LASERPRODUCT
WAARSCHUWING NETSNOER
42 – WPS set-up (Wi-Fi Protected Setup) (alleen MCS-838/MCS-434/MCS-FS232)
natural_image
Front view of a gray remote control with keyboard and mouse (no text or symbols visible)
Afstandsbediening (1)

natural_image
Simple line drawing of a cylindrical battery with a cross mark on its side (no text or symbols)
Batterijen (2)

natural_image
Simple line drawing of a cord with two connectors (no text or symbols)
Fm-antenne (1)
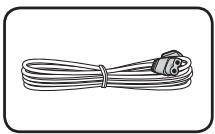
natural_image
Line drawing of a coiled cable with two connectors (no text or symbols)
Netsnoer
natural_image
Simple diagram of four circles arranged in a diamond shape within a rounded rectangle (no text or symbols)
Antislipkussentjes (1)
[2 cm x 2 cm]

natural_image
Simple line drawing of a screw with a star-shaped head (no text or symbols)
natural_image
Simple line drawing of a screw with a star-shaped head (no text or symbols)
natural_image
Simple geometric diagram of four overlapping circles inside a tilted square (no text or symbols)
natural_image
Simple line drawing of a screw with a star detail (no text or symbols)
natural_image
Simple diagram of a rectangular plate with eight circular holes, no text or symbols present.
Antislipkussentjes (1) [5 cm x 2,5 cm]

natural_image
Simple black-and-white icon of a curved object inside an oval frame (no text or symbols)
natural_image
Simple line drawing of a vertical metal bracket with a flat base (no text or symbols)
Grote staven (2)

natural_image
Simple line drawing of a metal bracket with mounting holes (no text or symbols)
Kleine staven (2)

natural_image
Simple line drawing of a screw with a star-shaped head (no text or symbols)
Grote schroeven (4)

natural_image
Simple line drawing of a screw with a star rating, enclosed in a rounded rectangle (no text or symbols)
natural_image
Simple geometric diagram of four overlapping ovals inside a tilted square (no text or symbols)
Antislipkussentjes (2)
[2 cm x 2 cm]

natural_image
Simple line drawing of a screw with a star on the screw (no text or symbols)
natural_image
Technical illustration of a mechanical assembly with an inset showing a detailed view of a component (no text or symbols present)
http://www.pioneer.co.uk/
In Rusland:
http://www.pioneer.eu/
http://www.pioneer-rus.ru/
In Hong Kong:
http://www.pioneerhongkong.com.hk/
IN Singapore:
http://www.pioneer.com.sg/firmwaredownload
In Australië:
http://www.pioneer.com.au/
Master Audio | Essential
natural_image
Illustration of a mechanical component with a downward arrow, no text or symbols present
natural_image
Diagram showing a circular mechanical component with internal components and an inset view of a multi-hole motor or fan assembly (no text or symbols present)
natural_image
Diagram of a device showing internal structure before and after disassembly (no text or symbols)
! Waarschuwing
natural_image
Mechanical assembly diagram showing a circular component with internal components and directional arrows indicating motion (no text or symbols)
natural_image
Mechanical assembly diagram showing a rotating wheel with mounting brackets and directional arrows indicating motion (no text or symbols)
natural_image
Mechanical assembly diagram showing a circular component with mounting flanges and bolted joints, no text or symbols present
natural_image
3D diagram of a device with a base mount and cable, no text or symbols present
natural_image
Diagram of a mechanical component with circular holes and a base, showing a transformation or assembly (no text or symbols present)

Waarschuwing
! Waarschuwing
(Wi-Fi Protected Setup)
(alleen MCS-838/MCS-434/MCS-FS232)
PIONEER 00, 31, 32, 07, 36, 42, 51, 22, 91, 92
ACURA 44
ADMIRAL 31
AIWA 60, 58
AKAI 32, 35, 42
AKURA 41
ALBA 07, 39, 41, 44
AMSTRAD 42, 44, 47
ANITECH 44
ASA 45
ASUKA 41
AUDIOGONIC 07, 36
BASIC LINE 41, 44
BAUR 31, 07, 42
BEKO 38, 83, 84, 89
BEON 07
BLAUPUNKT 31
BLUE SKY 41
BLUE STAR 18
BPL 18
BRANDT 36
BTC 41
BUSH 07, 41, 42, 44, 47, 56
CASCADE 44
CATHAY 07
CENTURION 07
CGB 42
CIMLINE 44
CLARIVOX 07
CLATRONIC 38
CONDOR 38
CONTEC 44
CROSLEY 32
CROWN 38, 44
CRYSTAL 42
CYBERTRON 41
DAEWOO 07, 44, 56
DAINICHI 41
DANSAI 07
DAYTON 44
DECCA 07, 48
DIXI 07, 44
DUMONT 53
ELIN 07
ELITE 41
ELTA 44
EMERSON 42
ERRES 07
FERGUSON 07, 36, 51
FINLANDIA 35, 43, 54
FINLUX 32, 07, 45, 48, 53, 54
FIRSTLINE 40, 44
FISHER 32, 35, 38, 45
FORMENTI 32, 07, 42
FRONTECH 31, 42, 46
FRONTECH/PROTECH 32
FUJITSU 48, 74, 77
FUNAI 40, 46, 58, 56
GBC 32, 42
GE 00, 01, 08, 07, 10, 11, 17, 02, 28, 18
GEC 07, 34, 48
GELOSO 32, 44
GENERAL 29
GENEXXA 31, 41
GOLDSTAR 10, 23, 21, 02, 07, 50
GOODMANS 07, 39, 47, 48, 56
GORENJE 38
GPM 41
GRAETZ 31, 42
GRANADA 07, 35, 42, 43, 48
GRADIENTE 30, 57
GRANDIN 18
GRUNDIG 31, 53
HANSEATIC 07, 42
HCM 18,44
HINARI 07, 41, 44
HISAWA 18
HITACHI 31, 33, 34, 36, 42, 43, 54, 06, 10, 24, 25, 18
HUANYU 56
HYPSON 07, 18, 46
ICE 46, 47
IMPERIAL 38, 42
INDIANA 07
INGELEN 31
INTERFUNK 31, 32, 07, 42
INTERVISION 46, 49
ISUKAI 41
ITC 42
ITT 31, 32, 42
JEC 05
JVC 13, 23
KAISUI 18, 41, 44
KAPSCH 31
KENDO 42
KENNEDY 32, 42
KORPEL 07
KOYODA 44
LEYCO 07, 40, 46, 48
LIESENK&TTER 07
LOEWE 07
LUXOR 32, 42, 43
M-ELECTRONIC 31, 44, 45, 54, 56, 07, 36, 51
MAGNADYNE 32, 49
MAGNAFON 49
MAGNAVOX 07, 10, 03, 12, 29, 81
MANESTH 39, 46
MARANTZ 07
MARK 07
MATSUI 07, 39, 40, 42, 44, 47, 48
MCMICHAEL 34
MEDIATOR 07
MEMOREX 44
METZ 31, 69
MINERVA 31, 53
MITSUBISHI 09, 10, 02, 21, 31, 73
MULTITECH 44, 49
NEC 59, 57
NECKERMANN 31, 07
NEI 07, 42
NIKKAI 05, 07, 41, 46, 48
NOBLIKO 49
NOKIA 32, 42, 52
NORDMENDE 32, 36, 51, 52
OCEANIC 31, 32, 42
ORION 32, 07, 39, 40
OSAKI 41, 46, 48
OSO 41
OSUME 48
OTTO VERSAND 31, 32, 07, 42
PALLADIUM 38
PANAMA 46
PANASONIC 31, 07, 08, 42, 22, 70
PATHO CINEMA 42
PAUSA 44
PHILCO 32, 42
PHILIPS 31, 07, 34, 56, 68, 55, 63, 82
PHOENIX 32
PHONOLA 07
PROFEX 42, 44
PROTECH 07, 42, 44, 46, 49
QUELLE 31, 32, 07, 42, 45, 53
R-LINE 07
RADIOLA 07
RADIOSHACK 10, 23, 21, 02
RBM 53
RCA 01, 10, 15, 16, 17, 18, 61, 62, 09, 59, 60
REDIFFUSION 32, 42
REX 31, 46
ROADSTAR 41, 44, 46
SABA 31, 36, 42, 51
SAISHO 39, 44, 46
SALORA 31, 32, 42, 43
SAMBERS 49
SAMSUNG 07, 38, 44, 46, 69, 70, 64, 65, 78, 79, 80
SANYO 35, 45, 48, 21, 14, 91, 67, 76
SBR 07, 34
SCHAUB LORENZ 42
SHARP 02, 19, 27, 67, 90, 62, 66
SIAREM 32, 49
SIEMENS 31
SINUDYNE 32, 39, 40, 49
SKANTIC 43
SOLAVOX 31
SONOKO 07, 44
SONOLOR 31, 35
SONTEC 07
SONY 04, 72
SOUNDWAVE 07
STANDARD 41, 44
STERN 31
SUSUMU 41
SYSLINE 07
TANDY 31, 41, 48
TASHIKO 34
TATUNG 07, 48
TEC 42
TELEAVIA 36
TELEFUNKEN 36, 37, 52
TELETECH 44
TENSAI 40, 41
THOMSON 36, 51, 52, 63, 61
THORN 31, 07, 42, 45, 48
TOMASHI 18
TOSHIBA 05, 02, 26, 21, 53
TOWADA 42
ULTRAVOX 32, 42, 49
UNIDEN 92, 68
UNIVERSUM 31, 07, 38, 42, 45, 46, 54
VESTEL 07
VICTOR 13
VOXSON 31
WALTHAM 43
WATSON 07
WATT RADIO 32, 42, 49
WHITE WESTINGHOUSE 07
YOKO 07, 42, 46
ZENITH 03, 20
Hoofdstuk 4
Afspelen
- Kies [Disc] of [Front USB].
- iPod nano (2G/3G/4G/5G/6G/7G)
- iPod touch (1G/2G/3G/4G/5G)
– iPhone 3G/iPhone 3GS/iPhone 4/iPhone 4S/iPhone 5
-iPad/iPad (2/3G/4G)
-iPad mini
• Auto Set IP Address
Albanian, sq/sqi, 1917
Amharic, am/amh, 0113
Arabic, ar/ara, 0118
Armenian, hy/hye, 0825
Assamese, as/asm, 0119
Aymara, ay/aym, 0125
Azerbaijani, az/aze, 0126
Bashkir, ba/bak, 0201
Basque, eu/eus, 0521
Belarusian, be/bel, 0205
Bengali, bn/ben, 0214
Bihari, bh/bih, 0208
Bislama, bi/bis, 0209
Breton, br/bre, 0218
Bulgarian, bg/bul, 0207
Burmese, my/mya, 1325
Catalan, ca/cat, 0301
Central Khmer, km/khm, 1113
Chinese, zh/zho, 2608
Corsican, co/cos, 0315
Croatian, hr/hrv, 0818
Czech, cs/ces, 0319
Danish, da/dan, 0401
Dutch, nl/nld, 1412
Dzongkha, dz/dzo, 0426
English, en/eng, 0514
Esperanto, eo/epo, 0515
Estonian, et/est, 0520
Finnish, fi/fin, 0609
Fijian, fj/fij, 0610
Faroese, fo/fao, 0615
Georgian, ka/kat, 1101
German, de/deu, 0405
Greek, el/ell, 0512
Guarani, gn/grn, 0714
Gujarati, gu/guj, 0721
Hausa, ha/hau, 0801
Hebrew, iw/heb, 0923
Hindi, hi/hin, 0809
Hungarian, hu/hun, 0821
Icelandic, is/isl, 0919
Indonesian, in/ind, 0914
Interlingua, ia/ina, 0901
Interlingue, ie/ile, 0905
Inupiaq, ik/ipk, 0911
Irish, ga/gle, 0701
Italian, it/ita, 0920
Japanese, ja/jpn, 1001
Javanese, jw/jav, 1023
Kalaallisut, kl/kal, 1112
Kannada, kn/kan, 1114
Kashmiri, ks/kas, 1119
Kazakh, kk/kaz, 1111
Kinyarwanda, rw/kin, 1823
Kirghiz, ky/kir, 1125
Korean, ko/kor, 1115
Kurdish, ku/kur, 1121
Lao, lo/lao, 1215
Latin, la/lat, 1201
Latvian, Iv/lav, 1222
Lingala, In/lin, 1214
Lithuanian, It/lit, 1220
Macedonian, mk/mkd, 1311
Malagasy, mg/mlg, 1307
Malay, ms/msa, 1319
Malayalam, ml/mal, 1312
Maltese, mt/mlt, 1320
Maori, mi/mri, 1309
Marathi, mr/mar, 1318
Mongolian, mn/mon, 1314
Moldavian, mo/mol, 1315
Nauru, na/nau, 1401
Nepali, ne/nep, 1405
Norwegian, no/nor, 1415
Occitan, oc/oci, 1503
Oriya, or/ori, 1518
Oromo, om/orm, 1513
Panjabi, pa/pan, 1601
Persian, fa/fas, 0601
Polish, pl/pol, 1612
Portuguese, pt/por, 1620
Pushto, ps/pus, 1619
Quechua, qu/que, 1721
Romanian, ro/ron, 1815
Romansch, rm/roh, 1813
Rundi, rn/run, 1814
Sanskrit, sa/san, 1901
Scottish Gaelic, gd/gla, 0704
Serbian, sr/srp, 1918
Serbo-Croatian, sh/---, 1908
Shona, sn/sna, 1914
Sindhi, sd/snd, 1904
Sinhalese, si/sin, 1909
Slovak, sk/slk, 1911
Slovenian, sl/slv, 1912
Somali, so/som, 1915
Sotho, Southern, st/sot, 1920
Spanish, es/spa, 0519
Sundanese, su/sun, 1921
Swahili, sw/swa, 1923
Swati, ss/ssw, 1919
Swedish, sv/swe, 1922
Telugu, te/tel, 2005
Thai, th/tha, 2008
Tibetan, bo/bod, 0215
Tigrinya, ti/tir, 2009
Tonga (Tonga Islands), to/ton, 2015
Tsonga, ts/tso, 2019
Tswana, tn/tsn, 2014
Turkmen, tk/tuk, 2011
Turkish, tr/tur, 2018
Twi, tw/twi, 2023
Ukrainian, uk/ukr, 2111
Urdu, ur/urd, 2118
Uzbek, uz/uzb, 2126
Vietnamese, vi/vie, 2209
Volapük, vo/vol, 2215
Welsh, cy/cym, 0325
Western Frisian, fy/fry, 0625
Wolof, wo/wol, 2315
Xhosa, xh/xho, 2408
Yiddish, ji/yid, 1009
87 – iPod/iPhone/iPad (solo MCS-838/MCS-434/MCS-FS232)
88 - Otros
10 Apéndice
natural_image
Front view of a gray remote control with keyboard and mouse (no text or symbols visible)
natural_image
Simple line drawing of a cylindrical battery with a cross mark on its side (no text or symbols)
Pilas (2)

natural_image
Simple line drawing of a cord with two connectors (no text or symbols)
Antena FM (1)

natural_image
Line drawing of a coiled cable with two connectors (no text or symbols)
natural_image
Simple diagram of four circles arranged in a diamond shape within a rounded rectangle (no text or symbols)
Apoyos
antideslizantes (1)
[2 cm x 2 cm]

natural_image
Simple line drawing of a screw with a star-shaped head (no text or symbols)
natural_image
Simple line drawing of a screw with a star rating, enclosed in a rounded rectangle (no text or symbols)
natural_image
Simple geometric diagram of four overlapping circles inside a tilted square (no text or symbols)
Apoyos
antideslizantes (5)
[2 cm x 2 cm]

natural_image
Simple line drawing of a screw with a star detail (no text or symbols)
natural_image
Simple diagram of a rectangular plate with eight circular holes, no text or symbols present.
Apoyos
antideslizantes (1)
[5 cm x 2,5 cm]

natural_image
Simple black-and-white icon of a curved object inside an oval frame (no text or symbols)
natural_image
Simple line drawing of a vertical metal bracket with a flat base (no text or symbols)
Barras grandes (2)
natural_image
Simple line drawing of a metal bracket with mounting holes (no text or symbols)
Barras pequeñas (2)
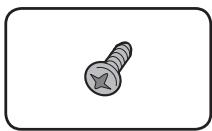
natural_image
Simple line drawing of a screw with a star on top, enclosed in a rounded rectangle (no text or symbols)
Tornillos grandes (4)
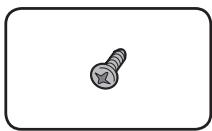
natural_image
Simple line drawing of a screw with a star-shaped head (no text or symbols)
natural_image
Simple diagram of four overlapping ovals inside a tilted square (no text or symbols)
Apoyos
antideslizantes (2)
[2 cm x 2 cm]

natural_image
Simple line drawing of a screw with a star-shaped head (no text or symbols)
natural_image
3D mechanical assembly diagram showing a bracket with internal components and a close-up inset of a slot (no text or symbols)
http://www.pioneer.co.uk/
En Rusia:
http://www.pioneer.eu/
http://www.pioneer-rus.ru/
En Hong Kong:
http://www.pioneerhongkong.com.hk/
En Singapur:
http://www.pioneer.com.sg/firmwaredownload
En Australia:
http://www.pioneer.com.au/
Master Audio | Essential
natural_image
Illustration of a mechanical component inserted into a circular base, with no visible text or symbols.
natural_image
Diagram showing a circular mechanical component with internal components and an inset view of a multi-hole motor or fan assembly (no text or symbols present)
natural_image
Diagram of a device showing internal structure before and after disassembly (no text or symbols)

Aviso
natural_image
Mechanical assembly diagram showing a circular component with internal components and mounting holes (no text or symbols)
natural_image
Mechanical assembly diagram showing a rotating wheel with mounting brackets and connecting wires (no text or symbols)
natural_image
Mechanical assembly diagram showing a circular component with mounting flanges and bolted joints, no text or symbols present
natural_image
3D diagram of a device with a base mount and cable, no text or symbols present
natural_image
Diagram of a cylindrical component with mounting holes and wiring, showing a magnified inset of its surface (no text or symbols)

Aviso

Aviso
PIONEER 00, 31, 32, 07, 36, 42, 51, 22, 91, 92
ACURA 44
ADMIRAL 31
AIWA 60, 58
AKAI 32, 35, 42
AKURA 41
ALBA 07, 39, 41, 44
AMSTRAD 42, 44, 47
ANITECH 44
ASA 45
ASUKA 41
AUDIOGONIC 07, 36
BASIC LINE 41, 44
BAUR 31, 07, 42
BEKO 38, 83, 84, 89
BEON 07
BLAUPUNKT 31
BLUE SKY 41
BLUE STAR 18
BPL 18
BRANDT 36
BTC 41
BUSH 07, 41, 42, 44, 47, 56
CASCADE 44
CATHAY 07
CENTURION 07
CGB 42
CIMLINE 44
CLARIVOX 07
CLATRONIC 38
CONDOR 38
CONTEC 44
CROSLEY 32
CROWN 38, 44
CRYSTAL 42
CYBERTRON 41
DAEWOO 07, 44, 56
DAINICHI 41
DANSAI 07
DAYTON 44
DECCA 07, 48
DIXI 07, 44
DUMONT 53
ELIN 07
ELITE 41
ELTA 44
EMERSON 42
ERRES 07
FERGUSON 07, 36, 51
FINLANDIA 35, 43, 54
FINLUX 32, 07, 45, 48, 53, 54
FIRSTLINE 40, 44
FISHER 32, 35, 38, 45
FORMENTI 32, 07, 42
FRONTECH 31, 42, 46
FRONTECH/PROTECH 32
FUJITSU 48, 74, 77
FUNAI 40, 46, 58, 56
GBC 32, 42
GE 00, 01, 08, 07, 10, 11, 17, 02, 28, 18
GEC 07, 34, 48
GELOSO 32, 44
GENERAL 29
GENEXXA 31, 41
GOLDSTAR 10, 23, 21, 02, 07, 50
GOODMANS 07, 39, 47, 48, 56
GORENJE 38
GPM 41
GRAETZ 31, 42
GRANADA 07, 35, 42, 43, 48
GRADIENTE 30, 57
GRANDIN 18
GRUNDIG 31, 53
HANSEATIC 07, 42
HCM 18,44
HINARI 07, 41, 44
HISAWA 18
HITACHI 31, 33, 34, 36, 42, 43, 54, 06, 10, 24, 25, 18
HUANYU 56
HYPSON 07, 18, 46
ICE 46, 47
IMPERIAL 38, 42
INDIANA 07
INGELEN 31
INTERFUNK 31, 32, 07, 42
INTERVISION 46, 49
ISUKAI 41
ITC 42
ITT 31, 32, 42
JEC 05
JVC 13, 23
KAISUI 18, 41, 44
KAPSCH 31
KENDO 42
KENNEDY 32, 42
KORPEL 07
KOYODA 44
LEYCO 07, 40, 46, 48
LIESENK&TTER 07
LOEWE 07
LUXOR 32, 42, 43
M-ELECTRONIC 31, 44, 45, 54, 56, 07, 36, 51
MAGNADYNE 32, 49
MAGNAFON 49
MAGNAVOX 07, 10, 03, 12, 29, 81
MANESTH 39, 46
MARANTZ 07
MARK 07
MATSUI 07, 39, 40, 42, 44, 47, 48
MCMICHAEL 34
MEDIATOR 07
MEMOREX 44
METZ 31, 69
MINERVA 31, 53
MITSUBISHI 09, 10, 02, 21, 31, 73
MULTITECH 44, 49
NEC 59, 57
NECKERMANN 31, 07
NEI 07, 42
NIKKAI 05, 07, 41, 46, 48
NOBLIKO 49
NOKIA 32, 42, 52
NORDMENDE 32, 36, 51, 52
OCEANIC 31, 32, 42
ORION 32, 07, 39, 40
OSAKI 41, 46, 48
OSO 41
OSUME 48
OTTO VERSAND 31, 32, 07, 42
PALLADIUM 38
PANAMA 46
PANASONIC 31, 07, 08, 42, 22, 70
PATHO CINEMA 42
PAUSA 44
PHILCO 32, 42
PHILIPS 31, 07, 34, 56, 68, 55, 63, 82
PHOENIX 32
PHONOLA 07
PROFEX 42, 44
PROTECH 07, 42, 44, 46, 49
QUELLE 31, 32, 07, 42, 45, 53
R-LINE 07
RADIOLA 07
RADIOSHACK 10, 23, 21, 02
RBM 53
RCA 01, 10, 15, 16, 17, 18, 61, 62, 09, 59, 60
REDIFFUSION 32, 42
REX 31, 46
ROADSTAR 41, 44, 46
SABA 31, 36, 42, 51
SAISHO 39, 44, 46
SALORA 31, 32, 42, 43
SAMBERS 49
SAMSUNG 07, 38, 44, 46, 69, 70, 64, 65, 78, 79, 80
SANYO 35, 45, 48, 21, 14, 91, 67, 76
SBR 07, 34
SCHAUB LORENZ 42
SHARP 02, 19, 27, 67, 90, 62, 66
SIAREM 32, 49
SIEMENS 31
SINUDYNE 32, 39, 40, 49
SKANTIC 43
SOLAVOX 31
SONOKO 07, 44
SONOLOR 31, 35
SONTEC 07
SONY 04, 72
SOUNDWAVE 07
STANDARD 41, 44
STERN 31
SUSUMU 41
SYSLINE 07
TANDY 31, 41, 48
TASHIKO 34
TATUNG 07, 48
TEC 42
TELEAVIA 36
TELEFUNKEN 36, 37, 52
TELETECH 44
TENSAI 40, 41
THOMSON 36, 51, 52, 63, 61
THORN 31, 07, 42, 45, 48
TOMASHI 18
TOSHIBA 05, 02, 26, 21, 53
TOWADA 42
ULTRAVOX 32, 42, 49
UNIDEN 92, 68
UNIVERSUM 31, 07, 38, 42, 45, 46, 54
VESTEL 07
VICTOR 13
VOXSON 31
WALTHAM 43
WATSON 07
WATT RADIO 32, 42, 49
WHITE WESTINGHOUSE 07
YOKO 07, 42, 46
ZENITH 03, 20
Capítulo 4
Reproducción
-iPod nano (2G/3G/4G/5G/6G/7G)
- iPod touch (1G/2G/3G/4G/5G)
– iPhone 3G/iPhone 3GS/iPhone 4/iPhone 4S/iPhone 5
-iPad/iPad (2/3G/4G)
- iPad mini
Active o desactive Vocal Cancel
Utilice el cursor para seleccionar [Vocal Cancel] → [On] u [Off] y, a continuación, pulse ENTER.
- Auto Set IP Address
Albanian, sq/sqi, 1917
Amharic, am/amh, 0113
Arabic, ar/ara, 0118
Armenian, hy/hye, 0825
Assamese, as/asm, 0119
Aymara, ay/aym, 0125
Azerbaijani, az/aze, 0126
Bashkir, ba/bak, 0201
Basque, eu/eus, 0521
Belarusian, be/bel, 0205
Bengali, bn/ben, 0214
Bihari, bh/bih, 0208
Bislama, bi/bis, 0209
Breton, br/bre, 0218
Bulgarian, bg/bul, 0207
Burmese, my/mya, 1325
Catalan, ca/cat, 0301
Central Khmer, km/khm, 1113
Chinese, zh/zho, 2608
Corsican, co/cos, 0315
Croatian, hr/hrv, 0818
Czech, cs/ces, 0319
Danish, da/dan, 0401
Dutch, nl/nld, 1412
Dzongkha, dz/dzo, 0426
English, en/eng, 0514
Esperanto, eo/epo, 0515
Estonian, et/est, 0520
Finnish, fi/fin, 0609
Fijian, fj/fij, 0610
Faroese, fo/fao, 0615
Georgian, ka/kat, 1101
German, de/deu, 0405
Greek, el/ell, 0512
Guarani, gn/grn, 0714
Gujarati, gu/guj, 0721
Hausa, ha/hau, 0801
Hebrew, iw/heb, 0923
Hindi, hi/hin, 0809
Hungarian, hu/hun, 0821
Icelandic, is/isl, 0919
Indonesian, in/ind, 0914
Interlingua, ia/ina, 0901
Interlingue, ie/ile, 0905
Inupiaq, ik/ipk, 0911
Irish, ga/gle, 0701
Italian, it/ita, 0920
Japanese, ja/jpn, 1001
Javanese, jw/jav, 1023
Kalaallisut, kl/kal, 1112
Kannada, kn/kan, 1114
Kashmiri, ks/kas, 1119
Kazakh, kk/kaz, 1111
Kinyarwanda, rw/kin, 1823
Kirghiz, ky/kir, 1125
Korean, ko/kor, 1115
Kurdish, ku/kur, 1121
Lao, lo/lao, 1215
Latin, la/lat, 1201
Latvian, Iv/lav, 1222
Lingala, In/lin, 1214
Lithuanian, It/lit, 1220
Macedonian, mk/mkd, 1311
Malagasy, mg/mlg, 1307
Malay, ms/msa, 1319
Malayalam, ml/mal, 1312
Maltese, mt/mlt, 1320
Maori, mi/mri, 1309
Marathi, mr/mar, 1318
Mongolian, mn/mon, 1314
Moldavian, mo/mol, 1315
Nauru, na/nau, 1401
Nepali, ne/nep, 1405
Norwegian, no/nor, 1415
Occitan, oc/oci, 1503
Oriya, or/ori, 1518
Oromo, om/orm, 1513
Panjabi, pa/pan, 1601
Persian, fa/fas, 0601
Polish, pl/pol, 1612
Portuguese, pt/por, 1620
Pushto, ps/pus, 1619
Quechua, qu/que, 1721
Romanian, ro/ron, 1815
Romansch, rm/roh, 1813
Rundi, rn/run, 1814
Sanskrit, sa/san, 1901
Scottish Gaelic, gd/gla, 0704
Serbian, sr/srp, 1918
Serbo-Croatian, sh/---, 1908
Shona, sn/sna, 1914
Sindhi, sd/snd, 1904
Sinhalese, si/sin, 1909
Slovak, sk/slk, 1911
Slovenian, sl/slv, 1912
Somali, so/som, 1915
Sotho, Southern, st/sot, 1920
Spanish, es/spa, 0519
Sundanese, su/sun, 1921
Swahili, sw/swa, 1923
Swati, ss/ssw, 1919
Swedish, sv/swe, 1922
Telugu, te/tel, 2005
Thai, th/tha, 2008
Tibetan, bo/bod, 0215
Tigrinya, ti/tir, 2009
Tonga (Tonga Islands), to/ton, 2015
Tsonga, ts/tso, 2019
Tswana, tn/tsn, 2014
Turkmen, tk/tuk, 2011
Turkish, tr/tur, 2018
Twi, tw/twi, 2023
Ukrainian, uk/ukr, 2111
Urdu, ur/urd, 2118
Uzbek, uz/uzb, 2126
Vietnamese, vi/vie, 2209
Volapük, vo/vol, 2215
Welsh, cy/cym, 0325
Western Frisian, fy/fry, 0625
Wolof, wo/wol, 2315
Xhosa, xh/xho, 2408
Yiddish, ji/yid, 1009
iPod/iPhone/iPad (solo MCS-838/MCS-434/MCS-FS232)
Manufacturer:
PIONEER CORPORATION
1-1, Shin-ogura, Saiwai-ku, Kawasaki-shi, Kanagawa 212-0031, Japan
EU Representative's:
Pioneer Europe NV
Haven 1087, Keetberglaan 1, 9120 Melsele, Belgium
http://www.pioneer.eu
C€
[*] MCS-838, MCS-434, MCS-FS232
English:
Hereby, Pioneer, declares that this [*] is in compliance with the essential requirements and other relevant provisions of Directive 1999/5/EC.
Suomi:
© 2013 PIONEER CORPORATION.
All rights reserved.
PIONEER ELECTRONICS (USA) INC.
P.O. BOX 1540, Long Beach, California 90801-1540, U.S.A. TEL: (800) 421-1404
PIONEER ELECTRONICS OF CANADA, INC.
340 Ferrier Street, Unit 2, Markham, Ontario L3R 2Z5, Canada TEL: 1-877-283-5901, 905-479-4411
PIONEER EUROPE NV
Haven 1087, Keetberglaan 1, B-9120 Melsele, Belgium TEL: 03/570.05.11
PIONEER ELECTRONICS ASIACENTRE PTE. LTD.
253 Alexandra Road, #04-01, Singapore 159936 TEL: 65-6472-7555
PIONEER ELECTRONICS AUSTRALIA PTY. LTD.
5 Arco Lane, Heatherton, Victoria, 3202, Australia, TEL: (03) 9586-6300
PIONEER ELECTRONICS DE MEXICO S.A. DE C.V.
Blvd.Manuel Avila Camacho 138 10 piso Col.Lomas de Chapultepec, Mexico, D.F. 11000 TEL: 55-9178-4270
K002_B3_En