
DEQ-P7000 - Car audio equipment PIONEER - Free user manual and instructions
Find the device manual for free DEQ-P7000 PIONEER in PDF.

User questions about DEQ-P7000 PIONEER
0 question about this device. Answer the ones you know or ask your own.
Ask a new question about this device
Download the instructions for your Car audio equipment in PDF format for free! Find your manual DEQ-P7000 - PIONEER and take your electronic device back in hand. On this page are published all the documents necessary for the use of your device. DEQ-P7000 by PIONEER.
USER MANUAL DEQ-P7000 PIONEER
Thank you for buying this Pioneer product.
Please read through these operating instructions so you will know how to operate your model properly. After you have finished reading the instructions, put them away in a safe place for future reference.
Before You Start
About this unit 3
- Dolby Digital/DTS compatibility (when combining this unit with a Pioneer DVD player such as DVH-P7000R) 3
About this manual 3
Precautions 3
In case of trouble 3
Resetting the microprocessor 4
Output setting of the DVD player 4
What's what 5
- Head Unit 5
03 Initial Settings
Correcting distorted sound 15
04 Additional Information
Troubleshooting 16
Common 16
Audio/DSP 17
DVD player setting 17
Terms 18
Specifications 19
Audio Adjustments
Introduction of audio adjustments 6
- Operating the audio menu 6
- Operating the audio details menu 6
Using the sound field control 7
Using the position selector 7
Using balance adjustment 8
Adjusting source levels 8
Using the dynamic range control 9
Using the dual mono mode 9
Using the direct control 9
Using the Dolby Pro Logic 9
Setting the speaker setting 10
- Correcting the subwoofer's phase 10
Selecting a cut-off frequency 11
Adjusting the speaker output levels 11
Adjusting the speaker output levels using a test tone 12
Adjusting the time alignment 13
Using the equalizer 13
Recalling equalizer curves 13
- Adjusting 3-band parametric equalizer
14
About this unit
This product complies with the EMC Directives (89/336/EEC, 92/31/EEC) and CE Marking Directive (93/68/EEC).
Dolby* Digital/DTS** compatibility (when combining this unit with a Pioneer DVD player such as DVH-P7000R)
When using this unit with a Pioneer DVD player, you can enjoy the atmosphere and excitement provided by DVD movie and music software featuring 5.1 channel recordings.

D I

GITAL

SURROUND
- Manufactured under license from Dolby Laboratories. "Dolby", "Pro Logic", and the double-D symbol are trademarks of Dolby Laboratories.
** "DTS" and "DTS Digital Surround" are registered trademarks of Digital Theater Systems, Inc.
About this manual
This unit features a number of sophisticated functions ensuring superior reception and operation. All the functions have been designed for the easiest possible use, but many are not self-explanatory. This operation manual will help you benefit fully from this unit's potential and to maximize your listening enjoyment.
We recommend that you familiarize yourself with the functions and their operation by reading through the manual before you begin using this unit. It is especially important that you read and observe the precautions listed on this page and in other sections.
Precautions
- Keep this manual handy as a reference for operating procedures and precautions.
Always keep the volume low enough so you can hear sounds outside of the car. - Protect this unit from moisture.
- If the battery is disconnected or discharged, the preset memory will be erased and must be reprogrammed.
In case of trouble
Should this unit fail to operate properly, contact your dealer or nearest authorized Pioneer
Service Station.
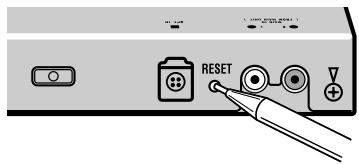
Resetting the microprocessor
The microprocessor must be reset under the following conditions:
- Prior to using this unit for the first time after installation.
- If the unit fails to operate properly.
-
When strange or incorrect messages appear on the display.
-
To reset the microprocessor, press the RESET button on the unit with a pen tip or other pointed instrument.

Output setting of the DVD player
When connecting Pioneer DVD player such as DVH-P7000R, make DIGITAL OUTPUT (Setting for digital output) and OUTPUT SELECTION (Setting digital and analog audio output) as follows:
| Function | Setting |
| DIGITAL OUTPUT | Dolby D/LPCM |
| OUTPUT SELECTION | 48KHz |
Refer to the DVD player manual for details on how to make those settings.

Important
- Be sure to set the correct position. If not, no audio can be outputted.
What's what
Operate this unit with the connected head unit. Instructions in this operation manual use DVH-P7000R as an example head unit.
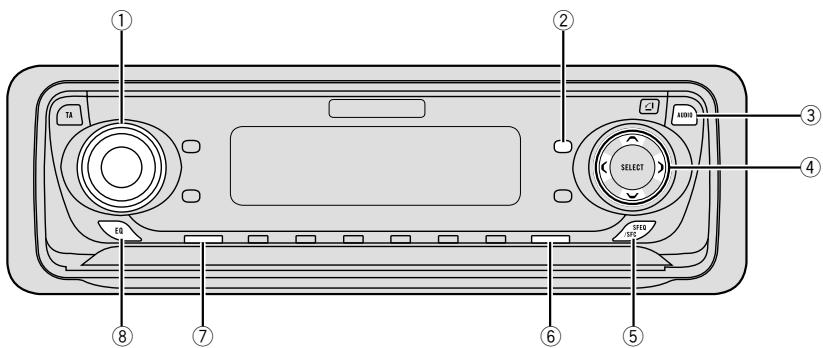
Head Unit
① VOLUME
Turn to adjust the volume.
When you press the VOLUME, it extends outward so that it becomes easier to turn.
To retract the VOLUME, press it again.
② FUNCTION button
Press to select functions.
③ AUDIO button
Press to select an audio function.
④ △/▼/▲按钮s
Press to adjust the selected audio function and turn it on or off.
⑤ SFEQ/SFC button
Press to select a sound field control.
⑥ BAND/ESC button
Press to return to the display of each source.
⑦ SOURCE button
This unit is switched on by selecting a source. Press to cycle through all of the available sources. Press and hold to turn off the unit.
⑧ EQ button
Press to select an equalizer curve.
Introduction of audio adjustments
By carrying out the following settings/adjustments in order, you can create a finely-tuned sound field effortlessly.
1 Setting the speaker setting
2 Using the position selector
3 Adjusting the time alignment
4 Adjusting the speaker output levels using a test tone
5 Selecting a cut-off frequency
6 Adjusting the speaker output levels
7 Adjusting 3-band parametric equalizer
Operating the audio menu
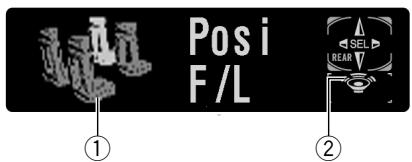
① AUDIO display
Shows the audio adjustments status.
② Subwoofer indicator
Appears in the display when the subwoofer output is turned on.
Press AUDIO to display the audio function names.
Press AUDIO repeatedly to switch between the following audio functions:
Posi (position selector)—Fad (balance adjustment)—SLA (source level adjustment)—DRC (dynamic range control)—D.MONO (dual monaural)—DIRECT (direct)—DolbyPL (Dolby Pro Logic)
- When selecting the FM tuner as the source, you cannot switch to SLA.
- When playing other than the DVD disc, you cannot switch to DRC or D.MONO.
- To return to the playback display, press BAND/ESC.

Note
- If you do not operate the audio function within about 30 seconds, the display is automatically returned to the source display.
Operating the audio details menu
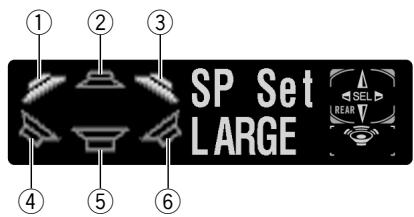
① Front left speaker
② Center speaker
③ Front right speaker
④ Rear left speaker
⑤ Subwoofer
⑥ Rear right speaker
Press AUDIO and hold until SP Set appears in the display, then press AUDIO to display the audio function names.
After SP Set is displayed, press AUDIO repeatedly to switch between the following audio functions:
Audio Adjustments
SP Set (speaker setting)—CutOff (cut-off frequency)—SP Lev (speaker output level)—T Tone (test tone)—Time A (time alignment)—PEQ (3-band parametric equalizer)
- When neither F/L nor F/R is selected in Posi, you cannot switch to Time A.
- When neither CUSTOM1 nor CUSTOM2 is selected as equalizer curve, you cannot switch to PEQ.
- To return to the playback display, press BAND/ESC.
Using the sound field control
The SFC function creates the sensation of a live performance.
- The acoustics of different performance environments are not the same and depend on the extent and contour of space through which sound waves move and on how sounds bounce off the stage, walls, floors and ceilings. At a live performance you hear music in three stages: direct sound, early reflections, and late reflections, or reverberations.
Those factors are programmed into the SFC circuitry to recreate the acoustics of various performance settings.
Press SFEQ/SFC to select the desired SFC mode.
Press SFEQ/SFC repeatedly to switch between the following mode:
Musical (musical)—Drama (drama)—Action (action)—Jazz (jazz)—Hall (hall)—Club (club)—OFF (off)

Note
- If the source is a 2-channel LPCM audio or a 2-channel Dolby Digital audio and you select SFC effects that are most applicable for 5.1-channel audio (i.e., Musical, Drama or
Action), we recommend switching Dolby Pro Logic on. On the other hand, when selecting SFC effects that are intended for use with 2-channel audio (i.e., Jazz, Hall or Club), we recommend switching Dolby Pro Logic off.
Using the position selector
One way to assure a more natural sound is to clearly position the stereo image, putting you right in the center of the sound field. The position selector function lets you automatically adjust the speaker output levels and inserts a delay time to match the number and position of occupied seats. When used in conjunction with the SFC, the feature will make the sound image more natural and offer a panoramic sound that envelops you.
1 Press AUDIO to select Posi.
Press AUDIO until Posi appears in the display.
2 Press / / to select a listening position.
Press one of these, / / , to select a listening position as listed in the table.
| Button | Display | Position |
| ▲ | F/L | Front seat left |
| ▲ | F/R | Front seat right |
| ▲ | FRONT | Front seats |
| ▼ | ALL | All seats |
- To cancel the selected listening position, press the same button again.

Note
- When you make adjustments for listening position, the speakers are automatically set for appropriate output levels. You can tailor them if you want as discussed under the heading of Adjusting the speaker output levels using a test tone or Adjusting the speaker output levels.
Using balance adjustment
You can select a fader/balance setting that provides an ideal listening environment in all occupied seats.
1 Press AUDIO to select Fad.
Press AUDIO until Fad appears in the display.
- If the balance setting has been previously adjusted, Bal will be displayed.
2 Press or to adjust front/rear speaker balance.
Each press of or moves the front/rear speaker balance to the front or the rear.
- Fad F25 - Fad R25 is displayed as the front/rear speaker balance moves from front to rear.
- Fad F/R 0 is the proper setting when only two speakers are used.
3 Press or to adjust left/right speaker balance.
When you press or , Bal L/R 0 is displayed. Each press of or moves the left/right speaker balance to the left or the right.
- Bal L25 - Bal R25 is displayed as the left/right speaker balance moves from left to right.
Adjusting source levels
SLA (source level adjustment) lets you adjust the volume level of each source to prevent radical changes in volume when switching between sources.
- Settings are based on the FM tuner volume level, which remains unchanged.
1 Compare the FM tuner volume level with the level of the source you want to adjust.
2 Press AUDIO to select SLA.
Press AUDIO until SLA appears in the display.
3 Press or to adjust the source volume.
Each press of or increases or decreases the source volume.
- SLA +4 - SLA -4 is displayed as the source volume is increased or decreased.

Notes
- Since the FM tuner volume is the control, it is not possible to apply source level adjustments to the FM tuner.
- The MW/LW tuning volume level can also be adjusted with source level adjustments.
Video CD and CD are set to the same volume adjustment setting automatically. - External unit 1 and external unit 2 are set to the same volume adjustment setting automatically.
Audio Adjustments
Using the dynamic range control
The dynamic range refers to the difference between the largest and softest sounds. The dynamic range control compresses this difference so that you can clearly hear sounds even at low volume levels.
1 Press AUDIO to select DRC.
Press AUDIO until DRC appears in the display.
2 Press to turn the dynamic range control on.
DRC ON appears in the display. Dynamic range control is now on.
- You can turn off dynamic range control by pressing .

Notes
- The dynamic range control is effective only on Dolby Digital sounds.
- When playing other than the DVD disc, you cannot switch this mode.
Using the dual mono mode
When playing a disc recorded on a dual monomode, you can select the channel to output.
1 Press AUDIO to select D.MONO.
Press AUDIO until D.MONO appears in the display.
2 Press or to select the desired output setting.
Press or until the desired output setting appears in the display.
L&R (left and right channels) L ch (left channel) R ch (right channel)

Notes
- This function is effective only on dual monomode sound.
- When playing other than the DVD disc, you cannot switch this mode.
Using the direct control
You can override audio settings to check for effectiveness of your audio settings.
1 Press AUDIO to select DIRECT.
Press AUDIO until DIRECT appears in the display.
2 Press to turn the direct control on.
DIRECT ON appears in the display. Direct control is now on.
- You can turn off direct control by pressing .

Note
- All audio functions are locked out during DIRECT ON except VOLUME.
Using the Dolby Pro Logic
Dolby Pro Logic gives enhanced spatial and directional effects, creating theater-like sense of presence and ambience.
- If the source is a 2-channel LPCM audio or a 2-channel Dolby Digital audio and you select SFC effects that are most applicable for 5.1-channel audio (i.e., Musical, Drama or
Action), we recommend switching Dolby Pro Logic on. On the other hand, when selecting SFC effects that are intended for use with 2-channel audio (i.e., Jazz, Hall or Club), we recommend switching Dolby Pro Logic off.
Audio Adjustments
1 Press AUDIO to select DolbyPL.
Press AUDIO until DolbyPL appears in the display.
2 Press to turn the Dolby Pro Logic on.
DolbyPLON appears in the display. Dolby Pro Logic is now on.
- You can turn off Dolby Pro Logic by pressing .

Note
- When playing a 2-channel mono source with Pro Logic switched on, there may be occasions when the following will occur:
No audio is outputted if the center speaker setting is SMALL or LARGE while no center speaker is installed.
Audio is heard only over the center speaker if installed and the center speaker setting is
SMALL or LARGE.
Setting the speaker setting
You need to make with/without (or yes/no) and size (bass reproducing capacity)
selection/adjustments depending on the installed speakers. The size needs to be set to LARGE (large) if the speaker is capable of reproducing sounds of about 100Hz or below.
Otherwise select SMALL (small).
1 Press AUDIO and hold until SP Set appears in the display.
2 Press or to select the speaker to be adjusted.
Each press of or selects the speaker in the following order:
Front speakers—Center speaker—Rear speakers—Subwoofer—S.W (subwoofer setting)
- You can switch to the S.W, only when the subwoofer has been set to ON.
3 Press or to select the correct size for the selected speaker.
Press or until the desired size appears in the display.
LARGE (large)—SMALL (small)—OFF (off)
- You cannot select OFF, when the front speakers have been selected.
- You can switch ON or OFF, when the subwoofer has been selected.
- You can switch Rev. (reverse phase) or Normal (normal phase), when S.W (subwoofer setting) has been selected.
4 Press BAND/ESC to return to the playback display.
Correcting the subwoofer's phase
If trying to boost the bass output of the subwoofer doesn't do much or rather makes you feel that the bass gets more murky, this may indicate that the subwoofer's output and bass content you hear over other speakers cancel each other out. To remove this problem, try changing the phase setting for the subwoofer.
1 Press AUDIO and hold until SP Set appears in the display.
2 Press or to select the subwoofer.
Press or selects the speaker in the following order:
Front speakers—Center speaker—Rear speakers—Subwoofer—S.W (subwoofer setting)
Audio Adjustments
3 Press to turn the subwoofer output on.
4 Press to select S.W (subwoofer setting).
5 Press or to select the subwoofer output phase.
Press to select Normal (normal phase).
Press to select Rev. (reverse phase).
6 Press BAND/ESC to return to the playback display.

Important
- Low frequency range is not outputted if the subwoofer is set to OFF and the front and rear speakers set to SMALL or OFF.

Notes
- It is imperative that non-installed speakers be set to OFF.
- Set the front or rear speaker to LARGE if the speaker is capable of reproducing bass content, or if no subwoofer is installed.
- When playing a 2-channel mono source with Pro Logic switched on, there may be occasions when the following will occur:
No audio is outputted if the center speaker setting is SMALL or LARGE while no center speaker is installed.
Audio is heard only over the center speaker if installed and the center speaker setting is
SMALL or LARGE.
Selecting a cut-off frequency
You can select a frequency, under which sounds are reproduced through the subwoofer.
If the installed speakers include one whose size has been set to SMALL, you can select a frequency, under which sounds are reproduced through a LARGE speaker or subwoofer.
1 Press AUDIO and hold until SP Set appears in the display, then press AUDIO to select CutOff.
After SP Set is displayed, press AUDIO until CutOff appears in the display.
2 Press or to select the cut-off frequency.
Each press of or selects the cut-off frequency in the following order:
- Press or until the desired frequency appears in the display.
3 Press BAND/ESC to return to the playback display.

Note
- Selecting a cut-off frequency is to set a cut-off frequency of the subwoofer's L.P.F. (low-pass filter) and that of the SMALL speaker H.P.F. (high-pass filter). Cut-off frequency setting has no effect if the subwoofer is set to OFF and any other speaker is set to LARGE or OFF.
Adjusting the speaker output levels
You can readjust the speaker output levels once adjusted using a test tone while listening to music at the time.
1 Press AUDIO and hold until SP Set appears in the display, then press AUDIO to select SP Lev.
After SP Set is displayed, press AUDIO until SP Lev appears in the display.
2 Press or to select the speaker to be adjusted.
Each press of or selects the speaker in the following order:
Front speaker left—Center speaker—Front speaker right—Rear speaker right—Rear speaker left—Subwoofer
- You cannot select speakers whose size is set OFF.
3 Press or to adjust the speaker output level.
Each press of or increases or decreases the speaker output level.
- +10 — -10 is displayed as the level is increased or decreased.
4 Press BAND/ESC to return to the playback display.

Note
- To adjust the speaker output levels at this mode is the same as making the speaker output levels at T Tone. Both provide the same results.
Adjusting the speaker output levels using a test tone
A convenient test tone allows you to easily get the overall balance right among the speakers.
1 Press AUDIO and hold until SP Set appears in the display, then press AUDIO to select T Tone.
After SP Set is displayed, press AUDIO until T Tone appears in the display.
2 Press to start the test tone output.
The test tone is outputted. It rotates from speaker to speaker in the following sequence at intervals of about 2 seconds. The current settings for the speaker over which you hear the test tone are shown in the display.
Front speaker left—Center speaker—Front speaker right—Rear speaker right—Rear speaker left—Subwoofer
Check each speaker output level. If no adjustments are needed, perform step 4 to stop the test tone.
- The settings do not appear for speakers whose size is set OFF.
3 Press or to adjust the speaker output level.
Each press of or increases or decreases the speaker output level.
- +10 — -10 is displayed as the level is increased or decreased.
- The test tone rotates to the next speaker after about 2 seconds from the last operation.
4 Press to stop the test tone output.
5 Press BAND/ESC to return to the playback display.

Notes
- If needed, select speakers and adjust their 'absolute' output levels, see Adjusting the speaker output levels on page 11.
- To adjust the speaker output levels at this mode is the same as making the speaker output levels at SP Lev. Both provide the same results.
Audio Adjustments
Adjusting the time alignment
By adjusting the distance between each speaker and a selected listening position, you can insert delay times into the speaker output to obtain a correct sound image and overall level balance. Although this is automatically achieved when you set the listening position, the time alignment feature provides a fine adjustment.
1 Press AUDIO and hold until SP Set appears in the display, then press AUDIO to select Time A.
After SP Set is displayed, press AUDIO until Time A appears in the display.
- You cannot select Time A when neither F/L nor F/R is selected in Posi.
2 Press or to select the speaker to be adjusted.
Each press of or selects the speaker in the following order:
Front speaker left—Center speaker—Front speaker right—Rear speaker right—Rear speaker left—Subwoofer
- You cannot select speakers whose size is set OFF.
3 Press or to adjust the distance between the selected speaker and the listening position.
Each press of or increases or decreases the distance.
- 500.0cm — 0.0cm is displayed as the distance is increased or decreased.
4 Press BAND/ESC to return to the playback display.
Using the equalizer
The parametric equalizer lets you adjust the equalization to match car interior acoustic characteristics as desired.
Recalling equalizer curves
There are seven stored equalizer curves which you can easily recall at any time. Here is a list of the equalizer curves:
| Display | Equalizer curve |
| SUPER BASS | Super bass |
| POWERFUL | Powerful |
| NATURAL | Natural |
| VOCAL | Vocal |
| FLAT | Flat |
| CUSTOM1, 2 | Custom1, 2 |
- CUSTOM1 and CUSTOM2 are adjusted equalizer curves that you can create for yourself.
- When FLAT is selected no supplement or correction is made to the sound. This is useful to check the effect of the equalizer curves by switching alternatively between FLAT and a set equalizer curve.
Press EQ to select the equalizer.
Press EQ repeatedly to switch between the following equalizer.
POWERFUL—NATURAL—VOCAL—FLAT—CUSTOM1—CUSTOM2—SUPER BASS
Adjusting 3-band parametric equalizer
For CUSTOM1 and CUSTOM2 equalizer curves, you can adjust the front, rear and center equalizer curves separately by selecting a center frequency, an equalizer level and a Q factor for each band.
- A separate CUSTOM1 curve can be created for each source.
- A CUSTOM2 curve can be created common to all sources.
- The center speaker largely determines the sound image and getting the balance right isn't easy. We recommend reproducing a 2-ch. audio (a CD for example) and getting the balance right among the speakers except for the center, and then reproducing a 5.1-ch. audio (Dolby Digital or DTS) and adjusting the center speaker output to the balance you have already got among the other speakers.
1 Press AUDIO and hold until SP Set appears in the display, then press AUDIO to select PEQ.
After SP Set is displayed, press AUDIO until PEQ appears in the display.
- You cannot select PEQ when neither CUSTOM1 nor CUSTOM2 equalizer curve is selected.
2 Press or to select the speaker selection mode.
Each press of or selects the item in the following order:
FRONT (speakers)—Low (bands)—Low (center frequency)—L (equalizer level)—Q.WIDE (Q factor)
3 Press or to select the speaker to be adjusted.
Each press of or selects the speaker in the following order:
FRONT(front speakers)—CENTER(center speaker)—REAR (rear speakers)
- You cannot select speakers whose size is set OFF.
4 Press and then press or to select the equalizer band to be adjusted.
Each press of or selects the equalizer band in the following order:
Low (low)—Mid (mid)—High (high)
5 Press and then press or to select the center frequency of selected band.
Each press of or selects the frequency in the following order:
$$ \begin{array}{l} 1 0 0 - 1 2 5 - 1 6 0 - 2 0 0 - 2 5 0 - 3 1 5 - 4 0 0 - 5 0 0 \ 6 3 0 - 8 0 0 - 1 k - 1. 2 5 k - 1. 6 k - 2 k - 2. 5 k \ 3. 1 5 k - 4 k - 5 k - 6. 3 k - 8 k (H z) \ \end{array} $$
6 Press and then press or to adjust the equalizer level.
Each press of or increases or decreases the equalizer level.
- +6 -6 is displayed as the level is increased or decreased.
7 Press and then press or to select the desired Q factor.
Each press or switches between the following Q factor:
Q.WIDE (wide)—Q.NAR. (narrow)
- You can adjust parameters for each band of the other speakers in the same way.
8 Press BAND/ESC to return to the playback display.

Note
- You can select a center frequency from among 20 frequencies for each band. You can change the center frequency in 1/3-octave steps, but you cannot select frequencies so that there are intervals shorter than 1 octave among the three bands' center frequencies.

Correcting distorted sound
You can minimize distortion likely caused by the equalizer curve settings.
- Setting an equalizer level high can cause distortion. If high sound crippled or distorted, try switching to Low. Normally, leave the setting at High to ensure quality sound.
1 Press SOURCE and hold until this unit turns off.
2 Press FUNCTION and hold until a function name appears in the display.
3 Press FUNCTION to select D.ATT.
Press FUNCTION until D.ATT appears in the display.
4 Press or to select Low or High.
Pressing or switches between Low (low) and High (high) and that status is displayed.
- To cancel initial settings, press BAND/ESC.
- You can also cancel initial settings by holding down FUNCTION until the unit turns off.
Troubleshooting
Common
| Symptom | Cause | Remedy |
| The power switch does not work. No functions come on. | Cables or connectors are not correctly connected. | Check whether the cables are plugged in correctly and firmly. |
| The fuse is blown. | Remove the cause of the blowing of the fuse, then replace the fuse. Be very sure the same rated proper fuse is installed. | |
| No sounds are heard. The volume level will not rise. | Cables are not connected correctly. | Connect the cables correctly. |
| The front, rear, left and right speakers are not properly adjusted in level balance. | Adjust the relative levels between the speakers correctly. (See page 8.) | |
| Sound is not heard over a specific speaker. | The speaker size is set to OFF. | Make the correct size setting for the speaker. (See page 10.) |
| The speaker level is set to too low. | Increase the speaker level setting to get the balance right with the other speakers. (See page 11.) | |
| The center speaker size is set to SMALL or LARGE whereas no center speaker is installed. | Set the center speaker size to OFF. (See page 10.) |
Audio/DSP
| Symptom | Cause | Remedy |
| Speakers are not available to be adjusted. | Their size settings is at OFF. | Make the correct size settings. (See page 10.) |
| Time alignment is not available. | Listening position is not set correctly. | Set listening position correctly. (See page 7.) |
| Their size settings is at OFF. | Make the correct size settings. (See page 10.) | |
| The subwoofer is not available to switch its phase. | The subwoofer is set to OFF. | Set the subwoofer to ON. (See page 10.) |
| Bass content is not heard. | The subwoofer is set to OFF and yet other speakers are set to OFF or SMALL in size. | Make the correct settings. (If no sub-woofer is installed, the front or rear speaker needs to be set to LARGE.) (See page 10.) |
| Occasionally no sounds are outputted when Dolby Pro Logic is switched on. | The center speaker setting is at SMALL or LARGE whereas no center speaker is installed. | Change the center speaker size setting to OFF. (If the audio source is mono and Dolby Pro Logic is switched on, sound is heard over the center speaker only.) (See page 10.) |
| Occasionally no sounds are heard over speakers other than the center one. | Dolby Pro Logic is switched on. | Set Dolby Pro Logic to OFF. (If the audio source is mono and Dolby Pro Logic is switched on, sound is heard over the center speaker only.) (See page 9.) |
| Switching dynamic range control on has no effects. | The currently reproduced sound is not Dolby Digital coded. | The feature is only effective on Dolby Digital sounds. (See page 9.) |
DVD player setting
| Symptom | Cause | Remedy |
| No sounds come from the DVD player only. | The optical cable has become detached. | Connect the cable correctly. |
| The DVD player is not properly set for output. | Make the correct output setting. (See the manual for the DVD player.) |
Terms
Dolby Digital
Dolby Digital provides discrete multichannel (up to a maximum of 5.1) audio. This is the same audio system as is installed in movie theaters. To enjoy Dolby Digital sound you need to connect this unit's optical digital input to the digital output on a DVD player with Dolby Digital decoding capability.

DOLBY
DIGITAL
Dolby Surround Pro Logic
When you play a 2-channel audio disc marked Dolby Surround Pro Logic using an AV amplifier equipped for Dolby Pro Logic, the audio is converted into 4-channel audio.
Dolby Pro Logic gives enhanced spatial and directional effects, creating theater-like sense of presence and ambience.

DOLBY SURROUND
PRO·LOGIC
DTS for Digital Theater Surround
DTS is a surround system delivering multi-channel audio from up to 6 independent sources. To hear DTS discs, you need to connect the digital output on DTS-capable DVD players and other units to this unit's digital input.

Dynamic Range Control
Dolby Digital has a function for compressing the difference between the loudest and softest sounds: Dynamic Range Control. This control ensures sounds with an increased dynamic range are heard clearly even at low volume levels.
Linear PCM (LPCM)/Pulse Code Modulation
This is a recording technology used on music CDs. Some DVD-Video discs also contain PCM sound tracks. While music CDs are recorded at 44.1 kHz/16 bits, DVD-Video discs' sound tracks are recorded at 48 kHz/16 bits to 96 kHz/24 bits, thereby offering better quality audio than music CDs.
Optical Digital Input
By receiving optical digital input audio signals in a digital signal format, the chance is minimized that the sonic quality deteriorates in the course of transmission. An optical digital input is an input designed to receive digital signals optically. (To take advantage of the digital input, output units such as DVD players must have optical outputs.)
Additional Information
Specifications
General
Power source 14.4 V DC
(10.8 - 15.1 V allowable)
Grounding system Negative type
Max. current consumption:
Backup current 10 A
Dimensions (W× H× D) .... 237× 29× 171mm
Weight 1.05 kg
Amplifier
Maximum power output .... 50 W x 5
Continuous power output
27W×5
(DIN45324, +B = 14.4 V)
Load impedance 4Ω
Preout maximum output level
5.0V
Decoder ......... Linear PCM/Dolby
Digital/Dolby Pro
Logic/DTS
Subwoofer output:
Crossover frequency
63/80/100/125/160/200 Hz
Level 10 dB
Speaker setting:
Time alignment . 0 - 500cm (2.5 cm)
Level ± 10 dB
Equalizer:
Band 3 band
Frequency 100/125/160/200/250/315/
400/500/630/800/1k/1.25k/
1.6k/2k/2.5k/3.15k/4k/5k/
6.3k/8k Hz
Gain ± 12 dB
Crossover frequency
63/80/100/125/160/200 Hz

Note
- Specifications and the design are subject to possible modification without notice due to improvements.
FRONT (altavoces)—Low (bandas)—Low
Musical (Musical)—Drama (Drama)—Action (Action)—Jazz (Jazz)—Hall (Halle)—Club (Klub)—OFF (Aus)

Hinweis
(LPCM)/Pulscodemodulation
Musical (musical)—Drama (fiction)—Action (action)—Jazz (jazz)—Hall (hall)—Club (club)—Off (hors service)

Remarque
LARGE (gros)—SMALL (petit)—OFF (hors service)
DTS (Digital Theater Surround)
Consummation maximale:
Courant de secours .... 10 A
Dimensions (L× H× P) . 237× 29× 171mm
Poids 1.05 kg
Amplificateur
Musical (musical)—Drama (drammatico)—
Action (azione)—Jazz (jazz)—Hall (hall)—
Club (club)—OFF (spento)

Nota
Musical (musical)—Drama (toneel)—Action (actie)—Jazz (jazz)—Hall (zaal)—Club (club)—OFF (uit)

Opmerking
Low (laag)—Mid (midden)—High (hoog)
Q.WIDE (breed)—Q.NAR. (smal)
Linear PCM (LPCM)/Pulscode modulatie
PIONEER ELECTRONICS (USA) INC.
P.O.Box 1540, Long Beach, California 90801-1540,U.S.A.
TEL: (800) 421-1404
PIONEER EUROPE NV
Haven 1087, Keetberglaan 1, B-9120 Melsele, Belgium
TEL: (0) 3/570.05.11
PIONEER ELECTRONICS ASIACENTRE PTE. LTD.
253 Alexandra Road, #04-01, Singapore 159936
TEL: 65-472-1111
PIONEER ELECTRONICS AUSTRALIA PTY. LTD.
178-184 Boundary Road, Braeside, Victoria 3195, Australia
TEL: (03) 9586-6300
PIONEER ELECTRONICS OF CANADA, INC.
300 Allstate Parkway, Markham, Ontario L3R OP2, Canada
TEL: (905) 479-4411
PIONEER ELECTRONICS DE MEXICO, S.A. de C.V.
San Lorenzo 1009 3er. Piso Desp. 302
Col. Del Valle Mexico, D.F.C.P. 03100
TEL: 55-5688-52-90
Published by Pioneer Corporation.
Copyright © 2002 by Pioneer Corporation.
All rights reserved.
Publication de Pioneer Corporation.
Copyright © 2002 Pioneer Corporation.