
FS-W40 - Home Theater System PIONEER - Free user manual and instructions
Find the device manual for free FS-W40 PIONEER in PDF.


| Product type | Home cinema system |
| Brand | Pioneer |
| Model | FS-W40 |
| Dimensions (main unit) | 435 x 58 x 300 mm |
| Weight (main unit) | 4.2 kg |
| Power supply | 220-240 V, 50/60 Hz |
| Power consumption | 150 W (max), 0.5 W (standby) |
| Total output power | 1000 W RMS |
| Supported audio formats | Dolby Digital, DTS, PCM |
| Connectivity | HDMI (2 inputs, 1 ARC output), optical, coaxial, USB, Bluetooth |
| Speakers included | 2 front speakers, 1 center, 2 rear, 1 subwoofer |
| Channel configuration | 5.1 channels |
| Main features | USB playback, FM radio, sound modes, automatic calibration |
| Care and cleaning | Dust with a soft dry cloth, avoid abrasive products |
| Safety | Do not expose to moisture, do not block ventilation slots |
| Spare parts and repairability | Available via Pioneer authorized service; repairability index: 6.5/10 |
Frequently Asked Questions - FS-W40 PIONEER
User questions about FS-W40 PIONEER
0 question about this device. Answer the ones you know or ask your own.
Ask a new question about this device
Download the instructions for your Home Theater System in PDF format for free! Find your manual FS-W40 - PIONEER and take your electronic device back in hand. On this page are published all the documents necessary for the use of your device. FS-W40 by PIONEER.
USER MANUAL FS-W40 PIONEER
- Install the Wireless Satellite Speakers 8
- Connect the TV 9
- Connect the AV Components 10
- Connect Other Cables ......11
Setup
Initial Setup with Auto Start-up Wizard 12
System Setup 14
AV Adjust 23
Playback
AV Component Playback 25
Internet Radio 26
Spotify 27
Music Server 28
USB Storage Device 30
BLUETOOTH® Playback 32
Listening to the FM Radio 33
Listening Modes 35
Supplementary information
Supplementary information for player functions 45
Firmware Update
Update Functions 46
How to update firmware 47
Others
Troubleshooting 50
License and Trademark 55
General Specifications 56
About HDMI 58
Before Start > Part Names > Install > Setup > Playback
Supplementary information | Firmware Update | Others
What's in the box

Sound System Controller AC-400 (1)

Wireless Satellite Speakers FS-400 (2)
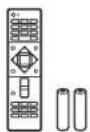
Remote controller (RC-932S) (1), batteries (AAA/R03) (2)

Indoor FM antenna (1)

Power cords (2)

- The power cord of sound system controller must be connected only after all other cable connections are completed.
- We will not accept responsibility for damage arising from the connection of equipment manufactured by other companies.
- Functionality may be introduced by firmware updates and service providers may cease services, meaning that some network services and content may become unavailable in the future. Furthermore, available services may vary depending on your area of residence.
- Specifications and appearance are subject to change without prior notice.
- When submitting the sound system controller or the speakers for repairs, please submit both the sound system controller and the speakers.
Before Start
Part Names
Install
Setup
Playback
Supplementary information | Firmware Update | Others
Front Panel
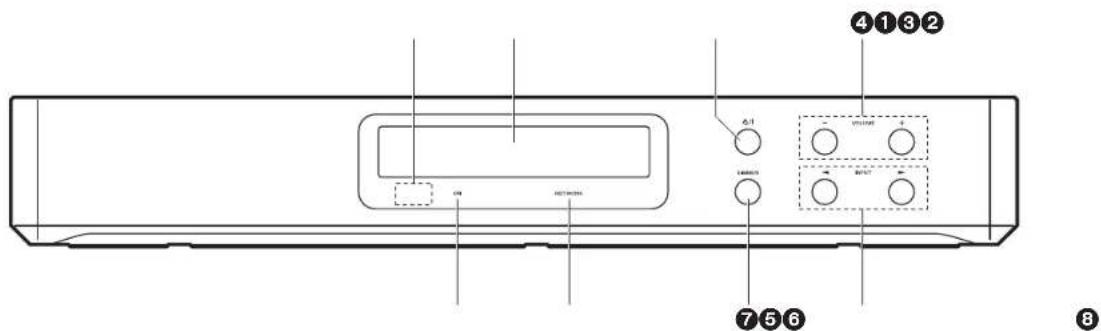
- Remote control sensor
- Display (→P6)
- ⏻/l button: Turns the unit on or into standby mode.
- VOLUME button: Allows you to adjust the volume. These buttons also cancel muting.
- ON indicator: This lights blue when the power is on and goes out when the unit switches to standby. It lights red if the unit enters standby mode when the features are enabled that continue to work when this unit is in standby, such as HDMI Standby Through and Wireless Speaker Standby.
- NETWORK indicator: This lights blue when network features are being used. It will flash if the connection to the network is not correct.
- DIMMER button: You can switch the display off or adjust the brightness of the display in three steps.
- INPUT button: Switches the input to be played. (BD/DVD / CBL/SAT / GAME / STRM BOX / DIGITAL IN / ANALOG IN / TV / FM / NET / USB / BT AUDIO)
Before Start
Part Names
Install
Setup
Playback
Supplementary information | Firmware Update | Others
Rear Panel

- ANTENNA FM 75Ω jack: Connect the supplied antenna.
- ANALOG IN jacks: Input audio signals from a TV, for example, with an analog audio cable.
- DIGITAL IN OPTICAL jack: Input digital audio signals from a TV, for example, with a digital optical cable.
- Wireless antenna: Raise for Wi-Fi connection or when using a BLUETOOTH enabled device. The diagram shows the movable range for the wireless antenna. Do not try to force it beyond this range otherwise you may break it.
- Power cord
- USB port: A USB storage device is connected so that music files stored in it can be played. You can also supply power (maximum 5V/1A) to USB devices with a USB cable.
- NETWORK port: Connect to the network with an Ethernet cable.
- HDMI OUT jack: Connect a HDMI cable to transfer video signals and audio signals to a TV.
- HDMI IN jacks: Input video signals and audio signals with a HDMI cable connected to an AV component.
Before Start
Part Names
Install
Setup
Playback
Supplementary information | Firmware Update | Others
Remote Controller

- ⏻ button: Turns the unit on or into standby mode.
- Input selector buttons: Switches the input to be played.
- ⚫ (AV ADJUST) button: You can perform common settings on the TV screen. (→P23)
- Cursors, ENTER button: Select the item with the cursors and press ENTER to confirm
- ⬆SETUP) button: Displays the System Setup screen. (→P14)
- Volume buttons: Allows you to adjust the volume. This button also cancels the muting.
- button: Temporarily mutes audio. Press again to cancel muting.
- LISTENING MODE buttons: Allows you to select the listening mode. (→P35)
- Play buttons: You can start play of the Music Server or USB.
- ✉ button: You can start repeat or random play of the Music Server or USB. CLEAR button: Deletes all characters you have entered when entering text on the TV screen.
- i (STATUS) button: Switches the information on the display.
- button: Returns the display to the previous state during setting.
- MODE button: Switches tuning to an FM station between automatic tuning and manual tuning.
14.+Fav button: Used to register FM radio stations.

Before Start
Part Names
Install
Setup
Playback
Supplementary information | Firmware Update | Others
Display
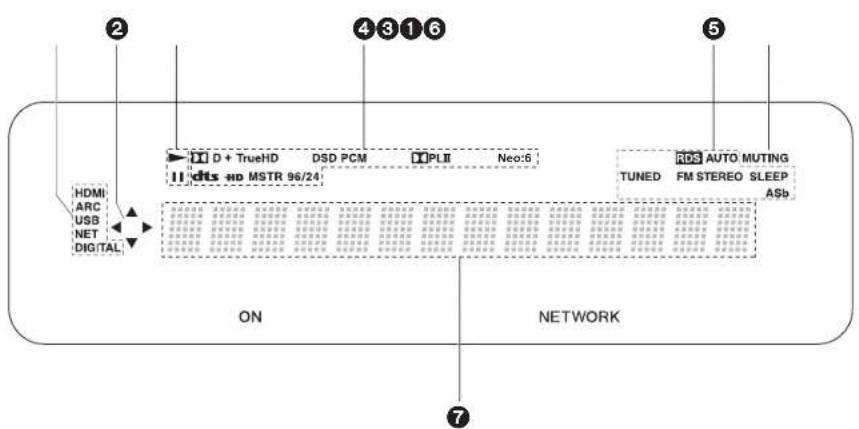
- Lights in the following conditions.
HDMI: HDMI signals are input and selected.
ARC: Audio signals from the ARC compatible TV are input and selected.
USB: When "USB" is selected with the input selector and the unit is connected by USB
and the USB device is selected. Flashes if the USB is not properly connected.
NET: When "NET" is selected with the input selector and the unit is connected to the
network. It will flash if the connection to the network is not correct.
DIGITAL: Digital signals are input and the digital input selector is selected. - Lights when operating the "NET" or "USB" input selector indicating remote controller
cursor operations are possible in screens showing list of tracks, for example. - Lights when operating the "NET" or "USB" input selector when tracks are played or paused.
- Lights according to the type of input digital audio signals and the listening mode.
- Lights in the following conditions.
RDS: Receiving RDS broadcasting.
AUTO: When tuning mode is auto.
TUNED: Receiving FM radio.
FM STEREO: Receiving FM stereo.
SLEEP: Sleep timer has been set.
ASb: When Auto Standby function is enabled.
- Flashes when muting is on.
- Displays various information of the input signals. Characters that cannot be displayed on this unit are replaced with asterisks (*).
Before Start
Part Names
Install
Setup
Playback
Supplementary information | Firmware Update | Others
Wireless Satellite Speakers
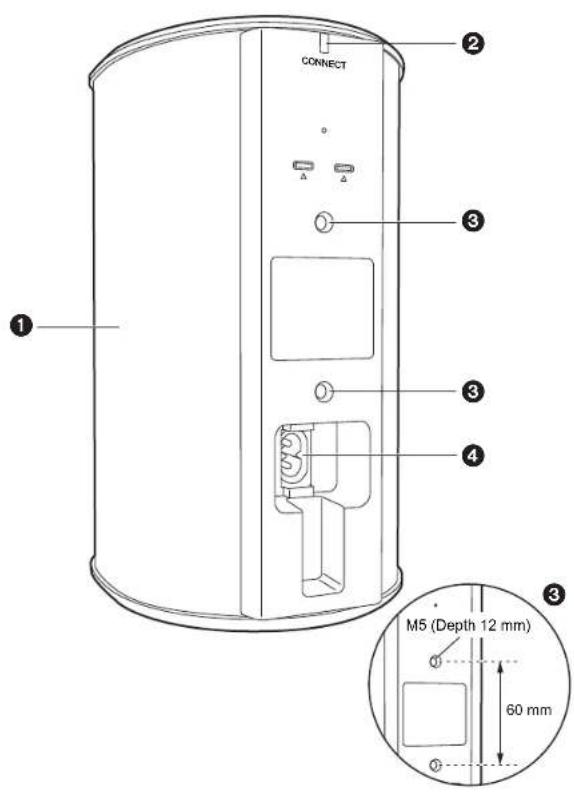
- Speaker grill
- CONNECT LED: This flashes red when unpaired with the sound system controller and lights blue when pairing is complete. Also, when "Wireless Speaker Standby" has been set to "On" on the sound system controller, this lights red when the sound system controller is in standby mode.
- Locations to attach fittings to hang from the wall: Use commercially available fittings to attach to a wall or hang from the ceiling. Make sure the fittings you choose are capable of sufficiently sustaining the weight of the Speaker. Refer to the instruction manual for the fittings for information about installation.
- AC IN: Connect the supplied power cord.

Before Start
Part Names
Install
Setup
Playback
Supplementary information | Firmware Update | Others
1. Install the Wireless Satellite Speakers

First install the speakers and connect their power cords. On the rear of the speakers you will see "L" or "R" on the label. Place the speaker with "L" at the left of the listening position. Place the speaker with "R" to the right of the listening position. The sound system controller and the speakers are connected wirelessly. Setup inside within a maximum 9 m (30 ft.) square. The optimum is to put the speakers at ear height, at an even distance from the listening position. When also installing the wireless subwoofer and wireless satellite speakers (sold separately), make sure you put them in place and connect their power cords. Refer to the instruction manuals for the other equipment for the location and power connections for them.

flowchart
graph TD
    L["Label L"] -->|Data Flow| Monitor["Monitor"]
    R["Label R"] -->|Data Flow| Monitor
    Monitor -->|*1| Feedback["Feedback Loop"]
    Feedback --> L
    Feedback --> R
* 1: The optimum is between 22° and 30°.
Before Start
Part Names
Install
Setup
Playback
Supplementary information | Firmware Update | Others
2. Connect the TV
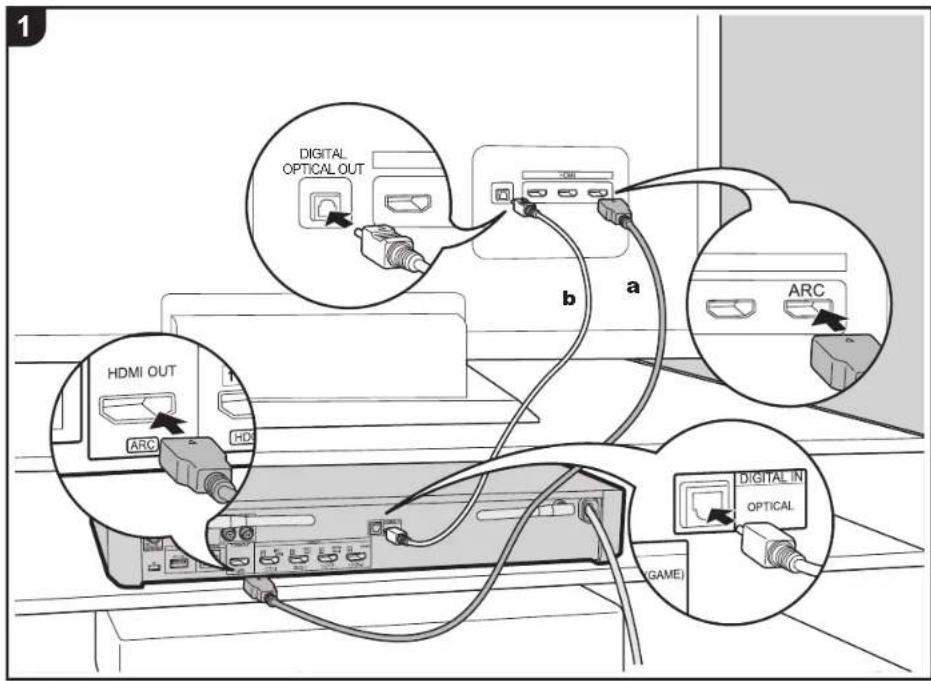
a HDMI cable, b Digital optical cable
To ARC TV
For a TV that supports the ARC (Audio Return Channel) feature, use an HDMI cable and connect according to illustration "a". Choose an HDMI IN jack on the TV that supports ARC when connecting.
To Non-ARC TV
For a TV that does not support the ARC (Audio Return Channel) feature, connect both the HDMI cable in illustration "a" and the digital optical cable in "b". If the TV doesn't have a DIGITAL OPTICAL OUT jack, use an analog audio cable and connect the TV's ANALOG AUDIO OUT jack to the AUDIO IN jack on the sound system controller. Connection with a digital optical cable or analog audio cable is not necessary if you will watch TV through a device such as a cable set-top box (that is, not use a tuner built into the TV) that you have connected to the HDMI IN jack on the sound system controller.

Setup
- Settings are required to use the ARC function. Make settings after all connections are complete. Settings are made in the System Setup (→P14) menu displayed by pressing ☑ on the remote controller. The ARC function is enabled by setting "Hardware" - "HDMI CEC" (→P17) in the System Setup menu to "On".
- Please refer to the TV's operation manual for directions on connections and setup for the TV.
Before Start
Part Names
Install
Setup
Playback
Supplementary information | Firmware Update | Others
3. Connect the AV Components

a HDMI cable
Use HDMI cables to connect AV components. With connection to an AV component that conforms with the CEC (Consumer Electronics Control) standard, you can use features such as the HDMI CEC feature that links with the input selector, and the HDMI Standby Through feature which allows you to play video and audio from AV components on the TV even when this unit is in standby mode. (→P58)
- To play 4K or 1080p video, use the high speed HDMI cable.

Setup
- Settings are required to use the HDMI CEC and HDMI Standby Through features. Make settings after all connections are complete. Settings are made in the System Setup (→P14) menu displayed by pressing ⚙ on the remote controller. In the System Setup menu, enable both "Hardware" - "HDMI CEC" (→P17) and "HDMI Standby Through" (→P18).
- To enjoy digital surround sound including Dolby Digital, audio output should be set to "Bitstream output" on the connected Blu-ray Disc player or other device.

Cable/Satellite set-top box
Streaming
media player
Before Start
Part Names
Install
Setup
Playback
Supplementary information | Firmware Update | Others
4. Connect Other Cables


a FM indoor antenna, b Ethernet cable, c Power cord
Antenna Hookup
Connect the supplied FM indoor antenna to the ANTENNA FM 75Ω terminal. Move the FM indoor antenna around while playing the radio to find the position with the best reception.
Network Hookup
You can enjoy network features such as internet radio by connecting the unit to the network via a LAN or Wi-Fi (wireless LAN). If you connect by wired LAN, connect the router with an Ethernet cable to the NETWORK port. To connect by Wi-Fi, follow the on-screen instructions in Initial Setup (→P13).
Power Cord Hookup
Connect the power cord of the sound system controller only after all other connections are completed.
Before Start
Part Names
Install
Setup
Playback
Supplementary information | Firmware Update | Others
Initial Setup with Auto Start-up Wizard

Initial Setup starts automatically
- Switch the input on the TV to that assigned to the unit.
- Put batteries into the remote controller of this unit.
- Press ⏻ on the remote controller. When power is turn on for the first time, an Initial Setup screen is automatically displayed on the TV to allow you to make settings required for start up.

- Follow the on-screen instructions to select the item with the cursors of the remote controller and press ENTER to confirm your selection.
• To return to the previous screen, press
To redo Initial Setup: If you terminate the procedure on the way or want to change a setting made during Initial Setup, press ☑ on the remote controller, select "Miscellaneous" - "Initial Setup", in the System Setup screen and press ENTER. To select the language displayed again, change "OSD Language". (→P14)
Before Start
Part Names
Install
Setup
Playback
Supplementary information | Firmware Update | Others

1. Registration of wireless Speakers
Pair the speakers and sound system controller. It takes about 30 seconds to detect the speakers. When all the speakers you will use have been detected, select "Save" to save the pairing information.
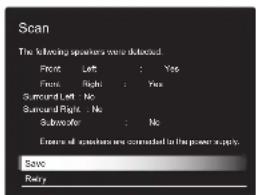
If there are speakers that cannot be detected, make sure that the speaker's power cord is properly plugged into the wall outlet, then select "Retry".
2. Easy Setup
Adjust the audio output of the speakers. By just selecting the positions of speakers as you see them from the listening position, you can automatically and easily set the output levels, etc., for each of the speakers.
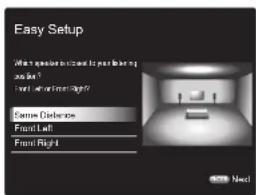
- You can also make more advanced settings for output levels and distances from the listening position for each of the speakers. (→P15)
3. Network Connection
Set up Wi-Fi connection with an access point such as a wireless LAN router. There are the following two methods of connecting by Wi-Fi:
"Enter Password": Enter the password (or key) of the access point to connect.
"Push Button": If the access point has an automatic connection button, you can connect without entering a password.
- If the SSID of the access point is not displayed, then in the screen listing the SSIDs, select "Other..." with the ➤ button on the remote controller and press ENTER, then follow the on-screen instructions.

Keyboard input: To switch between upper and lower case, select "A/a" on the screen and press ENTER. To select whether to mask the password with "*" or display it in plain text, press +Fav on the remote controller. Pressing CLEAR will delete all the input characters.
Privacy policy: A confirmation screen asking you to agree to the privacy policy is displayed during network setting. Select "Yes" and press ENTER to indicate agreement.

Before Start
Part Names
Install
Setup
Playback
Supplementary information | Firmware Update | Others
System Setup

The unit allows you to configure advanced settings to provide you with an even better experience.
- Switch the input on the TV to that assigned to the unit.
- Press on the remote controller.
- After the System Setup screen is displayed, select the content with ♦ / ♦ / ← / → on the remote controller and press ENTER to confirm your selection.

- Change the initial values for each of the settings with the cursors ← / → .
• To return to the previous screen, press
4. To exit the settings, press
TV Out
| TV Out / OSD | |
| 1080p -> 4K Upscaling | When using a TV that supports 4K, video signals input at 1080p can be automatically upscaled to 4K for output."Off (Default Value)': When not using this function"Auto": Use this functionSelect "Off" if your TV does not support 4K. |
| Super Resolution | When you have set "1080p -> 4K Upscaling" to "Auto", you can select the degree of video signal correction from "Off" and between "1" (weak) and "3" (strong). |
| OSD Language | Select the on-screen display language.English, German, French, Spanish, Italian, Dutch, Swedish, Russian, Chinese |
| Impose OSD | Set whether or not to display the information on the TV when the volume is adjusted or input is changed, for example."On (Default Value)': OSD displayed on the TV"Off": OSD not displayed on the TVOSD may not be displayed depending on the input signal even if "On" is selected. If the operation screen is not displayed, change the resolution of the connected device. |
| Screen Saver | Set the time to start the screen saver.Select a value from "3 minutes (Default Value)"; "5 minutes", "10 minutes" and "Off". |
Before Start
Part Names
Install
Setup
Playback
Supplementary information | Firmware Update | Others
Wireless Speaker
This setting cannot be selected if audio is being output from the speakers of the TV.
Setup Mode
| Setup Mode Select how to setup the audio output of the speakers. "Easy (Default Value)": To use "Easy Setup" for a simplified setup "Standard": When you want to set the Distance and Channel Level for each speaker individually |
Easy Setup
You can easily set the distance and volume level for each of the speakers. To make more detailed settings, set "Setup Mode" to "Standard", then set the distance and volume level for each speaker individually.
Distance
This can only be selected when the "Setup Mode" is "Standard".
| Front Left | Specify the distance between each speaker and the listening position. (Default Value is 3.00m (10.0ft)) |
| Front Right | Specify the distance between each speaker and the listening position. (Default Value is 3.00m (10.0ft)) |
| Surround Right | Specify the distance between each speaker and the listening position. (Default Value is 3.00m (10.0ft)) |
| Surround Left | Specify the distance between each speaker and the listening position. (Default Value is 3.00m (10.0ft)) |
| Subwoofer | Specify the distance between each speaker and the listening position. (Default Value is 3.00m (10.0ft)) |
- Distance units can be switched by pressing MODE on the remote controller. When the unit is set as meters, you can set between 0.03m and 9.00m in increments of 0.03m . When the unit is set as feet, you can set between 0.1 ft and 30.0 ft in increments of 0.1ft.
Channel Level
This can only be selected when the "Setup Mode" is "Standard".
| Front Left | Select a value between "-12 dB" and "+12 dB" (in 1 dB increments). A test tone will be output each time you change the value. Select the desired level. (Default Value is 0 dB) |
| Front Right Select a value between "-12 dB" and "+12 dB" (in 1 dB increments). A test tone will be output each time you change the value. Select the desired level. (Default Value is 0 dB) | |
| Surround Right Select a value between "-12 dB" and "+12 dB" (in 1 dB increments). A test tone will be output each time you change the value. Select the desired level. (Default Value is 0 dB) | |
| Surround Left | Select a value between "-12 dB" and "+12 dB" (in 1 dB increments). A test tone will be output each time you change the value. Select the desired level. (Default Value is 0 dB) |
| Subwoofer | Select a value between "-15 dB" and "+12 dB" (in 1 dB increments). A test tone will be output each time you change the value. Select the desired level. (Default Value is 0 dB) |
Scan
Use this to rescan for speakers when wireless satellite speakers and wireless subwoofer (sold separately) are added to the system. When performing this operation, first switch the power of the sound system controller to standby, then connect the power cords of all the speakers, then proceed.
Before Start
Part Names
Install
Setup
Playback
Supplementary information | Firmware Update | Others
Information
| Transmission Status This indicates the communication status of the sound system controller. | |
| Front Left The connection status of the front left speaker is displayed."---": Not paired"Connected": Successfully connected | |
| Front Right | The connection status of the front right speaker is displayed."---": Not paired"Connected": Successfully connected |
| Surround Left The connection status of the surround left speaker is displayed."---": Not paired"Connected": Successfully connected | |
| Surround Right The connection status of the surround right speaker is displayed."---": Not paired"Connected": Successfully connected | |
| Subwoofer The connection status of the subwoofer is displayed."---": Not paired"Connected": Successfully connected | |
Subwoofer
| Subwoofer Set whether | a subwoofer is connected or not. "Yes (Default Value)": When using a subwoofer "No": When not using a subwoofer |
Audio Adjust
| Dual Mono / Mono | |
| Dual Mono | Set the audio channel or language to be output when playing multiplex audio or multilingual TV broadcasts etc."Main (Default Value)": Main channel only"Sub": Sub channel only"Main / Sub": Main and sub channels will be output at the same time.If multiplex audio is being played, "1+1" will be displayed on the display of the sound system controller when i on the remote controller is pressed. |
| Mono Input Channel Set | the input channel to use for playing any 2 ch digital sourcesuch as Dolby Digital, or 2 ch analog/PCM source in the Mono listening mode."Left": Left channel only"Right": Right channel only"Left + Right (Default Value)": Left and right channels |
Dolby
| Loudness Management | When playing Dolby TrueHD, enable the dialog normalization function which keeps the volume of dialog at a certain level. Note that when this setting is Off, the DRC function that allows you to enjoy surround at low volumes is fixed to off when playing Dolby Digital Plus/Dolby TrueHD."On (Default Value)": Use this function"Off": Do not use this function |
Volume
| Volume Limit | Set the maximum value to avoid too high volume. Select "Off (Default Value)" or a value between "30" and "49". |
Before Start
Part Names
Install
Setup
Playback
Supplementary information | Firmware Update | Others
Source
■ Input Volume Absorber
Adjust the volume level difference between the devices connected to the unit. Select the input selector to configure.
| Input Volume Absorber | Select a value between “-12 dB” and “+12 dB”. Set a negative value if the volume of the target device is larger than the others and a positive value if smaller. To check the audio, start playback of the connected device. (Default Value is 0 dB) |
Fixed PCM
| Fixed PCM | Select whether to fix digital audio input signals to PCM (except multi-channel PCM). Set this item to "On" if noise is produced or truncation occurs at the beginning of a track when playing PCM sources. Select "Off" normally. (Default Value is Off) |
- The setting cannot be changed when "NET", " \$ ", "USB", "TUNER", or "ANALOG IN" input is selected.
Hardware
HDMI
| HDMI CEC | Setting to "On" enables the input selection link and other link functions with HDMI connected CEC compliant device. "On": Use this function "Off (Default Value): Do not use this function When changing this setting, turn off and then on again the power of all connected components. Depending on the TV set, a link may need to be configured on the TV. Setting to "On" and closing the on-screen menu displays the name of the CEC-compatible components and "CEC On" on the display of the sound system controller. Power consumption in standby mode may increase if "On" is set. (Depending on the TV status, the unit will enter the normal standby mode.) If you operate the VOLUME buttons on the unit when this setting is "On" and audio is output from the TV speakers, audio will be output also from the speakers connected to the unit. If you want to output from only either of them, change the unit or TV settings, or reduce the volume of the unit. If abnormal operation occurs when you set the setting to "On", set it to "Off". When connecting a non-CEC compatible component, or when you are not sure whether it is compatible, set the setting to "Off". |
Before Start
Part Names
Install
Setup
Playback
Supplementary information | Firmware Update | Others
| HDMI Standby Through | When this is set to anything other than "Off", you can play the video and audio of an HDMI connected player on the TV even if the unit is in standby mode. Only "Auto" and "Auto (Eco)" can be selected if "HDMI CEC" is set to "On". If you select anything else, set "HDMI CEC" to "Off". (Default Value is Off)Setting to anything other than "Off" increases the power consumption even when the unit is on standby. However, the increase in power consumption is kept to a minimum by automatically entering the HYBRID STANDBY mode, where only the essential circuit is operating."BD/DVD", "CBL/SAT", "GAME", "STRM BOX": For example, if you select "BD/DVD", you can play the equipment connected to the "BD/DVD" jack on the TV even if the unit is in standby mode. Select this setting if you have decided which player to use with this function."Last": You can play the video and audio of the input selected immediately prior to the unit being switched to standby on the TV. When "Last" is selected, you can switch the input of the unit with the remote controller even in the standby mode."Auto", "Auto (Eco)": Select one of these settings when you have connected equipment that conforms to the CEC standard. You can play the video and audio of the input selected on the TV, irrespective of what input was selected immediately prior to the unit being switched to standby, using the CEC link function.To play players on the TV that do not conform to the CEC standard, you will need to turn the unit on and switch to the relevant input.When using TV that complies with the CEC standard, you can reduce the power consumption in standby mode by selecting "Auto (Eco)". | Audio TV Out | You can enjoy audio through the speakers of the TV while this unit is on."On": Use this function"Off (Default Value)": Do not use this functionThe setting is fixed to "Auto" if "HDMI CEC" is set to "On". If you change this setting, set "HDMI CEC" to "Off".Listening mode cannot be changed while "Audio TV Out" is set to "On" and audio is being output through the speakers of the TV.Depending on your TV set or input signal of the component, audio may not output through the speakers of the TV even if this setting is set to "On". In such case, audio is output from the speakers of the unit.If you operate the VOLUME buttons on this unit when audio that is being input through this unit for output from the TV speakers, audio is output from this unit. If you do not want to output audio from the unit, change the unit or TV settings, or reduce the volume of the unit. |
| Audio Return Channel You can enjoy sound of the HDMI connected ARC compatible TV through the speakers connected to the unit.To use this function, set "HDMI CEC" to "On" in advance."Auto": When enjoying the TV sound through the speakers connected to the unit"Off": When not using the ARC function | |||
| Auto Delay This setting automatically corrects any desynchronization between the video and audio signals based on data from the HDMI LipSync compatible TV."On (Default Value)": Automatic correction will be enabled."Off": Automatic correction will be disabled. | |||


Before Start
Part Names
Install
Setup
Playback
Supplementary information | Firmware Update | Others
Network
- When LAN is configured with a DHCP, set "DHCP" to "Enable" to configure the setting automatically. To assign fixed IP addresses to each component, you must set "DHCP" to "Disable" and assign an address to this unit in "IP Address" as well as set information related to your LAN, such as Subnet Mask and Gateway.
| Wi-Fi Connect the unit to network via wireless LAN router. "On": Wireless LAN connection "Off(Wired) (Default Value)"; Wired LAN connection | |
| Wi-Fi Setup | You can configure wireless LAN settings by pressing ENTER when "Start" is displayed. |
| Wi-Fi Status The information of the connected access point will be displayed. "SSID": SSID of the connected access point. "Signal": Signal strength of the connected access point. "Status": Status of the connected access point. | |
| MAC Address This is the MAC address of this unit. This value is specific to the component and cannot be changed. | |
| DHCP | "Enable (Default Value)": Auto configuration by DHCP "Disable": Manual configuration without DHCP If selecting "Disable", you must set "IP Address", "Subnet Mask", "Gateway", and "DNS Server" manually. |
| IP Address | Displays/Sets the IP address. |
| Subnet Mask | Displays/Sets the subnet mask. |
| Gateway | Displays/Sets the gateway. |
| DNS Server | Displays/Sets the primary DNS server. |
| Proxy URL | Displays/Sets the proxy server URL. |
| Proxy Port | Displays/Sets the proxy server port number when you enter "Proxy URL". |
| Friendly Name | Change the device name for this unit which is shown on other devices connected to the network to an easily recognized name. This is set to Pioneer AC-400 * * * * * * at the time of purchase. (" * " stand for alphanumeric characters identifying each unit)1. Press ENTER to display the Edit screen.2. Select a character or symbol with the cursors and press ENTER.Repeat it to input 31 or less characters."A/a": Switches between upper and lower cases. (Pressing MODE on the remote controller also toggles between upper and lower cases.)"← " " → "; Moves the cursor to the arrow direction."X": Removes a character on the left of the cursor."□": Enters a space.Pressing CLEAR on the remote controller will remove all the input characters.3. After inputting, select "OK" with the cursors and press ENTER.The input name will be saved. |
| Usage Data | As a means of improving the quality of our products and services, our company may collect information about your usage over the network. Select "Yes" if you agree to our collecting this information. Select "No" if you do not want us to collect this information. (Default Value is No)You can set this after confirming the Privacy Policy. When you select "Usage Data" and press ENTER, the Privacy Policy is displayed. (The same screen is displayed once also when setting up the network connection.) If you agree to the collection of the information, this setting also becomes "Yes". Note that if you agree to the Privacy Policy but select "No" for this setting, the information will not be collected. |
| Network Check | You can check the network connection.Press ENTER when "Start" is displayed. |
- Wait for a while if "Network" cannot be selected. It will appear when the network feature is started.
Before Start
Part Names
Install
Setup
Playback
Supplementary information | Firmware Update | Others
Bluetooth
| Bluetooth Select whether or not to use the BLUETOOTH function. "On (Default Value)": Enables connection with a BLUETOOTH enabled device by using the BLUETOOTH function. Select "On" also when making various BLUETOOTH settings. "Off": When not using the BLUETOOTH function | |
| Auto Input Change The input of the unit will automatically be switched to " " when connection is made from a BLUETOOTH enabled device to the unit. "On (Default Value)": The input will automatically become " " when a BLUETOOTH enabled device is connected. "Off": The function is disabled. If the input is not switched automatically, set to "Off" and change the input manually. | |
| Auto Reconnect | This function automatically reconnects to the BLUETOOTH enabled device connected last when you change the input to " " " "On (Default Value): Use this function "Off": Do not use this function This may not work with some BLUETOOTH enabled devices. |
| Pairing Information | You can initialize the pairing information saved on this unit. Pressing ENTER when "Clear" is displayed initializes the pairing information stored in this unit. This function does not initialize the pairing information on the BLUETOOTH enabled device. When pairing the unit again with the device, be sure to clear the pairing information on the BLUETOOTH enabled device in advance. For information on how to clear the pairing information, refer to the BLUETOOTH enabled device's instruction manual. |
| Device | Displays the name of the BLUETOOTH enabled device connected to the unit. The name is not displayed when "Status" is "Ready" and "Pairing". |
| Status | Displays the status of the BLUETOOTH enabled device connected to the unit."Ready": Not paired"Pairing": Paired"Connected": Successfully connected |
- Wait for a while if "Bluetooth" cannot be selected. It will appear when the BLUETOOTH function is started up.
Power Management
| Sleep Timer | Allows the unit to enter standby automatically when the specified time elapses. Select from "30 minutes", "60 minutes", and "90 minutes". "Off (Default Value)": Does not turn the unit to standby automatically. |
| Auto Standby | This setting places the unit on standby automatically after 20 minutes of inactivity without any video or audio input. "On (Default Value)": The unit will automatically enter standby mode ("ASb" will stay lit). "Off": The unit will not automatically enter standby mode. · "Auto Standby" is displayed on the display of the sound system controller and TV screen 30 seconds before the Auto Standby comes on. |
| Auto Standby in HDMI Standby Through | Enable or disable "Auto Standby" while "HDMI Standby Through" is on. "On": The setting will be enabled. "Off": The setting will be disabled. · This setting cannot be set to "On" if "Auto Standby" is set to "Off". |
| USB Power Out at Standby | Devices connected to the USB port are supplied with electricity even when this unit is in standby mode when this function is "On". (Default Value is Off) · When using this feature, power consumption increases even when the unit is on standby, however, the increase in power consumption is kept to a minimum by automatically entering the HYBRID STANDBY mode, where only essential circuits are operating. |
Before Start
Part Names
Install
Setup
Playback
Supplementary information | Firmware Update | Others
| Network Standby When this feature is turned "On", you can turn on the power of the unit via the network using an application that can control this unit. (Default Value is On) ·When "Network Standby" is used, the power consumption increases even when the unit is on standby. However, the increase in power consumption is kept to a minimum by automatically entering the HYBRID STANDBY mode, where only the essential circuit is operating. ·"Network Standby", which suppresses power consumption, may be disabled when the network connection is lost. Use the power button on the remote controller or the sound system controller to turn the unit on if this happens. |
| Bluetooth Wakeup This function wakes up the unit on standby by connecting a BLUETOOTH enabled device. "On": Use this function "Off (Default Value)": Do not use this function ·Setting to "On" increases the power consumption even when the unit is on standby. However, the increase in power consumption is kept to a minimum by automatically entering the HYBRID STANDBY mode, where only the essential circuit is operating. ·This setting is fixed to "Off" if "Bluetooth" - "Auto Input Change" is set to "Off". |
| Wireless Speaker Standby When you switch the power of the sound system controller on, the speakers that have been paired with the sound system controller come on automatically. When this setting is "On", you can reduce the startup time when speakers start this way. (Default Value is Off) ·Enabling this function increases the power consumption even when the unit is on standby. However, the increase in power consumption is kept to a minimum by automatically entering the HYBRID STANDBY mode, where only the essential circuit is operating. |
- Wait for a while if "Network Standby" and "Bluetooth Wakeup" cannot be selected. It will appear when the network feature is started.
Miscellaneous
| ■ Firmware Update | |
| Update Notice | Availability of a firmware update will be notified via network."Enable (Default Value)": Notify updates"Disable": Do not notify updates |
| Version The current firmware version will be displayed. | |
| Update via NET | Press ENTER to select when you want to update the firmware via network.You will not be able to select this setting if you do not have Internet access or there is nothing to update. |
| Update via USB | Press ENTER to select when you want to update the firmware via USB.You will not be able to select this setting if a USB storage device is not connected or there is nothing to update in the USB storage device. |
- Wait for a while if "Firmware Update" cannot be selected. It will appear when the network feature is started.
■ Initial Setup
You can make the Initial Setup from the System Setup menu.
- Wait for a while if "Initial Setup" cannot be selected. It will appear when the network feature is started.
Lock
| Setup Parameter | Lock the Setup menu to protect the settings."Locked": The menu is locked."Unlocked (Default Value)": The menu is unlocked. |
Before Start
Part Names
Install
Setup
Playback
Supplementary information | Firmware Update | Others
Load Default
| Load Default | Reset the sound system controller to return the settings to the status at the time of shipment. This operation needs to be done while the CONNECT LED on the connected Wireless Satellite Speakers is illuminated and blue. Check the illumination status of the LEDs before doing the reset.Your settings will also be initialized when you reset, so note down your settings before starting reset. |


Before Start
Part Names
Install
Setup
Playback
Supplementary information | Firmware Update | Others
AV Adjust

By pressing the Button on the remote controller during play, you can adjust frequently used settings, such as the sound quality, using on-screen menus. Note that there is no display on the TV screen when the input selector is "TUNER", so follow the sound system controller's display while doing the operations.
-
Press on the remote controller.
-
After the AV Adjust screen is displayed, select the content with ♦ / ♦ on the remote controller and press ENTER to confirm your selection.
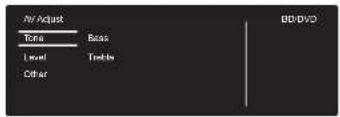
- Change the initial values for each of the settings with the cursors / .
• To return to the previous screen, press - To exit the settings, press
Tone
Bass: Enhance or moderate the bass range of the speaker.
Treble: Enhance or moderate the treble range of the speaker.
- It cannot be set if the listening mode is Pure Direct.
Level
Subwoofer: Adjust the speaker level of the subwoofer while listening to some sound.
- The adjustment you made will be reset to the previous status when you turn the unit to standby mode.
Other
Sound Delay: If the video is behind the audio, you can delay the audio to offset the gap. Different settings can be set for each input selector.
- This cannot be set if the listening mode is Pure Direct and the input signal is analog.
Sound Retriever: Improve the quality of the compressed audio. Playback sound of lossy compressed files such as MP3 will be improved. The setting can be separately set to each input selector. The setting is effective in the signals of 48 kHz or less. The setting is not effective in the bitstream signals.
- It cannot be set if the listening mode is Pure Direct.
DRC: Make small sounds easily heard. It is useful when you need to reduce the volume while watching a movie late night. This be set when signals are Dolby or DTS input signals are being played.
- It cannot be set if the listening mode is Pure Direct.
- If "Loudness Management" is set to "Off", this function is not available when playing Dolby Digital Plus or Dolby TrueHD.
Panorama: Broaden the sound field laterally when playing in the Dolby Pro Logic II Music listening mode.
Dimension: Adjust the depth of the sound field in the front to back direction when playing in the Dolby Pro Logic II Music listening mode. Set a small number to move the sound towards the front. Set a large number to move the sound back.
Before Start
Part Names
Install
Setup
Playback
Supplementary information | Firmware Update | Others
Dialog Enhancement: You can increase the dialog portion of the audio so that you can make dialog easier to hear over background noise.
- It cannot be set if the listening mode is Pure Direct.
Theater Filter: Adjust the soundtrack that was processed to enhance its high pitch range, in order to make it suitable for home theater. This function can be used in the following listening modes: Dolby Digital, Dolby Digital Plus, Dolby PL II Movie, Dolby TrueHD, Multichannel, DTS, DTS 96/24, DTS-HD High Resolution Audio, DTS-HD Master Audio, DTS Express, Neo:6 Cinema, and DSD.
- It cannot be set if the listening mode is Pure Direct.


Before Start > Part Names > Install > Setup > Playback
Supplementary information | Firmware Update | Others
AV Component Playback

Basic operations
Play an AV component or TV connected to this unit with an HDMI cable or other cable.
- Switch the input on the TV to that assigned to the unit.
-
Press the input selector (a) on the remote controller with the same name as the jack to which you connected the player to switch the input. Note that when the CEC link function works, the input switches automatically when you have connected a CEC compliant TV and player to this unit using HDMI connection.
-
BD/DVD - BD/DVD jack
- GAME - GAME jack
- CBL/SAT - CBL/SAT jack
- STRMBOX - STRM BOX jack
-TV - (*) - DIGITAL IN - DIGITAL IN OPTICAL jack
- ANALOG IN - ANALOG IN jack
(*) Selectable when a TV compatible with ARC is connected using an HDMI cable. If you have connected a TV with only an HDMI cable, you need to go to the System Setup menu (→P14) and set "Hardware" - "HDMI" - "Audio Return Channel" (→P18) to "Auto". If you have connected a TV with a digital optical cable, set the input on this unit to "DIGITAL IN", and if connected with an analog audio cable, set to "ANALOG IN". Note that if you have connected with either a digital optical cable or an analog audio cable, if "Audio Return Channel" (→P18) is set to "Off" you can listen to the audio from the TV through the "TV" input.
- Start play on the player.
- Use VOL+/- (b) to adjust the volume.
Before Start > Part Names > Install > Setup > Playback
Supplementary information | Firmware Update | Others
Internet Radio
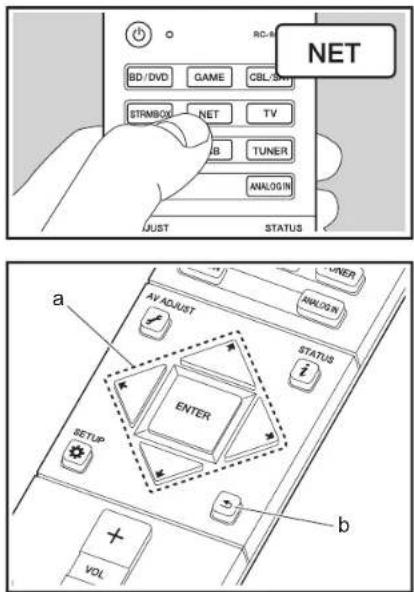
When this unit is connected to a network, you can listen to TuneIn or other preregistered Internet radio services.
-
Switch the input on the TV to that assigned to the unit.
-
Press NET on the remote controller.

- Follow the on-screen instructions, using the cursors to select radio stations and programs, then press ENTER to play (a). Play starts when 100% is displayed for buffering.
• To return to the previous screen, press←(b).
- If you cannot select a network service, it will become selectable when the network function is started.
Tuneln Radio
Regarding the TuneIn Radio Menu
To display the TuneIn Radio menu during play, press ENTER (a) on the remote controller.
Add to My Presets: Registers radio stations being broadcast and programs in "My Presets". Once registered, "My Presets" is displayed in the level under Tuneln Radio. To play, select the program you like from "My Presets".
Remove from My Presets: Removes a radio station or program from "My Presets" in TuneIn Radio.
Regarding the Tuneln Radio Account
Creating an account on the Tuneln Radio website (tunein.com) and logging in from the unit allows you to automatically add your favorite radio stations and programs to your "My Presets" on the unit as you follow them on the website. "My Presets" are displayed in the level under Tuneln Radio.
To display a radio station registered in "My Presets", you must log into Tuneln Radio from the unit. To log in, select "Login" - "I have a Tuneln account" in the "Tuneln Radio" top list on the unit, and then enter your user name and password.
If you associate the device on My Page within the TuneIn Radio website using the registration code obtained by selecting "Login" - "Login with a registration code" on the unit, you can log in without entering the user name and password.


Before Start > Part Names > Install > Setup > Playback
Supplementary information | Firmware Update | Others
Spotify
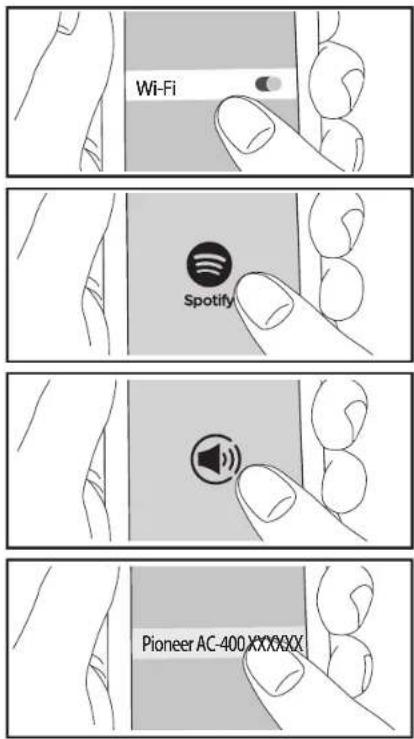

Spotify Connect play is possible by connecting this unit to the same network as a smart phone or tablet. To enable Spotify Connect, install the Spotify application on your smartphone or tablet and create a Spotify premium account.
- Connect the smartphone to the network that this unit is connected to.
- Click the Connect icon in the track play screen of the Spotify app.
- Select this unit.
- This unit turns on automatically and the input selector changes to NET and streaming of Spotify starts.
- If "Hardware" - "Power Management" - "Network Standby" is set to "Off" in the System Setup menu, manually turn the unit on and then press NET on the remote controller.
• Refer to the following for Spotify settings: www.spotify.com/connect/
- The Spotify software is subject to third party licenses found here: www.spotify.com/connect/third-party-licenses
The following remote controller operations are also possible.
(a) Pressed during play, this button changes the displayed track information.
(b) This button plays the previous track.
(c) This button lets you start repeat or random playback. Pressing this button repeatedly cycles through the repeat modes.
(d) Pressed during play this button pauses playback. Pressed while paused, and it restarts play.
(e) This button plays the next track.
> Before Start > Part Names > Install > Setup > Playback
Supplementary information | Firmware Update | Others
Music Server


It is possible to stream music files stored on PCs or NAS devices connected to the same network as this unit. The network servers this unit is compatible with are those PCs with players installed that have the server functionality of Windows Media® Player 11 or 12, or NAS that are compatible with home network functionality. You may need to make some settings in advance to use Windows Media® Player 11 or 12. Note that only music files registered in the library of Windows Media® Player can be played.
Configuring Windows Media® Player
Windows Media® Player 11
- Tum on your PC and start Windows Media ® Player 11.
- In the "Library" menu, select "Media Sharing" to display a dialog box.
- Select the "Share my media" check box, and then click "OK" to display the compatible devices.
- Select this unit, click "Allow" and put a check mark next to the icon for this unit.
- Click "OK" to close the dialog.
- Depending of the version of Windows Media Player, there may be differences in the names of items you can select.
Windows Media® Player 12
- Turn on your PC and start Windows Media® Player 12.
- In the "Stream" menu, select "Turn on media streaming" to display a dialog box.
- If media streaming is already turned on, select "More streaming options..." in the "Stream" menu to list players in the network, and then go to step 4.
- Click "Turn on media streaming" to list players in the network.
- Select this unit in "Media streaming options" and check that it is set to "Allow".
- Click "OK" to close the dialog.
- Depending of the version of Windows Media Player, there may be differences in the names of items you can select.
Playing
- Start the server (Windows Media® Player 11, Windows Media® Player 12, or NAS device) containing the music files to play.
- Make sure that the PCs and/or NASs are properly connected to the same network as this unit.
- Switch the input on the TV to that assigned to the unit.
- Press NET on the remote controller.

- With the cursors on the remote controller, select "Music Server", and then press ENTER (b).
- Select the target server with the cursors on the remote controller and press ENTER (b) to display the items list screen.
- With the cursors on the remote controller, select the music file to play, and then press ENTER (b) to start playback. To return to the previous screen, press 📄d).
- If "No Item." is displayed, check whether the network is properly connected.
> Before Start > Part Names > Install > Setup > Playback

Supplementary information | Firmware Update | Others
- Depending on the server and share settings, the unit may not recognize it, or may not be able to play its music files. Furthermore, the unit cannot access pictures and videos stored on servers.
- For music files on a server, there can be up to 20,000 tracks per folder, and folders may be nested up to 16 levels deep.
The following remote controller operations are also possible.
(a) When the folder or file lists are not shown on one screen, you can change the screen.
(c) Pressed during play, this button changes the displayed track information. Pressed while a folder or file list is displayed, this button returns you to the play screen.
(e) This button plays the previous track.
(f) This button lets you start repeat or random playback. Pressing this button repeatedly cycles through the repeat modes.
(g) Pressed during play this button pauses playback. Pressed while paused, and it restarts play.
(h) This button plays the next track.
Controlling Remote Playback from a PC
You can use this unit to play music files stored on your PC by operating the PC inside your home network. The unit supports remote playback with Windows Media ® Player 12.
- Turn on your PC and start Windows Media ® Player 12.
- Open the "Stream" menu and check that "Allow remote control of my Player..." is checked. Click "Turn on media streaming" to list players in the network.
- Switch the input on the TV to that assigned to the unit.
- Select and right-click the music file to play with Windows Media ® Player 12. To remotely play a music file on another server, open the target server from "Other Libraries" and select the music file to play.
- Select this unit in "Play to" to open the "Play to" window of Windows Media ® Player 12 and start playback on the unit. If your PC is running on Windows ® 8.1, click "Play to", and then select this unit.
If your PC is running on Windows ® 10, click "Cast to Device", and select this unit. Operations during remote playback are possible from the "Play to" window on the PC. The playback screen is displayed on the TV connected to the HDMI output of the unit.
-
Adjust the volume using the volume bar on the "Play to" window.
-
Sometimes, the volume displayed on the remote playback window may differ from that appeared on the display of the unit. Also, when the volume is adjusted from this unit, this is not reflected in the "Play to" window.
- Remote playback is not possible when using a network service or playing music files on a USB storage device.
- Depending of the version of Windows, there may be differences in the names of items you can select.
Supported Audio Formats
For server playback and playback from a USB storage device, this unit supports the following music file formats. Note that playback via wireless LAN of sampling rates of 88.2 kHz or higher, DSD, and Dolby TrueHD are not supported. Remote play of FLAC, DSD, and Dolby TrueHD is also not supported.
MP3 (.mp3/.MP3):
• Supported formats: MPEG-1/MPEG-2 Audio Layer-3
• Supported sampling rates: 44.1 kHz, 48 kHz
• Supported bitrates: Between 8 kbps and 320 kbps and VBR.
WMA (.wma/.WMA):
• Supported sampling rates: 44.1 kHz, 48 kHz
- Supported bitrates: Between 5 kbps and 320 kbps and VBR.
• WMA Pro/Voice/WMA Lossless formats are not supported
WAV (.wav/.WAV):
WAV files include uncompressed PCM digital audio.
• Supported sampling rates: 44.1 kHz, 48 kHz, 64 kHz, 88.2 kHz, 96 kHz, 176.4 kHz, 192 kHz
• Quantization bit: 8 bit, 16 bit, 24 bit
AIFF (.aiff/.aif/.aifc/.afc/.AIFF/.AIF/.AIFC/.AFC):
AIFF files include uncompressed PCM digital audio.
• Supported sampling rates: 44.1 kHz, 48 kHz, 64 kHz,
88.2 kHz, 96 kHz, 176.4 kHz, 192 kHz
• Quantization bit: 8 bit, 16 bit, 24 bit
AAC (.aac/.m4a/.mp4/.3gp/.3g2/.AAC/.M4A/.MP4/.3GP/.3G2):
• Supported formats: MPEG-2/MPEG-4 Audio
• Supported sampling rates: 44.1 kHz, 48 kHz, 64 kHz, 88.2 kHz, 96 kHz
• Supported bitrates: Between 8 kbps and 320 kbps and VBR.
FLAC (.flac/.FLAC):
• Supported sampling rates: 44.1 kHz, 48 kHz, 64 kHz,
88.2 kHz, 96 kHz, 176.4 kHz, 192 kHz
• Quantization bit: 8 bit, 16 bit, 24 bit
LPCM (Linear PCM):
• Supported sampling rates: 44.1 kHz, 48 kHz
• Quantization bit: 16 bit
Apple Lossless (.m4a/.mp4/.M4A/.MP4):
• Supported sampling rates: 44.1 kHz, 48 kHz, 64 kHz, 88.2 kHz, 96 kHz, 176.4 kHz, 192 kHz
• Quantization bit: 16 bit, 24 bit
DSD (.dsf/.dff/.DSF/.DFF):
• Supported formats: DSF/DSDIFF
• Supported sampling rates: 2.8 MHz, 5.6 MHz
• Variable bit-rate (VBR) files are supported. However,
playback times may not be displayed correctly.
- Remote playback does not support the gapless playback.
Before Start > Part Names > Install > Setup > Playback
Supplementary information | Firmware Update | Others
USB Storage Device

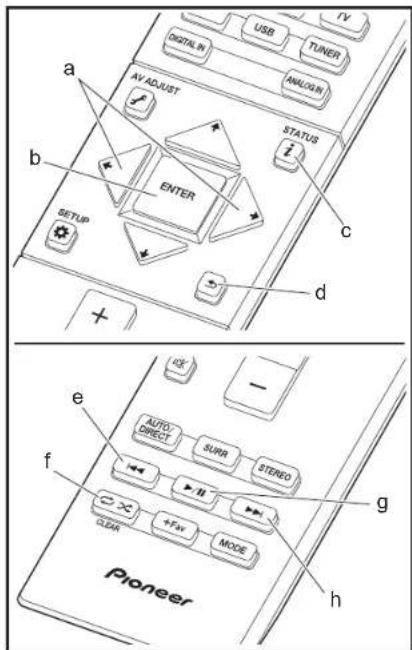
Basic play
Play music files on a USB storage device.
1. Switch the input on the TV to that assigned to the unit.
2. Plug your USB storage device with the music files into the USB port on the rear of this unit.
3. Press "USB" on the remote controller.
- If the "USB" indicator flashes on the display, check whether the USB storage device is plugged in properly.
- Do not unplug the USB storage device connected to the sound system controller while "Connecting..." is on the display. This may cause data corruption or malfunction.
4. Press ENTER (b) on the remote controller again in the next screen. The list of folders and music files on the USB storage device are displayed. Select the folder with the cursors and press ENTER (b) to confirm your selection.
• To return to the previous screen, press→(d).
5. With the cursors on the remote controller, select the music file, and then press ENTER (b) to start playback.
- The USB port of this unit conforms with the USB 2.0 standard. The transfer speed may be insufficient for some content you play, which may cause some interruption in sound.
The following remote controller operations are also possible.
(a) When the folder or file lists are not shown on one screen, you can change the screen.
(c) Pressed during play, this button changes the displayed track information. Pressed while a folder or file list is displayed, this button returns you to the play screen.
(e) This button plays the previous track.
(f) This button lets you start repeat or random playback. Pressing this button repeatedly cycles through the repeat modes.
(g) Pressed during play this button pauses playback. Pressed while paused, and it restarts play.
(h) This button plays the next track.


> Before Start > Part Names > Install > Setup > Playback

Supplementary information | Firmware Update | Others
USB Storage Device Requirements
- Note that operation is not guaranteed with all USB storage devices.
- This unit can use USB storage devices that comply with the USB mass storage device class standard. The unit is also compatible with USB storage devices using the FAT16 or FAT32 file system formats.
- If the USB storage device has been partitioned, each section will be treated as an independent device.
- Up to 20,000 tracks per folder can be displayed, and folders may be nested up to 16 levels deep.
- USB hubs and USB storage devices with hub functions are not supported. Do not connect these devices to the unit.
- USB storage devices with security function are not supported on this unit.
- If you connect a USB hard disk drive to the USB port of the unit, we recommend that you use its AC adapter to power it.
- Media inserted to the USB card reader may not be available in this function. Furthermore, depending on the USB storage device, proper reading of the contents may not be possible.
- We accept no responsibility whatsoever for the loss or damage to data stored on a USB storage device when that device is used with this unit. We recommend that you back up your important music files beforehand.
Supported Audio Formats
For server playback and playback from a USB storage device, this unit supports the following music file formats. Note that sound files that are protected by copyright cannot be played on this unit.
MP3 (.mp3/.MP3):
• Supported formats: MPEG-1/MPEG-2 Audio Layer 3
• Supported sampling rates: 44.1 kHz, 48 kHz
• Supported bitrates: Between 8 kbps and 320 kbps and VBR.
WMA (.wma/.WMA):
• Supported sampling rates: 44.1 kHz, 48 kHz
• Supported bitrates: Between 5 kbps and 320 kbps and VBR.
• WMA Pro/Voice/WMA Lossless formats are not supported
WAV (.wav/.WAV):
WAV files include uncompressed PCM digital audio.
• Supported sampling rates: 44.1 kHz, 48 kHz, 64 kHz,
88.2 kHz, 96 kHz, 176.4 kHz, 192 kHz
• Quantization bit: 8 bit, 16 bit, 24 bit
AIFF (.aiff/.aif/.aifc/.afc/.AIFF/.AIF/.AIFC/.AFC):
AIFF files include uncompressed PCM digital audio.
• Supported sampling rates: 44.1 kHz, 48 kHz, 64 kHz,
88.2 kHz, 96 kHz, 176.4 kHz, 192 kHz
• Quantization bit: 8 bit, 16 bit, 24 bit
AAC (.aac/.m4a/.mp4/.3gp/.3g2/.AAC/.M4A/.MP4/.3GP/.3G2):
• Supported formats: MPEG-2/MPEG-4 Audio
• Supported sampling rates: 44.1 kHz, 48 kHz, 64 kHz, 88.2 kHz, 96 kHz
• Supported bitrates: Between 8 kbps and 320 kbps and VBR.
FLAC (.flac/.FLAC):
• Supported sampling rates: 44.1 kHz, 48 kHz, 64 kHz, 88.2 kHz, 96 kHz, 176.4 kHz, 192 kHz
• Quantization bit: 8 bit, 16 bit, 24 bit
Apple Lossless (.m4a/.mp4/.M4A/.MP4):
• Supported sampling rates: 44.1 kHz, 48 kHz, 64 kHz, 88.2 kHz, 96 kHz, 176.4 kHz, 192 kHz
• Quantization bit: 16 bit, 24 bit
DSD (.dsf/.dff/.DSF/.DFF):
• Supported formats: DSF/DSDIFF
• Supported sampling rates: 2.8 MHz, 5.6 MHz
Dolby TrueHD (.vr/.mlp/.VR/.MLP):
• Supported sampling rates: 44.1 kHz, 48 kHz, 64 kHz,
88.2 kHz, 96 kHz, 176.4 kHz, 192 kHz
- Variable bit-rate (VBR) files are supported. However, playback times may not be displayed correctly.
- This unit supports the gapless playback of the USB storage device in the following conditions. When playing WAV, FLAC and Apple Lossless, and the same format, sampling frequency, channels and quantization bit rate are played continuously
Before Start > Part Names > Install > Setup > Playback
Supplementary information | Firmware Update | Others
BLUETOOTH® Playback
Pairing

Playing Back

Pairing
- When you press the button on the remote controller, "Now Pairing..." is displayed on the sound system controller's display, and the pairing mode is enabled.
Now Pairing...
- Enable (turn on) the BLUETOOTH function of the BLUETOOTH enabled device, then select this unit from amongst the devices displayed. If a password is requested, enter "0000".
- To connect another BLUETOOTH enabled device, press and hold the button until "Now Pairing..." is displayed, then perform step 2 above. This unit can store the data of up to eight paired devices.
- The coverage area is 15 meters (48 feet). Note that connection is not always guaranteed with all BLUETOOTH enabled devices.
Playing Back
- When the unit is on, perform the connection procedure on the BLUETOOTH enabled device.
- The input selector on this unit automatically switches to "BT AUDIO".
- Play the music files. Increase the volume of the BLUETOOTH enabled device to an appropriate level.
- Due to the characteristics of BLUETOOTH wireless technology, the sound produced on this unit may slightly be behind the sound played on the BLUETOOTH enabled device.

Before Start > Part Names > Install > Setup > Playback
Supplementary information | Firmware Update | Others
Listening to the FM Radio


Tuning into a Radio Station
Tuning Automatically
-
Press TUNER on the remote controller.
-
Press MODE (e) on the remote controller so that
"TunMode: Auto" appears on the display.
- When you press the cursor ♦ / ♦ buttons (a) on the remote controller, automatic tuning starts, and searching stops when a station is found. When tuned into a radio station, the "TUNED" indicator on the display lights. When tuned into a stereo FM station, the "FM STEREO" indicator lights.
- No sound is output while the "TUNED" indicator is off.
When FM broadcasts reception is poor: Radio waves may be weak depending on the building structure and environmental conditions. In that case, perform the procedure as explained below in "Tuning Manually" to manually select the desired station.
Tuning Manually
- Press TUNER on the remote controller.
- Press MODE (e) on the remote controller so that "TunMode: Manual" appears on the display.
- While pressing the cursor ♦ / ↓ buttons (a) on the remote controller, select the desired radio station.
- The frequency changes by 1 step each time you press the button. The frequency changes continuously if the button is held down and stops when the button is released. Tune by looking at the display.
To return to the auto tuning mode: Press MODE (e) on the remote controller again so that "TunMode: Auto" appears on the display. The unit tunes automatically into a radio station.
Presetting a Radio Station
It allows you to register up to 40 of your favorite radio stations. Registering radio stations in advance allows you to tune into your radio station of choice directly.
Registration Procedure
- Tune into the radio station you want to register.
- Press + Fav (d) on the remote controller so that the preset number on the display flashes.
- While the preset number is flashing (about 8 seconds), repeatedly press the cursor ← / → buttons (a) on the remote controller to select a number between 1 and 40.
- Press + Fav (d) on the remote controller again to register the station. When registered, the preset number stops flashing.
Selecting a Preset Radio Station
- Press TUNER on the remote controller.
- Press the cursor ← / → buttons (a) on the remote controller to select a preset number.
Deleting a Preset Radio Station
- Press TUNER on the remote controller.
- Press the cursor ← / → buttons (a) on the remote controller to select the preset number to delete.
- After pressing +Fav (d) on the remote controller, press CLEAR (c) while the preset number is flashing to delete the preset number.
- When deleted, the number on the display goes off.
> Before Start > Part Names > Install > Setup > Playback
Supplementary information | Firmware Update | Others

Using RDS
RDS stands for Radio Data System and is a method of transmitting data in FM radio signals. In regions using RDS, the radio station name is displayed when you tune into a radio station broadcasting program information. When you press (b) on the remote controller in this state, you can use the following functions.
Displaying text information (Radio Text)
- While the name of the station is being displayed on the display, press (b) on the remote controller once. Radio Text (RT) broadcast by the station is displayed scrolling across the display. "No Text Data" is displayed when no text information is available.
- Unusual characters may be displayed when the unit receives unsupported characters. However, this is not a malfunction. Also, if the signal from a station is weak, information may not be displayed.
Search for stations by Program Type
- While the name of the station is being displayed on the display, press (b) on the remote controller twice.
- Press the cursor / buttons (a) on the remote controller to select the Program Type you want to find, then press ENTER (a) to start the search. The Program Types displayed are as follows:
None
News (News reports)
Affairs (Current affairs)
Info (Information)
Sport
Educate (Education)
Drama
Culture
Science (Science and technology)
Varied
Pop M (Pop music)
Rock M (Rock music)
Easy M (Middle of the road music)
Light M (Light classics)
Classics (Serious classics)
Other M (Other music)
Weather
Finance
Children (Children's programmes)
Social (Social affairs)
Religion
Phone In
Travel
Leisure
Jazz (Jazz music)
Country (Country music)
Nation M (National music)
Oldies (Oldies music)
Folk M (Folk music)
Document (Documentary)
- The information displayed may sometimes not match the content being broadcast by the station.
- When a station is found, the station flashes on the display. Press ENTER (a) while this is happening to start receiving that station. If you don't press ENTER (a), the unit continues to search for another station.
- If no stations are found, the message "Not Found" is displayed.
- Unusual characters may be displayed when the unit receives unsupported characters. However, this is not a malfunction. Also, if the signal from a station is weak, information may not be displayed.
Before Start > Part Names > Install > Setup > Playback
Supplementary information | Firmware Update | Others
Listening Modes

Selecting Listening Modes
You can change the listening mode during play by pressing repeatedly "AUTO/DIRECT", "SURR", or "STEREO".
AUTO/DIRECT button (b)
Press repeatedly and the listening modes suited to the input signal are switched between "Auto Surround" and "Pure Direct". After selecting one of them, "Auto Surround" or "Pure Direct" is displayed on the display of the sound system controller, then the most suitable listening mode for the audio format is selected automatically (Dolby Digital for multi-channel input signals, Stereo for 2 channel input signals, etc.) and an indicator such as "Dolby D" is displayed on the display.

flowchart
graph TD
    A["AutoSurround"] --> B["Pure Direct"]
    B --> C["The display changes automatically."]
    C --> D["Dolby D"]
The "Pure Direct" mode shuts down processes that affect sound quality, so you get a more faithful reproduction of the original sound.
SURR button (c)
By pressing repeatedly you can select the audio format of the signals being input and switch between a variety of listening modes. Select the mode that suits your preference. The selected listening mode is displayed on the display.

STEREO button (d)
You can select the "Stereo" mode to playback only from the front speakers and subwoofer.
> Before Start > Part Names > Install > Setup > Playback

Supplementary information | Firmware Update | Others
The listening mode last selected for the source is remembered for each of the AUTO/DIRECT, SURR, and STEREO buttons. If content you play is not supported by the listening mode you selected last, the listening mode that is standard for that content is selected automatically. Press (a) repeatedly to switch the display of the sound system controller in order of:
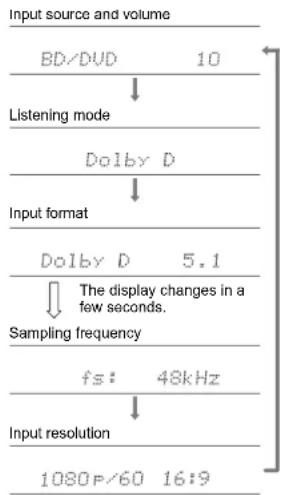
flowchart
graph TD
    A["Input source and volume"] --> B["BD/DVD 10"]
    B --> C["Listening mode"]
    C --> D["Dolby D"]
    D --> E["Input format"]
    E --> F["Dolby D 5.1"]
    F --> G["Sampling frequency"]
    G --> H["fs: 48kHz"]
    H --> I["Input resolution"]
    I --> J["1080P/60 16:9"]
Listening Mode Effects
In alphabetical order
Action
Mode suitable for movies with a lot of action scenes.
AdvancedGame
Mode suitable for game content.
Classical
Suitable for classical or operatic music, this mode emphasizes the surround channels in order to widen the stereo image, and simulates the natural reverberation of a large hall.
Dolby D (Dolby Digital)
This mode faithfully reproduces the sound design recorded in the Dolby Digital audio format.
Dolby Digital is a multi-channel digital format developed by Dolby Laboratories, Inc. widely adopted for use in movie production. It is also a standard audio format on DVD-Video and Blu-ray Discs. It is possible to record a maximum of 5.1 channels on a DVD-Video or Blu-ray Disc; two front channels, a center channel, two surround channels, and the LFE channel dedicated to the bass region (sound elements for the subwoofer).
- To enable transfer of this audio format, connect via digital cable and set audio output on the player to bitstream output.
Dolby D + (Dolby Digital Plus)
This mode faithfully reproduces the sound design recorded in the Dolby Digital Plus audio format.
The Dolby Digital Plus format is a revision based on Dolby Digital, increasing the number of channels and endeavoring to improve sound quality by giving more flexibility in data bit rates. Dolby Digital Plus is used as an optional audio format on Blu-ray Discs, based on 5.1ch, but with additional channels such as the surround back channel added for a maximum of 7.1ch.
• To enable transfer of this audio format, connect via HDMI
cable and set audio output on the player to bitstream output.
Dolby PL II (Dolby Pro Logic II)
If Wireless Satellite Speakers (sold separately) are connected to the surround channels, this listening mode allows you to expand 2 ch input signals to 4.1 ch for playback, including surround channels. Broadening the sound field provides you with a seamless sound with more depth and realism. Along with CD and movie sources, games can also benefit from the vivid sound localization. Choose from a mode ideal for movies (Movie), a mode ideal for music (Music), and a mode ideal for gaming (Game).
Dolby TrueHD
This mode faithfully reproduces the sound design recorded in the Dolby TrueHD audio format.
The Dolby TrueHD audio format is a reversible format expanded based on the lossless compression technology referred to as MLP, and it makes it possible to faithfully reproduce the master audio recorded in the studio. Dolby TrueHD is used as an optional audio format on Blu-ray Discs, based on 5.1ch, but with additional channels such as the surround back channel added for a maximum of 7.1ch. 7.1ch is recorded at 96 kHz/24 bit, and 5.1ch is recorded at 192 kHz/24 bit.
- To enable transfer of this audio format, connect via HDMI cable and set audio output on the player to bitstream output.
Drama
Suitable for TV shows produced in a TV studio, this mode enhances the surround effects to the entire sound to give clarity to voices and create a realistic acoustic image.
DSD
Mode suitable for playing sources recorded in DSD.
- This unit supports DSD signals input through HDMI IN. However, depending on the connected player, better sound is possible when output from the PCM output of the player.
• This listening mode cannot be selected if the output
> Before Start > Part Names > Install > Setup > Playback

Supplementary information | Firmware Update | Others
setting on your Blu-ray Disc/DVD player is not set to DSD.
DTS
This mode faithfully reproduces the sound design recorded in the DTS audio format.
The DTS audio format is a multi-channel digital format developed by DTS, Inc. This format is an optional audio format on DVD-Video and a standard on Blu-ray Discs. It enables recording of 5.1 channels; two front channels, a center channel, two surround channels, and the LFE channel dedicated to the bass region (sound elements for the subwoofer). The content is recorded with a rich volume of data, with maximum sampling rate of 48 kHz at a resolution of 24 bits and a bit rate of 1.5 Mbps.
- To enable transfer of this audio format, connect via digital cable and set audio output on the player to bitstream output.
DTS 96/24
This mode faithfully reproduces the sound design recorded in the DTS 96/24 audio format.
The DTS 96/24 format is an optional audio format on DVD-Video and Blu-ray Discs. It enables recording of 5.1 channels; two front channels, a center channel, two surround channels, and the LFE channel dedicated to the bass region (sound elements for the subwoofer). Detailed reproduction is achieved by recording the content at a sampling rate of 96 kHz at a resolution of 24 bits.
- To enable transfer of this audio format, connect via digital cable and set audio output on the player to bitstream output.
DTS Express
This mode faithfully reproduces the sound design recorded in the DTS Express audio format.
DTS Express is used as an optional audio format on Blu-ray Discs, based on 5.1ch, but with channels such as the surround back channel added for a maximum of 7.1ch. It also supports low bit rates.
- To enable transfer of this audio format, connect via HDMI cable and set audio output on the player to bitstream
output.
DTS-HD HR (DTS-HD High Resolution Audio)
This mode faithfully reproduces the sound design recorded in the DTS-HD High Resolution Audio audio format. DTS-HD High Resolution Audio is used as an optional audio format on Blu-ray Discs, based on 5.1ch, but with additional channels such as the surround back channel added for a maximum of 7.1ch. It can be recorded at a sampling rate of 96kHz with a resolution of 24 bits.
- To enable transfer of this audio format, connect via HDMI cable and set audio output on the player to bitstream output.
DTS-HD MSTR (DTS-HD Master Audio)
This mode faithfully reproduces the sound design recorded in the DTS-HD Master Audio audio format.
DTS-HD Master Audio is used as an optional audio format on Blu-ray Discs, based on 5.1ch, but with additional channels such as the surround back channel added for a maximum of 7.1ch, recorded using lossless audio reproduction technology. 96 kHz/24 bit is supported with 7.1ch, and 192 kHz/24 bit is supported with 5.1ch.
- To enable transfer of this audio format, connect via HDMI cable and set audio output on the player to bitstream output.
DTS Neo:6
If Wireless Satellite Speakers (sold separately) are connected to the surround channels, this listening mode allows you to expand 2 ch input signals to 4.1 ch for playback, including surround channels. It offers full-bandwidth on all channels, with great independence between the channels. There are two variants for this mode: Neo:6 Cinema which is ideal for movies and Neo:6 Music which is ideal for music.
Ent.Show (Entertainment Show)
Suitable for rock or pop music, Listening to music in this mode creates a lively sound field with a powerful acoustic image, like being at a club or rock concert.
Ext.Mono (Extended Mono)
In this mode, all speakers output the same sound in mono, so the sound you hear is the same regardless of where you are within the listening room.
Ext.Stereo (Extended Stereo)
Ideal for background music, this mode fills the entire listening area with stereo sound from the front, surround, and surround back speakers.
F.S.Surround (Front Stage Surround Advance)
In this mode, you can enjoy a virtual playback of multichannel surround sound even with only two or three speakers. This works by controlling how sounds reach the listener's left and right ears.
Mono
Use this mode when watching an old movie with a mono soundtrack, or use it to separately reproduce soundtracks in two different languages recorded in the left and right channels of some movies. It is also suitable for DVDs or other sources containing multiplexed audio.
Multich PCM (Multichannel PCM)
Mode suitable for playing sources recorded in multichannel PCM.
Rock/Pop
Mode suitable for rock content.
Sports
Mode suitable for sport content.
Stereo
In this mode, sound is output from the front left and right speakers and subwoofer.
Unplugged
Suitable for acoustic instruments, vocals and jazz, this mode emphasizes the front stereo image, giving the impression of being right in front of the stage.
Before Start > Part Names > Install > Setup > Playback
Supplementary information | Firmware Update | Others
Selectable listening modes
You can select a variety of listening modes to suit the audio format of the signal being input.
• The Stereo mode can be selected with any audio format.
Selectable listening modes
| Input Format Listening Mode | |
| Analog Stereo | |
| Mono | |
| PL II Movie | |
| PL II Music | |
| PL II Game | |
| Neo:6 Cinema | |
| Neo:6 Music | |
| Classical | |
| Unplugged | |
| Ent.Show | |
| Drama | |
| AdvancedGame | |
| Action | |
| Rock/Pop | |
| Sports | |
| Ext.Stereo | |
| Ext.Mono | |
| F.S.Surround | |
| * 1: You will need Wireless Satellite Speakers (sold separately). | |
> Before Start > Part Names > Install > Setup > Playback
Supplementary information | Firmware Update | Others
| Input Format Listening Mode | |
| PCMMusic files (except DSD/Dolby TrueHD) | Stereo |
| Mono | |
| PL II Movie1 | |
| PL II Music1 | |
| PL II Game1 | |
| Neo:6 Cinema+1 | |
| Neo:6 Music+1 | |
| Classical+1 | |
| Unplugged+1 | |
| Ent.Show+1 | |
| Drama+1 | |
| AdvancedGame+1 | |
| Action+1 | |
| Rock/Pop+1 | |
| Sports+1 | |
| Ext.Stereo+1 | |
| Ext.Mono+1 | |
| F.S.Surround | |
| * 1: You will need Wireless Satellite Speakers (sold separately). | |
| Input Format Listening Mode | |
| Multich PCM Stereo | |
| Multich PCM * 1 | |
| Classical * 1 | |
| Unplugged * 1 | |
| Ent.Show * 1 | |
| Drama * 1 | |
| AdvancedGame * 1 | |
| Action * 1 | |
| Rock/Pop * 1 | |
| Sports * 1 | |
| Ext.Stereo * 1 | |
| Ext.Mono * 1 | |
| F.S.Surround | |
| * 1: You will need Wireless Satellite Speakers (sold separately). | |
> Before Start > Part Names > Install > Setup > Playback
Supplementary information | Firmware Update | Others
| Input Format Listening Mode | |
| DSD Stereo | |
| DSD* 1 2 | |
| PL II Movie 3 | |
| PL II Music 3 | |
| PL II Game 3 | |
| Neo:6 Cinema * 3 | |
| Neo:6 Music 4 3 | |
| Classical * 2 | |
| Unplugged * 2 | |
| Ent.Show * 2 | |
| Drama * 2 | |
| AdvancedGame * 2 | |
| Action * 2 | |
| Rock/Pop + 2 | |
| Sports * 2 | |
| Ext.Stereo * 2 | |
| Ext.Mono * 2 | |
| F.S.Surround | |
| * 1: Cannot be selected when the input format is monaural or 2 ch.* 2: You will need Wireless Satellite Speakers (sold separately).* 3: Can only be selected when the input format is 2 ch and Wireless Satellite Speakers (sold separately) are installed. | |
| Input Format Listening Mode | |
| Dolby D Stereo | |
| Dolby D + + + + + + + + + + + + + + + - + + + + + + + + + + + + + + | |
| PL II Movie 3 | |
| PL II Music 3 | |
| PL II Game 3 | |
| Neo:6 Cinema + + + + + + + + + + + + + + 2 | |
| Neo:6 Music + + + + + + + + + + + + + + $ | |
| Classical^{+}^{+}^{+}^{+}^{+}^{+}^{+}^{+}^{+}^{+}^{+}^{+}^{+}^{+}+^{+}^{+}^{+}^{+}^{+}^{+}^{+}^{+}^{+}^{+}^{+}^{+}^{+}^{+}^{+}^{+}^{+}^{+}^{+}^{+}^{+}^{+}^{+}^{+}^{+}^{+}^{+}^{+}^{\text{ }} | |
| Ent.Show^{+}^{+}^{+}^{+}^{+}^{+}^{+}^{+}^{+}^{+}^{+}^{+}^{+}^{+}~^{+}^{+}^{+}^{+}^{+}^{+}^{+}^{+}^{+}^{+}^{+}^{+}^{+}^{+}^{+}\text{ }^{+}^{+}^{+}^{+}^{+}^{+}^{+}^{+}^{+}^{+}^{+}^{+}^{+}^{+}^{ + }^{+}^{+}^{+}^{+}^{+}^{+}^{+}^{+}^{+}^{+}^{+}^{+}^{+}^{+}( ) | |
| Drama^{+}^{+}^{+}^{+}^{+}^{+}^{+}^{+}^{+}^{+}^{+}^{+}^{+}^{+}(^{+} | |
| AdvancedGame^{+}^{+}^{+}^{+}^{+}^{+}^{+}^{+}^{+}^{+}^{+}^{+}^{+}^{+}{}^{+}^{+}^{+}^{+}^{+}^{+}^{+}^{+}^{+}^{+}^{+}^{+}^{+}^{+}^{+-} | |
| Action^{+}^{+}^{+}^{+}^{+}^{+}^{+}^{+}^{+}^{+}^{+}^{+}^{+}^{+}F.S.Surround | |
| Rock/Pop^{+}^{+}^{+}^{+}^{+}^{+}^{+}^{+}^{+}^{+}^{+}^{+}^{+}^{+}1 :Cannot be selected when the input format is 2 ch.^{*}2: You will need Wireless Satellite Speakers (sold separately).^{*}$ 3: Can only be selected when the input format is 2 ch and Wireless Satellite Speakers (sold separately) are installed. |
> Before Start > Part Names > Install > Setup > Playback
Supplementary information | Firmware Update | Others
| Input Format Listening Mode | |
| Dolby D+ Stereo | |
| Dolby D+ 1 2 3 | |
| PL II Movie 4 | |
| PL II Music 4 | |
| PL II Game 4 | |
| Neo:6 Cinema * 4 | |
| Neo:6 Music + 4 | |
| Classical * 2 | |
| Unplugged * 2 | |
| Ent.Show * 2 | |
| Drama + 2 | |
| AdvancedGame * 2 | |
| Action * 2 | |
| Rock/Pop + 2 | |
| Sports * 2 | |
| Ext.Stereo * 2 | |
| Ext.Mono * 2 | |
| F.S.Surround |
* 1: Cannot be selected when the input format is 2 ch.
* 2: You will need Wireless Satellite Speakers (sold separately).
* 3: Dolby D+ cannot be selected if the input source is Blu-ray Disc. You can select the Dolby D listening mode instead.
* 4: Can only be selected when the Input format is 2 ch and Wireless Satellite Speakers (sold separately) are installed.
| Input Format Listening Mode | |
| Dolby TrueHD Stereo | |
| Dolby TrueHD * 14 * 2 | |
| PL II Movie3 | |
| PL II Music3 | |
| PL II Game3 | |
| Neo:6 Cinema * 1 | |
| Neo:6 Music * 3 | |
| Classical * 2 | |
| Unplugged * 2 | |
| Ent.Show * 2 | |
| Drama * 2 | |
| AdvancedGame * 2 | |
| Action * 2 | |
| Rock/Pop * 2 | |
| Sports * 2 | |
| Ext.Stereo * 2 | |
| Ext.Mono * 2 | |
| F.S.Surround |
* 1: Cannot be selected when the input format is 2 ch.
* 2: You will need Wireless Satellite Speakers (sold separately).
* 3: Can only be selected when the input format is 2 ch and Wireless Satellite Speakers (sold separately) are installed.
> Before Start > Part Names > Install > Setup > Playback
Supplementary information | Firmware Update | Others
| Input Format Listening Mode | |
| DTS Stereo | |
| DTS * 1 * 2 | |
| PL II Movie3 | |
| PL II Music3 | |
| PL II Game3 | |
| Neo:6 Cinema * 3 | |
| Neo:6 Music * 3 | |
| Classical * 2 | |
| Unplugged * 2 | |
| Ent.Show * 2 | |
| Drama * 2 | |
| AdvancedGame * 2 | |
| Action * 2 | |
| Rock/Pop * 2 | |
| Sports * 2 | |
| Ext.Stereo * 2 | |
| Ext.Mono * 2 | |
| F.S.Surround | |
| * 1: Cannot be selected when the input format is 2 ch.* 2: You will need Wireless Satellite Speakers (sold separately).* 3: Can only be selected when the input format is 2 ch and Wireless Satellite Speakers (sold separately) are installed. | |
| Input Format Listening Mode | |
| DTS 96/24 Stereo | |
| DTS 96/24 + 1 + 2 | |
| PL II Movie3 | |
| PL II Music3 | |
| PL II Game3 | |
| Neo:6 Cinema * 1 | |
| Neo:6 Music * 3 | |
| Classical * 2 | |
| Unplugged + 2 | |
| Ent.Show * 2 | |
| Drama * 2 | |
| AdvancedGame * 2 | |
| Action * 2 | |
| Rock/Pop * 2 | |
| Sports * 2 | |
| Ext.Stereo * 2 | |
| Ext.Mono * 2 | |
| F.S.Surround | |
| * 1: Cannot be selected when the input format is 2 ch.* 2: You will need Wireless Satellite Speakers (sold separately).* 3: Can only be selected when the input format is 2 ch and Wireless Satellite Speakers (sold separately) are installed. | |
> Before Start > Part Names > Install > Setup > Playback
Supplementary information | Firmware Update | Others
| Input Format Listening Mode | |
| DTS Express Stereo | |
| DTS Express 3 1:3 2 | |
| PL II Movie 3 | |
| PL II Music 3 | |
| PL II Game 3 | |
| Neo:6 Cinema * 3 | |
| Neo:6 Music * 3 | |
| Classical * 2 | |
| Unplugged * 2 | |
| Ent.Show * 2 | |
| Drama * 2 | |
| AdvancedGame * 2 | |
| Action * 2 | |
| Rock/Pop * 2 | |
| Sports * 2 | |
| Ext.Stereo * 2 | |
| Ext.Mono * 2 | |
| F.S.Surround |
* 1: Cannot be selected when the input format is 2 ch.
* 2: You will need Wireless Satellite Speakers (sold separately).
* 3: Can only be selected when the input format is 2 ch and Wireless Satellite Speakers (sold separately) are installed.
| Input Format Listening Mode | |
| DTS-HD HR Stereo | |
| DTS-HD HR * 1 * 2 | |
| PL II Movie * | |
| PL II Music * | |
| PL II Game * | |
| Neo:6 Cinema * 1 | |
| Neo:6 Music * 3 | |
| Classical * 2 | |
| Unplugged + 2 | |
| Ent.Show * 2 | |
| Drama * 2 | |
| AdvancedGame * 2 | |
| Action * 2 | |
| Rock/Pop * 2 | |
| Sports * 2 | |
| Ext.Stereo * 2 | |
| Ext.Mono * 2 | |
| F.S.Surround |
* 1: Cannot be selected when the input format is 2 ch.
* 2: You will need Wireless Satellite Speakers (sold separately).
* 3: Can only be selected when the input format is 2 ch and Wireless Satellite Speakers (sold separately) are installed.
> Before Start > Part Names > Install > Setup > Playback
Supplementary information | Firmware Update | Others
| Input Format Listening Mode | |
| DTS-HD MSTR Stereo | |
| DTS-HD MSTR × 1 × 2 | |
| PL II Movie3 | |
| PL II Music3 | |
| PL II Game3 | |
| Neo:6 Cinema × 3 | |
| Neo:6 Music × 3 | |
| Classical × 2 | |
| Unplugged × 2 | |
| Ent.Show × 2 | |
| Drama × 2 | |
| AdvancedGame × 2 | |
| Action × 2 | |
| Rock/Pop × 2 | |
| Sports × 2 | |
| Ext.Stereo × 2 | |
| Ext.Mono × 2 | |
| F.S.Surround |
* 1: Cannot be selected when the input format is 2 ch.
* 2: You will need Wireless Satellite Speakers (sold separately).
* 3: Can only be selected when the input format is 2 ch and Wireless Satellite Speakers (sold separately) are installed.

Before Start > Part Names > Install > Setup > Playback
Supplementary information | Firmware Update | Others

Supplementary information for player functions
Due to firmware (the software for the system) updates after you make your purchase or firmware changes during production of the product, there may be additions or changes to the features available compared to what is in the instruction manual.
For information about player functions that have been added or changed, see the following references.
Supplementary information for player functions >>> Click here <<<

Before Start > Part Names > Install > Setup > Playback
Supplementary information | Firmware Update | Others

Update Functions
This unit has functionality to update the firmware of the sound system controller (the system software) over a network or by the USB port. This enables us to make improvements to a variety of operations and to add features. (→P47 for details on how to update)

> Before Start > Part Names > Install > Setup > Playback
Supplementary information | Firmware Update | Others

How to update firmware
This unit has functionality to update the firmware of the sound system controller (the system software) over a network or by the USB port. This enables us to make improvements to a variety of operations and to add features. (For details about the updated play operations, see P46)
The update may take about 30 minutes to complete for either method: via network or via USB. Furthermore, existing settings are guaranteed regardless of the method used for update.
Note that when this unit is connected to a network, you may see notifications about firmware updates on the display. To execute updating, select "Update" with the cursor buttons of the remote controller and press ENTER. "Completed!" is displayed when the update is complete.
- For the latest information on updates, visit our company's website. There is no need to update the firmware on this unit if there is no update available.
- During an update, do not
- Disconnect and reconnect any cable or USB storage device, or perform any operation on the component such as turn off its power
- Accessing this unit from a PC or smartphone using an application
Disclaimer: The program and accompanying online documentation are furnished to you for use at your own risk. We will not be liable and you will have no remedy for damages for any claim of any kind whatsoever concerning your use of the program or the accompanying online documentation, regardless of legal theory, and whether arising in tort or contract.
In no event will we be liable to you or any third party for any special, indirect, incidental, or consequential damages of any kind, including, but not limited to, compensation, reimbursement or damages on account of the loss of present or prospective profits, loss of data, or for any other reason whatsoever.
Updating the Firmware via Network
- Check that the unit is turned on, and the connection to the Internet is secured.
- Turn off the controller component (PC etc.) connected to the network.
- Stop any playing Internet radio, USB storage device, or server content.
- When "Hardware" - "HDMI" - "HDMI CEC" in the System Setup menu is set to "On", set it to "Off".
- The description may differ from the on-screen display but that will not change the way to operate or the function.
- Switch the input on the TV to that assigned to the unit.
- Press on the remote controller.
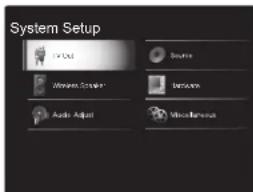
- Select "Miscellaneous" - "Firmware Update" - "Update via NET" with the cursors in order, then press ENTER.

- If "Firmware Update" is grayed out and cannot be selected, wait for a while until it starts up.
- You will not be able to select "Update via NET" if there is nothing to update.
- Press ENTER with "Update" selected to start update.
- During the update, the TV screen may go black depending on the updated program. In that case, check the progress on the display of the sound system controller. The TV screen will remain black until the update is complete and the power is turned on again.
- "Completed!" is displayed when the update is complete.
- Press ⏻/l on the sound system controller to turn the unit into standby mode. The process is completed and your firmware is updated to the latest version.
- Do not use ⏻ on the remote controller.
> Before Start > Part Names > Install > Setup > Playback
Supplementary information | Firmware Update | Others

If an error message is displayed: When an error occurs,
"* - * * Error!" is displayed on the display of the sound system controller. (" * " represents an alphanumeric character.) Check the following:
- * -01, * -10: Ethernet cable not found. Connect the Ethernet cable properly.
- *-02, *-03, *-04, *-05, *-06, *-11, *-13, *-14, *-16, *-17, *-18, *-20, *-21: Internet connection error. Check the following:
– The router is turned on.
- This unit and the router are connected via the network. Try to disconnect and then connect again the power to the unit and router. This may solve the problem. If you are still unable to connect to the Internet, the DNS server or proxy server may be temporarily down. Check the service status with your ISP provider.
- Others: Disconnect then reconnect the AC power cord, then repeat from the beginning.
Updating via USB
• Prepare a 128 MB or larger USB storage device. FAT16 or FAT32 file system format.
– Media inserted in a USB card reader may not be used for this function.
– USB storage devices with security function are not supported.
- USB hubs and USB devices with hub function are not supported. Do not connect these devices to the unit.
- Delete any data stored on the USB storage device.
- Turn off the controller component (PC etc.) connected to the network.
- Stop any playing Internet radio, USB storage device, or server content.
- When "Hardware" - "HDMI" - "HDMI CEC" in the System Setup menu is set to "On", set it to "Off".
- Some USB storage devices may take long to load, may not be loaded correctly, or may not be correctly fed depending on the device or their content.
- We will not be liable whatsoever for any loss or damage of data, or storage failure arising from the use of the USB storage device with this unit. Thank you for your understanding.
- The description may differ from the on-screen display but that will not change the way to operate or the function.
1. Connect the USB storage device to your PC.
2. Download the firmware file from our company's website to your PC and unzip.
Firmware files are named in the following way:
PIOFST ****_*************_
*** .zip
Unzip the file on your PC. The number of unzipped files and folders varies depending on the model.
- Copy all unzipped files and folders to the root folder of the USB storage device.
• Make sure to copy the unzipped files. - Connect the USB storage device to the USB port of the sound system controller.
- If you connect a USB hard disk drive to the USB port of the unit, we recommend that you use its AC adapter to
power it.
- If the USB storage device has been partitioned, each section will be treated as an independent device.
- Switch the input on the TV to that assigned to the unit.
- Press on the remote controller.

- Select "Miscellaneous" - "Firmware Update" - "Update via USB" with the cursors in order, then press ENTER.
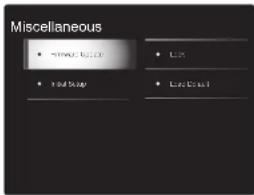
- If "Firmware Update" is grayed out and cannot be selected, wait for a while until it starts up.
- You will not be able to select "Update via USB" if there is nothing to update.
- Press ENTER with "Update" selected to start update.
- During the update, the TV screen may go black depending on the updated program. In that case, check the progress on the display of the sound system controller. The TV screen will remain black until the update is complete and the power is turned on again.
- During the update, do not turn off, or disconnect then reconnect the USB storage device.
> Before Start > Part Names > Install > Setup > Playback
Supplementary information | Firmware Update | Others

- "Completed!" is displayed when the update is complete.
- Remove the USB storage device from the sound system controller.
- Press ⬇/l on the sound system controller to turn the unit into standby mode. The process is completed and your firmware is updated to the latest version.
- Do not use ⏻ on the remote controller.
If an error message is displayed: When an error occurs,
"* - * * Error!" is displayed on the display of the sound system controller. (" * " represents an alphanumeric character.) Check the following:
- * -01, * -10: USB storage device not found. Check whether the USB storage device or USB cable is correctly inserted to the USB port of the sound system controller.
Connect the USB storage device to an external power source if it has its own power supply.
- * -05, * -13, * -20, * -21: The firmware file is not present in the root folder of the USB storage device, or the firmware file is for another model. Retry from the download of the firmware file.
- Others: Disconnect then reconnect the AC power cord, then repeat from the beginning.

Troubleshooting
Before starting the procedure
Problems may be solved by simply turning the power on/off or disconnecting/connecting the power cord, which is easier than working on the connection, setting and operating procedure. Try the simple measures on both the unit and the connected device. If the problem is that the video or audio is not output or the HDMI linked operation does not work, disconnecting/connecting the HDMI cable may solve it. When reconnecting, be careful not to wind the HDMI cable since if wound the HDMI cable may not fit well. After reconnecting, turn off and on the unit and the connected device.
- This unit contains a microPC for signal processing and control functions. In very rare situations, severe interference, noise from an external source, or static electricity may cause it to lockup. In the unlikely event that this happens, unplug the power cord from the wall outlet, wait at least 5 seconds, and then plug it back in.
- We are not responsible for reparations for damages (such as CD rental fees) due to unsuccessful recordings caused by the unit's malfunction. Before you record important data, make sure that the material will be recorded correctly.
If operation becomes unstable
Try restarting the unit
The issue may be fixed by restarting this unit. After switching this unit to standby, press and hold ⏻/l on the sound system controller for 5 or more seconds to restart the unit. (The settings in the unit are maintained.)
Resetting the unit (this resets the unit settings to the default)
If restarting the unit doesn't fix the problem, resetting the
unit to the status at the time of shipment may solve the problem. Your settings will also be initialized when you reset, so note down your settings before doing the following.
- Press on the remote controller, select "Miscellaneous" - "Load Default" in the System Setup screen and press ENTER.
- Select "Yes", and then press ENTER.
- The unit switches to standby and the settings are reset.
Power
Cannot turn on the unit
- Make sure that the power cord is properly plugged into the wall outlet.
- Unplug the power cord from the wall outlet, wait 5 seconds or more, then plug it in again.
The unit turns off unexpectedly
- The unit automatically switches to standby when the "Hardware" - "Power Management" - "Auto Standby" setting in the System Setup menu functions.
- The protective circuit function may have been activated because the temperature of the unit rose abnormally. If this happens, then the power will continue to turn off after you have turned the unit on again. Make sure the unit has plenty of space for ventilation around it, wait for the unit to cool down sufficiently, and then try turning it on again.
WARNING: If smoke, smell or abnormal noise is produced by the unit, unplug the power cord from the wall outlet immediately and contact the dealer or our company's support.
Audio
- Confirm that the connection between the output jack on the device and the input jack on this unit is correct.
- Make sure that none of the connecting cables are bent, twisted, or damaged.
- If the MUTING indicator on the display flashes, press on the remote controller to cancel muting.
- When "Source" - "Fixed PCM" - "Fixed PCM" in the System Setup menu is set to "On", no sound is played when signals other than PCM are input. Change the setting to Off.
Check the following if the above does not fix the problem:
It takes time for sound to start
- The default settings mean that sound will not be output for about 25 seconds after you turn this unit on so that the connection can be established with the wireless speakers. To reduce the amount of time it takes, in the System Setup menu, set "Hardware" - "Power Management" - "Wireless Speaker Standby" to "On". Power consumption in the standby mode increases when you enable Wireless Speaker Standby.
There is no sound from the TV
- Change the input selector on this unit to the position of the terminal to which the TV is connected.
- If the TV doesn't support the ARC function, along with connection by HDMI, connect the TV and this unit using a digital optical cable or analog audio cable.
- If you have connected a TV with a HDMI cable, go to the System Setup menu (→P14) and set "Hardware" - "HDMI" - "Audio Return Channel" (→P18) to "Auto".
> Before Start > Part Names > Install > Setup > Playback

Supplementary information | Firmware Update | Others
- If you have connected a TV with either a digital optical cable or an analog audio cable, and if System Setup menu (→P14) "Hardware" - "HDMI" - "Audio Return Channel" (→P18) is set to "Off", you can listen to the audio from the TV through the "TV" input.
No sound from a connected player
- Change the input selector on this unit to the position of the terminal to which the player is connected.
- Check the digital audio output setting on the connected component. On some game consoles, such as those that support DVD, the default setting is OFF.
- With some DVD-Video discs, you need to select an audio output format from a menu.
A speaker produces no sound
- Make sure that the speaker's power cord is properly plugged into the wall outlet.
- Check in "Wireless Speaker" - "Information" in the System Setup to see whether the speakers are paired correctly. If the connection status is displayed as "--", use "Wireless Speaker" - "Scan" in the System Setup menu to detect the speakers.
- Depending on the source and current listening mode, not much sound may be produced by the surround speakers. Select another listening mode to see if sound is output.
The subwoofer produces no sound
- When you play source material that contains no information in the LFE channel, the subwoofer produces no sound.
Noise occurs or there are interruptions
- Recommended environment: Install only one Freestyle Sound System in a single space delimited by walls. Noise or interruptions to the sound may occur if you install two or more systems in the same space. It is also recommended to use only one 5 GHz band router in the same space as this unit. Try the following if problems occur even in the environment recommended. - Move the speakers experiencing the interruptions closer to the sound system controller. If there are
obstacles between the speakers and the sound system controller, try moving them out of the way.
– Increase the distance between the wireless router and the sound system controller.
- Enable Wireless Speaker Standby. Note that power consumption in the standby mode increases when you enable this.
- When using a 5 GHz band router, either use 2.4 GHz connection or change to a wired connection by connecting with an Ethernet cable or set the channel used by the 5 GHz band to a band other than W52 (higher than 52 ch). Refer to the router's instruction manual for information on the settings.
Noise can be heard
- Using cable ties to bundle RCA cables with power cords, etc. may degrade the audio performance, so refrain from doing it.
- An audio cable may be picking up interference. Try repositioning your cables.
The beginning of audio received via HDMI cannot be heard
- Since it takes longer to identify the format of an HDMI signal than it does for other digital audio signals, audio output may not start immediately.
Sound suddenly reduces
- When the temperature inside the unit exceeds a certain temperature for extended periods, the volume may be reduced automatically to protect the circuits.
The sampling frequencies transferred wirelessly to the speakers from the sound system controller
- The sampling frequency is set to 48 kHz at the time of purchase. You can change the setting to 96 kHz, but normal operation cannot be guaranteed under all operating conditions, so leave the setting at 48 kHz under normal circumstances. If you change to 96 kHz, then depending on the operating conditions, you may notice regular interruptions to the sound or noise. To change the setting to 96 kHz, with the power of the
sound system controller on, while pressing VOLUME—, press ⏻/l. To return the setting to 48 kHz, with the power of the sound system controller on, while pressing INPUT◀, press ⏻/l.
Listening Modes
- To enjoy digital surround playback, such as Dolby Digital, the audio signals need to pass through a connection via HDMI cable or digital optical cable. Audio output should be set to bitstream output on the connected Blu-ray Disc player or other device.
- Pressi on the remote controller several times to switch the display of the sound system controller to check the input format.
Check the following if the above does not fix the problem:
Cannot select a desired listening mode
- Depending on the connecting status of the speaker, some listening modes may not be selected. (→P38)
There is no sound with Dolby TrueHD and DTS-HD Master Audio
If you cannot output formats such as Dolby TrueHD or DTS-HD Master Audio according to the format of the source, in the Blu-ray Disc player settings try setting "BD video supplementary sound" (or re-encode, secondary sound, video additional audio, etc.) to "Off". Change the listening mode for each source after changing the setting to confirm.
About DTS signals
- With media that switches suddenly from DTS to PCM, PCM playback may not start immediately. In such cases, you should stop your player for about 3 seconds and then resume playback.
- With some CD and LD players, you will not be able to playback DTS material properly even though your player is connected to a digital input on the unit. This is usually because the DTS bitstream has been processed (e.g.,
> Before Start > Part Names > Install > Setup > Playback
Supplementary information | Firmware Update | Others

output level, sampling rate, or frequency response changed) and the unit does not recognize it as a genuine DTS signal. In such cases, you may hear noise.
- Playing DTS program material, using the pause, fast forward, or fast reverse function on your player may produce a short audible noise. This is not a malfunction.
Video
- Confirm that the connection between the output jack on the device and the input jack on this unit is correct.
- Make sure that none of the connecting cables are bent, twisted, or damaged.
- When the TV image is blurry or unclear, power code or connection cables of the unit may have interfered. In that case, keep distance between TV antenna cable and cables of the unit.
- Make sure the switching of input screens is proper at the monitor side such as a TV.
Check the following if the above does not fix the problem:
There is no video
- Change the input selector on this unit to the position of the terminal to which the player is connected.
There is no picture from a source connected to an HDMI IN terminal
- To display video from the connected player on the TV while the unit is in standby, you need to enable "Hardware" - "HDMI" - "HDMI Standby Through" in the System Setup menu. Refer to (→P18) for information about HDMI Standby Through.
- Check if "Resolution Error" is displayed on the sound system controller's display when video input via HDMI IN jack is not displayed. In this case, the TV does not support the resolution of the video input from the player. Change the setting on the player.
- Reliable operation with an HDMI-to-DVI adapter is not guaranteed. In addition, video signals from a PC are not supported.
Images flicker
- It is possible that the resolution of the player is not compatible with the TV's resolution. If you have connected the player to this unit with an HDMI cable, try changing the output resolution on the player. There also may be an improvement if you change the screen mode on the TV.
Video and audio are out of sync
- Video may be delayed relative to audio depending on the settings and connections with your television. To adjust, press on the remote controller, and adjust in "Other" - "Sound Delay" in "AV Adjust".
Linked operation
There is no linked operation with CEC compliant devices, such as a TV
- In the System Setup menu of the unit, set "Hardware" - "HDMI" - "HDMI CEC" to "On".
- It is also necessary to set HDMI linking on the CEC compliant device. Check the instruction manual.
- When connecting a Sharp brand player or recorder by HDMI, set "Hardware" - "HDMI" - "HDMI Standby Through" to "Auto" in the System Setup menu.
FM broadcasts
Radio reception is poor or there is a lot of noise.
• Re-check the antenna connection.
- Move the antenna away from the power cord.
- Move the unit away from your TV or PC.
• Passing cars and airplanes can cause interference.
• Concrete walls weaken radio signals.
- Listen to the station in mono.
- FM reception may become clearer if you use the antenna jack on the wall used for the TV.
BLUETOOTH function
- Try plugging/unplugging the power of the unit and try turning on/off the BLUETOOTH enabled device. Restarting the BLUETOOTH enabled device may be effective.
- The BLUETOOTH enabled devices must support the A2DP profile.
- Near components such as microwave oven or cordless phone, which use the radio wave in the 2.4 GHz range, a radio wave interference may occur, which disables the use of this unit.
- If there is a metallic object near the unit, BLUETOOTH connection may not be possible as the metal can effect on the radio waves.
Check the following if the above does not fix the problem:
Cannot connect with this unit
- Check that the BLUETOOTH function of the BLUETOOTH enabled device is enabled.
Music playback is unavailable on the unit even after successful BLUETOOTH connection
When the audio volume of your BLUETOOTH enabled device is set low, the playback of audio may be unavailable. Turn up the volume on the BLUETOOTH enabled device.
• Some BLUETOOTH enabled devices may be equipped
with a Send/Receive selector switch. Select Send mode.
- Depending on the characteristics or specifications of your BLUETOOTH enabled device, playback on this unit may not be possible.
Sound is interrupted
- There may be a problem with the BLUETOOTH enabled device. Check the information on the internet.
The audio quality is poor after connection with a BLUETOOTH enabled device
• The BLUETOOTH reception is poor. Move the
> Before Start > Part Names > Install > Setup > Playback
Supplementary information | Firmware Update | Others
BLUETOOTH enabled device closer to the unit or remove any obstacle between the BLUETOOTH enabled device and this unit.
Network function
- If you cannot select a network service, it will become selectable when the network function is started. It may take about a minute to start up.
- When NET is blinking, this unit is not properly connected to the home network.
- Try plugging/unplugging the power supply of this unit and the router, and try rebooting the router.
- If the desired wireless LAN router is not in the access point list, it may be set to hide SSID or the ANY connection may be off. Change the setting and try again
Check the following if the above does not fix the problem:
Cannot access the Internet radio
- Certain network service or contents available through the unit may not be accessible in case the service provider terminates its service.
• Make sure that your modem and router are properly connected, and make sure they are both turned on. - Make sure that the LAN side port on the router is properly connected to this unit.
- Make sure that connecting to Internet from other components is possible. If connecting is not possible, turn off all components connected to the network, wait for a while, and then turn on the components again.
- If a specific radio station is unavailable for listening, make sure the registered URL is correct, or whether the format distributed from the radio station is supported by this unit.
- Depending on ISP, setting the proxy server is necessary.
• Make sure that the used router and/or modem is supported by your ISP.
Cannot access the network server
- This unit needs to be connected to the same router as the network server.
- This unit is compatible with Windows MediaPlayer 11 or 12 network servers or NAS that are compatible with home network functionality.
- You may need to make some settings on Windows Media® Player. (→P28)
- When using a PC, only music files registered in the Windows Media® Player library can be played.
Playback stops while listening to music files on the network server
• Make sure the network server is compatible with this unit.
- When the PC is serving as the network server, try quitting any application software other than the server software (Windows Media® Player 12, etc.).
- If the PC is downloading or copying large files, the playback may be interrupted.
USB storage device
USB storage device is not displayed
- Check whether the USB storage device or USB cable is correctly inserted to the USB port of the unit.
- Disconnect the USB storage device from the unit, and then try reconnecting.
• Performance of the hard disk that receive power from the USB port of the unit is not guaranteed.
- Depending on the type of format, the playback may not be performed normally. Check the type of the file formats that is supported.
- USB storage devices with security functions may not be played.
Wireless LAN Network
- Try plugging/unplugging the power supply of wireless LAN router and the unit, check the wireless LAN router power-on status, and try reboot of the wireless LAN router.
Check the following if the above does not fix the problem:
Cannot access wireless LAN network
- The wireless LAN router setting may be switched to Manual. Return the setting to Auto.
• Try the manual set-up. The connection may succeed. - When the wireless LAN router setting is at stealth mode (mode to hide the SSID key) or when ANY connection is off, the SSID is not displayed. Change the setting and try again.
- Check that the setting of SSID and encryption (WEP, etc.) is correct. Make sure the network settings of the unit is properly set.
- Connection to an SSID that includes multi-byte characters is not supported. Name the SSID of the wireless LAN router using single-byte alphanumeric characters only and try again.
Connected to an SSID different to the SSID selected • Some wireless LAN routers allow you to set multiple SSIDs for one unit. If you use the automatic setting button on such a router, you may end up connecting with a different SSID from the SSID you wanted to connect to. Use the connection method requiring you to enter a password if this happens.
Playback is interrupted and communication does not work
- You may not receive radio waves due to bad radio wave conditions. Shorten the distance from the wireless LAN access point or remove obstacles to improve visibility, and try again. Place the unit away from microwave ovens or other access points. It is recommended to place the wireless LAN router (access point) and the unit in the same room.
- If there is a metallic object near the unit, wireless LAN connection may not be possible as the metal can effect on the radio wave.
- When other wireless LAN devices are used near the unit, several issues such as interrupted playback and communication may occur. You can avoid these issues by changing the channel of your wireless LAN router. For
> Before Start > Part Names > Install > Setup > Playback
Supplementary information | Firmware Update | Others

instructions on changing channels, see the instruction manual provided with your wireless LAN router.
Remote Controller
- Make sure that the batteries are installed with the correct polarity.
• Install new batteries. Do not mix different types of batteries, or old and new batteries. - Make sure that the sound system controller is not subjected to direct sunshine or inverter-type fluorescent lights. Relocate if necessary.
- If the sound system controller is installed in a rack or cabinet with colored-glass doors or if the doors are closed, the remote controller may not work reliably.
Display, OSD
The display doesn't light
- The display may go dim while the Dimmer is working, and may also turn off. Press DIMMER button and change the brightness level of the display.
Others
Strange noises can be heard from the sound system controller
- If you have connected another unit to the same wall outlet as this unit, this noise may be an effect from the other unit. If the symptoms improve by unplugging the power cord of the other unit, use different wall outlets for this unit and the other unit.
DRC function does not work
• Make sure the source material is Dolby Digital, Dolby Digital Plus, Dolby TrueHD, or DTS.
> Before Start > Part Names > Install > Setup > Playback
Supplementary information | Firmware Update | Others

License and Trademark
DOLBY AUDIO
Manufactured under license from Dolby Laboratories. Dolby, Dolby Audio, Pro Logic, and the double-D symbol are trademarks of Dolby Laboratories.


For DTS patents, see http://patents.dts.com. Manufactured under license from DTS, Inc. DTS, the Symbol, DTS in combination with the Symbol, the DTS-HD logo, and DTS-HD Master Audio are registered trademarks or trademarks of DTS, Inc. in the United States and/or other countries. © DTS, Inc. All Rights Reserved.
HDMI®
The terms HDMI and HDMI High-Definition Multimedia Interface, and the HDMI Logo are trademarks or registered trademarks of HDMI Licensing LLC in the United States and other countries.

CERTIFIED
The Wi-Fi CERTIFIED Logo is a certification mark of Wi-Fi Alliance 25 .
Bluetooth
The Bluetooth ® word mark and logos are registered trademarks owned by the Bluetooth SIG, Inc.
This product is protected by certain intellectual property rights of Microsoft. Use or distribution of such technology outside of this product is prohibited without a license from Microsoft.
Windows and the Windows logo are trademarks of the Microsoft group of companies.
QR Code is a registered trademark of DENSO WAVE INCORPORATED.
"x.v.Color" and "x.v.Color" logo are trademarks of Sony Corporation.
DSD and the Direct Stream Digital logo are trademarks of Sony Corporation.
MPEG Layer-3 audio coding technology licensed from Fraunhofer IIS and Thomson.
*All other trademarks are the property of their respective owners."
General Specifications
Sound System Controller
Amplifier Section
Input Sensitivity and Impedance (1 kHz 100 W/8 Ω)
200 mV/47 kΩ (LINE (Unbalance))
Tone Control Characteristics
±10 dB, 90 Hz (BASS)
±10 dB, 7.5 kHz (TREBLE)
Tuner Section
FM Tuning Frequency Range
87.5 MHz - 108.0 MHz, RDS
Preset Channel
40
Network Section
Ethernet LAN
10BASE-T/100BASE-TX
Wireless LAN
IEEE 802.11 a/b/g/n standard
(Wi-Fi® standard)
5 GHz/2.4 GHz band
BLUETOOTH Section
Communication system
BLUETOOTH Specification version 4.1+LE
Frequency band
2.4 GHz band
Modulation method
FHSS (Freq Hopping Spread Spectrum)
Compatible BLUETOOTH profiles
A2DP 1.2
AVRCP 1.3
HOGP-Host (Client)
HOGP-HID Device (Server)
HID Service (HIDS)
Supported Codecs
SBC
AAC
Transmission range (A2DP)
20 Hz - 20 kHz (Sampling frequency 44.1 kHz)
Maximum communication range
Line of sight approx. 15 m ( * )
* The actual range will vary depending on factors such as obstacles between devices, magnetic fields around a microwave oven, static electricity, cordless phone, reception sensitivity, antenna's performance, operating system, software application, etc.
General
Power Supply
AC 100 - 240 V, 50/60 Hz
Power Consumption
25 W
0.4 W (Stand-by)
2.1 W (Wireless Speaker Standby)
2.8 W (Network Standby)
Dimensions (W × H × D)
445 mm × 69 mm × 303 mm
17-1/2" × 2-11/16" × 11-15/16"
Weight
3.2 kg (7.1 lbs.)
HDMI
Input
IN1 (BD/DVD, HDCP2.2), IN2 (CBL/SAT, HDCP2.2), IN3
(STRM BOX, HDCP2.2), IN4 (GAME, HDCP2.2)
Output
OUT (HDCP2.2)
Supported
Deep Color, x.v.Color., LipSync, Audio Return Channel,
3D, 4K 60 Hz, CEC, Extended Colorimetry (sYCC601,
Adobe RGB, Adobe YCC601), Content Type, HDR
Audio Format
Dolby TrueHD, Dolby Digital, Dolby Digital Plus, DTS,
DTS-HD Master Audio, DTS-HD High Resolution Audio,
DTS 96/24, DTS ES, DTS-HD Express, DSD, PCM
Maximum Video Resolution
4k 60 Hz (YCbCr 4:4:4)
Audio Inputs
Digital
OPTICAL (DIGITAL IN)
Analog
RCA (ANALOG IN)
Others
USB : 1 (Ver.2.0, 5 V/1 A)
Ethernet : 1
All channel wireless system
> Before Start > Part Names > Install > Setup > Playback
Supplementary information | Firmware Update | Others

Wireless Satellite Speaker
Type
2 Way Closed Box
Rated Output Power (IEC)
2 ch × 40 W at 4 ohms, 1 kHz, 1 ch driven of 10% THD
Maximum Effective Output Power (JEITA) (Australian models)
2 ch × 40 W at 4 ohms, 1 kHz, 1 ch driven of 10% THD
Frequency response
(2.1 ch): 85 Hz - 20 kHz
(2 ch): 65 Hz - 20 kHz
Dimensions (W × H × D)
125.5 mm × 220 mm × 145.5 mm
4-15/16" × 8-11/16" × 5-3/4"
Weight
1.7 kg (3.7 lbs.)
Drivers unit
9 cm (3-1/2") Cone Woofer × 1
2 cm (3/4") Dome Tweeter × 1
Power Supply
AC 100 - 240 V, 50/60 Hz
Power Consumption
21 W
2.1 W (Wireless Speaker Standby ON)
0.4 W (Wireless Speaker Standby OFF)
Other
Non-magnetic shielding
For non-magnetic shielded speakers:
Try moving the speakers away from your TV or monitor. If
discoloration should occur, turn off your TV or monitor, wait
15 to 30 minutes, and then turn it back on again. This
normally activates the degaussing function, which
neutralizes the magnetic field, thereby removing any
discoloration effects

About HDMI
Compatible functions
HDMI (High Definition Multimedia Interface) is a digital interface standard for connecting TVs, projectors, Blu-ray Disc/DVD players, set-top boxes, and other video components. Until now, several separate video and audio cables have been required to connect AV components. With HDMI, a single cable can carry control signals, digital video, and digital audio (2-channel PCM, multichannel digital audio, and multichannel PCM).
HDMI CEC functionality: By connecting devices and HDMI cables that comply with the CEC (Consumer Electronics Control) specification of the HDMI standard, a variety of linked operation become possible between devices. You can enjoy features such as linking input switching with the input selector and players, control volume using the remote controller of the TV, and automatically switching this unit to standby when the TV is turned off. The unit is designed to link with products that comply with the CEC standard, and that linked operation is not always guaranteed with all CEC devices.
ARC (Audio Return Channel): By connection a TV that supports ARC with a single HDMI cable, you can not only output the audio and video from this unit to the TV, but also input the audio from the TV to this unit.
HDMI Standby Through: Even if this unit is in standby, the input signals from AV components are transmitted to the TV.
Deep Color: By connecting devices supporting Deep Color, video signals input from the devices can be reproduced on the TV with even more colors.
x.v.Color™: This technology realizes even more realistic colors by broadening the color gamut.
3D: You can transmit 3D video signals from AV components to the TV.
4K: This unit supports 4K (3840 × 2160p) and 4K SMPTE (4096 × 2160p) video signals.
LipSync: This setting automatically corrects any desynchronization between the video and audio signals based on data from the HDMI LipSync compatible TV.
Supported Audio Formats
2-channel linear PCM: 32 kHz, 44.1 kHz, 48 kHz, 88.2 kHz, 96 kHz, 176.4 kHz, 192 kHz, 16/20/24 bit
Multi-channel linear PCM: Maximum 5.1 channels, 32 kHz, 44.1 kHz, 48 kHz, 88.2 kHz, 96 kHz, 176.4 kHz, 192 kHz, 16/20/24 bit
Bitstream: Dolby Digital, Dolby Digital Plus, Dolby TrueHD, DTS, DTS-HD High Resolution Audio, DTS-HD Master Audio
DSD: Supported sampling rates: 2.8 MHz Your Blu-ray Disc/DVD player must also support HDMI output of the above audio formats.
Supported resolutions
Copyright protection technology: HDCP1.4/HDCP2.2 Color space (Color Depth): 720 × 480i 60Hz, 720 × 576i 50Hz, 720 × 480p 60Hz, 720 × 576p 50Hz, 1920 × 1080i 50/60Hz, 1280 × 720p 24/25/30/50/60Hz, 1680 × 720p 24/25/30/50/60Hz, 1920 × 1080p 24/25/30/50/60Hz, 2560 × 1080p 24/25/30/50/60Hz, 4K (3840 × 2160p) 24/25/30Hz, 4K SMPTE (4096 × 2160p) 24/25/30Hz : RGB/YCbCr4:4:4 (8/10/12 bit), YCbCr4:2:2 (12 bit) 4K (3840 × 2160p) 50/60Hz, 4K SMPTE (4096 × 2160p) 50/60Hz : RGB/YCbCr4:4:4 (8 bit), YCbCr4:2:2 (12 bit), YCbCr4:2:0 (8/10/12 bit)
Pioneer
1-10-5 Yokoami, Sumida-ku, Tokyo 130-0015 JAPAN
18 PARK WAY, UPPER SADDLE RIVER, NEW JERSEY 07458, U.S.A.
Tel: 1-201-785-2600 Tel: 1-844-679-5350
Tel: +49(0)8142 4208 188 (Product Support)
Anteros Building, Odyssey Business Park, West End Road, South Ruislip, Middlesex, HA4 6QQ United Kingdom
Tel: +44(0)208 836 3612
6, Avenue de Marais F - 95816 Argenteuil Cedex FRANCE
Tel: +33(0)969 368 050
Register your product on http://www.pioneer.eu (Europe)
© 2016 Onkyo & Pioneer Corporation. All rights reserved.
Onkyo group has established its Privacy Policy, available at [http://pioneer-audiovisual.com/privacy/]
"Pioneer" is a trademark of Pioneer Corporation, and is used under license.
Miscellaneous
■ Firmware Update
AIFF (.aiff/.aif/.aifc/.afc/.AIFF/.AIF/.AIFC/.AFC):
AAC (.aac/.m4a/.mp4/.3gp/.3g2/.AAC/.M4A/.MP4/.3GP/.3G2):
DSD (.dsf/.dff/.DSF/.DFF):
- Bits de quantification: 8 bits, 16 bits, 24 bits
AIFF (.aiff/.aif/.aifc/.afc/.AIFF/.AIF/.AIFC/.AFC):
- Bits de quantification: 8 bits, 16 bits, 24 bits
AAC (.aac/.m4a/.mp4/.3gp/.3g2/.AAC/.M4A/.MP4/.3GP/.3G2):
- Bits de quantification: 16 bits, 24 bits
DSD (.dsf/.dff/.DSF/.DFF):
Dolby TrueHD (.vr/.mlp/.VR/.MLP):
Oldies (Anciens tubes)
Folk M (Musique folk)
F.S.Surround (Front Stage Surround Advance)

Manufactured under license from Dolby Laboratories. Dolby, Dolby Audio, Pro Logic, and the double-D symbol are trademarks of Dolby Laboratories.


For DTS patents, see http://patents.dts.com. Manufactured under license from DTS, Inc. DTS, the Symbol, DTS in combination with the Symbol, the DTS-HD logo, and DTS-HD Master Audio are registered trademarks or trademarks of DTS, Inc. in the United States and/or other countries. © DTS, Inc. All Rights Reserved.
HDMI®
The terms HDMI and HDMI High-Definition Multimedia Interface, and the HDMI Logo are trademarks or registered trademarks of HDMI Licensing LLC in the United States and other countries.

CERTIFIED
The Wi-Fi CERTIFIED Logo is a certification mark of Wi-Fi Alliance 4 .
Bluetooth
The Bluetooth ® word mark and logos are registered trademarks owned by the Bluetooth SIG, Inc.
This product is protected by certain intellectual property rights of Microsoft. Use or distribution of such technology outside of this product is prohibited without a license from Microsoft.
Windows and the Windows logo are trademarks of the Microsoft group of companies.
QR Code is a registered trademark of DENSO WAVE INCORPORATED.
"x.v.Color" and "x.v.Color" logo are trademarks of Sony Corporation.
DSD and the Direct Stream Digital logo are trademarks of Sony Corporation.
MPEG Layer-3 audio coding technology licensed from Fraunhofer IIS and Thomson.
*All other trademarks are the property of their respective owners."
87,5 MHz - 108,0 MHz, RDS
Chaîne préréglée
40
Partie réseau
Ethernet LAN
10BASE-T/100BASE-TX
LAN sans fil
Norme IEEE 802.11 a/b/g/n
(Norme Wi-Fi®)
Bande 5 GHz/2,4 GHz
Partie BLUETOOTH
FHSS (Freq Hopping Spread Spectrum)
Profils BLUETOOTH compatibles
A2DP 1.2
AVRCP 1.3
HOGP-Host (Client)
Dimensions (L × H × P)
445 mm × 69 mm × 303 mm
17-1/2" × 2-11/16" × 11-15/16"
Poids
3,2 kg (7,1 lbs.)
HDMI
Entrée
IN1 (BD/DVD, HDCP2.2), IN2 (CBL/SAT, HDCP2.2), IN3
(STRM BOX, HDCP2.2), IN4 (GAME, HDCP2.2)
Sortie
OUT (HDCP2.2)
Supportés
Deep Color, x.v.Color., LipSync, Audio Return Channel.
3D, 4K 60Hz, CEC, Extended Colorimetry (sYCC601,
Adobe RGB, Adobe YCC601), Content Type, HDR
Format audio
Dolby TrueHD, Dolby Digital, Dolby Digital Plus, DTS,
DTS-HD Master Audio, DTS-HD High Resolution Audio,
DTS 96/24, DTS ES, DTS-HD Express, DSD, PCM
OPTICAL (DIGITAL IN)
Analogique
RCA (ANALOG IN)
Autres
USB: 1 (Ver.2.0, 5 V/1 A)
Ethernet: 1
Dimensions (L × H × P)
125,5 mm × 220 mm × 145,5 mm
4-15/16" × 8-11/16" × 5-3/4"
Poids
1,7 kg (3,7 lbs.)
Unité de conducteur
Tel: +49(0)8142 4208 188 (Product Support)
Anteros Building, Odyssey Business Park, West End Road, South Ruislip, Middlesex, HA4 6QQ United Kingdom
Tel: +44(0)208 836 3612
6, Avenue de Marais F - 95816 Argenteuil Cedex FRANCE
Tel: +33(0)969 368 050
© 2016 Onkyo & Pioneer Corporation. All rights reserved.
Onkyo group has established its Privacy Policy, available at [http://pioneer-audiovisual.com/privacy/].
"Pioneer" is a trademark of Pioneer Corporation, and is used under license.
a Cable HDMI, b Cable óptico digital
- Conector GAME - GAME
- Conector CBL/SAT - CBL/SAT
- Conector STRMBOX - STRM BOX
-TV - (* ) - Conector DIGITAL IN - DIGITAL IN OPTICAL
- Conector ANALOG IN - ANALOG IN
AIFF (.aiff/.aif/.aifc/.afc/.AIFF/.AIF/.AIFC/.AFC):
AAC (.aac/.m4a/.mp4/.3gp/.3g2/.AAC/.M4A/.MP4/.3GP/.3G2):
- Formatos compatibles: Audio MPEG-2/MPEG-4
- Tasas de muestreo compatibles: 44,1 kHz, 48 kHz, 64 kHz, 88,2 kHz, 96 kHz
- Tasas de bits compatibles: Entre 8 kbps y 320 kbps y VBR.
FLAC (.flac/.FLAC):
DSD (.dsf/.dff/.DSF/.DFF):
AIFF (.aiff/.aif/.aifc/.afc/.AIFF/.AIF/.AIFC/.AFC):
AAC (.aac/.m4a/.mp4/.3gp/.3g2/.AAC/.M4A/.MP4/.3GP/.3G2):
- Formatos compatibles: Audio MPEG-2/MPEG-4
- Tasas de muestreo compatibles: 44,1 kHz, 48 kHz, 64 kHz, 88,2 kHz, 96 kHz
- Tasas de bits compatibles: Entre 8 kbps y 320 kbps y VBR.
FLAC (.flac/.FLAC):
DSD (.dsf/.dff/.DSF/.DFF):
Dolby TrueHD (.vr/.mlp/.VR/.MLP):
F.S.Surround (Front Stage Surround Advance)
- Seleccione "Miscellaneous" - "Firmware Update" - "Update via USB" con los cursores en este orden y pulse ENTER.

Manufactured under license from Dolby Laboratories. Dolby, Dolby Audio, Pro Logic, and the double-D symbol are trademarks of Dolby Laboratories.


For DTS patents, see http://patents.dts.com. Manufactured under license from DTS, Inc. DTS, the Symbol, DTS in combination with the Symbol, the DTS-HD logo, and DTS-HD Master Audio are registered trademarks or trademarks of DTS, Inc. in the United States and/or other countries. © DTS, Inc. All Rights Reserved.
HDMI®
The terms HDMI and HDMI High-Definition Multimedia Interface, and the HDMI Logo are trademarks or registered trademarks of HDMI Licensing LLC in the United States and other countries.

CERTIFIED
The Wi-Fi CERTIFIED Logo is a certification mark of Wi-Fi Alliance 4 .
Bluetooth
The Bluetooth® word mark and logos are registered trademarks owned by the Bluetooth SIG, Inc.
This product is protected by certain intellectual property rights of Microsoft. Use or distribution of such technology outside of this product is prohibited without a license from Microsoft.
Windows and the Windows logo are trademarks of the Microsoft group of companies.
QR Code is a registered trademark of DENSO WAVE INCORPORATED.
"x.v.Color" and "x.v.Color" logo are trademarks of Sony Corporation.
DSD and the Direct Stream Digital logo are trademarks of Sony Corporation.
MPEG Layer-3 audio coding technology licensed from Fraunhofer IIS and Thomson.
*All other trademarks are the property of their respective owners."
87,5 MHz - 108,0 MHz, RDS
17-1/2" × 2-11/16" × 11-15/16"
Peso
3,2 kg (7,1 lbs.)
HDMI
Input
IN1 (BD/DVD, HDCP2.2), IN2 (CBL/SAT, HDCP2.2), IN3
(STRM BOX, HDCP2.2), IN4 (GAME, HDCP2.2)
Salida
OUT (HDCP2.2)
Compatible
Deep Color, x.v.Color., LipSync, Audio Return Channel.
3D, 4K 60Hz, CEC, Extended Colorimetry (sYCC601,
Adobe RGB, Adobe YCC601), Content Type, HDR
Formato de Audio
Dolby TrueHD, Dolby Digital, Dolby Digital Plus, DTS,
DTS-HD Master Audio, DTS-HD High Resolution Audio,
DTS 96/24, DTS ES, DTS-HD Express, DSD, PCM
OPTICAL (DIGITAL IN)
Analógico
RCA (ANALOG IN)
Otros
USB : 1 (Ver. 2.0, 5 V/1 A)
Ethernet : 1
Tel: +49(0)8142 4208 188 (Product Support)
Anteros Building, Odyssey Business Park, West End Road, South Ruislip, Middlesex, HA4 6QQ United Kingdom
Tel: +44(0)208 836 3612
6, Avenue de Marais F - 95816 Argenteuil Cedex FRANCE
Tel: +33(0)969 368 050
© 2016 Onkyo & Pioneer Corporation. All rights reserved.
Onkyo group has established its Privacy Policy, available at [http://pioneer-audiovisual.com/privacy/]
"Pioneer" is a trademark of Pioneer Corporation, and is used under license.
AIFF (.aiff/.aif/.aifc/.afc/.AIFF/.AIF/.AIFC/.AFC):
AAC (.aac/.m4a/.mp4/.3gp/.3g2/.AAC/.M4A/.MP4/.3GP/.3G2):
DSD (.dsf/.dff/.DSF/.DFF):
AIFF (.aiff/.aif/.aifc/.afc/.AIFF/.AIF/.AIFC/.AFC):
AAC (.aac/.m4a/.mp4/.3gp/.3g2/.AAC/.M4A/.MP4/.3GP/
.3G2):
DSD (.dsf/.dff/.DSF/.DFF):
Dolby TrueHD (.vr/.mlp/.VR/.MLP):
Rock M (musica rock)
Easy M (musica MOR)
Country (musica country)
Folk M (musica folk)
Document (documentari)
F.S.Surround (Front Stage Surround Advance)
Manufactured under license from Dolby Laboratories. Dolby, Dolby Audio, Pro Logic, and the double-D symbol are trademarks of Dolby Laboratories.


For DTS patents, see http://patents.dts.com. Manufactured under license from DTS, Inc. DTS, the Symbol, DTS in combination with the Symbol, the DTS-HD logo, and DTS-HD Master Audio are registered trademarks or trademarks of DTS, Inc. in the United States and/or other countries. © DTS, Inc. All Rights Reserved.
HDMI®
The terms HDMI and HDMI High-Definition Multimedia Interface, and the HDMI Logo are trademarks or registered trademarks of HDMI Licensing LLC in the United States and other countries.

CERTIFIED
The Wi-Fi CERTIFIED Logo is a certification mark of Wi-Fi Alliance 4 .
Bluetooth
The Bluetooth ® word mark and logos are registered trademarks owned by the Bluetooth SIG, Inc.
This product is protected by certain intellectual property rights of Microsoft. Use or distribution of such technology outside of this product is prohibited without a license from Microsoft.
Windows and the Windows logo are trademarks of the Microsoft group of companies.
QR Code is a registered trademark of DENSO WAVE INCORPORATED.
"x.v.Color" and "x.v.Color" logo are trademarks of Sony Corporation.
DSD and the Direct Stream Digital logo are trademarks of Sony Corporation.
MPEG Layer-3 audio coding technology licensed from Fraunhofer IIS and Thomson.
*All other trademarks are the property of their respective owners."
87,5 MHz - 108,0 MHz, RDS
Canale predefinito
40
Sezione rete
Ethernet LAN
10BASE-T/100BASE-TX
LAN Wireless
Standard IEEE 802.11 a/b/g/n
(Wi-Fi® standard)
Banda 5 GHz/2,4 GHz
Sezione BLUETOOTH
FHSS (Freq Hopping Spread Spectrum)
Profili BLUETOOTH compatibili
A2DP 1.2
AVRCP 1.3
HOGP-Host (Client)
Dispositivo HOGP-HID (Server)
Servizio HID (HIDS)
Codec supportati
SBC
AAC
Dimensioni (L × A × P)
445 mm × 69 mm × 303 mm
17-1/2" × 2-11/16" × 11-15/16"
Peso
3,2 kg (7,1 lbs.)
HDMI
Input
IN1 (BD/DVD, HDCP2.2), IN2 (CBL/SAT, HDCP2.2), IN3
(STRM BOX, HDCP2.2), IN4 (GAME, HDCP2.2)
Uscita
OUT (HDCP2.2)
Supportato
Deep Color, x.v.Color., LipSync, Audio Return Channel.
3D, 4K 60 Hz, CEC, Extended Colorimetry (sYCC601,
Adobe RGB, Adobe YCC601), Content Type, HDR
Formato audio
Dolby TrueHD, Dolby Digital, Dolby Digital Plus, DTS,
DTS-HD Master Audio, DTS-HD High Resolution Audio,
DTS 96/24, DTS ES, DTS-HD Express, DSD, PCM
Wireless Satellite Speaker
Tipo
Box chiuso a 2 vie
Dimensioni (L × A × P)
125,5 mm × 220 mm × 145,5 mm
4-15/16" × 8-11/16" × 5-3/4"
Peso
1,7 kg (3,7 lbs.)
Unità driver
Woofer a cono 9 cm (3-1/2") × 1
Woofer a cupola 2 cm (3/4") × 1
Alimentazione
CA 100 - 240 V, 50/60 Hz
Consumo elettrico
21 W
2,1 W (Wireless Speaker Standby ON)
0,4 W (Wireless Speaker Standby OFF)
Altri
PCM lineare a 2 canall: 32 kHz, 44,1 kHz, 48 kHz, 88,2 kHz, 96 kHz, 176,4 kHz, 192 kHz, 16/20/24 bit
PCM lineare multicanale: Massimo 5.1 canali, 32 kHz, 44,1 kHz, 48 kHz, 88,2 kHz, 96 kHz, 176,4 kHz, 192 kHz, 16/20/24 bit
Bitstream : Dolby Digital, Dolby Digital Plus, Dolby TrueHD, DTS, DTS-HD High Resolution Audio, DTS-HD Master Audio
Tel: +49(0)8142 4208 188 (Product Support)
Anteros Building, Odyssey Business Park, West End Road, South Ruislip, Middlesex, HA4 6QQ United Kingdom
Tel: +44(0)208 836 3612
6, Avenue de Marais F - 95816 Argenteuil Cedex FRANCE
Tel: +33(0)969 368 050
© 2016 Onkyo & Pioneer Corporation. All rights reserved.
Onkyo group has established its Privacy Policy, available at [http://pioneer-audiovisual.com/privacy/].
"Pioneer" is a trademark of Pioneer Corporation, and is used under license.
Freestyle Sound System
- CBL/SAT - CBL/SAT-Buchse
- STRMBOX - STRM BOX-Buchse
-TV - (* )
- DIGITAL IN - DIGITAL IN OPTICAL-Buchse - ANALOG IN - ANALOG IN-Buchse
AIFF (.aiff/.aif/.aifc/.afc/.AIFF/.AIF/.AIFC/.AFC):
AAC (.aac/.m4a/.mp4/.3gp/.3g2/.AAC/.M4A/.MP4/.3GP/.3G2):
DSD (.dsf/.dff/.DSF/.DFF):
AIFF (.aiff/.aif/.aifc/.afc/.AIFF/.AIF/.AIFC/.AFC):
AAC (.aac/.m4a/.mp4/.3gp/.3g2/.AAC/.M4A/.MP4/.3GP/.3G2):
DSD (.dsf/.dff/.DSF/.DFF):
Dolby TrueHD (.vr/.mlp/.VR/.MLP):
F.S.Surround (Front Stage Surround Advance)
Manufactured under license from Dolby Laboratories. Dolby, Dolby Audio, Pro Logic, and the double-D symbol are trademarks of Dolby Laboratories.

dts-HD®
For DTS patents, see http://patents.dts.com. Manufactured under license from DTS, Inc. DTS, the Symbol, DTS in combination with the Symbol, the DTS-HD logo, and DTS-HD Master Audio are registered trademarks or trademarks of DTS, Inc. in the United States and/or other countries. © DTS, Inc. All Rights Reserved.
HDMI®
The terms HDMI and HDMI High-Definition Multimedia Interface, and the HDMI Logo are trademarks or registered trademarks of HDMI Licensing LLC in the United States and other countries.

CERTIFIED
The Wi-Fi CERTIFIED Logo is a certification mark of Wi-Fi Alliance 2 .
Bluetooth
The Bluetooth ® word mark and logos are registered trademarks owned by the Bluetooth SIG, Inc.
This product is protected by certain intellectual property rights of Microsoft. Use or distribution of such technology outside of this product is prohibited without a license from Microsoft.
Windows and the Windows logo are trademarks of the Microsoft group of companies.
QR Code is a registered trademark of DENSO WAVE INCORPORATED.
"x.v.Color" and "x.v.Color" logo are trademarks of Sony Corporation.
DSD and the Direct Stream Digital logo are trademarks of Sony Corporation.
MPEG Layer-3 audio coding technology licensed from Fraunhofer IIS and Thomson.
*All other trademarks are the property of their respective owners."
FHSS (Freq Hopping Spread Spectrum)
Kompatible BLUETOOTH-Profile
A2DP 1.2
AVRCP 1.3
HOGP-Host (Client)
17-1/2" × 2-11/16" × 11-15/16"
Gewicht
3,2 kg (7,1 lbs.)
HDMI
Input
IN1 (BD/DVD, HDCP2.2), IN2 (CBL/SAT, HDCP2.2), IN3
(STRM BOX, HDCP2.2), IN4 (GAME, HDCP2.2)
Ausgang
OUT (HDCP2.2)
Unterstützt
Deep Color, x.v.Color., LipSync, Audio Return Channel,
3D, 4K 60 Hz, CEC, Extended Colorimetry (sYCC601,
Adobe RGB, Adobe YCC601), Content Type, HDR
Audioformat
Dolby TrueHD, Dolby Digital, Dolby Digital Plus, DTS,
DTS-HD Master Audio, DTS-HD High Resolution Audio,
DTS 96/24, DTS ES, DTS-HD Express, DSD, PCM
OPTICAL (DIGITAL IN)
Analog
RCA (ANALOG IN)
Andere
USB: 1 (Ver.2.0, 5 V/1 A)
Ethernet: 1
Tel: +49(0)8142 4208 188 (Product Support)
Anteros Building, Odyssey Business Park, West End Road, South Ruislip, Middlesex, HA4 6QQ United Kingdom
Tel: +44(0)208 836 3612
6, Avenue de Marais F - 95816 Argenteuil Cedex FRANCE
Tel: +33(0)969 368 050
© 2016 Onkyo & Pioneer Corporation. All rights reserved.
Onkyo group has established its Privacy Policy, available at [http://pioneer-audiovisual.com/privacy/].
"Pioneer" is a trademark of Pioneer Corporation, and is used under license.
Sound system controller AC-400 (1)

Draadloze satelliet luidspreker FS-400 (2)

Afstandsbediening (RC-932S) (1), batterijen (AAA/R03) (2)

FM-binnenantenne (1)

Netsnoeren (2)

a HDMI-kabel, b Digitale optische kabel
Naar ARC TV
AIFF (.aiff/.aif/.aifc/.afc/.AIFF/.AIF/.AIFC/.AFC):
AIFF-bestanden bevatten ongecomprimeerde PCM digitale audio.
- Ondersteunde bemonsteringsfrequencies: 44,1 kHz, 48 kHz, 64 kHz, 88,2 kHz, 96 kHz, 176,4 kHz, 192 kHz
• Kwantiseringsbit: 8 bit, 16 bit, 24 bit
AAC (.aac/.m4a/.mp4/.3gp/.3g2/.AAC/.M4A/.MP4/.3GP/.3G2):
• Ondersteunde formaten: MPEG-2/MPEG-4 Audio
• Ondersteunde bemonsteringsfrequencies: 44,1 kHz, 48
kHz, 64 kHz, 88, 2 kHz, 96 kHz
- Ondersteunde bitsnelheden: Tussen 8 kbps en 320 kbps en VBR
FLAC (.flac/.FLAC):
• Ondersteunde bemonsteringsfrequencies: 44,1 kHz, 48
kHz, 64 kHz, 88,2 kHz, 96 kHz, 176,4 kHz, 192 kHz
• Kwantiseringsbit: 8 bit, 16 bit, 24 bit
LPCM (Lineair PCM):
- Ondersteunde bemonsteringsfrequencies: 44,1 kHz, 48 kHz
• Kwantiseringsbit: 16 bit
Apple Lossless (.m4a/.mp4/.M4A/.MP4):
- Ondersteunde bemonsteringsfrequenties: 44,1 kHz, 48 kHz, 64 kHz, 88,2 kHz, 96 kHz, 176,4 kHz, 192 kHz
• Kwantiseringsbit: 16 bit, 24 bit
DSD (.dsf/.dff/.DSF/.DFF):
AIFF (.aiff/.aif/.aifc/.afc/.AIFF/.AIF/.AIFC/.AFC):
AAC (.aac/.m4a/.mp4/.3gp/.3g2/.AAC/.M4A/.MP4/.3GP/.3G2):
• Ondersteunde formaten: MPEG-2/MPEG-4 Audio
- Ondersteunde bemonsteringsfrequencies: 44,1 kHz, 48 kHz, 64 kHz, 88,2 kHz, 96 kHz
- Ondersteunde bitsnelheden: Tussen 8 kbps en 320 kbps en VBR.
FLAC (.flac/.FLAC):
• Ondersteunde bemonsteringsfrequencies: 44,1 kHz, 48 kHz, 64 kHz, 88,2 kHz, 96 kHz, 176,4 kHz, 192 kHz
• Kwantiseringsbit: 8 bit, 16 bit, 24 bit
Apple Lossless (.m4a/.mp4/.M4A/.MP4):
• Ondersteunde bemonsteringsfrequencies: 44,1 kHz, 48 kHz, 64 kHz, 88,2 kHz, 96 kHz, 176,4 kHz, 192 kHz
• Kwantiseringsbit: 16 bit, 24 bit
DSD (.dsf/.dff/.DSF/.DFF):
• Ondersteunde formaten: DSF/DSDIFF
- Ondersteunde bemonsteringsfrequencies: 2,8 MHz, 5,6 MHz
Dolby TrueHD (.vr/.mlp/.VR/.MLP):
F.S.Surround (Front Stage Surround Advance)
"Sound Delay" in "AV Adjust".
Gekoppelde werking
Manufactured under license from Dolby Laboratories. Dolby, Dolby Audio, Pro Logic, and the double-D symbol are trademarks of Dolby Laboratories.


For DTS patents, see http://patents.dts.com. Manufactured under license from DTS, Inc. DTS, the Symbol, DTS in combination with the Symbol, the DTS-HD logo, and DTS-HD Master Audio are registered trademarks or trademarks of DTS, Inc. in the United States and/or other countries. © DTS, Inc. All Rights Reserved.
HDMI®
The terms HDMI and HDMI High-Definition Multimedia Interface, and the HDMI Logo are trademarks or registered trademarks of HDMI Licensing LLC in the United States and other countries.

CERTIFIED
The Wi-Fi CERTIFIED Logo is a certification mark of Wi-Fi Alliance 25 .
Bluetooth
The Bluetooth ® word mark and logos are registered trademarks owned by the Bluetooth SIG, Inc.
This product is protected by certain intellectual property rights of Microsoft. Use or distribution of such technology outside of this product is prohibited without a license from Microsoft.
Windows and the Windows logo are trademarks of the Microsoft group of companies.
QR Code is a registered trademark of DENSO WAVE INCORPORATED.
"x.v.Color" and "x.v.Color" logo are trademarks of Sony Corporation.
DSD and the Direct Stream Digital logo are trademarks of Sony Corporation.
MPEG Layer-3 audio coding technology licensed from Fraunhofer IIS and Thomson.
*All other trademarks are the property of their respective owners."
87,5 MHz - 108,0 MHz, RDS
Voorkeuzezender
40
Netwerksectie
Ethernet LAN
10BASE-T/100BASE-TX
Draadloze LAN
IEEE 802.11 a/b/g/n standaard
(Wi-Fi® standaard)
5 GHz/2.4 GHz band
BLUETOOTH
FHSS (Freq Hopping Spread Spectrum)
Compatibele BLUETOOTH profielen
A2DP 1.2
AVRCP 1.3
HOGP-Host (Client)
HOGP-HID Apparaat (Server)
HID Service (HIDS)
Ondersteunde codecs
SBC
AAC
Zendbereik (A2DP)
20 Hz - 20 kHz (Bemonsteringsfrequentie 44,1 kHz)
Maximum communicatiebereik
17-1/2" × 2-11/16" × 11-15/16"
Gewicht
3,2 kg (7,1 lbs.)
HDMI
Ingang
IN1 (BD/DVD, HDCP2.2), IN2 (CBL/SAT, HDCP2.2), IN3
(STRM BOX, HDCP2.2), IN4 (GAME, HDCP2.2)
Uitgang
OUT (HDCP2.2)
Ondersteund
Deep Color, x.v.Color., LipSync, Audio Return Channel.
3D, 4K 60Hz, CEC, Extended Colorimetry (sYCC601,
Adobe RGB, Adobe YCC601), Content Type, HDR
Audioformaat
Dolby TrueHD, Dolby Digital, Dolby Digital Plus, DTS
DTS-HD Master Audio, DTS-HD High Resolution Audio,
DTS 96/24, DTS ES, DTS-HD Express, DSD, PCM
Maximum Videoresolutie
4k 60 Hz (YCbCr 4:4:4)
Audio-ingangen
Digitaal
OPTICAL (DIGITAL IN)
Analoog
RCA (ANALOG IN)
Overige
USB : 1 (Ver.2.0, 5 V/1 A)
Ethernet : 1
Alle kanalen draadloos systeem

9 cm (3-1/2") Conus Woofer × 1
2 cm (3/4") Dome Tweeter × 1
Voeding
AC 100 - 240 V, 50/60 Hz
Stroomverbruik
21 W
2,1 W (Draadloze luidspreker Stand-by ON)
0,4 W (Draadloze luidspreker Stand-by OFF)
Overige
Niet-magnetische afscherming
Tel: +49(0)8142 4208 188 (Product Support)
Anteros Building, Odyssey Business Park, West End Road, South Ruislip, Middlesex, HA4 6QQ United Kingdom
Tel: +44(0)208 836 3612
6, Avenue de Marais F - 95816 Argenteuil Cedex FRANCE
Tel: +33(0)969 368 050
© 2016 Onkyo & Pioneer Corporation. All rights reserved.
Onkyo group has established its Privacy Policy, available at [http://pioneer-audiovisual.com/privacy/].
"Pioneer" is a trademark of Pioneer Corporation, and is used under license.


- Setup
- Playback
- Supplementary information
- Firmware Update
- Others
- What's in the box
- Front Panel
- Rear Panel
- Remote Controller
- Display
- Wireless Satellite Speakers
- Install the Wireless Satellite Speakers
- Connect the TV
- To ARC TV
- To Non-ARC TV
- Connect the AV Components
- Connect Other Cables
- Antenna Hookup
- Network Hookup
- Power Cord Hookup
- Initial Setup with Auto Start-up Wizard
- Initial Setup starts automatically
- Registration of wireless Speakers
- Easy Setup
- Network Connection
- System Setup
- Wireless Speaker
- Easy Setup
- Distance
- Channel Level
- Scan
- Source
- ■ Input Volume Absorber
- Fixed PCM
- Hardware
- HDMI
- Network
- ■ Initial Setup
- AV Adjust
- Tone
- Level
- Other
- AV Component Playback
- Basic operations
- Internet Radio
- Tuneln Radio
- Regarding the TuneIn Radio Menu
- Regarding the Tuneln Radio Account
- Spotify
- > Before Start > Part Names > Install > Setup > Playback
- Music Server
- Configuring Windows Media® Player
- Windows Media® Player 11
- Windows Media® Player 12
- Playing
- Controlling Remote Playback from a PC
- Supported Audio Formats
- MP3 (.mp3/.MP3):
- WMA (.wma/.WMA):
- WAV (.wav/.WAV):
- AIFF (.aiff/.aif/.aifc/.afc/.AIFF/.AIF/.AIFC/.AFC):
- AAC (.aac/.m4a/.mp4/.3gp/.3g2/.AAC/.M4A/.MP4/.3GP/.3G2):
- FLAC (.flac/.FLAC):
- LPCM (Linear PCM):
- Apple Lossless (.m4a/.mp4/.M4A/.MP4):
- DSD (.dsf/.dff/.DSF/.DFF):
- USB Storage Device
- Basic play
- USB Storage Device Requirements
- Dolby TrueHD (.vr/.mlp/.VR/.MLP):
- BLUETOOTH® Playback
- Pairing
- Playing Back
- Listening to the FM Radio
- Tuning into a Radio Station
- Tuning Automatically
- Tuning Manually
- Presetting a Radio Station
- Registration Procedure
- Selecting a Preset Radio Station
- Deleting a Preset Radio Station
- Using RDS
- Displaying text information (Radio Text)
- Search for stations by Program Type
- Listening Modes
- Selecting Listening Modes
- AUTO/DIRECT button (b)
- SURR button (c)
- STEREO button (d)
- Listening Mode Effects
- Action
- AdvancedGame
- Classical
- Dolby D (Dolby Digital)
- Dolby D + (Dolby Digital Plus)
- Dolby PL II (Dolby Pro Logic II)
- Dolby TrueHD
- Drama
- DSD
- DTS
- DTS 96/24
- DTS Express
- DTS-HD HR (DTS-HD High Resolution Audio)
- DTS-HD MSTR (DTS-HD Master Audio)
- DTS Neo:6
- Ent.Show (Entertainment Show)
- Ext.Mono (Extended Mono)
- Ext.Stereo (Extended Stereo)
- F.S.Surround (Front Stage Surround Advance)
- Mono
- Multich PCM (Multichannel PCM)
- Rock/Pop
- Sports
- Stereo
- Unplugged
- Selectable listening modes
- Supplementary information for player functions
- Update Functions
- How to update firmware
- Updating the Firmware via Network
- Updating via USB
- Troubleshooting
- Before starting the procedure
- If operation becomes unstable
- Try restarting the unit
- Resetting the unit (this resets the unit settings to the default)
- Power
- Cannot turn on the unit
- The unit turns off unexpectedly
- Audio
- It takes time for sound to start
- There is no sound from the TV
- No sound from a connected player
- A speaker produces no sound
- The subwoofer produces no sound
- Noise occurs or there are interruptions
- Noise can be heard
- The beginning of audio received via HDMI cannot be heard
- Sound suddenly reduces
- The sampling frequencies transferred wirelessly to the speakers from the sound system controller
- Cannot select a desired listening mode
- There is no sound with Dolby TrueHD and DTS-HD Master Audio
- About DTS signals
- Video
- There is no video
- There is no picture from a source connected to an HDMI IN terminal
- Images flicker
- Video and audio are out of sync
- Linked operation
- There is no linked operation with CEC compliant devices, such as a TV
- FM broadcasts
- Radio reception is poor or there is a lot of noise.
- BLUETOOTH function
- Cannot connect with this unit
- Music playback is unavailable on the unit even after successful BLUETOOTH connection
- Sound is interrupted
- The audio quality is poor after connection with a BLUETOOTH enabled device
- Network function
- Cannot access the Internet radio
- Cannot access the network server
- Playback stops while listening to music files on the network server
- USB storage device is not displayed
- Wireless LAN Network
- Cannot access wireless LAN network
- Playback is interrupted and communication does not work
- Display, OSD
- The display doesn't light
- Strange noises can be heard from the sound system controller
- DRC function does not work
- License and Trademark
- DOLBY AUDIO
- HDMI®
- CERTIFIED
- Bluetooth
- General Specifications
- Sound System Controller
- Amplifier Section
- Tuner Section
- Network Section
- BLUETOOTH Section
- AAC
- General
- Audio Inputs
- Wireless Satellite Speaker
- For non-magnetic shielded speakers:
- About HDMI
- Compatible functions
- Supported resolutions
- Pioneer
- Partie réseau
- Partie BLUETOOTH
- Autres
- Otros
- .3G2):
- Sezione rete
- Sezione BLUETOOTH
- Freestyle Sound System
- dts-HD®
- Andere
- Naar ARC TV
- LPCM (Lineair PCM):
- Gekoppelde werking
- Netwerksectie
- Audio-ingangen
- Overige
Brand : PIONEER
Model : FS-W40
Category : Home Theater System