
S-11 - Pregnant PIONEER - Free user manual and instructions
Find the device manual for free S-11 PIONEER in PDF.
| Brand | PIONEER |
| Model | S-11 |
| Category | Speaker |
| Speaker type | Satellite (front, surround) and center |
| Configuration | 1-way, 7.7 cm (cone) speaker |
| Nominal impedance | 6 Ω |
| Maximum input power | 150 W |
| Frequency range (front/surround) | 100 Hz – 20 kHz |
| Frequency range (center) | 90 Hz – 20 kHz |
| Sensitivity (front/surround) | 82 dB |
| Sensitivity (center) | 83 dB |
| Dimensions (front/surround) | 106 mm (W) x 116 mm (H) x 106 mm (D) |
| Dimensions (center) | 270 mm (W) x 100 mm (H) x 106 mm (D) |
| Weight (front) | 0.8 kg |
| Weight (surround) | 0.6 kg |
| Weight (center) | 1.0 kg |
| Enclosure type | Magnetically shielded sealed satellite (front and center), sealed satellite (surround) |
| Included accessories | Speaker cords (4 m x 3, 10 m x 2), non-slip pads (x20), wall brackets (x4), M5 screws (x4), warranty card, instruction manual |
| Maintenance | Clean with a soft, dry cloth. For stubborn dirt, use a soft cloth dampened with a diluted neutral detergent, then wipe with a dry cloth. Do not use wax, thinner, benzene, or insecticide. |
| Safety precautions | Do not expose to water or moisture. Do not place objects filled with liquid on the unit. Do not block ventilation openings. Do not install near a heat source. Disconnect during prolonged non-use. |
| Repairability | No user-serviceable parts. Refer all servicing to qualified personnel. |
Frequently Asked Questions - S-11 PIONEER
User questions about S-11 PIONEER
0 question about this device. Answer the ones you know or ask your own.
Ask a new question about this device
Download the instructions for your Pregnant in PDF format for free! Find your manual S-11 - PIONEER and take your electronic device back in hand. On this page are published all the documents necessary for the use of your device. S-11 by PIONEER.
USER MANUAL S-11 PIONEER
Discover the benefits of registering your product online at http://www.pioneer.co.uk (or http://www.pioneer.eu).
http://www.pioneerelectronics.com (US)
http://www.pioneerelectronics.ca (Canada)
http://www.pioneerelectronics.ca (Canada)
Operating Instructions / Mode d'emploi / Bedienungsanleitung / Istruzioni per l'uso / Handleiding /
Manual de instrucciones /Инстукции по захлелаци/操作手冊/取拔說明書

BZ02
Thank you for buying this PIONEER product. Please read through these operating instructions so you will know how to operate your model properly. After you have finished reading the instructions, put them away in a safe place for future reference.
These operating instructions have been written for joint use with the S-21W and S-11 models. Please consult those portions of the manual indicated for your model.
IMPORTANT

The lightning flash with arrowhead symbol, within an equilateral triangle, is intended to alert the user to the presence of uninsulated "dangerous voltage" within the product's enclosure that may be of sufficient magnitude to constitute a risk of electric shock to persons.
CAUTION
RISK OF ELECTRIC SHOCK DO NOT OPEN
CAUTION:
TO PREVENT THE RISK OF ELECTRIC SHOCK,DO NOT REMOVE COVER (OR BACK).NO USER-SERVICEABLE PARTS INSIDE.REFER SERVICING TO QUALIFIED SERVICE PERSONNEL.

The exclamation point within an equilateral triangle is intended to alert the user to the presence of important operating and maintenance (servicing) instructions in the literature accompanying the appliance.
D3-4-2-1-1_A1_En
WARNING
This equipment is not waterproof. To prevent a fire or shock hazard, do not place any container filled with liquid near this equipment (such as a vase or flower pot) or expose it to dripping, splashing, rain or moisture.
D3-4-2-1-3_A1_En
WARNING
Before plugging in for the first time, read the following section carefully.
The voltage of the available power supply differs according to country or region. Be sure that the power supply voltage of the area where this unit will be used meets the required voltage (e.g., 230 V or 120 V) written on the rear panel.
D3-4-2-1-4*A1_EN
WARNING
To prevent a fire hazard, do not place any naked flame sources (such as a lighted candle) on the equipment.
D3-4-2-1-7a_A1_En
VENTILATION CAUTION
When installing the subwoofer, make sure to leave space around the unit for ventilation to improve heat radiation (at least 10cm at top, 10cm at rear, and 10cm at each side).
WARNING
Slots and openings in the cabinet are provided for ventilation to ensure reliable operation of the product, and to protect it from overheating. To prevent fire hazard, the openings should never be blocked or covered with items (such as newspapers, table-cloths, curtains) or by operating the equipment on thick carpet or a bed.
D3-4-2-1-7b*A1En
Operating Environment
Operating environment temperature and humidity:
+5 °C to +35 °C (+41 °F to +95 °F); less than 85 %RH (cooling vents not blocked) Do not install this unit in a poorly ventilated area, or in locations exposed to high humidity or direct sunlight (or strong artificial light)
D3-4-2-1-7c*A1En
If the AC plug of this unit does not match the AC outlet you want to use, the plug must be removed and appropriate one fitted. Replacement and mounting of an AC plug on the power supply cord of this unit should be performed only by qualified service personnel. If connected to an AC outlet, the cut-off plug can cause severe electrical shock. Make sure it is properly disposed of after removal. The equipment should be disconnected by removing the mains plug from the wall socket when left unused for a long period of time (for example, when on vacation).
D3-4-2-2-1a_A1_En
For U.K. model and Singapore model only
Replacement and mounting of an AC plug on the power supply cord of this unit should be performed only by qualified service personnel.
IMPORTANT: THE MOULDED PLUG
This appliance is supplied with a moulded three pin mains plug for your safety and convenience. A 5 amp fuse is fitted in this plug. Should the fuse need to be replaced, please ensure that the replacement fuse has a rating of 5 amps and that it is approved by ASTA or BSI to BS1362.
Check for the ASTA mark or the BSI mark on the body of the fuse.
If the plug contains a removable fuse cover, you must ensure that it is refitted when the fuse is replaced. If you lose the fuse cover the plug must not be used until a replacement cover is obtained. A replacement fuse cover can be obtained from your local dealer.
If the fitted moulded plug is unsuitable for your socket outlet, then the fuse shall be removed and the plug cut off and disposed of safely. There is a danger of severe electrical shock if the cut off plug is inserted into any 13 amp socket.
If a new plug is to be fitted, please observe the wiring code as shown below. If in any doubt, please consult a qualified electrician.
IMPORTANT: The wires in this mains lead are coloured in accordance with the following code: Blue : Neutral Brown : Live
As the colours of the wires in the mains lead of this appliance may not correspond with the coloured markings identifying the terminals in your plug, proceed as follows;
The wire which is coloured BLUE must be connected to the terminal which is marked with the letter N or coloured BLACK.
The wire which is coloured BROWN must be connected to the terminal which is marked with the letter L or coloured RED.
How to replace the fuse: Open the fuse compartment with a screwdriver and replace the fuse.

D3-4-2-1-2-2*A2En
IMPORTANT SAFETY INSTRUCTIONS
1) Read these instructions.
2) Keep these instructions.
3) Heed all warnings.
4) Follow all instructions.
5) Do not use this apparatus near water.
6) Clean only with dry cloth.
7) Do not block any ventilation openings. Install in accordance with the manufacturer's instructions.
8) Do not install near any heat sources such as radiators, heat registers, stoves, or other apparatus (including amplifiers) that produce heat.
9) Do not defeat the safety purpose of the polarized or grounding-type plug. A polarized plug has two blades with one wider than the other. A grounding type plug has two blades and a third grounding prong. The wide blade or the third prong are provided for your safety. If the provided plug does not fit into your outlet, consult an electrician for replacement of the obsolete outlet.
10) Protect the power cord from being walked on or pinched particularly at plugs, convenience receptacles, and the point where they exit from the apparatus.
11) Only use attachments/accessories specified by the manufacturer.
12) Use only with the cart, stand, tripod, bracket, or table specified by the manufacturer, or sold with the apparatus. When a cart is used, use caution when moving the cart/apparatus combination to avoid injury from tip-over.

13) Unplug this apparatus during lightning storms or when unused for long periods of time.
14) Refer all servicing to qualified service personnel. Servicing is required when the apparatus has been damaged in any way, such as power-supply cord or plug is damaged, liquid has been spilled or objects have fallen into the apparatus, the apparatus has been exposed to rain or moisture, does not operate normally, or has been dropped.
D3-7-13-69_En
CAUTION
The POWER switch on this unit will not completely shut off all power from the AC outlet. Since the power cord serves as the main disconnect device for the unit, you will need to unplug it from the AC outlet to shut down all power. Therefore, make sure the unit has been installed so that the power cord can be easily unplugged from the AC outlet in case of an accident. To avoid fire hazard, the power cord should also be unplugged from the AC outlet when left unused for a long period of time (for example, when on vacation).
D3-4-2-2-2a*A1_EN
Information to User
Alterations or modifications carried out without appropriate authorization may invalidate the user's right to operate the equipment.
D8-10-2_A1_En
This Class B digital apparatus complies with Canadian ICES-003.
D8-10-1-3_A1_En
NOTE:
This equipment has been tested and found to comply with the limits for a Class B digital device, pursuant to Part 15 of the FCC Rules. These limits are designed to provide reasonable protection against harmful interference in a residential installation. This equipment generates, uses, and can radiate radio frequency energy and, if not installed and used in accordance with the instructions, may cause harmful interference to radio communications. However, there is no guarantee that interference will not occur in a particular installation. If this equipment does cause harmful interference to radio or television reception, which can be determined by turning the equipment off and on, the user is encouraged to try to correct the interference by one or more of the following measures:
— Reorient or relocate the receiving antenna.
Increase the separation between the equipment and receiver.
Connect the equipment into an outlet on a circuit different from that to which the receiver is connected.
Consult the dealer or an experienced radio/TV technician for help.
D8-10-1-2_A1_En
For Europe model only

If you want to dispose this product, do not mix it with general household waste. There is a separate collection system for used electronic products in accordance with legislation that requires proper treatment, recovery and recycling.
Private households in the member states of the EU, in Switzerland and Norway may return their used electronic products free of charge to designated collection facilities or to a retailer (if you purchase a similar new one).
For countries not mentioned above, please contact your local authorities for the correct method of disposal.
By doing so you will ensure that your disposed product undergoes the necessary treatment, recovery and recycling and thus prevent potential negative effects on the environment and human health.
K058b_A1_En
IMPORTANT NOTICE
THE MODEL NUMBER AND SERIAL NUMBER OF THIS EQUIPMENT ARE ON THE REAR.
RECORD THESE NUMBERS ON YOUR ENCLOSED WARRANTY CARD AND KEEP IN A SAFE PLACE FOR FUTURE REFERENCE.
D36-AP9-1_A1_En
For U.S. model only
WARNING: Handling the cord on this product or cords associated with accessories sold with the product may expose you to chemicals listed on proposition 65 known to the State of California and other governmental entities to cause cancer and birth defect or other reproductive harm.
Wash hands after handling.
D36-P5_B1_En
This product is for general household purposes. Any failure due to use for other than household purposes (such as long-term use for business purposes in a restaurant or use in a car or ship) and which requires repair will be charged for even during the warranty period.
K041_A1_En


Dear Customer:
Selecting fine audio equipment such as the unit you've just purchased is only the start of your musical enjoyment. Now it's time to consider how you can maximize the fun and excitement your equipment offers. This manufacturer and the Electronic Industries Association's Consumer Electronics Group want you to get the most out of your equipment by playing it at a safe level. One that lets the sound come through loud and clear without annoying blaring or distortion-and, most importantly, without affecting your sensitive hearing.
Sound can be deceiving. Over time your hearing "comfort level" adapts to higher volumes of sound. So what sounds "normal" can actually be loud and harmful to your hearing. Guard against this by setting your equipment at a safe level BEFORE your hearing adapts.
To establish a safe level:
- Start your volume control at a low setting.
- Slowly increase the sound until you can hear it
- Slowly and clearly, and without distortion.
Once you have established a comfortable sound level:
- Set the dial and leave it there.
Taking a minute to do this now will help to prevent hearing damage or loss in the future. After all, we want you listening for a lifetime.
We Want You Listening For A Lifetime
Used wisely, your new sound equipment will provide a lifetime of fun and enjoyment. Since hearing damage from loud noise is often undetectable until it is too late, this manufacturer and the Electronic Industries Association's Consumer Electronics Group recommend you avoid prolonged exposure to excessive noise. This list of sound levels is included for your protection.
Decibel
Level Example
30 Quiet library, soft whispers
40 Living room, refrigerator, bedroom away from traffic
50 Light traffic, normal conversation, quiet office
60 Air conditioner at 20 feet, sewing machine
70 Vacuum cleaner, hair dryer, noisy restaurant
80 Average city traffic, garbage disposals, alarm clock at two feet.
THE FOLLOWING NOISES CAN BE DANGEROUS UNDER CONSTANT EXPOSURE
90 Subway, motorcycle, truck traffic, lawn mower
100 Garbage truck, chain saw, pneumatic drill
120 Rock band concert in front of speakers,
thunderclap
140 Gunshot blast, jet plane
180 Rocket launching pad
Information courtesy of the Deafness Research Foundation.


Want You LISTENING FOR A ZINE
S001_A1_En
Contents
Features.. 6
Accessory Items 6
Installation 6
Connections and Use (S-21W) 8
Connections and Use (S-11) 10
Specifications 12
Troubleshooting 13
Features
S-21W
High Power 160 W (Peak)
- Compact Design and Deep Bass Sound
Phase Control Technology
S-11
150 W Power Handling
- Round shape enclosure
Phase Control Technology
Accessory Items
S-21W
RCA plug cord (3m)× 1
Power cord
S-11
- Speaker cords (4 m) x 3
- Speaker cords (10 m) x 2
Non-Skid Pads x 20 - Brackets for wall mounting x 4
- Screw (M5) x 4
Applies to both S-21W and S-11
Warranty card
- Operating instructions (this document)
Installation
Speaker installation
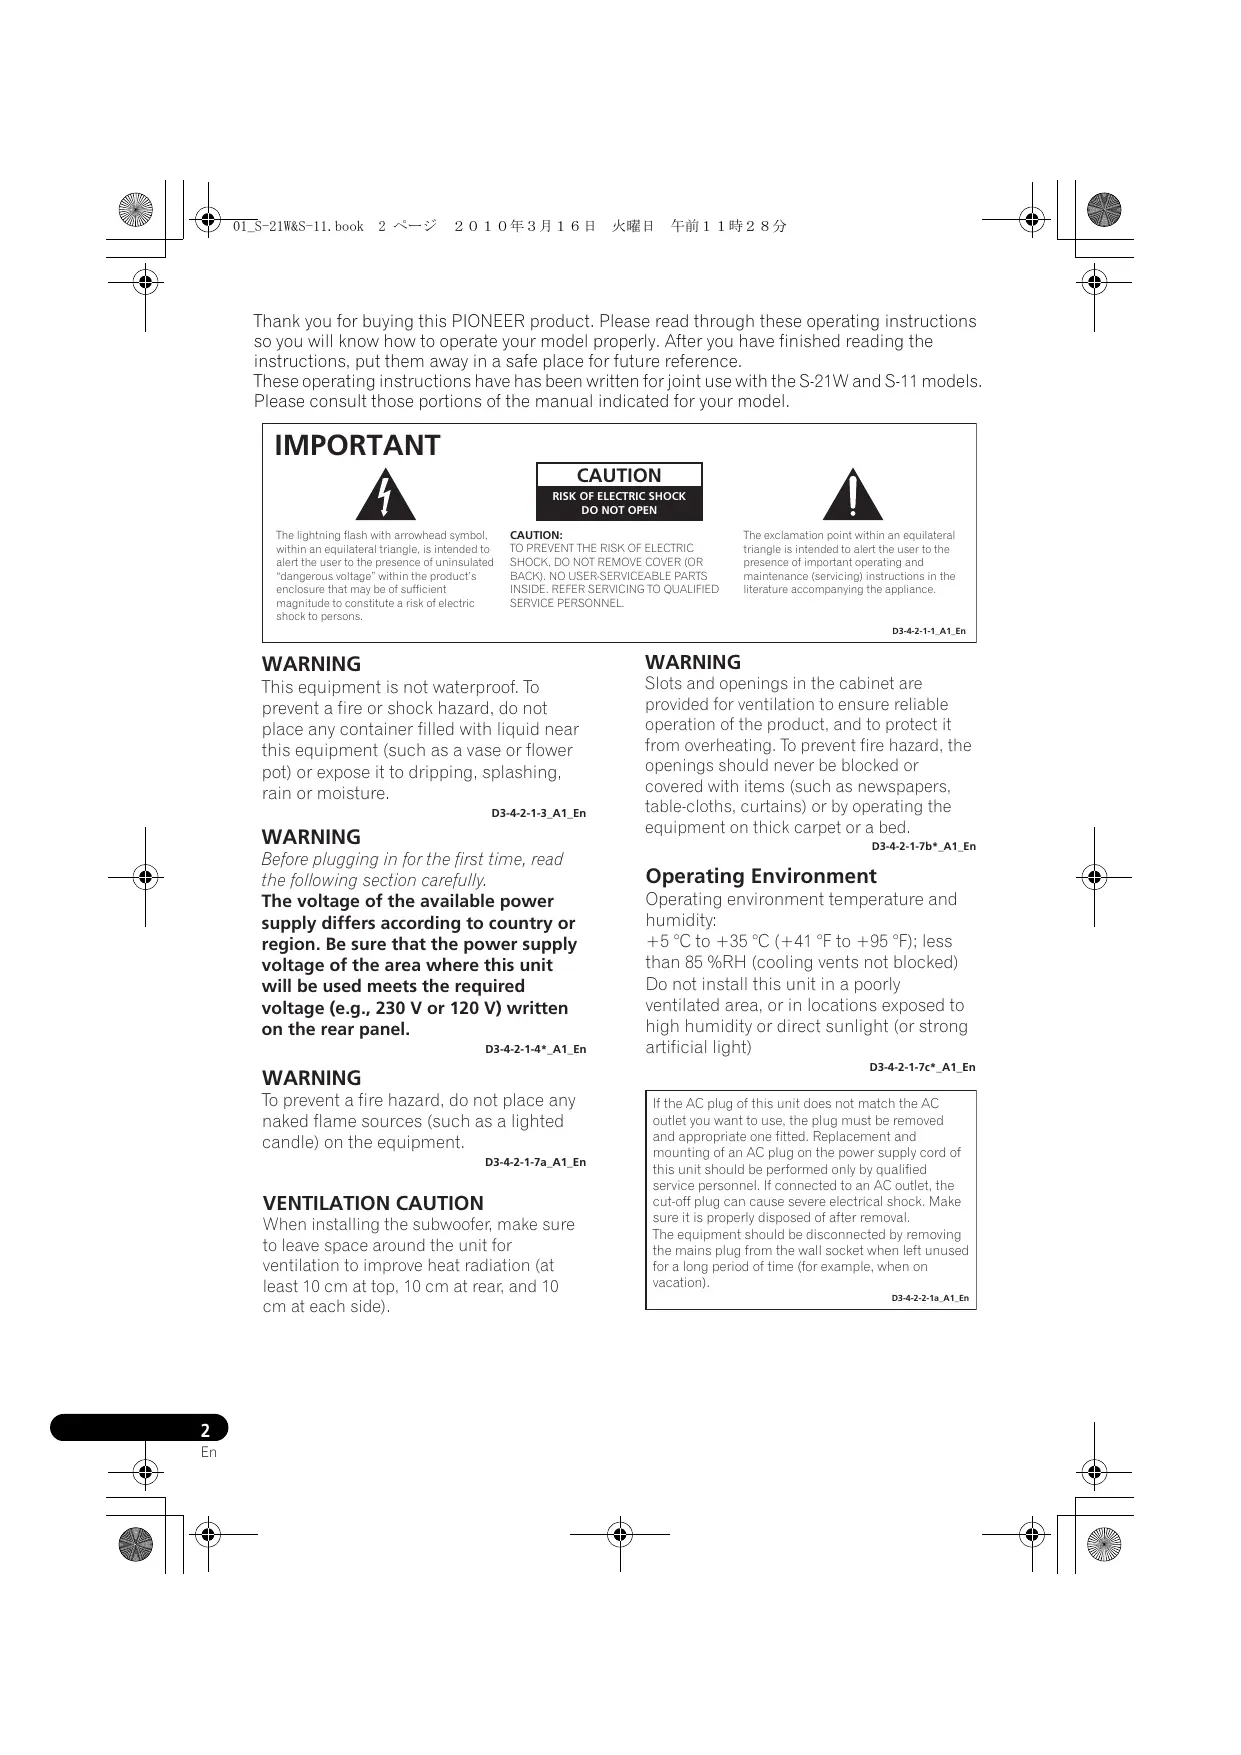
- As shown in the accompanying illustration, when surround speakers are installed to the rear of the listening position, you can enjoy genuine 5.1 channel surround sound.
1 Front left speaker
2 Center speaker
3 Front right speaker
4 Subwoofer
5 Listening position
6 Surround left speaker
7 Surround right speaker
- The subwoofer and surround speakers in this system cannot be used nearby a CRT-based TV or color monitor. When using this kind of CRT-based TV or color monitor, install the speakers away from the display device. Any other device liable to be influenced by magnetism (floppy disk drive, cassette tape recorder, video tape player, etc.) should also be kept at a distance from the subwoofer and surround speakers.
Subwoofer (S-21W)
- When moving the subwoofer, avoid touching the bottom surface, since the speaker unit is located there.
- Orient the subwoofer's front face pointing toward the listening position.
- The subwoofer plays back the bass in monaural, making use of the fact that the human ear is not very sensitive to the direction of low-pitched sound. Because of this, the subwoofer can be installed almost anywhere. If it is installed too far away, however, the sound from the other speakers may become unnatural. The degree of bass effect can be adjusted by moving the unit farther from or closer to the wall.
Satellite speakers (S-11)
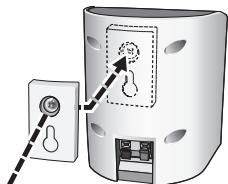
- Labels located on the rear of each speaker indicate whether they are designed for front or surround use.
- Speakers installed to the right and left should be separated by about 1.8m to 2.7 m distance. They should be installed at equal distances from the television, and at equal heights from the floor.
- Optional speaker stands can be purchased to facilitate optimal mounting of the surround speakers at or slightly above the listener's ear height.
- The surround effect will be diminished if the surround speakers are mounted at extreme distances from the listener's position.
- The front speakers and center speaker furnished in this system are designed for use close to a CRT-based TV or color monitor. However, if color distortion is caused due to the installation, try turning off the power to the CRT-based TV or color monitor for 15 to 30 minutes, then turning on the power again. The self-degaussing function built into the CRT-based TV or color monitor should help ameliorate the effect of the speakers on the image. If color distortion continues to be a problem, separate the speakers farther away from the screen. If magnets or devices emitting magnetic fields are installed nearby, the interactive effect with the speaker system may cause color distortion in a CRT-based TV or color monitor.

CAUTION
- Install the center speaker below the TV so that the sound of the center channel is localized at the TV screen.
- When installing the center speaker on top of the TV, be sure to secure it with tape or some other suitable means. Otherwise, the speaker may fall from the TV due to external shocks such as earthquakes, endangering those nearby or damaging the speaker.
Installation precautions
- Do not place heavy or large objects on top of the speaker. Doing so could provoke the speaker to fall, causing damages or bodily injury.
- Do not place the speaker on an unstable surface, as doing so may cause the speaker to fall and cause damage or bodily injury.
- Switch off and unplug your AV equipment and consult the instructions when connecting up components. Make sure you use the correct connecting cables.
- Do not sit or stand on the speaker, or let children play on the speaker. Doing so could provoke the speaker to fall, causing damages or bodily injury.
- Install the subwoofer in a well-ventilated location where it will not be exposed to high temperatures and high humidity.
- Do not place the subwoofer near stoves or other heating equipment or at locations exposed to direct sunlight, as these can have an adverse effect on the cabinet and internal components. Also, do not install the unit where there is too much dust or high humidity, as these can cause malfunctioning or breakdowns. (Avoid cooking tables and other locations where the unit would be exposed to heat, steam and soot.)
- Keep the subwoofer away from devices such as cassette decks which are sensitive to magnetic fields.
- Do not place cups, glasses, or other containers with fluids on top of the units, since the units may be damaged if the liquid spills.
- The installation location selected should have a sturdy floor surface. Mounting the subwoofer on a long-pile carpet should be avoided, since the carpet may touch the driver's diaphragm, causing distorted sound.
- Please install the subwoofer away from the antenna cable of the receiver, as noise can be caused with installation close to the antenna cable. In such a case, use the subwoofer at a position away from the antenna and the antenna cable, or when playback of extra bass is not required, switch off the power for the subwoofer.
- The front grilles on front/center/surround speakers cannot be removed. Do not try to forcibly remove them since doing so may damage the grille.
- When mounting front speakers or surround speakers on a wall surface, make sure that the wall you intend to mount the speakers on is strong enough to support them.
When attaching the speakers to brackets, always use the furnished brackets for wall mounting.
- Do not attach center speaker and subwoofer to the wall or ceiling, as they may cause injury in the event of a fall.
- This speaker system has an impedance of 6 , and should be connected only to an receiver designed with a load impedance of 6 (the receiver's speaker output connector should clearly be labeled "6 ).
- The S-11 incorporates autoregression technology to protect the speakers. If the speakers stop emitting noise when receiving too large a signal, turn the volume down on the receiver and wait a few seconds. The protection feature disables itself automatically.
Pioneer is not responsible for any accidents or damage that result from improper installation, misuse or modification of the product, or natural disasters.
Maintenance of external surfaces:
- Clean the surface by wiping with a soft, dry cloth.
- When the surfaces are very dirty, wipe with a soft cloth dipped in some neutral cleanser diluted five or six times with water, and wrung out well, and then wipe again with a dry cloth. Do not use furniture wax or cleaners.
- Never use thinners, benzine, insecticide sprays and other chemicals on or near this unit, since these will corrode the surfaces.
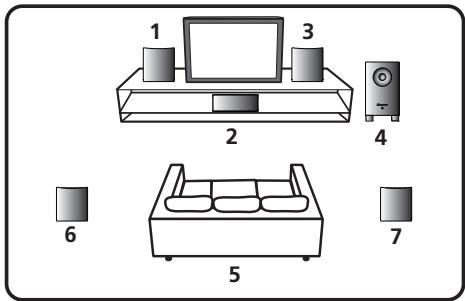
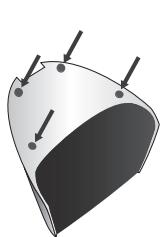
Affixing Non-Skid Pads
Apply the accessory non-skid pads to the bottom surfaces of the front/center/surround speakers
Effective Combination of Subwoofer and Satellite Speakers
- When the subwoofer is combined with satellite speakers in a total system, the sound characteristics produced are like those shown in the accompanying graph, depicting the enhancement of the bass frequencies.
This is particularly effective for reproducing ground rumbles and other deep sound effects found in movies.

Frequency(Hz)
Connections and Use (S-21W)
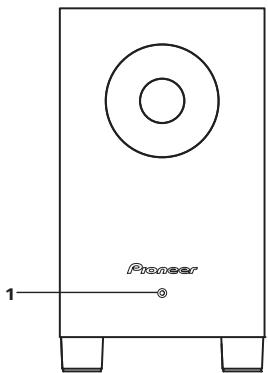
Panel facilities Front panel
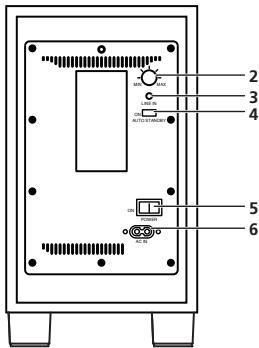
Rear panel
1 Power Indicator
When the power is turned ON, the indicator changes from flashing to steadily lighted blue. In the standby mode, the indicator lights red.

CAUTION
- The power is still supplied even when the power indicator is off. The power plug (interrupter) must be unplugged in order to completely cut the power supply. When not using this product for long periods of time, such as when traveling, unplug the power cord (interrupter) from the power outlet for safety purposes. Failure to do so could lead to fire.
2 Volume knob (MIN/MAX)
- Sets the subwoofer volume.
- With this unit, the bass level can be independently set, so do not turn up the bass on the receiver.

CAUTION
- The volume knob is factory set at the MIN position.
3 Line Level Input terminal (LINE IN)
4 Auto Standby switch (AUTO STANDBY)
- Turning the Auto Standby function on or off.

CAUTION
- The default setting for AUTO STANDBY switch is ON.
Auto standby function
When there is no (or only very weak) input signal for a period of about ten minutes, the power mode automatically changes to standby (power indicator lights red). The power automatically turns on when a signal is input. The auto standby function is deactivated when AUTO STANDBY switch is set to OFF.

CAUTION
- There may be cases where a connected component outputs noise or some other non-audio signal which causes the subwoofer to automatically power on when in Auto Standby mode. If this happens, switch off the Auto Standby mode and switch the subwoofer on/off manually.
5 Power switch (POWER)
- Switches the subwoofer between ON and OFF.
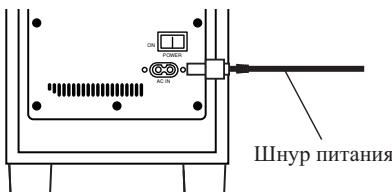
6 AC IN
- Connect the power cord to a AC socket.
Connection
Before making or changing the connections, switch off the power and disconnect the power cord from the AC outlet.
Line level connection
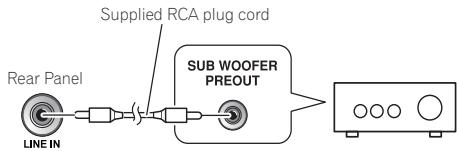
Connect the set's LINE IN terminal to the receiver's SUBWOOFER PREOUT terminal using the included RCA plug cord.

CAUTION
- When connected to the PREOUT terminal for surround center channel on the receiver, the bass is heard only on the center channel, so it will be insufficient.
Connecting the power cord
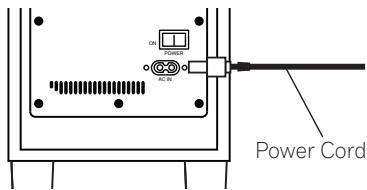
Connect the power cord for the this unit to the unit's power connector (AC IN), and the other ends to an AC power supply. When turning on the power, turn on the power to the receiver first, then the power to this unit.
Operation
For details regarding operating part functions, refer to Panel facilities on page 8.
1 Turn the POWER switch (5) ON.
- If the unit's power cord is connected to a switched AC outlet on the receiver and the switch is left ON, the unit can be turned ON/OFF together with the receiver.
- If the unit's power cord cannot be connected to the receiver, turn the power to the receiver ON before turning the power to the unit ON. When turning the power OFF, turn the power to the unit OFF before turning the power to the receiver OFF.
- Set the cross-over frequency to match that of the speakers actually used.
2 Operate the receiver and adjust the volume of the other speakers.
3 Adjust the volume of the bass with the volume knob (2).
- Turn the knob slowly from the MIN position.
4 Turn the POWER switch (5) OFF.
- The power indicator disappears.

CAUTION
- Do not use the speaker to output distorted sound for long periods of time. This can result in damages to the speaker and poses a potential fire hazard.
Connections and Use (S-11)
Connection
Before making or changing the connections, switch off the power and disconnect the power cord from the AC outlet.
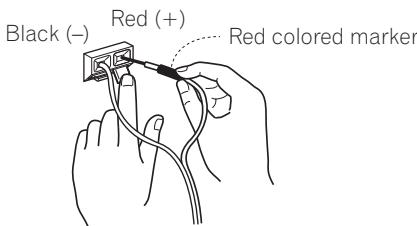
Connecting the speakers
To get the best out of your speakers it is important that you connect them properly to your receiver. Each speaker connection consists of a positive (+) and a negative (-) terminal. These should be matched between the receiver and the speaker.
1 Attach one end of the supplied speaker cord to the rear of the each speaker.
- Connect the wire with the colored marker to the red (+) terminal; the plain wire to the black (-) terminal. Press down the spring-loaded tab and insert the wire, as shown below. Release the tab to secure the wire.
2 Connect the other end of each speaker cord to your receiver.
- To connect, insert the colored wire into the matching positive (colored) terminal and the other wire into the negative (black) terminal. See also the Operating Instructions that came with your receiver.

CAUTION
- These speaker terminals carry HAZARDOUS LIVE voltage. To prevent the risk of electric shock when connecting or disconnecting the speaker cords, disconnect the power cord before touching any uninsulated parts.
- After connecting the plugs, pull lightly on the cords to make sure that the ends of the cords are securely connected to the terminals. Poor connections can create noise and interruptions in the sound.
- If the cords' wires happen to be pushed out of the terminals, allowing the wires to come into contact with each other, it places an excessive additional load on the receiver. This may cause the amp to stop functioning, and may even damage the receiver.
- When using a set of speakers connected to an receiver, you won't be able to obtain the normal stereo effect if the polarity (+, -) of one of the speakers (left or right) is reversed.
Operation
- Set the receiver's cross-over frequency at 200Hz .
Wall-mounting the front and surround speaker system
Attaching the brackets
- When attaching the speakers to brackets, always use the furnished brackets for wall mounting.
- Make sure to tighten the supplied screw as securely as possible when attaching the bracket to the back of the speaker.
- Do not attach brackets to center speaker or subwoofer.

CAUTION
- Use the M5 metric thread screw. Do not use inch thread screw.
Before mounting
- Remember that the speaker system is heavy and that its weight could cause the wood screws to work loose, or the wall material to fail to support it, resulting in the speaker falling. Make sure that the wall on which you intend to mount the speakers is strong enough to support them. Do not mount on plywood or soft surface walls.
- Mounting screws are not supplied. Use screws suitable for the wall material and support the weight of the speaker. If you are unsure of the qualities and strength of the walls, consult a professional for advice.

Specifications
S-21W
Power Amplifier Power Output (Peak) 160 W
Power Amplifier Power Output (RMS) 100 W (100 Hz, 4 Ω, THD 10 %)
Power Amplifier Power Output (FTC) 80 W (35 Hz to 500 Hz, 4 Ω, THD 1%)
Input (sensitivity at 100Hz LINE LEVEL (RCA jack) 300 mV
Cabinet........... Bass-reflex, floor type
Speaker 16 cm cone type
Speaker Frequency range 33 Hz to 700 Hz
Power Requirements European model.. AC 220 V to 240 V, 50 Hz/60 Hz
U.S., Canadian model AC 120 V, 60 Hz
Other model AC 110 V to 240 V, 50 Hz/60 HZ
Power Consumption 25 W
Power consumption in standby. 0.5 W or less
Outline Dimension. 230 mm (W) x 408 mm (H) x 344 mm (D)
(9 1/16 in.(W) x 16 1/16 in.(H) x 13 17/32 in. (D))
Weight (without package) 6.5 kg (14 lb 5 oz)
S-11
Front speakers / Surround speakers
Enclosure
Front speakers ..Closed-box bookshelf type (magnetically shielded)
Surround speakers Closed-box bookshelf type
System 7.7 cm 1-way system
Speaker 7.7 cm cone type
Nominal impedance 6Ω
Frequency range 100 Hz to 20 kHz
Sensitivity. 82 dB
Permissible input: maximum input. 150 W
Dimensions 106 mm (W) x 116 mm (H) x 106 mm (D)
(4 3/16 in.(W) x 4 9/16 in.(H) x 4 3/16 in.(D))
Weight
Front speakers 0.8 kg (1 lb 12 oz)
Surround speakers . 0.6 kg (1 lb 5 oz)
Center speaker
Enclosure............Closed-box bookshelf type (magnetically shielded)
System 7.7 cm 1-way system
Speaker 7.7 cm cone type
Nominal impedance 6Ω
Frequency range 90 Hz to 20 kHz
Sensitivity. 83 dB
Permissible input: maximum input. 150 W
Dimensions 270 mm (W) x 100 mm (H) x 106 mm (D)
(10 5/8 in.(W) x 3 15/16 in.(H) x 4 3/16 in.(D))
Weight. 1.0 kg (2 lb 3 oz)
Specifications and design subject to possible modification without notice, due to improvements.
Troubleshooting
Incorrect operations are often mistaken for trouble and malfunctions. If you think that there is something wrong with this component, check the points below. Sometimes the trouble may lie in another component. Investigate the other components and electrical appliances being used. If the trouble cannot be rectified even after exercising the checks listed below, ask your nearest PIONEER authorized service center or your dealer to carry out repair work.
S-21W
| Symptom | Cause | Remedy |
| No power is being supplied (Indicator does not light up when POWER switch is turned on). | • Power supply plug is not correctly inserted. | • Insert plug securely. |
| No sound (Indicator is lit blue). | • Connection of accessory RCA plug cord is wrong or disconnected. • Volume knob is set to MIN. • Input level is too low. | • Check again and connect correctly. • Turn clockwise slowly. • Raise the receiver's output level. |
| Sound is distorted. | • Level is too high. • Input level is too high. | • Turn the volume knob counterclockwise to lower the level. • Turn the receiver's output level (volume, bass control, bass boost) counter-clockwise to lower the level. |
| Howling noise occurs. | • No power supplied to the receiver. • Subwoofer level is set too high. | • Connect an receiver and supply power. • Place the subwoofer a good distance from speakers. Turn the volume knob counterclockwise to lower the volume. |
| Much noise when listening to AM or FM broadcasts. | • The AM loop antenna or the FM indoor antenna is close to this unit. | • Increase the distance between the AM or FM antenna (for indoor use) and this unit. |
| No sound is produced (power indicator lights red) | ·Unit has entered standby mode. | ·Turn the Auto Standby function OFF. - When the Auto Standby function is turned ON, if no signal (or only a very weak signal) is input for a period of about ten minutes, the power mode will automatically change to standby. - Note that when listening with the volume set to a very low level, the Auto Standby function may operate, switching the unit to the standby mode. |
| Initial sounds of a track can't be heard. | ·The audio signal was input when the unit was in the standby mode. |
S-11
| Symptom | Cause | Remedy |
| No sound. | Incorrect connection of speaker wire.Receiver is off.Volume control is at zero. | Connect correctly.Turn on receiver.Slowly turn up volume. |
| Sound is distorted. | Extreme signal condition. | Turn down the receiver's output level (volume, bass control, bass boost) to lower the level. |
| Speakers stop producing sound suddenly. | An excessively large signal was input, resulting in the operation of the automatic protection circuit. | Turn the volume down to resume normal speaker output. |
Articles accessories
S-21W
WAARSCHUWING NETSNOER
Achthbe NkntbIb-CTaPnHcEAE, BUIeBuaepin HOpberNIOyT CeBnTnHO BO3BaPaatbI cNtloBtOBAHbIe 3NtckPOTHBnHnBnBnBnBnBnBnBnBnBnBnBnBnBnBnBnBnBnBnBnBnBnBnBnBnBnBnBnBnBnBnBnBnBnBnBnBnBnBnBnBnBnBnBnBnBnBnBnBnBnBn
B cTpaHn, he nepeHcIeHbIbx bIwe, dIy nOlyeHHa HNfOpMaIOn o npAINbIbX cNoC6Ba xytNtHaZmIo6paauaiTeB CootBTCTByUoIue huyepKdHn.
Noctyana TAKIM Ogba3b, Bm Mokeche 6bItb YepebeH b M TOV yTHINNHPyBemn pnoDyt kSyd BoCTOBETCYBOUM mObpAmO mbopabotAH, nepedah C BOBTECTBYOUM nyHKT n nepebaotah Be3 0oBMOxHNb HeratBNHSn NOcneDtBm for NKpyAooe npCebIy a NdoOpBn IIOeJ.
K058b_A1_Ru
Copepkanhe
Функциональные BO3MOЖHOCTN.....4
Ppnilaraemblpe npnaadnexknoctn 4
YcTaHOBka. 4
Подклочени И Зкплuyaразця (S-21W) 7
IopklnoueHne n 3Kcnnyataaun (S-11)....9
Texnueckne xapaKtepncTkn 11
Ponck uyctpaehne henoanok 12
- BbICOKaMoIHOCtB 160BT (INKOBoe 3HaueHHe)
KOMIIaKTHa KOHCTpyKIIHn IJIy6OKoe 3ByuHaHE 6acOB
TexHIOIgHpeRyINpOBKΦa3bI
S-11
MaKCHMaJIbHaЯ MoUHOCt b 150 BT
Kopnyc KpyrIoi fOpMbI
TexHJIOrHpeRyJIINpOBKnΦa3bI
3 BxOJHOn pa3bEm IJIa IINHeiHOB BxoJa (LINE IN)
4 KhoNka aBTOMaTnueckoro nepeKIOUeHnB pexm OxuHaHnA (AUTO STANDBY)
BkJIIOUeHHe N BbIKJIIOUeHHe ΦyHKiHN aBTOMaTHueCKOFO IpeKeJIIOUeHnBpeKHM OKNJDAHn.

BHIMAHNE
- YctaHOBka IIO yMOJIuaHHIO JIJIIpeKeJIOuateJIr AUTO STANDBY: BKJIIOueHO (ON).
ФункцаabTomatnueckoro nepeKJIIOUeHnB pexm OxNdaHn
EcJIN B TeueHHe DecTH MNHyT He IIOCTyIaET BXoIHHO CNHHaJI (IIHN IOCTyIaET TOJIbKO OYeHb CJaobi CNHHaJI), yCTpoCTBO ABOTOMATNueCKn IpeKJIIOUOaETcB PekHM OxNiDaHHa (HHNkATOp IITAHn HAHnAETROPb KpaCHbIM TcBTOM). YCTPOIcTBo ABOTOMaTHueCKn BKIOHHTcPn IHOCTyIeHHN BXoIHOrO CNHHaJI. FyHKIIHn IpeKJIIOUeHHN B peKHM OxNiDaHHo OTKIOUeHa, KOrJa IpeKJIIOUaTeJIb AUTO STANDBY YctahOBJIeH B IOLOKeHHe BbIKIOUeHHa (OFF).

BHIMAHNE
Moryt Ha6JIIOdaTbC cIyuaH, KOJa c IIOKJIIOUeHHOTo KOMIOHeHTa IOCTUYaet IIYM HJIN dpyrHe CNHAlJIb, OTJINHuBleOT ayHNCHHaIOB, YTO Bb3bIAeT aBTOMATNUeCKOe BKJIOUeHENE INHTaHnA caOBByΦepa, HA KOtOpOM BKJIOUeH peKHM aBTOMATNUeCKOIEpeKIIIOUeHnB peKHM OKNlaHn. EcJIN 3TO IIPOH3oJET, BbIKJOUHTe cyHKIIIOuABOTAMATNUeCKOIEpeKIIIOUeHnB peKHM OKNlaHn H BKJIOUaHte H bIKJIOuaTe caOByΦep BpyHyIO.
5 BbikluoyateJIb nItaHn (POwER)
- IpekeKIOUaETIITaHHe ca6ByΦepa MeKJy peKHMAMN BkJIIOUeHnE (ON) H BbIKJIIOUeHnE (OFF).
6 Pa3beM AC IN
-ПоДсоeДИнНITEIHHypIITaHnK cTeBOI pO3eTKe IepemEHOro TOKa.
IopKJIIOUeHne
Ipeed BbINOJIHeHEm IIN N3MeHEnEM CoeHNHeHn OTKJIIOHTe NITaHne INOTCOeDINHIne 1hyp NITaHnO rOT cTeBOI p03ETKN NepemEHORo Toka.
CoeHHeHne IJIa JINHeHOrO cnHaJa

ПлдсоeДиНпe раЗьeM LINE IN ha yctpoiCTbe K pa3bemy SUBWOOFER PREOUT ha pechBpe c ПOMOПью Каб�Я co IIteKePOM RCA.

BHIMAHNE
Korla BbIIOJIHeHO IOIcoeIHHeHHe Kpa3bemy PREOUT IJIa IeHTpaJIbHOro KaHaJIa O6bEMHO 3Byka Ha peCnBepe, HHI3OQUaCTOTHbIe 3ByKn BOICIpON3BOJATcTc TOJIbKO HA IeHTpaJIbHOM KAHaJIe, YTO HeIOCTaTOUHO IJIH HopMaJIbHOro 3ByuHaHH.
Повсоевненьешуразптуни
IIOIOoeINHInTe IHHyp IINTaHHn DaHHORO yctpoCTBa K pa3bemy IINTAHn (AC IN) Ha yctpoCTBe, a npyroI KOHeII IIOIOeHNHTe K p03ETke IINTAHn IepemEHNO TOka. IIph BKJIIOUeHHN IINTAHn Chaayla BKJIIOUHTe IINTaHHe pechHBepa, a 3aTeM BKJIIOUHTe IINTaHHe DaHHORO yctpoCTBa.
Pa6ota c yctpoiCTBOM
3a IIOIPO6HOH HFOpMaIIHeI O fYHKIIHX opraHOB ynpabJIeHH IOpaIaIteCb K pa3JeIy Op2aHbI noKIOUeHua y npaaJIeHua Ha hapyJcHbIX naHeJax Ha cTp.7.
1 IpeekIIOUHTe BbIKIOUaTeJIb NITAHNPOWER (5) B NOLOXHeB EKIOUeHn (ON).
EcJIN IIHyp IINTaHHy ycTpoIcTBa IIOIKJIIOUeH K BCIIOMoRAteJBHoH po3ETke ceTH IINTaHHa Ha 3aJHei INaHEJIpeCHBepa, a BbIKJIIOUaTeJI bI NTaHHa YCTaHOBJEHN B IOJIIOKeHHe BKJIIOUeHHa (ON),ycTpoIcTBO MOKHO BKJIIOUaTB H BbIKJIIOuAtb OJHOBpeMeHHO c peCHBepom.
KorIa daHHoe yctpoHcTBO He MoKet 6bITb IIOCoEINHeO K p03eTke Ha pecHBepe, BKJIIOuaiTe IIHTaHHe pecHBepa IO TORO, KaK BKJIIOUaTB IIHTaHHe DAHHOro yctpoCTBa. IIpr BbIKJIOUeHHI IIHTaHHBbIKJIIOuaIte IIHTaHHe yctpoHcTBA IIpei TeM, KaK BbIKJIIOUHTb IIHTaHHe pecHBepa.
- YcTaHOBHTe TaCTOTy pa3JeJIeHn TaKHM O6pa3OM, Yo6bI OHa COBIIaJaIa C COOTBeTCTByIOUHM IIapaMeTpamH HcIOJIb3yEmbIX KOJIOHOK.
2 BbINOJIHnTe Heo6xOaIMMbIe OepaunncpeCINBepOM N HAcTpoIe yPoBeHb rPOMKoCTn DpyrNX KOJHOHK.
3 HactpoTe ypoBeHb rPOMKoCTn Hn3KOyAcTOTbIX 3ByKOB C NOMOoiBIO pyuKN peYJInpOBKn ypoBHrPOMKOCTn (2).
MeJIeHNO IOBOPaHbAte pyKy c IIOJIOKeHn MHHMaJIbHO rypOBHr MIN.
4 NepeekJIOUHTe BbIKHOuataIb NITaHINr POWER (5) B noJIOXeHne BbIKJIOUeHnR (OFF).
- INHdkaTop nHTaHHnI gnarachet.

BHIMAHNE
He IOnyckaIte BbIBOJ chepe3 rPOMKOrOBOpHTeJIb NcKaJKeHHOrO 3BykaB TeueHHe IIInTeJIbHOrO IepHoJa BpeMeHH.3To MOKeT BbI3BaTbIOBpeKdEHHe rPOMKOrOBOpHTeJIu Co3Jaet IOTeHuaJIbHyIO OnaCHOCT bIpePerBa.
Подключени и заця (S-11)
Повлочене
Peped BbIOpHeHnEM nIe N3MeHeHEm CoeINHeHn OTKIOUHTe NTaHne I OTCoEINHTe 1hyp PNTaHnO TcTeBOI p03ETKn NpeMeHHoro TOka.
IopcoeHHeNe KOJIOHOK
ДллллучehннHaHJIyUHnxpe3yJbTaTOB 3KcIIIyatauHHKOJIIOHOKBaJxHOIIpaBnJIbHO BbIIOJIHNbHIXIOJIKJIIOUeHHeKpeCBepy. IIOJIIOUeHHeKaKdoN3KOJIIOHOKBbIIOJIHJeTcOceINHeHnEM DBYx KOHTaKTOB:IOJIIOXHTeJIbHOro (+) nOTPiuaTeJIbHOro (-) .Heo6xoIIMOC6JIIOaTb POJIApHoCTbMeKdypeCBepom N KOJOHOKoi.
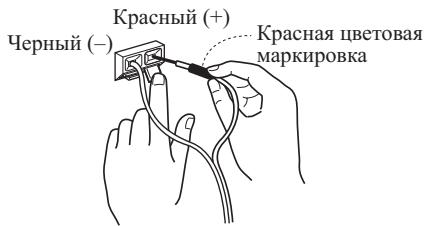
1 PoiDcoeDHHTE ODNH KOHeU npIJIraEMORO KOLOHOCHORO Ka6eJI K KOHTaKTAM B 3aHNe YactN KaKdoN KOJOhKn.
ПлбоeHHTe ПювОд cцьetoBOI mapKINpOBKoN KКрachOMy (+) KOHTaKTy; a IIpoBOD6e3MapKINpOBKN-КчepHOMY(-) KOHTaKTy.HaJxMITE HaIIpyJHHHbI J3bIyOK KJIeMMbI N BCTaBbTe IIpoBOD, KaK 3TO IIOKA3aHO HnKe.OTHyCTHTEЯ3bIyOK, YTO6bI 3aΦHKChPObaTb IIpoBOD.
2ПодсоeДинHTeДугоКоHeц KОJOHOuHOrO KaБелЯК pecuBepy.
ДлгЯ ПОДСоЕДИНЕНЯ BCТаБТЕ ΙВЕТΗΟΙΝΥΟДВ COOTBEТСТBYЮПУΟΙΝΥΚΤΕЛБΥΟ (ΙΝΒΕΤΗΑ) KJIΕΜΥ, a ΑργοΥ ΠΙΝΥΟД—В OTPИАТΕЛБΥΟ (Черна) KJIΕΜΥ. CM. ТAKЖЕ ИНСТРУКΙΝΥ ΠΟ ḋΚСПЛΥаΤΑΙΝΗ, ΠΡΗЛΑΓΑΕΜΙБΕΚ Pecнвepamу.

BHIMAHNE
KoHTaKTbIe KJIeMMbI IJIr
rPOMKOroBOpHTeJIe HaxoJITcR IIOI OIIACHbIM HAIIPRJKEHHEM.Bo
H36eKaHHe pNcKa IopJaKeHHN 3JIeKtpHueCKHM
TOKOM IIpr IIOCoEHHHeHH NIIH
OTCOeIHHeHH NIOHOuOHbIX Ka6eJIe
OTcoeIHnHJIte IIHyp IIITaHH, IpeJI TEM KAk
IIpHKacaTbC K HeH3OJIHpOBaHHbIM qACTM.
IocJIIOIcOeINHeHnIITeNcEJIeCJIeKa IOTAHITE 3a Ka6eJI, YTObIy 6eJITb8A TOM, YTO KOHIIb Ka6eJIe HaJeKHO 3aKpeJIeHb B KOHTAKTHBIX pa3BeMax. IIOXOH KOHTAKT MOKeT CtATb IIpHUNHOI IOBJIeHn IIIyMOB IN IPOIIaHaHH 3BYKa.
EclnIpoBOJa Ka6eJeB 6yJTy CJIyauaHNO BbIePHyTb I3 KOHTaKTbIX Pa3bEmOB IN BOiYt B KOHTaKT MeKJy CO6Ou, 3TO BbI3OBET Ype3MepHYIOI0JIHNTeJIbHYIO HaIpy3Ky Ha pecHBep. 3TO MOKeT IIpNBcTeK K c6oM B pa6oTe N daKe IIOJOMke peCHBepa
KorIa BbI IIOJIb3yeTecb KOMIIJIeKToM KOJIOHOK, IIOIOeINHeHHbIX K pecHBepy, BbI He CMOKeTe IIOJYuHTb HOpMaJIbHbI NΦΦeKT cTepeOΦoHnueCKOTO 3ByaHnA, ecIn IOJIaRPhOCTb IIOJIKJIIOUeHnA (+,-) OJHOH N3 KOJIOHOK (JIeBOH INIIN IIpaBOH) N3MeHeHa Ha o6paTHyIO.
Pa6ota c yctpoiCTBOM
- YcTaHOBHTe TaCTOTy pa3JeJIeHnHapecHBepe Ha 200 T.
KpeJIeHne nepeDnHex KOJHOK N KOJHOK O6bemHoro 3ByaHna Ha CTHe
MOHTAX Cko6
- IIpn KpeJIJIeHHN CkO6bI K 3aJIHeI IaHEJIIN KOJIOHKn KaK MOJHO KpeIyue 3aTAYHT BINT (IIpHJaRaTeC).
He npKpeJIyIe cko6bI K ueHTpaJIbHOJ KOIOHKe HJIN ca6Byepy.

BHIMAHNE
- IcnoJIb3yIte BnHT c pe3b6oI MeTpHueCKOTo TnIIa M5. He IcnoJIb3yIte BnHT c pe3b6oI IIIOMOBOrO TnIIa.
Ipeed BbInOJIHeHnEm MoHTaXa
IOMHHTe, YTO KOJIOHKA HMeet 3HaHNTeJIbHbI BEc. IOn ee TJKECTbO IIpyIbI MOryt OcJIa6eTb, a MaTePnaJI CTeHb HE BbIePkaTb HArpyK3N, YTO MOKeT IIpNBecTb KIIaDEHHO KOJIOHNK. Y6eJInteCbB TOM, YTO CTeHa, K KOTOpO BblIaHNPyeTe IIpHKpeINb KOJIOHN, HMeET IOCTaTOUYo IIpoUHOCTb, YTO6bl yDePkaTb Hx BEc. He 3aKpeJIJIaTIe KOJIOHNK Ha fApHePbIX CTeHax INI CTeHAX C MmIKoI NIOBepXHOCTbIO.
KpeIeKHbIe BnHTbI He npHJIaIaOTcI. HIOJIb3yIte BnHTbI, IOXIOJIaIIe IJI MaTePHaJIa CTeHb I yDepKaHIIr BEca KOJIOHN. EClI BbI Ye HBepeHb B XapakTePHeCTNkax IIIN HeCuIe CNOCO6HOCTN CTeHb, obaTInTeCb 3a KOHCyJIbTaIaIIe K CneUHaJIHCTy.
BnHT (IpiJIaeraTc)

TexhneckxapaKtepncnkn
S-21W
BbIXoHna MoIIOCTb yCNJIHTeJIa MOIIOCTn (IIIKOBoe 3NaueHne) 160 Bt
BbIXoIHnA MoHocThy cHJIHTeJIa MoHocTHN (RMS) 100 Bt (100 T, 4 Ω, IIOJIhI K03ΦHnHeT rApMOHnK 10%)
BbIXOJIHnA MoIHOCTb yCHJIHTeJIa MOIHOCTn (FTC) 80 Bt (ot 35 Tg Ido 500 Tg, 4 Ω, IIJIbIy Ko3ΦHIIHeHT rapMOHnK 1%)
BxOJ (UyBCTBHTeJIbHocTb IIH JINHEHbI BXOJ (pa3beM RCA) 300 MB
KopIyc. HAnIOJIbHOrO TnIIa c OtrpaKaTeJIeM 6acOB IHHAMIK 16 cm KOHycHOrO TnIIa
Дианэончacotakyctnuecko chTeMbI. 33 TIO700T
Tpe6obAHnK 3JIeKTPoHHTaHHIO .0r 220 Bdo 240 B IepemEHHO roka, 50 T/60 T
IopTe6JIaEma MoHocTb 25Bt
IopTe6JIeMaMA MoIOHocTB BpeKHe OKeHaHn 0,5BT HJIIM MeHbIIe
a6a p h T H b i e p a 3 M e p b i 230 MM (III) x 408 MM (B) x 344 MM (Γ)
Bec (6e3 ypaKOBKN) 6,5 K
S-11
IpejeHne KOJIOHKn / KOJIOnKn ObsemHoro 3ByaHna
Kopnyc
IpeHHe KOIOHKn. .KoIOHKn c 3aKpbTbIM KOpIycom «JIa KNJXHOH IOJIKN> (MaHHTHO3KpaHHPOBaHHBe)
KoIOHKn 06bEmHO 3ByaHHa. .KoIOHKn c 3aKpbItbM KOpIycom «JIJI KHNKHOIJIKN>
ChTeMa 7,7 cm,1-IOIOchna chTeMa
ДИНHAМК 7,7CM KOHYCHOROTIIA
HomHaJIbHoe IIOJIHoe cIipotHBJIeHne 6Ω
UyBCTBHTeJIbHOcTb. 82 JB
IOnyCTHMaMAOIOHOCTbHaBXoJe:MAKCHMaJIbHaaMOIOHOCTbHaBXoJe 150Bt
a apHTbIe pa3mepbl 106 MM (III) x 116 MM (B) x 106 MM (Γ)
Bec
IpeHHe KOIOHKn. 0,8K
KoIOHKn 06bEMHO 3ByaHHN 0,6 K
UeHTpaIbHaKoJOnKa
KopIyc. KoIOHka c 3aKpbIbIM KopIIycom «JIЯ KHHKHOIIOJIKH» (MaHHTHO3KpaHnpOBAHHa)
CnCTema 7,7 cm,1-IOIOchna cnCTema
ДИНAMИK 7,7 CM KOHYCHO TIIA
HomHaJIbHoe IIOJIHoe cIipotHBJIeHne 6Ω
UyBCTBHTeJIbHOCTb. 83 n6
IOnyCTHMa MOHOCb Ha BXOJe: MaKCHMaJIbHa MoIHOCb Ha BXOJe 150 Bt
a apHTbIe pa3mepbI 270 MM (III) x 100 MM (B) x 106 MM (Γ)
Bec 1,0 k
TexHHueckHe xapaKtepeHCTKN H KOHcTpkyKIIa MOyT H3MeHaTbc8e3 IIpeIbapHTeJIbHO ryeBOMJIeHN, B CBy3N C BHOCHMblIMN yCOBepHECTBOBAHHaMn.
- FEAIZONTOI-1ULTURISHINTHAELNULTALINTHAELINTHAELINTHAELINTHAELINTHAELINTHAELINTHAELINTHAELINTHAELINTHAELINTHAELINTHAELINTHAELINTHAELINTHAELINTHAELINTHAELINTHAELINTHAELINTHAELINTHAELINTHAELINTHAELINTHAELINTHAELINTHA
付属品の確認
S-21W
RCA バンコード (3 m) × 1
電源一卜 × 1
S-11
Sb一力一可一(4m)×3
Sv一力一一(10m)×2
滑止×20
壁掛け用TPLKUT×4
不(M5)×4
S-21W,S-11共通
保証書 × 1
取极説明書(本書)
設置
設置のた
PIONEER ELECTRONICS (USA) INC.
PIONEER ELECTRONICS OF CANADA, INC.
LIMITED WARRANTY
WARRANTY VALID ONLY IN COUNTRY OF PRODUCT PURCHASE
WARRANTY
Pione Electronics (USA) Inc. (PUSA), and Pioneer Electronics of Canada, Inc. (POC), warrant that products distributed by PUSA in the U.S.A., and by POC in Canada that fail to function properly under normal use due to a manufacturing defect when installed and operated according to the owner's manual enclosed with the unit will be repaired or replaced with a unit of comparable value, at the option of PUSA or POC, without charge to you for parts or actual repair work. Parts supplied under this warranty may be new or rebuilt at the option of PUSA or POC.
THIS LIMITED WARRANTY APPLIES TO THE ORIGINAL OR ANY SUBSEQUENT OWNER OF THIS PIONEER PRODUCT THROUGH THE WARRANTY PERIOD PROVIDED THE PRODUCT WAS PURCHASED FROM AN AUTHORIZER PIONEER DISTRIBUTOR/DEALER IN THE U.S.A. OR CANADA. YOU WILL BE REQUIRED TO PROVIDE A SALES RECEIPT OR OTHER VALID PROOF OF PURCHASE SHOWING THE DATE OF ORIGINAL PURCHASE OR, IF RENTED, YOUR RENTAL CONTRACT SHOWING THE PLACE AND DATE OF FIRST RENTNL. IN THE EVENT SERVICE IS REQUIRED, THE PRODUCT MUST BE DELIVERED WITHIN THE WARRANTY PERIOD, TRANSPORTATION PREPAID, ONLY FROM WITHIN THE COUNTRY OF PURCHASE AS EXPLAINED IN THIS DOCUMENT. YOU WILL BE RESPONSIBLE FOR REMOVAL AND INSTALLATION OF THE PRODUCT. PUSA OR POC, AS APPROPRIATE, WILL PAY TO RETURN THE REPAIRED OR REPLACEMENT PRODUCT TO YOU WITHIN THE COUNTRY OF PURCHASE.
PRODUCT WARRANTY PERIOD
Parts Labor
Home Audio and Video
1 Year 1 Year
Microphones, Headphones, Phono Cartridges and Styluses
90 Days 90 Days
Shorter limited warranty periods apply to some models. Please refer to the limited warranty document enclosed with the product for a definitive statement of the warranty period. The warranty period for retail customers who rent the product commences upon the date product is first put into use (a) during the rental period or (b) retail sale, whichever occurs first.
WHAT IS NOT COVERED
IF THIS PRODUCT WAS PURCHASED FROM AN UNAUTHORIZED DISTRIBUTOR, THERE ARE NO WARRANTYES, EXPRESS OR IMPLIED, INCLUDING THE IMPLIED WARRANTY OF MERCHANTIBILITY AND THE IMPLIED WARRANTY OF FITNESS FOR A PARTICULAR PURPOSE AND THIS PRODUCT IS SOLD STRICTLY "AS IS" AND "WITH ALL FAULTS". PIONEER SHALL NOT BE LIABLE FOR ANY CONSEQUENTIAL AND/or INCIDENTAL DAMAGE.
PIONEER DOES NOT WARRANTY ANY PRODUCT LISTED ABOVE WHEN IT IS USED IN A TRADE OR BUSINESS OR IN ANY INDUSTRIAL OR COMMERCIAL APPLICATION. THIS WARRANTY DOES NOT APPLY IF THE PRODUCT HAS BEEN SUBJECTED TO POWER IN EXCESS OF ITS SUPPLIED POWER RATING.
THIS WARRANTY DOES NOT COVER TELEVISION OR DISPLAY SCREENS DAMAGED BY STATIC, NON-MOVING, IMAGES APPLIED FOR LENGTHY PERIODS (BURN-IN).
THIS WARRANTY DOES NOT COVER THE CABINET OR ANY APPEARANCE ITEM, USER ATTACHED ANTENNA, ANY DAMAGE TO RECORDS OR RECORDING TAPES ORDISCS, ANY DAMAGE TO THE PRODUCT RESULTING FROM ALTERATIONS, MODIFICATIONS NOT AUTHORIZED IN WRITING BY PIONEER, ACCIDENT, MISUSE OR ABUSE, DAMAGE DUE TO LIGHTNINGTORPOWERSURGES, SUBSEQUENT DAMAGE FROMLEAKING, DAMAGE FROMINOPERATIVE BATTERIES, ORTHE USE OF BATTERIESNOTCONFORMINGTO THOSE SPECIFIED IN THE OWNER'S MANUAL.
THIS WARRANTY DOES NOT COVER THE COST OF PARTS OR LABOR WHICH WOULD BE OTHERWISE PROVIDED WITHOUT CHARGE UNDER THIS WARRANTY OBTAINED FROM ANY SOURCE OTHER THAN APIONEERAUTHORIZED SERVICE COMPANY OR OTHERWISE DESIGNATED LOCATION. THIS WARRANTY DOES NOT COVER DEFECTS OR DAMAGE CAUSED BY THE USE OF UNAUTHORIZED PARTS OR LABOR OR FROM IMPROPER MAINTENANCE.
ALtered, DEFACED, OR REMOVED SERIAL NUMBERS Void THIS ENTIRE WARRANTY
NO OTHER WARRANTYES
In the U.S. - PIONEER LIMITS ITS OBLIGATIONS UNDER ANY IMPLIED WARRANTY INCLUDING, BUT NOT LIMITED TO, THE IMPLIED WARRANTY OF MERCHANT ABILITIES AND FITNESS FOR A PARTICULAR PURPOSE, TO A PERIOD NOT TO EXCEED THE WARRANTY PERIOD. NOWWARRANTIES SHALL APPLY AFTER THE WARRANTY PERIOD. SOME STATES DON NOT ALLOW LIMITATION ON NOW LONG AN IMplied WARRANTY LASTS AND SOME STATES DON NOT ALLOW THE EXCLUSIONS OF THIS PERIOD. ALL RIGHTS REFLECT OR CONTRIBUTE THE IMPLIED WARRANTY. ALL RIGHTS MAY NOT APPLY TO YOU. THIS WARRANTY GIVES YOU SPECIFIC LEGAL RIGHTS AND YOU MAY HAVE OTHER RIGHTS WHICH MAY VARY FROM STATE TO STATE.
IN CANADA- EXCEPT AS EXPRESSLY PROVEDHEREIN, THERE ARE NO REPRESENTATIONS, WARRANTY, OBLIGATIONS OR CONDITIONS, IMPLIED, STATUTORY OR OTHERWISE, APPLICABLE TO THIS PRODUCT.
TO OBTAIN SERVICE
PUSA and POc have a p t r t you need to present your sales receipt or, if rented, your rental contract showing place and date of original owner's transaction. If shipping the unit you will need to package it carefully and send it, transportation prepaid by a traceable, insured method, to an Authorized Service Company. Package the product using adequate padding material to prevent damage in transit. The original container is ideal for this purpose. Include your name, address and telephone number where you can be reached during business hours.
On all complaints and concerns in the U.S.A. call Customer Support at 1-800-421-1404, or, in Canada, call Customer Satisfaction at 1-877-283-5901.
IN THE U.S.A.
For hook-up and operation of your unit or to locate an
Authorized Service Company, please call or write:
PIONEER ELECTRONICS SERVICE, INC. P.O. Box 1760
LONG BEACH, CALIFORNIA 90801
1-800-421-1404
http://www.pioneerelectronics.com
IN CANADA
For additional information on this warranty, please call or write:
CUSTOMERSATISFACTIONGROUP
PIONEERELECTRONICS OF CANADA, INC.
300 ALLSTATE PARKWAY MARKHAM, ON L3R 02
(905)479-4411
1-877-283-5901
http://www.pioneerelectronics.ca
DISPUTERESOLUTION
In THE U.S.A. - Following our response to any initial request to Customer Support, should a dispute arise between you and Pioneer, Pioneer makes available its Complaint Resolution Program to resolve the dispute. The Complaint Resolution Program is available to you without charge. You are required to use the Complaint Resolution Program before you exercise any rights under, or seek any remedies, created by Title I of the Magnuson-Moss Warranty-Federal Trade Commission Improvement Act, 15 U.S.C. 2301 of seq. To use the Complaint Resolution Program call 1-800-421-1404 and explain to the customer service representative the problem you are experiencing, steps you have taken to have the product repaired during the warranty period and the name of the authorized Distributor/Dealer from whom the Pioneer product was purchased. After the complaint has been explained to the representative, a resolution number will be issued. Within 40 days of receiving your complaint, Pioneer will investigate the dispute and will either: (1) respond to your complaint in writing informing you what action Pioneer will take, and in what time period, to resolve the dispute; or (2) respond to your complaint in writing informing you why it will not take any action.
IN CANADA - Call the Customer Satisfaction Manager at (905) 946-7446 to discuss your complaint and to obtain a prompt resolution.
RECORD THE PLACE AND DATE OF PURCHASE FOR FUTURE REFERENCE
Model No.
Serial No.
Purchase Date
Purchased From
Pioneer
PIONEER ELECTRONICS (USA) INC.
PIONEER ELECTRONIQUES DU CANADA, INC.
GARANTIE LIMITEE
GARANTIE VALID SEULEMENT DANS LE PAYS OU LE PRODUIT A ETÉ ACHTÉ
GARANTIE
PIONEER ELECTRONICS SERVICE, INC.
P.O.BOX1760
LONG BEACH, CALIFORNIA 90801
1-800-421-1404
http://www.pioneerelectronics.com
AU CANADA
DéPARTÉMENT DE SERVICE AU CONSOMMATEUR
PIONEER ÉLECTRONIQUES DU CANADA, INC.
ALLSTATE PARKWAY
MARKHAM, ON L3R 0P2
(905)479-4411
1-877-283-5901
http://www.pioneerelectronics.ca
RÉGLEMENT DES CONFLITS
http://www.pioneer.co.uk
http://www.pioneer.fr
http://www.pioneer.de
http://www.pioneer.it
http://www.pioneer.nl
http://www.pioneer.be
http://www.pioneer.es
http://www.pioneer-rus.ru
http://www.pioneer.eu
Published by Pioneer Corporation.
Copyright © 2010 Pioneer Corporation.
All rights reserved.
Publication de Pioneer Corporation.
© 2010 Pioneer Corporation.
Издано Pioneer Corporation.
Pioneer Corporation, 2010.
Bce npaba 3aunuehbl.
八才二株式会社
HmnpTeP: OOO "TMOHEP PUC"
125040, Pocca, r. MockBa, yI. PpaBbl, d.26 TeI.: +7(495) 956-89-01
PIONEER ELECTRONICS (USA) INC.
P.O. BOX 1540, Long Beach, California 90801-1540, U.S.A. TEL: (800) 421-1404
PIONEER ELECTRONICS OF CANADA, INC.
300 Allstate Parkway, Markham, Ontario L3R 0P2, Canada TEL: 1-877-283-5901, 905-479-4411
PIONEER EUROPE NV
Haven 1087, Keetberglaan 1, B-9120 Melsele, Belgium TEL: 03/570.05.11
PIONEER ELECTRONICS ASIACENTRE PTE. LTD.
253 Alexandra Road, #04-01, Singapore 159936 TEL: 65-6472-7555
PIONEER ELECTRONICS AUSTRALIA PTY. LTD.
178-184 Boundary Road, Braeside, Victoria 3195, Australia, TEL: (03) 9586-6300
PIONEER ELECTRONICS DE MEXICO S.A. DE C.V.
Blvd.Manuel Avila Camacho 138 10 piso Col.Lomas de Chapultepec, Mexico, D.F. 11000 TEL: 55-9178-4270
K002_B2_Ru