A-A6MK2-K - Audio Amplifier PIONEER - Free user manual and instructions
Find the device manual for free A-A6MK2-K PIONEER in PDF.

| Product type | Integrated stereo audio amplifier |
| Brand | PIONEER |
| Model | A-A6MK2-K |
| Dimensions (W × H × D) | 420 mm × 100 mm × 359 mm |
| Weight (without packaging) | 10 kg |
| Power supply | 220-230 V AC, 50/60 Hz |
| Power consumption | 170 W (standby: 0.8 W) |
| Continuous power output (20 Hz - 20 kHz) | 60 W + 60 W (0.2% THD, 8 Ω) / 45 W + 45 W (0.2% THD, 8 Ω) |
| Power output at 1 kHz | 70 W + 70 W (0.7% THD, 4 Ω) / 47 W + 47 W (0.7% THD, 8 Ω) |
| Compatible speaker impedance | 4 Ω to 16 Ω |
| Analog audio inputs | CD, TAPE, TUNER, AUX (200 mV / 22 kΩ) ; PHONO MM (2.8 mV / 47 kΩ) |
| Audio outputs | TAPE REC (200 mV / 1 kΩ), headphone jack (PHONES) |
| Frequency response | CD, TAPE, TUNER, AUX : 5 Hz - 100 kHz (+3 dB) ; PHONO MM : 20 Hz - 20 kHz (±0.2 dB) |
| Signal-to-noise ratio (IHF A) | CD, TAPE, TUNER, AUX : 103 dB ; PHONO MM : 80 dB (typ.) |
| Tone control | Bass ±10 dB (100 Hz), Treble ±10 dB (10 kHz) |
| Main functions | Direct mode, balance control, remote control, standby, headphone jack |
| Included accessories | Remote control, AAA batteries ×2, power cord, instruction manual, warranty card |
| Cleaning | Dry cloth, or soft cloth dampened with diluted neutral detergent and wrung well |
| Safety | Do not expose to water, do not block ventilation openings, disconnect before servicing |
| Warranty | Refer to the included warranty card |
Frequently Asked Questions - A-A6MK2-K PIONEER
User questions about A-A6MK2-K PIONEER
0 question about this device. Answer the ones you know or ask your own.
Ask a new question about this device
Download the instructions for your Audio Amplifier in PDF format for free! Find your manual A-A6MK2-K - PIONEER and take your electronic device back in hand. On this page are published all the documents necessary for the use of your device. A-A6MK2-K by PIONEER.
USER MANUAL A-A6MK2-K PIONEER
Discover the benefits of registering your product online at http://www.pioneer.co.uk (or http://www.pioneer.eu).
The lightning flash with arrowhead symbol, within an equilateral triangle, is intended to alert the user to the presence of uninsulated "dangerous voltage" within the product's enclosure that may be of sufficient magnitude to constitute a risk of electric shock to persons.
CAUTION
RISK OF ELECTRIC SHOCK DO NOT OPEN
CAUTION:
TO PREVENT THE RISK OF ELECTRIC SHOCK,DO NOT REMOVE COVER (OR BACK).NO USER-SERVICEABLE PARTS INSIDE.REFER SERVICING TO QUALIFIED SERVICE PERSONNEL.

The exclamation point within an equilateral triangle is intended to alert the user to the presence of important operating and maintenance (servicing) instructions in the literature accompanying the appliance.
D3-4-2-1-1_A1_En
WARNING
This equipment is not waterproof. To prevent a fire or shock hazard, do not place any container filled with liquid near this equipment (such as a vase or flower pot) or expose it to dripping, splashing, rain or moisture. D3-4-2-1-3_B_En
WARNING
To prevent a fire hazard, do not place any naked flame sources (such as a lighted candle) on the equipment. D3-4-2-1-7a_A_En
Operating Environment
Operating environment temperature and humidity:
+5°C to +35°C (+41°F to +95°F); less than 85%RH (cooling vents not blocked)
Do not install this unit in a poorly ventilated area, or in locations exposed to high humidity or direct sunlight (or strong artificial light) D3-4-2-1-7c*A1_EN
WARNING
Before plugging in for the first time, read the following section carefully.
The voltage of the available power supply differs according to country or region. Be sure that the power supply voltage of the area where this unit will be used meets the required voltage (e.g., 230 V or 120 V) written on the rear panel. D3-4-2-1-4_A_En
This product is for general household purposes. Any failure due to use for other than household purposes (such as long-term use for business purposes in a restaurant or use in a car or ship) and which requires repair will be charged for even during the warranty period. K041_EN
VENTILATION CAUTION
When installing this unit, make sure to leave space around the unit for ventilation to improve heat radiation (at least 60~cm at top, 10~cm at rear, and 30~cm at each side).
WARNING
Slots and openings in the cabinet are provided for ventilation to ensure reliable operation of the product, and to protect it from overheating. To prevent fire hazard, the openings should never be blocked or covered with items (such as newspapers, table-cloths, curtains) or by operating the equipment on thick carpet or a bed. D3-4-2-1-7b_A_En
If the AC plug of this unit does not match the AC outlet you want to use, the plug must be removed and appropriate one fitted. Replacement and mounting of an AC plug on the power supply cord of this unit should be performed only by qualified service personnel. If connected to an AC outlet, the cut-off plug can cause severe electrical shock. Make sure it is properly disposed of after removal. The equipment should be disconnected by removing the mains plug from the wall socket when left unused for a long period of time (for example, when on vacation). D3-4-2-2-1a_A1_En
CAUTION
The POWER switch on this unit will not completely shut off all power from the AC outlet. Since the power cord serves as the main disconnect device for the unit, you will need to unplug it from the AC outlet to shut down all power. Therefore, make sure the unit has been installed so that the power cord can be easily unplugged from the AC outlet in case of an accident. To avoid fire hazard, the power cord should also be unplugged from the AC outlet when left unused for a long period of time (for example, when on vacation). D3-4-2-2-2a_A_En
POWER-CORD CAUTION
Handle the power cord by the plug. Do not pull out the plug by tugging the cord and never touch the power cord when your hands are wet as this could cause a short circuit or electric shock. Do not place the unit, a piece of furniture, etc., on the power cord, or pinch the cord. Never make a knot in the cord or tie it with other cords. The power cords should be routed such that they are not likely to be stepped on. A damaged power cord can cause a fire or give you an electrical shock. Check the power cord once in a while. When you find it damaged, ask your nearest PIONEER authorized service center or your dealer for a replacement. 5002*En
Information for users on collection and disposal of old equipment and used batteries
(Symbol for equipment)

Symbol examples) for batteries


Pb
These symbols on the products, packaging, and/or accompanying documents mean that used electrical and electronic products and batteries should not be mixed with general household waste.
For proper treatment, recovery and recycling of old products and used batteries, please take them to applicable collection points in accordance with your national legislation.
By disposing of these products and batteries correctly, you will help to save valuable resources and prevent any potential negative effects on human health and the environment which could otherwise arise from inappropriate waste handling.
For more information about collection and recycling of old products and batteries, please contact your local municipality, your waste disposal service or the point of sale where you purchased the items.
These symbols are only valid in the European Union.
For countries outside the European Union:
If you wish to discard these items, please contact your local authorities or dealer and ask for the correct method of disposal.
K058a_A1_En
Replacement and mounting of an AC plug on the power supply cord of this unit should be performed only by qualified service personnel.
IMPORTANT: THE MOULDED PLUG
This appliance is supplied with a moulded three pin mains plug for your safety and convenience. A 10 amp fuse is fitted in this plug. Should the fuse need to be replaced, please ensure that the replacement fuse has a rating of 10 amps and that it is approved by ASTA or BSI to BS1362.
Check for the ASTA mark


or the BSI mark
on the body of the fuse.
If the plug contains a removable fuse cover, you must ensure that it is refitted when the fuse is replaced. If you lose the fuse cover the plug must not be used until a replacement cover is obtained. A replacement fuse cover can be obtained from your local dealer.
If the fitted moulded plug is unsuitable for your socket outlet, then the fuse shall be removed and the plug cut off and disposed of safely. There is a danger of severe electrical shock if the cut off plug is inserted into any 13 amp socket.
If a new plug is to be fitted, please observe the wiring code as shown below. If in any doubt, please consult a qualified electrician.
IMPORTANT: The wires in this mains lead are coloured in accordance with the following code:
Blue: Neutral Brown:Live
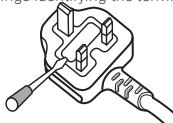
As the colours of the wires in the mains lead of this appliance may not correspond with the coloured markings identifying the terminals in your plug, proceed as follows ;
The wire which is coloured BLUE must be connected to the terminal which is marked with the letter N or coloured BLACK.
The wire which is coloured BROWN must be connected to the terminal which is marked with the letter L or coloured RED.
How to replace the fuse: Open the fuse compartment with a screwdriver and replace the fuse.
D3-4-2-1-2-B_En
Thank you for buying this Pioneer product.
Please read through these operating instructions so that you will know how to operate your model properly. After you have finished reading the instructions, put them in a safe place for future reference.
Contents
01 Before you start
Features 5
What's in the box 5
Inserting the battery 6
Installing the amplifier. 6
02 Connecting up
Making cable connections 7
Connecting audio components 7
Connecting the speakers. 8
Operating other Pioneer components with this unit's sensor. 9
Plugging in 9
03 Controls and displays
Front panel 10
Display 10
Remote control 11
Using the remote control 11
04 Listening to your system
Using Direct listening 12
Using the balance and tone controls. 12
Playing other sources 12
Making an audio recording 12
05 Additional information
Troubleshooting. 13
Specifications 14
Cleaning the unit. 14
Chapter 1: Before you start
Features
- Quick response power supply circuit The superior power supply circuit adopted by this unit achieves vastly improved response by employing 'no feedback' circuitry and low impedance parallel main capacitors characteristically used in professional audio monitoring.
- Twin-mono symmetrical construction This amplifier offers a new advancement in stereo imaging with the completely independent construction of left/right power amplification units and twin transformers.
- Direct construction In addition to the improved symmetrical design, the signal path of each block is designed for shortest signal path for minimum deterioration of signal clarity.
- Wide-Range Linear Circuit Through this proprietary feedback circuit, an output signal of low impedance offering a flat, even response over the widest possible frequency range is delivered to your speakers.
- Fine-tuned to world-class standards With the cooperation of the world-class studio engineers at AIR Studios, this amplifier has been AIR Studios certified:

What's in the box
Please confirm that the following accessories are in the box when you open it.
Remote control
- AAA/IEC R03 dry cell batteries x2
Power cord
- Operating instructions (This document)
Warranty card
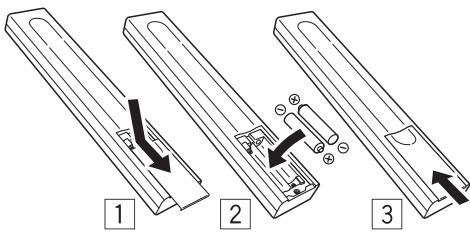
Inserting the battery
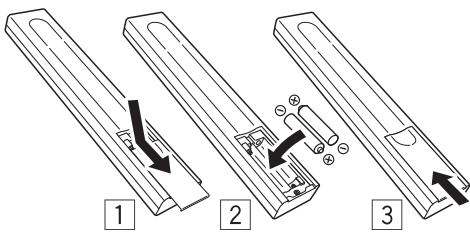

Caution
Incorrect use of batteries may result in such hazards as leakage and bursting. Observe the following precautions:
- Never use new and old batteries together.
- Insert the plus and minus sides of the batteries properly according to the marks in the battery case.
- Batteries with the same shape may have different voltages. Do not use different batteries together.
- When disposing of used batteries, please comply with governmental regulations or environmental public institution's rules that apply in your country or area.
WARNING
Do not use or store batteries in direct sunlight or other excessively hot place, such as inside a car or near a heater. This can cause batteries to leak, overheat, explode or catch fire. It can also reduce the life or performance of batteries.
Installing the amplifier
- When installing this unit, make sure to put it on a level and stable surface.
Don't install it on the following places:
-on a color TV (the screen may distort)
- near a cassette deck (or close to a device that gives off a magnetic field). This may interfere with the sound.
-in direct sunlight
-in damp or wet areas
- in extremely hot or cold areas
- in places where there is vibration or other movement
- in places that are very dusty
- in places that have hot fumes or oils (such as a kitchen)
Chapter 2:
Connecting up
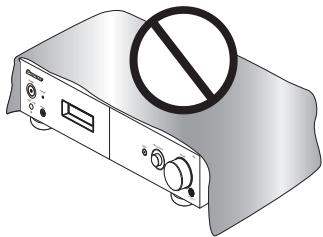
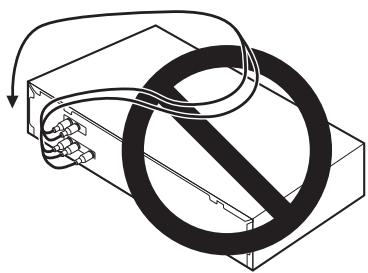
Making cable connections
Make sure not to bend the cables over the top of this unit (as shown in the illustration). If this happens, the magnetic field produced by the transformers in this unit may cause a humming noise from the speakers.

Important
- Before making or changing any connections, switch off the power and disconnect the power cord from the AC outlet.
Connecting audio components
The number and kind of connections depends on the kind of component you're connecting. Follow the steps below to connect a CD player, tape recorder, turntable or other audio component.
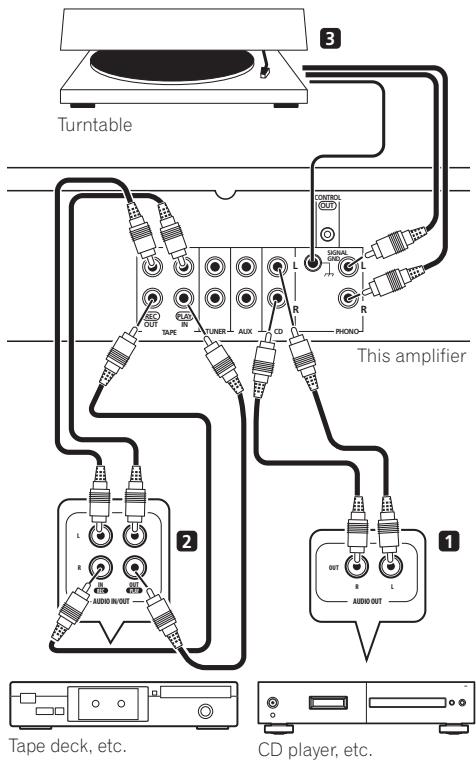
1 Connect the analog audio outputs of your CD player (or other component) to the CD inputs on this amplifier.
Use a stereo RCA phono cable as shown.
- Connect any other components (such as an iPod1 dock or a portable audio player) to the AUX and TUNER inputs in the same way.
2 Connect the analog outputs of your tape deck (or other recorder) to the TAPE inputs (IN) on this amplifier. Then connect the audio inputs on the tape deck to the TAPE outputs (OUT) on this amplifier.
This will allow you to make recordings from the components connected to this amplifier. Use stereo RCA phono cables as shown.
3 Turntables only: Connect the audio outputs of your turntable to the PHONO inputs on this amplifier.
- If your turntable has a grounding wire, secure it to the ground terminal on this amplifier.
- If your turntable has line-level outputs (i.e., it has a built-in phono pre-amp), connect it to the AUX inputs instead.
Connecting the speakers
Make sure you connect the speaker on the right to the right terminal and the speaker on the left to the left terminal. Also make sure the positive and negative (+ / -) terminals on the amplifier match those on the speakers. You can use speakers with a nominal impedance between 4 to 16
Be sure to complete all connections before connecting this unit to the AC power source.
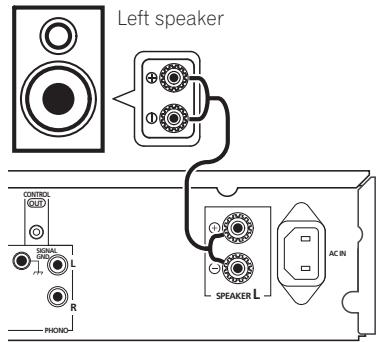
- Connect the speakers to the speaker terminals as shown above.
Connections for the left speaker are shown. Connect the right speaker in the same way. You can use either bare wire connections to do this (see below).
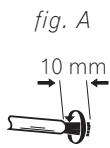
Bare wire connections
Make sure that the speaker cable you're going to use is properly prepared with about 10 mm of insulator stripped from each wire, and the exposed wire strands twisted together (fig. A).
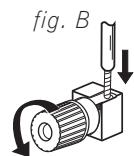
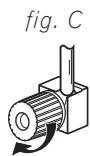
To connect a terminal, unscrew the terminal a few turns until there is enough space to insert the exposed wire (fig. B). Once the wire is in position, tighten the terminal until the wire is firmly clamped (fig. C).

Important
- Please refer to the manual that came with your speakers for details on how to connect the other end of the speaker cables to your speakers.

Caution
- These speaker terminals carry HAZARDOUS live voltage. To prevent the risk of electric shock when connecting or disconnecting the speaker cables, disconnect the power cord before touching any uninsulated parts.
- Make sure no exposed speaker wire is touching the rear panel, this may cause the amplifier to turn off automatically.
Operating other Pioneer components with this unit's sensor
Many Pioneer components have SR CONTROL jacks which can be used to link components together so that you can use just the remote sensor of one component. When you use a remote control, the control signal is passed along the chain to the appropriate component.
Note that if you use this feature, make sure that you also have at least one set of analog audio jacks connected to another component for grounding purposes.
1 Connect the CONTROL OUT jack of this amplifier to the CONTROL IN jack of another Pioneer component.
Use a cable with a mono mini-plug on each end for the connection.
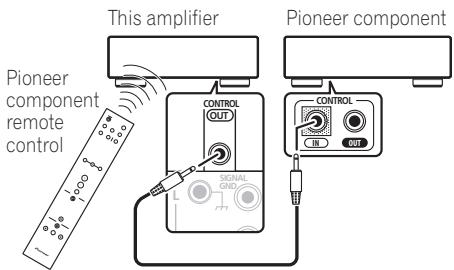
2 If the Pioneer component also has a CONTROL OUT jack, you can continue the chain in the same way for as many components as you have.
Plugging in
Make sure to complete all connections before connecting to an AC outlet.
- Connect the AC power cord to the AC IN inlet on the rear panel of the amplifier, then plug into an AC outlet.
Chapter 3:
Controls and displays
Front panel
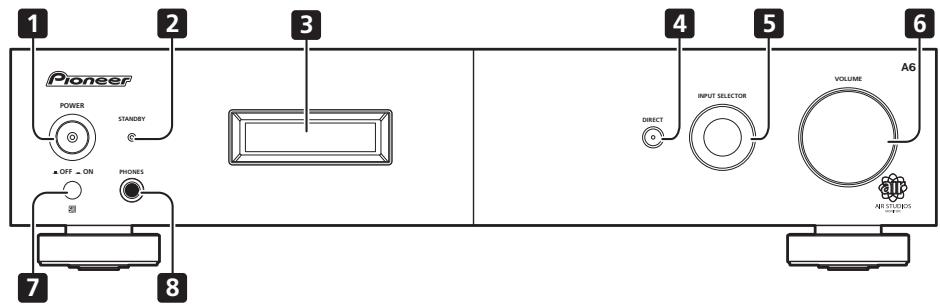
1 POWER OFF ON
2 STANDBY indicator
3 Display (below)
4 DIRECT
Press to switch the Direct listening feature on or off (page 12).
5 INPUT SELECTOR dial
Selects an input source.
6 VOLUME
7 Remote sensor
8 PHONES jack
Use to connect headphones (when connected, there is no sound output from the speakers).
Display
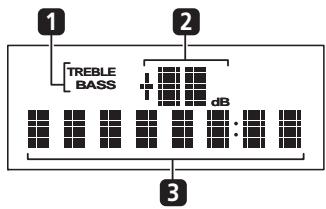
1 Tone control indicators
TREBLE - Lights when high-range tone adjustment is applied.
BASS - Lights when low-range tone adjustment is applied.
2 Master volume level
3 Character display
Displays various system information.
Note
When the unit is in the standby mode, if the power is turned off by pressing the main unit's POWER button, the power will not turn on if the button is pressed again. To turn on the power in this case, press either the remote control unit's AMP button or the DIRECT button on the main unit for about five seconds.
Remote control
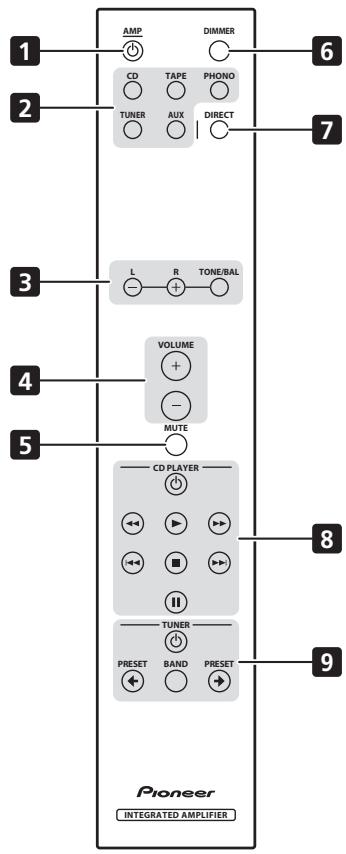
1 AMP
Switches the amplifier between standby and on.
2 Input selector buttons
Press to select an input source. These select the component connected to the corresponding input on the rear panel.
3 TONE/BAL controls
Use to adjust the tone and balance (page 12).
4 VOLUME + / -
Use to set the listening volume.
5 MUTE
Mutes/unmates the sound.
6 DIMMER
Dims or brightens the display (or switches the backlight off).
7 DIRECT
Press to access Direct listening (page 12).
8 CD PLAYER control buttons
Use to control Pioneer CD player.
9 TUNER control buttons
Use to control Pioneer tuner.
Using the remote control
Keep in mind the following when using the remote control:
- Make sure that there are no obstacles between the remote and the remote sensor on the unit.
- The remote has a range of about 7m at an angle of about 30^ from the remote sensor.
- Remote operation may become unreliable if strong sunlight or fluorescent light is shining on the unit's remote sensor.
- Remote controllers for different devices can interfere with each other. Avoid using remotes for other equipment located close to this unit.
- Replace the batteries when you notice a fall off in the operating range of the remote.
Chapter 4:
Listening to your system
Using Direct listening
Use the Direct listening feature when you want to hear the truest possible reproduction of a source. All unnecessary signal processing1 is bypassed, and you're left with the pure sound source.
While listening to a source, press DIRECT to switch Direct listening on or off.
Using the balance and tone controls
Depending on what you are listening to, you may want to adjust the bass, treble or left/right balance using the remote control.
-
Press TONE/BAL to select the option you want, then use the L/− and R/+ buttons to adjust as necessary.
-
BASS - Adjust the amount of bass from -10 to +10 .
- TRE - Adjust the amount of treble from -10 to +10 .
- BAL - Adjust the amount of left/right balance as you like. FLAT indicates a centered balance.
Wait about five seconds for your changes to be input automatically. The BASS and TREBLE indicators light in the front panel when the corresponding tone control is active.
- To return to the flat setting (tone control off), press L/- and R/+ at the same time.
Playing other sources
1 Turn on the power of the playback component.
2 Turn on the power of the amplifier.
3 Select the source you want to playback. Use the input select buttons (or INPUT SELECTOR dial).
4 Start playback of the component you selected in step 1.
Making an audio recording
You can make an audio recording from any audio source connected to the amplifier.
1 Select the source you want to record. Use the input select buttons (INPUT SELECTOR).
2 Prepare the source you want to record. Tune to the radio station, load the CD, set up the turntable, etc.
3 Prepare the recorder.
Insert a blank tape, MD, etc. into the recording device and set the recording levels.2
Refer to the instructions that came with the recorder if you are unsure how to do this.
4 Start recording, then start playback of the source component.
Note
1 The balance and tone controls are disabled, and the front panel display switches off.
2 The amplifier's volume, balance and tone controls have no effect on the recorded signal.
Chapter 5:
Additional information
Troubleshooting
Incorrect operations are often mistaken for trouble and malfunctions. If you think that there is something wrong with this component, check the points below. Sometimes the trouble may lie in another component. Investigate the other components and electrical appliances being used. If the trouble cannot be rectified even after exercising the checks listed below, ask your nearest Pioneer authorized service center or your dealer to carry out repair work.
- If the unit does not operate normally due to external effects such as static electricity disconnect the power plug from the outlet and insert again to return to normal operating conditions.
| Problem | Remedy |
| The power does not turn on. | ·Disconnect the power plug from the outlet, and insert again. ·Make sure there are no loose strands of speaker wire touching the rear panel. This could cause the amplifier to shut off automatically. ·If you're trying to switch on using the remote control, make sure the front panel POWER button is switched on first. ·If the power shuts off automatically, take the unit to your nearest Pioneer authorized service center or your dealer for servicing. |
| No sound is output when a function is selected. | ·Make sure the component is connected correctly (refer to Connecting up on page 7). ·Press MUTE on the remote control to turn muted off. |
| Noise during playback of a cassette deck. | ·Move the cassette deck further from your amplifier, until the noise disappears. |
| Can't operate the remote control. | ·Replace the battery (refer to page 6). ·Operate within 7 m, 30° of the remote sensor on the front panel (refer to page 11). ·Remove the obstacle or operate from another position. ·Avoid exposing the remote sensor on the front panel to direct light. |
| The display is dark or off. | ·Press DIMMER on the remote control repeatedly to return to the default. |
Specifications
Amplifier section
Power output specification is for when power supply is 230V
Continuous power output (both channels driven at 20Hz to 20kHz)^**
THD 0.2% . 60W + 60W
THD 0.2% 45 W + 45 W
- Continuous power output (both channels driven at 1 kHz)
THD 0.7% 4 . 70W + 70W
THD 0.7% 8Ω .47W+47W
Total harmonic distortion**
20 Hz to 20 kHz, 25 W, 8 Ω. 0.05%*
- Measured with DIRECT button switched on.
** Measured by Audio Spectrum Analyzer
Audio section
Input (Sensitivity/Impedance)
CD, TAPE, TUNER, AUX. 200 mV/22 kΩ
PHONO (MM) 2.8 mV/47 kΩ
Frequency response
CD, TAPE, TUNER, AUX. . . . 5 Hz to 100 kHz +_3^0 dB
PHONO (MM) 20 Hz to 20 kHz ±0.2 dB
PHONO (MM) overload level
1 kHz, THD 0.2%. 60 mV
Output (Level/Impedance)
TAPE REC 200 mV/1 kΩ
- Tone control
Bass. ± 10dB (100 Hz)
Treble. ± 10 dB (10 kHz)
- Signal-to-Noise Ratio (IHF SHORTED, A-NETWORK)
CD, TAPE, TUNER, AUX (200 mV input) .. 103 dB
PHONO (MM, 2.8 mV input) . 80 dB
Miscellaneous
Power requirements AC 220 V to 230 V, 50 Hz/60 Hz
Power consumption 170 W In standby. 0.8 W
Dimensions 420 mm (W) x 100 mm (H) x 359 mm (D)
Weight (without package) 10 kg
Accessories
Remote control 1
AAA/IEC R03 dry cell batteries 2
Power cord 1
Warranty card 1
Operating instructions (This document)

Note
- Specifications and the design are subject to possible modifications without notice, due to improvements.
Cleaning the unit
- Use a polishing cloth or dry cloth to wipe off dust and dirt.
- When the surface is dirty, wipe with a soft cloth dipped in some neutral cleanser diluted five or six times with water, and wrung out well, and then wipe again with a dry cloth. Do not use furniture wax or cleansers.
- Never use thinners, benzine, insecticide sprays or other chemicals on or near this unit, since these will corrode the surface.
Published by Pioneer Corporation.
Copyright © 2009 Pioneer Corporation.
All rights reserved.
IMPORTANT

TAPE REC 200 mV/1 kΩ
Publication de Pioneer Corporation.
© 2009 Pioneer Corporation.
Sensor and thisem Gerat 9
AnschlieBen 9
THD 0,2% 45 W + 45 W
TAPE REC 200 mV/1 kΩ
- Tonsteuerung
Basse. ± 10 dB (100 Hz)
Hohen ± 10 dB (10 kHz)
- Signalrauschabstand (IHF SHORTED, A-NETWORK)
CD, TAPE, TUNER, AUX
WAARSCHUWING NETSNOER
THD 0,2% 45 W + 45 W
TAPE REC 200 mV/1 kΩ
Toonbeheersing
Bass. ± 10dB (100 Hz)
Treble. ± 10 dB (10 kHz)
Copyright © 2009 Pioneer Corporation.
TAPE REC 200 mV/1 kΩ
Comando di tonalità
Bassi ± 10dB (100 Hz)
Alti 10 dB (10 kHz)
Copyright © 2009 Pioneer Corporation.
TAPE REC 200 mV/1 kΩ
Control del tono
Graves . ± 10 dB (100 Hz)
Agudos. 10 dB (10 kHz)
Copyright © 2009 Pioneer Corporation.
MEPbI IPEIOCTOPOXHOCTN IPIN OBPALUHIN C CETEBbIM UHYPOM
Дерхит eceBoi shур 3a BILky. He
BbITACKBaIe BILky, B3aBbINcB 3a shHyp, n
NkoRgda He KacaTeCb cteBOrO shHpy, ecn
Baun pyKn BlaJXhIbe, TAK kak 3To moKet
PnIBeCTN K KOPOTKOMY 3aMbIKAHIO nII
nopaxeHNIO 3JIeKTPnueCKm TKOM. He CTabBeT
annapat, npdMeTb Me6eJIu nT.d. Ha cteBOI
shHyp, He 3aXkMaiTe erO. He 3aB93bIbaIte y3IOB
Ha shHype n He CB83bIbaIte erO c dpyrIMN
shHypAMn. CteBEIe bHpybI doJXhbI leXkaTb Tak,
yTOb6Ha HIXn HEnb3 b6IbNoHactyNTb.
IOBpeXeHNbI ceBOIe SHypr MOxET cTaB
PnUHNOB BO3HNKHOBeHn noXapa nII nopa3ntb
Bac 3JIeKTPnueCKm TKOM. BpEmoT bpeMeHn
npOBepraIe CeBOIe SHnyp. B Cnyae
ObHApXeHn IOBpeXeHn IOpaHTe 3a
ZamEHOn B 6bnXaIwI OphiuaJIbHbI cepBncHbI
ZeHTp fIpMbI PIONEER nII K BaWemy dInJepy.
S002*Ru
HOpmaaIy IOnb3oBaTeJe No c6opy n yTnIn3aunn 6bIBwero B 3KcNpyatauoun O6opydoBaHna N OTPa6OtaBux XJemeHTOB NTaHNA
0603naeHne 1nnaobpydoBaHna

063nueHn 1J7eNemTeOBNTaHn

3TN 603aHHe HApOdyKUHH, YNaKOBKe, H/IIIN CoIPOBOIDHTeJIbHbIX DOkyMeHTax O3NaHAcOT, TTO 6bIBIIaBn B KcIJIyataaHH 3JIeKTPOTEXHueCKA H 3JIeKTPOHHA IIPOdyKIIHH OtpaOtaHbIe 3JIeMeHTbI NHTaHH He DIOJIKHb IblbpaCbIbATcB MBeCTe C 6bYbIM 6bTobMbIM MyCOpOM.
IToTOY06bIaHnAaBbIaBbYIOITpe6JIeHHINPOyUKIIHIOrTaOHTHBIE3IeMeHTbI ITHAHnCOOTBEcTBYIOUIIMOBpAOMo6oPatoHbIyTNH3HPOBAHbIHypepeoTAHbI, POkaJIyCTa, PepeDAITEHX B COOTBEcTBYIOUIINyHKCTcOpaHcNIOJIb3OBAHbIX 3JKeTPOHHbIX H3dJIInB C BOOTcTBnC MeCThBM3aKHOJaTeJIbCTBOM.
YTHIN3HpyaDHHbE yctpoBCTBa HJIeMeHTbI IITAHNIIpaBbHbO, BblIOMoraTe coxpanHTb IHeHNbIpe cpcByb HnpedTbparNTb BO3MOXbHE HeATAHNBHe IOcJIeCTBnI J3IOpOBbI IIOJeONKpyAHOJIe CpeBb, KOTOpBe MOrTy BO3HNKHyTb B pe3YbTaTe HEco0BTcTByoHcero YdaJIeHN OTOxoBD.
IJIIOJIYUeHINI IOIOIIINHTIEBHOI INHfOpMaIHHO I npABHbIbIX cNOCo6aX c60pa H yTHIN3AICIIN OTAPoBADtIeBOOpyOBaHIN H NcIOJIIOBAHbIX 3JIeMeHTOB IIHTAHIN O6pAlaiTBe CooTBETCTBYIOJIe MeCTHbIe OprAHIbCaMOIPaBJIeHN, B IeHTPbI yTHIN3AICIIN OTXOOB I HII IO MecTy IOKyIKn DAHHOr H3JIeHN.
Danhhie 6o3haueHn yTbeXdeHb ToIbKO Ie Ebponeckoro Co103a.
Дястан, КOTOPье He BXODЯВ COCTaB EBponeNcKOrO CoU3a:
EcII BBy JeJIaTe TynIIN3HIOBATb DAHNHe N3JeINH, 6OpATITcB CooTBTCTBYIOHnE MeTCHbIe yUpeKJdENH INI K JInIepaM IINIPOUYEHN HINΦOpMaIH N O pIaBbJIbHbIX cIcO6ax TynIIN3aINH.
YcTaHOBka 6aTaapeek 6
YcTaHOBka ycHJIHTeJIa 6
02Подклоченe
IIOKJIIOUeHHe Ka6eJIeI 7
IIOKJIIOUeHHe aYJIO KOMIOHEHTOB .7
IIOJIIOUeHHe aKycTHuecKO chTeMbI .8
YIpaBJIeHHe IpyTHMN KOMIOHeHTaMn Pioneer c IOMOIIbIO ceHCopa 3TOrO yCHJIInTeJI. .9
IoiKJIIOUeHHe K cetn. 9
03 OpraHbI ynpaBneHnI INHdkaTopbI
IpeDnnaHeJIb 10
DnCIIeI 10
IyIbT InCTaHIOHHOуIipaBJIeHnI. 11
HcnoJIb3OBAHHe NyJIbTa IINCTaHIIOHOHOro yIpaBJIeHHra 11
04 Bocnpon3BedeHne
HcIOJIb3OBAHHepeKHMaIprMoTO
BocIIPOHN3BeJeHHa 12
HcIOJIb3OBAHHeopraHOByipabJIeHHaJaAHCOM H
Tem6pOM. 12
BocIOPH3BeJeHHeIpyTHXHCTOHTHHKOB. 12
3aIINc baydno cHHaJa (Ha BHeIIHee
3aIHcBbAHOIIee yctPoIcTBO) 12
05 DonolnHnteIbHaI INΦopMaIaIa
YctpaHHe HEnCIIpaBHOcTei 13
TexHHueckhe xapaKtepHCTKNH. 14
UncTka yctpoiCTBa 14
Глaba 1:
- COOTBETCTBNE MIPOBbIM CTaHdapTaM
Пи HeIOcpeIcTBeHHOM yuactHn BbICOKOJIaCCbHbxCIEHuaJIInCTOB AIR Studios 3OT yCHJIHTeJIb IIOJyUHJI cepTHkAT AIR Studios:
KomnneKtaun
Korda otKpbBaete Kopo6ky, IpoBepbTe, YTO B Heh HaxoJATcS cJeIyUOIIne IIpuHaJIeXHocTH:
-Пульт дuctанционогу npabJIeHЯ
Cuyxhe6aTaapeKHN AAA/IEC R03,2IIT.
Ka6eJb IHTaHHa
- INHctpyKuHHIIO 3KcIIyatauHHN (3TOT JOKymENT)
- KapaHTHbI TaIOH
YctaHOBka 6aTaapeek

OctopoxHo
HnipabHbHoe HcIIb30BaHne 6aTaapeek MoKet IpNBecTH K TAKHM OAnCHM YBJIeHNMA, KaK yTeKa H MKNPOb3pbIB. IIpIeKJbAHteCb CJIeYIOUHX PpeIOCTOpOJKHOCTeN:
BHIMAHNE
Hnkorga He hncIOJIb3yIte cTapIe H NOBIIe 6aTapeKn OJHOBpeMeHHO.
BCTabJIyIe 6aTapeKn TaKHM O6pa3OM, YTO6bI 6o3HaueHn IJIIOc H MHHyc Ha 6aTapeKkax COOTBeTCTBOBaJIH TaKHM JKe 6o3HaueHnM B OTCKe IJIa 6aTaapeek.
- BaTaapeKn OJHOrO H TOrO JKe TNIopa3Mepa MoYrT JaBaTb pa3Hoe NaIpyKeHne. He HcIOJIb3yIte pa3HbIe 6aTaapeKn OJHOBpeMeHHO.
- YTHIN3Hpyr HcIOJIb3OBAHHIbe 6aTapeiKN, BbIIIOJIHnTe IocyIapCTBeHHIe IIpaBUNa I Tpe6OBaHHY ypeKJdeHNI IO oxpAne OKpyKaHOIe cpeIb, KOTOpIe JeIcTByIOT B BaIIe CTpaHe NII B BaIIeM peHOnE.
He hCIOJIb3yIte H He XpaHHTe 6aTapeKn Ha IIpMOM COJIHeHOM CBETy HJIN B MecTax C IIOBbIIeHHoI TeIIepaTyOi, HApIpHMepB ABTOMo6HJIe HJIN BO3JIe 6aTapeN OTOJIeHHa. 3TO MOKeT Bb3BaTb IPOTeKaHne, IpePgeB, MHKpOB3pIB HJIN BO3rOpaHne 6aTapeek. KpOME TOFO, 3TO MOKeT IIpHBecTH K cOKpaIeHHIO cPoKA cIJyKbI HJIN IIPOH3BOIHTeJIbHOCTN 6aTapeek.
YctaHOBka YcHJInteJIa
- YcTpoIcTBO HUxKHO yCTaHOBHTb Ha pOBHyIO H yCToIHINByIO IOBepXHOCTb.
He yctaHaBJIbAaIe erO bCJIeIyIOIIne MeCTa:
- Ha TeJIeBH3Op (3TO MOKeT BbI3BaTb HcKaJHeHn3O6paKeHH)
-BO3JIe KAcceTHoI JeKN (HJIN B6JIH3N yCTpoiCTBa, rHepeHpyIOIIeTO MaRHHTOE IOJIe). 3TO MoKET Bb13BaTb HCKaKeHHe 3Byka. - Ha IIpIaMbIX COJIHeuHbIX JIyuaX
-BcIbIX IN BJIaJXHbIX MecTAX
-B Ype3MepHO XOJIIOHbIX HJIN IORpUHX MeCTaX
-B MeCTax,ГДe HMeeT MecTo BHopaIIHЯ HJIHpyTOE DBHXeHHe
-B OUeHb IIbJIbHbIX MeCTaX
-B MeCTax, TJIe IIpHcyTCTByOT TOpRyHe HcIapEnHn HJIN MacJa (HaIIpHmep, Ha KxHne)
2 KhoNKe nepeKJIIOUeHnBxOIOB
HcIOJIb3yIte 3TH KHOIIKN IJIY BbIbOpa HCTOUYHKa BXOJIHO RCHIHAJ. 3TH KHOIIKN BbIOpaOT KOMIOHET,IOJIKJIIOUeHHBI K COOTBTcTBYIOUIEMy BXOJy Ha 3aJHeN PAHeJN.
3 KhoIKN TONE/BAL
3TN KHOIIKN HcIOJIb3yIOTcJdJIpeRyJIINpOBKNTeMba 3BvuaHnHa 6aJaHaCka KaHaIIOB (ctp.12).
4 VOLUME +/-
HcnoJIb3yIOTcJIIpeRyJIHpOBKn rPOMKocTH BOCIIpOHN3BeDeHn.
5 MUTE
OTKJIIOHaET N BKKJIOHae3ByK.
6 DIMMER
PeryIINpOBKa IApKoCTN IINCIIJIe (HJIN IIOJIHoe BbIKJIIOUChEHNIE IOIDCBETKN).
7 DIRECT
HaKImaIte 3Ty KHOIIKy IJIa BKJIIOueHn/ BbIKJIOueHnH yHKINI INpRMOrO BOCIpOn3BeJeHnA (ctp.12).
8 KhonkynypaBneHnCDPLAYER
C IIOMOIbIO 3THX KHOIIOK OcYIeCTBJIaTeTcYIpaBJIeHHe IPOHNpIbIaTeJIeM KOMIIaKT-DIckOB.
9 Khonkn ynpablen TUNER
C I NOMOJIbIbO 3THX KHOIIOK OCUJIeCTBJIeTcY yIpaBJIeHHe paJIOIIpHMeHHKOM Pioneer.
IcnoJb3OBAHHe nylbTa InCTaHcNoHHOr ynpabJeHnA
IIpn HcIOJIb3OBAHHN IIJIbTa IINCTAHUNHO yIpaBJIeHHN IOMHHTe O CJJeDyIOIeM:
CJIeIHTe 3a TeM, YTO6bIM MeKJy IYJbTOM INCTaHINHOHHOуIpyABJIeHNHa HAXOJIIHMcH Na yCHJIHTeJIe IIpHEMHbIM ceHCOPOM He 6bJIIO HNKAKHX IIpeIITCTBnI.
-Пиьт ДИСТаHиОнHOrOуправIeHЯ ИМeETДАльбовсьДeИСТВИЯ OKJO7MПрУгЛeOTKJOHeHЯ OT ceHcopa 30^
-Пиьт ДИСТаHINOHHOrO yIpaBJIeHnЯ MOKeT pa6oTaTB HeYcToHbNO,ecJH Na IprHemNKe erO cHrHaIOB IOnIaJaET cHJbHbCOJIHeuHbCBET HJIN JIOMHHeCIEHTHOE H3JIyUeHnE.
-Пильты ДИСТАнЦИНОНУ yIpaВIeHЯ OTO pa3NbIx yCtpoIcTB MOrY MeIaTb IpyrДPyrHy. He ИсПОЛьЗуITE ДИСТАнЦИHьIE Пильты ДИРYO OБOPUdOBAHЯ,pacIOLOJOKEHORO pIdom C 3THM yCtpoIcTBOM.
- EcINBb3aMeHTe yMeHbIIeHHe JaJIbHoCTN DeIcTBn IyJIbTa IIcTaHIOHOHOrO yIpaJIeHn, 3aMeHIne B IIyJIte 6aTapeKy.
Глaba 4:
Bocnpon3VeJeHne
IcnoJb3OBAHne pexnMa npramoro BOCPOn3BeDeHnA
HcIOJIb3yItepeKHMIpMOrOBOCpOHO3BeDeHHB TOM CJYae,ecIN Bbl XOTHTe CJIbIHATb MAKCHMaJIbHO IOJINIHHOE 3BYUaHHe NCTOuHNKa CnHaJa. Ipn 3TOM OTKJIIOuaETc BcH HeHyxHa o6pa6OTka CnHaJa H BOCpOHN3BOJNTcYHCTbI 3BYK HCTOUYHKa CnHaJa.
BoBpem npocnyuBaHnHa nCTOChnka cnHana dIa BkNIOUeHn I BbIKIOUeHn FyHKun npmOro BOCpON3BeHn HcNoJIb3yIn Te KhoNky DIRECT.
BocnpOn3BeDeHne dpyrnx nCTOuHNKOB
1 BkIIOUHTe NITaHne KOMNOHeHTa, CnHrAIC KOtOporo 6yJeT NCIOJIb3OBA TbCra.
2 BknoHTe nTaHne ycInTeJra.
3 BbIbepnte nCTOuHnK, CnHnC KOTOPORo Bbl XOTNTe BOCpON3BecTn.
ДлЯЗТОУнCSIOЛБ3уTe KHOПКи Вьбopa
ИСТОУнКа (ИЛДДСК ПЕКЛЮЧЕНЯ BXOJOB
INPUT SELECTOR).
4 HaunHe BocpOn3BedeHne Ha KOMNoHEHe, Bb6paHHOM Ha Ware 1.
3a\Pncb aydno cnrHaJa (Ha BHeUHee 3a\PncsbIbAIOuOee yCTpOJcTBO)
BbMoKeTe IPOH3BOIDHTb 3aINHc b ayIHO cngHaJIc JIOBOI HCTOUYHKa, IIOJKIIHOeHHORO K yCNJITeJIHO Ha JIOBOe 3aINCbIBaIOJooee ycTpoIcTB0.
1 BbIbepnte nCTOuHnK, cnHaJc KOTOPOROBblXOTNE3aNNCaTb.
Дя ЭTOGO ИСПОЛьзУТе KНОПКВ ВИБОра (INPUT SELECTOR).
2 NpOroTOBbTe HcTouHnK, CnHnA n c KOTOPORo Bbl XOTNe 3aNCAtB.
HactpoiTeCb Ha paIIOcTaIHIO, BCTaBbTe CD IINCK, PIOIIOTOBbTe IIPOHrPbIbATEJIb IIIActINHOK H.T.II.
3 NpOtroTOBbTe 3aNNcblBaIOoee yCtpoiCTBO.
BcTaBbTe B3aIINCbIbAIOJIeE yCTpoIcTBO YIcHTyJIeHTy, MHNIIINCK I T.I. N yCTaHOBInTe ypOBH3aIINCH.2
EcJIN BbI He yBepeHb I TOM, KaK 3TO cJeIaTb, O3HaKoMbTeCb C HcHTpyKlIHMN, pHiJIaFaeMbIMK 3aIIHcIBaIOIIeMy yCTpoJIcTBy.
4 Haunthe 3aNCb, a 3aTEM Haunthe Bocpon3BeDeHne Ha KOMnOHeTeNCTOuHKe CnHaJa.
Пгимеанно
1Пин 3ТOM OTKJIIOUaETc yIpaBJIeHHe 6aJIaHcom I TeMbPOM, a TAKKe BbIKJIOUaETc IINcIIJIe H a IpeIeHne I NaHeIh.
2 YpOBeHb rPOMKocTH, a TaKKe peRyJIHrPoBKN TeM6pa H 6aJIaHca ycJIHTeJI He BJIINOT Ha 3aIIHcBIAeMbH CnIHHaJI.
Глaba 5:
Дононтульнаиформаця
YcTpaHHe HEnCnPaBHOCTe
3aayactyIO HeBepHbIe IeHCTBnHO IIHHMOHTc3a HeIOJIaIKN HIN HeHCpABHOCTH. EcIN BAM KAKTeC, YTO OTOT KOMIOHEHT HeCNpABeH, NOJaIyIcTa, ChauJaI O3HAKOMbTEc b cPiHBeJHeHbIMn HInKe IIOsCHENHM. HOrTJa Ipo6JIeMa MoKeT 6bITb C8B3aHa c dpyrHM KOMIOHEHTOM. IPOBepbTe dpyrHe KOMIOHEThI HNCIOJIb3YeMbte 0JIeKTPHuCeckNe IpiHbOpbI. Ecln HeIOJIaIKY He ydaetcYcTpAHNTb DaJce O3HAKOMJIeHN C pIHBeJehbIMn HInke peKOMHeJAaIIHM, To o6paHTTEcB B 6JlnKaIIHb ABTOPH3OBAHHbI cepBnchbl ueHtp Pioneer INI K BAIIeMy DJIepey.
- EcJIN yCtpoHCTBO IpecTaET HopMaJIbHO pa6OtaTB H3-3a BHeIHHero BO3JeIcTBnA,HaIIpHMep,H3-3a pa3PraOB cTATNuEcKOrO 3JIeKtpNueCTBa,TOOTKJIIOUHTe ceTeByIO BVJIky OT pO3eTKn, a 3aTEM IIOKJIIOHHTe ee CHOBA -3TO IOMOKeT BePhyTB HcXoIHbIe pa6OuHne ycIOBnI.
- HenpepbIBHna BbIXOHa MOnHocTb (Oba KaHana Ha YacToTe 1 KTu)
KHN 0,7% 4Ω. .70B+70B
KHIN 0,7% ,8 . 47B+47B
CymmapHoe HeJIHHeHoe NCKaXHeHne**
20 _II - 20 _II,25B ,8 . 0.05%
- H3Mepeno npu hačamou khonke DIRECT.
**H3mepeHo 38yKo6bLM cneKmpoanaIu3amopOM
Aydno
BxoJd(yBCTBNTeJIbHOCtBJ/ conpoTnBJIeHne)
CD, TAPE, TUNER, AUX. 200 MB/22 kΩ
PHONO (MM). 2,8 MB/47 KΩ
- Dua3OH BocnpOn3BedeHnHaCTOT
CD, TAPE, TUNER, AUX . . . 5 _II do 100 _-3^II dB PHONO (MM) . . . . . . . . . . . . . . . . . . . . . . . . . . . . . . . . . . . . . . . . . . . . . . . . . . . . . . . . . . . . . . . . . . . . 20 _II do 20 _II ± 0,2 dB
- YpOBeHb nepeRpy3kn PHONO (MM)
BbICOKHe YacTObI .10 I6 (10 KfI)
- OthoWeHne cnHaJI/7yM (IHF, A-NETWORK, BxOd 3aKopoYeH)
CD, TAPE, TUNER, AUX
(BXOJHOH CNHaJI 200 MB) 103 JB
PHONO (MM, BxOДной сигнад 2,8Mb) ...80дБ
Почи napametpbI
Tpe6obAHnK IHTaHHIO .IepemHbI ToK 220B Do 230B,50 _II / 60_II
IopTe6JIaEma MoHocTb 170Bt BpeKHeOJHaHHa .0,8BT
ГабарNTы 420 MM (III) x 100 MM (B) x 359 MM (Γ)
Bec (6e3 yIaKOBKn) 10 Kr
PpHaadJIeXHoCTn
IyIbT nHCTaHnOHnO yIpaBJIeHHra. 1
Cyxhe 6aTaapeKKn AAA/IEC R03.2
Ka6eJIb IITaHnIa 1
FapaHTHnHbI TaIOH. 1
Hnctpykunnn IIO 3KcnIyataunn (TOTOKymeHT)

PpimmeaHne
BcB3HcIIOCTOHHbIM COBepIIeHCTBOBaHHem H3JeJIH TeXHHueCKHe XapaKTePHeCTHKn H KOHCtpyKIIH MOrTy 6bITb H3MeHeHb 6e3 IIpeDabapHTeJIbHOTo YBeIOMJIeHHN.
UcTka yCTpoNCTBa
UTO6bI ydaJIHTbc ycHJIHTeJIa IIbIb HJIINrP3b, HCIOJIb3yIte IIOJIHPoBOOHyIO TkaHB HJIN cyXHy TOPIOChy.
EclnIOBepxHocbYcHJIHTeJ3aqr3HeHa, IIpOtpIte ee MArKoTprIIOuKoCJIerKa yBIAJXHEHHbIM HeITpaJIbHBIM MOIOIHm cpeICTBOM,pa36abJIeHBIM YHCTOBoBOIOB B5 Do 6 pa3,a 3aTeM CHOBA BbITpIte cyXOH TpRIOH.K.He HcNIOJIb3yIte BOCKdJIa Me6eJIH MoIOUIne cpeICTBa.
He HcIOJIb3yIte IJIa OUHCTKN paCtBOpHTeJIH, 6eHHN, CpeJIcTBA OT HaceKOMbIX IN JpyrTHe XHMKaTbI HN HA IOBepXHOCTH 3TOGO yCTpoJIcTBA, HN PdIOM C HMM - 3TO MOKeT BblBaTb KoppO3HNO eTO IOBepXHOCTH.
H3daHo Pioneer Corporation.
Pioneer Corporation, 2009.
Bce npaba 3aunneHbI.
Приимechanicals:
B COOTBETCTBmC o CTaTbe 5 3aKoHa Pocnckoi Φeepaun "O 3aunite npab notpe6ntra" U YkaaHnEM NpaBNTbCTBa Pocnckoi Φeepaun No 720 ot 16 noHra 1997 roa Kopnpaun Pioneer Europe Nv tcaHnBaIe TcJOpHe na CneDyUOyIO pOdoJNtBnHOctb cPoka cLnyKbbl oFniMaJIbHo nocTabIeMbIX ha Pocnckn pbIHOK ToBapOB.
Aydno n Bndeoo6opydoBaHne: 7 let
Ipehenochoe ayuioo6opyobAHne: 6 let
http://www.pioneer.co.uk
http://www.pioneer.fr
http://www.pioneer.de
http://www.pioneer.nl - http://www.pioneer.be
http://www.pioneer.it
http://www.pioneer.es
http://www.pioneer-rus.ru
http://www.pioneer.eu
Published by Pioneer Corporation.
Copyright © 2009 Pioneer Corporation.
All rights reserved.
Publication de Pioneer Corporation.
© 2009 Pioneer Corporation.
PIONEER ELECTRONICS (USA) INC.
P.O. BOX 1540, Long Beach, California 90801-1540, U.S.A. TEL: (800) 421-1404
PIONEER ELECTRONICS OF CANADA, INC.
300 Allstate Parkway, Markham, Ontario L3R 0P2, Canada TEL: 1-877-283-5901, 905-479-4411
PIONEER EUROPE NV
Haven 1087, Keetberglaan 1, B-9120 Melsele, Belgium TEL: 03/570.05.11
PIONEER ELECTRONICS ASIACENTRE PTE. LTD.
253 Alexandra Road, #04-01, Singapore 159936 TEL: 65-6472-7555
PIONEER ELECTRONICS AUSTRALIA PTY. LTD.
178-184 Boundary Road, Braeside, Victoria 3195, Australia, TEL: (03) 9586-6300
PIONEER ELECTRONICS DE MEXICO S.A. DE C.V.
Blvd.Manuel Avila Camacho 138 10 piso Col.Lomas de Chapultepec, Mexico,D.F. 11000 TEL: 55-9178-4270
K002_Ru