
HTP-330 - Audio Amplifier PIONEER - Free user manual and instructions
Find the device manual for free HTP-330 PIONEER in PDF.


| Product Type | Audio Amplifier (AV Receiver) |
| Brand | Pioneer |
| Model | HTP-330 |
| Dimensions (W x H x D) | 435 x 150 x 360 mm |
| Weight | 8.0 kg |
| Power Supply | AC 120V, 60 Hz |
| Power Consumption | 400 W (max) |
| Output Power (per channel) | 100 W (8 ohms, 20 Hz-20 kHz, 0.08% THD) |
| Total Harmonic Distortion | 0.08% (rated power) |
| Frequency Response | 20 Hz - 20 kHz ±1 dB |
| Signal-to-Noise Ratio | 100 dB (IHF-A) |
| Inputs | 4x RCA, 2x Optical, 1x Coaxial, AM/FM antenna |
| Outputs | 2x Speaker terminals, 1x Pre-out subwoofer, 1x Headphone |
| Tuner | FM/AM, 30 station presets |
| Supported Audio Formats | Dolby Digital, DTS, Dolby Pro Logic |
| Features | Sleep timer, bass/treble control, direct function |
| Remote Control | Included (RC-647) |
| Standby Power Consumption | 0.5 W |
| Warranty | 2 years (subject to region) |
Frequently Asked Questions - HTP-330 PIONEER
User questions about HTP-330 PIONEER
0 question about this device. Answer the ones you know or ask your own.
Ask a new question about this device
Download the instructions for your Audio Amplifier in PDF format for free! Find your manual HTP-330 - PIONEER and take your electronic device back in hand. On this page are published all the documents necessary for the use of your device. HTP-330 by PIONEER.
USER MANUAL HTP-330 PIONEER
Pioneer sound.vision.soul
HTP-330
SX-SW330
S-ST330
Audio Multi-channel Receiver Subwoofer 多聲道音效接收重低音
Speaker System 揚聲器系統
Operating Instructions
操作手册
Thank you for buying this Pioneer product.
Please read through these operating instructions so that you will know how to operate your model properly. After you have finished reading the instructions, put them in a safe place for future reference.
IMPORTANT

The lightning flash with arrowhead symbol, within an equilateral triangle, is intended to alert the user to the presence of uninsulated "dangerous voltage" within the product's enclosure that may be of sufficient magnitude to constitute a risk of electric shock to persons.
CAUTION
RISK OF ELECTRIC SHOCK DO NOT OPEN
CAUTION:
TO PREVENT THE RISK OF ELECTRIC SHOCK, DO NOT REMOVE COVER (OR BACK). NO USER-SERVICEABLE PARTS INSIDE. REFER SERVICING TO QUALIFIED SERVICE PERSONNEL.

The exclamation point within an equilateral triangle is intended to alert the user to the presence of important operating and maintenance (servicing) instructions in the literature accompanying the appliance. D3-4-2-1-1_En-A
WARNING
This equipment is not waterproof. To prevent a fire or shock hazard, do not place any container filed with liquid near this equipment (such as a vase or flower pot) or expose it to dripping, splashing, rain or moisture. D3-4-2-1-3_A_En
WARNING
To prevent a fire hazard, do not place any naked flame sources (such as a lighted candle) on the equipment. D3-4-2-1-7a_A_En
Operating Environment
Operating environment temperature and humidity: +5 °C to +35 °C (+41 °F to +95 °F); less than 85 %RH (cooling vents not blocked) Do not install this unit in a poorly ventilated area, or in locations exposed to high humidity or direct sunlight (or strong artificial light) D3-4-2-1-7c_A_En
CAUTION
The ⏻ STANDBY/ON switch on this unit will not completely shut off all power from the AC outlet. Since the power cord serves as the main disconnect device for the unit, you will need to unplug it from the AC outlet to shut down all power. Therefore, make sure the unit has been installed so that the power cord can be easily unplugged from the AC outlet in case of an accident. To avoid fire hazard, the power cord should also be unplugged from the AC outlet when left unused for a long period of time (for example, when on vacation).
WARNING
Before plugging in for the first time, read the following section carefully.
The voltage of the available power supply differs according to country or region. Be sure that the power supply voltage of the area where this unit will be used meets the required voltage (e.g., 230 V or 120 V) written on the rear panel. D3-4-2-1-4 A En
This product is for general household purposes. Any failure due to use for other than household purposes (such as long-term use for business purposes in a restaurant or use in a car or ship) and which requires repair will be charged for even during the warranty period. K041_En
If the AC plug of this unit does not match the AC outlet you want to use, the plug must be removed and appropriate one fitted. Replacement and mounting of an AC plug on the power supply cord of this unit should be performed only by qualified service personnel. If connected to an AC outlet, the cut-off plug can cause severe electrical shock. Make sure it is properly disposed of after removal. The equipment should be disconnected by removing the mains plug from the wall socket when left unused for a long period of time (for example, when on vacation). D3-4-2-2-1a_A_En
POWER-CORD CAUTION
Handle the power cord by the plug. Do not pull out the plug by tugging the cord and never touch the power cord when your hands are wet as this could cause a short circuit or electric shock. Do not place the unit, a piece of furniture, etc., on the power cord, or pinch the cord. Never make a knot in the cord or tie it with other cords. The power cords should be routed such that they are not likely to be stepped on. A damaged power cord can cause a fire or give you an electrical shock. Check the power cord once in a while. When you find it damaged, ask your nearest PIONEER authorized service center or your dealer for a replacement. S002_En
VENTILATION CAUTION
When installing this unit, make sure to leave space around the unit for ventilation to improve heat radiation (at least 5 cm at top, 5 cm at rear, and 5 cm at each side).
WARNING
Slots and openings in the cabinet are provided for ventilation to ensure reliable operation of the product, and to protect it from overheating. To prevent fire hazard, the openings should never be blocked or covered with items (such as newspapers, table-cloths, curtains) or by operating the equipment on thick carpet or a bed. D3-4-2-1-7b A En

Contents
Contents
01 Speaker Setup Guide
Safety precautions when setting up....4
Home theater sound setup 4
Front surround setup (recommended)....4
Standard surround setup 6
Wall mounting the speakers 7
Before mounting 7
Additional notes on speaker placement....7
02 Connecting up
Basic connections 8
Using this system for TV audio....11
03 Controls and displays
Display unit 12
Display 12
Remote control 13
Using the remote control....14
Putting the batteries in the remote control ..... 14
04 Getting started
System demo setting 15
Using the Auto MCACC setup for optimal surround
sound 15
05 Listening to your system
Auto listening mode 16
Listening in surround sound 16
Dolby Pro Logic II Music settings 16
Using Front Stage Surround Advance ..... 17
Using Advanced Surround....17
Listening in stereo 17
Using the Sound Retriever....17
Listening with Acoustic Calibration EQ 18
Enhancing dialogue....18
Using Quiet and Midnight listening modes ..... 18
Adjusting the bass and treble 18
Boosting the bass level 18
06 Listening to the radio
Listening to the radio....19
Improving poor FM reception 19
Improving poor AM sound....19
Memorizing stations 19
Listening to station presets 19
Changing the frequency step 20
07 Surround sound settings
Using the Setup menu....21
Channel level setting....21
Speaker distance setting....21
Dynamic Range Control 21
Dual mono setting....22
Adjusting the channel levels using the test tone .... 22
08 Other connections
Connecting auxiliary components 23
Connecting an analog audio component....23
Listening to an external audio source 23
Connecting external antennas 23
Using this unit with a Pioneer plasma display ..... 24
SR+ Setup for Pioneer plasma displays .....24
Using the SR+ mode with a Pioneer plasma display....25
About control out connections 25
09 Additional information
Setting the sleep timer....26
Dimming the display 26
DTS CD setting 26
Resetting the system 26
Installation and maintenance 27
Hints on installation 27
Setting up the remote to control your TV .....27
Using the TV remote control buttons....27
Preset code list....28
Troubleshooting....29
General 29
Tuner....30
Error Messages....30
Glossary....30
Specifications 31
What's in the box
Please confirm that the following items are all supplied.
Receiver subwoofer (SX-SW330) box:
- Remote control (page 13)
- AA/R6 dry cell batteries (to confirm operation) x2 (page 14)
- Display unit (page 12)
• Power cords x2 (page 11)
• AM loop antenna (page 9)
• FM wire antenna (page 9) - Display cable (page 9)
- Coaxial cable (page 23)
- Microphone (for Auto MCACC setup) (page 15)
• Non-skid pads (large) x4 (page 5, 6)
- Spacers x2 (page 9)
• This operating instructions
Speakers (S-ST330) box:
- Speakers (front x2, surround x2, center x2) (page 9)
- Speaker cables x5 (page 9)
• Non-skid pads (small) x24 (page 5, 6) - Brackets x2 (page 5, 6)
- Spiral wrap x2 (page 10)
- Screws x8 (page 5, 6)
Chapter 1
Speaker Setup Guide
Safety precautions when setting up
When assembling the speakers, lay them down flat on their side to avoid accidents or injury. Make sure to use a stable surface when assembling, setting up, and placing the speakers.
If the speakers are to be used in a stacked configuration, always use the provided brackets to secure them together (page 5.6).
Home theater sound setup
Most 5.1 channel home theater systems are designed so that speakers are placed to surround the listener's position as shown in the illustration. Such designs, however, produce the undesirable effect of forcing the center speaker to be mounted above or below the television monitor, and require room for the surround speakers.

flowchart
graph TD
    A["Front left"] --> B["Center"]
    B --> C["Front right"]
    C --> D["Bass"]
    E["Surround left"] --> F["Surround right"]
    G["Surround right"] --> H["Surround left"]
The present system, however, features Pioneer's proprietary New Front Surround technology and Dual Center Speakers, using only two speaker positions (to right and left of television as shown in the illustration) in order to provide full home theater sound while greatly simplifying the issue of speaker placement.

flowchart
graph TD
    A["House TV"] --> B["Central"]
    C["House TV"] --> B
    D["Bass"] --> E["Surround right"]
    E --> F["Surround left"]
    F --> G["Front left"]
    G --> H["Center"]
    H --> I["Front right"]
    I --> J["Surround right"]
    J --> K["Surround left"]
Front surround setup (recommended)
This recommended method places the surround speakers in front, to simplify the issue of speaker placement in the room. The center speakers can be placed in independently in the center if desired.

En
Speaker Setup Guide
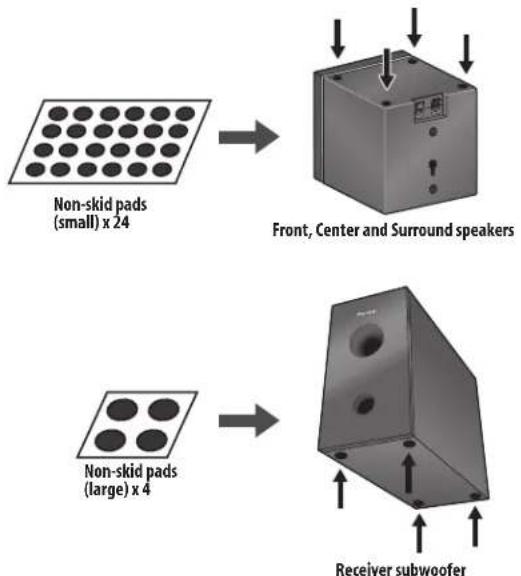
1 Attach the smaller non-skid pads to the base of each of the front, center and surround speakers. The four large non-skid pads are for the receiver subwoofer (as shown).
Use the adhesive side of the pads to attach them to the base (flat surface) of each speaker.
flowchart
graph TD
    A["Non-skid pads (small) x 24"] --> B["Front, Center and Surround speakers"]
    C["Non-skid pads (large) x 4"] --> D["Receiver subwoofer"]
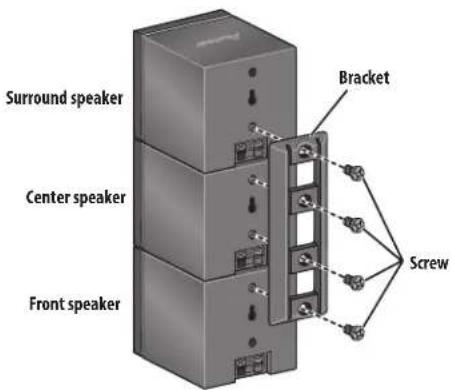
2 Stack the speakers and fix with the brackets.
Each speaker is provided with a color-coded indicator on the model label on the rear side to assist identification. Refer to the color indicators and install the speakers correctly.

As shown in the illustration, stack the speakers from the bottom up in the order front speaker, center speaker, surround speaker. Align the bracket with the respective upper screw hole on the back of the front speaker, the two screw holes on the center speaker, and the bottom screw hole on the surround speaker, and fasten the screws securely.
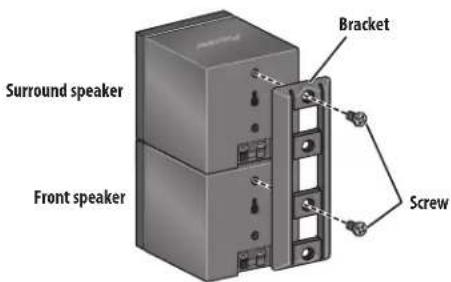
When placing the center speakers independently, stack the front speaker on the bottom and the surround speaker on top, then align the 1st and 3rd screw holes from the top of the bracket with the upper screw holes on the back of the speakers, and fasten the two securely.
Caution
- Do not attempt to carry the speakers when they are connected with the bracket. Doing so may cause damage to the bracket or worsen damage to the bracket and speakers in the event they are dropped.
3 Connect the speaker system.
Refer to Connecting up to connect the speakers properly. After connecting everything, place the speakers as shown in the diagram above for optimal surround sound. After placing the speakers, run the Auto MCACC setup (page 15) to complete your surround sound setup.
Speaker Setup Guide
Standard surround setup
This is a standard multichannel surround sound speaker setup for optimal 5.1 channel home theater sound.
The center speakers can be installed independently in the center if desired.

1 Attach the smaller non-skid pads to the base of each of the front, center and surround speakers. The four large non-skid pads are for the receiver subwoofer (as shown).
Use the adhesive side of the pads to attach them to the base (flat surface) of each speaker.

flowchart
graph TD
    A["Non-skid pads (small) x 24"] --> B["Front, Center and Surround speakers"]
    C["Non-skid pads (large) x 4"] --> D["Receiver subwoofer"]
2 (When mounting center speakers to right and left) Stack the speakers and fix with the bracket.
Each speaker is provided with a color-coded indicator on the model label on the rear side to assist identification. Refer to the color indicators and install the speakers correctly.


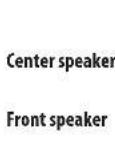

As shown in the illustration, stack the speakers with the front speaker on the bottom and center speaker on top, then align the 1st and 3rd screw holes from the top of the bracket with the upper screw holes on the back of the speakers, and fasten the two securely.

Caution
- Do not attempt to carry the speakers when they are connected with the bracket. Doing so may cause damage to the bracket or worsen damage to the bracket and speakers in the event they are dropped.
3 Connect the speaker system.
Refer to Connecting up to connect the speakers properly. After connecting everything, place the speakers as shown in the diagram above for optimal surround sound. After placing the speakers, run the Auto MCACC setup (page 15) to complete your surround sound setup.
En

Downloaded from www.Manualslib.com manuals search engine
Speaker Setup Guide
Wall mounting the speakers
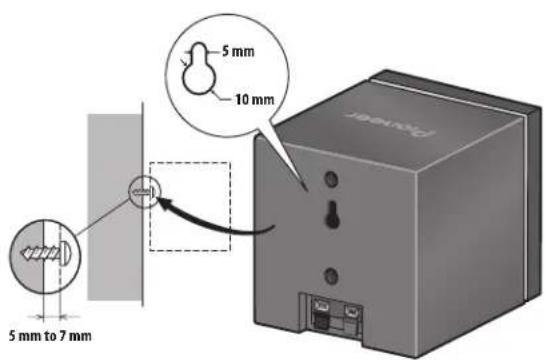
The front, center and surround speakers have a mounting hole which can be used to mount the speaker on the wall.
Before mounting
- Remember that the speaker system is heavy and that its weight could cause the screws to work loose, or the wall material to fail to support it, resulting in the speaker falling. Make sure that the wall you intend to mount the speakers on is strong enough to support them. Do not mount on plywood or soft surface walls.
- Mounting screws are not supplied. Use screws suitable for the wall material and support the weight of the speaker.

Caution
- If you are unsure of the qualities and strength of the wall, consult a professional for advice.
- Pioneer is not responsible for any accidents or damage that result from improper installation.
Additional notes on speaker placement
• Install the main front left and right speakers at an equal distance from the TV.
- When using the Front surround setup, separate the left and right speakers by about 1.5m for optimum effect.
- When using the Standard surround setup, install the surround speakers slightly above ear level for optimum effect.
Precautions:
- When installing the center speaker on top of the TV, be sure to secure it with tape or some other suitable means. Otherwise, the speaker may fall from the TV due to external shocks such as earthquakes, endangering those nearby or damaging the speaker.
- The front (x2), center (x2) and surround (x2) speakers supplied with this system are magnetically shielded. However, depending on the installation location, color distortion may occur if the speaker is installed extremely close to the screen of a television set. If this happens, turn the power switch of the television set OFF, and turn it ON after 15 min to 30 min. If the problem persists, place the speaker system away from the television set.
- The receiver subwoofer is not magnetically shielded and so should not be placed near a TV or monitor. Magnetic storage media (such as floppy discs and tape or video cassettes) should also not be kept close to the receiver subwoofer.
- Do not attach the receiver subwoofer to the wall or ceiling. They may fall off and cause injury.
- For safety, make sure that there is no exposed bare speaker wire outside of the speaker terminals.
- Do not connect the supplied speakers with any other amplifier. This may result in malfunction or fire.
- Do not connect any speakers other than those supplied to this system.

Chapter 2
Connecting up
Basic connections

Important
- When connecting this system or changing connections, be sure to switch power off and disconnect the power cord from the wall socket. After completing all connections, connect the power cord to the wall socket.
Receiver subwoofer

Note
- When using the display unit in a wall-mounted location, take full precautions to prevent the unit from accidentally falling.
- Screws and other fixtures for use in wall mounting are not included.

WARNING
- Pioneer bears no responsibility for accidents resulting from faulty assembly or installation, insufficient mounting strength of walls, mounting fixtures (or other building fixtures), misuse or natural disasters.
En

Downloaded from www.Manualslib.com manuals search engine
Connecting up
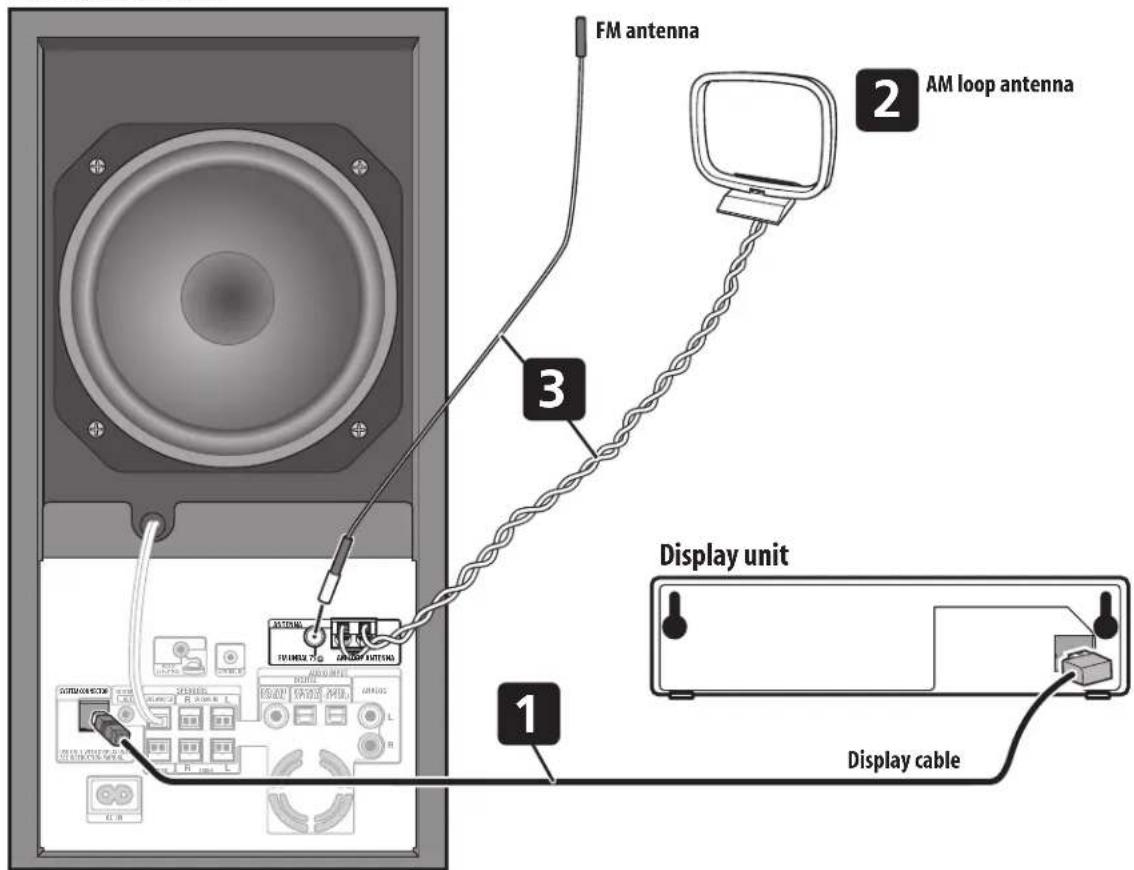
1 Fasten the spacers to the display unit and connect.
If the display unit is difficult to view, the spacers can be attached to allow changing of the viewing angle. Peel off the protective paper from the spacers and press the spacers onto the depressions on the bottom of the display unit.
Plug the L-shaped end of the display cable into the connector on the rear of the display unit, then plug the other end of the display cable into SYSTEM CONNECTOR jack on the receiver subwoofer.

natural_image
3D rendering of a rectangular electronic component with mounting holes and a label (no text or symbols)2 Assemble the AM loop antenna.
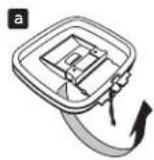


a. Bend the stand in the direction indicated by the arrow.
b. Clip the loop onto the stand.
c. If you want to fix to a wall or other surface, perform step b after first securing the stand with screws.
It is recommended that you determine the reception strength before securing the stand with the screws.
3 Connect the AM and FM antennas 1.
a. Connect one wire of the AM loop antenna to each AM antenna terminal ^2 .
For each terminal, press down on the tab to open; insert the wire, then release to secure.

b. Push the FM antenna ^3 plug onto the center pin of the FM antenna socket.
4 Connect each speaker.
- The front and surround speaker cables have a color-coded connector at one end and two bare wires at the other end.

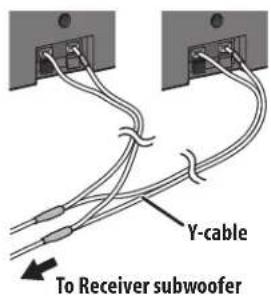
- Since there is only one terminal to connect the two center speakers, you will need to use the supplied Y-cable for the connection.
- Twist and pull off the protective shields on each wire.
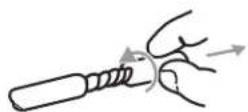
- Connect the wires to the speaker. Each speaker in the illustration can be identified by means of the color-coded indicator provided on the rear-surface model label. Match the color-coded wire with the color indicator on the model label, then insert the color-coded wire into the red (+) side and the other wire into the black (−) side.
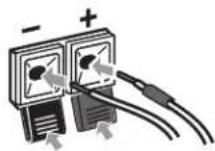
- When connecting the center speakers, connect the Y-cable dual end to the two center speakers in the same way.
Note
1 • Keep antenna cables away from other cables, the display unit and receiver subwoofer.
- If reception with the supplied antenna is poor, see Improving poor FM reception and Improving poor AM sound on page 19 or Connecting external antennas on page 23.
- Do not attach any antenna other than the provided loop antenna, or an external antenna as described on page 23.
2 • Don't let it come into contact with metal objects and avoid placing near computers, television sets or other electrical appliances.
- If radio reception is poor, you may be able to improve it by re-inserting each antenna wire into the opposite terminal.
- For best reception, do not untwist the AM loop antenna wires or wrap them around the loop antenna.
3 To ensure optimum reception, make sure the FM antenna is fully extended and not coiled or hanging at the rear of the unit.

flowchart
graph TD
    A["Receiver subwoofer"] --> B["Speaker system"]
    B --> C["Surround right (Gray)"]
    B --> D["Surround left (Blue)"]
    B --> E["Center (Green)"]
    B --> F["Center (Green)"]
    B --> G["Front right (Red)"]
    B --> H["Front left (White)"]
    B --> I["Y-cable"]
    B --> J["To AC outlet"]
- Connect the other end to the color-coded speaker terminals on the rear of the receiver subwoofer. Make sure to insert completely.
The small lug at the wire-end of the speaker plug should face up or down depending on whether it's being plugged into one of the upper or lower speaker terminals. Please make sure to connect correctly.
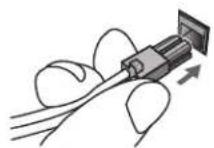
Upper terminal

Lower terminal
- When connections are completed, adjust the cable placements. If the speakers have been fixed with the brackets, fix the cable to the groove in the brackets as shown.

natural_image
Diagram of a wall-mounted electrical socket with wires and connectors (no text or symbols)- Fasten the cables together with the spiral wrap. Hold multiple cables together and place the wrap over the cables from the end. Wrap the spiral wrap with the cables in the center. The spiral wrap may be cut at a desired length.

natural_image
Illustration of hands tying a rope knot with a curved cord (no text or symbols)5 Connect the subwoofer cable.
- Just below the subwoofer speaker, to the left of center, you should see the subwoofer connecting cable. Plug this into the SUBWOOFER SPEAKER terminal.
Caution
• These speaker terminals carry HAZARDOUS LIVE voltage. To prevent the risk of electric shock when connecting or disconnecting the speaker cables, disconnect the power cord before touching any uninsulated parts.
- Do not connect any speakers other than those supplied to this system.
En

Connecting up
- Do not connect the supplied speakers to any amplifier other than the one supplied with this system. Connection to any other amplifier may result in malfunction or fire.
- The center speakers and front/surround speakers are designed with different impedance values. Be sure to identify and connect the speakers correctly since improper connections may result in degraded sound or operation.
6 If you have a DVD player or other source ^1 component you want to connect, connect it now before connecting the power cord in the next step.
See Connecting auxiliary components on page 23 for how to connect a digital source component.
7 Connect the power cord. 2
- Connect the power cord to AC inlet on the receiver subwoofer. Connect the power cord to a wall socket.
Using this system for TV audio
If your TV has a stereo audio output you can connect it to this system and enjoy surround TV sound.
Important
- When connecting this system, be sure to switch power off and disconnect the power cord from the wall socket. Connect the power cord to the wall socket only after completing all other connections.

1 Connect the audio output jacks on your TV to the ANALOG input jacks on the receiver subwoofer.
Use the red/white stereo audio cable (not supplied) for this connection. Make sure you match the left and right outputs with their corresponding inputs for correct stereo sound.
- You can use the ANALOG input jacks for any analog source you want, such as a tape deck, etc.

Note
1 Make sure to connect a TV or monitor (for video sources) to take advantage of this system's home theater potential. Please refer to the instruction manual supplied with your TV or monitor for connection details.
2 • Do not use any power cord other than the one supplied with this system.
- Do not use the supplied power cord for any purpose other than connecting to this system.
Chapter 3
Controls and displays
Display unit
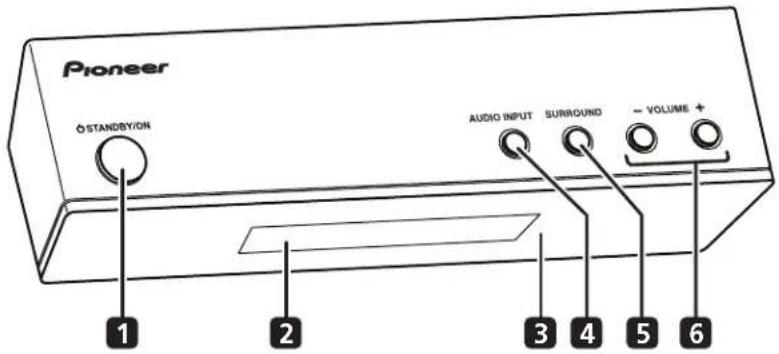
1 ⏻ STANDBY/ON
Press to switch the system on/into standby.
2 Front panel display
See below for details.
3 IR remote sensor (page 14)
4 AUDIO INPUT (page 23)
Press repeatedly to select one of the external audio inputs (DVD/DVR1, DVD/DVR2, DIGITAL or ANALOG).
5 SURROUND
Use to select a Surround mode (page 16).
6 VOLUME buttons
Use to adjust the volume.
Display

flowchart
graph TD
    A["1"] --> B["2"]
    B --> C["3"]
    C --> D["SOUND"]
    D --> E["DTS F.SURR."]
    E --> F["7"]
    F --> G["9"]
    F --> H["8"]
    F --> I["7"]
    E --> J["6"]
    J --> K["kHz MHz"]
    K --> L["5"]
    L --> M["4"]
    M --> N["Output"]
1 DTS
Lights during playback of a DTS source (page 16).
2 F.SURR.
Lights when one of the Front Stage Surround Advance listening modes is selected (page 17).
SURR.
Lights when one of the Advanced Surround listening modes is selected (page 17).
3 SOUND
Lights when Sound Retriever is active (page 17).
4 Tuner indicators (page 19)
^40 – Lights when a broadcast is being received.
- Lights when a stereo FM broadcast is being received in auto stereo mode.
- Lights when FM mono reception is selected.
5 kHz / MHz
Indicates the frequency unit shown in the character display (kHz for AM, MHz for FM).
6 Character display
7
Lights when sleep timer is active (page 26).
8 □□ PL II
Lights during Dolby Pro Logic II decoding (page 16).
9 D
Lights during playback of a Dolby Digital source (page 16).
Controls and displays
Remote control

1 ⏻ STANDBY/ON
Press to switch the receiver subwoofer on or into standby.
2 MUTE
Press to mute all audio from the speakers. Press again to cancel and restore the sound.
3 VOLUME +/-
Use to adjust the volume.
4 Input select buttons
DVD/DVR1 – Press to select the DVD/DVR1 digital audio input.
DVD/DVR2 – Press to select the DVD/DVR2 digital audio input.
DIGITAL – Press to select the DIGITAL audio input.
ANALOG – Press to select the ANALOG audio input. (page 23)
FM/AM – Press to select the built-in radio tuner. (page 19)
5 Number buttons, CLEAR and ENTER
Use the number buttons for entering radio stations directly, and so on.
Use CLEAR to clear an entry and start again.
Use ENTER to confirm an entry.
6 SLEEP
Press to set the sleep timer (page 26).
7 SETUP
Use to access the menu system for surround sound setup, tuner settings and so on (page 15, 19, 20, 21, 26).
8 SR+
Use to setup the SR+ features and to select the SR+ mode (page 25).
9 ↑/↓/←/→ (cursor buttons) and ENTER
Use to navigate the receiver subwoofer menus.
10 SOUND (page 18)
Press to access the sound menu, from which you can adjust bass and treble, etc.
11 TEST TONE
Use to output the test tone (for speaker setup) (page 22).
12 SOUND RETRIEVER
Press to restore CD quality sound to compressed stereo audio sources (page 17).
13 SURROUND
Use to select a Surround mode (page 16).
14 ADVANCED
Use to select a Pioneer original surround mode (page 17).
15 F.S.SURR
Use to select a Front Stage Surround Advance mode (page 17).
16 MCACC
Starts the Auto MCACC setup (page 15).
17 TV CONTROL (page 27)
After setting up, use these controls to control your TV.
Using the remote control
Please keep in mind the following when using the remote control:
- Make sure that there are no obstacles between the remote and the remote sensor on the unit.
- Remote operation may become unreliable if strong sunlight or fluorescent light is shining on the unit's remote sensor.
- Remote controllers for different devices can interfere with each other. Avoid using remotes for other equipment located close to this unit.
- Replace the batteries when you notice a fall off in the operating range of the remote.
- Use within the operating range in front of the remote control sensor on the display unit, as shown.

Putting the batteries in the remote control
1 Open the battery compartment cover on the back of the remote control.
2 Insert two AA/R6 batteries into the battery compartment following the indications (⊕,⊖) inside the compartment.

natural_image
Illustration of a remote control device with an open lid and battery pack, showing mechanical components (no text or symbols)3 Close the cover.

Caution
Incorrect use of batteries can result in hazards such as leakage and bursting. Please observe the following:
- Don't mix new and old batteries together.
- Don't use different kinds of battery together — although they may look similar, different batteries may have different voltages.
- Make sure that the plus and minus ends of each battery match the indications in the battery compartment.
- Remove batteries from equipment that isn't going to be used for a month or more.
- When disposing of used batteries, please comply with governmental regulations or environmental public instruction's rules that apply in your country or area.

WARNING
- Do not use or store batteries in direct sunlight or other excessively hot place, such as inside a car or near a heater. This can cause batteries to leak, overheat, explode or catch fire. It can also reduce the life or performance of batteries.
En

Chapter 4 Getting started
System demo setting
Switches the automatic demo feature on or off (this starts when you plug in for the first time).

1 Switch the system into standby.
2 Press SETUP.
3 Use the / (cursor left/right) buttons to select DEMO from the menu, then press ENTER.
4 Use the ↑/↓ (cursor up/down) buttons to select a setting, then press ENTER.
Select from:
- DEMO ON – Switches the demo display on.
- DEMO OFF – Switches the demo display off and the system into standby.
Using the Auto MCACC setup for optimal surround sound
The Multichannel Acoustic Calibration (MCACC) system measures the acoustic characteristics of your listening area, taking into account ambient noise, and testing for channel delay and channel level. After you have set up the microphone provided, the system uses the information from a series of test tones to optimize the speaker settings and equalization (Acoustic Calibration EQ) for your particular room. ^1

Important
- The test tones used for Auto MCACC setup are loud; however, do not turn the volume down during setup as this may result in a sub-optimal setup.
- Make sure the microphone and speakers are not moved during the MCACC setup.
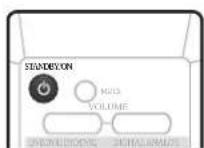

1 Connect the microphone to the MCACC SETUP MIC jack on the rear panel.

2 Place the microphone at your normal listening position.
Place the mic horizontally about ear level at your normal listening position using a table or chair.
Make sure there are no obstacles between the speakers and the microphone.
3 If the receiver subwoofer is off, press ⏻ STANDBY/ON to turn the power on.
4 Press MCACC
Try to be as quiet as possible after pressing MCACC. The volume increases automatically and the system outputs a series of test tones.
- To cancel Auto MCACC setup before it has finished, press MCACC The unit will continue to use the previous settings.
- If the ambient noise level is too high, NOISY blinks in the display for five seconds. To exit and check the noise levels ^2 , press MCACC, or to try again, press ENTER when RETRY shows in the display.
- If you see an ERR MIC or ERR SP message in the display, there may be a problem with your mic or the speaker connections. To try again, press ENTER when you see RETRY. ^3
When the MCACC setup is complete, the volume level returns to normal, COMPLETE ^4 shows in the display, and Acoustic Calibration EQ is activated. ^5

Note
You only need to use the Auto MCACC setup once (unless you change the placement of your speakers or your room layout).
2 • If the room environment is not optimal for the Auto MCACC setup (too much ambient noise, echo off the walls, obstacles blocking the speakers from the microphone) the final settings may be incorrect. Check for household appliances (air conditioner, fridge, fan, etc.), that may be affecting the environment and switch them off if necessary.
- Some older TVs may interfere with the operation of the mic. If this seems to be happening, switch off the TV during Auto MCACC setup.
3 If this doesn't work, press MCACC, turn off the power, and check the problem indicated by the ERR message, then try the Auto MCACC setup again.
4 If COMPLETE doesn't appear, it is likely an error occurred during the setup. Please check all connections and try again.
5 See Listening with Acoustic Calibration EQ on page 18 to switch on/off Acoustic Calibration EQ.
Chapter 5
Listening to your system
Auto listening mode
The Auto listening mode is the simplest way to listen to any source as it was mastered: the output from the speakers mirrors the channels in the source material.
If you set up the system for Front surround (page 4), the Front Surround modes will give the best results (see Using Front Stage Surround Advance on page 17).

- Press SURROUND to select the AUTO listening mode.
If the source is Dolby Digital or DTS, the front panel □□ D or DTS indicator lights.
- You can also use the SURROUND button on the display unit to change the listening mode.
Listening in surround sound
You can listen to stereo or multichannel sources in surround sound. Surround sound is generated from stereo sources using one of the Dolby Pro Logic decoding modes.
If you set up the system for Front surround (page 4), the Front Surround modes will give the best results (see Using Front Stage Surround Advance on page 17).

- Press SURROUND repeatedly to select a listening mode.
- You can also use the SURROUND button on the display unit to change the listening mode.
The choices that appear in the display will vary according to the type of source that's playing.
If the source is Dolby Digital or DTS, the front panel ☐☐ D or DTS indicator lights.
• AUTO – Auto listening mode (see above)
- DOLBY PL (Dolby Pro Logic) – 4.1 channel surround sound for use with any two-channel source
• MOVIE (Dolby Pro Logic II Movie) – 5.1 channel surround sound, especially suited to movie sources, for use with any two-channel source
- MUSIC (Dolby Pro Logic II Music) – 5.1 channel surround sound, especially suited to music sources, for use with any two-channel source; see Dolby Pro Logic II Music settings below
• STEREO – See Listening in stereo on page 17
Dolby Pro Logic II Music settings
When listening in Dolby Pro Logic II Music mode (see above), there are three settings you can adjust: Center Width, Dimension, and Panorama.

1 With Dolby Pro Logic II Music mode active, press SOUND.
2 Use ←/→ (cursor left/right) to select C WIDTH, DIMEN. or PANORAMA then press ENTER.
- C WIDTH (Center Width) – Provides a better blend of the front speakers by spreading the center channel between the front right and left speakers, making it sound wider (higher settings) or narrower (lower settings)
- DIMEN. (Dimension) – Adjusts the depth of the surround sound balance from front to back, making the sound more distant (minus settings), or more forward (positive settings)
- PANORAMA – Extends the front stereo image to include the surround speakers for a 'wraparound' effect.
3 Use ↑/↓ (cursor up/down) to adjust the setting then press ENTER to confirm.
Using Front Stage Surround Advance
The Front Stage Surround Advance modes are effective when you are using the Front surround speaker setup as described on page 4.

- Press F.S.SURR to select a Front Stage Surround Advance mode.
Press repeatedly to select FOCUS5.1, WIDE5.1 or EXTRAPWR.
- FOCUS5.1 – Use to provide a rich surround sound effect directed to the center area where the left and right speakers' sound projection converges.
- WIDE5.1 – Use to provide a surround sound effect to a wider area than FOCUS5.1 mode.
- EXTRAPWR – Outputs stereo sound (in the case of multi-channel sources, down-mixed stereo sound) from the surround speakers for powerful stereo effect.
Using Advanced Surround
The Advanced Surround effects can be used with any multichannel or stereo source for a variety of additional surround sound effects. These modes are designed to provide optimum listening effect when using the Standard surround setup described on page 6.

- Press ADVANCED to select an Advanced Surround mode.
Press repeatedly to select:
• ACTION – Suitable for action movies
- UNPLUGED – Suitable for acoustic musical sources
- EXPANDED – Wide sound field
• TV SURR. – Surround sound for mono or stereo TV broadcasts
• SPORTS – Suitable for sports programming
- ADV.GAME – Suitable for TV game units
- VIRTUAL – A virtual surround effect using just the subwoofer and front speakers.
• X-STEREO – Powerful surround sound for stereo music sources
Listening in stereo
You can listen to any source—stereo or multichannel—in stereo. When playing a multichannel source, all channels are downmixed to the front left/right speakers and the subwoofer.
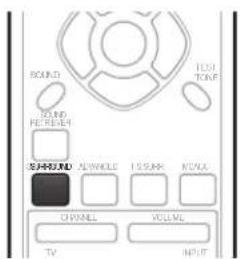
- Press SURROUND repeatedly until STEREO shows in the display.
- You can also use the SURROUND button on the display unit to change the listening mode.
Using the Sound Retriever
When audio data is removed during the MP3 or WMA compression process, sound quality often suffers from an uneven sound image. The Sound Retriever feature employs new DSP technology that helps bring CD quality sound back to compressed 2-channel audio by restoring sound pressure and smoothing jagged artifacts left over after compression.
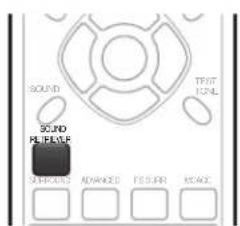
- While listening to a stereo source, preSOUND RETRIEVER.
Press repeatedly to switch between:
• RTRV ON — Switches the Sound Retriever on.
• RTRV OFF — Switches the Sound Retriever off.
Listening with Acoustic Calibration EQ
You can listen to sources using the Acoustic Calibration EQ set in Using the Auto MCACC setup for optimal surround sound on page 15.

2 Use the ←/→ (cursor left/right) buttons to select MCACC EQ then press ENTER.
3 Use the ↑/↓ (cursor up/down) buttons to switch EQ ON or EQ OFF then press ENTER to confirm.
- On the EQ OFF setting, equalization is set to off and speaker settings (channel delay and channel level) remains as it is set.
- Acoustic Calibration EQ is set to on automatically after Auto MCACC setup is used.
Enhancing dialogue
The Dialogue Enhancement feature is designed to make the dialogue stand out from other background sounds in a TV or movie sound track.
1 Press SOUND.
2 Use the / (cursor left/right) buttons to select DIALOGUE then press ENTER.
3 Use the ↑/↓ (cursor up/down) buttons to select the amount dialogue enhancement then press ENTER to confirm.
Select between OFF, MID or MAX.
Using Quiet and Midnight listening modes
The Quiet listening feature reduces excessive bass or treble in a sound source.
The Midnight listening feature allows you to hear effective surround sound of movies at low volume levels.
1 Press SOUND.
2 Use the / (cursor left/right) buttons to select TONE then press ENTER.
3 Use the ↑/↓ (cursor up/down) buttons to select QUIET or MIDNIGHT then press ENTER to confirm.
- To cancel the Quiet or Midnight listening modes, select BASS/TRE.
Adjusting the bass and treble
Use the bass and treble controls to adjust the overall tone.
1 Press SOUND.
2 Use the / (cursor left/right) buttons to select TONE then press ENTER.
3 Use the ↑/↓ (cursor up/down) buttons to select BASS/TRE then press ENTER.
- Selecting BASS/TRE cancels the Quiet and Midnight listening modes. These modes cannot be used at the same time.
4 Use the / (cursor left/right) buttons to select BASS or TREBLE; use the / (cursor up/down) buttons to adjust the sound then press ENTER to confirm.
Boosting the bass level
There are two bass modes you can use to enhance the bass in a source.
1 Press SOUND.
2 Use the ←/→ (cursor left/right) buttons to select BASSMODE then press ENTER.
3 Use the ↑/↓ (cursor up/down) buttons to select the sound then press ENTER to confirm.
Select between OFF, MUSIC or CINEMA.
Chapter 6
Listening to the radio
Listening to the radio
The tuner can receive both FM and AM broadcasts, and lets you memorize your favorite stations so you don't have to manually tune in every time you want to listen.

1 Press FM/AM to switch to the tuner, then press repeatedly to select the FM or AM band.
The display shows the band and frequency.
2 Tune to a frequency.
There are three tuning modes — manual, auto, and high-speed:
- Manual tuning – Press TUNE +/- repeatedly to change the displayed frequency.
- Auto tuning – Press and hold TUNE +/- until the frequency display starts to move, then release. The tuner will stop on the next station it finds. Repeat to keep searching.
- High-speed tuning – Press and hold TUNE +/- until the frequency display starts to move rapidly. Keep the button held down until you reach the frequency you want. If necessary, fine tune the frequency using the manual tuning method.
Improving poor FM reception
If you're listening to an FM station in stereo but the reception is weak, you can improve the sound quality by switching to mono.
1 Tune to an FM radio station then press SETUP.
2 Use the / (cursor left/right) buttons to choose FM MODE then press ENTER.
3 Use the ↑/↓ (cursor up/down) buttons to select FM MONO then press ENTER.
The mono indicator (○) lights when the tuner is in mono reception mode.
Select FM AUTO above to switch back to auto-stereo mode (the stereo indicator (○) lights when receiving a stereo broadcast).
Improving poor AM sound
The simplest way to improve the sound quality of AM radio is to make sure that the TV in the room is switched off. Also try changing the position and direction of the AM loop antenna.
Changing the noise cut mode
If you find that the sound quality is bad even after trying the above, you may be able to improve it using a different noise cut mode. Just choose the one that sounds best.
1 Tune to an AM radio station then press SETUP.
2 Use the / (cursor left/right) buttons to choose NOISECUT then press ENTER.
3 Use the ↑/↓ (cursor up/down) buttons to select a Noise cut mode (1, 2 or 3) then press ENTER.
Memorizing stations
You can save up to 30 station presets so that you always have easy access to your favorite stations without having to tune in manually each time.
1 Tune to an FM or AM radio station.
Select mono or auto-stereo reception (FM) or the Noise Cut mode (AM) as necessary. These settings are saved along with the preset.
2 Press SETUP.
3 Use the / (cursor left/right) buttons to choose ST.MEM. then press ENTER.
4 Use the ↑/↓ (cursor up/down) buttons to select the station preset you want then press ENTER
Listening to station presets
1 Make sure the tuner function is selected.
2 Use the ST +/- buttons to select a station preset.
- Alternatively, use the number buttons to select a preset directly.
Listening to the radio
Changing the frequency step
If you find that you can't tune into stations successfully, the frequency step may not be suitable for your country/region.
1 S witch the system into standby.
2 Press SETUP.
3 Use the / (cursor left/right) buttons to select 'AM 9K/10K', then press ENTER.
4 Use the ↑/↓ (cursor up/down) buttons to select a setting then press ENTER to confirm.
- AM 9K – 9 kHz step for AM; 50 kHz step for FM
• AM 10K–10 kHz step for AM; 100 kHz step for FM
Chapter 7
Surround sound settings
Using the Setup menu
From the Setup menu you can access all the surround sound settings of the system ^1 , including channel levels, speaker distances, dynamic range adjustment and dual mono audio playback.
Use the following buttons to use the Setup menu.

Channel level setting
The Auto MCACC feature (see page 15) should give you the best surround sound setup. However you may find that by further adjustment of the channel levels you can improve the surround sound in your listening room.
This method of setting the channel levels allows you to listen to a source and adjust the levels of each playback channel. Note that the channel level settings for stereo playback are independent of the settings for surround sound playback.
A further method of setting the channel levels is to use the test tone method. See Adjusting the channel levels using the test tone on page 22 for more on this.
1 Select stereo or multichannel playback for a source.
2 Press SETUP.
3 Use the ←/→ (cursor left/right) buttons to select CH LEVEL, then press ENTER.
4 Use ←/→ (cursor left/right) to select a channel; ↑/↓ (cursor up/down) to adjust the level of that channel.
- You can adjust the level of each channel by ± 10 dB.
- If the system is in Stereo or Virtual mode, or a stereo source is playing in Auto mode, you will not be able to adjust the center or surround channels.
5 Press ENTER when you're finished.
- If you use the Auto MCACC feature again, it will overwrite the settings you have made here.
Speaker distance setting
The Auto MCACC feature (see page 15) should give you the best surround sound setup. However you may find that by further adjustment of the speaker distance settings you can improve the surround sound in your listening room.
Set the distance of each speaker from your normal listening position.
1 Press SETUP.
2 Use the / (cursor left/right) buttons to select DISTANCE, then press ENTER.
3 Use ←/→ (cursor left/right) to select a speaker; ↑/↓ (cursor up/down) to adjust the distance.
Adjust the following speakers:
- L - Front left speaker
- C – Center speaker
- R - Front right speaker
• SR – Surround right speaker - SL – Surround left speaker
- SW – Subwoofer
Each speaker can be adjusted from 0.3 m to 9.0 m.
4 Press ENTER when you're finished.
- If you use the Auto MCACC feature again, it will overwrite the settings you have made here.
Dynamic Range Control
When watching Dolby Digital or DTS material at low volume, low level sounds — including some of the dialogue — can be difficult to hear properly. Using one of the Dynamic Range Control (DRC) settings can help by bringing up the low level sounds, while controlling high level peaks.
Dynamic Range Control works only with Dolby Digital soundtracks and some DTS soundtracks.
1 Press SETUP.
2 Use the / (cursor left/right) buttons to select DRC, then press ENTER.
Note
1 There are other settings you can adjust from the Setup menu; these are explained in Listening to the radio on page 19 and Additional information on page 26.
3 Use ↑/↓ (cursor up/down) to select a setting.
Select one of the following:
- DRC OFF (default) – No dynamic range adjustment (use when listening at higher volume)
- DRC MID – Mid setting
- DRC HIGH – Dynamic range is reduced (loud sounds are reduced in volume while quieter sounds are increased)
4 Press ENTER to exit.
Dual mono setting
Specifies how dual mono encoded Dolby Digital or DTS soundtracks should be played. You can also use this setting to switch the audio channel on DVD-RW discs recorded with bilingual audio.
1 Press SETUP.
2 Use the / (cursor left/right) buttons to select DUALMONO, then press ENTER.
3 Use ↑/↓ (cursor up/down) to select a setting.
Select one of the following:
- CH1 MONO (default) – Only channel 1 is played
- CH2 MONO – Only channel 2 is played
- CH1/CH2 – Both channels are played through the front speakers
4 Press ENTER to exit.
Adjusting the channel levels using the test tone
If you prefer, you can set the channel levels using a test tone as a reference, rather than playing a source (see Channel level setting on page 21). A test tone is played through each speaker in turn, allowing you to adjust the level as it plays.
Note that the channel level settings for stereo sources are independent of the settings for surround sound sources.

1 Press SURROUND to select the Auto listening mode.
- If you want to set the channel levels for stereo (two channel) playback, select the STEREO listening mode.
2 Press TEST TONE.
The test tone is output from each speaker in turn.
3 W hile a test tone is playing, use the/↓ (cursor up/down) buttons to adjust that channel level.
The aim is to adjust the levels so that you hear the test tone at the same volume from each speaker. You can adjust the level of each channel by ±10 dB.
- You can adjust the overall volume of test tone output using the VOLUME +/- buttons (this does not affect the channel level settings).
- If the system is in Stereo or Virtual mode, you will not be able to adjust the center or surround channels.
- Because of the ultra low frequencies the subwoofer produces, it may sound quieter than it really is. We suggest adjusting the subwoofer level while listening to a source. See the method described in Channel level setting on page 21.
4 W hen you're done, preENTER to exit test tone setup.
- If you use the Auto MCACC feature again, it will overwrite the settings you have made here.
Chapter 8
Other connections

Important
- When connecting this system or changing connections, be sure to switch power off and disconnect the power cord from the wall socket. After completing all connections, connect the power cord to the wall socket.
Connecting auxiliary components
The receiver subwoofer has several digital inputs for digital playback components, such as DVD, CD and MD players.
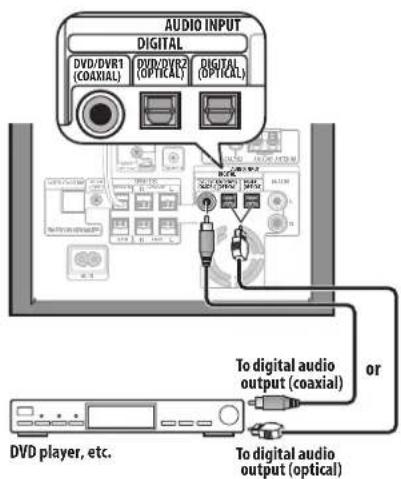
- Connect the digital output jack on your DVD player, etc. to one of the DIGITAL input jacks on the receiver subwoofer.
Use a commercially available optical cable or supplied coaxial cable to make this connection.
Connecting an analog audio component
You can use the ANALOG input jacks to connect an analog audio component, such as a tape player. See Using this system for TV audio on page 11 for connection details (this explains connecting the audio output from your TV, but any analog audio component can be connected).
Listening to an external audio source
You can connect both analog and digital external audio sources to this system. Digital audio sources include digital satellite receivers, CD recorders, etc. Analog sources include your TV. See also Connecting auxiliary components above.

1 If the system isn't already on, press Ⓧ STANDBY/ON to switch on.
Also make sure that the external source (TV, satellite receiver, etc.) is switched on.
2 Select DVD/DVR1, DVD/DVR2, DIGITAL or ANALOG to select the source for playback.
These buttons correspond with the input jacks on the receiver subwoofer.
3 If necessary, start playback of the external source.
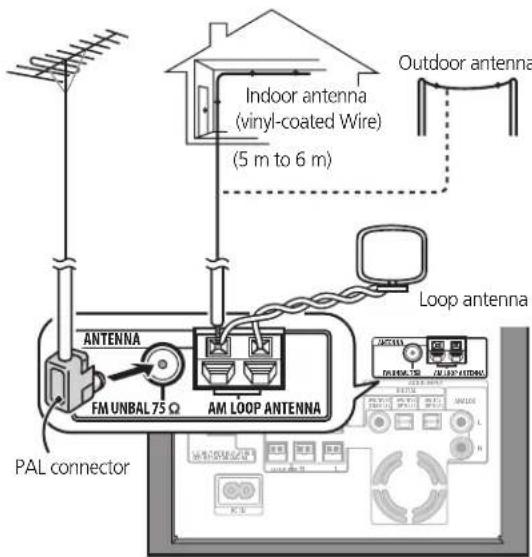
Connecting external antennas
For an external AM antenna, use 5 to 6 meters of vinyl-insulated wire and set up either indoors or outdoors. Leave the loop antenna connected.
For an external FM antenna, use a PAL connector to hook up an external FM antenna.
external FM antenna external AM antenna
Using this unit with a Pioneer plasma display
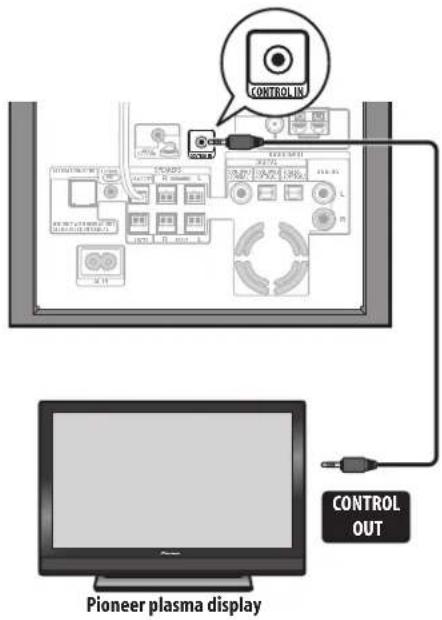
If you have a Pioneer plasma display ^1 , you can use an SR+ cable ^2 to connect it to this unit and take advantage of various convenient features, such as controlling this unit via the plasma display's remote sensor, automatic video input switching of the plasma display, display unit messages appearing on the plasma display screen, and automatic volume muting on the plasma display.

Important
- With an SR+ cable connected, the remote must now be pointed towards your plasma display rather than the display unit of the receiver subwoofer in order to control the receiver subwoofer.
- Use a 3-ringed miniplug SR+ cable to connect the CONTROL IN jack of this unit to the CONTROL OUT jack of your plasma display. ^3
Before you can use the extra SR+ features, you need to make a few settings in the unit — see SR+ Setup for Pioneer plasma displays below.
SR+ Setup for Pioneer plasma displays
Make the following settings if you have connected a Pioneer plasma display to this unit using an SR+ cable.
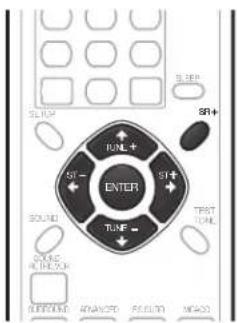
1 Press SR+.
2 Use the ←/→ (cursor left/right) buttons to choose SETUP, then press ENTER.
3 Use the ←/→ (cursor left/right) buttons to choose the setting you want to adjust.
The current setting is shown for each option as you cycle through the display. See below for a full list and description of each.
4 Use the ↑/↓ (cursor up/down) buttons to adjust the setting.
5 Repeat steps 3 and 4 to make other settings.
6 When you're done, press ENTER to leave the SR+ setup menu.
Automatic plasma display volume muting
When Volume Control is switched on, the volume of the plasma display is automatically muted when the receiver subwoofer is switched on, or the receiver subwoofer's input function is changed to one that you would want to hear the sound from the receiver subwoofer rather than the plasma display (DVD, for example).
- VOL.C ON – When this unit is switched on, or the input function is changed, the volume on the plasma display is muted so only sound from this unit is heard.
- VOL.C OFF – This unit does not control the volume of the plasma display
Note
This system is compatible with all Pioneer plasma displays from 2003 onward.
2 The 3-ringed SR+ cable from Pioneer is commercially available under the part number ADE7095. Contact the Pioneer Customer Support division for more information on obtaining an SR+ cable.
3 You won't be able to use the remote sensor of this unit with the CONTROL IN jack of this unit connected to the CONTROL OUT jack of your plasma display. You can use the remote sensor of the plasma display (even in standby) as long as the power isn't switched off.
En

Other connections
Automatic plasma display input switching
In order that the plasma display can switch automatically to the correct input when you switch the input function of the receiver subwoofer, you need to tell it how your system is connected.
For example, if you connected your DVD player to the DV1 input on the receiver subwoofer, and to input 2 on your plasma display, select the DV1 PDP2 setting here so that when you switch the input function of the receiver subwoofer to DV1 to watch your DVD player, the plasma display will automatically switch to input 2.
For each receiver subwoofer input function (DV1 (DVD/DVR1), DV2 (DVD/DVR2), DIG (DIGITAL), ANA (ANALOG)) you can select:
- NONE – does not switch the plasma display input
- PDP1 to PDP7 – switches the plasma display input to one of the numbered inputs. (Note that the number displayed may vary depending on the plasma display to which you connect this unit.)
- TVTN – switches the plasma display to its built-in TV tuner

Note
- Note that certain PDP inputs (ex. PDP7) may be referred to on your plasma display as 'PC Input'.
- The SR+ setting remains in effect even in standby.
- The SR+ setting does not affect the FM/AM tuner function.
Using the SR+ mode with a Pioneer plasma display
1 Press SR+ on the remote.
2 Use ←/→ (cursor left/right) to select SR+ ON then press ENTER.
- The SR+ setting is maintained even after switching the receiver subwoofer into standby then back on. Automatic muting and input switching will be effective when the receiver subwoofer is switched on.
- If you disconnect the SR+ cable or switch the plasma display off while SR+ is on, the SR+ ON setting remains.
- To switch to SR+ OFF, follow steps 1 and 2, selecting SR+ OFF.

Note
- You can control this unit with the plasma display's remote sensor even in standby, but you can't control this unit with either this unit's remote sensor or the plasma display's remote sensor when the plasma display is switched off (AC off) and the SR+ cable is connected to the CONTROL IN jack of this unit.
About control out connections
Many Pioneer components support SR CONTROL connections, by which you can use the remote controls of any connected components by aiming them at the sensor of just one component.
When you use a remote control, the control signal is passed along the chain to the appropriate component. If you choose to use this feature, you must make sure that you also have at least one set of analog or coaxial digital audio jacks connected to another component for grounding purposes.
- Using a cable with mono mini-plugs on either side (sold separately), connect the CONTROL IN jack on another Pioneer component to the CONTROL OUT jack on the receiver subwoofer.
This will allow you to control the other component (such as a DVD recorder in a cabinet) by pointing its remote at the display unit supplied with this receiver subwoofer.
- You can also connect this receiver subwoofer to your plasma display as described above, in which case you should point the remote at the plasma display to control your DVD player, receiver subwoofer, and plasma display.
Chapter 9
Additional information
Setting the sleep timer
The sleep timer switches off the receiver subwoofer after a specified time so you can fall asleep without worrying about it. ^1

1 Press the SLEEP button to select an option. Choose between the following options:
• SLP ON – Switches off after about an hour
- SLP OFF – Cancels the sleep timer
After selecting SLP ON, you can press SLEEP again to check how much time is left. Each line indicates approximately 12 minutes (remaining):

Dimming the display
You can choose to dim the display if you find it too bright. ^2

1 Press SETUP.
2 Use the / (cursor left/right) buttons to select DIMMER then press ENTER.
3 Use the ↑/↓ (cursor up/down) buttons to select LIGHT or DARK then press ENTER.
Note
- The display dims when the sleep timer is set.
2 The display dims when the sleep timer is set, regardless of this setting.
DTS CD setting
If you play a DTS-encoded CD, you will need to change this setting to hear the decoded signal.
1 Switch the system into standby.
2 Press SETUP.
3 Use the / (cursor left/right) buttons to select CD TYPE from the menu, then press ENTER.
4 Use the ↑/↓ (cursor up/down) buttons to select a setting, then press ENTER.
Select from:
- NORMAL – Use for playback of regular audio CDs. Some DTS-encoded CDs will output noise when played.
- DTS-CD – Use for playback of DTS-encoded CDs, but note that the beginning of regular CD tracks may be skipped.
Resetting the system
Use this procedure to reset all system settings to the factory default.
1 Switch the system on.
2 Press and hold SURROUND then press the ⏻ STANDBY/ON button on the display unit.
The next time you switch on, all the system settings should be reset.
En

Installation and maintenance
Hints on installation
We want you to enjoy using this system for years to come, so please bear in mind the following points when choosing a location:
Do...
√ Use in a well-ventilated room.
√ Place on a solid, flat, level surface, such as a table, shelf or stereo rack.
Don't...
✗ Use in a place exposed to high temperatures or humidity, including near radiators and other heat-generating appliances.
✗ Place on a window sill or other place where the system will be exposed to direct sunlight.
✗ Use in an excessively dusty or damp environment.
✗ Place directly on top of an amplifier, or other component in your stereo system that becomes hot in use.
✗ Use near a television or monitor as you may experience interference—especially if the television uses an indoor antenna.
✗ Use in a kitchen or other room where the system may be exposed to smoke or steam.
✗ Use on a thick rug or carpet, or cover with cloth—this may prevent proper cooling of the system unit.
✗ Place on an unstable surface, or one that is not large enough to support all four of the system unit's feet.
Setting up the remote to control your TV
You can use the supplied remote to control your TV. To be able to use this feature you first have to program the remote with a maker code from the table on the following page.

1 Switch on your TV.
2 Press and hold down the CLEAR button, then enter the maker code for your TV.
- If the maker's name of your TV doesn't appear in the table, you will not be able to use this remote to control your TV.
3 Point the remote towards your TV and press ⏻ TV to check that the remote works with your TV.
If the remote is set up correctly, the TV should switch off. If it doesn't and there is another code given for your maker, repeat step 2 with a new code.
Using the TV remote control buttons
The table below shows how to use this remote control with your TV.
| Button | What it does |
| TV | Press to switch the TV on/off (standby) |
| INPUT | Press to change the TV's video input |
| TV VOLUME | Use to adjust the TV volume |
| TV CHANNEL | Use to change TV channels |
Preset code list
Please note that there are cases where only certain functions may be controllable after assigning the proper preset code, or the codes for the manufacturer in the list will not work for the model that you are using.
| Manufacturer Code(s) | Manufacturer Code(s) | Manufacturer Code(s) | Manufacturer Code(s) |
| ACURA 644 | FORMENTI 632, 607, 642 | MAGNAFON 649 | SAMSUNG 607, 638, 644, 646, 669, 670 |
| ADMIRAL 631 | FRONTECH 631, 642, 646 | MAGNAVOX 607, 610, 603, 612, 629 | SANYO 635, 645, 648, 621, 614 |
| AIWA 660 | FRONTECH PROTECH 632 | MANESTH 639, 646 | SBR 607, 634 |
| AKAI 632, 635, 642 | FUJITSU 648, 629 | MARANTZ 607 | SCHAUB LORENZ 642 |
| AKURA 641 | FUNAI 640, 646, 658 | MARK 607 | SCHNEIDER 607, 641, 647 |
| ALBA 607, 639, 641, 644 | GBC 632, 642 | MATSUI 607, 639, 640, 642, 644, 647, 648 | SEG 642, 646 |
| AMSTRAD 642, 644, 647 | GE 601, 606, 607, 610, 617, 602, 628, 618 | MCMICHAEL 634 | SEI 632, 640, 649 |
| ANITECH 644 | GEC 607, 634, 648 | MEDIATOR 607 | SELECO 631, 642 |
| ASA 645 | GELOSO 632, 644 | MEMOREX 644 | SHARP 602, 619, 627, 667 |
| ASUKA 641 | GENEXXA 631, 641 | METZ 631 | SIAREM 632, 649 |
| AUDIOGONIC 607, 636 | GOLDSTAR 610, 623, 621, 602, 607, 650 | MINERVA 631, 653 | SIEMENS 631 |
| BASIC LINE 641, 644 | GOODMANS 607, 639, 647, 648, 656 | MITSUBISHI 609, 610, 602, 621, 631 | SINUDYNE 632, 639, 640, 649 |
| BAUR 631, 607, 642 | GORENJE 638 | MULTITECH 644, 649 | SKANTIC 643 |
| BEKO 638 | GPM 641 | NEC 659 | SOLAVOX 631 |
| BEON 607 | GRAETZ 631, 642 | NECKERMANN 631, 607 | SONOKO 607, 644 |
| BLAUPUNKT 631 | GRANADA 607, 635, 642, 643, 648 | NEI 607, 642 | SONOLOR 631, 635 |
| BLUE SKY 641 | GRADIENTE 630 | NIKKAI 605, 607, 641, 646, 648 | SONTEC 607 |
| BLUE STAR 618 | GRANDIN 618 | NOBLIK0 649 | SONY 604 |
| BPL 618 | GRUNDIG 631, 653 | NOKIA 632, 642, 652 | SOUNDWAVE 607 |
| BRANDT 636 | HANSEATIC 607, 642 | NORDMENDE 632, 636, 651, 652 | STANDARD 641, 644 |
| BTC 641 | HCM 618, 644 | OCEANIC 631, 632, 642 | STERN 631 |
| BUSH 607, 641, 642, 644, 647, 656 | HINARI 607, 641, 644 | ORION 632, 607, 639, 640 | SUSUMU 641 |
| CASCADE 644 | HISAWA 618 | OSAKI 641, 646, 648 | SYSLINE 607 |
| CATHAY 607 | HITACHI 631, 633, 634, 636, 642, 643, 654, 606, 610, 624, 625, 618 | OSO 641 | TANDY 631, 641, 648 |
| CENTURION 607 | TASHIKO 634 | ||
| CGB 642 | HUANYU 656 | OSUME 648 | TATUNG 607, 648 |
| CIMLINE 644 | HYPSON 607, 618, 646 | OTTO VERSAND 631, 632, 607, 642 | TEC 642 |
| CLARIVOX 607 | ICE 646, 647 | PALLADIUM 638 | TELEAVIA 636 |
| CLATRONIC 638 | IMPERIAL 638, 642 | PANAMA 646 | TELEFUNKEN 636, 637, 652 |
| CONDOR 638 | INDIANA 607 | PANASONIC 631, 607, 608, 642, 822 | TELETECH 644 |
| CONTEC 644 | INGELEN 631 | PATHO CINEMA 642 | TENSAI 640, 641 |
| CROSLEY 632 | INTERFUNK 631, 632, 607, 642 | PAUSA 644 | THOMSON 636, 651, 652, 683 |
| CROWN 638, 644 | INTERVISION 646, 649 | PHILCO 632, 642 | THORN 631, 607, 642, 645, 648 |
| CRYSTAL 642 | ISUKAI 641 | PHILIPS 631, 607, 634, 656, 668 | TOMASHI 618 |
| CYBERTRON 641 | ITC 642 | PHOENIX 632 | TOSHIBA 605, 602, 628, 621, 653 |
| DAEWOO 607, 644, 658 | ITT 631, 632, 642 | PHONOLA 607 | TOWADA 642 |
| DAINICHI 641 | JEC 605 | PROFEX 642, 644 | ULTRAVOX 632, 642, 649 |
| DANSAI 607 | JVC 613, 623 | PROTECH 607, 642, 644, 646, 649 | UNIDEN 671 |
| DAYTON 644 | QUELLE 631, 632, 607, 642, 645, 653 | UNIVERSUM 631, 607, 638, 642, 645, 646, 654 | |
| DECCA 607, 648 | KAISUI 618, 641, 644 | R-LINE 607 | VESTEL 607 |
| DIXI 607, 644 | KAPSCH 631 | RADIOLA 607 | VICTOR 613 |
| DUMONT 653 | KENDO 642 | RADIOSHACK 610, 623, 621, 602 | VOXSON 631 |
| ELIN 607 | KENNEDY 632, 642 | RBM 653 | WALTHAM 643 |
| ELITE 641 | KORPEL 607 | RCA 601, 810, 615, 616, 617, 618, 681, 882, 609 | WATSON 607 |
| ELTA 644 | KOYODA 644 | ||
| EMERSON 642 | LEYCO 607, 640, 646, 648 | REDIFFUSION 632, 642 | WATT RADIO 632, 642, 649 |
| ERRES 607 | LIESENK&TTER 607 | REX 631, 646 | WHITE WESTINGHOUSE 607 |
| FERGUSON 607, 638, 651 | LOEWE 607 | ROADSTAR 641, 644, 646 | YOKO 607, 642, 646 |
| FINLANDIA 635, 643 | LUXOR 632, 642, 643 | SABA 631, 638, 642, 651 | ZENITH 603, 620 |
| FINLUX 632, 607, 645, 648, 653, 654 | M-ELECTRONIC 631, 644, 645, 654, 656, 607, 636, 651 | SAISHO 639, 644, 646 | PIONEER 600, 631, 632, 607, 636, 642, 651 |
| FIRSTLINE 640, 644 | SALORA 631, 632, 642, 643 | ||
| FISHER 632, 635, 638, 645 | MAGNADYNE 632, 649 | SAMBERS 649 |
Additional information
Troubleshooting
Incorrect operations are often mistaken for trouble and malfunctions. If you think that there is something wrong with this component, check the points below. Sometimes the trouble may lie in another component. Investigate the other components and electrical appliances being used. If the trouble cannot be rectified even after exercising the checks listed below, ask your nearest Pioneer authorized service center or your dealer to carry out repair work.
- If the system does not operate normally due to external effects such as static electricity disconnect the plug from the outlet and insert again to return to normal operating conditions.
- For audio-related problems, please also check the settings of the audio playback device. See the operating instructions for the device for detailed information.
General
| Problem | Remedy |
| The power does not turn on, or switches off suddenly (an error message may be displayed at startup). | Leave the unit plugged in, wait for one minute, then switch back on.Make sure there are no loose strands of wire touching the unit. This could cause the system to shut off automatically.Check that the speakers are connected correctly.Make sure there is enough space for ventilation around the receiver subwoofer.Make sure the voltage of the mains power source is correct for the model.Try reducing the volume level.If the problem persists, take it to your nearest Pioneer authorized service center or your dealer for servicing. |
| No sound is output when an input function is selected. | If you're using the line input, make sure the component is connected correctly (see Connecting auxiliary components on page 23).Turn up the volume.PressMUTEon the remote control to turn muting off. |
| No sound from surround or center speakers. | Refer to Channel level setting on page 21 to check the speaker levels.Check that you haven't selected the AUTO, STEREO, or VIRTUAL mode (see Listening in surround sound on page 16).Connect the speakers properly (refer to Connecting up). |
| Can't operate using the remote control. | Replace the batteries (Putting the batteries in the remote control on page 14).Operate within 7 m, 30° of the remote sensor (Using the remote control on page 14).Remove any obstacles or operate from another position.Avoid exposing the remote sensor on the front panel to direct light.For operating the other Pioneer component connected to the CONTROL OUTjack of this receiver subwoofer, make sure that the control cable and coaxial cable or at least one set of analog audio cables are connected. (page 25)If the receiver subwoofer is connected to a Pioneer plasma display with an SR+ cable, check that the plasma display is switched on. Point the remote control at the plasma display in order to operate the receiver subwoofer.Check that nothing is mistakenly plugged into the CONTROL IN jack. |
Additional information
Tuner
| Problem | Remedy |
| Considerable noise in radio broadcasts. | Connect the AM antenna (refer to Connecting up) and adjust the direction and position for best reception. You may also connect an additional internal or external AM antenna (refer to Connecting external antennas on page 23).Fully extend the FM wire antenna, position for best reception, and secure to a wall. You may also connect an outdoor FM antenna (see Connecting external antennas on page 23).Turn off other equipment that may be causing the noise or move it further away.The tuning interval is incorrect for your country or region. See Changing the frequency step on page 20 to switch the tuning interval. |
| Auto tuning does not pick up some stations. | The radio signal is weak. Auto tuning will only detect radio stations with a good signal. For more sensitive tuning, connect an outdoor antenna. |
Error Messages
| Message | Description |
| 2CH ONLY | • An operation is prohibited because it is only applicable to 2 channel sources, while the current source is a multichannel source. |
| 96K | • An operation is prohibited because the source is 96 kHz digital. |
| MUTING | • An operation is prohibited because the sound is muted (press MUTE). |
| EXIT | • Appears when a menu is automatically exited after a set period of inactivity. |
| NOISY | • Background noise is too high to complete MCACC setup successfully. |
| ERR MIC | • An error occurred during MCACC setup because the microphone is not connected or is not connected properly. |
| ERR SP | • An error occurred during MCACC setup because the speakers are not connected or are not connected properly. |
| EEP ERROR | • Contact your Pioneer authorized service center or your dealer for servicing. |
| NO SPTYP | • Try switching the unit off then on again. If the error still appears, please contact a Pioneer authorized service center or your dealer. |
Glossary
| Dolby Digital | A multi-channel audio encoding system developed by Dolby Laboratories that enables far more audio to be stored on a disc than PCM encoding. |
| Dolby Pro Logic II | A matrix decoding technology developed by Dolby Laboratories that expands any two-channel source audio, such as CDs and TV broadcasts, to a five-channel playback (left/center/right/left surround/right surround), resulting in a surround experience. |
DTS


Digital Surround
A multi-channel audio encoding system developed by DTS that enables far more audio to be stored on a disc than PCM encoding.
Manufactured under license from Dolby Laboratories.
"Dolby", "Pro Logic" and the double-D symbol are trademarks of Dolby Laboratories.
"DTS" and "DTS Digital Surround" are registered trademarks of DTS, Inc.
En
Additional information
Specifications
SX-SW330 Audio Multi-channel Receiver Subwoofer
• A modifier section
RMS Power Output:
Front, Center, Surround.... 100 W per channel
(1 kHz, 10 % T.H.D., 4 Ω)
Subwoofer....100 W (100 Hz, 10 % T.H.D., 4 Ω)
• F M tuner section
Frequency range 87.5 MHz to 108 MHz
Antenna 75 Ω, unbalanced
• A M tuner section
Frequency range
With 9 kHz step....531 kHz to 1602 kHz
With 10 kHz step. 530 kHz to 1700 kHz
Antenna....Loop antenna
- Subwoofer section
Enclosure....Bass-reflex floor type
System 16 cm 1-way system
Speaker 16 cm cone type
Nominal impedance.... 4 Ω
Frequency range 25 Hz to 1.0 kHz
Maximum Input Power 100 W
- M is cell lane o u s
Power requirements..... AC 220 V to 240 V, 50 Hz/60 Hz
Power consumption 50 W
Power consumption in standby....0.3 W
Dimensions ..... 200 mm (W) × 375 mm (H) × 428 mm (D)
Weight 9.0 kg
- Accessories
Remote control 1
Display unit 1
AA/R6 dry cell batteries (to confirm operation) ..... 2
Coaxial cable 1
Display cable....1
AM loop antenna 1
FM wire antenna 1
Microphone (for Auto MCACC setup).... 1
Power cords 2
Non-skid pads (large) 4
Spacers 2
This operating instructions
S-ST330 Speaker system
(Front speakers x2, surround speakers x2, center speakers x2)
- Front/surround speakers
Enclosure .... Closed-box bookshelf type
(magnetically shielded)
System 7.7 cm 1-way system
Speakers....7.7 cm cone type
Nominal impedance 4 Ω
Frequency range 80 Hz to 20 kHz
Maximum input power 100 W
Dimensions . . . 100 mm (W) x 100 mm (H) x 102.5 mm (D)
Weight 0.55 kg
• Center speakers
Enclosure .... Closed-box bookshelf type
(magnetically shielded)
System 7.7 cm 1-way system
Speakers....7.7 cm cone type
Nominal impedance 8 Ω
Frequency range 80 Hz to 20 kHz
Maximum input power 50 W
Dimensions ... 100 mm (W) x 100 mm (H) x 102.5 mm (D)
Weight 0.55 kg
- Accessories
Speaker cables 5
Non-skid pads (small) 24
Brackets 2
Screws 8
Spiral wrap 2

Note
- Specifications and design subject to possible modification without notice, due to improvements.
感謝您購買本台Pioneer產品。
wnloaded from www.Manualslib.com manuals search engine
將揚聲器固定於牆上
wnloaded from www.Manualslib.com manuals search engine
接線
1 固定顯示裝置的墊塊並連接。
natural_image
3D rendering of a rectangular electronic component with two mounting holes and a label on its side (no text or symbols present)2 組裝 AM 迴路天線。


natural_image
Close-up of a wall-mounted electrical socket with wires and connectors (no text or symbols visible)- 使用纏繞管將連接線固定在一起。
natural_image
Illustration of hands tying a rope knot with a curved cord (no text or symbols)5 連接重低音接線。
wnloaded from www.Manualslib.com manuals search engine
接線
装入遙控器電池
1 打開遙控器背面的電池槽蓋。
natural_image
Illustration of a remote control with battery charging mechanism (no text or symbols)3 閱上電池蓋。

注意
2 請將麥克風置於正常的聆聽位置。
Downloaded from www.Manualslib.com manuals search engine
其他接線
電漿顯示器自動輸入切換
Published by Pioneer Corporation.
Copyright © 2007 Pioneer Corporation.
All rights reserved.
日本先峰公司出版。
版權 © 2007 日本先峰公司。
版權所有。
PIONEER CORPORATION
4-1, Meguro 1-Chome, Meguro-ku, Tokyo 153-8654, Japan
PIONEER ELECTRONICS (USA) INC.
P.O. BOX 1540, Long Beach, California 90801-1540, U.S.A. TEL: (800) 421-1404
PIONEER ELECTRONICS OF CANADA, INC.
300 Allstate Parkway, Markham, Ontario L3R 0P2, Canada TEL: 1-877-283-5901, 905-479-4411
PIONEER EUROPE NV
Haven 1087, Keetberglaan 1, B-9120 Melsele, Belgium TEL: 03/570.05.11
PIONEER ELECTRONICS ASIACENTRE PTE. LTD.
253 Alexandra Road, #04-01, Singapore 159936 TEL: 65-6472-7555
PIONEER ELECTRONICS AUSTRALIA PTY. LTD.
178-184 Boundary Road, Braeside, Victoria 3195, Australia, TEL: (03) 9586-6300
PIONEER ELECTRONICS DE MEXICO S.A. DE C.V.
Blvd.Manuel Avila Camacho 138 10 piso Col.Lomas de Chapultepec, Mexico,D.F. 11000 TEL: 55-9178-4270
K002 B En
Printed in China
- HTP-330
- IMPORTANT
- CAUTION
- CAUTION:
- WARNING
- Operating Environment
- POWER-CORD CAUTION
- VENTILATION CAUTION
- Contents
- Speaker Setup Guide
- Connecting up
- Controls and displays
- Getting started
- Listening to your system
- Listening to the radio
- Surround sound settings
- Other connections
- Additional information
- What's in the box
- Receiver subwoofer (SX-SW330) box:
- Speakers (S-ST330) box:
- Chapter 1
- Speaker Setup Guide
- Safety precautions when setting up
- Home theater sound setup
- Front surround setup (recommended)
- Connect the speaker system.
- Standard surround setup
- Wall mounting the speakers
- Before mounting
- Additional notes on speaker placement
- Precautions:
- Chapter 2
- Connecting up
- Basic connections
- Note
- Fasten the spacers to the display unit and connect.
- Assemble the AM loop antenna.
- Connect the AM and FM antennas 1.
- Connect each speaker.
- Connect the subwoofer cable.
- If you have a DVD player or other source 1 component you want to connect, connect it now before connecting the power cord in the next step.
- Connect the power cord. 2
- Using this system for TV audio
- Connect the audio output jacks on your TV to the ANALOG input jacks on the receiver subwoofer.
- Chapter 3
- Controls and displays
- Display unit
- ⏻ STANDBY/ON
- Front panel display
- AUDIO INPUT (page 23)
- SURROUND
- VOLUME buttons
- Display
- DTS
- F.SURR.
- SURR.
- SOUND
- Tuner indicators (page 19)
- kHz / MHz
- Character display
- 7
- □□ PL II
- D
- MUTE
- VOLUME +/-
- Input select buttons
- Number buttons, CLEAR and ENTER
- SLEEP
- SETUP
- SR+
- ↑/↓/←/→ (cursor buttons) and ENTER
- SOUND (page 18)
- TEST TONE
- SOUND RETRIEVER
- SURROUND
- ADVANCED
- F.S.SURR
- MCACC
- TV CONTROL (page 27)
- Using the remote control
- Putting the batteries in the remote control
- Chapter 4 Getting started
- System demo setting
- Using the Auto MCACC setup for optimal surround sound
- Chapter 5
- Listening to your system
- Auto listening mode
- Listening in surround sound
- Dolby Pro Logic II Music settings
- Using Front Stage Surround Advance
- - Press F.S.SURR to select a Front Stage Surround Advance mode.
- Using Advanced Surround
- - Press ADVANCED to select an Advanced Surround mode.
- Listening in stereo
- - Press SURROUND repeatedly until STEREO shows in the display.
- Using the Sound Retriever
- - While listening to a stereo source, preSOUND RETRIEVER.
- Listening with Acoustic Calibration EQ
- Enhancing dialogue
- Using Quiet and Midnight listening modes
- Adjusting the bass and treble
- Boosting the bass level
- Chapter 6
- Listening to the radio
- Improving poor FM reception
- Improving poor AM sound
- Changing the noise cut mode
- Memorizing stations
- Listening to station presets
- Changing the frequency step
- Chapter 7
- Surround sound settings
- Using the Setup menu
- Channel level setting
- Speaker distance setting
- Dynamic Range Control
- Use ↑/↓ (cursor up/down) to select a setting.
- Press ENTER to exit.
- Dual mono setting
- Press SETUP.
- Adjusting the channel levels using the test tone
- Press SURROUND to select the Auto listening mode.
- Press TEST TONE.
- W hile a test tone is playing, use the/↓ (cursor up/down) buttons to adjust that channel level.
- W hen you're done, preENTER to exit test tone setup.
- Chapter 8
- Other connections
- Connecting auxiliary components
- Connecting an analog audio component
- Listening to an external audio source
- Connecting external antennas
- Using this unit with a Pioneer plasma display
- - Use a 3-ringed miniplug SR+ cable to connect the CONTROL IN jack of this unit to the CONTROL OUT jack of your plasma display. 3
- SR+ Setup for Pioneer plasma displays
- Automatic plasma display volume muting
- Automatic plasma display input switching
- Using the SR+ mode with a Pioneer plasma display
- Use ←/→ (cursor left/right) to select SR+ ON then press ENTER.
- About control out connections
- - Using a cable with mono mini-plugs on either side (sold separately), connect the CONTROL IN jack on another Pioneer component to the CONTROL OUT jack on the receiver subwoofer.
- Chapter 9
- Additional information
- Setting the sleep timer
- Dimming the display
- DTS CD setting
- Resetting the system
- Installation and maintenance
- Hints on installation
- Do...
- Don't...
- Setting up the remote to control your TV
- Switch on your TV.
- Press and hold down the CLEAR button, then enter the maker code for your TV.
- Point the remote towards your TV and press ⏻ TV to check that the remote works with your TV.
- Using the TV remote control buttons
- Preset code list
- Troubleshooting
- DTS
- Specifications
- SX-SW330 Audio Multi-channel Receiver Subwoofer
- • A modifier section
- • F M tuner section
- • A M tuner section
- - Subwoofer section
- - M is cell lane o u s
- - Accessories
- S-ST330 Speaker system
- - Front/surround speakers
- • Center speakers
- 將揚聲器固定於牆上
- 接線
- 固定顯示裝置的墊塊並連接。
- 組裝 AM 迴路天線。
- 連接重低音接線。
- 装入遙控器電池
- 注意
- 其他接線
- 電漿顯示器自動輸入切換
- PIONEER CORPORATION
Brand : PIONEER
Model : HTP-330
Category : Audio Amplifier